
10. Making the Most of Phone and Messaging
In This Chapter
![]() Making phone calls—and avoiding unwanted calls
Making phone calls—and avoiding unwanted calls
![]() Setting up Google Hangouts the way you want
Setting up Google Hangouts the way you want
![]() Communicating via Hangouts
Communicating via Hangouts
In this chapter, you learn how to get the most out of the standard Phone app that comes with Android phones. You then dig into how to get the most out of Google’s Hangouts app, including messaging and audio and video chats.
Becoming Expert with the Phone App
Open the Phone app by tapping the Phone icon on the Home screen or on the Apps screen. You can then quickly start making calls, review recent activity, or choose settings to configure the Phone app.
Many manufacturers customize the Phone app heavily, so your phone may have a substantially different look and layout than the Phone app shown here. Your phone may also have extra features added, but the essential features should be the same.
Making Calls the Easy Way
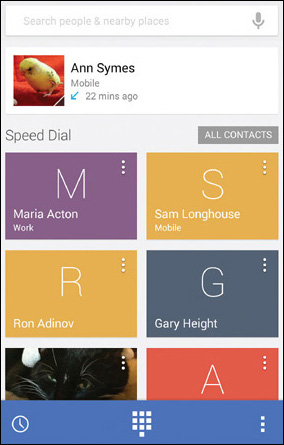
When you first open the Phone app, it displays a screen showing any recent activity plus the Speed Dial list (see Figure 10.1). From here, you can take the following actions:
![]() Tap the Search box at the top and search for a contact or a number.
Tap the Search box at the top and search for a contact or a number.
![]() Tap a recent item to call that number.
Tap a recent item to call that number.
![]() Tap a tile in the Speed Dial list to call that contact. If the contact has multiple numbers, the Choose Number dialog box opens (see Figure 10.2). Check the Remember This Choice box if you want to use this particular number in the future, and then tap the number to call.
Tap a tile in the Speed Dial list to call that contact. If the contact has multiple numbers, the Choose Number dialog box opens (see Figure 10.2). Check the Remember This Choice box if you want to use this particular number in the future, and then tap the number to call.
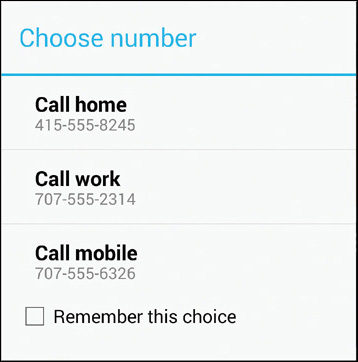
FIGURE 10.2 If the contact has multiple numbers, tap the appropriate one in the Choose Number dialog box.
The Speed Dial list shows those of your Favorites in the People app that have one or more phone numbers. To add a contact to the Speed Dial list, open the contact in the People app and tap the Favorite star. To remove a contact from the Speed Dial list in the People app, open the contact and tap the Favorite star to remove it. To remove a contact from the Speed Dial list in the Phone app, tap and hold the contact, and then drag it to the Remove button that appears at the top of the screen. Doing this also removes the contact from the Favorites list.
![]() Tap the Menu button on a tile to display other calling options, such as sending an instant message instead.
Tap the Menu button on a tile to display other calling options, such as sending an instant message instead.
![]() Tip
Tip
You can also place phone calls from the People app or from other apps that display contact information that includes phone numbers. If in doubt, try tapping the phone number and see what happens.
![]() Tap the All Contacts button to display the All Contacts screen so that you can browse all your contacts.
Tap the All Contacts button to display the All Contacts screen so that you can browse all your contacts.
![]() Note
Note
In either the Phone app or the People app, you can tap the Menu button and then tap Clear Frequents to clear the Frequently Contacted list. This is the list that appears below the Favorites list in the People app. It is separate from the Speed Dial list in the Phone app. On some phones, you can clear the list only from the Favorites tab of the Phone app.
Saving Time with the Call Log and History
You can often save time and effort by using the call log, which tracks your incoming and outgoing calls. KitKat refers to the call log as History, whereas older versions of Android refer to it as Call Log; some phones call it Recent. Either way, it’s easy to use: Tap the button with the clock icon in the lower-left corner of the Phone app, and the History screen (or the Call Log screen, or the Recent screen) appears.
![]() Tip
Tip
Place your vital contacts on the Home screen so that you can get in touch with them quickly. Open the contact in the People app or in the Phone app, tap the Menu button, and then tap Place on Home Screen.
The All tab (see Figure 10.3) on the History screen appears at first. Here, a green arrow shows an outgoing call, a red arrow shows an incoming call you missed or ducked, and a blue arrow shows an incoming call you took. You can tap the Missed tab to restrict the list to calls you missed.
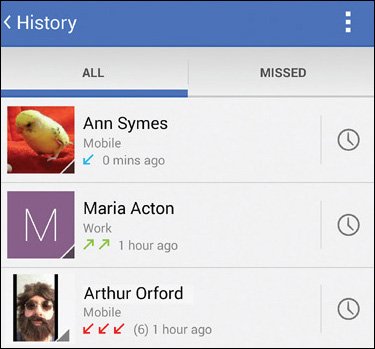
FIGURE 10.3 Use the History screen or Call Log screen to return missed calls or to follow up with people you are trying to reach.
You can tap the Call Details icon (the clock icon) on the right side of a button on the History screen to display the Call Details screen (see Figure 10.4). On some phones, you may need to tap in the middle instead. Here you can view the list of recent contacts and also take these actions:

FIGURE 10.4 Display the Call Details screen when you need to see the details of your calls with a contact.
![]() Call the contact. Tap the appropriate Call button—for example, the Mobile number.
Call the contact. Tap the appropriate Call button—for example, the Mobile number.
![]() Tip
Tip
In Samsung TouchWiz, you can swipe right from the Call Log to call the contact’s default number. For balance, you can also swipe left from the Call Log to start an instant message.
![]() Edit the contact’s number and then place the call. Tap the Menu button and then tap Edit Number Before Call. For example, you may need to add a dialing prefix, a pause, or a wait to the number.
Edit the contact’s number and then place the call. Tap the Menu button and then tap Edit Number Before Call. For example, you may need to add a dialing prefix, a pause, or a wait to the number.
![]() Remove the call from the call log. Tap the Menu button and then tap Remove from Call Log.
Remove the call from the call log. Tap the Menu button and then tap Remove from Call Log.
![]() Tip
Tip
When you’ve worked your way through the call log, clear it by tapping the Menu button and then tapping Clear Call Log.
Dialing with the Smart Dialer
To dial with the Smart Dialer, tap the Dialer button at the bottom of the screen and then tap the buttons to dial. You can also take the following actions:
![]() Dial a contact. As you dial, the Phone app displays contacts with matching numbers at the top of the screen. Tap the contact you want to dial.
Dial a contact. As you dial, the Phone app displays contacts with matching numbers at the top of the screen. Tap the contact you want to dial.
![]() Add a two-second pause. Tap the Menu button and then tap Add 2-Sec Pause.
Add a two-second pause. Tap the Menu button and then tap Add 2-Sec Pause.
![]() Add a wait. Tap the Menu button and then tap Add Wait.
Add a wait. Tap the Menu button and then tap Add Wait.
Making Multiperson Calls with the Phone App
The Phone app enables you to easily make multiperson calls: You simply place the initial call as usual and then add other calls one by one as needed.
The maximum number of participants in a call depends on your carrier rather than on your phone. If you need to find out the limit, ask your carrier’s support department.
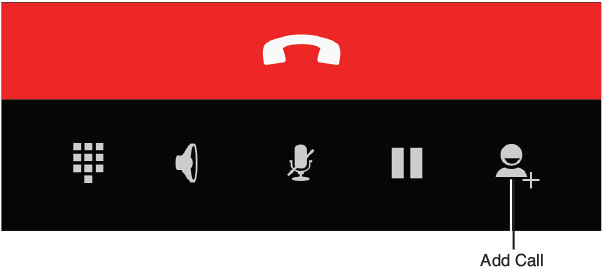
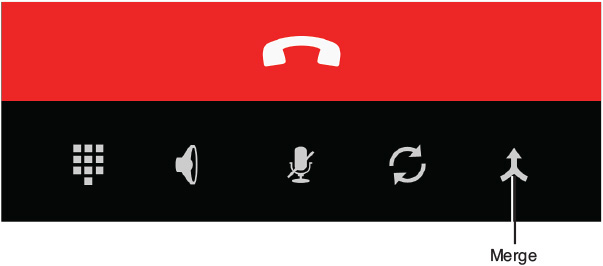
To add a call, tap the Add Call button on the right of the control bar at the bottom of the call screen (see Figure 10.5). The Dial to Add a Call screen appears, and you can dial the call by using the Dialer or the History screen.
![]() Tip
Tip
Tapping the Add Call button puts the first caller on hold, so it’s a good idea to tell that person you’re about to disappear temporarily.
After the new person you’ve called answers, exchange pleasantries, tell the person you’re about to drop him in a multiperson call, and then tap the Merge button (see Figure 10.6) to merge the calls.
After you merge the calls, the Phone app displays the Conference Call screen, replacing the participants’ pictures with a group picture of smiling but otherwise faceless characters (see Figure 10.7). You can now add other calls if necessary (tap the Add Call button as before) or just talk, but you can also chat privately to individuals or drop people from the call.

FIGURE 10.7 Tap the Manage Conference button on the Conference Call screen when you need to speak individually to participants or to drop people from the call.
To manage the call like this, tap the Manage Conference button and work on the Manage Conference Call screen (see Figure 10.8). Here you can tap the arrow button to speak to a participant privately or tap the End Call button to drop that participant from the call.
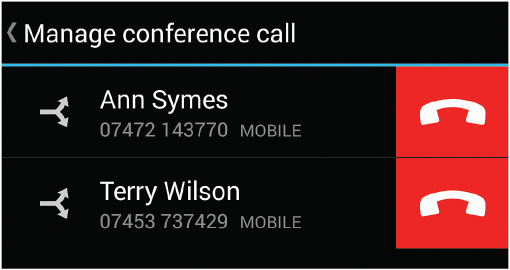
FIGURE 10.8 Using the Manage Conference Call screen, you can speak to a participant individually or hang up on a participant.
Taking Calls—or Avoiding Them
When you receive a phone call, you can take it, decline it, or send a text response.
Taking or Declining a Call
When you receive a call, your phone displays the calling number if it’s available and any associated contact name and picture. The circle containing a phone receiver and the expanding concentric circles around it (see Figure 10.9) give a visual cue that the phone is ringing in case you’ve suppressed the sound.
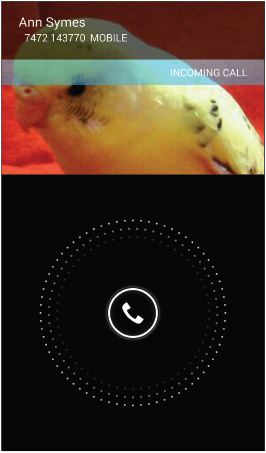
FIGURE 10.9 When a call comes in, your phone displays the number (if available) and any associated contact name and picture.
Tap the receiver icon to display the available actions (see Figure 10.10). You can then drag the receiver to the green icon on the right to accept the call or to the red icon on the left to decline it.

FIGURE 10.10 Drag to the green icon to take the call or to the red icon to decline it. Drag up to the Quick Response icon to send a Quick Response.
Sending a Text Response to a Call
When you receive a call you can’t take or don’t want to take, you can send one of your Quick Responses back as a text. Drag the call circle straight up to the Quick Response icon, and then tap the response you want to use in the Quick Response dialog box that opens (see Figure 10.11).
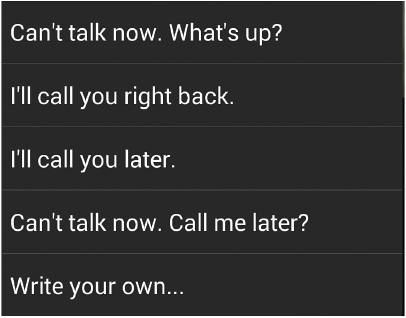
FIGURE 10.11 Tap the Quick Response you want to send, or tap Write Your Own, type the response, and then tap the Send button.
Configuring the Phone App to Work Your Way
To get the most out of the Phone app with minimal effort and frustration, spend a few minutes configuring it to work your way. Open the Phone app, tap the Menu button, and then tap Settings to display the Settings screen (see Figure 10.12).
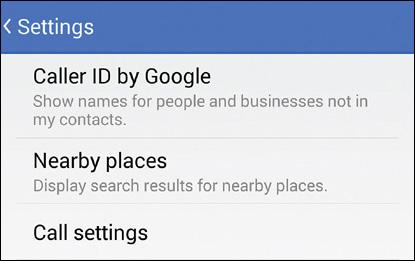
FIGURE 10.12 From the Settings screen in the Phone app, you can turn on Caller ID by Google, view search results for nearby places, or display the Call Settings screen.
Turning on Caller ID by Google
First, turn on the Caller ID by Google feature to help identify as many incoming calls as possible. To do so, tap the Caller ID by Google button on the Settings screen, and then set the Caller ID by Google switch on the resulting screen to On.
![]() Note
Note
Some phones don’t offer the Caller ID by Google feature.
The Phone app displays caller information for a call from any number listed in your contacts in the People app unless the caller has blocked Caller ID or there’s another problem. For example, the call may be routed internationally or through a calling service. Caller ID by Google enables the Phone app to display information for callers who are not among your contacts in the People app.
Choosing Whether to Use the Nearby Places Feature
On the Settings screen, you can tap the Nearby Places button to display the Settings screen that contains information about the Nearby Places feature. You can then set the Nearby Places switch to On or Off, as needed. Nearby Places uses your location (as determined by your device’s GPS, by its cellular connection, or by known wireless networks nearby) to add nearby places from Google’s database to your search results.
![]() Note
Note
Only some phones have the Nearby Places feature.
From the Settings screen for Nearby Places, you can tap the View Location Settings button to jump to the Location screen in the Settings app. Here you can set the Location switch to Off if you want to turn off location reporting. You can also tap the Mode button and choose High Accuracy, Battery Saving, or Device Only on the Location Mode screen.
Displaying the Call Settings Screen
After choosing settings for the Caller ID by Google and Nearby Places feature, tap the Call Settings button on the Settings screen to display the Call Settings screen (see Figure 10.13). Here you find most of the options for configuring the Phone app.
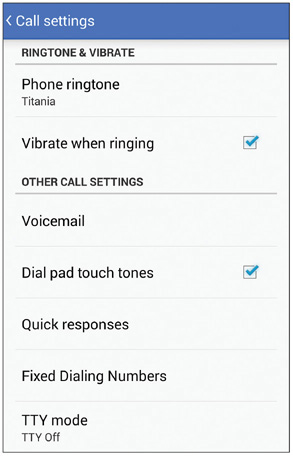
FIGURE 10.13 From the Call Settings screen, you can configure the Phone app’s default ringtone and vibration, set up Quick Responses and Fixed Dialing Numbers, and configure Internet calling.
Choosing Ringtone, Vibrate, Voicemail, and Touch Tones Settings
The top part of the Call Settings screen has four essential settings:
![]() Phone Ringtone. Tap this Phone Ringtone button to set the default ringtone—the ringtone that plays when the calling number isn’t a contact to whom you’ve assigned a default ringtone or the calling number isn’t available.
Phone Ringtone. Tap this Phone Ringtone button to set the default ringtone—the ringtone that plays when the calling number isn’t a contact to whom you’ve assigned a default ringtone or the calling number isn’t available.
![]() Vibrate When Ringing. Check this box if you want your phone to vibrate when it’s ringing.
Vibrate When Ringing. Check this box if you want your phone to vibrate when it’s ringing.
![]() Voicemail. Tap this button to display the Voicemail screen. Here, you can tap the Service button to choose the voicemail service (such as your carrier); tap the Setup button to set up the Voicemail feature with the appropriate phone number; tap the Sound button to choose the Voicemail notification sound; and check or uncheck the Vibrate check box as needed.
Voicemail. Tap this button to display the Voicemail screen. Here, you can tap the Service button to choose the voicemail service (such as your carrier); tap the Setup button to set up the Voicemail feature with the appropriate phone number; tap the Sound button to choose the Voicemail notification sound; and check or uncheck the Vibrate check box as needed.
![]() Dial Pad Touch Tones. Check this box to have Android play touch tones as you dial numbers.
Dial Pad Touch Tones. Check this box to have Android play touch tones as you dial numbers.
Tailoring Your Quick Responses to Your Needs
The Phone app provides four preset Quick Responses, such as “I’ll call you right back” and “Can’t talk now. Call me later?” You can edit them by tapping the Quick Responses button on the Call Settings screen and then working on the Edit Quick Responses screen. Tap a Quick Response to open it for editing, type the text you want in the Quick Response dialog box, and then tap the OK button.
![]() Note
Note
As of writing, you can’t add extra Quick Responses. If you want to restore the Quick Responses to their default text, tap the Menu button on the Edit Quick Responses screen and then tap Restore Defaults.
Limiting Outgoing Calls with Fixed Dialing Numbers
The Fixed Dialing Numbers (FDN) feature enables you to limit the phone to call only specific numbers you save to the SIM card. You might want to set up Fixed Dialing Numbers on a phone you give to a child.
![]() Note
Note
The Fixed Dialing Numbers feature is available only on phones that use the Global System for Mobile Communications (GSM) standard. If your phone uses the Code Division Multiple Access (CDMA) standard, Fixed Dialing Numbers isn’t available.
![]() Caution
Caution
To set up the FDN feature, you may need to get a PIN2 number from your carrier. PIN2 is a secondary PIN, separate from your unlocking PIN or your encryption passcode (or PIN), used to secure the Fixed Dialing Numbers list against unauthorized access.
Here’s how to set up Fixed Dialing Numbers:
1. Tap the Fixed Dialing Numbers button on the Call Settings screen to display the Fixed Dialing Numbers screen (see Figure 10.14).
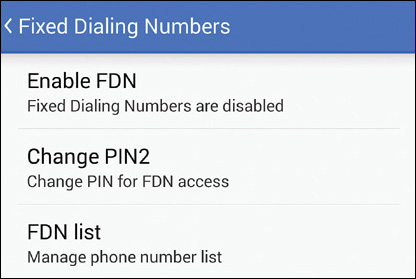
FIGURE 10.14 To limit outgoing calls to specific numbers, set up the FDN list and then enable the FDN feature on the Fixed Dialing Numbers screen.
2. Tap the FDN List button to display the FDN List screen. You can then tap the Menu button and tap Add Contact to add a contact to the list. You’ll need to type the contact name and phone number manually; you can’t add this information directly from the People app.
3. After you’ve set up the FDN list, tap the Enable FDN button on the Fixed Dialing Numbers screen. In the Enable FDN dialog box, type the PIN2, and then touch OK.
Choosing a TTY Mode to Help with Hearing Problems
If you have hearing problems, you can use the TTY Mode setting on the Call Settings screen to turn on a particular teletypewriter mode on your Android device. Tap the TTY Mode button to display the TTY Mode dialog box, and then tap the appropriate radio button: TTY Off (the default setting), TTY Full (for full teletypewriter features), TTY HCO (for Hearing Carry-Over functionality), or TTY VCO (for Voice Carry-Over functionality).
Setting Up Call Forwarding
To set up Call Forwarding, tap the Call Forwarding button on the Call Settings screen to display the Call Forwarding Settings screen. Here you can choose these four settings:
![]() Always Forward. When you need to forward all calls, tap this button, enter the number in the Always Forward dialog box, and then tap the Enable button.
Always Forward. When you need to forward all calls, tap this button, enter the number in the Always Forward dialog box, and then tap the Enable button.
![]() Note
Note
Some phones and carriers don’t provide call forwarding. Others provide only some forwarding features, such as an All Incoming Calls button and an Unanswered button.
![]() Forward When Busy. Tap this button to display the Forward When Busy dialog box, change the number if necessary, and then tap the Update button.
Forward When Busy. Tap this button to display the Forward When Busy dialog box, change the number if necessary, and then tap the Update button.
![]() Note
Note
The Forward When Busy, Forward When Unanswered, and Forward When Unreachable features are normally enabled and go to your voicemail service by default. You can redirect them as needed—for example, to a work colleague or a family member. You can also tap the Disable button in the feature’s dialog box if you need to disable the feature.
![]() Forward When Unanswered. Tap this button to display the Forward When Unanswered dialog box, change the number if necessary, and then tap the Update button.
Forward When Unanswered. Tap this button to display the Forward When Unanswered dialog box, change the number if necessary, and then tap the Update button.
![]() Forward When Unreachable. Tap this button to display the Forward When Unreachable dialog box, change the number if necessary, and then tap the Update button.
Forward When Unreachable. Tap this button to display the Forward When Unreachable dialog box, change the number if necessary, and then tap the Update button.
Configuring Caller ID and Call Waiting
To configure Caller ID and Call Waiting, tap the Additional Settings button on the Call Settings screen. On the Additional Settings screen, tap the Caller ID button, and then tap the Network Default radio button, the Hide Number radio button, or the Show Number radio button in the Caller ID dialog box (see Figure 10.15).
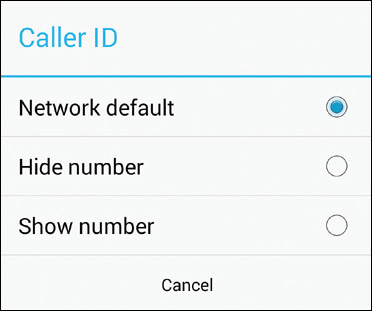
FIGURE 10.15 In the Caller ID dialog box, choose whether to show your number when calling, hide it, or go with the network default setting.
Some phones name the Caller ID controls differently, such as Caller ID Readout. Other phones and carriers provide neither Caller ID nor Call Waiting.
![]() Caution
Caution
Don’t use the Network Default setting for Caller ID unless you know what it does. If you’re not sure, ask your carrier or place a call to another mobile phone you can see to find out what the default setting for standard calls is.
![]() Tip
Tip
In the United States, you can override your Caller ID blocking for a call by dialing *82 before the number. If you’ve turned on Caller ID, you can block it for a call by dialing *67 before the number. Other countries use different numbers for blocking and releasing.
On the Additional Settings screen, check the Call Waiting box if you want Call Waiting to notify you of incoming calls when you’re already in a call.
Configuring Internet Calling
Use the buttons in the Internet Call Settings section at the bottom of the Call Settings screen to set up your Internet calling accounts and to specify when to use them.
![]() Note
Note
Some phones and carriers don’t offer Internet calling.
Tap the Accounts button to display the Internet Calling (SIP) Accounts screen. You can then add an Internet calling account by tapping the Add Account button at the bottom of the screen, filling in the account’s details on the SIP Account Details screen, and then tapping the Save button.
![]() Note
Note
SIP is the acronym for Session Initiation Protocol, the Internet protocol used for Internet calls.
On the Internet Calling (SIP) Account screen, check the Receive Incoming Calls box if you want your device to listen for incoming calls. Be aware that turning on this feature reduces your device’s battery life.
Back in the Internet Call Settings section of the Call Settings screen, tap the Use Internet Calling button to display the Use Internet Calling dialog box, and then tap the appropriate option button: For All Calls When Data Network Is Available, Only for Internet Calls, or Ask for Each Call.
Setting Custom Ringtones for Important Callers
If you want to be able to distinguish your important callers easily, set a custom ringtone for each of them like this:
1. Open the contact in either the Phone app or in the People app.
2. Tap the Menu button and then tap Set Ringtone to display the Ringtones dialog box.
3. Tap a ringtone to listen to it.
4. After you’ve made your choice, tap the OK button.
If you tire of your device’s built-in ringtones, you can download plenty more from the Internet. Alternatively, use an app such as Ringtone Maker from Big Bang (available free from the Play Store) to create custom ringtones from key sections of your favorite songs.
Blocking and Screening Calls
The great thing about having an Android phone is that anyone can call you at any time.
The bad thing about having an Android phone is that anyone can call you at any time.
To keep peace of mind and your privacy, you’ll probably want to send some contacts’ calls directly to voicemail, either sometimes or always. You may want to block some calls completely to prevent specific people (or specific phone numbers) from calling you. You may also want to screen your calls so that you can choose which to take and which to leave.
Sending a Contact’s Calls Directly to Voicemail
To send all of a contact’s calls to voicemail, open the contact from the People app or the Phone app, tap the Menu button, and then check the All Calls to Voicemail box.
Blocking Calls
Sending a contact’s calls to voicemail is straightforward. Blocking calls isn’t. But here are four things you can do:
![]() Have your carrier block specific numbers. If you’re being plagued by calls from a particular phone number, you can ask your carrier to block it. Setting up the blocking is a hassle, but the blocking is effective.
Have your carrier block specific numbers. If you’re being plagued by calls from a particular phone number, you can ask your carrier to block it. Setting up the blocking is a hassle, but the blocking is effective.
![]() Tip
Tip
If you are being troubled by telemarketing calls in the United States, you can register your phone number on the National Do Not Call Registry (www.donotcall.gov). The listing takes up to 31 days to become effective; and not all telemarketers respect the Registry, but many do. If you’re in another country, see if it has a similar registry or body.
![]() Use a call-blocker app. When you need to block calls from specific numbers, look at apps such as Call Control or Extreme Call Blocker. These apps let you choose which calls to take and which to avoid.
Use a call-blocker app. When you need to block calls from specific numbers, look at apps such as Call Control or Extreme Call Blocker. These apps let you choose which calls to take and which to avoid.
![]() Use an app such as Do Not Disturb. The Do Not Disturb app from Cabooze Software enables you to suppress phone calls, Short Message Service (SMS) messages, and other interruptions either on a schedule you define (for example, to allow you to sleep at night) or for a period of time (for example, two hours starting now). You can allow interruptions from specific people or for emergency calls. Do Not Disturb offers a two-week trial that enables you to test the features included in the premium version. After the trial, you must either pay for the premium version ($1.99) or give up on some of the more attractive features.
Use an app such as Do Not Disturb. The Do Not Disturb app from Cabooze Software enables you to suppress phone calls, Short Message Service (SMS) messages, and other interruptions either on a schedule you define (for example, to allow you to sleep at night) or for a period of time (for example, two hours starting now). You can allow interruptions from specific people or for emergency calls. Do Not Disturb offers a two-week trial that enables you to test the features included in the premium version. After the trial, you must either pay for the premium version ($1.99) or give up on some of the more attractive features.
![]() Tip
Tip
The forthcoming version of Android, Lollipop, has a full-fledged Do Not Disturb feature.
![]() Turn on Airplane mode. When you need total peace and quiet, open the Quick Settings panel and tap the Airplane Mode button to silence all communications.
Turn on Airplane mode. When you need total peace and quiet, open the Quick Settings panel and tap the Airplane Mode button to silence all communications.
![]() Note
Note
Some phones have a Blocking mode that you can use to block all calls. For example, Samsung phones have a Blocking mode that enables you to block incoming calls, turn off notifications, or turn off the alarm and timer—or all three features.
Setting a SIM Card Lock
As you know, Android enables you to secure your phone or tablet against intrusion by setting a screen lock, such as a PIN or a password, and to secure your data by encrypting it. But a phone also has another point of vulnerability: Anyone who can get one-on-one time with the phone can remove the SIM card, insert it in another phone, and run up charges on your tab.
To set a SIM card lock, you will need to know the PIN Unlock Key, or PUK, for your SIM. Normally, you get the PUK from your carrier. For example, if your phone is on AT&T, log in to myAT&T, click Wireless, click Phone/Device, and then click Unblock SIM Card to get the PUK. On Verizon, log in to My Verizon, click About My Device, and then use the My PIN and Unblocking Key (PUK) controls.
To minimize the damage from someone filching your SIM card, you can lock it. Follow these steps:
1. Open the Settings app.
2. Tap the Security button to display the Security screen.
![]() Note
Note
Depending on your phone, you may need to take different steps here. For example, you may need to display the Security & Screen Lock screen or tap the button to assign a SIM PIN.
3. Tap the Set Up SIM Card Lock button to display the SIM Card Lock Settings screen.
4. Check the Lock SIM Card box. The Lock SIM Card dialog box opens.
5. Type the SIM PIN.
6. Tap the OK button.
![]() Tip
Tip
After enabling the SIM card lock, tap Change SIM PIN on the SIM Card Lock Settings screen and set a new SIM for security.
Adding Phone Calling to a Tablet with Google Voice
If you have a tablet rather than a phone, and you’re in the United States, consider adding the Google Voice app to it so that you can use the Google Voice telecommunications service. The app is free and the cost is minimal: Domestic and outbound calls from the United States and Canada are free, and calls from elsewhere cost $0.01 per minute. The main limitation is that the service is available only to Google account holders in the United States.
To get the Google Voice app, fire up the Play Store app, tap the Apps button, and then search for Google voice. Tap the right result, tap the Install button, and then review the extensive list of permissions that the app requires.
You first need to sign up for Google Voice. Open a web browser, either on your Android device or (easier) on a computer, and go to www.google.com/voice. Sign in with your Google account, and then go through the signup process for Google Voice. You need to verify your application using an existing U.S. phone number to prove that you’re in the United States rather than maintaining a virtual presence through a virtual private network (VPN).
Chatting, Talking, and Conferencing via Hangouts
Google’s Hangouts app and Hangout service enable you to chat via text, via audio, or via audio and video across either a Wi-Fi connection or a cellular connection. Google has been developing Hangouts aggressively, has recently integrated Google Talk and Google Messenger into Hangouts, and has made Hangouts the default app for text messaging in Android KitKat and later versions.
![]() Note
Note
Android may let you choose between Messaging and Hangouts as your default messaging app.
Hangouts makes all three kinds of chat as simple as possible, but the underlying technologies are far from simple. Because of this, it’s vital to configure your Hangouts account or accounts correctly so that you can get the most out of this app. You should also be aware of the wide range of configurable options that Hangouts offers, even if you choose to leave many of them set to their default settings.
Google syncs your hangouts automatically across your devices that are logged in to the same Google+ account on Hangouts. This means that you can start a hangout on your phone, pick it up on your tablet, and then finish it on your computer.
Getting an Account
To start using Hangouts, you need a Google account. Chances are that you have set up your Google account on your device already, because you can’t get far on Android without a Google account. But if you use multiple Google accounts on your device, you may need to set up another account at this point.
![]() Tip
Tip
To get the most out of Hangouts, sign up for the Google+ service. With Google+, you can get up to nine people in a video chat in Hangouts; without Google+, you can have only yourself and one other person.
Getting Started with Hangouts
To get started with Hangouts, tap the Hangouts icon on the Apps screen. If it’s not there, open the Google folder and tap the Hangouts icon there.
![]() Note
Note
The first time you launch Hangouts on a phone, the app prompts you to confirm your phone number. After you do this, Hangouts prompts you to turn on SMS so that you can send text messages. Tap the Turn On SMS button if you want to do this; it’s usually helpful. If you want to postpone this decision, tap the Maybe Later button.
The first time you launch Hangouts, it displays the Share Device, Call Status, and Mood dialog box. Tap the OK button if you want to share all three items. Otherwise, tap the Settings button to display the Share Your Status screen (see Figure 10.16), and then choose settings:

FIGURE 10.16 On the Share Your Status screen, choose which information you want to share with other people on Hangouts.
![]() Set Your Mood. Tap this button, and then tap the icon. You can set your mood quickly afterward by opening the menu and then tapping Set Mood.
Set Your Mood. Tap this button, and then tap the icon. You can set your mood quickly afterward by opening the menu and then tapping Set Mood.
![]() Device. Check this box to allow others to see which device you’re using.
Device. Check this box to allow others to see which device you’re using.
![]() In Call. Check this box to let others see when you’re in a video call or an audio call.
In Call. Check this box to let others see when you’re in a video call or an audio call.
Tap the Back button at the top of the Share Your Status screen to go back to the main Settings screen, which lists your Google accounts and Google+ accounts. You can then configure Hangouts as described in the next section.
Making Hangouts Comfortable for You
From the main Settings screen, tap your account name to display the settings screen for the account (see Figure 10.17). You can then choose settings using these controls:

FIGURE 10.17 Use the main Settings screen in Hangouts to set your profile photo, choose notifications, and manage your profile and contacts.
![]() Profile Photo. Tap this button to set your profile photo for Hangouts.
Profile Photo. Tap this button to set your profile photo for Hangouts.
![]() Share Your Status. Tap this button to display the Share Your Status screen, shown in Figure 10.16, earlier in this chapter.
Share Your Status. Tap this button to display the Share Your Status screen, shown in Figure 10.16, earlier in this chapter.
![]() Hangouts Messages & Invites. Tap this button to display the Hangouts Messages & Invites screen. You can then check the Notifications box to receive notifications, tap the Sound button to choose the sound for incoming Hangouts messages and invitations, and check the Vibrate box to have your device vibrate (if it has a vibration motor).
Hangouts Messages & Invites. Tap this button to display the Hangouts Messages & Invites screen. You can then check the Notifications box to receive notifications, tap the Sound button to choose the sound for incoming Hangouts messages and invitations, and check the Vibrate box to have your device vibrate (if it has a vibration motor).
![]() Video Calls. Tap this button to display the Video Calls screen. This screen has the same options as the Hangouts Messages & Invites screen (discussed in the preceding bullet).
Video Calls. Tap this button to display the Video Calls screen. This screen has the same options as the Hangouts Messages & Invites screen (discussed in the preceding bullet).
![]() Customize Invites. Tap this button to display the Customize Invites screen (see Figure 10.18). Here you can tap either a circle or the Everyone Else button to open a dialog box for configuring invitations, and then tap either the Hangout with You radio button or the Invite Only radio button.
Customize Invites. Tap this button to display the Customize Invites screen (see Figure 10.18). Here you can tap either a circle or the Everyone Else button to open a dialog box for configuring invitations, and then tap either the Hangout with You radio button or the Invite Only radio button.
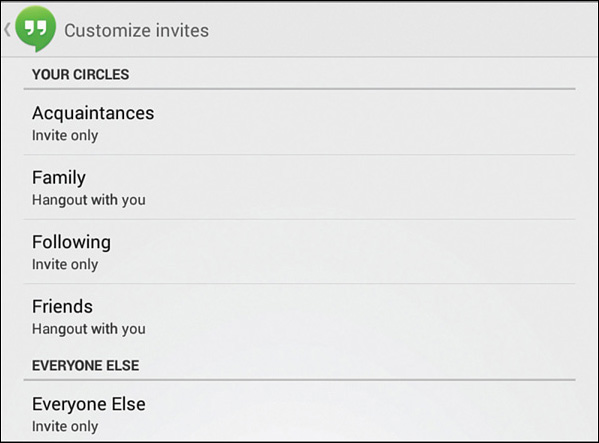
FIGURE 10.18 On the Customize Invites screen, tap the circle for which you want to customize invitations, or tap the Everyone Else button.
![]() Google+ Profile. Tap this button to open your Google+ profile in either the Google+ app or in a browser.
Google+ Profile. Tap this button to open your Google+ profile in either the Google+ app or in a browser.
![]() Confirm Phone Number. On a phone, tap this button to confirm the phone number to use for calls and SMS messages. (This button doesn’t appear in Figure 10.18, which shows a tablet.)
Confirm Phone Number. On a phone, tap this button to confirm the phone number to use for calls and SMS messages. (This button doesn’t appear in Figure 10.18, which shows a tablet.)
![]() Blocked People. Tap this button to display the Blocked People screen, which shows a list of the people you have blocked. Tap the Unblock button for anybody you want to reprieve.
Blocked People. Tap this button to display the Blocked People screen, which shows a list of the people you have blocked. Tap the Unblock button for anybody you want to reprieve.
![]() Hidden Contacts. Tap this button to display the Hidden Contacts screen, which shows a list of the contacts you have hidden. Tap the Unhide button to hide a contact.
Hidden Contacts. Tap this button to display the Hidden Contacts screen, which shows a list of the contacts you have hidden. Tap the Unhide button to hide a contact.
![]() Sign Out. Tap this button to sign out of Hangouts.
Sign Out. Tap this button to sign out of Hangouts.
![]() Improve Hangouts. Check this box to allow your device to send data to Google about how you use Hangouts so that Google can improve the app and the service.
Improve Hangouts. Check this box to allow your device to send data to Google about how you use Hangouts so that Google can improve the app and the service.
Configuring SMS in Hangouts
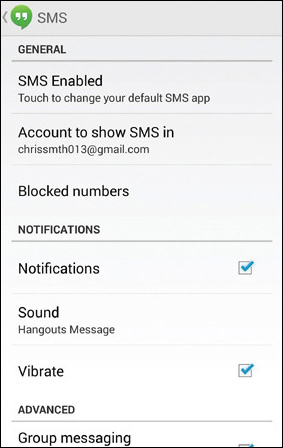
If you’re going to use SMS in Hangouts, spend a few minutes choosing suitable settings. Tap the SMS button on the Settings screen to display the SMS screen. Figure 10.19 shows the top part of the SMS screen.
Here you can choose the following settings:
![]() SMS Enabled. Tap this button to go to the Wireless & Networks screen in the Settings app. Here you can tap the Default SMS App button and choose a different SMS app (if you have installed one) in the Default SMS App dialog box.
SMS Enabled. Tap this button to go to the Wireless & Networks screen in the Settings app. Here you can tap the Default SMS App button and choose a different SMS app (if you have installed one) in the Default SMS App dialog box.
![]() Note
Note
On some devices, such as the Nexus 5, Hangouts is the default text-messaging app. You can’t uninstall Hangouts, but you can install a third-party messaging app and make it the default app instead of Hangouts. See the section “Sending Messages in the Hangout,” later in this chapter, for information about other messaging apps.
![]() Account to Show SMS In. This button shows the Google account in Hangouts in which SMS messages sent to your Android phone will appear (if you have multiple accounts set up on it). To change the account, tap this button and then tap the appropriate Google account in the Select SMS Account dialog box.
Account to Show SMS In. This button shows the Google account in Hangouts in which SMS messages sent to your Android phone will appear (if you have multiple accounts set up on it). To change the account, tap this button and then tap the appropriate Google account in the Select SMS Account dialog box.
![]() Blocked Numbers. Tap this button to display the Blocked People screen, which shows a list of people whose phone numbers you’ve blocked. Tap the Unblock button to unblock a number.
Blocked Numbers. Tap this button to display the Blocked People screen, which shows a list of people whose phone numbers you’ve blocked. Tap the Unblock button to unblock a number.
![]() Notifications. Check this box to receive SMS notifications.
Notifications. Check this box to receive SMS notifications.
![]() Sound. Tap this button to choose the sound to play when an SMS message arrives in Hangouts.
Sound. Tap this button to choose the sound to play when an SMS message arrives in Hangouts.
![]() Vibrate. Check this box to have your phone vibrate when an SMS message arrives in Hangouts.
Vibrate. Check this box to have your phone vibrate when an SMS message arrives in Hangouts.
![]() Group Messaging. Check this box to have Hangouts use Multimedia Messaging Service (MMS) instead of SMS to send a single message to multiple recipients.
Group Messaging. Check this box to have Hangouts use Multimedia Messaging Service (MMS) instead of SMS to send a single message to multiple recipients.
![]() Delete Old Messages. Check this box to have Hangouts automatically delete old messages when your phone runs out of space. This feature is helpful unless you must keep your old Hangouts messages.
Delete Old Messages. Check this box to have Hangouts automatically delete old messages when your phone runs out of space. This feature is helpful unless you must keep your old Hangouts messages.
![]() Delivery Reports. Check this box to request a delivery report for each SMS message. You receive the delivery reports only if the recipient has allowed Hangouts to send them.
Delivery Reports. Check this box to request a delivery report for each SMS message. You receive the delivery reports only if the recipient has allowed Hangouts to send them.
![]() Auto Retrieve MMS. Check this box to have Hangouts automatically retrieve MMS messages sent to your phone. This feature is usually helpful.
Auto Retrieve MMS. Check this box to have Hangouts automatically retrieve MMS messages sent to your phone. This feature is usually helpful.
![]() Roaming Auto-Retrieve. If you check the Auto Retrieve MMS box, you can check this box to have Hangouts retrieve MMS messages automatically when you are roaming. You may want to turn this feature off unless you have a generous data plan.
Roaming Auto-Retrieve. If you check the Auto Retrieve MMS box, you can check this box to have Hangouts retrieve MMS messages automatically when you are roaming. You may want to turn this feature off unless you have a generous data plan.
![]() Wireless Alerts. Tap this button to display the Cell Broadcasts screen in the Settings app, which shows a list of emergency alerts broadcast on the cellular network.
Wireless Alerts. Tap this button to display the Cell Broadcasts screen in the Settings app, which shows a list of emergency alerts broadcast on the cellular network.
![]() Access Point Names. Tap this button to display the APNs screen. Here, you can tap the radio button for the APN you want to use. If the right APN doesn’t appear, tap the Add (+) button and use the Edit Access Point screen to add the APN.
Access Point Names. Tap this button to display the APNs screen. Here, you can tap the radio button for the APN you want to use. If the right APN doesn’t appear, tap the Add (+) button and use the Edit Access Point screen to add the APN.
Normally, it’s best not to change the APN your phone is using unless your carrier’s support staff tells you that you need to. APN is the abbreviation for Access Point Name, the identifier for the gateway by which a phone connects to the cellular network.
![]() Enable Merged Conversations. Check this box to allow Hangouts to merge SMS hangouts from a particular contact with other hangouts from the same contact.
Enable Merged Conversations. Check this box to allow Hangouts to merge SMS hangouts from a particular contact with other hangouts from the same contact.
Communicating via Hangouts
After you’ve set up Hangouts, communicating is largely straightforward—as soon as you know your way around the interface.
Opening a New Hangout or an Existing Hangout
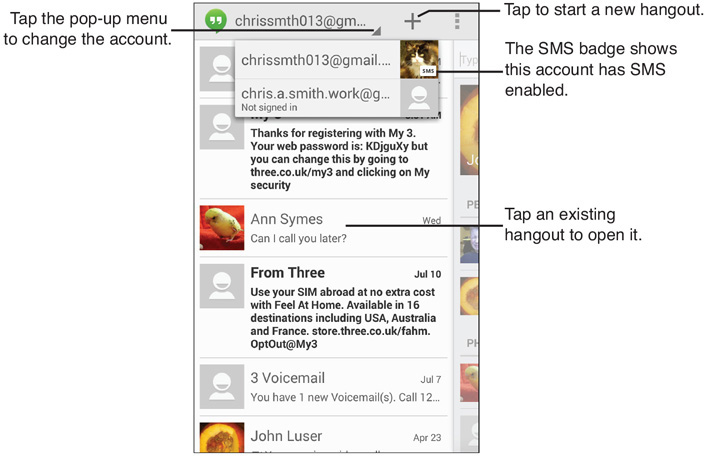
When you open Hangouts, the app displays the list of current hangouts (see Figure 10.20). A hangout is a chat session whose list of participants is saved, so you can easily return to chatting with the same person or group of people. Hangouts saves text chat history as well, so you can go back to previous chats.
![]() Tip
Tip
If you’ve set up Hangouts for multiple Google accounts, you can switch from one account to another by tapping the pop-up button at the top of the screen and then tapping the account you want to use.
To start a new hangout, tap the + button to display the New Message screen, and then either type in the contact name, email address, phone number, or circle; or tap the person in the People You Hangout With list or the Phone Contacts list.
Sending Messages in the Hangout
After you’ve opened a hangout, you can chat with the other people in it. For a text chat, simply type the message in the message box at the bottom of the screen (see Figure 10.21) and then tap the Send button to send it.

FIGURE 10.21 After opening a hangout, you can chat, switch to another chat type, or configure the hangout.
To switch to another type of chat, tap the appropriate icon at the top of the screen. The choices available depend on the device and the communications technology you’re using. For example, in Figure 10.21, you can tap the phone icon to the left of the Menu button to place a phone call.
![]() Caution
Caution
Any SMS messages you send via Hangouts go across the cellular network and count against your data allowance. Look for the SMS indicator at the left end of the message box if you’re not sure whether this hangout is using SMS or the Internet.
![]() Tip
Tip
If you want to stop recording the history for a non-SMS hangout, tap the Menu button in the hangout and then tap Turn History Off.
Configuring the Hangout
To configure the hangout, tap the Menu button, and then tap People & Options to display the People & Options screen (see Figure 10.22). Here you can take the following actions:
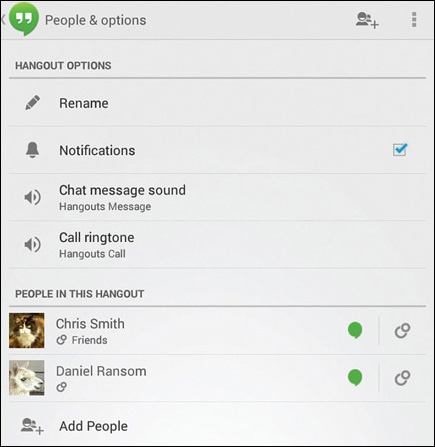
FIGURE 10.22 On the People & Options screen for the hangout, you can add other participants, rename the hangout, or choose options to make the hangout easy to identify.
![]() Add people to the hangout. Tap the Add People button to display the Add People screen. You can then add participants from the People You Hangout With list or the Phone Contacts list or by typing in the contact name, email address, phone number, or circle.
Add people to the hangout. Tap the Add People button to display the Add People screen. You can then add participants from the People You Hangout With list or the Phone Contacts list or by typing in the contact name, email address, phone number, or circle.
![]() Add a participant to a circle. Tap the Circles icon on the right of the participant’s button in the People in This Hangout list to display the Add to Circles panel. You can then check the box for the circle or circles to which you want to add the participant.
Add a participant to a circle. Tap the Circles icon on the right of the participant’s button in the People in This Hangout list to display the Add to Circles panel. You can then check the box for the circle or circles to which you want to add the participant.
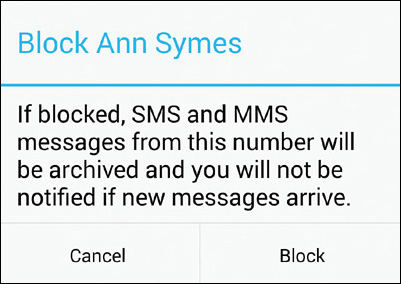
![]() Block a participant. You can block someone who is participating in a hangout via SMS by tapping the Block Name button on the People & Options screen for the hangout. Tap the Block button in the Block dialog box that opens (see Figure 10.23). Blocking prevents the person from contacting you directly, and you no longer receive notifications about the person’s messages. The person still appears in any group hangouts of which you’re both members.
Block a participant. You can block someone who is participating in a hangout via SMS by tapping the Block Name button on the People & Options screen for the hangout. Tap the Block button in the Block dialog box that opens (see Figure 10.23). Blocking prevents the person from contacting you directly, and you no longer receive notifications about the person’s messages. The person still appears in any group hangouts of which you’re both members.
To unblock a contact, tap the New Message button to display the New Message screen, and then tap the contact in the Phone Contacts list. Hangouts displays a message saying that you’ve blocked the contact. Tap the Unblock button to remove the blocking. Tap the Back button if you don’t want to start a new hangout with the contact.
![]() Rename the hangout. Tap the Rename button, type the new name in the Rename Hangout dialog box, and then tap the Save button.
Rename the hangout. Tap the Rename button, type the new name in the Rename Hangout dialog box, and then tap the Save button.
![]() Enable or disable notifications for the hangout. Check or uncheck the Notifications box.
Enable or disable notifications for the hangout. Check or uncheck the Notifications box.
![]() Set a distinctive chat message sound. Tap the Chat Message Sound button and browse for a suitable sound.
Set a distinctive chat message sound. Tap the Chat Message Sound button and browse for a suitable sound.
![]() Set a distinctive call ringtone. Tap the Call Ringtone button and select a ringtone you will be able to identify easily.
Set a distinctive call ringtone. Tap the Call Ringtone button and select a ringtone you will be able to identify easily.
![]() Tip
Tip
You can hide a contact from the People You Hangout With list by tapping and holding until the Contact Options dialog box opens, and then tapping Hide Contact. To get a hidden contact back, go to the main Hangouts screen, tap the Menu button, and then tap Settings. On the Settings screen, tap the account for which you hid the contact. Tap the Hidden Contacts button to display the Hidden Contacts screen, and then tap the Unhide button for the appropriate contact. The contact then reappears in the People You Hangout With list.
Merging Hangouts
If you’ve checked the Enable Merged Conversations box on the SMS screen in Hangouts Settings, Hangouts automatically merges your SMS messages from a particular contact with your other Hangouts messages from that contact.
![]() Tip
Tip
If you need to separate the SMS messages from the rest of the hangout, tap the Menu button in the hangout and then tap Un-Merge SMS.
Troubleshooting the Merging of Hangouts
If you’ve checked the Enable Merged Conversations box on the SMS screen, but SMS messages from a contact appear in a separate hangout from other messages from that contact, you may need to edit the contact’s record to get the conversations to merge. In either the People app or the Phone app, open the contact’s record, tap the Menu button, and then tap Edit. Make sure that the contact record has both the right phone number (for SMS messages) and the right email address; if not, add the missing information. Save the changes.
Often, the problem is that you have two separate contact records, one with the phone number and the other with the email address. When this happens, open one of the contacts for editing, tap the Menu button, and then tap Join. Select the second contact record, and then tap the Done button.
Archiving a Hangout
When you’ve finished using a hangout for now, you can archive it. Archiving the hangout removes it from your Hangouts list and places it in the Archived Hangouts list, where you can access it again if you need to.
To archive a hangout, swipe it off the Hangouts list to the left or right. The Hangout Archived pop-up message appears briefly at the bottom of the screen, with an Undo button that you can tap to undo the archiving if it was a mistake.
You can also archive a hangout by tapping and holding it in the Hangouts list until Hangouts switches to selection mode, and then tapping the Archive icon (the folder icon) at the top of the screen. Alternatively, after going into Selection mode, tap other hangouts to add them to the selection, tap the Menu button, and then tap Delete.
To return to a hangout you’ve archived, tap the Menu button and then tap Archived Hangouts. On the Archived Hangouts screen, tap the hangout.
Deleting a Hangout
When you no longer need a hangout, you can delete it:
1. Tap and hold the hangout in the Hangouts list until Hangouts switches to Selection mode.
2. Tap the Delete icon (the trash icon) at the top of the screen. The Delete Hangout dialog box opens (see Figure 10.24).

FIGURE 10.24 Tap the Delete button in the Delete Hangout dialog box to delete the hangout, its messages, and its history.
3. Tap the Delete button.