
11. Exploiting Camera, Photos, and Videos
In This Chapter
![]() Configuring the Camera app to shoot your way
Configuring the Camera app to shoot your way
![]() Taking photos and capturing video
Taking photos and capturing video
![]() Editing photos
Editing photos
![]() Capturing screenshots on your device
Capturing screenshots on your device
Always in your hand if not in your pocket or your bag, your Android device is perfectly positioned to take photos and videos of anything interesting you encounter.
Most Android phones have both a front (screen-side) camera for taking shots and footage of yourself and your surroundings and a rear camera for shooting the rest of the world.
In this chapter, you’ll explore how to get the most out of your device’s cameras. That means configuring the Camera app to take the types of photos and videos you want, using the app’s features to actually capture those shots and footage, examining your photos and videos, and editing your photos as needed. You’ll also examine how to capture screenshots showing what’s on your device’s screen.
Getting Great Photos with the Camera App
In this section, you’ll explore the Camera app, configure it to suit your needs, and then give its various modes a good workout.
![]() Note
Note
This section shows screens from the Nexus 5, Google’s flagship phone, which runs the Google Camera app. Many phone and tablet manufacturers provide a custom camera app instead of Android’s default. If your device has a different camera app, use the suggestions in this section for exploring the features that your device’s app offers. See Chapter 14, “Using Samsung TouchWiz,” for coverage of the Camera app on Samsung devices. See Chapter 15, “Using HTC Sense,” for coverage of the Camera app on HTC devices.
![]() Tip
Tip
You can install the Google Camera app on any device that is running KitKat. The app is free from the App Store and is well worth trying. If your device is running KitKat but has an older version of the stock Camera app, update to Google Camera to get the features described here.
Opening the Camera App and Navigating Its Interface
Tap the Camera icon on the Home screen (it’s usually there) or on the Apps screen to open the Camera app. The app has a stripped-down, uncluttered user interface, as you can see in Figure 11.1, which shows the Camera mode, the mode you use to take regular photos.
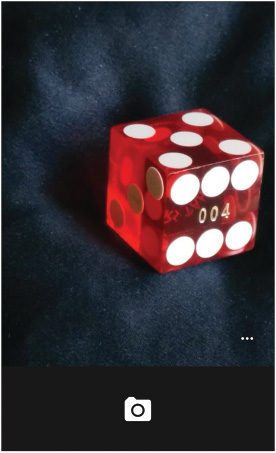
FIGURE 11.1 The Camera in Camera mode, for taking regular photos. Tap the three horizontal dots (…) to display the options.
![]() Tip
Tip
If you have an early-model Nexus 7, which has a front camera but no rear camera, download and install the Camera Nexus 7 app. This app gives you access to the device’s camera, which otherwise you can access only through apps such as Hangouts.
Swipe right to display the Modes list (see Figure 11.2), which enables you to switch among the app’s five modes: Photo Sphere mode, Panorama mode, Lens Blur mode, Camera mode, and Video mode.

With the Modes list open, you can also tap the Settings icon to access the Settings screen.
Accessing the Camera from the Lock Screen
To enable you to take photos quickly without messing about authenticating yourself, recent versions of Android let you access the Camera app directly from the lock screen. If the Camera icon appears in the lower-right corner of the lock screen, swipe left to display the Camera app.
You can then take photos as usual by tapping the Shutter button. Swipe right to display the Mode list if you want to change to a different mode, such as Video or Panorama. After taking a photo (or video), you can swipe left to display it for viewing.
For security, the Camera app restricts you to taking photos and videos and viewing what you’ve just taken since the device was locked. So you can determine whether you’ve shot what you need or whether you need to keep shooting. After you swipe past the first photo or video you took, a lock screen icon appears. You can then unlock your device to view other photos.
Similarly, after displaying a photo or video, you can tap the Photos icon in the upper-left corner to jump to the Photos app, but to get there, you must unlock your device.
![]() Note
Note
KitKat considers the camera on the lock screen to be a shortcut rather than a widget. This means that you can’t remove the camera from the lock screen by unchecking the Enable Widgets box on the Security screen in the Settings app.
The only way to remove the camera shortcut is to replace the lock screen. You can find various lock screen replacements in the App Store.
Configuring the Camera App to Suit Your Needs
To get the most out of the Camera app, spend a few minutes configuring it to suit your needs. In the Camera app, swipe right to display the main controls, and then tap the Settings icon in the lower-right corner to display the Settings screen (see Figure 11.3).
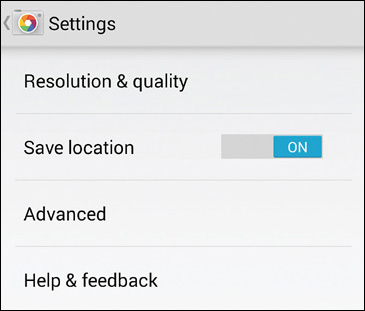
FIGURE 11.3 From the Settings screen for the Camera app, you can choose resolution and quality settings, turn on or off saving the location in photos, and visit the Advanced screen.
Choosing Resolution and Quality Settings
Tap the Resolution & Quality button on the Settings screen to display the Resolution & Quality screen (see Figure 11.4). You can then choose the following settings:
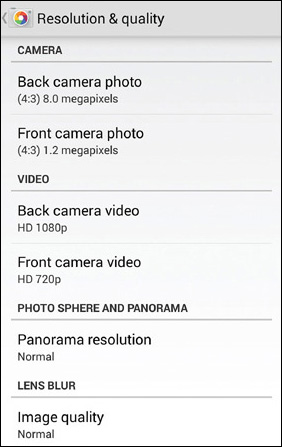
FIGURE 11.4 On the Resolution & Quality screen, set the resolution for shooting photos and videos with your device’s cameras.
![]() Back Camera Photo. Tap this button to open the Back Camera Photo dialog box, and then tap the radio button for the resolution you want.
Back Camera Photo. Tap this button to open the Back Camera Photo dialog box, and then tap the radio button for the resolution you want.
![]() Tip
Tip
When setting the Back Camera Photo resolution and the Front Camera Photo resolution, you’ll normally want to use the highest resolution available. This means that the big decision is whether to go for the 4:3 aspect ratio or the 16:9 (widescreen) aspect ratio. Typically, the 4:3 aspect ratio uses all of the camera’s resolution, whereas the 16:9 resolution lops off the outer parts of the long sides. So unless you specifically need the widescreen format, you’re usually better off shooting in the 4:3 format and then cropping the photos as required.
![]() Front Camera Photo. Tap this button to open the Front Camera Photo dialog box, and then tap the radio button for the resolution you want.
Front Camera Photo. Tap this button to open the Front Camera Photo dialog box, and then tap the radio button for the resolution you want.
![]() Note
Note
The resolutions available for Back Camera Photo, Front Camera Photo, Back Camera Video, and Front Camera Video vary depending on your device’s cameras.
![]() Back Camera Video. Tap this button to open the Back Camera Video dialog box, and then tap the radio button for the video resolution to use.
Back Camera Video. Tap this button to open the Back Camera Video dialog box, and then tap the radio button for the video resolution to use.
![]() Tip
Tip
You can down-resolve video as needed after shooting it, but doing so takes much more effort than down-resolving a photo. So it’s a good idea to set the video resolution you’ll normally want. If your device is short of space, shooting video at a lower resolution can help you avoid running out altogether.
![]() Note
Note
Some camera apps offer the CIF format for shooting video. CIF is the acronym for Common Intermediate Format, a standard video format that uses 352×288-pixel resolution. This resolution is very low by today’s standards, so use it only if you’re certain that it’s what you need.
![]() Front Camera Video. Tap this button to open the Front Camera Video dialog box, and then tap the radio button for the video resolution to use.
Front Camera Video. Tap this button to open the Front Camera Video dialog box, and then tap the radio button for the video resolution to use.
![]() Photo Sphere and Panorama. Tap this button to open the Panorama Resolution dialog box, and then tap the High radio button, the Normal radio button, or the Low (Fastest) radio button, as needed.
Photo Sphere and Panorama. Tap this button to open the Panorama Resolution dialog box, and then tap the High radio button, the Normal radio button, or the Low (Fastest) radio button, as needed.
![]() Tip
Tip
To get the best Photo Sphere and panorama photos, tap the High radio button in the Panorama Resolution dialog box and use a tripod to keep your device steady while taking the photos.
![]() Image Quality. To control the resolution the Lens Blur feature uses, tap this button to display the Image Quality dialog box, and then tap the Normal radio button or the Low (Fastest) radio button, as needed.
Image Quality. To control the resolution the Lens Blur feature uses, tap this button to display the Image Quality dialog box, and then tap the Normal radio button or the Low (Fastest) radio button, as needed.
![]() Caution
Caution
The Low (Fastest) setting in the Image Quality dialog box uses 1024×768 resolution for the Lens Blur feature to give quicker response time. This setting is sometimes useful when you need the speed, but 1024×768 resolution is quite low. So usually it’s better to use the Normal setting, which uses the resolution you set in the Back Camera Photo dialog box.
Choosing Whether to Save the Location in Your Photos
Back on the main Settings screen for the Camera app, set the Save Location switch to On or Off to control whether the Camera app saves the location in photos you take.
Saving the location enables you to sort your photos by locations, which is great for browsing and organizing your photos. The disadvantage of saving the location is that it enables anyone with whom you share the photo to see exactly where you took it. If you post photos online, this may be a privacy concern.
![]() Tip
Tip
You can remove location information from a photo by using an app such as PhotoInfo Eraser or Pixelgarde Free, both of which you can download for free from the Play Store.
Choosing Advanced Settings
Tap the Advanced button on the Settings screen to display the Advanced screen, and then choose from the available settings. At this writing, there’s only one: You can set the Manual Exposure switch to On if you want to be able to control the exposure manually from the Settings bar.
Taking Regular Photos
By this point, whether you’ve carefully chosen settings to suit your needs or you’ve decided to stick with the defaults, you should be ready to take photos. This section covers regular photos, the kind you’ll likely want to take most of the time. The following sections cover the specialized photo types: Photo Sphere photos, panorama photos, and photos using the Lens Blur feature.
Switching to the Regular Camera
If the Camera app doesn’t display the regular Camera feature when you open the app, swipe right to display the Modes list, and then tap Camera.
Zooming, Focusing, and Shooting
To take a quick photo, aim the camera lens at your subject, and then tap the Shutter button.
![]() Tip
Tip
You can press either the Volume Up button or the Volume Down button to take a photo.
To zoom in, place your finger and thumb (or two fingers) together on the screen and then pinch apart. To zoom back in, place your finger and thumb apart on screen and then pinch together.
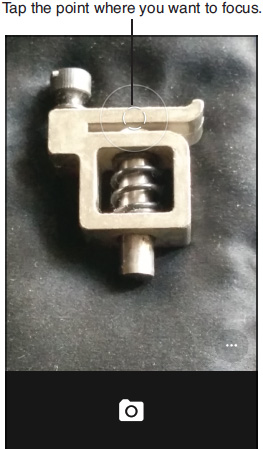
To focus, tap the point on which you want to place the focus. The Camera app displays a focus icon briefly (see Figure 11.5) to indicate that it is adjusting the focus.
Camera shake—the camera moving while the shutter is open—can ruin a photo by making it blurred. The smaller and lighter the camera you’re using, the easier it is to get camera shake when taking photos. With one of today’s featherweight phones, getting camera shake is easier than falling off a log.
Some devices have automatic image stabilization for photos. But even so, you may need to use other means to steady your device when taking photos, especially when the light is low or when you have zoomed far in.
If you’re taking photos of still subjects, a tripod remains the most effective means of stabilization. Where a tripod is impractical, try a monopod or a chest brace. You can also use a foot strap, which you slip around your foot and then hold the device under tension by pulling upward. To use any of these options, you’ll need a tripod mount for your device.
When you have no hardware beyond your device, stabilize your position by using an available solid object, such as a tree, a building, or a vehicle. You may also be able to reduce camera shake by, instead of tapping the Shutter button to take a photo, tapping and holding the Shutter button while you line up the shot, and then releasing it when you’re ready to take the photo. This trick doesn’t work if your device has a Burst mode and you’ve enabled it, because tapping and holding the Shutter button takes a burst of photos instead.
Using the Timer, Grid, HDR, and Flash
To choose settings for taking photos, tap the button with three horizontal dots (…) in the lower-right corner of the screen. The Camera app displays the settings bar (see Figure 11.6), and you can choose the following settings:
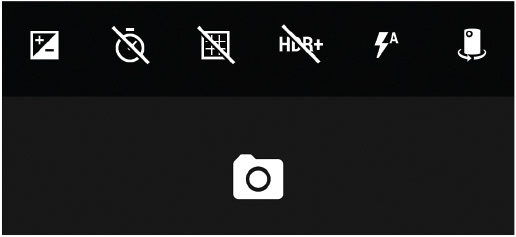
FIGURE 11.6 From the settings bar, you can control exposure, the timer, and the flash; turn on the grid or HDR; and switch between the rear camera and the front camera.
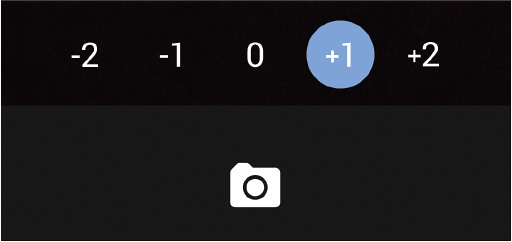
![]() Manual Exposure. Tap this icon to display the Manual Exposure bar (see Figure 11.7), and then tap the exposure you want: –2, –1, 0 (the default), +1, or +2.
Manual Exposure. Tap this icon to display the Manual Exposure bar (see Figure 11.7), and then tap the exposure you want: –2, –1, 0 (the default), +1, or +2.
![]() Tip
Tip
Use the –1 exposure setting for backgrounds that are too bright for the automatic exposure control; use the –2 setting for extremely bright backgrounds, such as snow in sunshine. Use the +1 setting for a background that is too dark, and the +2 setting for photographing black cats in a coalmine at night.
![]() Note
Note
The Manual Exposure icon appears on the settings bar only if you have set the Manual Exposure switch on the Advanced screen to On.
![]() Timer. Tap this icon to cycle through the three settings: No delay, 3 seconds, and 10 seconds.
Timer. Tap this icon to cycle through the three settings: No delay, 3 seconds, and 10 seconds.
![]() Grid. Tap this icon to toggle the grid on or off. Many people find the grid useful for composing their photos. You can use the grid simply to help make sure that vertical objects are upright and horizontal objects are level on the screen, or you can use it to help you compose your photos according to the Rule of Thirds, a compositional guideline for placing your subjects in photos.
Grid. Tap this icon to toggle the grid on or off. Many people find the grid useful for composing their photos. You can use the grid simply to help make sure that vertical objects are upright and horizontal objects are level on the screen, or you can use it to help you compose your photos according to the Rule of Thirds, a compositional guideline for placing your subjects in photos.
If you search online for rule of thirds, make sure you get the rule about photography rather than the rule about driving (one third of your gas supply is for the outward journey, one third for the return journey, and the last third for safety).
![]() HDR+. Tap this icon to toggle the HDR feature. HDR stands for High Dynamic Range. It helps improve the color and lighting balance of your photos, and sometimes adds more detail, by taking a series of shots in rapid succession and merging them into a single photo.
HDR+. Tap this icon to toggle the HDR feature. HDR stands for High Dynamic Range. It helps improve the color and lighting balance of your photos, and sometimes adds more detail, by taking a series of shots in rapid succession and merging them into a single photo.
When to Use HDR and When Not To
HDR is a great feature in the Camera app and a great addition to your photography arsenal, so you’ll probably want to use it often—but don’t use it all the time.
Use HDR when you’re taking photos of still subjects, such as landscapes, buildings, or still lifes (peaches, grapes, optional dead pheasant). Keep your device as steady as possible to make sure that each of the shots has the same alignment and contents, enabling Camera to merge them successfully. Use a tripod or other steadying device when you can, especially when shooting in low light.
Don’t use HDR for anything involving movement, such as sports, children, or candid photos. You can’t use HDR for any photos that need the flash, because the Camera app disables the flash when you turn on HDR.
![]() Note
Note
Some cameras don’t support HDR mode. Many support it on the rear camera but not on the front camera.
![]() Flash. Tap this icon to cycle among the three flash settings: On (the lightning-bolt symbol), Automatic (the lightning-bolt symbol with an A to its right), and Off (the lightning-bolt symbol with a diagonal line through it).
Flash. Tap this icon to cycle among the three flash settings: On (the lightning-bolt symbol), Automatic (the lightning-bolt symbol with an A to its right), and Off (the lightning-bolt symbol with a diagonal line through it).
Turning on HDR disables the flash and timer. It also disables Manual Exposure control (if you have set the Manual Exposure switch on the Advanced screen to On).
![]() Tip
Tip
Set the Flash feature to On when you need to force Camera to use the flash when it normally would not, such as when you need the flash to light up the shadowed face of a subject positioned in front of a bright background. Set Flash to Off when you need to be discreet or when you’ll get a better effect with the ambient light.
![]() Switch Cameras. Tap this icon to switch from the rear camera to the front camera or vice versa.
Switch Cameras. Tap this icon to switch from the rear camera to the front camera or vice versa.
![]() Note
Note
The capabilities of the front camera depend on the device, but a typical front camera has no flash and cannot use the HDR feature.
After selecting the settings you want, compose your photo and tap the Shutter button to take it.
Reviewing Your Photos Quickly
To see the photo or photos you’ve just taken, swipe left from the main Camera screen. The photo appears (see Figure 11.8), and you can share it, edit it, or delete it by tapping the three icons at the bottom of the screen.
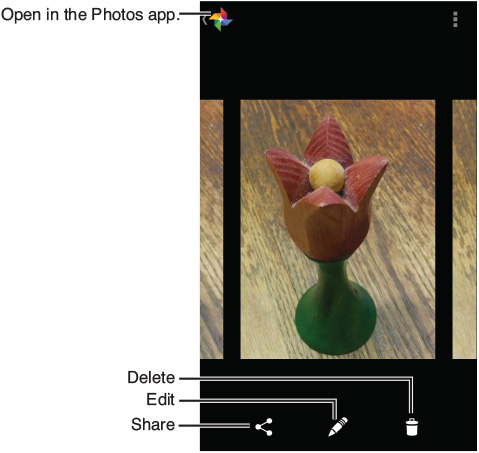
FIGURE 11.8 After displaying a photo for viewing in the Camera app, you can share it, delete it, edit it, or view it in the Photos app.
You can view the information for a photo by tapping the Menu button and then tapping Details. The Details dialog box opens (see Figure 11.9), showing you a wide range of information from the date, time, and location; through the photo’s resolution and orientation; whether the flash was used; and the focal length, aperture, exposure time, and ISO rating.
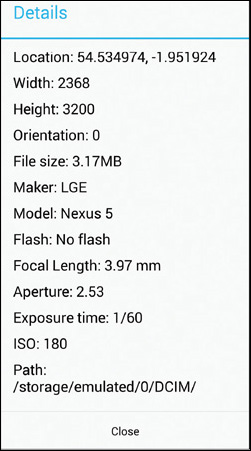
FIGURE 11.9 Open the Details dialog box to see a photo’s location, resolution, aperture, exposure time, and other details.
Tap the Close button when you’ve seen enough.
Swipe right to go back to the Camera screen so that you can take more photos.
Improving Your Photos Using Tripods and Lenses
If you need to be able to keep your phone or tablet steady while taking photos, attach it to a tripod. All you need is a tripod mount for the device. Many of these are spring-loaded clips with a hole at the bottom threaded to receive a standard tripod screw—very simple, but effective as long as they’re strong enough. You can use any standard tripod, from a table-top toy to a professional monster.
Search online using terms such as smartphone tripod mount, tablet tripod mount, or flexible tripod mount, and you’ll find plenty of options, usually starting from the price of a disappointing cup of coffee. Or see what your local electronics store can offer.
You can expand your photo-taking repertoire greatly by adding lenses to your phone or tablet. Many clip-on or stick-on lens sets are available that enable you to add macro, wide-angle, or fish-eye capabilities to your phone or tablet. These are straightforward to use, although you need to position them carefully to get the best effect. Both clip-on and stick-on lenses usually require you to remove any case from your device.
You can also get telephoto lenses and zoom lenses. Because these are typically bigger than macro, wide-angle, and fish-eye lenses, they need firmer fixing, such as a case with a lens mount built into it. This arrangement enables you to swap lenses easily and make sure the lenses are positioned correctly for the camera, so it’s helpful if you use lenses a lot. But you have to remove any case from your device for these lenses as well.
Taking Photo Sphere Photos
The Photo Sphere feature enables you to create panoramic photos that pan up and down as well as from side to side. These can be a lot of fun to view. The Camera app does a fine job of stitching together the component photos into a whole, but while you can take Photo Sphere photos and get reasonable results, it helps to use a tripod with a smooth panning mechanism so you can keep the central point of the sphere the same.
In the Camera app, swipe right to display the Modes list, tap Photo Sphere, and then follow the prompts for aiming the lens. The Camera app displays white dots to indicate the areas you can go to next; when you track to a dot, it turns blue, as you see in Figure 11.10; and when you hold steady on a dot, Camera captures that section of the picture.
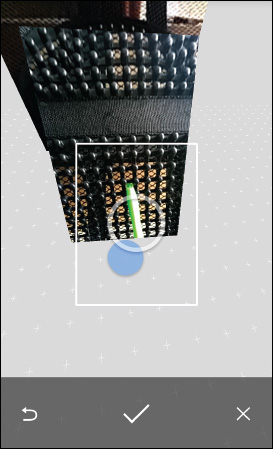
When you finish capturing the area for the Photo Sphere, tap the check mark.
Taking Panorama Photos
The Panorama feature enables you to take regular panorama photos—long, flat panoramas—but also vertical, square, and rounded panorama photos.
In the Camera app, swipe right to display the Modes list, and then tap Panorama. If you want to change the type of panorama, tap the three horizontal dots (…) and then tap the panorama type. Tap the Shutter button, and then follow the dots.
When you finish capturing the panorama, tap the check mark.
Taking Photos with the Lens Blur Feature
The Lens Blur feature enables you to make a subject stand out more from the background. Lens Blur works with both the rear camera and the front camera on many devices, so you can use it for taking self-portraits as well as taking photos of other subjects.
![]() Tip
Tip
Lens Blur is mostly useful for close-up photos, such as portraits of people or pictures of objects, in which your subject is positioned in front of a background whose main features are some distance between them. For example, if you’re taking a photo of your significant other in the park, you can use Lens Blur to make sure that the background is blurred to draw attention to the subject.
To use Lens Blur, take the photo and then move the device up to enable the Camera app to record information about the depth of objects in the picture. After taking the photo, you can adjust the amount of blur as needed. Follow these steps:
1. Swipe right on the main Camera screen to display the Modes list.
2. Tap Lens Blur to switch to Lens Blur mode.
3. Optionally, tap the three horizontal dots to display the options bar, and then tap the options you want. Only two are available: You can toggle the display of the grid, and you can switch between the rear camera and the front camera.
4. Line up your shot and tap the Shutter button. Camera takes the initial photo and prompts you to move the device upward (see Figure 11.11).
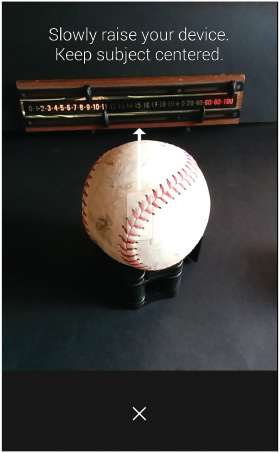
FIGURE 11.11 Raise your phone or tablet slowly following the Lens Blur feature’s prompts and the arrow on the screen.
5. Slowly raise your device, following the tracking arrow and keeping the subject centered in the frame, until Camera displays a check mark.
6. Swipe left to see the photo. You may have to wait while Camera processes the Lens Blur effect.
7. Tap the Lens Blur button (the shutter symbol, second from the left) to display the controls for editing the blurring.
8. If necessary, tap the point to which you want to move the focus.
9. Drag the slider to the left or right as needed. The left screen in Figure 11.12 shows a photo with a small amount of lens blur. The right screen shows the same photo with blurring turned up all the way.
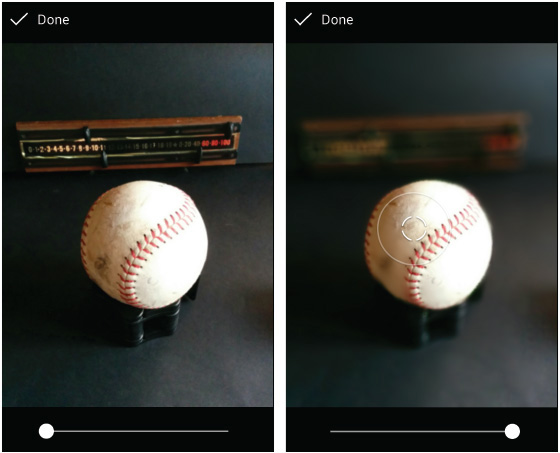
10. Tap the Done button when you are satisfied with the result.
If you need to move the camera faster than the Lens Blur feature will allow in order to get your shot, go back to the Resolution & Quality screen in the Camera app’s settings, tap the Image Quality button, and then tap the Low (Fastest) radio button. This setting reduces the image resolution to 1024×768, so be aware you’re sacrificing many pixels to get the extra speed.
Editing Your Photos
It’s great if you can get your photos perfect when shooting them, but chances are that you’ll need to edit many of your shots to get them just the way you want. Your Android device provides easy-to-use editing tools that enable you to make anything from subtle tweaks to wholesale changes.
To edit a photo from the Camera app, swipe left from the screen for whichever camera mode you’ve been using, swipe further left as needed until you reach the right photo, and then tap the Edit button to open the photo for editing in the Photos app.
![]() Caution
Caution
Many Android devices include multiple apps that can edit photos. So the first time you tap the Edit button for a photo in the Camera app, Android displays the Complete Action Using dialog box to let you decide which app to use. To follow these examples, tap Photos. If you want to use Photos for all your editing, tap the Always button; if you want to keep your options open, tap the Just Once button.
Alternatively, you can tap the Photos button in the upper-left corner of the screen to open the Photos app. You can then browse the photos and start any editing directly in the Photos app.
The Photos app contains a wide range of editing tools that range from basic moves (such as cropping and rotating photos) to more advanced moves (such as Tilt-Shift). These tools work in largely the same way, but some have extra features that you can switch to.
Here are the basic moves for using the editing tools:
1. Open the photo you want to change.
2. Tap the Edit button to turn on Editing mode.
3. Tap the appropriate tool button at the bottom of the screen. Figure 11.13 shows the first screen’s worth of buttons in landscape orientation.
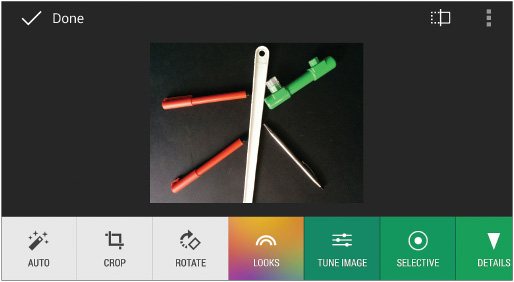
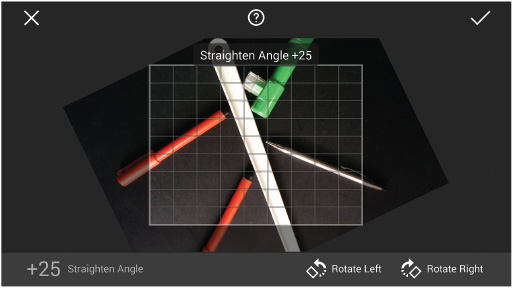
4. You use the tool’s controls to manipulate the photo. For example, on the Rotate screen, tap the photo and drag to straighten the photo (as shown in Figure 11.14), or tap the Rotate Left button or the Rotate Right button to rotate it 90 degrees at a time.
![]() Tip
Tip
For some editing tools, you can tap and hold the Toggle Original button in the middle of the toolbar at the top to display the original photo momentarily so that you can check the effect of the changes you’ve made.
5. Tap the check mark to keep the changes you’ve made or the cross to discard them.
So far, so easy. But many of the editing tools have options to which you can switch by tapping and holding the screen and then sliding your finger to the item you want to select. Here’s an example with the Tune Image tool:
1. Tap the Tune Image button at the bottom of the screen to display the Tune Image screen. As you can see in the left screen in Figure 11.15, the Tune Image tool selects the Brightness option first, so the Brightness readout appears in the lower-left corner of the screen.
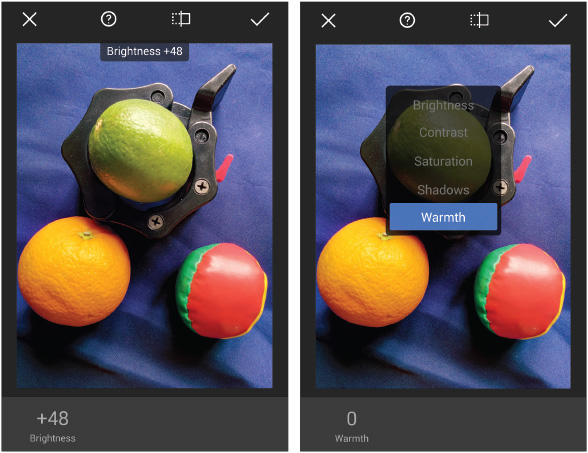
FIGURE 11.15 In the Tune Image tool, tap and slide your finger horizontally to adjust the brightness (left). Tap, hold, and slide your finger vertically to switch among the options (right).
2. Tap the photo and slide your finger horizontally if you want to adjust the brightness. The current setting appears both at the top of the screen and on the Brightness readout.
3. Tap the photo and slide your finger vertically to switch to another option: Contrast, Saturation, Shadows, or Warmth. The Warmth readout replaces the Brightness readout.
4. Tap the photo and slide your finger horizontally to adjust the warmth.
5. Switch to another option and adjust it as needed.
Many of the tools have a Style button that gives you access to a selection of predefined styles. For example, when you tap the Style button in the Retro Lux tool, you can choose from the lighting mixes shown at the bottom of the screen in Figure 11.16.
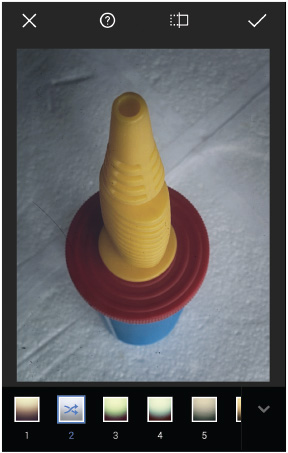
FIGURE 11.16 Tap the style you want to use, and then tap the down-arrow button to hide the Style list.
After choosing the style you want, tap the down-arrow button at the right of the Style list to hide the list again.
Shooting Videos
The Camera app makes it easy to shoot videos. Simply open the app, swipe right to display the Modes list, and then tap Video to switch to video mode.
![]() Note
Note
When you switch to video mode with your device in portrait orientation, the Camera app displays an animated symbol in the middle of the screen suggesting that you turn it to landscape orientation. If you ignore this symbol and start shooting in portrait orientation, the symbol goes away.
Video mode typically offers three options: displaying or hiding the grid, turning the flash on or off, and switching between the rear camera and the front camera.
After you’ve made those choices, tap the Shutter button to start shooting video. You can zoom in or out as needed by pinching outward or pinching together. Tap the Shutter button again when you’re ready to stop filming.
![]() Tip
Tip
While shooting a video, you can capture a still photo by tapping the screen.
Capturing Screenshots
Sometimes it’s useful to capture what’s on the screen of your Android device so that you can use it to amaze your friends or confound your carrier’s tech support—or simply refer to it yourself later.
You can capture the screen on any stock Android device by pressing the Power button and the Volume Down button at the same time and holding them for a moment. This maneuver may be awkward until you get the hang of it, so it’s worth practicing a few times before you need it. When you get it right, the screen gives a flash and displays a smaller version of what’s onscreen, framed with a white border like an old-style photo, so you’ll know you’ve captured the screen.
Android stores the screenshots in a folder called Screenshots inside the Pictures folder, so you can access them easily using any file browser.
![]() Tip
Tip
If you need to shoot a lot of screens on Android, install the Android SDK from the Android Developer website (http://developer.android.com), run the Monitor app, and use the Screenshot feature to capture screens. This method has the advantage of saving the screens directly to your computer. It’s also useful for those (relatively few) screens you can’t capture using the Power-and–Volume Down keypress.