
12. Enjoying Your Music Everywhere
In This Chapter
![]() Getting your music onto your device or making it available online
Getting your music onto your device or making it available online
![]() Enjoying music with the Play Music app
Enjoying music with the Play Music app
![]() Going further with other music apps
Going further with other music apps
One of the great things about your device is that you can use it to enjoy high-quality music through headphones or speakers everywhere you go.
But should you put the music files on your device, or should you stream them across the Internet? Should you do both? And how do you get your existing music files, such as those on your CDs, onto your device? What format and compression should you use to get as much music as possible on your device at as high a quality as you need, and how can you make it sound as good as possible?
In this chapter, you’ll learn about the Play Music app. Stock Android devices come with this app, which provides plenty of features for playing back music either stored on your device or streamed across the Internet. You’ll also learn about some of the other music apps you may want to try on your device. Finally, you’ll discover options for dealing with the space problems that music addiction tends to bring to Android devices.
Understanding Your Options for Listening to Music on Your Device
You have three main options for listening to music on your device:
![]() Put your own music on your device and play it back from the device. This is what you might call the old-school approach, but it remains simple and effective, and many people prefer it. The two disadvantages are that you need to get the music files, and your device must have enough space to hold them—plus all the other files you need to carry with you, not to mention preferably leaving several gigabytes free for you to shoot the next viral video.
Put your own music on your device and play it back from the device. This is what you might call the old-school approach, but it remains simple and effective, and many people prefer it. The two disadvantages are that you need to get the music files, and your device must have enough space to hold them—plus all the other files you need to carry with you, not to mention preferably leaving several gigabytes free for you to shoot the next viral video.
![]() Stream music from an online service. Various online services (Spotify, Pandora, and so on) enable you to stream music from their servers across your Internet connection and play the music on your device. On the plus side, you can access a wide variety of music that you don’t own and you don’t need to store the music files on your device. The disadvantage is that you may need to pay for the online service (typically via a subscription), and you always need an Internet connection to be able to play the music.
Stream music from an online service. Various online services (Spotify, Pandora, and so on) enable you to stream music from their servers across your Internet connection and play the music on your device. On the plus side, you can access a wide variety of music that you don’t own and you don’t need to store the music files on your device. The disadvantage is that you may need to pay for the online service (typically via a subscription), and you always need an Internet connection to be able to play the music.
![]() Put your music online, stream it, or store it on your device. You can combine the two preceding approaches by putting your music collection online using a service such as Google’s Play Music or Apple’s iTunes Match. You can then either stream the music when you have a suitable Internet connection or put specific songs on your device so that you can play them anywhere, even when you don’t have an Internet connection. The advantage of this approach is that you can play your music on a variety of devices (usually up to a set number of devices). The disadvantage is that you may need to pay for the service, and you need an Internet connection when streaming music.
Put your music online, stream it, or store it on your device. You can combine the two preceding approaches by putting your music collection online using a service such as Google’s Play Music or Apple’s iTunes Match. You can then either stream the music when you have a suitable Internet connection or put specific songs on your device so that you can play them anywhere, even when you don’t have an Internet connection. The advantage of this approach is that you can play your music on a variety of devices (usually up to a set number of devices). The disadvantage is that you may need to pay for the service, and you need an Internet connection when streaming music.
Getting Your Music onto Your Device
You can transfer your music files onto your device by using the techniques discussed in Chapter 2, “Syncing Your Device”:
![]() Windows 8. Use File Explorer to copy files.
Windows 8. Use File Explorer to copy files.
![]() Windows 7 and earlier versions. Use Windows Explorer to copy files.
Windows 7 and earlier versions. Use Windows Explorer to copy files.
![]() OS X. Use Android File Transfer or another app to copy files.
OS X. Use Android File Transfer or another app to copy files.
If you’re going to use Google’s Play Music service, you don’t necessarily have to put music on your device, because you can simply stream it all instead. Skip ahead to the section “Getting the Most out of the Play Music App” to read about streaming with the Play Music app. The same goes for other streaming services: You don’t need to put the music on your device.
Alternatively, if your device takes an SD card, you can copy the music files to the SD card using your computer and then insert the SD card in your device.
![]() Tip
Tip
If your device doesn’t take an SD card, you can copy the files to a USB On-the-Go drive and connect it to your device’s micro-USB port. You can then either play the files from the drive or use a file-management app to copy them to the Music folder or another convenient folder.
![]() Note
Note
Android’s default file system includes a folder called Music, which is the central repository for music files. To keep your device’s file system neatly organized, you may want to put your music files here. But you can also store them in other folders, because Android automatically makes all music files available to music-player apps, no matter which folder the files are in. If your device has limited built-in storage but enables you to add an SD card, putting your music on the SD card is usually the best approach.
Understanding Which Music Formats Your Device Can Play
Android can play music in the following formats:
![]() MP3. Technically, MP3 stands for “MPEG-1 Audio Layer III” or “MPEG-2 Audio Layer III,” where MPEG stands for Moving Pictures Expert Group, so it’s no surprise that people simply use the abbreviation. MP3 is a lossy audio format (see the nearby tip) that sounds okay for music at bit rates of 128Kbps and pretty good at higher bit rates, such as 256Kbps or 320Kbps.
MP3. Technically, MP3 stands for “MPEG-1 Audio Layer III” or “MPEG-2 Audio Layer III,” where MPEG stands for Moving Pictures Expert Group, so it’s no surprise that people simply use the abbreviation. MP3 is a lossy audio format (see the nearby tip) that sounds okay for music at bit rates of 128Kbps and pretty good at higher bit rates, such as 256Kbps or 320Kbps.
![]() Tip
Tip
Audio formats use either lossless compression or lossy compression to reduce the amount of space needed for an audio file. Lossless compression retains the full audio quality, whereas lossy compression loses some of the details—preferably the details that the human ear would normally miss anyway because they’re masked by other sounds. Lossy compression is adjustable, so you can choose the quality, but typically it can compress audio far more than lossless compression.
![]() Note
Note
Audio encoders use several settings to determine the quality and—indirectly—the file size. The key setting is the bit rate, which is the number of bits (individual pieces) of data per second. The bit rate can be either constant or variable. Variable bit rate (VBR) gives better quality than constant bit rate (CBR) at the same bit rate because it can use the bits more intelligently to store the data.
![]() AAC. Advanced Audio Coding (AAC) is a lossy audio format that provides slightly better quality than MP3. AAC is technically superior to MP3 and is Apple’s preferred format for lossily compressed audio, but MP3 is more widely used.
AAC. Advanced Audio Coding (AAC) is a lossy audio format that provides slightly better quality than MP3. AAC is technically superior to MP3 and is Apple’s preferred format for lossily compressed audio, but MP3 is more widely used.
![]() OGG. Ogg Vorbis (variously referred to as “Ogg,” “Vorbis,” and “Ogg Vorbis”) is a lossy audio format that delivers similar quality to MP3 and AAC at similar file sizes. At this writing, Ogg Vorbis is not widely used.
OGG. Ogg Vorbis (variously referred to as “Ogg,” “Vorbis,” and “Ogg Vorbis”) is a lossy audio format that delivers similar quality to MP3 and AAC at similar file sizes. At this writing, Ogg Vorbis is not widely used.
![]() Note
Note
Ogg Vorbis and FLAC are open-source formats, which means that anyone can use them without paying licensing fees. By contrast, MP3 and AAC are both proprietary formats that require the payment of licensing fees. Usually, the manufacturers of the devices pay these fees, so you, as the user of a device, don’t need to pay.
![]() FLAC. Free Lossless Audio Codec (FLAC) is a lossless compression format. FLAC delivers full-quality sound, but its files are large. Therefore, it is not a good choice for an Android device unless the device has plenty of storage, or you are happy to carry only a small amount of music with you.
FLAC. Free Lossless Audio Codec (FLAC) is a lossless compression format. FLAC delivers full-quality sound, but its files are large. Therefore, it is not a good choice for an Android device unless the device has plenty of storage, or you are happy to carry only a small amount of music with you.
![]() PCM/WAV. Pulse Code Modulation (PCM) and Waveform Audio File Format (WAVE or WAV, after the three-letter file extension) are uncompressed audio formats. This means they deliver full-quality audio, but the file sizes are huge, so you wouldn’t normally want to use them on an Android device. These formats also don’t have containers for the tag information in which the other formats store the artist, album, song name, and so on, so the only way to identify PCM and WAV files is by their filenames.
PCM/WAV. Pulse Code Modulation (PCM) and Waveform Audio File Format (WAVE or WAV, after the three-letter file extension) are uncompressed audio formats. This means they deliver full-quality audio, but the file sizes are huge, so you wouldn’t normally want to use them on an Android device. These formats also don’t have containers for the tag information in which the other formats store the artist, album, song name, and so on, so the only way to identify PCM and WAV files is by their filenames.
![]() Note
Note
The preceding formats are built into Android. Some apps may support other music formats, but you’re generally better off sticking with the main ones.
![]() Tip
Tip
Opinions vary, but normally, you’re best off using MP3 or AAC for audio files on your Android device. If possible, spend some time listening to MP3 files and AAC files encoded at 128Kbps and higher bit rates to decide the minimum level of quality you need. Listen to the songs on both your Android device and on your computer (if you use one), and listen through both headphones and speakers.
Getting Your CDs onto Your Android Device
If you have CDs containing songs you want to play on your device, you’ll need to create digital files from the CDs. This process is called ripping, and you can perform it with many different apps on computers.
At this writing, iTunes is arguably the best free app for ripping audio files from CDs. iTunes comes built into OS X, so if you have a Mac, you already have iTunes installed. If you have Windows, you can download iTunes for free from Apple’s website, www.apple.com/itunes/download/.
Here’s how to configure iTunes with suitable settings for ripping your CDs:
1. Open the Preferences dialog box by pressing Ctrl+, (Ctrl+comma) in Windows or Cmd+, (Cmd+comma) on the Mac.
2. Click the General button on the tab bar to display the General pane.
3. In the When You Insert a CD pop-up menu, choose Show CD.
4. Check the Automatically Retrieve CD Track Names from Internet box.
5. Click the Import Settings button to display the Import Settings dialog box. Figure 12.1 shows the Import Settings dialog box in Windows.
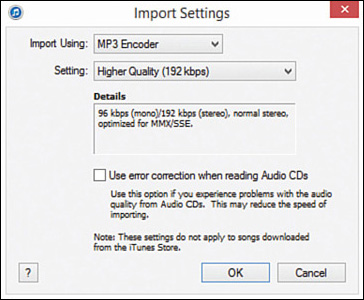
FIGURE 12.1 In the Import Settings dialog box for iTunes, choose the encoder and setting for the file format you want.
6. Open the Import Using pop-up menu and click the encoder to use. Normally, you’ll want to choose either AAC Encoder or MP3 Encoder.
7. Open the Setting pop-up menu and click the setting to use. The settings available depend on the encoder. For example, for AAC, you can choose High Quality (128Kbps), iTunes Plus, or Spoken Podcast. For MP3 Encoder, you can choose Good Quality (128Kbps), High Quality (160Kbps), or Higher Quality (192Kbps). To get other—or higher—quality on either MP3 Encoder or AAC, click Custom and work in the AAC Encoder dialog box or the MP3 Encoder dialog box (see Figure 12.2). Figure 12.2 shows the MP3 Encoder dialog box in Windows.
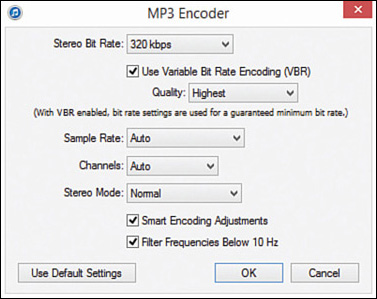
FIGURE 12.2 For high quality on your audio files, choose custom settings in the MP3 Encoder dialog box or the AAC Encoder dialog box.
![]() Caution
Caution
Use the Spoken Podcast setting only for spoken-word audio. It uses high compression that makes music sound horrible.
![]() Tip
Tip
For highest quality of AAC and MP3 files, choose the 320Kbps setting in the Stereo Bit Rate pop-up menu, leave the Sample Rate pop-up menu and Channels pop-up menu set to Auto, and check the Use Variable Bit Rate Encoding (VBR) box.
For MP3 Encoder, choose Highest in the Quality pop-up menu, choose Normal in the Stereo Mode pop-up menu, and check both the Smart Encoding Adjustments box and the Filter Frequencies Below 10 Hz box.
For AAC Encoder, check the Use High Efficiency box, but uncheck the Optimize for Voice box.
8. Check the Use Error Correction When Reading Audio CDs box. Using error correction slows down the ripping process a little but helps avoid getting skips and crackles in your audio files.
9. Click the OK button to close the Import Settings dialog box.
![]() Caution
Caution
Don’t choose the Apple Lossless Encoding option in the Import Settings dialog box in iTunes. This format is great for Apple devices (such as iPhones, iPads, and Macs), but most Android devices don’t play it.
10. Click the OK button to close the Preferences dialog box.
In Windows, you can use Windows Media Player to rip CDs to MP3 files. Windows Media Player uses Microsoft’s Windows Media Audio file format by default, so you need to change the settings. Click the Organize menu and then click Options to open the Options dialog box, click the Rip Music tab, and then open the Format drop-down list and choose MP3. Drag the Audio Quality slider to set the bit rate you want, and then click the OK button.
![]() Tip
Tip
If you want to create Ogg Vorbis files or FLAC files in Windows, use an app such as Total Audio Converter, which you can download from many software sites online. There’s a 30-day trial, after which the app costs $19.90. The Audacity audio editor app (free from http://audacity.sourceforge.net) can also export audio in both Ogg Vorbis and FLAC formats. The easiest way to create Ogg Vorbis files or FLAC files on the Mac is by using XLD, which is available for free from various software sites.
After you’ve chosen your import settings, you can insert a CD in your computer’s optical drive and rip it. Assuming you checked the Automatically Retrieve CD Track Names from Internet box, iTunes downloads the CD’s details from the Gracenote database on the Internet and displays the results.
At this point, you can simply click the Import CD button to start importing the songs. But before you do, it’s usually a good idea to look through the details that iTunes has retrieved and correct any errors. The Gracenote database contains an impressive amount of information, but it has many typos and other errors.
If any item of the CD info as a whole is wrong, click the CD Info button and use the CD Info dialog box to change it. This dialog box contains fields for the artist, composer, album title, disk number (for example, disk 1 of 2), genre, and year. You can also check the Compilation CD box if this CD is a compilation by different artists.
![]() Caution
Caution
Check the Compilation CD box in the CD Info dialog box only if the CD is a compilation by different artists, not a compilation from the works of a single artist. Checking this box makes iTunes store the file in the folder called Compilations instead of in the artist’s folder. When the CD is by a single artist, store the files in the artist’s folder, where you can find them easily.
To change the information for an individual track, you can click a field twice to open it for editing. Pause between the clicks so that iTunes doesn’t receive a double-click, which starts the track playing. For more extensive changes, right-click or Ctrl+click the track name and then click Get Info to display the Information dialog box, which gives you access to a wide range of fields for the track.
![]() Tip
Tip
When importing CDs, you’ll often need to change the genre allocated to the music. Music fans can argue all day long about exactly which genre any given track belongs to, and iTunes and other apps enable you to assign a genre to each track rather than having to assign the genre at the album level (so that each track must have the same genre). To keep your music library straight and enable you to find the types of music you want easily, assign the genre that you will find most useful, no matter what genre other people suggest.
![]() Note
Note
Samsung provides the Kies app for managing many of its devices, including most Samsung Android devices. You can import your music files into Kies and then sync them from there to your Samsung device. You can download Kies from http://www.samsung.com/in/support/usefulsoftware/KIES/JSP. For Windows, you must establish whether Kies (the older version) or Kies 3 (which is newer) is compatible with your device, so check the devices listed before you download the software.
Transcoding Existing Files
If you have music files in formats that your device can’t play, you have two options: Either install an app that can play back the files, or transcode the files to a supported format so that you can play them with your existing app.
Usually, transcoding the files is the better option, because it enables you to use your preferred music player for all your music. If the files in question are lossless, you can transcode them to another lossless format without losing quality or transcode them to your preferred lossy format with the normal loss in quality. Transcoding lossy files to another lossy format sacrifices more audio quality—you get any defects the first lossless format produced plus any defects the transcoding adds—but usually produces acceptable results. (If the results aren’t acceptable, you can delete the transcoded files and figure out a plan B.)
In Windows, iTunes can transcode WMA files to a format such as MP3 or AAC. Otherwise, you’ll need an app such as Total Audio Converter for Windows or XLD for the Mac.
Syncing Songs Directly with doubleTwist
If you use iTunes to manage your music, you can use the free doubleTwist app to sync songs directly between iTunes and your Android device. Syncing directly can save you time and effort over syncing manually, so it’s well worth a try. doubleTwist is also a music-playback app for Android; you can use it instead of the Play Music app or other playback apps.
Here’s how to set up and use doubleTwist:
1. On your Android device, open the Play Store app and download the doubleTwist Music Player app from the Apps section. This app is free.
![]() Caution
Caution
In Windows, the doubleTwist Setup Wizard recommends you install AVG PC TuneUp, a free trial version of a commercial app. Unless you actually want to install this app, you must uncheck the I Accept the Terms of the AVG PC TuneUp End User License Agreement and Privacy Policy and Want to Install AVG PC TuneUp box on the Install AVG PC TuneUp screen.
2. On your Mac or PC, go to the doubleTwist website (www.doubletwist.com) and download the doubleTwist Music Player app by clicking the Download for PC link or the Download for Mac link. Follow through the installation procedure as usual.
![]() Tip
Tip
In Windows, the final screen of the doubleTwist Setup Wizard contains two check boxes—the Launch doubleTwist box and the Always Run on Startup box—that are checked by default. Launching doubleTwist now is usually helpful, but you may want to uncheck the Always Run on Startup box so that you can run doubleTwist manually.
3. Connect your device to your Mac or PC via USB.
On the Mac, OS X warns you that doubleTwist is from an unidentified developer and verifies that you want to run it. Click the Open button if you want to use the app. doubleTwist then requests access to your contacts. You’ll probably want to deny this request by clicking the Don’t Allow button.
4. Drag your music from your library to your device in the Devices list in the sidebar. You can also drag photos and videos to your device.
![]() Note
Note
If you want to sync your music via Wi-Fi, pay for the upgrade to the doubleTwist AirSync feature.
Getting the Most Out of the Play Music App
The Play Music app is the app Google provides for enjoying music on mobile devices. Play Music can play music stored on your phone or device, but its most compelling feature is its ability to stream songs stored online. You can store 20,000 songs in your Google account. And if you subscribe to Google Music, you can also listen to any of the millions of songs in the Google Music catalog.
![]() Tip
Tip
If your device doesn’t have the Play Music app installed, open the Play Store app, search for play music, and then install the app. It’s free.
Getting Started with Play Music
To get started with Play Music, tap the Play Music icon on the Home screen or on the Apps screen. The first time you launch the Play Music app, you need to decide between standard use (tap the Use Standard button) or signing up for a trial subscription (tap the Try All Access button). You may want to start with standard use, which enables you to upload 20,000 of your songs to Google Play and listen to them on your devices.
After you’ve made that decision, the Listen Now screen appears (see Figure 12.3). This is one of the four main screens in the Play Music app: Listen Now, My Library, Playlists, and Instant Mixes. To navigate among the screens, tap the Menu button to display the menu panel (see Figure 12.4), and then tap the screen you want to display.
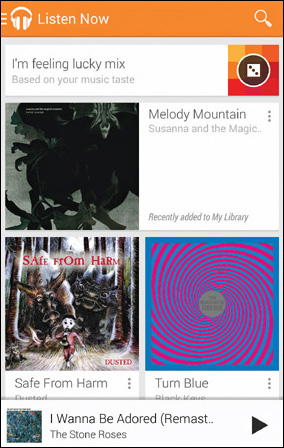
FIGURE 12.3 The Listen Now screen gives you access to your recent music and to recommendations. To navigate to other areas of Google Play, tap the Listen Now heading or the Menu button to its left to display the menu panel.
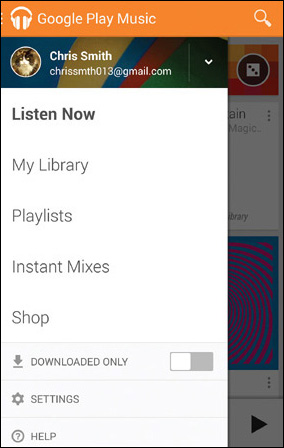
FIGURE 12.4 On the menu panel, tap the button for the area of Google Play Music that you want to use, or tap the Settings button to display the Music Settings screen.
If your device contains songs, you can start playing them by navigating to one of them and tapping it. For example, on the Listen Now screen, tap an album to open it, and then tap the song you want to play.
Setting Up an Account
If you’ve set up a Google account on your Android device, the Play Music app automatically uses that account. If necessary, you can switch to another account by following these steps:
1. Tap the Menu button to display the menu panel.
2. Tap Settings to display the Music Settings screen.
3. In the General section, tap the Google Account button to display the Select an Account screen.
4. Tap the existing account to use, or tap the Add Account button and follow through the resulting screens to set up a new account.
Syncing Your 20,000 Songs to Play Music
If you plan to sync songs to Google Play so that you can play them back with the Play Music app on your device, download and install the Google Music Manager app from https://music.google.com/music/listen#manager_pl. Click the Download Music Manager button to download the app’s distribution file, and then install it by double-clicking the file in Windows or by dragging the app’s file from the disk image to the Applications folder on OS X.
After installing Music Manager, open it from the Start screen or Start menu (in Windows) or from Launchpad on the Mac. The Music Manager setup routine runs, and you can configure the app by doing the following:
1. On the Sign In with Your Google Account screen, sign in using the Google account you will use for music on your computer and your device.
2. On the What Would You Like to Do? screen, select the Upload Songs to Google Play radio button and click the Continue button.
3. On the Where Do You Keep Your Music Collection? screen (see Figure 12.5), select the iTunes radio button, the Music Folder radio button, or the Other Folders radio button, as appropriate. If you select the Other Folders radio button, click the Add Folder button and add the folders to the list box. Click the Continue button when you’re done.

FIGURE 12.5 On the Where Do You Keep Your Music Collection? screen, specify the folders you want Music Manager to search for music to upload to your Google Play account.
4. On the screen that asks whether you want to automatically upload songs you add to your selected folders in the future, click the Yes button or the No button, as appropriate. Uploading the songs automatically can be helpful, but you may want to perform quality control on your computer first to avoid loading turkeys into your Google Play account.
5. Follow through the remaining screens until the Your Music Is Being Added screen appears. You can then click the Go to Music Player button to open the online music player in your default web browser or click the Close button to close the Music Manager setup routine without opening the online music player.
![]() Note
Note
Uploading your songs will likely take hours or days, depending on how many songs you’re uploading and how fast your Internet connection is. You can pause the upload at any time by giving the Pause command from the Music Manager icon in the notification area in Windows or toward the right end of the menu bar in OS X. From the pop-up menu, you can also click Go to Music Player to display the music player in your browser.
Buying Songs from the Play Store
The Play Music app makes it easy for you to buy music from the Play Store. From within the Play Music app, you can get to the Music section of the Play Store in a couple of ways:
![]() Go to the Home screen of the Music section. In the Play Music app, open the menu panel and then tap Shop. The Shop button is dimmed if you have set the Downloaded Only switch (which you’ll learn about shortly) to On.
Go to the Home screen of the Music section. In the Play Music app, open the menu panel and then tap Shop. The Shop button is dimmed if you have set the Downloaded Only switch (which you’ll learn about shortly) to On.
![]() Go to a particular artist. Tap the menu button for an artist, album, or song, and then tap Shop This Artist on the menu.
Go to a particular artist. Tap the menu button for an artist, album, or song, and then tap Shop This Artist on the menu.
In each case, the Play Music app switches you over to the Play Store app. If you prefer, you can simply start with the Play Store app by tapping its icon on the Home screen or on the Apps screen. On the Home screen of the Play Store, either tap the Music button to start browsing music, or simply search by the name of the artist, album, or song you’re looking for.
You can preview a song by tapping the Play button to its left. When you find a song you want to buy, tap its price button and then follow through the payment process.
If you’d like some free music, look at the Free Music area on the Home page of the Music section of the Play Store. You can tap the More button to display the Free Music screen, which shows all the free songs. These songs are genuinely free, but you still have to specify your means of payment and tap the Buy button to approve the payment of $0.00.
Navigating the Play Music App
The Play Music app has four main areas:
![]() Listen Now. The Listen Now screen provides quick access to the music you’ve added recently, music you’ve played recently, and music that Google Play recommends for you (if you have a subscription). You can tap the I’m Feeling Lucky Mix button at the top to create a custom mix of songs. If you’ve set the Downloaded Only switch to On, the Shuffle All button appears instead of the I’m Feeling Lucky Mix button.
Listen Now. The Listen Now screen provides quick access to the music you’ve added recently, music you’ve played recently, and music that Google Play recommends for you (if you have a subscription). You can tap the I’m Feeling Lucky Mix button at the top to create a custom mix of songs. If you’ve set the Downloaded Only switch to On, the Shuffle All button appears instead of the I’m Feeling Lucky Mix button.
![]() My Library. The My Library screen (see Figure 12.6) enables you to browse the music in your music library by genres, by artists, by albums, or by songs. Tap the tab by which you browse. Tap the menu button for an item (such as a song) to display the menu of actions you can take with it, such as Play Next or Go to Artist.
My Library. The My Library screen (see Figure 12.6) enables you to browse the music in your music library by genres, by artists, by albums, or by songs. Tap the tab by which you browse. Tap the menu button for an item (such as a song) to display the menu of actions you can take with it, such as Play Next or Go to Artist.
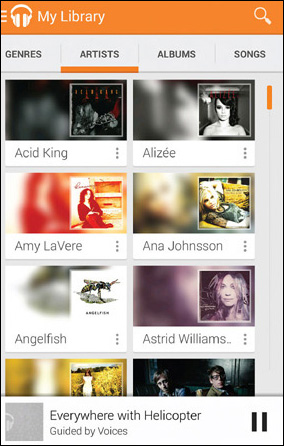
FIGURE 12.6 On the My Library screen, tap Genres, Artists, Albums, or Songs. You can then browse your music or start it playing.
![]() Note
Note
The songs in your music library are those you’ve loaded onto your device and those you’ve uploaded to the Play Music service. You can download songs from the Play Music service and store them on your device so that you can play them directly from the device without streaming. We’ll look at how to do this a little later in this chapter.
![]() Playlists. The Playlists screen contains three categories of playlists. The Recent Playlists category contains playlists you’ve created or edited recently. The Auto Playlists category contains playlists that the Play Music app maintains for you, such as the Last Added playlist and the Free and Purchased playlist, to give you easy access to particular categories of music. The All Playlists category shows all the playlists you’ve created.
Playlists. The Playlists screen contains three categories of playlists. The Recent Playlists category contains playlists you’ve created or edited recently. The Auto Playlists category contains playlists that the Play Music app maintains for you, such as the Last Added playlist and the Free and Purchased playlist, to give you easy access to particular categories of music. The All Playlists category shows all the playlists you’ve created.
![]() Instant Mixes. The Instant Mixes screen enables you to create and enjoy mixes of songs that the Play Music app assembles for you. The My Mixes tab contains mixes you’ve created, and you can tap the Create New Instant Mix to start creating a new instant mix based on a song you select. The Recommended tab contains mixes that the app recommends for you.
Instant Mixes. The Instant Mixes screen enables you to create and enjoy mixes of songs that the Play Music app assembles for you. The My Mixes tab contains mixes you’ve created, and you can tap the Create New Instant Mix to start creating a new instant mix based on a song you select. The Recommended tab contains mixes that the app recommends for you.
You navigate among these areas by opening the menu panel and then tapping Listen Now, My Library, Playlists, or Instant Mixes.
The menu panel also contains three more commands (plus the Help command and the Send Feedback command):
![]() Shop. Tap this command to go to the Music section of Google Play in the Play Store app.
Shop. Tap this command to go to the Music section of Google Play in the Play Store app.
![]() Downloaded Only. Tap this switch, turning it from gray (off) to orange (on), to set the Play Music app to display only the music on your device. You’d do this when your device doesn’t have an Internet connection or when you don’t want to use up your cellular allowance by streaming music.
Downloaded Only. Tap this switch, turning it from gray (off) to orange (on), to set the Play Music app to display only the music on your device. You’d do this when your device doesn’t have an Internet connection or when you don’t want to use up your cellular allowance by streaming music.
![]() Settings. Tap this command to display the Music Settings screen. You’ll look at this in the section “Configuring the Play Music App,” later in this chapter.
Settings. Tap this command to display the Music Settings screen. You’ll look at this in the section “Configuring the Play Music App,” later in this chapter.
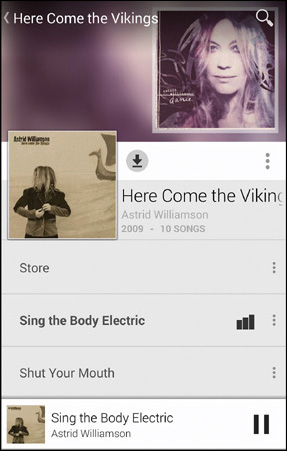
1. Tap the Artists button to display the Artists screen.
2. Tap the artist to display the list of albums.
3. Tap the album to display the list of songs from the album.
4. Tap the song you want to play. A playback indicator showing three moving vertical bars appears (see Figure 12.7).
From here, you can tap another song to play it, or tap the Now Playing button at the bottom of the screen to display the Now Playing screen (see Figure 12.8). You can easily control the music:
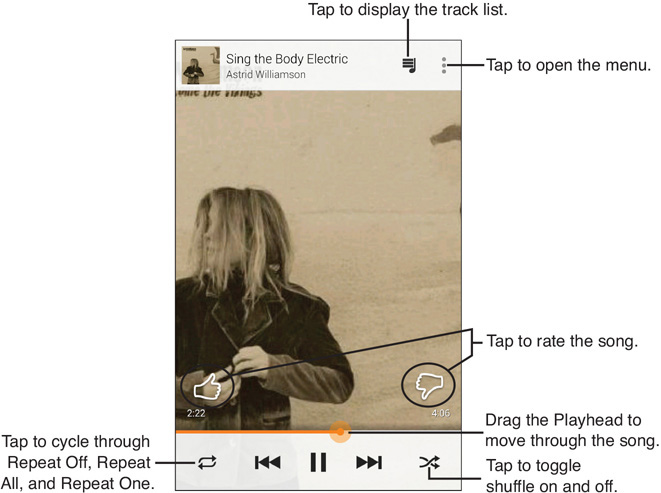
FIGURE 12.8 From the Now Playing screen, you can drag the Playhead to move quickly through the song, turn on repeat or shuffle, rate the song, and display the track list.
![]() Use the playback controls to pause or resume playback, fast-forward or rewind, or skip to the next song or go back to the previous song.
Use the playback controls to pause or resume playback, fast-forward or rewind, or skip to the next song or go back to the previous song.
![]() Drag the Playhead to scrub quickly through the song.
Drag the Playhead to scrub quickly through the song.
![]() Tap the Repeat button to cycle through Repeat Off, Repeat All, and Repeat One.
Tap the Repeat button to cycle through Repeat Off, Repeat All, and Repeat One.
![]() Tap the Shuffle button to toggle shuffling on or off.
Tap the Shuffle button to toggle shuffling on or off.
![]() Tap the thumbs-up icon to like the song or the thumbs-down icon to dislike it.
Tap the thumbs-up icon to like the song or the thumbs-down icon to dislike it.
![]() Tap the Track List button to display the track list. You can then tap another song to start it playing.
Tap the Track List button to display the track list. You can then tap another song to start it playing.
![]() Tap the Menu button to display the menu, which contains commands such as Start Instant Mix, Play Next, Add to Playlist, Go to Artist, Go to Album, Remove from Queue, and Shop This Artist.
Tap the Menu button to display the menu, which contains commands such as Start Instant Mix, Play Next, Add to Playlist, Go to Artist, Go to Album, Remove from Queue, and Shop This Artist.
The queue contains the list of songs that will play next. You can add a song to the queue by opening the menu and then tapping Add to Queue. (If the song is already on the queue, the Remove from Queue command appears on the menu instead of the Add to Queue command.) To clear the current songs from the queue, tap the Menu button on the Now Playing screen and then tap Clear Queue. To save the contents of the queue as a playlist, tap the Menu button, and then tap Save Queue. In the Add to Playlist dialog box, you can either tap an existing playlist to add the queue’s contents to it or tap New Playlist to create a new playlist.
![]() Note
Note
If you lock your device while music is playing or Android locks it after the Sleep interval you have set, the music continues to play. Android displays playback controls on the lock screen enabling you to pause and resume the music without unlocking your device. You can also skip to the next song, return to the beginning of the current song, or go back to the previous song.
Downloading Songs
The Play Music app shows both the songs that are actually on your device and those that are stored online in your Google Play library. When you start to play a song that isn’t on your device, the Play Music app streams it across your device’s Internet connection.
When you don’t have a Wi-Fi connection, you may want to turn off streaming music so as not to use your cellular data plan. Tap the Menu button to display the menu panel and then set the Downloaded Only switch to On to make the Play Music app show only the songs that are on your device and that you can play without streaming. The app displays a gray bar saying Downloaded Only near the top of the screen to remind you that you’ve restricted the library.
You can download songs from your Google Play library to your device as needed—preferably over a Wi-Fi connection. Tap the Albums button to display the albums screen, navigate to the album you want to download, tap the Menu button, and then tap Download.
Deleting Songs from Your Device and Your Library
If you don’t like a song, you can delete it. You may also want to delete songs if your device becomes too full and you need to clear some space on it.
Because the Play Music app shows you both the songs actually on your device and those in your Google Play library, you need to be careful when deleting songs.
If the song is part of an album you’ve downloaded from your Google Play library, you’ll usually do best to remove the album from your device. This keeps the album in your Google Play library, so you can play it again via streaming any time.
To remove an album, go to the album’s screen, tap the album’s Menu button, and then tap Remove Download. In the confirmation dialog box (see Figure 12.9), tap the Remove button; you can check the Don’t Ask Me Again box first if you want to suppress this confirmation in the future.

FIGURE 12.9 To free up space on your device, you can remove a downloaded album, leaving the songs available in your Google Play library.
You can also simply delete a song by going to the song, tapping its Menu button, and then tapping Delete. What happens then depends on whether you’ve copied the song to your device directly or it is in your Google Play library:
![]() Song copied to your device. A delete confirmation dialog box opens showing the song’s name (see Figure 12.10). Tap the OK button to delete the song.
Song copied to your device. A delete confirmation dialog box opens showing the song’s name (see Figure 12.10). Tap the OK button to delete the song.
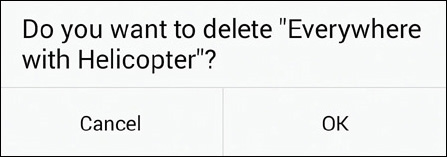
FIGURE 12.10 This type of delete confirmation dialog box indicates the song is one that you’ve copied to your device.
![]() Song in your Google Play library. The Delete from Library? dialog box opens (see Figure 12.11). You can tap the OK button to delete the song, but normally it’s best to tap the Cancel button and then use the Remove Download command to remove the downloaded album, leaving the songs in your Google Play library.
Song in your Google Play library. The Delete from Library? dialog box opens (see Figure 12.11). You can tap the OK button to delete the song, but normally it’s best to tap the Cancel button and then use the Remove Download command to remove the downloaded album, leaving the songs in your Google Play library.
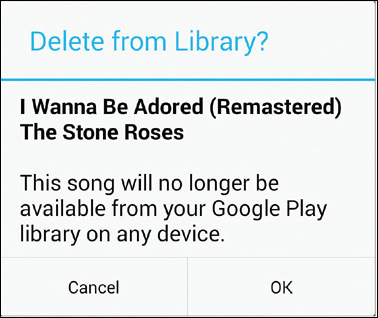
FIGURE 12.11 The Delete from Library? dialog box checks that you want to remove the song from your Google Play library, not just from your device.
Configuring the Play Music App
Like most apps, the Play Music app offers a variety of settings that you can customize to make the app work your way. To configure it, open the menu panel, tap Settings, and then work on the Music Settings screen (see Figure 12.12).
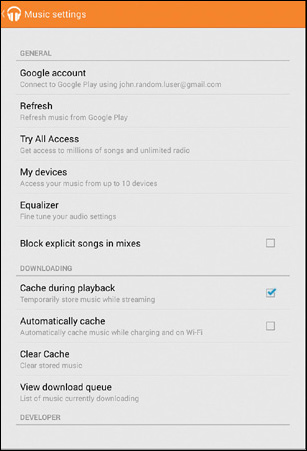
FIGURE 12.12 The Music Settings screen enables you to manage your devices, control downloading and caching, and access the Equalizer.
![]() Tip
Tip
If you play streaming music with the Play Music app, it’s important to configure your streaming and caching settings to make sure you don’t go through data allowance unintentionally.
The Music Settings screen has three sections: General, Downloading, and Developer. Here’s what you can do with the General settings:
![]() Google Account. Tap this button to display the Select an Account screen. You can then select the account you want to use for Google Play Music.
Google Account. Tap this button to display the Select an Account screen. You can then select the account you want to use for Google Play Music.
![]() Refresh. Tap this button to refresh the list of music from Google Play. You’d want to do this after uploading songs from your computer to Google Play.
Refresh. Tap this button to refresh the list of music from Google Play. You’d want to do this after uploading songs from your computer to Google Play.
![]() Try All Access. Tap this button to start setting up a 30-day trial of access to all the music on Google Play. When the trial ends, continuing all access costs $9.99 per month.
Try All Access. Tap this button to start setting up a 30-day trial of access to all the music on Google Play. When the trial ends, continuing all access costs $9.99 per month.
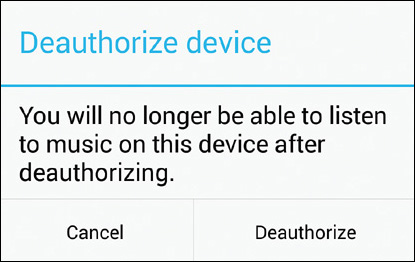
![]() My Devices. Tap this button to display the My Devices screen, which lists the devices you’re using for Google Play Music. You can use up to 10 devices at a time. To stop using a device, tap the × icon on the right of its button, and then tap the Deauthorize button in the Deauthorize Device dialog box (see Figure 12.13).
My Devices. Tap this button to display the My Devices screen, which lists the devices you’re using for Google Play Music. You can use up to 10 devices at a time. To stop using a device, tap the × icon on the right of its button, and then tap the Deauthorize button in the Deauthorize Device dialog box (see Figure 12.13).
![]() Equalizer. Tap this button to choose Equalizer settings. You’ll look at how to do this a little later in this chapter.
Equalizer. Tap this button to choose Equalizer settings. You’ll look at how to do this a little later in this chapter.
![]() Block Explicit Songs in Mixes. Check this box to prevent Play Music from including in mixes any songs that are marked as Explicit. This setting doesn’t ensure complete sanitization of the music, but it’s pretty solid—although it seems to block the occasional “explicit” instrumental.
Block Explicit Songs in Mixes. Check this box to prevent Play Music from including in mixes any songs that are marked as Explicit. This setting doesn’t ensure complete sanitization of the music, but it’s pretty solid—although it seems to block the occasional “explicit” instrumental.
These are the Downloading settings you can choose:
![]() Cache During Playback. Check this box to enable the Play Music app to cache (store) data temporarily while streaming music. Caching helps prevent interruptions, so it’s usually helpful. Turn caching off only when your device is crammed full of data.
Cache During Playback. Check this box to enable the Play Music app to cache (store) data temporarily while streaming music. Caching helps prevent interruptions, so it’s usually helpful. Turn caching off only when your device is crammed full of data.
![]() Automatically Cache. Check this box to allow the Play Music app to cache data only while your device is on Wi-Fi and when it’s charging. This check box is available only when you’ve checked the Cache During Playback box.
Automatically Cache. Check this box to allow the Play Music app to cache data only while your device is on Wi-Fi and when it’s charging. This check box is available only when you’ve checked the Cache During Playback box.
![]() Clear Cache. Tap this button to delete all the cached music. Normally, you’d want to do this only to reclaim the space the cached music is occupying.
Clear Cache. Tap this button to delete all the cached music. Normally, you’d want to do this only to reclaim the space the cached music is occupying.
![]() Download via Wi-Fi Only. (Cellular-capable devices only.) Check this box to prevent your device from downloading music across the cellular network. If you’ve got a meager data plan, it’s a good idea to keep this box checked.
Download via Wi-Fi Only. (Cellular-capable devices only.) Check this box to prevent your device from downloading music across the cellular network. If you’ve got a meager data plan, it’s a good idea to keep this box checked.
![]() View Download Queue. Tap this button to display the Download Queue screen so that you can see which songs the Play Music app is currently downloading.
View Download Queue. Tap this button to display the Download Queue screen so that you can see which songs the Play Music app is currently downloading.
The Developer section of the Music Settings screen contains to the Open Source Licenses button, which you can tap to see the details of the open-source licenses that the app uses, and the Music Version button, which displays the app’s version number. You might need the version number when reporting or troubleshooting a problem with the app.
Creating Playlists
The Play Music app makes it easy to create playlists containing only the songs you want to hear and in your preferred order. You can start creating a playlist from any song in your library. You can also quickly add songs to an existing playlist.
Here’s how to create a playlist:
1. Navigate to the song or other item you want to put in the playlist.
2. Tap the item’s Menu button and then tap Add to Playlist on the menu. The Add to Playlist dialog box opens (see Figure 12.14).
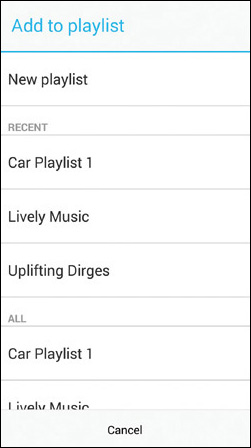
FIGURE 12.14 From the Add to Playlist dialog box, tap New Playlist to start a new playlist, or tap the existing playlist to which you want to add the item.
3. Tap New Playlist. The New Playlist dialog box opens (see Figure 12.15).
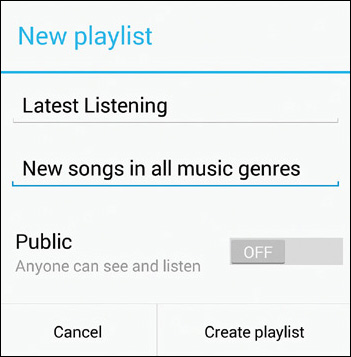
FIGURE 12.15 In the New Playlist dialog box, type the name and description for the playlist and decide whether to make it public.
4. Type the name and description for the playlist.
![]() Tip
Tip
The description is to help you identify the playlist from others with similar names, so it’s a good idea to type something clear, no matter how redundant it seems now.
5. Set the Public switch to On if you want to make the playlist visible to other people on Google Play.
6. Tap the Create Playlist button.
Now that you’ve created the playlist, you can add other songs—or other items, such as an album or artist—to it by tapping each item’s Menu button, tapping Add to Playlist, and then tapping the playlist’s name in the Add to Playlist dialog box.
To play back a playlist, open the menu panel and tap Playlists to display the Playlists screen. You can then tap the playlist to open it and tap a song to start it playing.
To change a playlist you’ve created, display the playlist. You can then drag a song up or down the playlist using the handle on the left side. To remove a song from the playlist, swipe it off to the left or to the right.
Improving Your Music with the Equalizer
To make the music to which you listen sound as good as possible through your headphones or speakers, it’s a good idea to use the equalizer built into the Play Music app. You can either apply an existing equalization, such as Folk or Heavy Metal, or create a custom equalization that suits your ears and your headphones or speakers.
![]() Tip
Tip
If you often listen to music using your Android device, consider getting a headphone amplifier to improve the sound. A headphone amplifier is a small device that enables you to adjust the sound balance or turn up the volume.
Turning On the Equalizer
Connect your headphones or speakers and set some music playing so that you can hear the effects of the changes you make. Then open the menu panel, tap Settings to display the Settings screen, and then tap Equalizer. On the Equalizer screen (see Figure 12.16), set the switch to On, enabling the other controls.
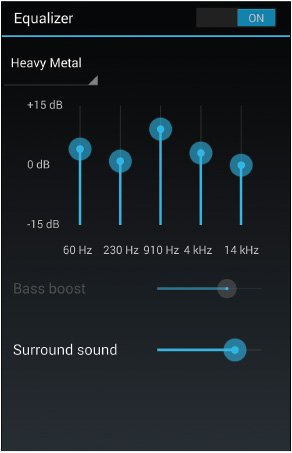
FIGURE 12.16 Set the Equalizer switch to On, pick an equalization from the pop-up menu, and then adjust the Bass Boost and Surround Sound as needed.
![]() Note
Note
The equalizer may not be available on all devices.
![]() Note
Note
The Bass Boost and Surround Sound features are available only if your device has the audio hardware needed for them.
You can then tap the pop-up menu and tap the preset equalization you want to apply: Normal, Classical, Dance, Flat, Folk, Heavy Metal, Hip Hop, Jazz, Pop, Rock, or FX Booster.
![]() Note
Note
The Flat equalization has all the sliders at their midpoints, giving 0 decibel (dB) adjustment. This equalization has the same effect as turning the Equalizer off except that you can adjust the Bass Boost and Surround Sound settings (if your device supports them). The Normal equalization gives a slight boost to the lowest (60Hz) and highest (14kHz) frequencies to punch up the sound a little.
Now drag the Bass Boost and Surround Sound sliders to tweak the sound to how you prefer it.
Creating a Custom Equalization
The Equalizer’s presets offer a good range of equalizations, but if none meets your needs, you can create a custom equalization. Apply the existing equalization that sounds best to you, and then drag the frequency sliders to improve the sound. As soon as you adjust one of the sliders, Play Music selects the User item in the pop-up menu.
![]() Note
Note
You can also start creating your custom equalization by opening the pop-up menu and tapping User. This enables you to start with all the sliders at their midpoints.
When you’ve set up the equalization you want, tap the Back button twice to return to your music.
Add an Equalizer to Android Versions Before Jelly Bean
Android versions before Jelly Bean (Android 4.1) come without an equalizer. You can find various equalizers on the App Store—some of them free, others paid. The app called Equalizer from Smart Android Apps, LLC is a good place to start.
Using Other Music Apps
Play Music can be great, but you can use a huge number of other Android apps to play music on your device. This section introduces you to three apps for identifying music you hear and three streaming services for exploring music and radio.
Three Apps for Identifying Music
These apps enable you to identify music easily:
![]() Shazam. Shazam is a free app that can automatically identify a song by listening to a snippet of it playing. Shazam enables you to share your music and TV discoveries via Facebook and Google+, but you can ignore these features if you don’t need them.
Shazam. Shazam is a free app that can automatically identify a song by listening to a snippet of it playing. Shazam enables you to share your music and TV discoveries via Facebook and Google+, but you can ignore these features if you don’t need them.
![]() SoundHound. SoundHound is a free app that can automatically identify a song by listening to it being played nearby or by your humming the tune.
SoundHound. SoundHound is a free app that can automatically identify a song by listening to it being played nearby or by your humming the tune.
![]() TrackID. Also free, TrackID enables you to identify songs within range of your device’s microphone. TrackID gives you access to artist biographies and links to music videos on YouTube.
TrackID. Also free, TrackID enables you to identify songs within range of your device’s microphone. TrackID gives you access to artist biographies and links to music videos on YouTube.
Three Streaming Services
If you like listening to a wide variety of music, try these three streaming services:
![]() Spotify. Spotify gives you access to a huge amount of music via streaming. You can browse through top lists or new releases, explore genres and moods, or simply search using keywords. The basic Spotify service is free and supported by ads. You can upgrade to the Premium service to get ad-free listening.
Spotify. Spotify gives you access to a huge amount of music via streaming. You can browse through top lists or new releases, explore genres and moods, or simply search using keywords. The basic Spotify service is free and supported by ads. You can upgrade to the Premium service to get ad-free listening.
![]() Pandora. Pandora is a music-streaming service that plays selections based on the artists you choose. You can rate the songs that Pandora plays to tune the selections toward what you like. Pandora enables you to find information about the music played and to purchase it from various sources. Pandora also includes other features, such as enabling you to set alarm clocks and providing personalized radio recommendations.
Pandora. Pandora is a music-streaming service that plays selections based on the artists you choose. You can rate the songs that Pandora plays to tune the selections toward what you like. Pandora enables you to find information about the music played and to purchase it from various sources. Pandora also includes other features, such as enabling you to set alarm clocks and providing personalized radio recommendations.
![]() Note
Note
At this writing, Pandora is available only in the United States, Australia, and New Zealand because of licensing constraints. To access Pandora from other countries, you need to use a VPN connection to one of these three countries.
![]() TuneIn Radio. TuneIn Radio is an online radio station that offers more than 100,000 real radio stations and millions of on-demand programs and podcasts. TuneIn Radio is a free service, but you can pay for the TuneIn Radio Pro upgrade if you want to be able to record radio to your device so that you can listen to it later.
TuneIn Radio. TuneIn Radio is an online radio station that offers more than 100,000 real radio stations and millions of on-demand programs and podcasts. TuneIn Radio is a free service, but you can pay for the TuneIn Radio Pro upgrade if you want to be able to record radio to your device so that you can listen to it later.
![]() Caution
Caution
Streaming audio can take up a huge amount of bandwidth if you use it frequently. If you use streaming audio over the cellular network, keep a close eye on your data usage to make sure you don’t rack up charges.