
7. Doodlz App
Two-Dimensional Graphics, Canvas, Bitmap, Accelerometer, SensorManager, Multitouch Events, MediaStore, Printing, Immersive Mode
Objectives
In this chapter you’ll:
![]() Detect when the user touches the screen, moves a finger across the screen and removes a finger from the screen.
Detect when the user touches the screen, moves a finger across the screen and removes a finger from the screen.
![]() Process multiple touches so the user can draw with multiple fingers at once.
Process multiple touches so the user can draw with multiple fingers at once.
![]() Use a
Use a SensorManager and the accelerometer to detect motion events.
![]() Use a
Use a Paint object to specify the color and width of a line.
![]() Use
Use Path objects to store each line’s data and use a Canvas to draw each line into a Bitmap.
![]() Create a menu and display menu items on the action bar.
Create a menu and display menu items on the action bar.
![]() Use Android 4.4’s immersive mode to enable the user to draw on the entire screen.
Use Android 4.4’s immersive mode to enable the user to draw on the entire screen.
![]() Use Android 4.4’s printing framework and the Android Support Library’s
Use Android 4.4’s printing framework and the Android Support Library’s PrintHelper class to enable the user to print a drawing.
7.2.1 Using SensorManager to Listen for Accelerometer Events
7.2.3 Drawing with Canvas and Bitmap
7.2.4 Processing Multiple Touch Events and Storing Lines in Paths
7.2.5 Android 4.4 Immersive Mode
7.2.6 GestureDetector and SimpleOnGestureListener
7.2.7 Saving the Drawing to the Device’s Gallery
7.2.8 Android 4.4 Printing and the Android Support Library’s PrintHelper Class
7.3 Building the App’s GUI and Resource Files
7.3.4 Menu for the DoodleFragment
7.3.5 activity_main.xml Layout for MainActivity
7.3.6 fragment_doodle.xml Layout for DoodleFragment
7.3.7 fragment_color.xml Layout for ColorDialogFragment
7.3.8 fragment_line_width.xml Layout for LineWidthDialogFragment
7.3.9 Adding Class EraseImageDialogFragment
7.8 LineWidthDialogFragment Class
7.9 EraseImageDialogFragment Class
7.1. Introduction
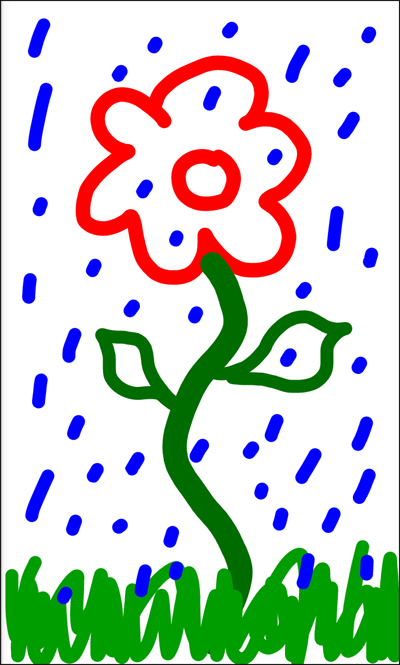
The Doodlz app (Fig. 7.1) enables you to paint by dragging one or more fingers across the screen. The app uses Android 4.4’s immersive mode so that you can draw on the entire screen—the device’s system bars and action bar toggle between displayed and hidden when you tap the screen.

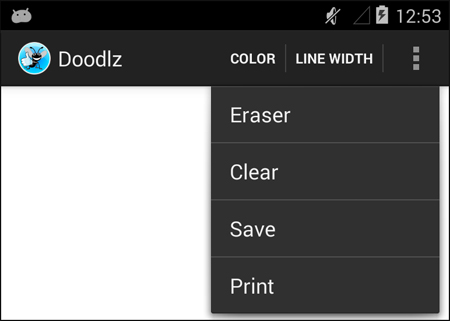
The app’s options enable you to set the drawing color and line width. The Choose Color dialog (Fig. 7.2(a)) provides alpha (transparency), red, green and blue SeekBars (i.e., sliders) that allow you to select the ARGB color (introduced in Section 1.9). As you move each SeekBar’s thumb, the updated color is displayed below the SeekBars. The Choose Line Width dialog (Fig. 7.2(b)) provides a single SeekBar that controls the thickness of the line that you’ll draw. Additional menu items (Fig. 7.3) in the app’s options menu allow you to turn your finger into an eraser (Eraser), to clear the screen (Clear), to save the current drawing into your device’s Gallery (Save) and, on Android 4.4 devices, to print the current drawing. Depending on your device’s screen size, some or all of the app’s menu items are displayed directly on the action bar—any that do not fit are displayed in the options menu. At any point, you can shake the device to clear the entire drawing from the screen. You test-drove this app in Section 1.9, so we do not present a test drive in this chapter. Though this app works in AVDs, the capabilities are more fluid on actual devices. [Note: Due to a Gallery app bug at the time of this writing, on some devices you might need to take a picture with the device’s camera app before you’ll be able to save properly from the Doodlz app.]

7.2. Technologies Overview
This section presents the new technologies that we use in the Doodlz app.
7.2.1. Using SensorManager to Listen for Accelerometer Events
In this app, you can shake the device to erase the current drawing. Most devices have an accelerometer that allows apps to detect movement. Other sensors currently supported by Android include gravity, gyroscope, light, linear acceleration, magnetic field, orientation, pressure, proximity, rotation vector and temperature. The list of Sensor constants representing these sensor types can be found at:
We’ll discuss in Section 7.5 the accelerometer and sensor event handling. For a complete discussion of Android’s other sensors, see the Sensors Overview at
7.2.2. Custom DialogFragments
Several previous apps have used AlertDialogs in DialogFragments to display information to the user or to ask questions and receive responses from the user in the form of Button clicks. The AlertDialogs you’ve used so far were created using anonymous inner classes that extended DialogFragment and displayed only text and buttons. AlertDialogs may also contain custom Views. In this app, you’ll define three subclasses of DialogFragment:
• ColorDialogFragment (Section 7.7) displays an AlertDialog with a custom View containing GUI components for previewing and selecting a new ARGB drawing color.
• LineWidthDialogFragment (Section 7.8) displays an AlertDialog with a custom View containing GUI components for previewing and selecting the line thickness.
• EraseImageDialogFragment (Section 7.9) displays a standard AlertDialog asking the user to confirm whether the entire image should be erased.
For the ColorDialogFragment and EraseImageDialogFragment, you’ll inflate the custom View from a layout resource file. In each of the three DialogFragment subclasses, you’ll also override the following Fragment lifecycle methods:
• onAttach—The first Fragment lifecycle method called when a Fragment is attached to a parent Activity.
• onDetach—The last Fragment lifecycle method called when a Fragment is about to be detached from a parent Activity.
Preventing Multiple Dialogs from Appearing at the Same Time
It’s possible that the event handler for the shake event could try to display the confirmation dialog for erasing an image when another dialog is already on the screen. To prevent this, you’ll use onAttach and onDetach to set the value of a boolean that indicates whether a dialog is on the screen. When the boolean’s value is true, we will not allow the event handler for the shake event to display a dialog.
7.2.3. Drawing with Canvas and Bitmap
This app draws lines onto Bitmaps (package android.graphics). You can associate a Canvas with a Bitmap, then use the Canvas to draw on the Bitmap, which can then be displayed on the screen (Section 7.6). A Bitmap can also be saved into a file—we’ll use this capability to store drawings in the device’s gallery when you touch the Save option.
7.2.4. Processing Multiple Touch Events and Storing Lines in Paths
You can drag one or more fingers across the screen to draw. The app stores the information for each individual finger as a Path object (package android.graphics) that represents line segments and curves. You process touch events by overriding the View method onTouchEvent (Section 7.6). This method receives a MotionEvent (package android.view) that contains the type of touch event that occurred and the ID of the finger (i.e., pointer) that generated the event. We use the IDs to distinguish the different fingers and add information to the corresponding Path objects. We use the type of the touch event to determine whether the user has touched the screen, dragged across the screen or lifted a finger from the screen.
7.2.5. Android 4.4 Immersive Mode
Android 4.4 introduces a new full-screen immersive mode (Section 7.6) that enables an app to take advantage of the entire screen, but still allows the user to access the system bars when necessary. In this app, you’ll use this mode when the app is running on an Android 4.4 or higher device.
7.2.6. GestureDetector and SimpleOnGestureListener
This app uses a GestureDetector (package android.view) to hide or show the device’s system bars and the app’s action bar. A GestureDetector allows an app to react to user interactions such as flings, single taps, double taps, long presses and scrolls by implementing the methods of interfaces GestureDetector.OnGestureListener and Gesture-Detector.On-Double-Tap-Listener interfaces. Class GestureDetector.SimpleOnGestureListener is an adapter class that implements all the methods of these two interfaces, so you can extend this class and override just the method(s) you need from these interfaces. In Section 7.6, you’ll initialize a GestureDetector with a SimpleOnGestureListener, which will handle the single-tap event that hides or shows the system bars and action bar.
7.2.7. Saving the Drawing to the Device’s Gallery
The app provides a Save option that allows the user to save a drawing into the device’s gallery—the default location in which photos taken with the device are stored. A Content-Resolver (package android.content) enables the app to read data from and store data on a device. You’ll use a ContentResolver (Section 7.6) and the method insertImage- of class MediaStore.Images.Media to save an image into the device’s Gallery. The MediaStore manages media files (images, audio and video) stored on a device.
7.2.8. Android 4.4 Printing and the Android Support Library’s PrintHelper Class
Android 4.4 now includes a printing framework. In this app, we use class PrintHelper (Section 7.6) to print the current drawing. Class PrintHelper provides a user interface for selecting a printer, has a method for determining whether a given device supports printing and provides a method for printing a Bitmap. PrintHelper is part of the Android Support Library—a set of libraries that are commonly used to provide new Android features for use in older Android versions. The libraries also include additional convenience features, like class PrintHelper, that support specific Android versions.
7.3. Building the App’s GUI and Resource Files
In this section, you’ll create the Doodlz app’s resource files, GUI layout files and classes.
7.3.1. Creating the Project
Begin by creating a new Android project named Doodlz. Specify the following values in the New Android Project dialog, then press Finish:
• Application Name: Doodlz
• Project Name: Doodlz
• Package Name: com.deitel.doodlz
• Minimum Required SDK: API18: Android 4.3
• Target SDK: API19: Android 4.4
• Compile With: API19: Android 4.4
• Theme: Holo Light with Dark Action Bar
In the New Android Project dialog’s second New Android Application step, leave the default settings, and press Next >. In the Configure Launcher Icon step, select an app icon image, then press Next >. In the Create Activity step, select Blank Activity, then press Next >. In the Blank Activity step, leave the default settings and click Finish to create the project. Open activity_main.xml in the Graphical Layout editor and select Nexus 4 from the screen-type drop-down list. Once again, we’ll use this device as the basis for our design.
The new project will automatically be configured to use the current version of the Android Support Library. If you’re updating an existing project, you can add the latest version of the Android Support Library to your project. For details, visit:
http://developer.android.com/tools/support-library/index.html
http://developer.android.com/tools/support-library/setup.html
7.3.2. strings.xml
You created String resources in earlier chapters, so we show only a table of the String resource names and corresponding values here (Fig. 7.4). Double click strings.xml in the res/values folder to display the resource editor for creating these String resources.

7.3.3. dimens.xml
Figure 7.5 shows a table of the dimension resource names and values that we added to dimens.xml. Open dimens.xml in the res/values folder to display the resource editor for creating these resources. The line_imageview_height resource specifies the height of the ImageView that previews the line width in the LineWidthDialogFragment, and the color_view_height resource specifies height of the View that previews the drawing color in the ColorDialogFragment.

7.3.4. Menu for the DoodleFragment
In Chapter 5, you used the default menu provided by the IDE to display the Flag Quiz app’s Settings menu item. You will not use the default menu in this app, so you can delete the main.xml file in your project’s res/menu folder. In this app, you’ll define your own menu for the DoodleFragment.
Menus for Different Android Versions
You’ll provide two versions of the DoodleFragment’s menu—one for Android 4.3 and earlier devices and one for Android 4.4 and higher devices. Printing is available only in Android 4.4 and higher, so only the menu for such devices will include a Print option. To support separate menus, you’ll define one menu resource in the res/menu folder and a separate menu resource in the res/menu-v19 folder—19 is the Android API version that corresponds to Android 4.4. Android will choose the menu resource in the res/menu-v19 folder when the app is running on Android 4.4 and higher devices. To create the res/menu-v19 folder, right click the res folder, select New > Folder, specify the Folder name menu-v19 and click Finish.
Menu for Android 4.3 and Earlier Versions
To create the menu resource for Android 4.3 and earlier versions:
1. Right click the res/menu folder and select New > Android XML File.
2. In the dialog that appears, name the file doodle_fragment_menu.xml and click Finish. The IDE opens the file in the editor for menu resources.
3. Click Add..., click the editor’s Layout tab in the dialog that appears, select Item and click OK. The IDE highlights the new item and displays its attributes to the right.
4. Change its Id to @+id/color, its Title to @string/menuitem_color and its Show as action to ifRoom. The value ifRoom indicates that Android should display the menu item on the action bar if there’s room available; otherwise, the menu item will appear in the options menu at the right side of the action bar. Other Show as action values can be found at http://developer.android.com/guide/topics/resources/menu-resource.html.
5. Repeat Steps 3 and 4 for the lineWidth, eraser, clear and save items in Fig. 7.6. Note that when you click Add... for each additional menu item, you’ll need to select Create a new element at the top level in Menu in the dialog that appears.

6. Save and close doodle_fragment_menu.xml.
Menu for Android 4.4 and Higher Versions
To create the menu resource for Android 4.4 and higher devices:
1. Copy doodle_fragment_menu.xml from res/menu, paste it into res/menu-v19 and open the file.
2. Click Add..., select Create a new element at the top level in Menu in the dialog that appears, then select Item and click OK.
3. Change the new item’s Id to @+id/print, its Title to @string/menuitem_print and its Show as action to ifRoom.
7.3.5. activity_main.xml Layout for MainActivity
The activity_main.xml layout for this app’s MainActivity contains only the DoodleFragment. To add this Fragment to the layout:
1. Open activity_main.xml in the Graphical Layout editor, then follow the steps in Section 2.5.2 to switch from a FrameLayout to a RelativeLayout.
2. From the Palette’s Layouts section, drag a Fragment onto the design area or onto the RelativeLayout node in the Outline window.
3. The preceding step displays the Choose Fragment Class dialog. Click Create New... to display the New Java Class dialog.
4. Enter DoodleFragment in the dialog’s Name field, change the Superclass field’s value to android.app.Fragment and click Finish to create the class. The IDE opens the Java file for the class, which you can close for now.
5. Change the new Fragment’s Id to @+id/doodleFragment, then save the layout.
7.3.6. fragment_doodle.xml Layout for DoodleFragment
The fragment_doodle.xml layout for the DoodleFragment contains a FrameLayout that displays the DoodleView. In this section, you’ll create DoodleFragment’s layout and the DoodleView class. To add the fragment_doodle.xml layout:
1. Expand the project’s res/layout node in the Package Explorer.
2. Right click the layout folder and select New > Android XML File to display the New Android XML File dialog.
3. In the dialog’s File field, enter fragment_doodle.xml
4. In the Root Element section, select FrameLayout, then click Finish.
5. From the Palette’s Advanced section, drag a view (with a lowercase v) onto the GUI.
6. The previous step displays the Choose Custom View Class dialog. In that dialog, click Create New... to display the New Java Class dialog.
7. In the Name field, enter DoodleView. Ensure that Constructors from superclass is checked, then click Finish. This creates and opens DoodleView.java. We’ll be using only the two-argument constructor, so delete the other two. Save and close DoodleView.java.
8. In fragment_doodle.xml, select view1 in the Outline window. In the Properties window’s Layout Parameters section, set Width and Height to match_parent.
9. In the Outline window, right click view1, select Edit ID..., rename view1 as doodleView and click OK.
10. Save and close fragment_doodle.xml.
7.3.7. fragment_color.xml Layout for ColorDialogFragment
The fragment_color.xml layout for the ColorDialogFragment contains a GridLayout that displays a GUI for selecting and previewing a new drawing color. In this section, you’ll create ColorDialogFragment’s layout and the ColorDialogFragment class. To add the fragment_color.xml layout:
1. Expand the project’s res/layout node in the Package Explorer.
2. Right click the layout folder and select New > Android XML File to display the New Android XML File dialog.
3. In the dialog’s File field, enter fragment_color.xml
4. In the Root Element section, select GridLayout, then click Finish.
5. In the Outline window, select the GridLayout and change its Id value to @+id/colorDialogGridLayout.
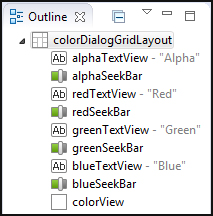
6. Using the Graphical Layout editor’s Palette, drag TextViews, SeekBars and a View onto the colorDialogGridLayout node in the Outline window. Drag the items in the order they’re listed in Fig. 7.7 and set each item’s Id as shown in the figure.
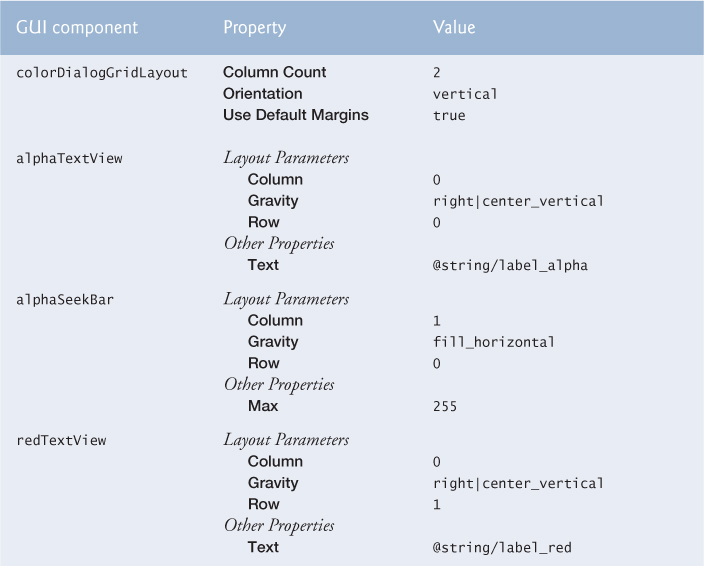
7. After completing Step 6, configure the GUI component properties with the values shown in Fig. 7.8, then save and close fragment_color.xml.


1. Right click the package com.deitel.doodlz in the project’s src folder and select New > Class to display the New Java Class dialog.
2. In the Name field, enter ColorDialogFragment.
3. In the Superclass field, change the superclass to android.app.DialogFragment.
4. Click Finish to create the class.
7.3.8. fragment_line_width.xml Layout for LineWidthDialogFragment
The fragment_line_width.xml layout for the LineWidthDialogFragment contains a GridLayout that displays a GUI for selecting and previewing a new line thickness. In this section, you’ll create LineWidthDialogFragment’s layout and the LineWidthDialogFragment class. To add the fragment_line_width.xml layout:
1. Expand the project’s res/layout node in the Package Explorer.
2. Right click the layout folder and select New > Android XML File to display the New Android XML File dialog.
3. In the dialog’s File field, enter fragment_line_width.xml
4. In the Root Element section, select GridLayout, then click Finish.
5. In the Outline window, select the GridLayout and change its Id value to @+id/lineWidthDialogGridLayout.
6. Using the Graphical Layout editor’s Palette, drag an ImageView and a SeekBar onto the lineWidthDialogGridLayout node in the Outline window so that the window appears as shown in Fig. 7.9. Set each item’s Id as shown in the figure.

7. After completing Step 6, configure the GUI component properties with the values shown in Fig. 7.10, then save and close fragment_line_width.xml.

Adding Class LineWidthDialogFragment to the Project
To add class LineWidthDialogFragment to the project:
1. Right click the package com.deitel.doodlz in the project’s src folder and select New > Class to display the New Java Class dialog.
2. In the Name field, enter LineWidthDialogFragment.
3. In the Superclass field, change the superclass to android.app.DialogFragment.
4. Click Finish to create the class.
7.3.9. Adding Class EraseImageDialogFragment
The EraseImageDialogFragment does not require a layout resource as it will display a simple AlertDialog containing text. To add class EraseImageDialogFragment to the project:
1. Right click the package com.deitel.doodlz in the project’s src folder and select New > Class to display the New Java Class dialog.
2. In the Name field, enter EraseImageDialogFragment.
3. In the Superclass field, change the superclass to android.app.DialogFragment.
4. Click Finish to create the class.
• MainActivity (Fig. 7.11)—Serves as the parent Activity for this app’s Fragments.
1 // MainActivity.java
2 // Sets MainActivity's layout
3 package com.deitel.doodlz;
4
5 import android.app.Activity;
6 import android.content.pm.ActivityInfo;
7 import android.content.res.Configuration;
8 import android.os.Bundle;
9
10 public class MainActivity extends Activity
11 {
12 @Override
13 protected void onCreate(Bundle savedInstanceState)
14 {
15 super.onCreate(savedInstanceState);
16 setContentView(R.layout.activity_main);
17
18 // determine screen size
19 int screenSize =
20 getResources().getConfiguration().screenLayout &
21 Configuration.SCREENLAYOUT_SIZE_MASK;
22
23 // use landscape for extra large tablets; otherwise, use portrait
24 if (screenSize == Configuration.SCREENLAYOUT_SIZE_XLARGE)
25 setRequestedOrientation(
26 ActivityInfo.SCREEN_ORIENTATION_LANDSCAPE);
27 else
28 setRequestedOrientation(
29 ActivityInfo.SCREEN_ORIENTATION_PORTRAIT);
30 }
31 } // end class MainActivity
Fig. 7.11 | MainActivity class.
• DoodleFragment (Section 7.5)—Manages the DoodleView and accelerometer event handling.
• DoodleView (Section 7.6)—Provides the drawing, saving and printing capabilities.
• ColorDialogFragment (Section 7.7)—A DialogFragment that’s displayed when the user taps COLOR to set the drawing color.
• LineWidthDialogFragment (Section 7.8)—A DialogFragment that’s displayed when the user taps LINE WIDTH to set the line width.
• EraseImageDialogFragment (Section 7.9)—A DialogFragment that’s displayed when the user taps CLEAR or shakes the device to erase the current drawing.
Class MainActivity’s onCreate method (Fig. 7.11) inflates the GUI (line 16), then uses the techniques you learned in Section 5.2.2 to determine the device’s size and set MainActivity’s orientation. If this app is running on an extra large device (line 24), we set the orientation to landscape (lines 25–26); otherwise, we set it to portrait (lines 28–29).
7.5. DoodleFragment Class
Class DoodleFragment (Figs. 7.12–7.19) displays the DoodleView (Section 7.6), manages the menu options displayed on the action bar and in the options menu and manages the sensor event handling for the app’s shake-to-erase feature.
1 // DoodleFragment.java
2 // Fragment in which the DoodleView is displayed
3 package com.deitel.doodlz;
4
5 import android.app.Fragment;
6 import android.content.Context;
7 import android.graphics.Color;
8 import android.hardware.Sensor;
9 import android.hardware.SensorEvent;
10 import android.hardware.SensorEventListener;
11 import android.hardware.SensorManager;
12 import android.os.Bundle;
13 import android.view.LayoutInflater;
14 import android.view.Menu;
15 import android.view.MenuInflater;
16 import android.view.MenuItem;
17 import android.view.View;
18 import android.view.ViewGroup;
19
20 public class DoodleFragment extends Fragment
21 {
22 private DoodleView doodleView; // handles touch events and draws
23 private float acceleration;
24 private float currentAcceleration;
25 private float lastAcceleration;
26 private boolean dialogOnScreen = false;
27
28 // value used to determine whether user shook the device to erase
29 private static final int ACCELERATION_THRESHOLD = 100000;
30
Fig. 7.12 | DoodleFragment class package statement, import statements and fields.
package Statement, import Statements and Fields
Section 7.2 discussed the key new classes and interfaces that class DoodleFragment uses. We’ve highlighted these classes and interfaces in Fig. 7.12. DoodleView variable doodleView (line 22) represents the drawing area. The float variables declared in lines 23–25 are used to calculate changes in the device’s acceleration to determine when a shake event occurs (so we can ask whether the user would like to erase the drawing), and the constant in line 29 is used to ensure that small movements are not interpreted as shakes—we picked this constant via trial and error by shaking the app on several devices. Line 26 defines a boolean variable with the default value false that will be used throughout this class to specify when there’s a dialog displayed on the screen. We use this to prevent multiple dialogs from being displayed at the same time—for example, if the Choose Color dialog is displayed and the user accidentally shakes the device, the dialog for erasing the image should not be displayed.
Overriding Fragment Method onCreateView
Method onCreateView (Fig. 7.13) inflates the DoodleFragment’s GUI and initializes the instance variables. Like an Activity, a Fragment can place items in the app’s action bar and options menu. To do so, the Fragment must call its setHasOptionsMenu method with the argument true. If the parent Activity also has options menu items, then both the Activity’s and the Fragment’s items will be placed on the action bar and in the options menu (based on their settings).
31 // called when Fragment's view needs to be created
32 @Override
33 public View onCreateView(LayoutInflater inflater, ViewGroup container,
34 Bundle savedInstanceState)
35 {
36 super.onCreateView(inflater, container, savedInstanceState);
37 View view =
38 inflater.inflate(R.layout.fragment_doodle, container, false);
39
40 setHasOptionsMenu(true); // this fragment has menu items to display
41
42 // get reference to the DoodleView
43 doodleView = (DoodleView) view.findViewById(R.id.doodleView);
44
45 // initialize acceleration values
46 acceleration = 0.00f;
47 currentAcceleration = SensorManager.GRAVITY_EARTH;
48 lastAcceleration = SensorManager.GRAVITY_EARTH;
49 return view;
50 }
51
Fig. 7.13 | Overriding Fragment method onCreateView.
Line 43 gets a reference to the DoodleView, then lines 46–48 initialize the instance variables that help calculate acceleration changes to determine whether the user shook the device. We initially set variables currentAcceleration and lastAcceleration to SensorManager’s GRAVITY_EARTH constant, which represents the acceleration due to gravity on earth. SensorManager also provides constants for other planets in the solar system, for the moon and for several other entertaining values, which you can see at:
Methods onStart and enableAccelerometerListening
Accelerometer listening should be enabled only when the DoodleFragment is on the screen. For this reason, we override Fragment lifecycle method onStart (Fig. 7.14, lines 53–58), which calls method enableAccelerometerListening (lines 61–72) to begin listening for accelerometer events. A SensorManager is used to register listeners for accelerometer events.
52 // start listening for sensor events
53 @Override
54 public void onStart()
55 {
56 super.onStart();
57 enableAccelerometerListening(); // listen for shake
58 }
59
60 // enable listening for accelerometer events
61 public void enableAccelerometerListening()
62 {
63 // get the SensorManager
64 SensorManager sensorManager =
65 (SensorManager) getActivity().getSystemService(
66 Context.SENSOR_SERVICE);
67
68 // register to listen for accelerometer events
69 sensorManager.registerListener(sensorEventListener,
70 sensorManager.getDefaultSensor(Sensor.TYPE_ACCELEROMETER),
71 SensorManager.SENSOR_DELAY_NORMAL);
72 }
73
Fig. 7.14 | Methods onStart and enableAccelerometerListening.
Method enableAccelerometerListening first uses Activity’s getSystemService method to retrieve the system’s SensorManager service, which enables the app to interact with the device’s sensors. Lines 69–71 then register to receive accelerometer events using SensorManager’s registerListener method, which receives three arguments:
• The SensorEventListener that responds to the events (defined in Fig. 7.16)
• A Sensor object representing the type of sensor data the app wishes to receive—this is retrieved by calling SensorManager’s getDefaultSensor method and passing a Sensor-type constant (Sensor.TYPE_ACCELEROMETER in this app).
• A rate at which sensor events should be delivered to the app. We chose SENSOR_DELAY_NORMAL to receive sensor events at the default rate—a faster rate can be used to get more accurate data, but this is also more CPU and battery intensive.
Methods onPause and disableAccelerometerListening
To ensure that accelerometer listening is disabled when the DoodleFragment is not on the screen, we override Fragment lifecycle method onPause (Fig. 7.15, lines 75–80), which calls method disableAccelerometerListening (lines 83–93). Method disableAccelerometerListening uses class SensorManager’s unregisterListener method to stop listening for accelerometer events.
74 // stop listening for sensor events
75 @Override
76 public void onPause()
77 {
78 super.onPause();
79 disableAccelerometerListening(); // stop listening for shake
80 }
81
82 // disable listening for accelerometer events
83 public void disableAccelerometerListening()
84 {
85 // get the SensorManager
86 SensorManager sensorManager =
87 (SensorManager) getActivity().getSystemService(
88 Context.SENSOR_SERVICE);
89
90 // stop listening for accelerometer events
91 sensorManager.unregisterListener(sensorEventListener,
92 sensorManager.getDefaultSensor(Sensor.TYPE_ACCELEROMETER));
93 }
94
Fig. 7.15 | Methods onPause and disableAccelerometerListening.
Anonymous Inner Class That Implements Interface SensorEventListener to Process Accelerometer Events
Figure 7.16 overrides SensorEventListener method onSensorChanged (lines 100–125) to process accelerometer events. If the user moves the device, this method determines whether the movement was enough to be considered a shake. If so, line 123 calls method confirmErase (Fig. 7.17) to display an EraseImageDialogFragment (Section 7.9) and confirm whether the user really wants to erase the image. Interface SensorEventListener also contains method onAccuracyChanged (lines 128–131)—we don’t use this method in this app, so we provide an empty body because the method is required by the interface.
95 // event handler for accelerometer events
96 private SensorEventListener sensorEventListener =
97 new SensorEventListener()
98 {
99 // use accelerometer to determine whether user shook device
100 @Override
101 public void onSensorChanged(SensorEvent event)
102 {
103 // ensure that other dialogs are not displayed
104 if (!dialogOnScreen)
105 {
106 // get x, y, and z values for the SensorEvent
107 float x = event.values[0];
108 float y = event.values[1];
109 float z = event.values[2];
110
111 // save previous acceleration value
112 lastAcceleration = currentAcceleration;
113
114 // calculate the current acceleration
115 currentAcceleration = x * x + y * y + z * z;
116
117 // calculate the change in acceleration
118 acceleration = currentAcceleration *
119 (currentAcceleration - lastAcceleration);
120
121 // if the acceleration is above a certain threshold
122 if (acceleration > ACCELERATION_THRESHOLD)
123 confirmErase();
124 }
125 } // end method onSensorChanged
126
127 // required method of interface SensorEventListener
128 @Override
129 public void onAccuracyChanged(Sensor sensor, int accuracy)
130 {
131 }
132 }; // end anonymous inner class
133
Fig. 7.16 | Anonymous inner class that implements interface SensorEventListener to process accelerometer events.
134 // confirm whether image should be erased
135 private void confirmErase()
136 {
137 EraseImageDialogFragment fragment = new EraseImageDialogFragment();
138 fragment.show(getFragmentManager(), "erase dialog");
139 }
140
Fig. 7.17 | Method confirmErase displays an EraseImageDialogFragment.
The user can shake the device even when dialogs are already displayed on the screen. For this reason, onSensorChanged first checks whether a dialog is displayed (line 104). This test ensures that no other dialogs are displayed; otherwise, onSensorChanged simply returns. This is important because the sensor events occur in a different thread of execution. Without this test, we’d be able to display the confirmation dialog for erasing the image when another dialog is on the screen.
The SensorEvent parameter contains information about the sensor change that occurred. For accelerometer events, this parameter’s values array contains three elements representing the acceleration (in meter/second2) in the x (left/right), y (up/down) and z (forward/backward) directions. A description and diagram of the coordinate system used by the SensorEvent API is available at:
This link also describes the real-world meanings for a SensorEvent’s x, y and z values for each different Sensor.
Lines 107–109 store the acceleration values. It’s important to handle sensor events quickly or to copy the event data (as we did here) because the array of sensor values is reused for each sensor event. Line 112 stores the last value of currentAcceleration. Line 115 sums the squares of the x, y and z acceleration values and stores them in currentAcceleration. Then, using the currentAcceleration and lastAcceleration values, we calculate a value (acceleration) that can be compared to our ACCELERATION_THRESHOLD constant. If the value is greater than the constant, the user moved the device enough for this app to consider the movement a shake. In this case, we call method confirmErase.
Method confirmErase
Method confirmErase (Fig. 7.17) simply creates an EraseImageDialogFragment (Section 7.9) and uses the DialogFragment method show to display it.
Overridden Fragment Methods onCreateOptionsMenu and onOptionsItemSelected
Figure 7.18 overrides Fragment’s onCreateOptionsMenu method (lines 142–147) to add the options to the method’s Menu argument using the method’s MenuInflater argument. When the user selects a menu item, Fragment method onOptionsItemSelected (lines 150–180) responds to the selection.
141 // display this fragment's menu items
142 @Override
143 public void onCreateOptionsMenu(Menu menu, MenuInflater inflater)
144 {
145 super.onCreateOptionsMenu(menu, inflater);
146 inflater.inflate(R.menu.doodle_fragment_menu, menu);
147 }
148
149 // handle choice from options menu
150 @Override
151 public boolean onOptionsItemSelected(MenuItem item)
152 {
153 // switch based on the MenuItem id
154 switch (item.getItemId())
155 {
156 case R.id.color:
157 ColorDialogFragment colorDialog = new ColorDialogFragment();
158 colorDialog.show(getFragmentManager(), "color dialog");
159 return true; // consume the menu event
160 case R.id.lineWidth:
161 LineWidthDialogFragment widthdialog =
162 new LineWidthDialogFragment();
163 widthdialog.show(getFragmentManager(), "line width dialog");
164 return true; // consume the menu event
165 case R.id.eraser:
166 doodleView.setDrawingColor(Color.WHITE); // line color white
167 return true; // consume the menu event
168 case R.id.clear:
169 confirmErase(); // confirm before erasing image
170 return true; // consume the menu event
171 case R.id.save:
172 doodleView.saveImage(); // save the current image
173 return true; // consume the menu event
174 case R.id.print:
175 doodleView.printImage(); // print the current images
176 return true; // consume the menu event
177 } // end switch
178
179 return super.onOptionsItemSelected(item); // call super's method
180 } // end method onOptionsItemSelected
181
Fig. 7.18 | Overridden Fragment methods onCreateOptionsMenu and onOptionsItemSelected.
We use the MenuItem argument’s getItemID method (line 154) to get the resource ID of the selected menu item, then take different actions based on the selection. The actions are as follows:
• For R.id.color, lines 157–158 create and show a ColorDialogFragment (Section 7.7) to allow the user to select a new drawing color.
• For R.id.lineWidth, lines 161–163 create and show a LineWidthDialogFragment (Section 7.8) to allow the user to select a new drawing color.
• For R.id.eraser, line 166 sets the doodleView’s drawing color to white, which effectively turns the user’s fingers into erasers.
• For R.id.clear, line 169 calls method confirmErase (Fig. 7.17) to display an EraseImageDialogFragment (Section 7.9) and confirm whether the user really wants to erase the image.
• For R.id.save, line 172 calls doodleView’s saveImage method to save the painting as an image stored in the device’s Gallery.
• For R.id.print, line 175 calls doodleView’s printImage method to allow the user to save the image as a PDF or to print the image.
Methods getDoodleView and setDialogOnScreen
Methods getDoodleView and setDialogOnScreen (Fig. 7.19) are called by methods of the app’s DialogFragment subclasses. Method getDoodleView returns a reference to this Fragment’s DoodleView so that a DialogFragment can set the drawing color, set the line width or clear the image. Method setDialogOnScreen is called by Fragment lifecycle methods of the app’s DialogFragment subclasses to indicate when a dialog is on the screen.
182 // returns the DoodleView
183 public DoodleView getDoodleView()
184 {
185 return doodleView;
186 }
187
188 // indicates whether a dialog is displayed
189 public void setDialogOnScreen(boolean visible)
190 {
191 dialogOnScreen = visible;
192 }
193 }
Fig. 7.19 | Methods getDoodleView and setDialogOnScreen.
7.6. DoodleView Class
The DoodleView class (Figs. 7.20–7.33) processes the user’s touches and draws the corresponding lines.
1 // DoodleView.java
2 // Main View for the Doodlz app.
3 package com.deitel.doodlz;
4
5 import java.util.HashMap;
6 import java.util.Map;
7
8 import android.content.Context;
9 import android.graphics.Bitmap;
10 import android.graphics.Canvas;
11 import android.graphics.Color;
12 import android.graphics.Paint;
13 import android.graphics.Path;
14 import android.graphics.Point;
15 import android.os.Build;
16 import android.provider.MediaStore;
17 import android.support.v4.print.PrintHelper;
18 import android.util.AttributeSet;
19 import android.view.GestureDetector;
20 import android.view.GestureDetector.SimpleOnGestureListener;
21 import android.view.Gravity;
22 import android.view.MotionEvent;
23 import android.view.View;
24 import android.widget.Toast;
25
Fig. 7.20 | DooldleView package statement and import statements.
DooldleView package Statement and import Statements
Figure 7.20 lists class DoodleView’s package statement, import statements and fields. The new classes and interfaces are highlighted here. Many of these were discussed in Section 7.2 and the rest are discussed as we use them throughout class DoodleView.
DoodleView static and Instance Variables
Class DoodleView’s static and instance variables (Fig. 7.21, lines 30–43) are used to manage the data for the set of lines that the user is currently drawing and to draw those lines. Line 38 creates the pathMap, which maps each finger ID (known as a pointer) to a corresponding Path object for the lines currently being drawn. Lines 39–40 create the previousPointMap, which maintains the last point for each finger—as each finger moves, we draw a line from its current point to its previous point. We discuss the other fields as we use them in class DoodleView.
26 // the main screen that is painted
27 public class DoodleView extends View
28 {
29 // used to determine whether user moved a finger enough to draw again
30 private static final float TOUCH_TOLERANCE = 10;
31
32 private Bitmap bitmap; // drawing area for display or saving
33 private Canvas bitmapCanvas; // used to draw on bitmap
34 private final Paint paintScreen; // used to draw bitmap onto screen
35 private final Paint paintLine; // used to draw lines onto bitmap
36
37 // Maps of current Paths being drawn and Points in those Paths
38 private final Map<Integer, Path> pathMap = new HashMap<Integer, Path>();
39 private final Map<Integer, Point> previousPointMap =
40 new HashMap<Integer, Point>();
41
42 // used to hide/show system bars
43 private GestureDetector singleTapDetector;
44
Fig. 7.21 | DoodleView static and instance variables.
DoodleView Constructor
The constructor (Fig. 7.22) initializes several of the class’s instance variables—the two Maps are initialized in their declarations in Fig. 7.21. Line 49 creates the Paint object paintScreen that will be used to display the user’s drawing on the screen and line 52 creates the Paint object paintLine that specifies the settings for the line(s) the user is currently drawing. Lines 53–57 specify the settings for the paintLine object. We pass true to Paint’s setAntiAlias method to enable anti-aliasing which smooths the edges of the lines. Next, we set the Paint’s style to Paint.Style.STROKE with Paint’s setStyle method. The style can be STROKE, FILL or FILL_AND_STROKE for a line, a filled shape without a border and a filled shape with a border, respectively. The default option is Paint.Style.FILL. We set the line’s width using Paint’s setStrokeWidth method. This sets the app’s default line width to five pixels. We also use Paint’s setStrokeCap method to round the ends of the lines with Paint.Cap.ROUND. Lines 60–61 create a GestureDetector that uses the singleTapListener to check for single-tap events.
45 // DoodleView constructor initializes the DoodleView
46 public DoodleView(Context context, AttributeSet attrs)
47 {
48 super(context, attrs); // pass context to View's constructor
49 paintScreen = new Paint(); // used to display bitmap onto screen
50
51 // set the initial display settings for the painted line
52 paintLine = new Paint();
53 paintLine.setAntiAlias(true); // smooth edges of drawn line
54 paintLine.setColor(Color.BLACK); // default color is black
55 paintLine.setStyle(Paint.Style.STROKE); // solid line
56 paintLine.setStrokeWidth(5); // set the default line width
57 paintLine.setStrokeCap(Paint.Cap.ROUND); // rounded line ends
58
59 // GestureDetector for single taps
60 singleTapDetector =
61 new GestureDetector(getContext(), singleTapListener);
62 }
63
Fig. 7.22 | DoodleView constructor.
Overridden View Method onSizeChanged
The DoodleView’s size is not determined until it’s inflated and added to the MainActivity’s View hierarchy; therefore, we can’t determine the size of the drawing Bitmap in onCreate. So, we override View method onSizeChanged (Fig. 7.23), which is called when the DoodleView’s size changes—e.g., when it’s added to an Activity’s View hierarchy or when the user rotates the device. In this app, onSizeChanged is called only when the DoodleView is added to the Doodlz Activity’s View hierarchy, because the app always displays in portrait on phones and small tablets, and in landscape on large tablets.
64 // Method onSizeChanged creates Bitmap and Canvas after app displays
65 @Override
66 public void onSizeChanged(int w, int h, int oldW, int oldH)
67 {
68 bitmap = Bitmap.createBitmap(getWidth(), getHeight(),
69 Bitmap.Config.ARGB_8888);
70 bitmapCanvas = new Canvas(bitmap);
71 bitmap.eraseColor(Color.WHITE); // erase the Bitmap with white
72 }
73
Fig. 7.23 | Overridden View method onSizeChanged.
Bitmap’s static createBitmap method creates a Bitmap of the specified width and height—here we use the DoodleView’s width and height as the Bitmap’s dimensions. The last argument to createBitmap is the Bitmap’s encoding, which specifies how each pixel in the Bitmap is stored. The constant Bitmap.Config.ARGB_8888 indicates that each pixel’s color is stored in four bytes (one byte each for the alpha, red, green and blue values) of the pixel’s color. Next, we create a new Canvas that’s used to draw shapes directly to the Bitmap. Finally, we use Bitmap’s eraseColor method to fill the Bitmap with white pixels—the default Bitmap background is black.
DoodleView Methods clear, setDrawingColor, getDrawingColor, setLineWidth and getLineWidth
Figure 7.24 defines methods clear (lines 75–81), setDrawingColor (lines 84–87), getDrawingColor (lines 90–93), setLineWidth (lines 96–99) and getLineWidth (lines 102–105), which are called from the DoodleFragment. Method clear, which we use in the EraseImageDialogFragment, empties the pathMap and previousPointMap, erases the Bitmap by setting all of its pixels to white, then calls the inherited View method invalidate to indicate that the View needs to be redrawn. Then, the system automatically determines when the View’s onDraw method should be called. Method setDrawingColor changes the current drawing color by setting the color of the Paint object paintLine. Paint’s setColor method receives an int that represents the new color in ARGB format. Method getDrawingColor returns the current color, which we use in the ColorDialogFragment. Method setLineWidth sets paintLine’s stroke width to the specified number of pixels. Method getLineWidth returns the current stroke width, which we use in the LineWidthDialogFragment.
74 // clear the painting
75 public void clear()
76 {
77 pathMap.clear(); // remove all paths
78 previousPointMap.clear(); // remove all previous points
79 bitmap.eraseColor(Color.WHITE); // clear the bitmap
80 invalidate(); // refresh the screen
81 }
82
83 // set the painted line's color
84 public void setDrawingColor(int color)
85 {
86 paintLine.setColor(color);
87 }
88
89 // return the painted line's color
90 public int getDrawingColor()
91 {
92 return paintLine.getColor();
93 }
94
95 // set the painted line's width
96 public void setLineWidth(int width)
97 {
98 paintLine.setStrokeWidth(width);
99 }
100
101 // return the painted line's width
102 public int getLineWidth()
103 {
104 return (int) paintLine.getStrokeWidth();
105 }
106
Fig. 7.24 | DoodleView methods clear, setDrawingColor, getDrawingColor, setLineWidth and getLineWidth.
Overridden View Method onDraw
When a View needs to be redrawn, its onDraw method is called. Figure 7.25 overrides onDraw to display bitmap (the Bitmap that contains the drawing) on the DoodleView by calling the Canvas argument’s drawBitmap method. The first argument is the Bitmap to draw, the next two arguments are the x-y coordinates where the upper-left corner of the Bitmap should be placed on the View and the last argument is the Paint object that specifies the drawing characteristics. Lines 115–116 then loop through and display the Paths that are currently being drawn. For each Integer key in the pathMap, we pass the corresponding Path to Canvas’s drawPath method to draw the Path using the paintLine object, which defines the line width and color.
107 // called each time this View is drawn
108 @Override
109 protected void onDraw(Canvas canvas)
110 {
111 // draw the background screen
112 canvas.drawBitmap(bitmap, 0, 0, paintScreen);
113
114 // for each path currently being drawn
115 for (Integer key : pathMap.keySet())
116 canvas.drawPath(pathMap.get(key), paintLine); // draw line
117 }
118
Fig. 7.25 | Overridden View method onDraw.
DoodleView Methods hideSystemBars and showSystemBars
This app uses Android 4.4’s new immersive mode to allow users to draw on the entire screen. When the user taps the screen, a GestureDetector’s SimplyOnGestureListener (Fig. 7.27) determines whether the system bars and action bar are displayed. If so, method hideSystemBars (Fig. 7.26, lines 120–130) is called; otherwise, method showSystemBars (Fig. 7.26, lines 133–140) is called. For this app, we enable immersive mode only for Android 4.4. So, both methods first check whether the version of Android running on the device—Build.VERSION_SDK_INT—is greater than or equal to the constant for Android 4.4 (API level 19)—Build.VERSION_CODES_KITKAT. If so, both methods use View method setSystemUiVisibility to configure the system bars and action bar. To hide the system bars and action bar and place the UI into immersive mode, you pass to setSystemUiVisibility the constants that are combined via the bitwise OR (|) operator in lines 124–129. To show the system bars and action bar, you pass to setSystemUiVisibility the constants that are combined in lines 137–139. These combinations of View constants ensure that the DoodleView is not resized each time the system bars and action bar are hidden and redisplayed. Instead, the system bars and action bar overlay the DoodleView—that is, part of the DoodleView is temporarily hidden when the system bars and action bar are on the screen. The constant View.SYSTEM_UI_FLAG_IMMERSIVE is new in Android 4.4. For more information on immersive mode, visit:
119 // hide system bars and action bar
120 public void hideSystemBars()
121 {
122 if (Build.VERSION.SDK_INT >= Build.VERSION_CODES.KITKAT)
123 setSystemUiVisibility(
124 View.SYSTEM_UI_FLAG_LAYOUT_STABLE |
125 View.SYSTEM_UI_FLAG_LAYOUT_HIDE_NAVIGATION |
126 View.SYSTEM_UI_FLAG_LAYOUT_FULLSCREEN |
127 View.SYSTEM_UI_FLAG_HIDE_NAVIGATION |
128 View.SYSTEM_UI_FLAG_FULLSCREEN |
129 View.SYSTEM_UI_FLAG_IMMERSIVE);
130 }
131
132 // show system bars and action bar
133 public void showSystemBars()
134 {
135 if (Build.VERSION.SDK_INT >= Build.VERSION_CODES.KITKAT)
136 setSystemUiVisibility(
137 View.SYSTEM_UI_FLAG_LAYOUT_STABLE |
138 View.SYSTEM_UI_FLAG_LAYOUT_HIDE_NAVIGATION |
139 View.SYSTEM_UI_FLAG_LAYOUT_FULLSCREEN);
140 }
141
Fig. 7.26 | DoodleView methods hideSystemBars and showSystemBars.
Anonymous Inner Class that Implements Interface SimpleOnGestureListener
Figure 7.27 creates the SimpleOnGestureListener named singleTapListener, which was registered at lines 60–61 (Fig. 7.14) with the GestureDetector. Recall that SimpleOnGestureListener is an adapter class that implements interfaces OnGestureListener and OnDoubleTapListener. The methods simply return false—indicating that the events were not handled. We override only the onSingleTap method (lines 146–155), which is called when the user taps the screen. We determine whether the system bars and app bar are displayed (lines 149–150) by calling method View method getSystemUiVisibilty and combining its result with the constant View.SYSTEM_UI_FLAG_HIDE_NAVIGATION. If the result is 0, the system bars and app bar are currently displayed, so we call method hideSystemBars; otherwise, we call showSystemBars. Returning true indicates that the single-tap event has been handled.
142 // create SimpleOnGestureListener for single tap events
143 private SimpleOnGestureListener singleTapListener =
144 new SimpleOnGestureListener()
145 {
146 @Override
147 public boolean onSingleTapUp(MotionEvent e)
148 {
149 if ((getSystemUiVisibility() &
150 View.SYSTEM_UI_FLAG_HIDE_NAVIGATION) == 0)
151 hideSystemBars();
152 else
153 showSystemBars();
154 return true;
155 }
156 };
157
Fig. 7.27 | Anonymous inner class that implements interface SimpleOnGestureListener.
Overridden View Method onTouchEvent
Method onTouchEvent (Fig. 7.28) is called when the View receives a touch event. Android supports multitouch—that is, having multiple fingers touching the screen. At any time, the user can touch the screen with more fingers or remove fingers from the screen. For this reason, each finger—known as a pointer—has a unique ID that identifies it across touch events. We’ll use that ID to locate the corresponding Path objects that represent each line currently being drawn. These Paths are stored in pathMap.
158 // handle touch event
159 @Override
160 public boolean onTouchEvent(MotionEvent event)
161 {
162 // get the event type and the ID of the pointer that caused the event
163 // if a single tap event occurred on KitKat or higher device
164 if (singleTapDetector.onTouchEvent(event)
)
165 return true;
166
167 int action = event.getActionMasked(); // event type
168 int actionIndex = event.getActionIndex(); // pointer (i.e., finger)
169
170 // determine whether touch started, ended or is moving
171 if (action == MotionEvent.ACTION_DOWN ||
172 action == MotionEvent.ACTION_POINTER_DOWN)
173 {
174 touchStarted(event.getX(actionIndex), event.getY(actionIndex),
175 event.getPointerId(actionIndex));
176 }
177 else if (action == MotionEvent.ACTION_UP ||
178 action == MotionEvent.ACTION_POINTER_UP)
179 {
180 touchEnded(event.getPointerId(actionIndex));
181 }
182 else
183 {
184 touchMoved(event);
185 }
186
187 invalidate(); // redraw
188 return true;
189 } // end method onTouchEvent
190
Fig. 7.28 | Overridden View method onTouchEvent.
When a touch event occurs, line 164 calls the GestureDetector (singleTapDetector) method onTouchEvent to first determine if the touch event was a tap to hide or show the system bars and app bar. If the motion event was a tap, the method returns immediately.
MotionEvent’s getActionMasked method (line 167) returns an int representing the MotionEvent type, which you can use with constants from class MotionEvent to determine how to handle each event. MotionEvent’s getActionIndex method (line 168) returns an integer index representing which finger caused the event. This index is not the finger’s unique ID—it’s simply the index at which that finger’s information is located in this MotionEvent object. To get the finger’s unique ID that persists across MotionEvents until the user removes that finger from the screen, we’ll use MotionEvent’s getPointerID method (lines 175 and 180), passing the finger index as an argument.
If the action is MotionEvent.ACTION_DOWN or MotionEvent.ACTION_POINTER_DOWN (lines 171–172), the user touched the screen with a new finger. The first finger to touch the screen generates a MotionEvent.ACTION_DOWN event, and all other fingers generate MotionEvent.ACTION_POINTER_DOWN events. For these cases, we call the touchStarted method (Fig. 7.29) to store the initial coordinates of the touch. If the action is MotionEvent.ACTION_UP or MotionEvent.ACTION_POINTER_UP, the user removed a finger from the screen, so we call method touchEnded (Fig. 7.31) to draw the completed Path to the bitmap so that we have a permanent record of that Path. For all other touch events, we call method touchMoved (Fig. 7.30) to draw the lines. After the event is processed, line 187 calls the inherited View method invalidate to redraw the screen, and line 188 returns true to indicate that the event has been processed.
191 // called when the user touches the screen
192 private void touchStarted(float x, float y, int lineID)
193 {
194 Path path; // used to store the path for the given touch id
195 Point point; // used to store the last point in path
196
197 // if there is already a path for lineID
198 if (pathMap.containsKey(lineID))
199 {
200 path = pathMap.get(lineID); // get the Path
201 path.reset(); // reset the Path because a new touch has started
202 point = previousPointMap.get(lineID); // get Path's last point
203 }
204 else
205 {
206 path = new Path();
207 pathMap.put(lineID, path); // add the Path to Map
208 point = new Point(); // create a new Point
209 previousPointMap.put(lineID, point); // add the Point to the Map
210 }
211
212 // move to the coordinates of the touch
213 path.moveTo(x, y);
214 point.x = (int) x;
215 point.y = (int) y;
216 } // end method touchStarted
217
Fig. 7.29 | touchStarted method of class DoodleView.
touchStarted Method of Class DoodleView
The touchStarted method (Fig. 7.29) is called when a finger first touches the screen. The coordinates of the touch and its ID are supplied as arguments. If a Path already exists for the given ID (line 198), we call Path’s reset method to clear any existing points so we can reuse the Path for a new stroke. Otherwise, we create a new Path, add it to pathMap, then add a new Point to the previousPointMap. Lines 213–215 call Path’s moveTo method to set the Path’s starting coordinates and specify the new Point’s x and y values.
touchMoved Method of Class DoodleView
The touchMoved method (Fig. 7.30) is called when the user moves one or more fingers across the screen. The system MotionEvent passed from onTouchEvent contains touch information for multiple moves on the screen if they occur at the same time. MotionEvent method getPointerCount (line 222) returns the number of touches this MotionEvent describes. For each, we store the finger’s ID (line 225) in pointerID, and store the finger’s corresponding index in this MotionEvent (line 226) in pointerIndex. Then we check whether there’s a corresponding Path in the pathMap HashMap (line 229). If so, we use MotionEvent’s getX and getY methods to get the last coordinates for this drag event for the specified pointerIndex. We get the corresponding Path and last Point for the pointerID from each respective HashMap, then calculate the difference between the last point and the current point—we want to update the Path only if the user has moved a distance that’s greater than our TOUCH_TOLERANCE constant. We do this because many devices are sensitive enough to generate MotionEvents indicating small movements when the user is attempting to hold a finger motionless on the screen. If the user moved a finger further than the TOUCH_TOLERANCE, we use Path’s quadTo method (lines 248–249) to add a geometric curve (specifically a quadratic Bezier curve) from the previous Point to the new Point. We then update the most recent Point for that finger.
218 // called when the user drags along the screen
219 private void touchMoved(MotionEvent event)
220 {
221 // for each of the pointers in the given MotionEvent
222 for (int i = 0; i < event.getPointerCount(); i++)
223 {
224 // get the pointer ID and pointer index
225 int pointerID = event.getPointerId(i)
;
226 int pointerIndex = event.findPointerIndex(pointerID);
227
228 // if there is a path associated with the pointer
229 if (pathMap.containsKey(pointerID))
230 {
231 // get the new coordinates for the pointer
232 float newX = event.getX(pointerIndex);
233 float newY = event.getY(pointerIndex);
234
235 // get the Path and previous Point associated with
236 // this pointer
237 Path path = pathMap.get(pointerID);
238 Point point = previousPointMap.get(pointerID);
239
240 // calculate how far the user moved from the last update
241 float deltaX = Math.abs(newX - point.x);
242 float deltaY = Math.abs(newY - point.y);
243
244 // if the distance is significant enough to matter
245 if (deltaX >= TOUCH_TOLERANCE || deltaY >= TOUCH_TOLERANCE)
246 {
247 // move the path to the new location
248 path.quadTo(point.x, point.y, (newX + point.x) / 2,
249 (newY + point.y) / 2);
250
251 // store the new coordinates
252 point.x = (int) newX;
253 point.y = (int) newY;
254 }
255 }
256 }
257 } // end method touchMoved
258
Fig. 7.30 | touchMoved method of class DoodleView.
touchEnded Method of Class DoodleView
The touchEnded method (Fig. 7.31) is called when the user lifts a finger from the screen. The method receives the ID of the finger (lineID) for which the touch just ended as an argument. Line 262 gets the corresponding Path. Line 263 calls the bitmapCanvas’s draw-Path method to draw the Path on the Bitmap object named bitmap before we call Path’s reset method to clear the Path. Resetting the Path does not erase its corresponding painted line from the screen, because those lines have already been drawn to the bitmap that’s displayed to the screen. The lines that are currently being drawn by the user are displayed on top of that bitmap.
259 // called when the user finishes a touch
260 private void touchEnded(int lineID)
261 {
262 Path path = pathMap.get(lineID); // get the corresponding Path
263 bitmapCanvas.drawPath(path, paintLine); // draw to bitmapCanvas
264 path.reset(); // reset the Path
265 }
266
Fig. 7.31 | touchEnded method of class DoodleView.
DoodleView Method saveImage
Method saveImage (Fig. 7.32) saves the current drawing to a file in the device’s gallery. Line 271 creates a filename for the image, then lines 274–276 store the image in the device’s Gallery by calling class MediaStore.Images.Media’s insertImage method. The method receives four arguments:
• a ContentResolver that the method uses to locate where the image should be stored on the device
• the Bitmap to store
• the name of the image
• a description of the image
267 // save the current image to the Gallery
268 public void saveImage()
269 {
270 // use "Doodlz" followed by current time as the image name
271 String name = "Doodlz" + System.currentTimeMillis() + ".jpg";
272
273 // insert the image in the device's gallery
274 String location = MediaStore.Images.Media.insertImage(
275 getContext().getContentResolver(), bitmap, name,
276 "Doodlz Drawing");
277
278 if (location != null) // image was saved
279 {
280 // display a message indicating that the image was saved
281 Toast message = Toast.makeText(getContext(),
282 R.string.message_saved, Toast.LENGTH_SHORT);
283 message.setGravity(Gravity.CENTER, message.getXOffset() / 2,
284 message.getYOffset() / 2);
285 message.show();
286 }
287 else
288 {
289 // display a message indicating that the image was saved
290 Toast message = Toast.makeText(getContext(),
291 R.string.message_error_saving, Toast.LENGTH_SHORT);
292 message.setGravity(Gravity.CENTER, message.getXOffset() / 2,
293 message.getYOffset() / 2);
294 message.show();
295 }
296 } // end method saveImage
297
Fig. 7.32 | DoodleView method saveImage.
Method insertImage returns a String representing the image’s location on the device, or null if the image could not be saved. Lines 278–295 check whether the image was saved and display an appropriate Toast.
DoodleView Method printImage
On Android 4.4 and higher devices, method printImage (Fig. 7.33) uses the Android Support Library’s PrintHelper class to print the current drawing. Line 301 first confirms that printing support is available on the device. If so, line 304 creates a PrintHelper object. Next, line 307 specifies the image’s scale mode—PrintHelper.SCALE_MODE_FIT indicates that the image should fit within the printable area of the paper. There’s also the scale mode PrintHelper.SCALE_MODE_FILL, which causes the image to fill the paper, possibly cutting off a portion of the image. Finally, line 308 calls PrintHelper method printBitmap, passing as arguments the print job name (used by the printer to identify the print) and the Bitmap containing the image to print. This displays Android’s print dialog, which allows the user to choose whether to save the image as a PDF document on the device or to print the image to an available printer.
298 // print the current image
299 public void printImage()
300 {
301 if (PrintHelper.systemSupportsPrint() )
302 {
303 // use Android Support Library's PrintHelper to print image
304 PrintHelper printHelper = new PrintHelper(getContext());
305
306 // fit image in page bounds and print the image
307 printHelper.setScaleMode(PrintHelper.SCALE_MODE_FIT);
308 printHelper.printBitmap("Doodlz Image", bitmap);
309 }
310 else
311 {
312 // display message indicating that system does not allow printing
313 Toast message = Toast.makeText(getContext(),
314 R.string.message_error_printing, Toast.LENGTH_SHORT);
315 message.setGravity(Gravity.CENTER, message.getXOffset() / 2,
316 message.getYOffset() / 2);
317 message.show();
318 }
319 }
320 } // end class DoodleView
Fig. 7.33 | DoodleView method printImage.
7.7. ColorDialogFragment Class
Class ColorDialogFragment (Figs. 7.34–7.38) extends DialogFragment to create an AlertDialog for setting the drawing color. The class’s instance variables (lines 19–24) are used to reference the GUI controls for selecting the new color, displaying a preview of it and storing the color as a 32-bit int value that represents the color’s ARGB values.
1 // ColorDialogFragment.java
2 // Allows user to set the drawing color on the DoodleView
3 package com.deitel.doodlz;
4
5 import android.app.Activity;
6 import android.app.AlertDialog;
7 import android.app.Dialog;
8 import android.app.DialogFragment;
9 import android.content.DialogInterface;
10 import android.graphics.Color;
11 import android.os.Bundle;
12 import android.view.View;
13 import android.widget.SeekBar;
14 import android.widget.SeekBar.OnSeekBarChangeListener;
15
16 // class for the Select Color dialog
17 public class ColorDialogFragment extends DialogFragment
18 {
19 private SeekBar alphaSeekBar;
20 private SeekBar redSeekBar;
21 private SeekBar greenSeekBar;
22 private SeekBar blueSeekBar;
23 private View colorView;
24 private int color;
25
Fig. 7.34 | ColorDialogFragment’s package statement, import statements and instance variables.
Overridden DialogFragment Method onCreateDialog
Method onCreateDialog (Fig. 7.35) inflates the custom View (lines 32–34) defined by fragment_color.xml containing the GUI for selecting a color, then attaches that View to the AlertDialog by calling AlertDialog.Builder’s setView method (line 35). Lines 42–50 get references to the dialog’s SeekBars and colorView. Next, lines 53–56 register colorChangedListener (Fig. 7.38) as the listener for the SeekBars’ events.
26 // create an AlertDialog and return it
27 @Override
28 public Dialog onCreateDialog(Bundle bundle)
29 {
30 AlertDialog.Builder builder =
31 new AlertDialog.Builder(getActivity());
32 View colorDialogView =
33 getActivity().getLayoutInflater().inflate(
34 R.layout.fragment_color, null);
35 builder.setView(colorDialogView); // add GUI to dialog
36
37 // set the AlertDialog's message
38 builder.setTitle(R.string.title_color_dialog);
39 builder.setCancelable(true);
40
41 // get the color SeekBars and set their onChange listeners
42 alphaSeekBar = (SeekBar) colorDialogView.findViewById(
43 R.id.alphaSeekBar);
44 redSeekBar = (SeekBar) colorDialogView.findViewById(
45 R.id.redSeekBar);
46 greenSeekBar = (SeekBar) colorDialogView.findViewById(
47 R.id.greenSeekBar);
48 blueSeekBar = (SeekBar) colorDialogView.findViewById(
49 R.id.blueSeekBar);
50 colorView = colorDialogView.findViewById(R.id.colorView);
51
52 // register SeekBar event listeners
53 alphaSeekBar.setOnSeekBarChangeListener(colorChangedListener);
54 redSeekBar.setOnSeekBarChangeListener(colorChangedListener);
55 greenSeekBar.setOnSeekBarChangeListener(colorChangedListener);
56 blueSeekBar.setOnSeekBarChangeListener(colorChangedListener);
57
58 // use current drawing color to set SeekBar values
59 final DoodleView doodleView = getDoodleFragment().getDoodleView();
60 color = doodleView.getDrawingColor();
61 alphaSeekBar.setProgress(Color.alpha(color));
62 redSeekBar.setProgress(Color.red(color));
63 greenSeekBar.setProgress(Color.green(color));
64 blueSeekBar.setProgress(Color.blue(color));
65
66 // add Set Color Button
67 builder.setPositiveButton(R.string.button_set_color,
68 new DialogInterface.OnClickListener()
69 {
70 public void onClick(DialogInterface dialog, int id)
71 {
72 doodleView.setDrawingColor(color);
73 }
74 }
75 ); // end call to setPositiveButton
76
77 return builder.create(); // return dialog
78 } // end method onCreateDialog
79
Fig. 7.35 | Overridden DialogFragment method onCreateDialog.
Line 59 calls method getDoodleFragment (Fig. 7.36) to get a reference to the DoodleFragment, then calls the DoodleFragment’s getDoodleView method to get the DoodleView. Lines 60–64 get the DoodleView’s current drawing color, then use it to set each SeekBar’s value. Color’s static methods alpha, red, green and blue extract the ARGB values from the color, and SeekBar’s setProgress method positions the thumbs. Lines 67–75 configure the AlertDialog’s positive button to set the DoodleView’s new drawing color. Line 77 returns the AlertDialog.
Method getDoodleFragment
Method getDoodleFragment (Fig. 7.36) simply uses the FragmentManager to get a reference to the DoodleFragment.
80 // gets a reference to the DoodleFragment
81 private DoodleFragment getDoodleFragment()
82 {
83 return (DoodleFragment) getFragmentManager().findFragmentById(
84 R.id.doodleFragment);
85 }
86
Fig. 7.36 | Method getDoodleFragment.
Overridden Fragment Lifecycle Methods onAttach and onDetach
When the ColorDialogFragment is added to a parent Activity, method onAttach (Fig. 7.37, lines 88–96) is called. Line 92 gets a reference to the DoodleFragment. If that reference is not null, line 95 calls DoodleFragment’s setDialogOnScreen method to indicate that the Choose Color dialog is now displayed. When the ColorDialogFragment is removed from a parent Activity, method onDetach (lines 99–107) is called. Line 106 calls DoodleFragment’s setDialogOnScreen method to indicate that the Choose Color dialog is no longer on the screen.
87 // tell DoodleFragment that dialog is now displayed
88 @Override
89 public void onAttach(Activity activity)
90 {
91 super.onAttach(activity);
92 DoodleFragment fragment = getDoodleFragment();
93
94 if (fragment != null)
95 fragment.setDialogOnScreen(true);
96 }
97
98 // tell DoodleFragment that dialog is no longer displayed
99 @Override
100 public void onDetach()
101 {
102 super.onDetach();
103 DoodleFragment fragment = getDoodleFragment();
104
105 if (fragment != null)
106 fragment.setDialogOnScreen(false);
107 }
108
Fig. 7.37 | Overridden Fragment lifecycle methods onAttach and onDetach.
Anonymous Inner Class That Implements Interface OnSeekBarChangeListener to Respond to the Events of the Alpha, Red, Green and Blue SeekBars
Figure 7.38 defines an anonymous inner class that implements interface OnSeekBarChangeListener to respond to events when the user adjusts the SeekBars in the Choose Color Dialog. This was registered as the SeekBars’ event handler in Fig. 7.35 (lines 53–56). Method onProgressChanged (lines 115–123) is called when the position of a SeekBar’s thumb changes. If the user moved a SeekBar’s thumb (line 118), lines 119–121 store the new color. Class Color’s static method argb combines the SeekBars’ values into a Color and returns the appropriate color as an int. We then use class View’s setBackgroundColor method to update the colorView with a color that matches the current state of the SeekBars.
109 // OnSeekBarChangeListener for the SeekBars in the color dialog
110 private OnSeekBarChangeListener colorChangedListener =
111 new OnSeekBarChangeListener()
112 {
113 // display the updated color
114 @Override
115 public void onProgressChanged(SeekBar seekBar, int progress,
116 boolean fromUser)
117 {
118 if (fromUser) // user, not program, changed SeekBar progress
119 color = Color.argb(alphaSeekBar.getProgress(),
120 redSeekBar.getProgress(), greenSeekBar.getProgress(),
121 blueSeekBar.getProgress());
122 colorView.setBackgroundColor(color);
123 }
124
125 @Override
126 public void onStartTrackingTouch(SeekBar seekBar) // required
127 {
128 }
129
130 @Override
131 public void onStopTrackingTouch(SeekBar seekBar) // required
132 {
133 }
134 }; // end colorChanged
135 } // end class ColorDialogFragment
Fig. 7.38 | Anonymous inner class that implements interface OnSeekBarChangeListener to respond to the events of the alpha, red, green and blue SeekBars.
7.8. LineWidthDialogFragment Class
Class LineWidthDialogFragment (Fig. 7.39) extends DialogFragment to create an AlertDialog for setting the line width. The class is similar to class ColorDialogFragment, so we discuss only the key differences here. The class’s only instance variable is an ImageView (line 22) in which we draw a line showing the current line-width setting.
1 // LineWidthDialogFragment.java
2 // Allows user to set the drawing color on the DoodleView
3 package com.deitel.doodlz;
4
5 import android.app.Activity;
6 import android.app.AlertDialog;
7 import android.app.Dialog;
8 import android.app.DialogFragment;
9 import android.content.DialogInterface;
10 import android.graphics.Bitmap;
11 import android.graphics.Canvas;
12 import android.graphics.Paint;
13 import android.os.Bundle;
14 import android.view.View;
15 import android.widget.ImageView;
16 import android.widget.SeekBar;
17 import android.widget.SeekBar.OnSeekBarChangeListener;
18
19 // class for the Select Color dialog
20 public class LineWidthDialogFragment extends DialogFragment
21 {
22 private ImageView widthImageView;
23
24 // create an AlertDialog and return it
25 @Override
26 public Dialog onCreateDialog(Bundle bundle)
27 {
28 AlertDialog.Builder builder =
29 new AlertDialog.Builder(getActivity());
30 View lineWidthDialogView = getActivity().getLayoutInflater().inflate(
31 R.layout.fragment_line_width, null);
32 builder.setView(lineWidthDialogView); // add GUI to dialog
33
34 // set the AlertDialog's message
35 builder.setTitle(R.string.title_line_width_dialog);
36 builder.setCancelable(true);
37
38 // get the ImageView
39 widthImageView = (ImageView) lineWidthDialogView.findViewById(
40 R.id.widthImageView);
41
42 // configure widthSeekBar
43 final DoodleView doodleView = getDoodleFragment().getDoodleView();
44 final SeekBar widthSeekBar = (SeekBar)
45 lineWidthDialogView.findViewById(R.id.widthSeekBar);
46 widthSeekBar.setOnSeekBarChangeListener(lineWidthChanged);
47 widthSeekBar.setProgress(doodleView.getLineWidth());
48
49 // add Set Line Width Button
50 builder.setPositiveButton(R.string.button_set_line_width,
51 new DialogInterface.OnClickListener()
52 {
53 public void onClick(DialogInterface dialog, int id)
54 {
55 doodleView.setLineWidth(widthSeekBar.getProgress());
56 }
57 }
58 ); // end call to setPositiveButton
59
60 return builder.create(); // return dialog
61 } // end method onCreateDialog
62
63 // gets a reference to the DoodleFragment
64 private DoodleFragment getDoodleFragment()
65 {
66 return (DoodleFragment) getFragmentManager().findFragmentById(
67 R.id.doodleFragment);
68 }
69
70 // tell DoodleFragment that dialog is now displayed
71 @Override
72 public void onAttach(Activity activity)
73 {
74 super.onAttach(activity);
75 DoodleFragment fragment = getDoodleFragment();
76
77 if (fragment != null)
78 fragment.setDialogOnScreen(true);
79 }
80
81 // tell DoodleFragment that dialog is no longer displayed
82 @Override
83 public void onDetach()
84 {
85 super.onDetach();
86 DoodleFragment fragment = getDoodleFragment();
87
88 if (fragment != null)
89 fragment.setDialogOnScreen(false);
90 }
91
92 // OnSeekBarChangeListener for the SeekBar in the width dialog
93 private OnSeekBarChangeListener lineWidthChanged =
94 new OnSeekBarChangeListener()
95 {
96 Bitmap bitmap = Bitmap.createBitmap(
97 400, 100, Bitmap.Config.ARGB_8888);
98 Canvas canvas = new Canvas(bitmap); // associate with Canvas
99
100 @Override
101 public void onProgressChanged(SeekBar seekBar, int progress,
102 boolean fromUser)
103 {
104 // configure a Paint object for the current SeekBar value
105 Paint p = new Paint();
106 p.setColor(
107 getDoodleFragment().getDoodleView().getDrawingColor());
108 p.setStrokeCap(Paint.Cap.ROUND);
109 p.setStrokeWidth(progress);
110
111 // erase the bitmap and redraw the line
112 bitmap.eraseColor(
113 getResources().getColor(android.R.color.transparent));
114 canvas.drawLine(30, 50, 370, 50, p);
115 widthImageView.setImageBitmap(bitmap);
116 }
117
118 @Override
119 public void onStartTrackingTouch(SeekBar seekBar) // required
120 {
121 }
122
123 @Override
124 public void onStopTrackingTouch(SeekBar seekBar) // required
125 {
126 }
127 }; // end lineWidthChanged
128 }
Fig. 7.39 | Class LineWidthDialogFragment.
Method onCreateDialog
Method onCreateDialog (lines 25–61) inflates the custom View (lines 30–31) defined by fragment_line_width.xml that displays the GUI for selecting the line width, then attaches that View to the AlertDialog by calling AlertDialog.Builder’s setView method (line 32). Lines 39–40 get a reference to the ImageView in which the sample line will be drawn. Next, lines 43–47 get a reference to the widthSeekBar, register lineWidthChanged (lines 93–127) as the SeekBar’s listener and set the SeekBar’s current value to the current line width. Lines 50–58 define the dialog’s positive button to call the DoodleView’s setLine-Width method when the user touches the Set Line Width button. Line 60 returns the AlertDialog for display.
Anonymous Inner Class That Implements Interface OnSeekBarChangeListener to Respond to the Events of the widthSeekBar
Lines 93–127 define the lineWidthChanged OnSeekBarChangeListener that responds to events when the user adjusts the SeekBar in the Choose Line Width dialog. Lines 96–97 create a Bitmap on which to display a sample line representing the selected line thickness. Line 98 creates a Canvas for drawing on the Bitmap. Method onProgressChanged (lines 100–116) draws the sample line based on the current drawing color and the SeekBar’s value. First, lines 105–109 configure a Paint object for drawing the sample line. Class Paint’s setStrokeCap method (line 108) specifies the appearance of the line ends—in this case, they’re rounded (Paint.Cap.ROUND). Lines 112–113 clear bitmap’s background to the predefined Android color android.R.color.transparent with Bitmap method eraseColor. We use canvas to draw the sample line. Finally, line 115 displays bitmap in the widthImageView by passing it to ImageView’s setImageBitmap method.
7.9. EraseImageDialogFragment Class
Class EraseImageDialogFragment (Fig. 7.40) extends DialogFragment to create an AlertDialog that confirms whether the user really wants to erase the entire image. The class is similar to class ColorDialogFragment and LineWidthDialogFragment, so we discuss only method onCreateDialog (lines 16–41) here. The method creates an AlertDialog with Erase Image and Cancel button. Lines 27–35 configure the Erase Image button as the positive button—when the user touches this, line 32 in the button’s listener calls the DoodleView’s clear method to erase the image. Line 38 configures Cancel as the negative button—when the user touches this, the dialog is dismissed. Line 40 returns the AlertDialog.
1 // EraseImageDialogFragment.java
2 // Allows user to erase image
3 package com.deitel.doodlz;
4
5 import android.app.Activity;
6 import android.app.AlertDialog;
7 import android.app.Dialog;
8 import android.app.DialogFragment;
9 import android.content.DialogInterface;
10 import android.os.Bundle;
11
12 //class for the Select Color dialog
13 public class EraseImageDialogFragment extends DialogFragment
14 {
15 // create an AlertDialog and return it
16 @Override
17 public Dialog onCreateDialog(Bundle bundle)
18 {
19 AlertDialog.Builder builder =
20 new AlertDialog.Builder(getActivity());
21
22 // set the AlertDialog's message
23 builder.setMessage(R.string.message_erase);
24 builder.setCancelable(false);
25
26 // add Erase Button
27 builder.setPositiveButton(R.string.button_erase,
28 new DialogInterface.OnClickListener()
29 {
30 public void onClick(DialogInterface dialog, int id)
31 {
32 getDoodleFragment().getDoodleView().clear(); // clear image
33 }
34 }
35 ); // end call to setPositiveButton
36
37 // add Cancel Button
38 builder.setNegativeButton(R.string.button_cancel, null);
39
40 return builder.create(); // return dialog
41 } // end method onCreateDialog
42
43 // gets a reference to the DoodleFragment
44 private DoodleFragment getDoodleFragment()
45 {
46 return (DoodleFragment) getFragmentManager().findFragmentById(
47 R.id.doodleFragment);
48 }
49
50 // tell DoodleFragment that dialog is now displayed
51 @Override
52 public void onAttach(Activity activity)
53 {
54 super.onAttach(activity);
55 DoodleFragment fragment = getDoodleFragment();
56
57 if (fragment != null)
58 fragment.setDialogOnScreen(true);
59 }
60
61 // tell DoodleFragment that dialog is no longer displayed
62 @Override
63 public void onDetach()
64 {
65 super.onDetach();
66 DoodleFragment fragment = getDoodleFragment();
67
68 if (fragment != null)
69 fragment.setDialogOnScreen(false);
70 }
71 } // end class EraseImageDialogFragment
Fig. 7.40 | Class EraseImageDialogFragment.
7.10. Wrap-Up
In this chapter, you built the Doodlz app which enables users to paint by dragging one or more fingers across the screen. You implemented a shake-to-erase feature by using Android’s SensorManager to register a SensorEventListener that responds to accelerometer events, and you learned that Android supports many other sensors.
You created subclasses of DialogFragment that displayed custom Views in AlertDialogs. You also overrode the Fragment lifecycle methods onAttach and onDetach, which are called when a Fragment is attached to or detached from a parent Activity, respectively.
We showed how to associate a Canvas with a Bitmap, then use the Canvas to draw on the Bitmap. We demonstrated how to handle multitouch events so the user can draw with multiple fingers at the same time. You stored the information for each individual finger as a Path. You processed the touch events by overriding the View method onTouchEvent, which receives a MotionEvent containing the event type and the ID of the pointer that generated the event. We used the IDs to distinguish among the fingers and add information to the corresponding Path objects.
You used Android 4.4’s new full-screen immersive mode that enables an app to take advantage of the entire screen, but still allows the user to access the system bars and action bar when necessary. To toggle immersive mode, you used a GestureDetector to determine when the user single-tapped the screen.
You used a ContentResolver and the MediaStore.Images.Media.insertImage method to save an image into the device’s Gallery. Finally, we showed how to use the new Android 4.4 printing framework to allow users to print their drawings. You used the Android Support Library’s PrintHelper class to print a BitmapBitmap. The PrintHelper displayed a user interface for selecting a printer or saving the image into a PDF document.
In Chapter 8, we build the database-driven Address Book app, which provides quick and easy access to stored contact information and the ability to add contacts, delete contacts and edit existing contacts. You’ll learn how to dynamically swap Fragments in a GUI and once again provide layouts that optimize screen real estate on phones and tablets.