
8. Address Book App
ListFragment, FragmentTransactions and the Fragment Back Stack, Threading and AsyncTasks, CursorAdapter, SQLite and GUI Styles
Objectives
In this chapter you’ll:
![]() Use a
Use a ListFragment to display and manage a ListView.
![]() Use
Use FragmentTransactions and the back stack to dynamically attach Fragments to and detach Fragments from the GUI.
![]() Create and open SQLite databases using a
Create and open SQLite databases using a SQLiteOpenHelper, and insert, delete and query data in a SQLite database using a SQLiteDatabase object.
![]() Use a
Use a SimpleCursorAdapter to bind database query results to a ListView’s items.
![]() Use a
Use a Cursor to manipulate database query results.
![]() Use multithreading and
Use multithreading and AsyncTasks to perform database operations outside the GUI thread and maintain application responsiveness.
![]() Define styles containing common GUI attributes and values, then apply them to multiple GUI components.
Define styles containing common GUI attributes and values, then apply them to multiple GUI components.
8.2 Test-Driving the Address Book App
8.3.1 Displaying Fragments with FragmentTransactions
8.3.2 Communicating Data Between a Fragment and a Host Activity
8.3.3 Method onSaveInstanceState
8.3.4 Defining Styles and Applying Them to GUI Components
8.3.5 Specifying a Background for a TextView
8.3.6 Extending Class ListFragment to Create a Fragment That Contains a ListView
8.3.7 Manipulating a SQLite Database
8.3.8 Performing Database Operations Outside the GUI Thread with AsyncTasks
8.4 Building the GUI and Resource Files
8.4.2 Creating the App’s Classes
8.4.6 MainActivity’s Layout: activity_main.xml
8.4.7 DetailsFragment’s Layout: fragment_details.xml
8.4.8 AddEditFragment’s Layout: fragment_add_edit.xml
8.4.9 Defining the Fragments’ Menus
8.9 DatabaseConnector Utility Class
8.1. Introduction
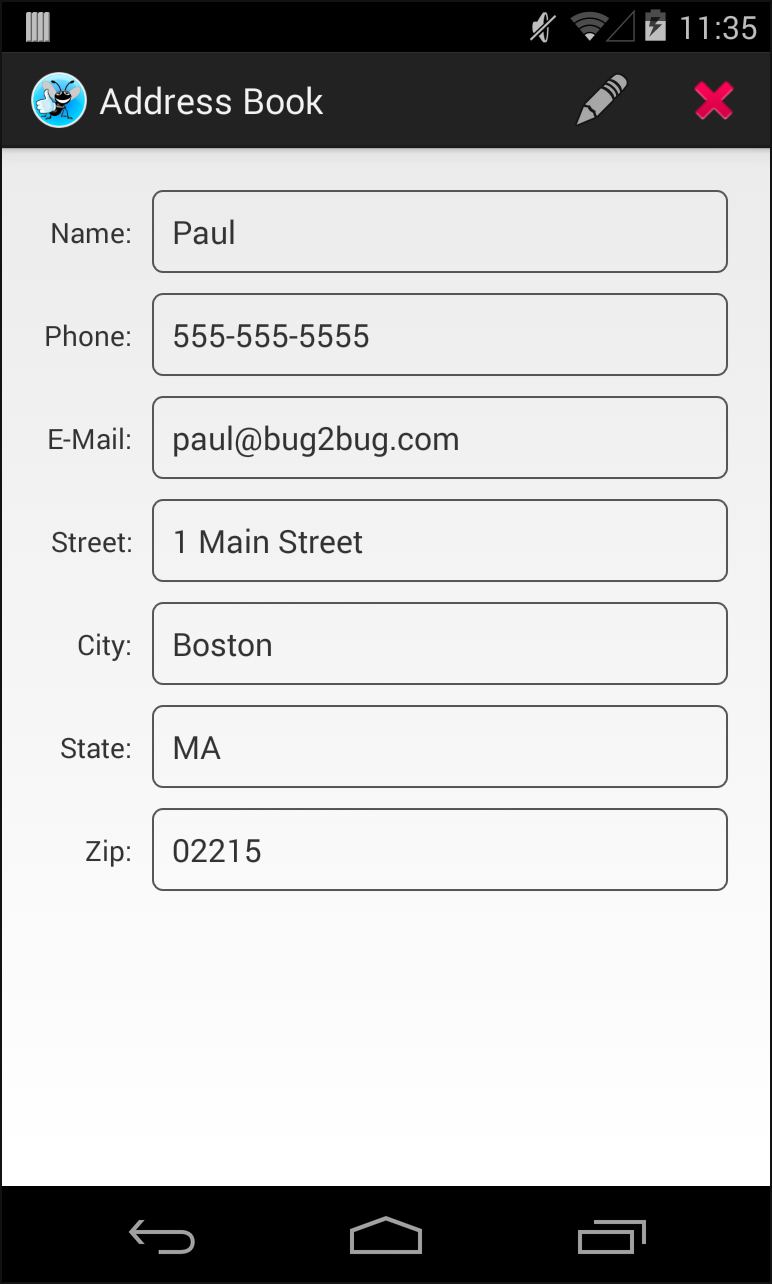
The Address Book app (Fig. 8.1) provides convenient access to contact information that’s stored in a SQLite database on the device. You can scroll through an alphabetical contact list and can view a contact’s details by touching the contact’s name.

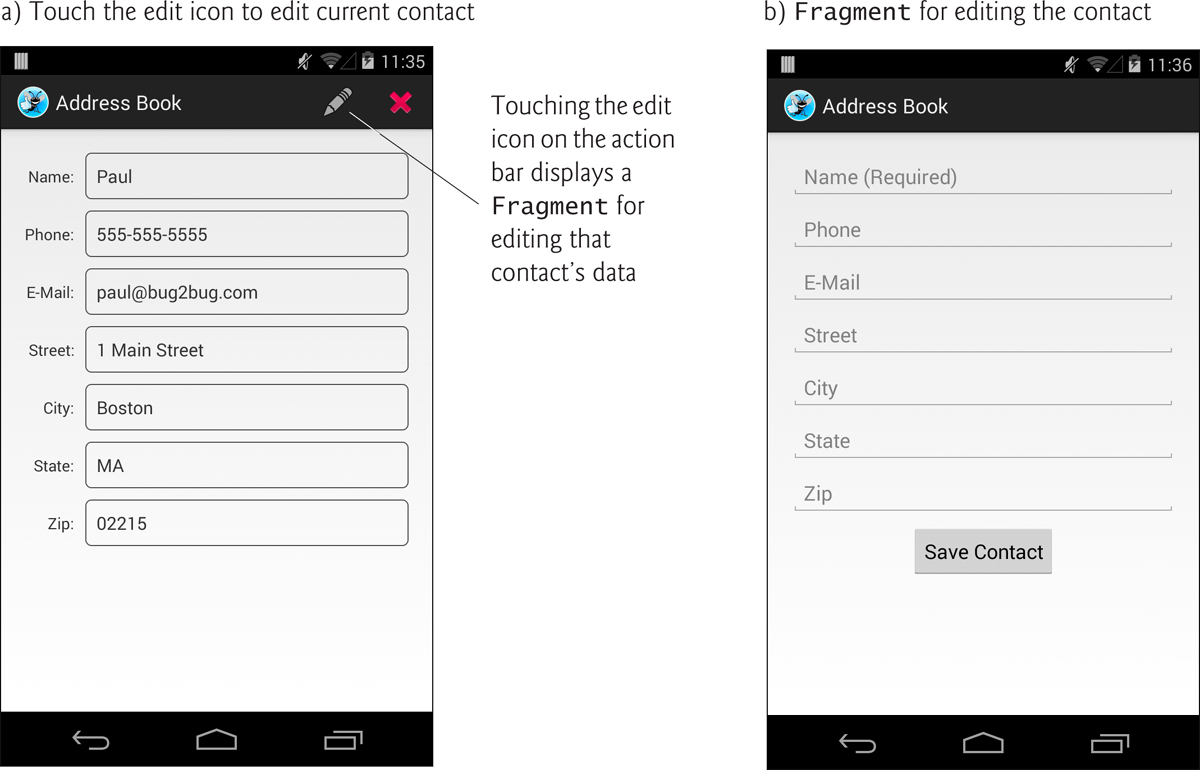
When a contact’s details are displayed, touching edit (![]() ) displays a
) displays a Fragment containing prepopulated EditTexts for editing the contact’s data (Fig. 8.2), and touching delete (![]() ) displays a
) displays a DialogFragment asking the user to confirm the deletion (Fig. 8.3).

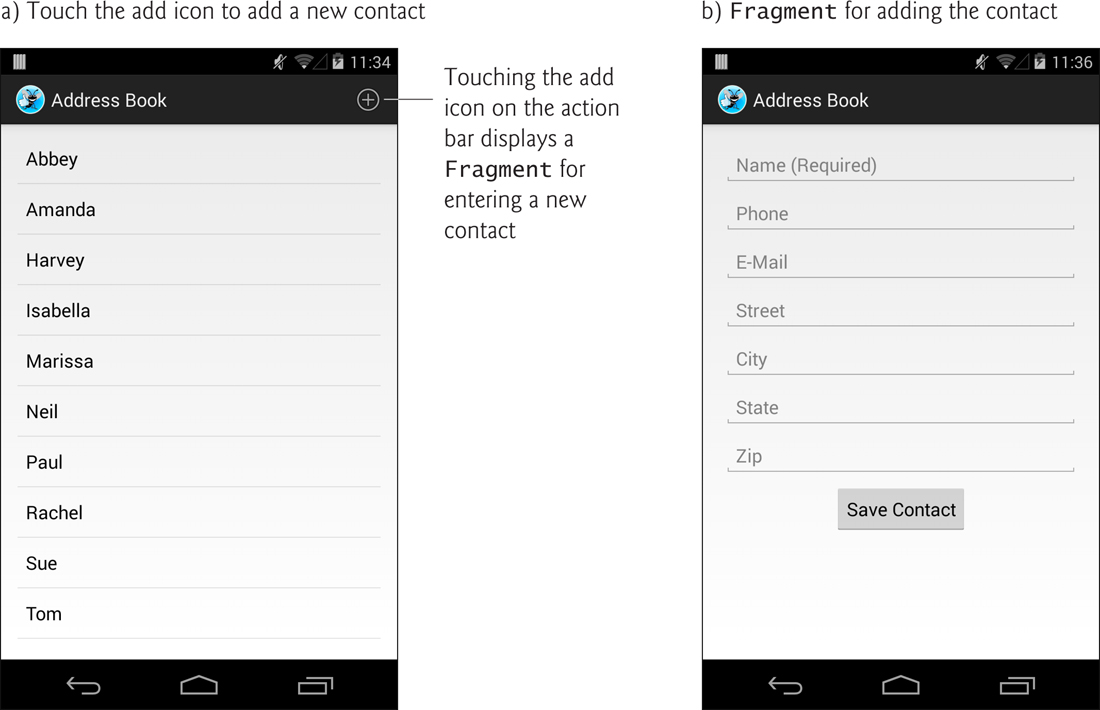
When viewing the contact list, touching add (![]() ) displays a
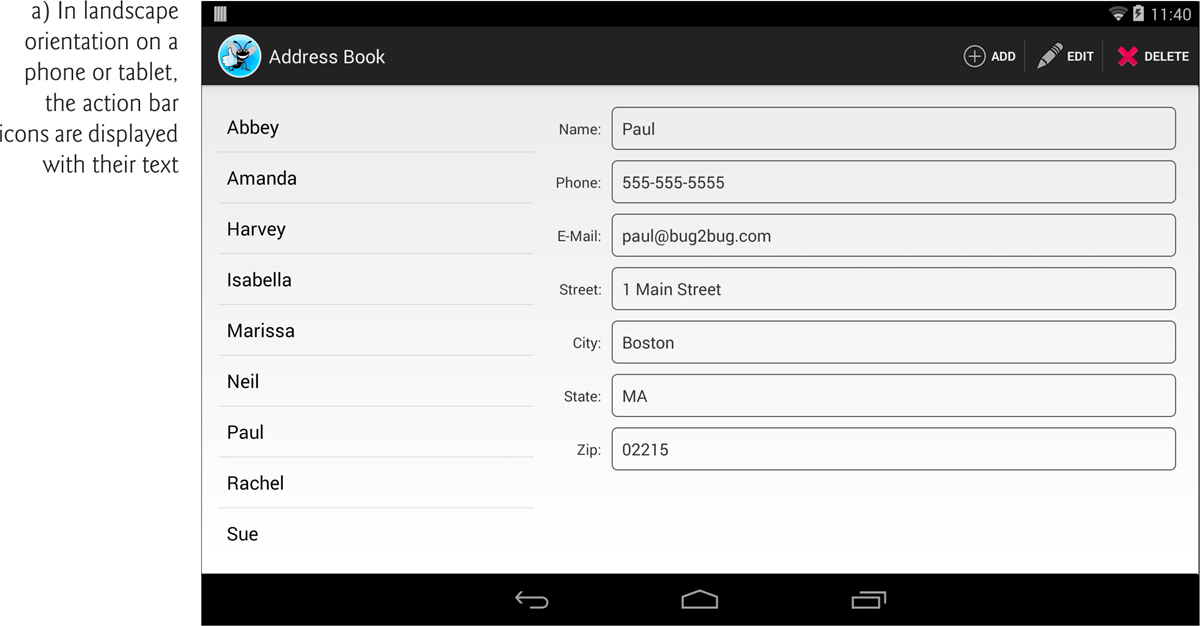
) displays a Fragment containing EditTexts that you can use to add the new contact’s data (Fig. 8.4). When editing an existing contact or adding a new one, you touch the Save Contact Button to save the contact’s data. Figure 8.5 shows the app running on a tablet in landscape orientation. On tablets, the contact list is always displayed at the app’s left side.
8.2. Test-Driving the Address Book App
Opening and Running the App
Open Eclipse and import the Address Book app project. Perform the following steps:
1. Open the Import Dialog. Select File > Import... to open the Import dialog.
2. Import the Address Book app’s project. In the Import dialog, expand the General node and select Existing Projects into Workspace, then click Next > to proceed to the Import Projects step. Ensure that Select root directory is selected, then click the Browse... button. In the Browse for Folder dialog, locate the AddressBook folder in the book’s examples folder, select it and click OK. Click Finish to import the project into Eclipse. The project now appears in the Package Explorer window at the left side of the Eclipse window.
3. Launch the Address Book app. In Eclipse, right click the AddressBook project in the Package Explorer window, then select Run As > Android Application from the menu that appears.
Adding a Contact
The first time you run the app, the contact list will be empty and will display No Contacts in the center of the screen. Touch ![]() on the action bar to display the screen for adding a new entry. After adding the contact’s information, touch the Save Contact
on the action bar to display the screen for adding a new entry. After adding the contact’s information, touch the Save Contact Button to store the contact in the database and return to the app’s main screen. If you choose not to add the contact, you can simply touch the device’s back button to return to the main screen. Add more contacts if you wish. On a tablet, after adding a contact, the new contact’s details will be displayed to the right of the contact list, as in Fig. 8.5.
Viewing a Contact
Touch the name of the contact you just added in the contacts list to view that contact’s details. On a tablet, the details are displayed to the right of the contact list.
Editing a Contact
While viewing the contact’s details, touch ![]() on the action bar to display a screen of
on the action bar to display a screen of Edit-Texts that are prepopulated with the contact’s data. Edit the data as necessary, then touch the Save Contact Button to store the updated contact information in the database and return to the app’s main screen. On a tablet, after editing a contact, the new contact’s details will be displayed to the right of the contact list.
Deleting a Contact
While viewing the contact’s details, touch ![]() on the action bar to delete the contact. A dialog will be displayed asking you to confirm this action. If you do, the contact will be removed from the database and the app will display the updated contact list.
on the action bar to delete the contact. A dialog will be displayed asking you to confirm this action. If you do, the contact will be removed from the database and the app will display the updated contact list.
8.3. Technologies Overview
This section presents the new technologies that we use in the Address Book app in the order in which they’re encountered throughout the chapter.
8.3.1. Displaying Fragments with FragmentTransactions
In earlier apps that used Fragments, you declared each Fragment in an Activity’s layout or, for a DialogFragment, called its show method to create it. The Flag Quiz app demonstrated how to use multiple activities to host each of the app’s Fragments on a phone device. In this app, you’ll use only one Activity to host all of the app’s Fragments. On a phonesized device, you’ll display one Fragment at a time. On a tablet, you’ll always display the Fragment containing the list of contacts and display the Fragments for viewing, adding and editing contacts as necessary at the app’s right side. You’ll use the FragmentManager and FragmentTransactions to dynamically display Fragments. In addition, you’ll use Android’s Fragment back stack—a data structure that stores Fragments in last-in-first-out (LIFO) order—to provide automatic support for the Android system bar’s back button and to allow the app to remove Fragments in the reverse order from which they were added.
8.3.2. Communicating Data Between a Fragment and a Host Activity
To communicate data between Fragments and a host Activity or the Activity’s other Fragments, it’s considered best practice to do so through the host Activity—this makes the Fragments more reusable, because they do not refer to one another directly. Typically, each Fragment defines an interface of callback methods that are implemented in the host Activity. We’ll use this technique to enable this app’s MainActivity to be notified when the user selects a contact to display, touches an action bar item (![]() ,
, ![]() or
or ![]() ), or finishes editing an existing contact or adding a new one.
), or finishes editing an existing contact or adding a new one.
8.3.3. Method onSaveInstanceState
onSaveInstanceState is called by the system when the configuration of the device changes during the app’s execution—for example, when the user rotates the device or slides out a keyboard on a device with a hard keyboard. This method can be used to save state information that you’d like to restore when the app’s onCreate method is called as part of the configuration change. When an app is simply placed into the background, perhaps so the user can answer a phone call or when the user starts another app, the app’s GUI components will automatically save their contents for when the app is brought back to the foreground (provided that the system does not kill the app). We use onSaveInstanceState in Fig. 8.47.
8.3.4. Defining Styles and Applying Them to GUI Components
You can define common GUI component attribute–value pairs as style resources (Section 8.4.4). You can then apply the styles to all components that share those values (Section 8.4.7) by using the style attribute. Any subsequent changes you make to a style are automatically applied to all GUI components that use the style. We use this to style the TextViews that display a contact’s information.
8.3.5. Specifying a Background for a TextView
By default TextViews do not have a border. To define one, you can specify a Drawable as the value for the TextView’s android:background attribute. The Drawable could be an image, but in this app you’ll define a Drawable as a shape in a resource file (Section 8.4.5). The resource file for such a Drawable is defined in one or more of the app’s drawable folders—in this app, textview_border.xml is defined in the drawable-mdpi folder.
8.3.6. Extending Class ListFragment to Create a Fragment That Contains a ListView
When a Fragment’s primary task is to display a scrollable list of items, you can extend class ListFragment (package android.app, Section 8.6)—this is nearly identical to extending ListActivity, as you did in Chapter 4. A ListFragment uses a ListView as its default layout. In this app, rather than an ArrayAdapter, we’ll use a CursorAdapter (package android.widget) to display the results of a database query in the ListView.
8.3.7. Manipulating a SQLite Database
The contact information is stored in a SQLite database. According to www.sqlite.org, SQLite is one of the world’s most widely deployed database engines. Each Fragment in this app interacts with a SQLite database via utility class DatabaseConnector (Section 8.9). That class uses a nested subclass of SQLiteOpenHelper (package android.database.sqlite), which simplifies creating the database and enables you to obtain a SQLiteDatabase object (package android.database.sqlite) for manipulating a database’s contents. Database queries are performed with Structured Query Language (SQL) and query results are managed via a Cursor (package android.database).
8.3.8. Performing Database Operations Outside the GUI Thread with AsyncTasks
You should perform long-running operations or operations that block execution until they complete (e.g., file and database access) outside the GUI thread. This helps maintain application responsiveness and avoid Activity Not Responding (ANR) dialogs that appear when Android thinks the GUI is not responsive. When we need a database operation’s results in the GUI thread, we’ll use a subclass of AsyncTask (package android.os) to perform the operation in one thread and receive the results in the GUI thread. The details of creating and manipulating threads are handled for you by class AsyncTask, as are communicating the results from the AsyncTask to the GUI thread.
8.4. Building the GUI and Resource Files
In this section, you’ll create the Address Book app’s additional Java source-code files, resource files and GUI layout files.
8.4.1. Creating the Project
Begin by creating a new Android project. Specify the following values in the New Android Project dialog, then press Finish:
• Application Name: Address Book
• Project Name: AddressBook
• Package Name: com.deitel.addressbook
• Minimum Required SDK: API18: Android 4.3
• Target SDK: API19: Android 4.4
• Compile With: API19: Android 4.4
• Theme: Holo Light with Dark Action Bar
In the New Android Project dialog’s second New Android Application step, leave the default settings, and press Next >. In the Configure Launcher Icon step, select an app icon image, then press Next >. In the Create Activity step, select Blank Activity, then press Next >. In the Blank Activity step, leave the default settings and click Finish to create the project. Open activity_main.xml in the Graphical Layout editor and select Nexus 4 from the screen-type drop-down list. Once again, we’ll use this device as the basis for our design.
8.4.2. Creating the App’s Classes
This app consists of five classes:
• Class MainActivity (Section 8.5) manages the app’s fragments and coordinates the interactions between them.
• Class ContactListFragment (Section 8.6) is a subclass of ListFragment that displays the contacts’ names and provides a menu item for adding a new contact.
• Class AddEditFragment (Section 8.7) is a subclass of Fragment that provides a GUI for adding a new contact or editing an existing one.
• Class DetailsFragment (Section 8.8) is a subclass of Fragment that displays one contact’s data and provides menu items for editing and deleting that contact.
• Class DatabaseConnector (Section 8.9) is a subclass of Object that manages this app’s interactions with a SQLite database.
Class MainActivity is created by the IDE when you create your project. As you’ve done in prior projects, you must add the other classes to the project’s com.deitel.addressbook package in the src folder. To do so for each class, right click the package and select New > Class, then specify the class’s name and superclass.
8.4.3. strings.xml
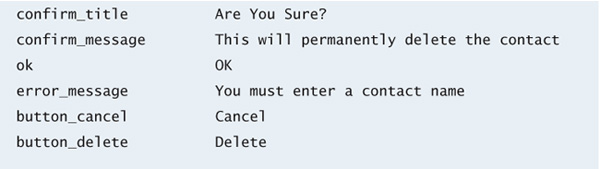
Figure 8.6 shows this app’s String resource names and corresponding values. Double click strings.xml in the res/values folder to display the resource editor for creating these String resources.

8.4.4. styles.xml
In this section, you’ll define the styles for the DetailsFragment’s TextViews that display a contact’s information (Section 8.4.7). Like other resources, style resources are placed in the app’s res/values folder. When you create a project, the IDE creates a styles.xml file containing predefined styles. Each new style you create specifies a name that’s used to apply that style to GUI components and one or more items specifying property values to apply. To create the new styles:
1. In the app’s res/values folder, open the styles.xml file and ensure that the Resources tab is selected at the bottom of the editor window.
2. Click Add..., then select Style/Theme and click OK to create a new style.
3. Set the style’s Name to ContactLabelTextView and save the file.
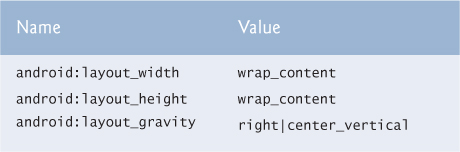
4. With the ContactLabelTextView style selected, click Add..., then click OK to add an Item to the style. Set the Name and Value attributes for the new Item and save the file. Repeat this step for each Name and Value in Fig. 8.7.
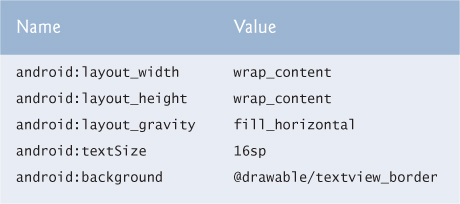
5. Repeat Steps 2 and 3 to create a style named ContactTextView—when you click Add..., you’ll need to select Create a new element at the top level in Resources. Then repeat Step 4 for each Name and Value in Fig. 8.8. When you’re done, save and close styles.xml.
8.4.5. textview_border.xml
The style ContactTextView that you created in the preceding section defines the appearance of the TextViews that are used to display a contact’s details. You specified a Drawable (i.e., an image or graphic) named @drawable/textview_border as the value for the TextView’s android:background attribute. In this section, you’ll define that Drawable in the app’s res/drawable-mdpi folder. If a Drawable is defined in only one of the project’s drawable folders, Android will use that Drawable on all device sizes and resolutions. To define the Drawable:
1. Right click the res/drawable-mdpi folder and select New > Android XML File.
2. Specify textview_border.xml as the File name and select shape as the root element, then click Finish.
3. At the time of this writing, the IDE does not provide an editor for creating Drawables, so enter the XML code in Fig. 8.9 into the file.
1 <?xml version="1.0" encoding="utf-8"?>
2 <shape xmlns:android="http://schemas.android.com/apk/res/android"
3 android:shape="rectangle" >
4 <corners android:radius="5dp"/>
5 <stroke android:width="1dp" android:color="#555"/>
6 <padding android:top="10dp" android:left="10dp" android:bottom="10dp"
7 android:right="10dp"/>
8 </shape>
Fig. 8.9 | XML representation of a Drawable that’s used to place a border on a TextView.
The shape element’s element’s android:shape attribute (line 3) can have the value "rectangle" (used in this example), "oval", "line" or "ring". The corners element (line 4) specifies the rectangle’s corner radius, which rounds the corners. The stroke element (line 5) defines the rectangle’s line width and line color. The padding element (lines 6–7) specifies the spacing around the content in the element to which this Drawable is applied. You must specify the top, left, right and bottom padding amounts separately. The complete details of defining shapes can be viewed at:
8.4.6. MainActivity’s Layout: activity_main.xml
You’ll provide two layouts for MainActivity—one for phone-sized devices in the res/layout folder and one for tablet-sized devices in the res/layout-large folder. You’ll need to add the layout-large folder.
Phone Layout: activity_main.xml in res/layout
For the phone layout, open activity_main.xml in the res/layout folder. Right click the RelativeLayout in the Outline window, then select Change Layout... and change the layout to a FrameLayout. Set the FrameLayout’s Id to @id/fragmentContainer. This FrameLayout will be used on phones to display the app’s Fragments.
Tablet Layout: activity_main.xml in res/layout-large
For the tablet layout, create a new activity_main.xml layout in the res/layout-large folder. This layout should use a horizontal LinearLayout containing a ContactListFragment and an empty FrameLayout. Use the techniques you learned in Section 5.4.9 to add the ContactListFragment to the layout, then add the FrameLayout. Set the following properties:
• For the LinearLayout set Weight Sum to 3—this will help allocate the horizontal space to the ContactListFragment and FrameLayout.
• For the Fragment, set the Id to @+id/contactListFragment, the Width to 0, the Height to match_parent, the Weight to 1 and the Right margin to @dimen/activity_horizontal_margin.
• For the FrameLayout set the Id to @+id/rightPaneContainer, the Width to 0, the Height to match_parent and the Weight to 2.
Setting the LinearLayout’s Weight Sum to 3, then setting the ContactListFragment’s and FrameLayout’s Weights to 1 and 2, respectively, indicates that the ContactListFragment should occupy one-third of the LinearLayout’s width and the FrameLayout should occupy the remaining two-thirds.
8.4.7. DetailsFragment’s Layout: fragment_details.xml
When the user touches a contact in the MainActivity, the app displays the DetailsFragment (Fig. 8.10). This Fragment’s layout (fragment_details.xml) consists of a ScrollView containing a vertical GridLayout with two columns of TextViews. A ScrollView is a ViewGroup that can contain other Views (like a layout) and that lets users scroll through content too large to display on the screen. We use a ScrollView here to ensure that the user can scroll through a contact’s details if a device does not have enough vertical space to show all the TextViews in Fig. 8.10. Follow the steps in Section 5.4.8 to create the fragment_details.xml file, but use a ScrollView as the Root Element. After creating the file, set the ScrollView’s Id to @+id/detailsScrollView and add a GridLayout to the ScrollView.

GridLayout Settings
For the GridLayout, we set the Width to match_parent, Height to wrap_content, Column Count to 2 and Use Default Margins to true. The Height value enables the parent ScrollView to determine the GridLayout’s actual height and decide whether to provide scrolling. Add TextViews to the GridLayout as shown in Fig. 8.10.
Left Column TextView Settings
For each TextView in the left column set the TextView’s Id property as specified in Fig. 8.10 and set:
• Row to a value from 0–6 depending on the row.
• Column to 0.
• Text to the appropriate String resource from strings.xml.
• Style (located in the View category) to @style/ContactLabelTextView—style resources are specified using the syntax @style/styleName.
Right Column TextView Settings
For each TextView in the right column set the TextView’s Id property as specified in Fig. 8.10 and set:
• Row to a value from 0–6 depending on the row.
• Column to 1.
• Style (located in the View category) to @style/ContactTextView.
8.4.8. AddEditFragment’s Layout: fragment_add_edit.xml
When the user touches the action bar items ![]() or
or ![]() , the
, the MainActivity displays the AddEditFragment (Fig. 8.11) with a layout (fragment_add_edit.xml) that uses a ScrollView containing a one-column vertical GridLayout. Be sure to set the ScrollView’s Id to @+id/addEditScrollView. If the AddEditFragment is displayed to add a new contact, the EditTexts will be empty and will display hints (Fig. 8.4). Otherwise, they’ll display the contact’s data that was passed to the AddEditFragment by the MainActivity. Each EditText specifies the Input Type and IME Options properties. For devices that display a soft keyboard, the Input Type specifies which keyboard to display when the user touches the corresponding EditText. This enables us to customize the keyboard to the specific type of data the user must enter in a given EditText. We use the IME Options property to display a Next button on the soft keyboards for the nameEditText, emailEditText, phoneEditText, streetEditText, cityEditText and stateEditText. When one of these has the focus, touching this Button transfers the focus to the next EditText. If the zipEditText has the focus, you can hide the soft keyboard by touching the keyboard’s Done Button.
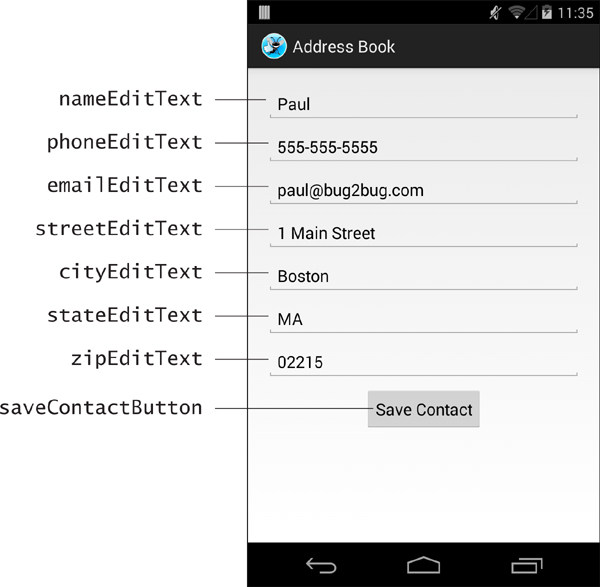
Fig. 8.11 | AddEditFragment’s GUI components labeled with their id property values. This GUI’s root component is a ScrollView that contains a vertical GridLayout.
GridLayout Settings
For the GridLayout, we set the Width to match_parent, Height to wrap_content, Column Count to 1 and Use Default Margins to true. Add the components shown in Fig. 8.11.
EditText Settings
For each EditText, set the TextView’s Id property as specified in Fig. 8.11 and set:
• Width to match_parent.
• Height to wrap_content.
• Hint to the appropriate String resource from strings.xml.
• IME Options to actionNext for all EditTexts except zipEditText, which should have the value actionDone.
• Style (located in the View category) to @style/ContactLabelTextView—style resources are specified using the syntax @style/styleName.
Set the EditTexts’ Input Type properties to display appropriate keyboards as follows:
• nameEditText: textPersonName|textCapWords—for entering names and starts each word with a capital letter.
• phoneEditText: phone—for entering phone numbers.
• emailEditText: textEmailAddress—for entering an e-mail address.
• streetEditText: textPostalAddress|textCapWords—for entering an address and starts each word with a capital letter.
• cityEditText: textPostalAddress|textCapWords.
• stateEditText: textPostalAddress|textCapCharacters—ensures that state abbreviations are displayed in capital letters.
• zipEditText: number—for entering numbers.
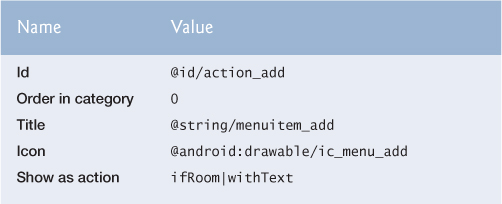
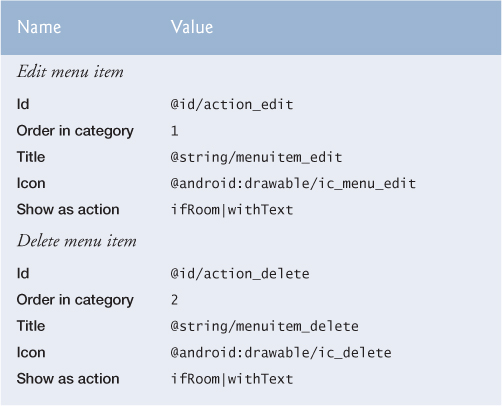
8.4.9. Defining the Fragments’ Menus
You’ll now use the techniques you learned in Section 7.3.4 to create two menu resource files in the app’s res/menu folder:
• fragment_contact_list_menu.xml defines the menu item for adding a contact.
• fragment_details_menu.xml defines the menu items for editing an existing contact and deleting a contact.
When both the ContactListFragment and the DetailsFragment are displayed on a tablet at the same time, all of the menu items are displayed.
Figures 8.12–8.13 show the settings for the menu items in the two menu resource files. Each menu item’s Order in category values determines the order in which the menu items appear on the action bar. For each menu item’s Icon value, we specified a standard Android icon. You can see the complete set of standard icons in the Android SDK’s platforms folder under each platform version’s data/res/drawable-hdpi folder. To refer to these icons in your menus or layouts, prefix them with @android:drawable/icon_name.
8.5. MainActivity Class
Class MainActivity (Figs. 8.14–8.23) manages the app’s fragments and coordinates the interactions between them. On phones, MainActivity displays one Fragment at a time, starting with the ContactListFragment. On tablets, MainActivity always displays the ContactListFragment at the left of the layout and, depending on the context, displays either the DetailsFragment or the AddEditFragment in the right two-thirds of the layout.
1 // MainActivity.java
2 // Hosts Address Book app's fragments
3 package com.deitel.addressbook;
4
5 import android.app.Activity;
6 import android.app.FragmentTransaction;
7 import android.os.Bundle;
8
9 public class MainActivity extends Activity
10 implements ContactListFragment.ContactListFragmentListener,
11 DetailsFragment.DetailsFragmentListener,
12 AddEditFragment.AddEditFragmentListener
13 {
14 // keys for storing row ID in Bundle passed to a fragment
15 public static final String ROW_ID = "row_id";
16
17 ContactListFragment contactListFragment; // displays contact list
18
Fig. 8.14 | MainActivity package statement, import statements and fields.
MainActivity package Statement, import statements and Fields
Class MainActivity (Fig. 8.14) uses class FragmentTransaction (imported at line 6) to add and remove the app’s Fragments. MainActivity implements three interfaces:
• ContactListFragment.ContactListFragmentListener contains callback methods that the ContactListFragment uses to tell the MainActivity when the user selects a contact in the contact list or adds a new contact.
• DetailsFragment.DetailsFragmentListener contains callback methods that the DetailsFragment uses to tell the MainActivity when the user deletes a contact or wishes to edit an existing contact.
• AddEditFragment.AddEditFragmentListener contains callback methods that the AddEditFragment uses to tell the MainActivity when the user finishes adding a new contact or editing an existing one.
The constant ROW_ID (line 15) is used as a key in a key–value pair that’s passed between the MainActivity and its Fragments. The instance variable contactListFragment (line 17) is used to tell the ContactListFragment to update the displayed list of contacts after a contact is added or deleted.
MainActivity Overridden onCreate Method
Method onCreate (Fig. 8.15) inflates MainActivity’s GUI and, if the app is running on a phone-sized device, displays a ContactListFragment. As you’ll see in Section 8.6, you can configure a Fragment to be retained across configuration changes, such as when the user rotates the device. If the Activity is being restored after being shut down or recreated from a configuration change, savedInstanceState will not be null. In this case, we simply return (line 28) because the ContactListFragment already exists—on a phone, it would have been retained and on a tablet, it’s part of the MainActivity’s layout that was inflated in line 24.
19 // display ContactListFragment when MainActivity first loads
20 @Override
21 protected void onCreate(Bundle savedInstanceState)
22 {
23 super.onCreate(savedInstanceState);
24 setContentView(R.layout.activity_main);
25
26 // return if Activity is being restored, no need to recreate GUI
27 if (savedInstanceState != null)
28 return;
29
30 // check whether layout contains fragmentContainer (phone layout);
31 // ContactListFragment is always displayed
32 if (findViewById(R.id.fragmentContainer) != null)
33 {
34 // create ContactListFragment
35 contactListFragment = new ContactListFragment();
36
37 // add the fragment to the FrameLayout
38 FragmentTransaction transaction =
39 getFragmentManager().beginTransaction();
40 transaction.add(R.id.fragmentContainer, contactListFragment);
41 transaction.commit(); // causes ContactListFragment to display
42 }
43 }
44
Fig. 8.15 | MainActivity overridden onCreate method.
If the R.id.fragmentContainer exists in MainActivity’s layout (line 32), then the app is running on a phone. In this case, line 35 creates the ContactListFragment, then lines 38–41 use a FragmentTransaction to add the ContactListFragment to the user interface. Lines 38–39 call FragmentManager’s beginTransaction method to obtain a FragmentTransaction. Next, line 40 uses FragmentTransaction method add to specify that, when the FragmentTransaction completes, the ContactListFragment should be attached to the View with the ID specified as the first argument. Finally, line 41 uses FragmentTransaction method commit to finalize the transaction and display the ContactListFragment.
MainActivity Overridden onResume Method
Method onResume (Fig. 8.16) determines whether contactListFragment is null—if so, the app is running on a tablet, so lines 55–57 use the FragmentManager to get a reference to the existing ContactListFragment in MainActivity’s layout.
45 // called when MainActivity resumes
46 @Override
47 protected void onResume()
48 {
49 super.onResume();
50
51 // if contactListFragment is null, activity running on tablet,
52 // so get reference from FragmentManager
53 if (contactListFragment == null)
54 {
55 contactListFragment =
56 (ContactListFragment) getFragmentManager().findFragmentById(
57 R.id.contactListFragment);
58 }
59 }
60
Fig. 8.16 | MainActivity overridden onResume method.
MainActivity Method onContactSelected
Method onContactSelected (Fig. 8.17) from the ContactListFragment.ContactListFragmentListener interface is called by the ContactListFragment to notify the MainActivity when the user selects a contact to display. If the app is running on a phone (line 65), line 66 calls method displayContact (Fig. 8.18), which replaces the ContactListFragment in the fragmentContainer (defined in Section 8.4.6) with the DetailsFragment that shows the contact’s information. On a tablet, line 69 calls the FragmentManager’s popBackStack method to pop (remove) the top Fragment on the back stack, then line 70 calls displayContact, which replaces the contents of the rightPaneContainer (defined in Section 8.4.6) with the DetailsFragment that shows the contact’s information.
61 // display DetailsFragment for selected contact
62 @Override
63 public void onContactSelected(long rowID)
64 {
65 if (findViewById(R.id.fragmentContainer) != null) // phone
66 displayContact(rowID, R.id.fragmentContainer);
67 else // tablet
68 {
69 getFragmentManager().popBackStack(); // removes top of back stack
70 displayContact(rowID, R.id.rightPaneContainer);
71 }
72 }
73
Fig. 8.17 | MainActivity method onContactSelected.
74 // display a contact
75 private void displayContact(long rowID, int viewID)
76 {
77 DetailsFragment detailsFragment = new DetailsFragment();
78
79 // specify rowID as an argument to the DetailsFragment
80 Bundle arguments = new Bundle();
81 arguments.putLong(ROW_ID, rowID);
82 detailsFragment.setArguments(arguments);
83
84 // use a FragmentTransaction to display the DetailsFragment
85 FragmentTransaction transaction =
86 getFragmentManager().beginTransaction();
87 transaction.replace(viewID, detailsFragment);
88 transaction.addToBackStack(null);
89 transaction.commit(); // causes DetailsFragment to display
90 }
91
Fig. 8.18 | MainActivity method displayContact.
MainActivity Method displayContact
Method displayContact (Fig. 8.18) creates the DetailsFragment that displays the selected contact and uses a FragmentTransaction to attach it to the GUI. You can pass arguments to a Fragment by placing them in a Bundle of key–value pairs—we do this to pass the selected contact’s rowID so that the DetailsFragment knows which contact to get from the database. Line 80 creates the Bundle. Line 81 calls its putLong method to store a key–value pair containing the ROW_ID (a String) as the key and the rowID (a long) as the value. Line 82 passes the Bundle to the Fragment’s setArguments method—the Fragment can then extract the information from the Bundle (as you’ll see in Section 8.8). Lines 85–86 get a FragmentTransaction, then line 87 calls FragmentTransaction method replace to specify that, when the FragmentTransaction completes, the DetailsFragment should replace the contents of the View with the ID specified as the first argument. Line 88 calls FragmentTransaction method addToBackStack to push (add) the DetailsFragment onto the back stack. This allows the user to touch the back button to pop the Fragment from the back stack and allows MainActivity to programmatically pop the Fragment from the back stack.
MainActivity Method onAddContact
Method onAddContact (Fig. 8.19) from the ContactListFragment.ContactListFragment-Listener interface is called by the ContactListFragment to notify the MainActivity when the user chooses to add a new contact. If the layout contains the fragmentContainer, line 97 calls displayAddEditFragment (Fig. 8.20) to display the AddEditFragment in the fragmentContainer; otherwise, line 99 calls displayAddEditFragment to display the Fragment in the rightPaneContainer. The second argument is a Bundle. Specifying null indicates that a new contact is being added.
92 // display the AddEditFragment to add a new contact
93 @Override
94 public void onAddContact()
95 {
96 if (findViewById(R.id.fragmentContainer) != null) // phone
97 displayAddEditFragment(R.id.fragmentContainer, null);
98 else // tablet
99 displayAddEditFragment(R.id.rightPaneContainer, null);
100 }
101
Fig. 8.19 | MainActivity method onAddContact.
102 // display fragment for adding a new or editing an existing contact
103 private void displayAddEditFragment(int viewID, Bundle arguments)
104 {
105 AddEditFragment addEditFragment = new AddEditFragment();
106
107 if (arguments != null) // editing existing contact
108 addEditFragment.setArguments(arguments);
109
110 // use a FragmentTransaction to display the AddEditFragment
111 FragmentTransaction transaction =
112 getFragmentManager().beginTransaction();
113 transaction.replace(viewID, addEditFragment);
114 transaction.addToBackStack(null);
115 transaction.commit(); // causes AddEditFragment to display
116 }
117
Fig. 8.20 | MainActivity Method displayAddEditFragment.
MainActivity Method displayAddEditFragment
Method displayAddEditFragment (Fig. 8.20) receives a View’s resource ID specifying where to attach the AddEditFragment and a Bundle of key–value pairs. If the second argument is null, a new contact is being added; otherwise, the Bundle contains the data to display in the AddEditFragment for editing. Line 105 creates the AddEditFragment. If the Bundle argument is not null, line 108 uses it to set the Fragment’s arguments. Lines 111–115 then create the FragmentTransaction, replace the contents of the View with the specified resource ID, add the Fragment to the back stack and commit the transaction.
MainActivity Method onContactDeleted
Method onContactDeleted (Fig. 8.21) from the DetailsFragment.DetailsFragmentListener interface is called by the DetailsFragment to notify the MainActivity when the user deletes a contact. In this case, line 122 pops the DetailsFragment from the back stack. If the app is running on a tablet, line 125 calls the contactListFragment’s updateContactList method to reload the contacts.
118 // return to contact list when displayed contact deleted
119 @Override
120 public void onContactDeleted()
121 {
122 getFragmentManager().popBackStack(); // removes top of back stack
123
124 if (findViewById(R.id.fragmentContainer) == null) // tablet
125 contactListFragment.updateContactList();
126 }
127
Fig. 8.21 | MainActivity method onContactDeleted.
MainActivity Method onEditContact
Method onEditContact (Fig. 8.22) from the DetailsFragment.DetailsFragmentListener interface is called by the DetailsFragment to notify the MainActivity when the user touches the menu item to edit a contact. The DetailsFragment passes a Bundle containing the contact’s data so that it can be displayed in the AddEditFragment’s EditTexts for editing. If the layout contains the fragmentContainer, line 133 calls displayAddEditFragment to display the AddEditFragment in the fragmentContainer; otherwise, line 135 calls displayAddEditFragment to display the AddEditFragment in the rightPaneContainer.
128 // display the AddEditFragment to edit an existing contact
129 @Override
130 public void onEditContact(Bundle arguments)
131 {
132 if (findViewById(R.id.fragmentContainer) != null) // phone
133 displayAddEditFragment(R.id.fragmentContainer, arguments);
134 else // tablet
135 displayAddEditFragment(R.id.rightPaneContainer, arguments);
136 }
137
Fig. 8.22 | MainActivity method onEditContact.
MainActivity Method onAddEditCompleted
Method onAddEditCompleted (Fig. 8.23) from the AddEditFragment.AddEditFragmentListener interface is called by the AddEditFragment to notify the MainActivity when the user saves a new contact or saves changes to an existing one. Line 142 pops the AddEditFragment from the back stack. If the app is running on a tablet (line 144), line 146 pops the back stack again to remove the DetailsFragment (if there is one). Then line 147 updates the contact list in the ContactListFragment and line 150 displays the new or updated contact’s details in the rightPaneContainer.
138 // update GUI after new contact or updated contact saved
139 @Override
140 public void onAddEditCompleted(long rowID)
141 {
142 getFragmentManager().popBackStack(); // removes top of back stack
143
144 if (findViewById(R.id.fragmentContainer) == null) // tablet
145 {
146 getFragmentManager().popBackStack(); // removes top of back stack
147 contactListFragment.updateContactList(); // refresh contacts
148
149 // on tablet, display contact that was just added or edited
150 displayContact(rowID, R.id.rightPaneContainer);
151 }
152 }
153 }
Fig. 8.23 | MainActivity method onAddEditCompleted.
8.6. ContactListFragment Class
Class ContactListFragment (Figs. 8.24–8.33) extends ListFragment to display the contact list in a ListView and provides a menu item for adding a new contact.
1 // ContactListFragment.java
2 // Displays the list of contact names
3 package com.deitel.addressbook;
4
5 import android.app.Activity;
6 import android.app.ListFragment;
7 import android.database.Cursor;
8 import android.os.AsyncTask;
9 import android.os.Bundle;
10 import android.view.Menu;
11 import android.view.MenuInflater;
12 import android.view.MenuItem;
13 import android.view.View;
14 import android.widget.AdapterView;
15 import android.widget.AdapterView.OnItemClickListener;
16 import android.widget.CursorAdapter;
17 import android.widget.ListView;
18 import android.widget.SimpleCursorAdapter;
19
Fig. 8.24 | ContactListFragment package statement and import statements.
ContactListFragment package Statement and import Statements
Figure 8.24 lists ContactListFragment’s package statement and import statements. We’ve highlighted the imports for the new classes and interfaces.
ContactListFragmentListener Interface and ContactListFragment Instance Variables
Figure 8.25 begins class ContactListFragment’s declaration. Lines 23–30 declare the nested interface ContactListFragmentListener, which contains the callback methods that MainActivity implements to be notified when the user selects a contact (line 26) and when the user touches the menu item to add a new contact (line 29). Line 32 declares instance variable listener which will refer to the object (MainActivity) that implements the interface. Instance variable contactListView (line 34) will refer to the ContactListFragment’s built-in ListView, so we can interact with it programmatically. Instance variable contactAdapter will refer to the CursorAdapter that populates the AddressBook’s ListView.
20 public class ContactListFragment extends ListFragment
21 {
22 // callback methods implemented by MainActivity
23 public interface ContactListFragmentListener
24 {
25 // called when user selects a contact
26 public void onContactSelected(long rowID);
27
28 // called when user decides to add a contact
29 public void onAddContact();
30 }
31
32 private ContactListFragmentListener listener;
33
34 private ListView contactListView; // the ListActivity's ListView
35 private CursorAdapter contactAdapter; // adapter for ListView
36
Fig. 8.25 | ContactListFragmentListener interface and ContactListFragment instance
ContactListFragment Overridden Methods onAttach and onDetach
Class ContactListFragment overrides Fragment lifecycle methods onAttach and onDetach (Fig. 8.26) to set instance variable listener. In this app, listener refers to the host Activity (line 42) when the ContactListFragment is attached and is set to null (line 50) when the ContactListFragment is detached.
37 // set ContactListFragmentListener when fragment attached
38 @Override
39 public void onAttach(Activity activity)
40 {
41 super.onAttach(activity);
42 listener = (ContactListFragmentListener) activity;
43 }
44
45 // remove ContactListFragmentListener when Fragment detached
46 @Override
47 public void onDetach()
48 {
49 super.onDetach();
50 listener = null;
51 }
52
Fig. 8.26 | ContactListFragment overridden methods onAttach and onDetach.
ContactListFragment Overridden Method onViewCreated
Recall that class ListFragment already contains a ListView, so we don’t need to inflate the GUI as in previous app’s Fragments. However, class ContactListFragment has tasks that should be performed after its default layout is inflated. For this reason, ContactList-Fragment overrides Fragment lifecycle method onViewCreated (Fig. 8.27), which is called after onCreateView.
53 // called after View is created
54 @Override
55 public void onViewCreated(View view, Bundle savedInstanceState)
56 {
57 super.onViewCreated(view, savedInstanceState);
58 setRetainInstance(true); // save fragment across config changes
59 setHasOptionsMenu(true); // this fragment has menu items to display
60
61 // set text to display when there are no contacts
62 setEmptyText(getResources().getString(R.string.no_contacts));
63
64 // get ListView reference and configure ListView
65 contactListView = getListView();
66 contactListView.setOnItemClickListener(viewContactListener);
67 contactListView.setChoiceMode(ListView.CHOICE_MODE_SINGLE);
68
69 // map each contact's name to a TextView in the ListView layout
70 String[] from = new String[] { "name" };
71 int[] to = new int[] { android.R.id.text1 };
72 contactAdapter = new SimpleCursorAdapter(getActivity(),
73 android.R.layout.simple_list_item_1, null, from, to, 0);
74 setListAdapter(contactAdapter); // set adapter that supplies data
75 }
76
Fig. 8.27 | ContactListFragment overridden method onViewCreated.
Line 58 calls Fragment method setRetainInstance with the argument true to indicate that the ContactListFragment should be retained rather than recreated when the host Activity is re-created on a configuration change (e.g., when the user rotates the device). Line 59 indicates that the ContactListFragment has menu items that should be displayed on the Activity’s action bar (or in its options menu). ListFragment method setEmptyText (line 62) specifies the text to display ("No Contacts") when there are no items in the ListView’s adapter.
Line 65 uses the inherited ListActivity method getListView to obtain a reference to the built-in ListView. Line 66 sets the ListView’s OnItemClickListener to viewContactListener (Fig. 8.28), which responds when the user touches a contact in the ListView. Line 67 calls ListView method setChoiceMode to indicate that only one item can be selected at a time.
77 // responds to the user touching a contact's name in the ListView
78 OnItemClickListener viewContactListener = new OnItemClickListener()
79 {
80 @Override
81 public void onItemClick(AdapterView<?> parent, View view,
82 int position, long id)
83 {
84 listener.onContactSelected(id); // pass selection to MainActivity
85 }
86 }; // end viewContactListener
87
Fig. 8.28 | viewContactListener that processes ListView item selection events.
Configuring the CursorAdapter That Binds Database Data to the ListView
To display the Cursor’s results in a ListView we create a new CursorAdapter object (lines 70–73) which exposes the Cursor’s data in a manner that can be used by a ListView. SimpleCursorAdapter is a subclass of CursorAdapter that’s designed to simplify mapping Cursor columns directly to TextViews or ImagesViews defined in your XML layouts. To create a SimpleCursorAdapter, you first define arrays containing the column names to map to GUI components and the resource IDs of the GUI components that will display the data from the named columns. Line 70 creates a String array indicating that only the "name" column will be displayed, and line 71 creates a parallel int array containing corresponding GUI components’ resource IDs. Chapter 4 showed that you can create your own layout resources for ListView items. In this app we used a predefined Android layout resource named android.R.layout.simple_list_item_1—a layout that contains one TextView with the ID android.R.id.text1. Lines 72–73 create the SimpleCursorAdapter. Its constructor receives:
• the Context in which the ListView is running (i.e., MainActivity).
• the resource ID of the layout that’s used to display each item in the ListView.
• the Cursor that provides access to the data—we supply null for this argument because we’ll specify the Cursor later.
• the String array containing the column names to display.
• the int array containing the corresponding GUI resource IDs.
• the last argument is typically 0.
Line 74 uses inherited ListActivity method setListAdapter to bind the ListView to the CursorAdapter, so that the ListView can display the data.
viewContactListener That Processes ListView Item Selection Events
The viewContactListener (Fig. 8.28) notifies MainActivity when the user touches a contact to display. Line 84 passes the argument id—the row ID of the selected contact—to the listener’s onContactSelected method (Fig. 8.17).
ContactListFragment Overridden Method onResume
Fragment lifecycle method onResume (Fig. 8.29) creates and executes an AsyncTask (line 93) of type GetContactsTask (defined in Fig. 8.30) that gets the complete list of contacts from the database and sets the contactAdapter’s Cursor for populating the ContactList-Fragment’s ListView. AsyncTask method execute performs the task in a separate thread. Method execute’s argument in this case indicates that the task does not receive any arguments—this method can receive a variable number of arguments that are, in turn, passed as arguments to the task’s doInBackground method. Every time line 93 executes, it creates a new GetContactsTask object—this is required because each AsyncTask can be executed only once.
88 // when fragment resumes, use a GetContactsTask to load contacts
89 @Override
90 public void onResume()
91 {
92 super.onResume();
93 new GetContactsTask().execute((Object[]) null);
94 }
95
Fig. 8.29 | ContactListFragment overridden method onResume.
96 // performs database query outside GUI thread
97 private class GetContactsTask extends AsyncTask<Object, Object, Cursor>
98 {
99 DatabaseConnector databaseConnector =
100 new DatabaseConnector(getActivity());
101
102 // open database and return Cursor for all contacts
103 @Override
104 protected Cursor doInBackground(Object... params)
105 {
106 databaseConnector.open();
107 return databaseConnector.getAllContacts();
108 }
109
110 // use the Cursor returned from the doInBackground method
111 @Override
112 protected void onPostExecute(Cursor result)
113 {
114 contactAdapter.changeCursor(result); // set the adapter's Cursor
115 databaseConnector.close();
116 }
117 } // end class GetContactsTask
118
Fig. 8.30 | GetContactsTask subclass of AsyncTask.
GetContactsTask Subclass of AsyncTask
Nested class GetContactsTask (Fig. 8.30) extends class AsyncTask. The class defines how to interact with the DatabaseConnector (Section 8.9) to get the names of all the contacts and return the results to this Activity’s GUI thread for display in the ListView. AsyncTask is a generic type that requires three type parameters:
• The variable-length parameter-list type for AsyncTask’s doInBackground method (lines 103–108)—When you call the task’s execute method, doInBackground performs the task in a separate thread. We specify Object as the type parameter and pass null as the argument to the AsyncTask’s execute method, because GetContactsTask does not require additional data to perform its task.
• The variable-length parameter-list type for the AsyncTask’s onProgressUpdate method—This method executes in the GUI thread and is used to receive intermediate updates of the specified type from a long-running task. We don’t use this feature in this example, so we specify type Object here and ignore this type parameter.
• The type of the task’s result, which is passed to the AsyncTask’s onPostExecute method (lines 111–116)—This method executes in the GUI thread and enables the ContactListFragment to use the AsyncTask’s results.
A key benefit of using an AsyncTask is that it handles the details of creating threads and executing its methods on the appropriate threads for you, so that you do not have to interact with the threading mechanism directly.
Lines 99–100 create a new object of our utility class DatabaseConnector, passing the Context (the ContactListFragment’s host Activity) as an argument to the class’s constructor. Method doInBackground uses databaseConnector to open the database connection and get all the contacts from the database. The Cursor returned by getAllContacts is passed to method onPostExecute, which receives the Cursor containing the results and passes it to the contactAdapter’s changeCursor method. This enables the ContactList-Fragment’s ListView to populate itself with the contacts’ names.
ContactListFragment Overridden Method onStop
Fragment lifecycle method onStop (Fig. 8.31) is called after onPause when the Fragment is no longer visible to the user. In this case, the Cursor that allows us to populate the ListView is not needed, so line 123 calls CursorAdapter method getCursor to get the current Cursor from the contactAdapter. Line 124 calls CursorAdapter method changeCursor with the argument null to remove the Cursor from the CursorAdapter. Then line 127 calls Cursor method close to release resources used by the Cursor.
119 // when fragment stops, close Cursor and remove from contactAdapter
120 @Override
121 public void onStop()
122 {
123 Cursor cursor = contactAdapter.getCursor(); // get current Cursor
124 contactAdapter.changeCursor(null); // adapter now has no Cursor
125
126 if (cursor != null)
127 cursor.close(); // release the Cursor's resources
128
129 super.onStop();
130 }
131
Fig. 8.31 | ContactListFragment overridden method onStop.
ContactListFragment Overridden Methods onCreateOptionsMenu and onOptionsItemSelected
Method onCreateOptionsMenu (Fig. 8.32, lines 133–138) uses its MenuInflater argument to create the menu from fragment_contact_list_menu.xml, which contains the definition of the add (![]() ) menu item. If the user touches that
) menu item. If the user touches that MenuItem, method onOptionsItemSelected (lines 141–152) calls listener’s onAddContact method to notify the MainActivity that the user wants to add a new contact. MainActivity then displays the AddEditFragment (Section 8.7).
132 // display this fragment's menu items
133 @Override
134 public void onCreateOptionsMenu(Menu menu, MenuInflater inflater)
135 {
136 super.onCreateOptionsMenu(menu, inflater);
137 inflater.inflate(R.menu.fragment_contact_list_menu, menu);
138 }
139
140 // handle choice from options menu
141 @Override
142 public boolean onOptionsItemSelected(MenuItem item)
143 {
144 switch (item.getItemId())
145 {
146 case R.id.action_add:
147 listener.onAddContact();
148 return true;
149 }
150
151 return super.onOptionsItemSelected(item); // call super's method
152 }
153
Fig. 8.32 | ContactListFragment overridden methods onCreateOptionsMenu and onOptionsItemSelected.
ContactListFragment Method updateContactList
Method updateContactList (Fig. 8.33) creates and executes a GetContactsTask to update the contact list.
154 // update data set
155 public void updateContactList()
156 {
157 new GetContactsTask().execute((Object[]) null);
158 }
159 } // end class ContactListFragment
Fig. 8.33 | ContactListFragment method updateContactList.
8.7. AddEditFragment Class
The AddEditFragment (Figs. 8.34–8.40) provides the interface for adding new contacts or editing existing ones.
1 // AddEditFragment.java
2 // Allows user to add a new contact or edit an existing one
3 package com.deitel.addressbook;
4
5 import android.app.Activity;
6 import android.app.AlertDialog;
7 import android.app.Dialog;
8 import android.app.DialogFragment;
9 import android.app.Fragment;
10 import android.content.Context;
11 import android.os.AsyncTask;
12 import android.os.Bundle;
13 import android.view.LayoutInflater;
14 import android.view.View;
15 import android.view.View.OnClickListener;
16 import android.view.ViewGroup;
17 import android.view.inputmethod.InputMethodManager;
18 import android.widget.Button;
19 import android.widget.EditText;
20
21 public class AddEditFragment extends Fragment
22 {
Fig. 8.34 | AddEditFragment package statement and import statements.
AddEditFragment package Statement and import Statements
Figure 8.34 lists the package statement and import statements for class AddEditFragment. No new classes are used in this Fragment.
AddEditFragmentListener Interface
Figure 8.35 declares the nested interface AddEditFragmentListener containing the callback method onAddEditCompleted that MainActivity implements to be notified when the user saves a new contact or saves changes to an existing one.
23 // callback method implemented by MainActivity
24 public interface AddEditFragmentListener
25 {
26 // called after edit completed so contact can be redisplayed
27 public void onAddEditCompleted(long rowID);
28 }
29
Fig. 8.35 | AddEditFragmentListener interface.
AddEditFragment Instance Variables
Figure 8.36 lists the class’s instance variables:
• Variable listener refers to the AddEditFragmentListener that’s notified when the user clicks the Save Contact button.
• Variable rowID represents the current contact being manipulated if this Fragment was displayed to allow the user to edit an existing contact.
• Variable contactInfoBundle will be null if a new contact is being added or will refer to a Bundle of contact information if an existing contact is being edited.
• The instance variables at lines 36–42 will refer to the Fragment’s EditTexts.
30 private AddEditFragmentListener listener;
31
32 private long rowID; // database row ID of the contact
33 private Bundle contactInfoBundle; // arguments for editing a contact
34
35 // EditTexts for contact information
36 private EditText nameEditText;
37 private EditText phoneEditText;
38 private EditText emailEditText;
39 private EditText streetEditText;
40 private EditText cityEditText;
41 private EditText stateEditText;
42 private EditText zipEditText;
43
Fig. 8.36 | AddEditFragment instance variables.
AddEditFragment Overridden Methods onAttach and onDetach
Class AddEditFragment overrides Fragment lifecycle methods onAttach and onDetach (Fig. 8.37) to set instance variable listener to refer to the host Activity (line 49) when the AddEditFragment is attached and to set listener to null (line 57) when the AddEditFragment is detached.
44 // set AddEditFragmentListener when Fragment attached
45 @Override
46 public void onAttach(Activity activity)
47 {
48 super.onAttach(activity);
49 listener = (AddEditFragmentListener) activity;
50 }
51
52 // remove AddEditFragmentListener when Fragment detached
53 @Override
54 public void onDetach()
55 {
56 super.onDetach();
57 listener = null;
58 }
59
Fig. 8.37 | AddEditFragment overridden methods onAttach and onDetach.
AddEditFragment Overridden Method onCreateView
In method onCreateView (Fig. 8.38), lines 70–78 inflate the GUI and get the Fragment’s EditTexts. Next, we use Fragment method getArguments to get the Bundle of arguments (if any). When we launch the AddEditFragment from the MainActivity, we don’t pass a Bundle, because the user is adding a new contact’s information. In this case, getArguments will return null. If it returns a Bundle (line 82), then the AddEditFragment was launched from the DetailsFragment and the user chose to edit an existing contact. Lines 84–91 read the arguments out of the Bundle by calling methods getLong (line 84) and getString, and the String data is displayed in the EditTexts for editing. Lines 95–97 register a listener (Fig. 8.39) for the Save Contact Button.
60 // called when Fragment's view needs to be created
61 @Override
62 public View onCreateView(LayoutInflater inflater, ViewGroup container,
63 Bundle savedInstanceState)
64 {
65 super.onCreateView(inflater, container, savedInstanceState);
66 setRetainInstance(true); // save fragment across config changes
67 setHasOptionsMenu(true); // fragment has menu items to display
68
69 // inflate GUI and get references to EditTexts
70 View view =
71 inflater.inflate(R.layout.fragment_add_edit, container, false);
72 nameEditText = (EditText) view.findViewById(R.id.nameEditText);
73 phoneEditText = (EditText) view.findViewById(R.id.phoneEditText);
74 emailEditText = (EditText) view.findViewById(R.id.emailEditText);
75 streetEditText = (EditText) view.findViewById(R.id.streetEditText);
76 cityEditText = (EditText) view.findViewById(R.id.cityEditText);
77 stateEditText = (EditText) view.findViewById(R.id.stateEditText);
78 zipEditText = (EditText) view.findViewById(R.id.zipEditText);
79
80 contactInfoBundle = getArguments(); // null if creating new contact
81
82 if (contactInfoBundle != null)
83 {
84 rowID = contactInfoBundle.getLong(MainActivity.ROW_ID);
85 nameEditText.setText(contactInfoBundle.getString("name"));
86 phoneEditText.setText(contactInfoBundle.getString("phone"));
87 emailEditText.setText(contactInfoBundle.getString("email"));
88 streetEditText.setText(contactInfoBundle.getString("street"));
89 cityEditText.setText(contactInfoBundle.getString("city"));
90 stateEditText.setText(contactInfoBundle.getString("state"));
91 zipEditText.setText(contactInfoBundle.getString("zip"));
92 }
93
94 // set Save Contact Button's event listener
95 Button saveContactButton =
96 (Button) view.findViewById(R.id.saveContactButton);
97 saveContactButton.setOnClickListener(saveContactButtonClicked);
98 return view;
99 }
100
Fig. 8.38 | AddEditFragment overridden method onCreateView.
OnClickListener to Process Save Contact Button Events
When the user touches the Save Contact Button, the saveContactButtonClicked listener (Fig. 8.39) executes. To save a contact, the user must enter at least the contact’s name. Method onClick ensures that the length of the name is greater than 0 characters (line 107) and, if so, creates and executes an AsyncTask (to perform the save operation). Method doInBackground (lines 113–118) calls saveContact (Fig. 8.40) to save the contact into the database. Method onPostExecute (lines 120–131) programmatically hides the keyboard (lines 124–128), then notifies MainActivity that a contact was saved (line 130). If the nameEditText is empty, lines 139–153 display a DialogFragment telling the user that a contact name must be provided to save the contact.
101 // responds to event generated when user saves a contact
102 OnClickListener saveContactButtonClicked = new OnClickListener()
103 {
104 @Override
105 public void onClick(View v)
106 {
107 if (nameEditText.getText().toString().trim().length() != 0)
108 {
109 // AsyncTask to save contact, then notify listener
110 AsyncTask<Object, Object, Object> saveContactTask =
111 new AsyncTask<Object, Object, Object>()
112 {
113 @Override
114 protected Object doInBackground(Object... params)
115 {
116 saveContact(); // save contact to the database
117 return null;
118 }
119
120 @Override
121 protected void onPostExecute(Object result)
122 {
123 // hide soft keyboard
124 InputMethodManager imm = (InputMethodManager)
125 getActivity().getSystemService(
126 Context.INPUT_METHOD_SERVICE);
127 imm.hideSoftInputFromWindow(
128 getView().getWindowToken(), 0);
129
130 listener.onAddEditCompleted(rowID);
131 }
132 }; // end AsyncTask
133
134 // save the contact to the database using a separate thread
135 saveContactTask.execute((Object[]) null);
136 }
137 else // required contact name is blank, so display error dialog
138 {
139 DialogFragment errorSaving =
140 new DialogFragment()
141 {
142 @Override
143 public Dialog onCreateDialog(Bundle savedInstanceState)
144 {
145 AlertDialog.Builder builder =
146 new AlertDialog.Builder(getActivity());
147 builder.setMessage(R.string.error_message);
148 builder.setPositiveButton(R.string.ok, null);
149 return builder.create();
150 }
151 };
152
153 errorSaving.show(getFragmentManager(), "error saving contact");
154 }
155 } // end method onClick
156 }; // end OnClickListener saveContactButtonClicked
157
Fig. 8.39 | OnClickListener to process Save Contact Button events.
158 // saves contact information to the database
159 private void saveContact()
160 {
161 // get DatabaseConnector to interact with the SQLite database
162 DatabaseConnector databaseConnector =
163 new DatabaseConnector(getActivity());
164
165 if (contactInfoBundle == null)
166 {
167 // insert the contact information into the database
168 rowID = databaseConnector.insertContact(
169 nameEditText.getText().toString(),
170 phoneEditText.getText().toString(),
171 emailEditText.getText().toString(),
172 streetEditText.getText().toString(),
173 cityEditText.getText().toString(),
174 stateEditText.getText().toString(),
175 zipEditText.getText().toString());
176 }
177 else
178 {
179 databaseConnector.updateContact(rowID,
180 nameEditText.getText().toString(),
181 phoneEditText.getText().toString(),
182 emailEditText.getText().toString(),
183 streetEditText.getText().toString(),
184 cityEditText.getText().toString(),
185 stateEditText.getText().toString(),
186 zipEditText.getText().toString());
187 }
188 } // end method saveContact
189 } // end class AddEditFragment
Fig. 8.40 | AddEditFragment method saveContact.
AddEditFragment Method saveContact
The saveContact method (Fig. 8.40) saves the information in this Fragment’s EditTexts. First, lines 162–163 create the DatabaseConnector object, then we check whether the contactInfoBundle is null. If so, this is a new contact and lines 168–175 get the Strings from the EditTexts and pass them to the DatabaseConnector object’s insertContact method to create the new contact. If the Bundle is not null, an existing contact is being updated. In this case, we get the Strings from the EditTexts and pass them to the DatabaseConnector object’s updateContact method, using the existing rowID to indicate which record to update. DatabaseConnector methods insertContact and updateContact each handle opening and closing the database.
8.8. DetailsFragment Class
The DetailsFragment (Figs. 8.41–8.50) displays one contact’s information and provides menu items that enable the user to edit or delete that contact.
1 // DetailsFragment.java
2 // Displays one contact's details
3 package com.deitel.addressbook;
4
5 import android.app.Activity;
6 import android.app.AlertDialog;
7 import android.app.Dialog;
8 import android.app.DialogFragment;
9 import android.app.Fragment;
10 import android.content.DialogInterface;
11 import android.database.Cursor;
12 import android.os.AsyncTask;
13 import android.os.Bundle;
14 import android.view.LayoutInflater;
15 import android.view.Menu;
16 import android.view.MenuInflater;
17 import android.view.MenuItem;
18 import android.view.View;
19 import android.view.ViewGroup;
20 import android.widget.TextView;
21
22 public class DetailsFragment extends Fragment
23 {
Fig. 8.41 | DetailsFragment package statement and import statements.
DetailsFragment package Statement and import Statements
Figure 8.41 lists the package statement, the import statements and the beginning of class ContactListFragment’s declaration. There are no new classes and interfaces used in this class.
DetailsFragmentListener Interface
Figure 8.42 declares the nested interface DetailsFragmentListener containing the callback methods that MainActivity implements to be notified when the user deletes a contact (line 28) and when the user touches the edit menu item to edit a contact (line 31).
24 // callback methods implemented by MainActivity
25 public interface DetailsFragmentListener
26 {
27 // called when a contact is deleted
28 public void onContactDeleted();
29
30 // called to pass Bundle of contact's info for editing
31 public void onEditContact(Bundle arguments);
32 }
33
Fig. 8.42 | DetailsFragmentListener interface.
DetailsFragment Instance Variables
Figure 8.43 shows the class’s instance variables. Line 34 declares variable listener which will refer to the object (MainActivity) that implements the DetailsFragmentListener interface. Variable rowID represents the current contact’s unique row ID in the database. The TextView instance variables (lines 37–43) are used to display the contact’s data on the screen.
34 private DetailsFragmentListener listener;
35
36 private long rowID = -1; // selected contact's rowID
37 private TextView nameTextView; // displays contact's name
38 private TextView phoneTextView; // displays contact's phone
39 private TextView emailTextView; // displays contact's email
40 private TextView streetTextView; // displays contact's street
41 private TextView cityTextView; // displays contact's city
42 private TextView stateTextView; // displays contact's state
43 private TextView zipTextView; // displays contact's zip
44
Fig. 8.43 | DetailsFragment instance variables.
DetailsFragment Overridden Methods onAttach and onDetach
Class DetailsFragment overrides Fragment lifecycle methods onAttach and onDetach (Fig. 8.44) to set instance variable listener when the DetailsFragment is attached and detached, respectively.
45 // set DetailsFragmentListener when fragment attached
46 @Override
47 public void onAttach(Activity activity)
48 {
49 super.onAttach(activity);
50 listener = (DetailsFragmentListener) activity;
51 }
52
53 // remove DetailsFragmentListener when fragment detached
54 @Override
55 public void onDetach()
56 {
57 super.onDetach();
58 listener = null;
59 }
60
Fig. 8.44 | DetailsFragment overridden methods onAttach and onDetach.
DetailsFragment Overridden Method onCreateView
The onCreateView method (Fig. 8.45) obtains the selected contact’s row ID (lines 70–79). If the Fragment is being restored, we load the rowID from the savedInstanceState bundle; otherwise, we get it from the Fragment’s Bundle of arguments. Lines 82–93 inflate the GUI and get references to the TextViews.
61 // called when DetailsFragmentListener's view needs to be created
62 @Override
63 public View onCreateView(LayoutInflater inflater, ViewGroup container,
64 Bundle savedInstanceState)
65 {
66 super.onCreateView(inflater, container, savedInstanceState);
67 setRetainInstance(true); // save fragment across config changes
68
69 // if DetailsFragment is being restored, get saved row ID
70 if (savedInstanceState != null)
71 rowID = savedInstanceState.getLong(MainActivity.ROW_ID);
72 else
73 {
74 // get Bundle of arguments then extract the contact's row ID
75 Bundle arguments = getArguments();
76
77 if (arguments != null)
78 rowID = arguments.getLong(MainActivity.ROW_ID);
79 }
80
81 // inflate DetailsFragment's layout
82 View view =
83 inflater.inflate(R.layout.fragment_details, container, false);
84 setHasOptionsMenu(true); // this fragment has menu items to display
85
86 // get the EditTexts
87 nameTextView = (TextView) view.findViewById(R.id.nameTextView);
88 phoneTextView = (TextView) view.findViewById(R.id.phoneTextView);
89 emailTextView = (TextView) view.findViewById(R.id.emailTextView);
90 streetTextView = (TextView) view.findViewById(R.id.streetTextView);
91 cityTextView = (TextView) view.findViewById(R.id.cityTextView);
92 stateTextView = (TextView) view.findViewById(R.id.stateTextView);
93 zipTextView = (TextView) view.findViewById(R.id.zipTextView);
94 return view;
95 }
96
Fig. 8.45 | DetailsFragment overridden method onCreateView.
DetailsFragment Overridden Method onResume
Fragment lifecycle method onResume (Fig. 8.46) creates and executes an AsyncTask (line 102) of type LoadContactTask (defined in Fig. 8.49) that gets the specified contact from the database and displays its data. Method execute’s argument in this case is the rowID of the contact to load. Every time line 102 executes, it creates a new LoadContactTask object—again, this is required because each AsyncTask can be executed only once.
97 // called when the DetailsFragment resumes
98 @Override
99 public void onResume()
100 {
101 super.onResume();
102 new LoadContactTask().execute(rowID); // load contact at rowID
103 }
104
Fig. 8.46 | DetailsFragment overridden method onResume.
DetailsFragment Overridden Method onSaveInstanceState
Fragment method onSaveInstanceState (Fig. 8.47) saves the selected contact’s rowID when the configuration of the device changes during the app’s execution—for example, when the user rotates the device or slides out a keyboard on a device with a hard keyboard. The state of the GUI components is saved for you automatically, but any other items that you wish to restore during a configuration change should be stored in the Bundle that onSaveInstanceState receives.
105 // save currently displayed contact's row ID
106 @Override
107 public void onSaveInstanceState(Bundle outState)
108 {
109 super.onSaveInstanceState(outState);
110 outState.putLong(MainActivity.ROW_ID, rowID);
111 }
112
Fig. 8.47 | DetailsFragment overridden method onSaveInstanceState.
DetailsFragment Overridden Methods onCreateOptionsMenu and onOptionsItemSelected
The DetailsFragment’s menu provides options for editing the current contact and for deleting it. Method onCreateOptionsMenu (Fig. 8.48, lines 114–119) inflates the menu resource file fragment_details_menu.xml. Method onOptionsItemSelected (lines 122–146) uses the selected MenuItem’s resource ID to determine which one was selected. If the user selected the menu item with ID R.id.action_edit, lines 129–137 create a Bundle containing the contact’s data, then line 138 passes the Bundle to the DetailsFragment-Listener for use in the AddEditFragment. If the user selected the menu item with ID R.id.action_delete, line 141 calls method deleteContact (Fig. 8.50).
113 // display this fragment's menu items
114 @Override
115 public void onCreateOptionsMenu(Menu menu, MenuInflater inflater)
116 {
117 super.onCreateOptionsMenu(menu, inflater);
118 inflater.inflate(R.menu.fragment_details_menu, menu);
119 }
120
121 // handle menu item selections
122 @Override
123 public boolean onOptionsItemSelected(MenuItem item)
124 {
125 switch (item.getItemId())
126 {
127 case R.id.action_edit:
128 // create Bundle containing contact data to edit
129 Bundle arguments = new Bundle();
130 arguments.putLong(MainActivity.ROW_ID, rowID);
131 arguments.putCharSequence("name", nameTextView.getText());
132 arguments.putCharSequence("phone", phoneTextView.getText());
133 arguments.putCharSequence("email", emailTextView.getText());
134 arguments.putCharSequence("street", streetTextView.getText());
135 arguments.putCharSequence("city", cityTextView.getText());
136 arguments.putCharSequence("state", stateTextView.getText());
137 arguments.putCharSequence("zip", zipTextView.getText());
138 listener.onEditContact(arguments); // pass Bundle to listener
139 return true;
140 case R.id.action_delete:
141 deleteContact();
142 return true;
143 }
144
145 return super.onOptionsItemSelected(item);
146 }
147
Fig. 8.48 | DetailsFragment overridden methods onCreateOptionsMenu and onOptionsItemSelected.
LoadContactTask Subclass of AsyncTask
Nested class LoadContactTask (Fig. 8.49) extends class AsyncTask and defines how to interact with the database to get one contact’s information for display. In this case the three generic type parameters are:
• Long for the variable-length argument list passed to AsyncTask’s doInBackground method. This will contain the row ID needed to locate one contact.
• Object for the variable-length argument list passed to AsyncTask’s onProgressUpdate method, which we don’t use in this example.
• Cursor for the type of the task’s result, which is passed to the AsyncTask’s onPostExecute method.
148 // performs database query outside GUI thread
149 private class LoadContactTask extends AsyncTask<Long, Object, Cursor>
150 {
151 DatabaseConnector databaseConnector =
152 new DatabaseConnector(getActivity());
153
154 // open database & get Cursor representing specified contact's data
155 @Override
156 protected Cursor doInBackground(Long... params)
157 {
158 databaseConnector.open();
159 return databaseConnector.getOneContact(params[0]);
160 }
161
162 // use the Cursor returned from the doInBackground method
163 @Override
164 protected void onPostExecute(Cursor result)
165 {
166 super.onPostExecute(result);
167 result.moveToFirst(); // move to the first item
168
169 // get the column index for each data item
170 int nameIndex = result.getColumnIndex("name");
171 int phoneIndex = result.getColumnIndex("phone");
172 int emailIndex = result.getColumnIndex("email");
173 int streetIndex = result.getColumnIndex("street");
174 int cityIndex = result.getColumnIndex("city");
175 int stateIndex = result.getColumnIndex("state");
176 int zipIndex = result.getColumnIndex("zip");
177
178 // fill TextViews with the retrieved data
179 nameTextView.setText(result.getString(nameIndex));
180 phoneTextView.setText(result.getString(phoneIndex));
181 emailTextView.setText(result.getString(emailIndex));
182 streetTextView.setText(result.getString(streetIndex));
183 cityTextView.setText(result.getString(cityIndex));
184 stateTextView.setText(result.getString(stateIndex));
185 zipTextView.setText(result.getString(zipIndex));
186
187 result.close(); // close the result cursor
188 databaseConnector.close(); // close database connection
189 } // end method onPostExecute
190 } // end class LoadContactTask
191
Fig. 8.49 | LoadContactTask subclass of AsyncTask.
Lines 151–152 create a new object of our DatabaseConnector class (Section 8.9). Method doInBackground (lines 155–160) opens the connection to the database and calls the DatabaseConnector’s getOneContact method, which queries the database to get the contact with the specified rowID that was passed as the only argument to this AsyncTask’s execute method. In doInBackground, the rowID is stored in params[0].
The resulting Cursor is passed to method onPostExecute (lines 163–189). The Cursor is positioned before the first row of the result set. In this case, the result set will contain only one record, so Cursor method moveToFirst (line 167) can be used to move the Cursor to the first row in the result set. [Note: It’s considered good practice to ensure that Cursor method moveToFirst returns true before attempting to get data from the Cursor. In this app, there will always be a row in the Cursor.]
We use Cursor’s getColumnIndex method (lines 170–176) to get the column indices for the columns in the database’s contacts table. (We hard coded the column names in this app, but these could be implemented as String constants as we did for ROW_ID in class MainActivity in Fig. 8.14.) This method returns -1 if the column is not in the query result. Class Cursor also provides method getColumnIndexOrThrow if you prefer to get an exception when the specified column name does not exist. Lines 179–185 use Cursor’s getString method to retrieve the String values from the Cursor’s columns, then display these values in the corresponding TextViews. Lines 187–188 close the Cursor and the connection to the database, as they’re no longer needed. It’s good practice to release resources like database connections when they are not being used so that other activities can use the resources.
Method deleteContact and DialogFragment confirmDelete
Method deleteContact (Fig. 8.50, lines 193–197) displays a DialogFragment (lines 200–252) asking the user to confirm that the currently displayed contact should be deleted. If so, the DialogFragment uses an AsyncTask to delete the contact from the database. If the user clicks the Delete Button in the dialog, lines 222–223 create a new DatabaseConnector. Lines 226–241 create an AsyncTask that, when executed (line 244), passes a Long value representing the contact’s row ID to the doInBackground, which then deletes the contact. Line 232 calls the DatabaseConnector’s deleteContact method to perform the actual deletion. When the doInBackground completes execution, line 239 calls the listener’s onContactDeleted method so that MainActivity can remove the DetailsFragment from the screen.
192 // delete a contact
193 private void deleteContact()
194 {
195 // use FragmentManager to display the confirmDelete DialogFragment
196 confirmDelete.show(getFragmentManager(), "confirm delete");
197 }
198
199 // DialogFragment to confirm deletion of contact
200 private DialogFragment confirmDelete =
201 new DialogFragment()
202 {
203 // create an AlertDialog and return it
204 @Override
205 public Dialog onCreateDialog(Bundle bundle)
206 {
207 // create a new AlertDialog Builder
208 AlertDialog.Builder builder =
209 new AlertDialog.Builder(getActivity());
210
211 builder.setTitle(R.string.confirm_title);
212 builder.setMessage(R.string.confirm_message);
213
214 // provide an OK button that simply dismisses the dialog
215 builder.setPositiveButton(R.string.button_delete,
216 new DialogInterface.OnClickListener()
217 {
218 @Override
219 public void onClick(
220 DialogInterface dialog, int button)
221 {
222 final DatabaseConnector databaseConnector =
223 new DatabaseConnector(getActivity());
224
225 // AsyncTask deletes contact and notifies listener
226 AsyncTask<Long, Object, Object> deleteTask =
227 new AsyncTask<Long, Object, Object>()
228 {
229 @Override
230 protected Object doInBackground(Long... params)
231 {
232 databaseConnector.deleteContact(params[0]);
233 return null;
234 }
235
236 @Override
237 protected void onPostExecute(Object result)
238 {
239 listener.onContactDeleted();
240 }
241 }; // end new AsyncTask
242
243 // execute the AsyncTask to delete contact at rowID
244 deleteTask.execute(new Long[] { rowID });
245 } // end method onClick
246 } // end anonymous inner class
247 ); // end call to method setPositiveButton
248
249 builder.setNegativeButton(R.string.button_cancel, null);
250 return builder.create(); // return the AlertDialog
251 }
252 }; // end DialogFragment anonymous inner class
253 } // end class DetailsFragment
Fig. 8.50 | Method deleteContact and DialogFragment confirmDelete.
8.9. DatabaseConnector Utility Class
The DatabaseConnector utility class (Figs. 8.51–8.58) manages this app’s interactions with SQLite for creating and manipulating the UserContacts database, which contains one table named contacts.
1 // DatabaseConnector.java
2 // Provides easy connection and creation of UserContacts database.
3 package com.deitel.addressbook;
4
5 import android.content.ContentValues;
6 import android.content.Context;
7 import android.database.Cursor;
8 import android.database.SQLException;
9 import android.database.sqlite.SQLiteDatabase;
10 import android.database.sqlite.SQLiteOpenHelper;
11 import android.database.sqlite.SQLiteDatabase.CursorFactory;
12
13 public class DatabaseConnector
14 {
15 // database name
16 private static final String DATABASE_NAME = "UserContacts";
17
18 private SQLiteDatabase database; // for interacting with the database
19 private DatabaseOpenHelper databaseOpenHelper; // creates the database
20
Fig. 8.51 | DatabaseConnector class’s package statement, import statements and instance
package Statement, import Statements and Fields
Figure 8.51 lists class DatabaseConnector’s package statement, import statements and fields. We’ve highlighted the import statements for the new classes and interfaces discussed in Section 8.3. The String constant DATABASE_NAME (line 16) specifies the name of the database that will be created or opened. Database names must be unique within a specific app but need not be unique across apps. A SQLiteDatabase object (line 18) provides read/write access to a SQLite database. The DatabaseOpenHelper (line 19) is a private nested class that extends abstract class SQLiteOpenHelper—such a class is used to manage creating, opening and upgrading databases (perhaps to modify a database’s structure). We discuss SQLiteOpenHelper in more detail in Fig. 8.58.
DatabaseConnector Constructor and Methods open and close
DatabaseConnection’s constructor (Fig. 8.52, lines 22–27) creates a new object of class DatabaseOpenHelper (Fig. 8.58), which will be used to open or create the database. We discuss the details of the DatabaseOpenHelper constructor in Fig. 8.58. The open method (lines 30–34) attempts to establish a connection to the database and throws a SQLException if the connection attempt fails. Method getWritableDatabase (line 33), which is inherited from SQLiteOpenHelper, returns a SQLiteDatabase object. If the database has not yet been created, this method will create it; otherwise, the method will open it. Once the database is opened successfully, it will be cached by the operating system to improve the performance of future database interactions. The close method (lines 37–41) closes the database connection by calling the inherited SQLiteOpenHelper method close.
21 // public constructor for DatabaseConnector
22 public DatabaseConnector(Context context)
23 {
24 // create a new DatabaseOpenHelper
25 databaseOpenHelper =
26 new DatabaseOpenHelper(context, DATABASE_NAME, null, 1);
27 }
28
29 // open the database connection
30 public void open() throws SQLException
31 {
32 // create or open a database for reading/writing
33 database = databaseOpenHelper.getWritableDatabase();
34 }
35
36 // close the database connection
37 public void close()
38 {
39 if (database != null)
40 database.close(); // close the database connection
41 }
42
Fig. 8.52 | DatabaseConnector constructor and methods open and close.
DatabaseConnector Method insertContact
Method insertContact (Fig. 8.53) inserts a new contact with the given information into the database. We first put each piece of contact information into a new ContentValues object (lines 47–54), which maintains a map of key–value pairs—the database’s column names are the keys. Lines 56–58 open the database, insert the new contact and close the database. SQLiteDatabase’s insert method (line 57) inserts the values from the given ContentValues into the table specified as the first argument—the "contacts" table in this case. The second parameter of this method, which is not used in this app, is named null-ColumnHack and is needed because SQLite does not support inserting a completely empty row into a table—this would be the equivalent of passing an empty ContentValues object to insert. Instead of making it illegal to pass an empty ContentValues to the method, the nullColumnHack parameter is used to identify a column that accepts NULL values.
43 // inserts a new contact in the database
44 public long insertContact(String name, String phone, String email,
45 String street, String city, String state, String zip)
46 {
47 ContentValues newContact = new ContentValues();
48 newContact.put("name", name);
49 newContact.put("phone", phone);
50 newContact.put("email", email);
51 newContact.put("street", street);
52 newContact.put("city", city);
53 newContact.put("state", state);
54 newContact.put("zip", zip);
55
56 open(); // open the database
57 long rowID = database.insert("contacts", null, newContact);
58 close(); // close the database
59 return rowID;
60 } // end method insertContact
61
Fig. 8.53 | DatabaseConnector method insertContact.
DatabaseConnector Method updateContact
Method updateContact (Fig. 8.54) is similar to method insertContact, except that it calls SQLiteDatabase’s update method (line 76) to update an existing contact. The update method’s third argument represents a SQL WHERE clause (without the keyword WHERE) that specifies which record(s) to update. In this case, we use the record’s row ID to update a specific contact.
62 // updates an existing contact in the database
63 public void updateContact(long id, String name, String phone,
64 String email, String street, String city, String state, String zip)
65 {
66 ContentValues editContact = new ContentValues();
67 editContact.put("name", name);
68 editContact.put("phone", phone);
69 editContact.put("email", email);
70 editContact.put("street", street);
71 editContact.put("city", city);
72 editContact.put("state", state);
73 editContact.put("zip", zip);
74
75 open(); // open the database
76 database.update("contacts", editContact, "_id=" + id, null);
77 close(); // close the database
78 }
79
Fig. 8.54 | DatabaseConnector method updateContact.
Method getAllContacts
Method getAllContacts (Fig. 8.55) uses SqLiteDatabase’s query method (lines 83–84) to retrieve a Cursor that provides access to the IDs and names of all the contacts in the database. The arguments are:
• the name of the table to query.
• a String array of the column names to return (the _id and name columns here)—null returns all columns in the table, which is generally a poor programming practice, because to conserve memory, processor time and battery power, you should obtain only the data you need.
• a SQL WHERE clause (without the keyword WHERE), or null to return all rows.
• a String array of arguments to be substituted into the WHERE clause wherever ? is used as a placeholder for an argument value, or null if there are no arguments in the WHERE clause.
• a SQL GROUP BY clause (without the keywords GROUP BY), or null if you don’t want to group the results.
• a SQL HAVING clause (without the keyword HAVING) to specify which groups from the GROUP BY clause to include in the results—null is required if the GROUP BY clause is null.
• a SQL ORDER BY clause (without the keywords ORDER BY) to specify the order of the results, or null if you don’t wish to specify the order.
80 // return a Cursor with all contact names in the database
81 public Cursor getAllContacts()
82 {
83 return database.query("contacts", new String[] {"_id", "name"},
84 null, null, null, null, "name");
85 }
86
Fig. 8.55 | DatabaseConnector method getAllContacts.
The Cursor returned by method query contains all the table rows that match the method’s arguments—the so-called result set. The Cursor is positioned before the first row of the result set—Cursor’s various move methods can be used to move the Cursor through the result set for processing.
Method getOneContact
Method getOneContact (Fig. 8.56) also uses SqLiteDatabase’s query method to query the database. In this case, we retrieve all the columns in the database for the contact with the specified ID.
87 // return a Cursor containing specified contact's information
88 public Cursor getOneContact(long id)
89 {
90 return database.query(
91 "contacts", null, "_id=" + id, null, null, null, null);
92 }
93
Fig. 8.56 | DatabaseConnector method getOneContact.
Method deleteContact
Method deleteContact (Fig. 8.57) uses SqLiteDatabase’s delete method (line 98) to delete a contact from the database. In this case, we retrieve all the columns in the database for the contact with the specified ID. The three arguments are the database table from which to delete the record, the WHERE clause (without the keyword WHERE) and, if the WHERE clause has arguments, a String array of values to substitute into the WHERE clause (null in our case).
94 // delete the contact specified by the given String name
95 public void deleteContact(long id)
96 {
97 open(); // open the database
98 database.delete("contacts", "_id=" + id, null);
99 close(); // close the database
100 }
101
Fig. 8.57 | DatabaseConnector method deleteContact.
private Nested Class DatabaseOpenHelper That Extends SQLiteOpenHelper
The private nested class DatabaseOpenHelper (Fig. 8.58) extends abstract class SQLiteOpenHelper, which helps apps create databases and manage version changes. The constructor (lines 105–109) simply calls the superclass constructor, which requires four arguments:
• the Context in which the database is being created or opened,
• the database name—this can be null if you wish to use an in-memory database,
• the CursorFactory to use—null indicates that you wish to use the default SQLite CursorFactory (typically for most apps) and
• the database version number (starting from 1).
102 private class DatabaseOpenHelper extends SQLiteOpenHelper
103 {
104 // constructor
105 public DatabaseOpenHelper(Context context, String name,
106 CursorFactory factory, int version)
107 {
108 super(context, name, factory, version);
109 }
110
111 // creates the contacts table when the database is created
112 @Override
113 public void onCreate(SQLiteDatabase db)
114 {
115 // query to create a new table named contacts
116 String createQuery = "CREATE TABLE contacts" +
117 "(_id integer primary key autoincrement," +
118 "name TEXT, phone TEXT, email TEXT, " +
119 "street TEXT, city TEXT, state TEXT, zip TEXT);";
120
121 db.execSQL(createQuery); // execute query to create the database
122 }
123
124 @Override
125 public void onUpgrade(SQLiteDatabase db, int oldVersion,
126 int newVersion)
127 {
128 }
129 } // end class DatabaseOpenHelper
130 } // end class DatabaseConnector
Fig. 8.58 | SQLiteOpenHelper class DatabaseOpenHelper.
You must override this class’s abstract methods onCreate and onUpgrade. If the database does not yet exist, the DatabaseOpenHelper’s onCreate method will be called to create it. If you supply a newer version number than the database version currently stored on the device, the DatabaseOpenHelper’s onUpgrade method will be called to upgrade the database to the new version (perhaps to add tables or to add columns to an existing table).
The onCreate method (lines 112–122) specifies the table to create with the SQL CREATE TABLE command, which is defined as a String (lines 116–119). In this case, the contacts table contains an integer primary key field (_id) that’s auto-incremented, and text fields for all the other columns. Line 121 uses SQLiteDatabase’s execSQL method to execute the CREATE TABLE command. Since we don’t need to upgrade the database, we simply override method onUpgrade with an empty body. Class SQLiteOpenHelper also provides the onDowngrade method that can be used to downgrade a database when the currently stored version has a higher version number than the one requested in the call to class SQLiteOpenHelper’s constructor. Downgrading might be used to revert the database back to a prior version with fewer columns in a table or fewer tables in the database—perhaps to fix a bug in the app.
All the SQLiteDatabase methods we used in class DatabaseConnector have corresponding methods which perform the same operations but throw exceptions on failure, as opposed to simply returning -1 (e.g., insertOrThrow vs. insert). These methods are interchangeable, allowing you to decide how to deal with database read and write errors.
8.10. Wrap-Up
In this chapter, you created an Address Book app that enables users to add, view, edit and delete contact information that’s stored in a SQLite database. You defined common GUI component attribute–value pairs as XML style resources, then applied the styles to all components that share those values by using the components’ style attribute. You added a border to a TextView by specifying a Drawable as the value for the TextView’s android:background attribute and you created a custom Drawable using an XML representation of a shape. You also used Android standard icons to enhance the visual appearance of the app’s menu items.
When an Fragment’s primary task is to display a scrollable list of items, you learned that you can extend class ListFragment to create a Fragment that displays a ListView in its default layout. You used this to display the contacts stored in the app’s database. You bound data to the ListView via a CursorAdapter that displayed the results of a database query.
In this app’s Activity, you used FragmentTransactions to add Fragments to and replace Fragments in the GUI dynamically. You also used the Fragment back stack to support the back button for returning to a previously displayed Fragment and to allow the app’s Activity to programmatically return to previous Fragments.
We demonstrated how to communicate data between Fragments and a host Activity or the Activity’s other Fragments via interfaces of callback methods that are implemented by the host Activity. You also used Bundles to pass arguments to Fragments.
You used a subclass of SQLiteOpenHelper to simplify creating the database and to obtain a SQLiteDatabase object for manipulating a database’s contents. You processed query results via a Cursor. You used subclasses of AsyncTask to perform database tasks outside the GUI thread and return results to the GUI thread. This allowed you to take advantage of Android’s threading capabilities without directly creating and manipulating threads.
In Chapter 9, we discuss the business side of Android app development. You’ll see how to prepare your app for submission to Google Play, including making icons. We’ll discuss how to test your apps on devices and publish them on Google Play. We discuss the characteristics of great apps and the Android design guidelines to follow. We provide tips for pricing and marketing your app. We also review the benefits of offering your app for free to drive sales of other products, such as a more feature-rich version of the app or premium content. We show how to use Google Play to track app sales, payments and more.