
Most mobile applications are developed with established assumptions about the users or user types. In software testing, the term user personas reflects such user types, including their possible usage flows and how the application might help them in their daily activities. Despite the fact that user personas are created during the early stages of the software development lifecycle, they may not consider people with disabilities.
Around 300 million people around the world have a visual impairment and use mobile applications with the help of specific accessibility tools installed on their mobile devices.
Android Accessibility Tools
TalkBack—The preinstalled screen reader application that allows users to interact with Android applications without visual access to the screen. Users with visual impairments may rely on TalkBack to use your app.
BrailleBack —An accessibility service that helps users with visual impairments use Braille devices. Working in combination with the TalkBack app, it provides a combined Braille and speech experience.
Voice Access —Lets users control their Android devices with voice commands. Voice Access is available on devices running Android 5.0 (API level 21) and higher.
Label UI elements —Many screen readers, such as TalkBack, rely on this service to properly explain the function of a particular control. For example, for UI objects such as ImageView and ImageButton objects, the android:contentDescription parameter is set to specify its purpose. For EditText objects, android:hint is used.
Group content —Just as the visual UI is grouped into understandable components like lists with list items, so the screen reader content should also be grouped in a logical way. Instead of being presented as separate elements, items should be read back as a single announcement—a TO-DO item with a title, a description, and a checkbox state.
Create an easy-to-follow navigation —Applications should support keyboards navigation and navigation gestures. Avoid having UI elements fade out or disappear after a certain amount of time.
Make touch targets large —By providing larger touch targets, you make it substantially easier for users to navigate your app. In general, according to the guidelines, the touchable area of focusable item should be a minimum of 48dpx48dp.
Provide adequate color contrast —People with poor vision or those who use devices with dimmed displays have difficulty reading information on the screen. By providing increased contrast ratios between the foreground and background colors in your app, you make it easier for users to navigate within and between screens.
Testing Application Accessibility
The Espresso testing framework supports writing automated accessibility tests that evaluate the accessibility of your application. In order to start writing accessibility tests, add the following dependencies to the build.gradle file.
Note
AccessibilityChecks should be enabled only once per test class, otherwise, the test will fail. Therefore, the @BeforeClass annotation should be used with methods in which checks are enabled. In Kotlin, the method annotated with the @BeforeClass annotation should be declared in the class companion object.
With AccessibilityChecks.enable() set, checks are enabled each time the Espresso ViewAction is called on the UI element, including its descendants. Such approach limits accessibility testing to UI test coverage.
To cover more UI elements within the test run, set setRunChecksFromRootView(true), which enables you to validate the entire view hierarchy.
Unfortunately, it is not possible to set accessibility checks on each test method or test class, or to disable it after a test run.
By the way, you may notice accessibility issues with the native Android UI elements like snackbar. Suppressing them sometimes is not an easy task. In the previous code sample, the withChild() view matcher was used twice to locate the snackbar root layout and suppress the accessibility issue for it.

Accessibility logcat logs when setThrowExceptionForErrors(false) is set
You may notice that the header parts in both cases are identical.
In addition to automated accessibility testing, Google developers also provide a possibility to test manually using the Accessibility Scanner application ( https://play.google.com/store/apps/details?id=com.google.android.apps.accessibility.auditor ).
This application allows you to check for accessibility issues types and better understand errors shown in your Espresso accessibility test reports or inside the logcat logs based on the visual representation.
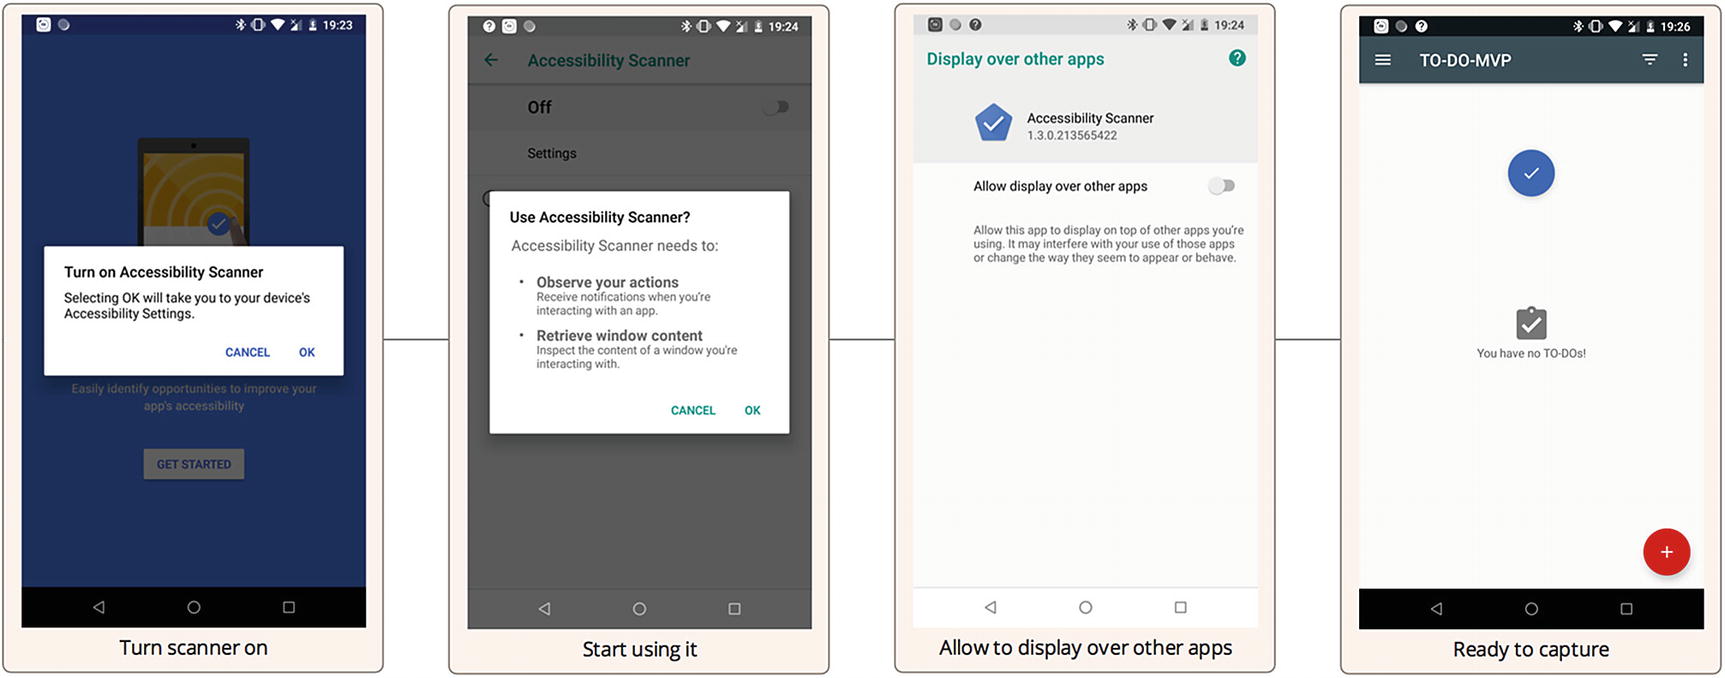
Start using the Accessibility scanner flow
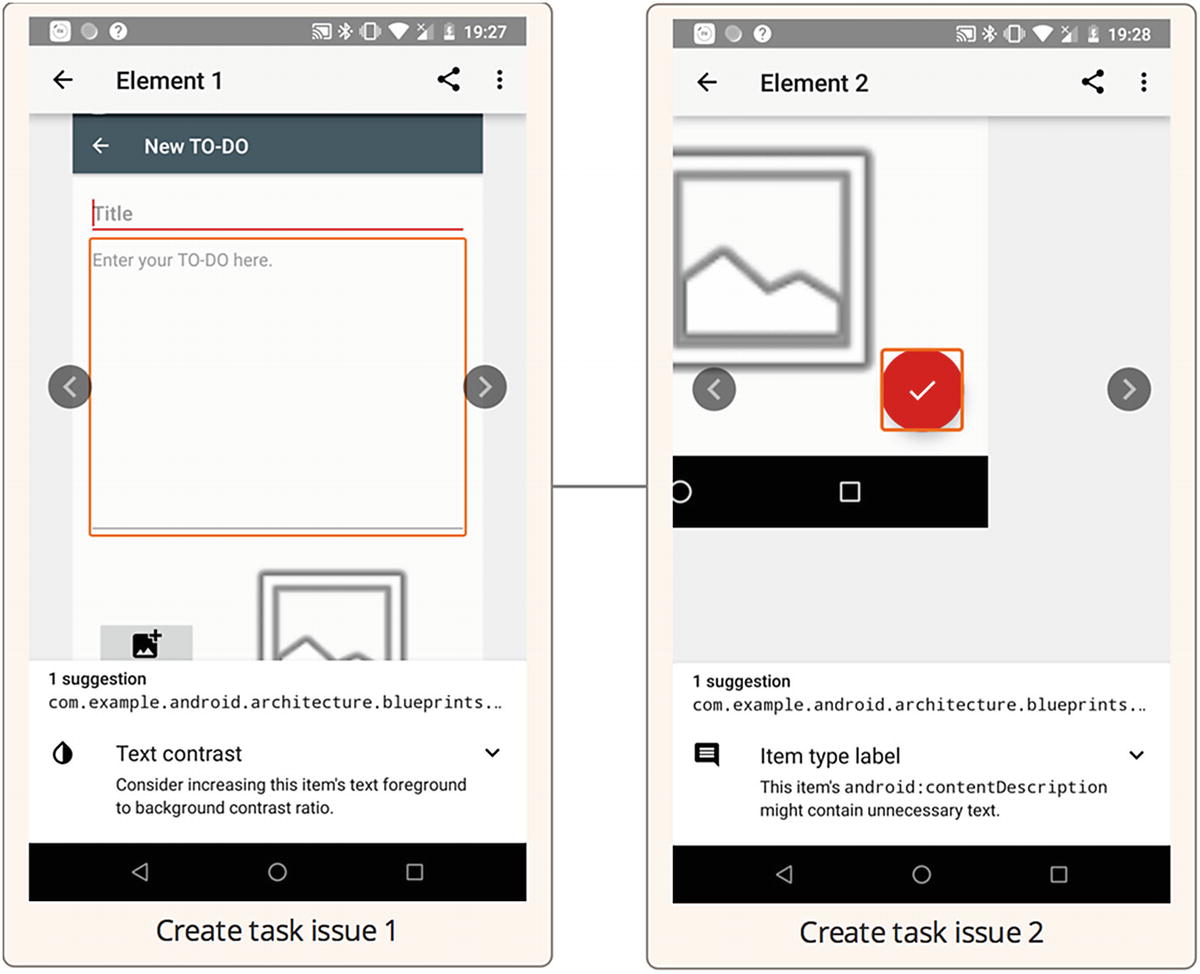
Accessibility issues in the Create Task view
Exercise 19
- 1.
Install the Accessibility Scanner application and enable accessibility checks. Launch the sample TO-DO application and perform the accessibility checks across the application. Observe the issue types.
- 2.
Run tests from the AccessibilityTest.kt class with the AccessibilityChecks.enable() option only. Observe the test results.
- 3.
Run tests from the AccessibilityTest.kt class with the setRunChecksFromRootView(true) option. Observe the test results.
- 4.
Suppress some accessibility failures, as shown in the AccessibilityTest.kt class’s setAccessibilityPrefs() method, and run the tests again. Observe the test results.
- 5.
Add the setThrowExceptionForErrors(false) parameter and run the tests. Observe the test results and device logcat logs.
Summary
Unfortunately, accessibility testing is frequently ignored, with the focus mostly on functional testing. It may be not clear from the first look, but good accessibility support is important too. Its main goal is to make applications accessible to people with visual impairments, but it also has nice side effects—it makes your applications more testable and helps you understand different application use cases. It maybe even result in your application getting a higher Google PlayStore rating, since Android-crawling algorithms may analyze the application from the accessibility side and give preference to those with proper accessibility support.