
Many programming languages rely on the concept of a thread for work that runs in the background – or, as it is often called, asynchronously. Threads are responsible for managing execution of your program. A thread has a sequence of instructions that it executes, performing them in the order they are declared in.
An individual thread can only do so much work in a set period of time, so to keep the system responsive to the user while also performing complicated tasks, developers distribute work across many threads. On an individual device, the system can have multiple threads, and each of those threads can execute their instructions simultaneously.
The primary thread, which manages the work the user interacts with directly, is called the main thread or UI thread. Up until now, all the code that you have written has executed on the main thread. In fact, on Android all the code that directly interacts with the UI must be executed on the main thread.
On the other hand, Android forbids code that makes network requests or interacts with a database on the main thread. These kinds of operations can take a long time to execute, so they can block the thread. When a thread is blocked, it is unable to respond to user input, making your application appear frozen. Thankfully, you have access to many threads to perform various types of work. For the database work in this chapter, you will offload that execution to a background thread.
By using a background thread, you will be able to execute long-running work while the main thread continues without pause. Once you have successfully queried the database for the list of crimes on the background thread, you will pass that list back over to the main thread, where you can update your RecyclerView.
Unfortunately, threads are a fairly low-level API, making them difficult to work with. There is an implementation of threads on the Java platform, and you can create threads directly on Android, but it is very easy to make mistakes when doing so – mistakes that can lead to the application wasting resources or crashing unexpectedly.
This is where coroutines come in. Coroutines are Kotlin’s first-party solution for defining work that will run asynchronously and are fully supported on Android. They are based on the idea of functions being able to suspend, meaning that a function can be paused until a long-running operation completes. When the code running in a coroutine is suspended, the thread that the coroutine was executing on is free to work on other things, like drawing your UI, responding to touch events, or making more expensive calculations.
Coroutines provide a high-level and safer set of tools to help you build asynchronous code. Under the hood, Kotlin’s coroutines use threads to perform work in parallel, but you often do not have to worry about this detail. Coroutines make it easy to start work on the main thread, hop over to a background thread to perform asynchronous work, and then return the result back to the main thread.
To keep this book at a reasonable length, we cannot explain Kotlin coroutines in full. If coroutines are entirely new to you, JetBrains has excellent documentation on how to use them (kotlinlang.org/docs/coroutines-overview.html). Also, there is a little book written by some very cool folks titled “Kotlin Programming: The Big Nerd Ranch Guide.” That book does an excellent job explaining the basics of coroutines and how to use them, as well as other Kotlin topics. We highly recommend that book.
In this chapter and throughout this book, we will primarily focus on how to use coroutines in the context of an Android app.
Your work will begin with the familiar step of adding dependencies to your build.gradle file. You need to add the core Coroutines library, a library to hook up the main thread in Android to your coroutines, and a library to enable you to safely consume data coming from a coroutine inside your Fragment. Open the build.gradle file labeled (Module: CriminalIntent.app) and add those three dependencies:
Listing 12.1 Adding coroutines to your project’s build (app/build.gradle)
...
dependencies {
    ...
    implementation 'androidx.recyclerview:recyclerview:1.2.1'
    implementation 'org.jetbrains.kotlinx:kotlinx-coroutines-core:1.6.0'
    implementation 'org.jetbrains.kotlinx:kotlinx-coroutines-android:1.6.0'
    implementation 'androidx.lifecycle:lifecycle-runtime-ktx:2.4.1'
    testImplementation 'junit:junit:4.13.2'
    ...
}
Do not forget to click the ![]() Sync Project with Gradle Files button or the Sync Now button after you have made these changes.
Sync Project with Gradle Files button or the Sync Now button after you have made these changes.
Before you get into using coroutines with a database, let’s take a quick tour of coroutines using the existing hardcoded data. To run your code in a coroutine, you use a coroutine builder. A coroutine builder is a function that creates a new coroutine. Most coroutine builders also start executing the code within the coroutine immediately after creating it.
Several builders are defined for you in the Coroutines library. The most commonly used coroutine builder is launch, a function that is defined as an extension to a class called CoroutineScope.
Every coroutine builder launches its coroutines inside a coroutine scope. A coroutine’s scope has control over how the coroutine’s code executes. This includes setting up the coroutine, canceling the coroutine, and choosing which thread will be used to run the code.
On Android, this idea of scopes maps neatly onto the various lifecycles you have encountered so far. The Activity, Fragment, and ViewModel classes have unique lifecycles and coroutine scopes to match. For ViewModels, you have access to the viewModelScope class property. This viewModelScope is available from the time your ViewModel is initialized, and it cancels any coroutine work still running when the ViewModel is cleared out from memory.
Open CrimeListViewModel.kt and launch a coroutine using the viewModelScope property, wrapping the initialization of your list of crimes inside the new coroutine.
Listing 12.2 Launching your first coroutine (CrimeListViewModel.kt)
class CrimeListViewModel : ViewModel() {

    val crimes = mutableListOf<Crime>()

    init {
        viewModelScope.launch {
            for (i in 0 until 100) {
                val crime = Crime(
                    id = UUID.randomUUID(),
                    title ="Crime #$i",
                    date = Date(),
                    isSolved = i % 2 == 0
                )

                crimes += crime
            }
        }
    }
}
On its own, that code does not do much. But now that you have launched a coroutine, you can invoke suspending functions within it. A suspending function is a function that can be paused until a long-running operation can be completed. This may sound similar to long-running functions that block a thread; the big difference is that coroutines are able to be much more resource friendly.
Behind the scenes, Kotlin saves and restores the function state between suspending function calls. This allows the original function call to be temporarily freed from memory until it is ready to be resumed. Because of these optimizations, coroutines are considerably more resource efficient than native threads.
One of the most basic suspending functions is delay(timeMillis: Long). As the name suggests, this function delays a coroutine – without blocking a thread – for a specified number of milliseconds. Add a call to this function, as well as some logging calls, to your initialization block.
Listing 12.3 Delaying work (CrimeListViewModel.kt)
private const val TAG = "CrimeListViewModel"

class CrimeListViewModel : ViewModel() {

    val crimes = mutableListOf<Crime>()

    init {
        Log.d(TAG, "init starting")
        viewModelScope.launch {
            Log.d(TAG, "coroutine launched")
            delay(5000)
            for (i in 0 until 100) {
                val crime = Crime(
                    id = UUID.randomUUID(),
                    title ="Crime #$i",
                    date = Date(),
                    isSolved = i % 2 == 0
                )

                crimes += crime
            }
            Log.d(TAG, "Loading crimes finished")
        }
    }
}
Open Logcat and search for CrimeListViewModel, then run your app. You should see the two initialization messages print out and then, five seconds later, “Loading crimes finished” should print out.
Because delay is running inside a coroutine, during the five seconds that the function is counting milliseconds your UI is still capable of drawing any new updates and can instantly respond to user input (Figure 12.2). (If this were not the case, your users would see a system dialog saying “CriminalIntent isn’t responding” with the options to kill the app or wait for it to respond.)

Coroutines allow you to perform asynchronous code in a resource- and performance-friendly way. If you were using a thread directly, you would need to do more setup to accomplish the same result correctly and without wasting system resources.
(If you took a peek at your Android device when running this new code, you might have noticed that the crimes no longer display in your RecyclerView. You might already know why that is happening, and you will learn how to solve that problem shortly.)
You can also define your own suspending functions.
Suspending functions can take in parameters, use visibility modifiers, and return values, just like regular functions.
All you need to do to convert one of your regular functions to a suspending function is add the suspend modifier to the function definition.
Marking a function as a suspending function does limit the number of places where you can invoke it, because you need a coroutine scope to invoke a suspending function. But when you make a function a suspending function, you can then call other suspending functions within it. To see this, move your crime loading code into its own suspending function. Within the new loadCrimes() suspending function, you can call the delay() suspending function.
Listing 12.4 Defining your own suspending function (CrimeListViewModel.kt)
private const val TAG = "CrimeListViewModel"

class CrimeListViewModel : ViewModel() {
    ...
    init {
        Log.d(TAG, "init starting")
        viewModelScope.launch {
            Log.d(TAG, "coroutine launched")
            delay(5000)
            for (i in 0 until 100) {
                val crime = Crime(
                    id = UUID.randomUUID(),
                    title = "Crime #$i",
                    date = Date(),
                    isSolved = i % 2 == 0
                )

                crimes += crime
            }
            crimes += loadCrimes()
            Log.d(TAG, "Loading crimes finished")
        }
    }

    suspend fun loadCrimes(): List<Crime> {
        val result = mutableListOf<Crime>()
        delay(5000)
        for (i in 0 until 100) {
            val crime = Crime(
                id = UUID.randomUUID(),
                title = "Crime #$i",
                date = Date(),
                isSolved = i % 2 == 0
            )

            result += crime
        }
        return result
    }
}
Run your app again to confirm that the behavior is the same.
Right now, you access the crimes property from your CrimeListViewModel in the onCreateView(…) callback within your CrimeListFragment. This callback is invoked right after the fragment is created. But with the changes you have made in this chapter, you do not add the list of crimes to the crimes property until five seconds have passed. That is why your RecyclerView is no longer showing the list of crimes.
This is a textbook example of a race condition, a common problem in multithreaded code where the timing of independent events affects the output of the code. In this case, it is extremely unlikely that the crimes property can be properly loaded with data before the onCreateView(…) function is invoked.
Instead of trying to access your asynchronously loaded data in an error-prone way, you should instead reach for a more reliable approach. As we mentioned earlier, the Fragment and Activity classes have properties to access coroutine scopes for their respective lifecycles. Both classes have a lifecycleScope property, but you should prefer the viewLifecycleScope when using coroutines with Fragments.
(The reasons for using viewLifecycleScope in a Fragment go back to the same subtle detail about memory management with Fragments we discussed in the section called Fragments and memory management in Chapter 9. It is wasteful and potentially dangerous to execute coroutine code when your Fragment does not have a view.)
Figure 12.3 shows the fragment lifecycle.
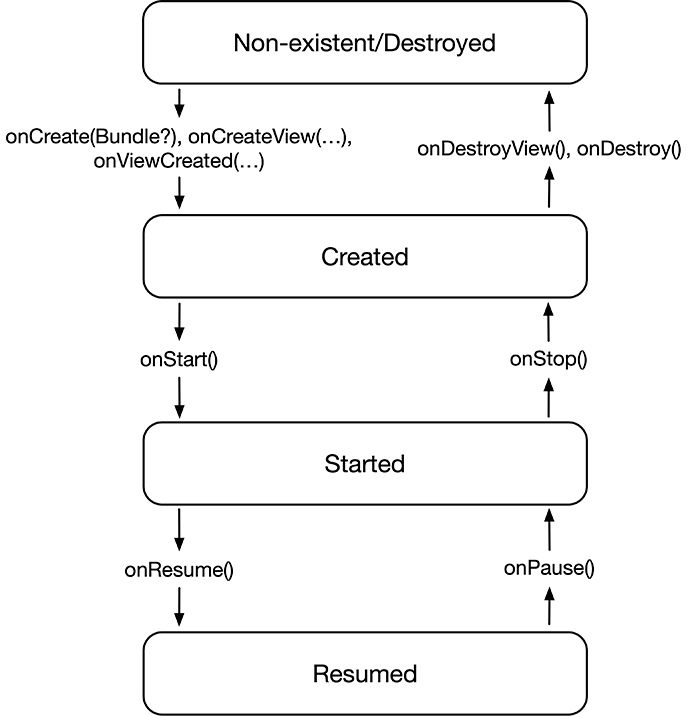
viewLifecycleScope is active for as long as the view is in memory (in other words, after onViewCreated() but before onDestroyView()). After the view is destroyed, the coroutine scope – and all work within it – is canceled. But you should only update the UI while the Fragment is in the started lifecycle state or higher. It does not make sense to update the UI when it is not visible.
To do this, you will ensure that you only load crimes when the view is running. Instead of relying on the coroutine scope to only run during the appropriate time, you will have to manage that work yourself. The way you manage coroutine work is via the Job class. When you launch a new coroutine, a Job instance is returned to you, and you can use it to cancel the work at the appropriate time.
Launch your work in the onStart() callback and then cancel it in the onStop() callback.
Listing 12.5 Calling coroutines from your CrimeListFragment (CrimeListFragment.kt)
class CrimeListFragment : Fragment() {
    ...
    private val crimeListViewModel: CrimeListViewModel by viewModels()

    private var job: Job? = null
    ...
    override fun onCreateView(
        inflater: LayoutInflater,
        container: ViewGroup?,
        savedInstanceState: Bundle?
    ): View? {
        ...
    }

    override fun onStart() {
        super.onStart()

        job = viewLifecycleOwner.lifecycleScope.launch {
            val crimes = crimeListViewModel.loadCrimes()
            binding.crimeRecyclerView.adapter = CrimeListAdapter(crimes)
        }
    }

    override fun onStop() {
        super.onStop()
        job?.cancel()
    }
    ...
}
This approach will work, but it is annoying to keep a reference to a Job and to make sure you cancel the work when the fragment goes in the background. That is where the repeatOnLifecycle(…) function comes into play.
With the repeatOnLifecycle(…) function, you can execute coroutine code while your fragment is in a specified lifecycle state. For example, you only want this coroutine code to execute while your fragment is in the started or resumed state. Also, repeatOnLifecycle is itself a suspending function. You will launch it in your view lifecycle scope, which will cause your work to be canceled permanently when your view is destroyed.
You are not required to call the repeatOnLifecycle(…) function in the onStart() callback. Normally, you use the onViewCreated(…) callback to hook up listeners to views and to set the data within those views. This is the perfect spot to handle your coroutine code, too. Change your implementation to use repeatOnLifecycle(…):
Listing 12.6 Using repeatOnLifecycle(…) (CrimeListFragment.kt)
class CrimeListFragment : Fragment() {
    ...
    private var job: Job? = null
    ...
    override fun onStart() {
        super.onStart()

        job = viewLifecycleOwner.lifecycleScope.launch {
            val crimes = crimeListViewModel.loadCrimes()
            binding.crimeRecyclerView.adapter = CrimeListAdapter(crimes)
        }
    }

    override fun onStop() {
        super.onStop()
        job?.cancel()
    }

    override fun onViewCreated(view: View, savedInstanceState: Bundle?) {
        super.onViewCreated(view, savedInstanceState)

        viewLifecycleOwner.lifecycleScope.launch {
            viewLifecycleOwner.repeatOnLifecycle(Lifecycle.State.STARTED) {
                val crimes = crimeListViewModel.loadCrimes()
                binding.crimeRecyclerView.adapter =
                    CrimeListAdapter(crimes)
            }
        }
    }
    ...
}
Your code will behave exactly as it did with onStart() and onStop(), but now there are fewer lifecycle methods to override and you will not have to worry about forgetting to cancel your Job. repeatOnLifecycle(…) handles all that for you.
repeatOnLifecycle(…) will begin executing your coroutine code when your fragment enters the started state and will continue running in the resumed state. But if your app is backgrounded and your fragment is no longer visible, repeatOnLifecycle(…) will cancel the work once the fragment falls from the started state to the created state. If your lifecycle re-enters the started state without fully being destroyed, your coroutine will be restarted from the beginning, repeating its work. (This explains the function’s name.)
Before running your app, clean up some unneeded code. Remove your onCreate(…) implementation that logs the number of crimes; you do not need it anymore. Also, delete the code that tries to initialize your CrimeListAdapter with missing data.
Listing 12.7 Cleaning up (CrimeListFragment.kt)
private const val TAG = "CrimeListFragment"class CrimeListFragment : Fragment() { ...override fun onCreate(savedInstanceState: Bundle?) {super.onCreate(savedInstanceState)Log.d(TAG, "Total crimes: ${crimeListViewModel.crimes.size}")}override fun onCreateView( inflater: LayoutInflater, container: ViewGroup?, savedInstanceState: Bundle? ): View? { _binding = FragmentCrimeListBinding.inflate(inflater, container, false) binding.crimeRecyclerView.layoutManager = LinearLayoutManager(context)val crimes = crimeListViewModel.crimesval adapter = CrimeListAdapter(crimes)binding.crimeRecyclerView.adapter = adapterreturn binding.root } ... }
Run CriminalIntent. When the fragment is created, there is a five second delay, and then the crimes load and display in your RecyclerView. That is good! But now try rotating your device.
Another five second delay. Unfortunately, your list of crimes is being recalculated every time your fragment is re-created. In GeoQuiz, you used a ViewModel to store state across configuration changes. It is also an excellent place to perform expensive calculations that would be painful to do every time your fragment is created. You will learn how to do this by the end of this chapter.