
When fragments were first introduced, developers had to jump through numerous hoops to display them. In 2019, Google introduced the FragmentContainerView, which makes it easier to create host containers for a fragment. In this section, you will use a FragmentContainerView to host your CrimeDetailFragment. Then you will learn about the FragmentManager and the fragment lifecycle. Finally, you will tie up one loose end in CrimeDetailFragment.
FragmentContainerView is, as its name suggests, built to contain fragments. Fragments have changed significantly over the years, so FragmentContainerView helps provide a consistent environment for fragments to operate in. Much like the views you have used so far, the FragmentContainerView has common XML attributes to define its ID and its size.
Locate and open MainActivity’s layout in res/layout/activity_main.xml. Replace the default layout with a FragmentContainerView, as shown in Listing 9.11.
Listing 9.11 Creating the fragment container layout (res/layout/activity_main.xml)
<androidx.constraintlayout.widget.ConstraintLayoutxmlns:android="http://schemas.android.com/apk/res/android"xmlns:tools="http://schemas.android.com/tools"xmlns:app="http://schemas.android.com/apk/res-auto"android:layout_width="match_parent"android:layout_height="match_parent"tools:context=".MainActivity"><TextViewandroid:layout_width="wrap_content"android:layout_height="wrap_content"android:text="Hello World!"app:layout_constraintBottom_toBottomOf="parent"app:layout_constraintLeft_toLeftOf="parent"app:layout_constraintRight_toRightOf="parent"app:layout_constraintTop_toTopOf="parent"/></androidx.constraintlayout.widget.ConstraintLayout><androidx.fragment.app.FragmentContainerView xmlns:android="http://schemas.android.com/apk/res/android" xmlns:tools="http://schemas.android.com/tools" android:id="@+id/fragment_container" android:name="com.bignerdranch.android.criminalintent.CrimeDetailFragment" android:layout_width="match_parent" android:layout_height="match_parent" tools:context=".MainActivity" />
FragmentContainerView has one XML attribute that you have not seen on other views: android:name, whose value here is the full package name for CrimeDetailFragment. With that, the FragmentContainerView will manage creating your CrimeDetailFragment and inserting it in the activity’s layout.
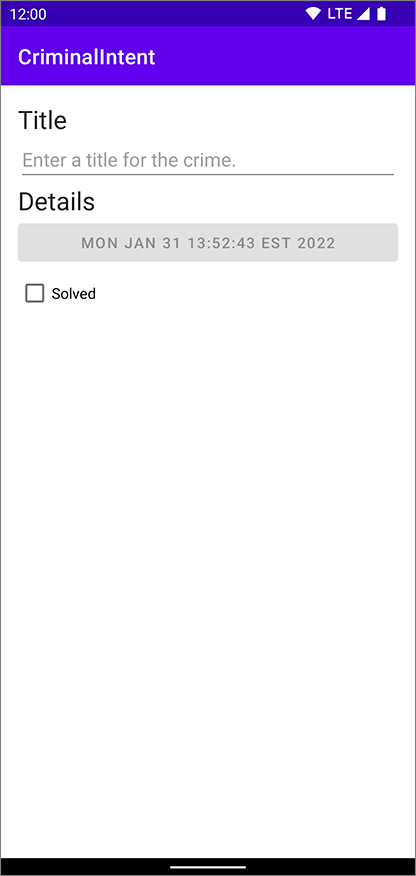
At last, it is time to run CriminalIntent to check your code. You will see your CrimeDetailFragment below an app bar that shows CriminalIntent’s name (Figure 9.11). (The app bar – the toolbar at the top of your app – is included automatically because of the way you configured your activity. You will learn more about the app bar in Chapter 15.)
Now that you have seen the results of your work, let’s go behind the scenes and discuss how fragments and their lifecycles are managed.
When the Fragment class was introduced in Honeycomb, the Activity class was changed to include a piece called the FragmentManager. The FragmentManager is responsible for adding the fragments’ views to the activity’s view hierarchy and driving the fragments’ lifecycles. It handles two things: a list of fragments and a back stack of fragment transactions (which you will learn about shortly) (Figure 9.12).

Right now, your FragmentContainerView interacts with the FragmentManager to display your CrimeDetailFragment. The FragmentContainerView uses the FragmentManager to create and host the fragment you specified in the android:name XML attribute.
As an alternative to using the android:name XML attribute, you can attach fragments to your activities in code with the FragmentManager. Also, in addition to the basic functionality provided by your FragmentContainerView, you can use the FragmentManager to remove a fragment from view, replace it with another, and even alter the navigation backstack.
To add a fragment to an activity in code, you make explicit calls to the activity’s FragmentManager.
You can access the activity’s fragment manager using the supportFragmentManager property.
You use supportFragmentManager because you are using the Jetpack library and the AppCompatActivity class.
(The name is prefixed with “support” because the property originated in the v4 support library, but the support library has since been repackaged as an androidx library within Jetpack.)
Actions such as adding, removing, or replacing fragments are accomplished using fragment transactions. They allow you to group multiple operations, such as adding multiple fragments to different containers at the same time. They are the heart of how you use fragments to compose and recompose screens at runtime.
The FragmentManager maintains a back stack of fragment transactions that you can navigate. If your fragment transaction includes multiple operations, they are reversed when the transaction is removed from the back stack. This provides more control over your UI state when you group your fragment operations into a single transaction.
    val fragment = CrimeDetailFragment()
    supportFragmentManager
        .beginTransaction()
        .add(R.id.fragment_container, fragment)
        .commit()
In this example, the FragmentManager.beginTransaction() function creates and returns an instance of FragmentTransaction.
The FragmentTransaction class uses a fluent interface – functions that configure FragmentTransaction return a FragmentTransaction instead of Unit, which allows you to chain them together.
So the code highlighted above says, “Create a new fragment transaction, include one add operation in it, and then commit it.”
The add(…) function is the meat of the transaction. It has two parameters: a container view ID and the newly created CrimeDetailFragment. The container view ID should look familiar. It is the resource ID of the FragmentContainerView that you would define in an activity’s layout.
A container view ID serves two purposes:
-
It tells the FragmentManager where in the activity’s view the fragment’s view should appear.
-
It is used as a unique identifier for a fragment in the FragmentManager’s list.
As we mentioned, another responsibility of the FragmentManager is driving the fragment lifecycle, which is shown in Figure 9.13. The fragment lifecycle is similar to the activity lifecycle: It has created, started, and resumed states, and it has functions you can override to get things done at critical points – many of which correspond to activity lifecycle functions.

The correspondence is important. Because a fragment works on behalf of an activity, its state should reflect the activity’s state. Thus, it needs corresponding lifecycle functions to handle the activity’s work.
One critical difference between the fragment lifecycle and the activity lifecycle is that fragment lifecycle functions are called by the FragmentManager of the hosting activity, not the OS. The OS knows nothing about the fragments that an activity is using to manage things. Fragments are the activity’s internal business. The onAttach(Context?), onCreate(Bundle?), onCreateView(…), and onViewCreated(…) functions are called when you add the fragment to the FragmentManager.
The onActivityCreated(Bundle?) function is called after the hosting activity’s onCreate(Bundle?) function has executed. You are adding the CrimeDetailFragment in MainActivity.onCreate(Bundle?), so this function will be called after the fragment has been added.
What happens if you add a fragment while the activity is already resumed? In that case, the FragmentManager immediately walks the fragment through whatever steps are necessary to get it caught up to the activity’s state. For example, as a fragment is added to an activity that is already resumed, that fragment gets calls to onAttach(Context?), onCreate(Bundle?), onCreateView(…), onViewCreated(…), onActivityCreated(Bundle?), onStart(), and then onResume().
Once the fragment’s state is caught up to the activity’s state, the hosting activity’s FragmentManager will call further lifecycle functions around the same time that it receives the corresponding calls from the OS to keep the fragment’s state aligned with that of the activity.
Fragments can be swapped in and out as the user navigates your app. For CriminalIntent, you will make another Fragment in Chapter 10 that displays a list of crimes. By the time you have completed developing the app, you will be able to navigate from the list fragment to the detail fragment, and your list will disappear from the user’s view. Because the user can navigate back to the list screen, the fragment is retained in memory so it is ready to be used when the user presses the Back button.
But what about its view? Because the previous fragment is not being displayed, the system does not need to keep its view in memory. And, in fact, Fragment has a lifecycle method to destroy its view when it is no longer needed. This method is called onDestroyView(). When the Fragment becomes visible again, its onCreateView(…) method will be called again to re-create the view.
And here we come to the loose end we mentioned earlier: Although you have an onCreateView(…) callback in CriminalIntent, your view is not currently being freed from memory, because you are holding a reference to it via the binding property. The system sees that there is a chance you might access the view later and prevents the system from clearing its memory.
This wastes resources, since the view is being held in memory even though it is not used – and even though the view will be re-created when the Fragment becomes visible again. With your current implementation, the system cannot free the memory associated with your old view until either the view is re-created by calling onCreateView(…) again or the entire Fragment is destroyed.
The good news is that there is a straightforward solution to this problem: Null out any references to views in the onDestroyView() lifecycle callback. As long as you make sure to clean up any references to your views in onDestroyView(), you will be safe from the issues associated with this second lifecycle – and you benefit from a performance boost by freeing up unused resources.
Listing 9.12 Nulling out references to your view (CrimeDetailFragment.kt)
class CrimeDetailFragment : Fragment() {
    ...
    override fun onViewCreated(view: View, savedInstanceState: Bundle?) {
        ...
    }

    override fun onDestroyView() {
        super.onDestroyView()
        binding = null
    }
}
After you make those changes, Android Studio will start complaining. Currently, your binding is not nullable. But with a few small changes, you can null out your references and have easy access to your binding. Create a nullable backing property, named _binding, and change the binding property to become a computed property. By using the checkNotNull() precondition, Kotlin will be able to smart cast the binding property to be non-null.
Listing 9.13 Having the best of both worlds (CrimeDetailFragment.kt)
class CrimeDetailFragment : Fragment() {

    private lateinit var binding: FragmentCrimeDetailBinding
    private var _binding: FragmentCrimeDetailBinding? = null
    private val binding
        get() = checkNotNull(_binding) {
            "Cannot access binding because it is null. Is the view visible?"
        }
    ...
    override fun onCreateView(
        inflater: LayoutInflater,
        container: ViewGroup?,
        savedInstanceState: Bundle?
    ): View? {
        binding =
            FragmentCrimeDetailBinding.inflate(inflater, container, false)
        _binding =
            FragmentCrimeDetailBinding.inflate(inflater, container, false)
        ...
    }
    ...
    override fun onDestroyView() {
        super.onDestroyView()
        binding = null
        _binding = null
    }
}
When accessing binding, you still have the benefit of a non-nullable property, but now you also have the backing _binding property that you can null out in onDestroyView().
In this chapter, you used fragments to display an individual screen free of the limitations associated with activities. In the next chapter, you will create another fragment and leverage a RecyclerView to display your crimes in a list.