
There are a few sensor types that provide digital signals. Some of them are digital by nature, such as presence and door sensors, and most commonly, they are analog sensors with an external circuit that implements a threshold, usually attached to a potentiometer, such as smoke/harmful gas detectors or raindrop detectors.

We will look at analog sensors in a later chapter. For now let's focus on sensors with a digital signal.
Let's look at a diagram that uses a presence sensor to turn a lamp on or off:
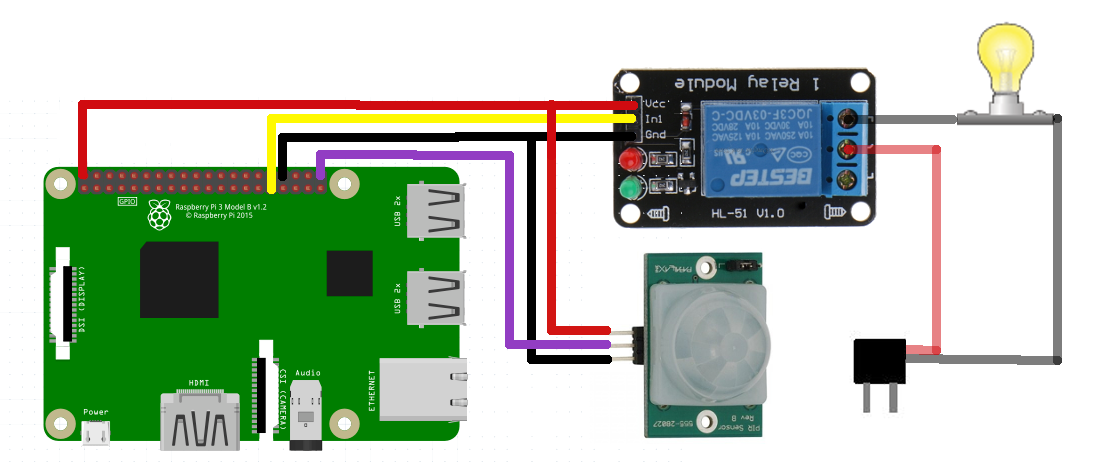
Note that the wiring and components are completely different from what we have been using until now. However, let's look at the code:
class ButtonGpioActivity : Activity() {

    private lateinit var redLed: Gpio
    private lateinit var buttonA: Gpio

    override fun onCreate(savedInstanceState: Bundle?) {
        super.onCreate(savedInstanceState)

        redLed = PeripheralManager.getInstance().openGpio(BoardDefaults.ledR)
        redLed.setDirection(Gpio.DIRECTION_OUT_INITIALLY_LOW)

        buttonA = PeripheralManager.getInstance().openGpio(BoardDefaults.buttonA)
        buttonA.setDirection(Gpio.DIRECTION_IN)
        buttonA.setActiveType(Gpio.ACTIVE_LOW)
        buttonA.setEdgeTriggerType(Gpio.EDGE_BOTH)
        buttonA.registerGpioCallback {
            redLed.value = it.value
            true
        }
    }

    override fun onDestroy() {
        super.onDestroy()
        redLed.close()
        buttonA.close()
    }
}
It is exactly the same code we used for turning the red LED on when we pressed the button A. I purposely kept the same variable names and BoardDefaults; I also used the same pins on the diagram.
If you want to change the logic a bit (for example, turning the light off if we have not detected a presence for two minutes), you can still test that logic with an LED and a button, and then, once it works the way you want it, connect it to the proper hardware.
Note that if we want to have a system that turns on a fan for two minutes when a certain level of gas is reached, the code is still the same; it is just the components we connect that are different.

And, finally, let's look at other peripherals that use GPIO in less standard ways.