
19. Working with Animation
This chapter talks about the different animation features built into Android. Here, we cover everything from using animated GIF and frame-by-frame animation to using the two animation frameworks that the Android SDK has to offer: tweened or view animation and the more robust property animation features that were added in later versions of the Android SDK.
Exploring Android’s Animation Abilities
The Android platform supports several types of graphics animation:
• Animated GIF images
• Frame-by-frame animation
• Tweened animation (also known as view animation)
• Property animation
Animated GIFs store the animation frames in the image, and you simply include these GIFs like any other graphic-drawable resource. For frame-by-frame animation, the developer must provide all graphic frames of the animation. However, with tweened animation (or view animation), only a single graphic is needed, upon which transforms can be programmatically applied. Property animation, or the modification of any object property over a certain time duration, was added in Android 3.0. The Android animation framework also supports numerous interpolators for different animation effects.

Many of the code examples provided in this chapter are taken from the ShapeShifter application. This source code for the ShapeShifter application is provided for download on the book’s websites.
Working with Frame-by-Frame Animation
You can think of frame-by-frame animation as a digital flipbook in which a series of similar images display on the screen in a sequence, each subtly different from the last. When you display these images quickly, they give the illusion of movement. This technique is called frame-by-frame animation and is often used on the Web in the form of animated GIF images.
Frame-by-frame animation is best used for complicated graphics transformations that are not easily implemented programmatically.
For example, we can create the illusion of a genie juggling gifts using a sequence of three images, as shown in Figure 19.1.
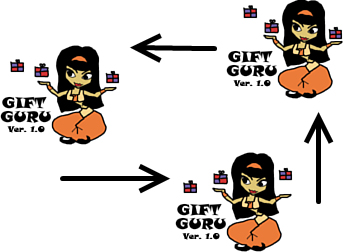
Figure 19.1. Three frames for an animation of a genie juggling.
In each frame, the genie remains fixed, but the gifts are repositioned slightly. The smoothness of the animation is controlled by providing an adequate number of frames and choosing the appropriate speed on which to swap them.
The following code demonstrates how to load three Bitmap resources (our three genie frames) and create an AnimationDrawable. We then set the AnimationDrawable as the background resource of an ImageView and start the animation:
ImageView img = (ImageView)findViewById(R.id.ImageView1);
BitmapDrawable frame1 = (BitmapDrawable)getResources().
getDrawable(R.drawable.f1);
BitmapDrawable frame2 = (BitmapDrawable)getResources().
getDrawable(R.drawable.f2);
BitmapDrawable frame3 = (BitmapDrawable)getResources().
getDrawable(R.drawable.f3);
int reasonableDuration = 250;
AnimationDrawable mAnimation = new AnimationDrawable();
mAnimation.addFrame(frame1, reasonableDuration);
mAnimation.addFrame(frame2, reasonableDuration);
mAnimation.addFrame(frame3, reasonableDuration);
img.setBackgroundDrawable(mAnimation);
To name the animation loop continuously, we can call the setOneShot() method:
mAnimation.setOneShot(false);
To begin the animation, we call the start() method:
mAnimation.start();
We can end our animation at any time using the stop() method:
mAnimation.stop();
Although we used an ImageView background in this example, you can use a variety of different View controls for animations. For example, you can instead use the ImageSwitcher view and change the displayed Drawable resource using a timer. This sort of operation is best done on a separate thread. The resulting animation might look something like Figure 19.2—you just have to imagine it moving.
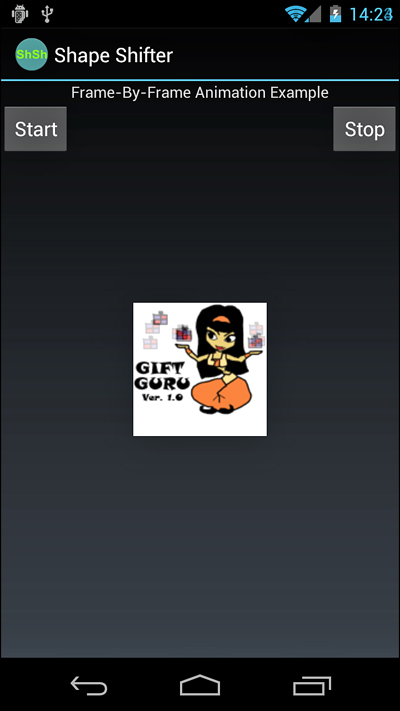
Figure 19.2. The genie animation in the Android emulator.
Working with Tweened Animations
With tweened animation (also called view animation), you can provide a single Drawable resource—it is a Bitmap graphic (see Figure 19.3, left), a ShapeDrawable, a TextView (see Figure 19.3, right), or any other type of View object—and the intermediate frames of the animation are rendered by the system. Android provides tweening support for several common image transformations, including alpha, rotate, scale, and translate animations. You can apply tweened animation transformations to any View, whether it is an ImageView with a Bitmap, a shape Drawable, or a layout such as a TableLayout.
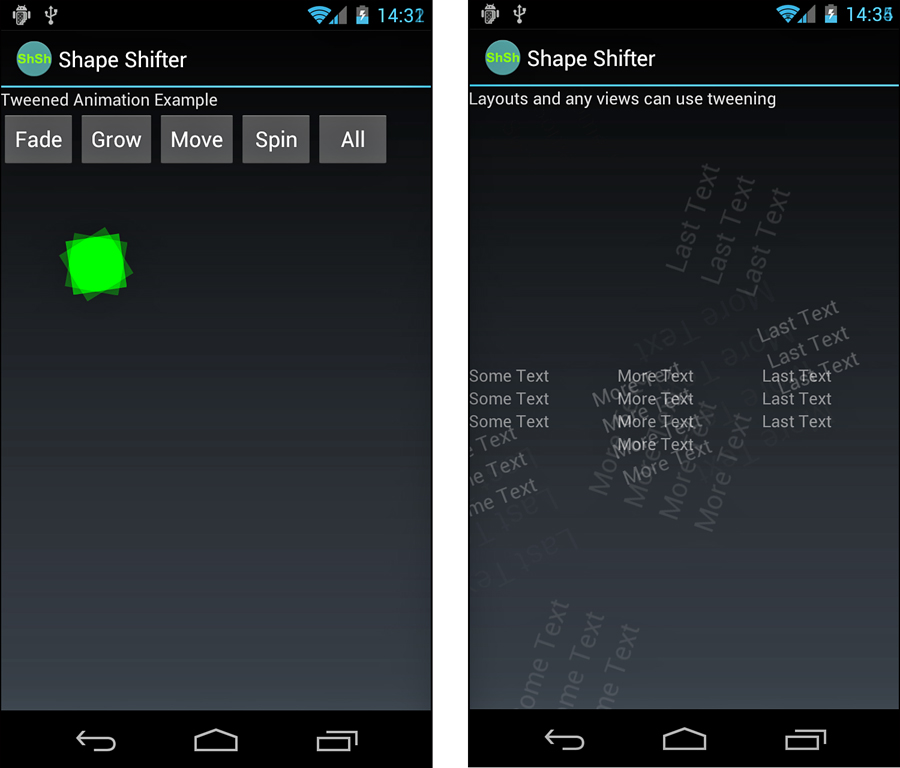
Figure 19.3. Rotating a green rectangle shape drawable (left) and a TableLayout (right).
Defining Tweening Transformations
You can define tweening transformations as XML resource files or programmatically. All tweened animations share some common properties, including when to start, how long to animate, and whether to return to the starting state upon completion.
Defining Tweened Animations as XML Resources
You can store animation sequences as specially formatted XML files in the /res/anim/ resource directory. For example, the following resource file called /res/anim/spin.xml describes a simple five-second rotation:
<?xml version="1.0" encoding="utf-8" ?>
<set xmlns:android
= "http://schemas.android.com/apk/res/android"
android:shareInterpolator="false">
<rotate
android:fromDegrees="0"
android:toDegrees="360"
android:pivotX="50%"
android:pivotY="50%"
android:duration="5000" />
</set>
Defining Tweened Animations Programmatically
You can programmatically define these animations. The different types of transformations are available as classes in the android.view.animation package. For example, you can define the aforementioned rotation animation as follows:
import android.view.animation.RotateAnimation;
...
RotateAnimation rotate = new RotateAnimation(
0, 360, RotateAnimation.RELATIVE_TO_SELF, 0.5f,
RotateAnimation.RELATIVE_TO_SELF, 0.5f);
rotate.setDuration(5000);
Defining Simultaneous and Sequential Tweened Animations
Animation transformations can happen simultaneously or sequentially when you set the startOffset and duration properties, which control when and for how long an animation takes to complete. You can combine animations into the <set> tag (programmatically, using AnimationSet) to share properties.
For example, the following animation resource file /res/anim/grow.xml includes a set of two scale animations: First, we take 2.5 seconds to double in size, and then at 2.5 seconds, we start a second animation to shrink back to our starting size:
<?xml version="1.0" encoding="utf-8" ?>
<set xmlns:android=
http://schemas.android.com/apk/res/android
android:shareInterpolator="false">
<scale
android:pivotX="50%"
android:pivotY="50%"
android:fromXScale="1.0"
android:fromYScale="1.0"
android:toXScale="2.0"
android:toYScale="2.0"
android:duration="2500" />
<scale
android:startOffset="2500"
android:duration="2500"
android:pivotX="50%"
android:pivotY="50%"
android:fromXScale="1.0"
android:fromYScale="1.0"
android:toXScale="0.5"
android:toYScale="0.5" />
</set>
Loading Animations
Loading animations is made simple using the AnimationUtils helper class. The following code loads an animation XML resource file called /res/anim/grow.xml and applies it to an ImageView whose source resource is a green rectangle shape drawable:
import android.view.animation.Animation;
import android.view.animation.AnimationUtils;
...
ImageView iView = (ImageView)findViewById(R.id.ImageView1);
iView.setImageResource(R.drawable.green_rect);
Animation an =
AnimationUtils.loadAnimation(this, R.anim.grow);
iView.startAnimation(an);
We can listen for Animation events, including the animation start, end, and repeat events, by implementing an AnimationListener class, such as the MyListener class shown here:
class MyListener implements Animation.AnimationListener {
public void onAnimationEnd(Animation animation) {
// Do at end of animation
}
public void onAnimationRepeat(Animation animation) {
// Do each time the animation loops
}
public void onAnimationStart(Animation animation) {
// Do at start of animation
}
}
You can then register your AnimationListener as follows:
an.setAnimationListener(new MyListener());
Exploring the Four Different Tweening Transformations
Now let’s look at each of the four types of tweening transformations individually. These types are
• Transparency changes (Alpha)
• Rotations (Rotate)
• Scaling (Scale)
• Movement (Translate)
Working with Alpha Transparency Transformations
Transparency is controlled using Alpha transformations. Alpha transformations can be used to fade objects in and out of view or to layer them on the screen.
Alpha values range from 0.0 (fully transparent or invisible) to 1.0 (fully opaque or visible). Alpha animations involve a starting transparency (fromAlpha) and an ending transparency (toAlpha).
The following XML resource file excerpt defines a transparency-change animation, taking five seconds to fade in from fully transparent to fully opaque:
<alpha
android:fromAlpha="0.0"
android:toAlpha="1.0"
android:duration="5000">
</alpha>
Programmatically, you can create this same animation using the AlphaAnimation class within the android.view.animation package.
Working with Rotating Transformations
You can use rotation operations to spin objects clockwise or counterclockwise around a pivot point in the object’s boundaries.
Rotations are defined in terms of degrees. For example, you might want an object to make one complete clockwise rotation. To do this, you set the fromDegrees property to 0 and the toDegrees property to 360. To rotate the object counterclockwise instead, you set the toDegrees property to –360.
By default, the object pivots around the (0,0) coordinate, or the top-left corner of the object. This is great for rotations such as those of a clock’s hands, but much of the time, you want to pivot from the center of the object. You can do this easily by setting the pivot point, which can be a fixed coordinate or a percentage.
The following XML resource file excerpt defines a rotation animation, taking five seconds to make one full clockwise rotation, pivoting from the center of the object:
<rotate
android:fromDegrees="0"
android:toDegrees="360"
android:pivotX="50%"
android:pivotY="50%"
android:duration="5000" />
Programmatically, you can create this same animation using the RotateAnimation class in the android.view.animation package.
Working with Scaling Transformations
You can use scaling operations to stretch objects vertically and horizontally. Scaling operations are defined as relative scales. Think of the scale value of 1.0 as 100 percent, or full-size. To scale to half-size, or 50 percent, set the target scale value of 0.5.
You can scale horizontally and vertically on different scales or on the same scale (to preserve aspect ratio). You need to set four values for proper scaling: starting scale (fromXScale, fromYScale) and target scale (toXScale, toYScale). Again, you can use a pivot point to stretch your object from a specific (x,y) coordinate such as the center or another coordinate.
The following XML resource file excerpt defines a scaling animation, taking five seconds to double an object’s size, pivoting from the center of the object:
<scale
android:pivotX="50%"
android:pivotY="50%"
android:fromXScale="1.0"
android:fromYScale="1.0"
android:toXScale="2.0"
android:toYScale="2.0"
android:duration="5000" />
Programmatically, you can create this same animation using the ScaleAnimation class within the android.view.animation package.
Working with Moving Transformations
You can move objects around using translate operations. Translate operations move an object from one position on the (x,y) coordinate to another coordinate.
To perform a translate operation, you must specify the change, or delta, in the object’s coordinates. You can set four values for translations: starting position (fromXDelta, fromYDelta) and relative target location (toXDelta, toYDelta).
The following XML resource file excerpt defines a translate animation, taking 5 seconds to move an object up (negative) by 100 on the y-axis. We also set the fillAfter property to be true, so the object doesn’t “jump” back to its starting position when the animation finishes:
<translate android:toYDelta="-100"
android:fillAfter="true"
android:duration="2500" />
Programmatically, you can create this same animation using the TranslateAnimation class in the android.view.animation package.
Working with Property Animation
Introduced in Android API Level 11 and refined in Android API Level 12, property animation is the capability to animate any object property over time. The property animation system is much more flexible and robust than the features available in the tweened view animation framework. Unlike the view animation framework, when property animation is used, the properties of the objects (such as a View control) are actually modified over the course of time, as opposed to just drawn with the underlying object remaining unchanged.
Property animation can be configured in the following ways:
• Animations can be applied to value or object types.
• Animations can use the various interpolators available on the platform.
• Animations can be defined in sets, with multiple attributes changing simultaneously or in sequence.
• Animations are created separate from the target objects they are applied to, and can be reused.
• Animation duration, repeat count (a number or infinite), repeat behavior (repeat from the beginning or reverse), and other animation characteristics can be set as needed.
The code examples provided in this section are taken from the SimplePropertyAnimation application. This source code for the SimplePropertyAnimation application is provided for download on the book websites.
There are several important classes you’ll want to be aware of for property animation:
• The ValueAnimator class (android.animation.ValueAnimator) is the base class for all property animations.
• The ObjectAnimator class (android.animation.ObjectAnimator) is the convenience class for animating a specific target object and property. This is the class you will use most frequently for animating properties on objects like View controls.
• The ViewPropertyAnimator class (android.animation.ViewPropertyAnimator) enables optimized and easy animation for View objects. The animate() method of View objects provides access to this class and its performance may be better than alternate methods. In fact, the results may be hardware accelerated.
• There are a number of evaluator classes (android.animation.*), such as IntEvaluator, FloatEvaluator, ArgbEvaluator, and TypeEvaluator. These enable you to animate any type of property an object can have by defining how to calculate changes in the property over time.
In addition to these classes, which are specific to property animation, you also use the standard AnimationSet and interpolator classes.
Defining Property Animations as XML Resources
Property animation sets can be configured via XML, much like view animations. You can store property animation sequences as specially formatted XML files in the /res/animator/ resource directory.
Although you can save your animation resources wherever you like, it is recommended in Android 3.1+ that property animation resources be stored in the /res/animator/ resource directory instead of the /res/anim directory so that the Eclipse ADT plug-in can find them.
A property animation has a number of attributes, including:
• A duration—the amount of time it takes, in milliseconds, for the animation to complete. This value is set with the android:duration attribute.
• A property name—the name of the property to be modified in the animation. This value is set with the android:propertyName attribute; drop the android: from the property name. Only properties with getter/setter methods that return int or float should be used.
• The repeat count—the number of times this animation should take place. This value is set with the android:repeatCount attribute. If you want the animation to repeat without stopping, use –1.
• The repeat mode—the way the animation repeats. This value is set with the android:repeatMode attribute. If you want the animation to repeat by resetting and starting from the beginning, use repeat. If you want the animation to reverse and go back to the way it started, use reverse.
• The value start and stop points—the range of values between which to animate the value of the property. These values are set with the android:valueFrom and android:valueTo attributes. If you want to animate from the current value of the property, you need not specify it with the android:valueFrom attribute.
• The value type—this is the datatype of the property being animated on. This value is set with the android:valueType attribute. XML files support both intType and floatType. Other types, such as color values, can be set programmatically.
For example, the following resource file called /res/animator/blinky_anim.xml describes a simple property animation set that modifies the alpha and backgroundColor properties of an object over time:
<?xml version="1.0" encoding="utf-8" ?>
<set xmlns:android="http://schemas.android.com/apk/res/android"
android:ordering="together" >
<objectAnimator
android:duration="2500"
android:propertyName="alpha"
android:repeatCount="-1"
android:repeatMode="reverse"
android:valueFrom="0"
android:valueTo="1"
android:valueType="floatType" />
<objectAnimator
android:duration="7500"
android:propertyName="backgroundColor"
android:repeatCount="-1"
android:repeatMode="reverse"
android:valueFrom="#2E0854"
android:valueTo="#BF5FFF" />
</set>
This animation set contains two animations that are performed simultaneously. The first animates the alpha property, causing the object to fade in and out of view over the course of 5 seconds, indefinitely, because a repeatCount of –1 means to animate continuously and the repeatMode causes the animation to reverse itself each time. The second animation happens more slowly in duration, changing the backgroundColor attribute of the object between two purple colors, as specified in the valueFrom and valueTo attributes of the animation configuration.
Defining and Modifying Property Animations Programmatically
You can also programmatically define property animations. The property animation classes are available in the android.animation package. There are also times when you may need to modify an animation defined in XML. For example, here we load the animation set that was defined earlier in XML and set the value type of the objectAnimator for the backgroundColor attribute to an ArgbEvaluator, which can’t be defined via XML:
AnimatorSet set = (AnimatorSet) AnimatorInflater.loadAnimator(this,
R.animator.blinky_anim);
ArrayList<Animator> animations = set.getChildAnimations();
for (Animator animator : animations)
{
if (animator instanceof ObjectAnimator)
{
ObjectAnimator anim = (ObjectAnimator) animator;
if (anim.getPropertyName().compareTo("backgroundColor") == 0)
{
anim.setEvaluator(new ArgbEvaluator());
}
}
}
set.setInterpolator(new LinearInterpolator());
Starting Property Animations Programmatically
To use a property animation, you must attach it to an object of your choice. For example, we can attach the property animation we just created to a TextView control (defined in the layout) and start the animation as follows:
TextView tv = (TextView) findViewById(R.id.myText);
set.setTarget(tv);
set.start();
Here, we attach the property animation to a view using the setTarget() method and then begin animating with the start() method.
When you are just animating properties of a View control, it is often more efficient and usually easier to use the animate() method. Starting with API Level 12, all View objects have an animate() method that returns a ViewPropertyAnimator object. Through this object, a subset of properties can be animated easily and efficiently. For example:
tv.animate().translationXBy(75f).rotationXBy(720).setDuration(1250);
layout.animate().scaleX(0.5f).scaleY(0.5f)
.setInterpolator(new BounceInterpolator())
.setDuration(1500);
The first one shows a TextView being moved horizontally by 75 pixels and rotated around the X axis, both of which take place over 1250 ms. The rotation around the X-axis is, indeed, a three-dimensional rotation. The second example shows an entire layout—including all buttons, images, text, indeed, all children—being scaled to 50 percent of its original size with a bounce interpolator, over a duration of 1500ms.
For more examples of programmatic property animation, see the sample application provided. We recommend running it so you can see what the animations do; print does not treat animations well (see Figure 19.4). You can also find numerous property animation examples in the Android SDK samples, such as API Demos.
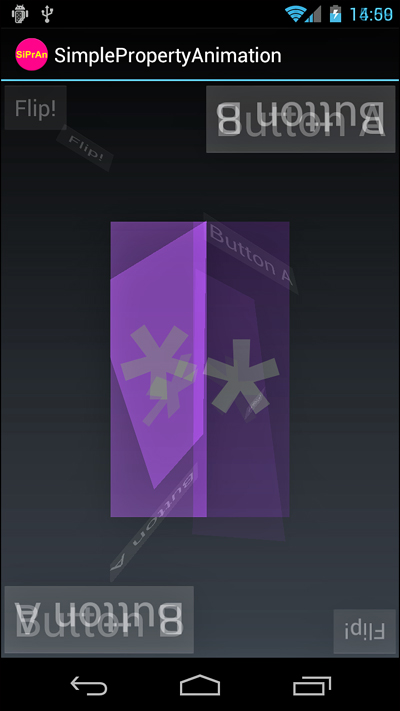
Figure 19.4. Example of a ViewPropertyAnimator in action.
Working with Different Interpolators
The interpolator determines the rate at which an animation happens in time. Interpolators apply to both view and property animation. There are a number of different interpolators provided as part of the Android SDK framework. Some of these interpolators include:
• AccelerateDecelerateInterpolator: Animation starts slowly, speeds up, and ends slowly.
• AccelerateInterpolator: Animation starts slowly and then accelerates.
• AnticipateInterpolator: Animation starts backward, and then flings forward.
• AnticipateOvershootInterpolator: Animation starts backward, flings forward, overshoots its destination, and then settles at the destination.
• BounceInterpolator: Animation “bounces” into place at its destination.
• CycleInterpolator: Animation is repeated a certain number of times, smoothly transitioning from one cycle to the next.
• DecelerateInterpolator: Animation begins quickly and then decelerates.
• LinearInterpolator: Animation speed is constant throughout.
• OvershootInterpolator: Animation overshoots its destination, and then settles at the destination.
You can specify the interpolator used by an animation programmatically using the setInterpolator() method or in the animation XML resource using the android:interpolator attribute. For more information, check out the Interpolator class (android.view.animation.Interpolator) and its subclasses.
Summary
The Android SDK supports several different types of animation. All versions of the Android SDK support frame-by-frame animation, animated GIF files, and tweened (view) animation. Android 3.0 added a much more robust animation framework that supports property animation that leverages the hardware acceleration features built into newer versions of the Android platform. Property animation allows developers to animate any object attribute over time, be it a View control or something else.
References and More Information
Android SDK Documentation on the android.animation package:
http://d.android.com/reference/android/animation/package-summary.html
Android SDK Documentation on the android.view.animation package:
http://d.android.com/reference/android/view/animation/package-summary.html
Android Dev Guide: “Animation”:
http://d.android.com/guide/topics/graphics/animation.html
Android Dev Guide: “Property Animation”:
http://d.android.com/guide/topics/graphics/prop-animation.html
Android Dev Guide: “View Animation”:
http://d.android.com/guide/topics/graphics/view-animation.html
Android Developer Blog: Animation in Honeycomb:
http://android-developers.blogspot.com/2011/02/animation-in-honeycomb.html