
So far, we have created and returned the network graph data from the service back to the component. Since this graph is going to be shown inside the modal component, we cannot process the graph data here. Instead, we have to pass it on to the modal component.
That means inside EvidenceComponent, we need to modify the buildClusters() function again and use it as bridge between EvidenceService and ModalComponent as follow:
// src/app/evidence/evidence.component.ts
//...
export class EvidenceComponent implements OnInit {
  //...
  buildClusters() {
    const self = this;
    this.evidenceService.clusterBuilder(this.mainKeyword,
      this.clusterKeywords).then(data => {
          self.modal.showModal(data[0]); });
  }
}
Please notice that since clusterBuilder() returns a promise, we need to get the output data via then() and pass it as a parameter in the showModal() function.
Having said that, the next step would be making the Modal component process the network data and display the network graph inside the modal.
We passed the network data to the showModal() function. That means now we need to make it parametric and after receiving the data, we need to pass it to VisJs so it can do its job and display a graph upon receiving it.
So the first obvious step here is importing the VisJs library, setting up a couple of private and public variables, and modifying the constructor to reflect these changes. Open ModalComponent and make the following changes:
// src/app/modal/modal.component.ts
import * as Vis from 'vis';
import { VisNetworkService } from 'ng2-vis/components/network';

//...
export class ModalComponent{
  public ModalIsVisible: boolean;
  public visNetwork: string = 'networkId1';
  public visNetworkData: Vis.IData;
  public visNetworkOptions: Vis.IOptions;
  public visNetworkService: VisNetworkService;

  constructor (vns: VisNetworkService) {
    this.visNetworkService = vns;
    this.visNetworkOptions = {};
  }

  showModal(data)
  {
    this.visNetworkData = data;
    this.ModalIsVisible = true;
  }
  //...
}
So we imprted and initialized required variables for VisJs. We also assigned the network data (calculated in EvidenceService) to the vis.NetworkData variable. Now what is next? Technically, that is it! The rest rests on the shoulders of VisJs and (technically) we should be able to see the graph as soon as we hit the Build Clusters button in the evidence template.
But before rushing to the browser and trying the output (and most likely facing an empty modal), lets talk about these new variables a little. To keep it short, each variable has a duty as follow:
visNetwork: The network id for the current graphvisNetworkData: The home for the {nodes:[], edges:[]} objectvisNetworkOptions: Where we can decorate the graphvisNetworkService: Where we can interact with the graph and process events such as click, drag, hover, and so on
But here is the problem: when we click on the Build Clusters button, the modal window pops up (instantly!) but it is empty. Checking the console area doesn't show any errors. So what went wrong?
The challenge that we have here is the timing. Since calculating clusters - depending on the size of our corpus - takes a while, calling the showModal function in EvidenceComponent will result in an empty graph. Technically, we should use an observer (or a promise) and subscribe to it for fetching the network data and there is a function for it:
clusterBuilder(this.mainKeyword, this.clusterKeywords).then(data => { this.visNetworkService.setData("idOfYourNetwork", data); })
But at the time of writing this chapter, there are a few bugs in the setData() function, which brings us to the other alternative.
For the time being, use timeout so the cluster builder has a chance to recover from all of those heavy calculations and returns the network data on time:
// src/app/evidence/evidence.component.ts
//...
export class EvidenceComponent implements OnInit {
  //...
  buildClusters() {
    const self = this;
    this.evidenceService.clusterBuilder(this.mainKeyword,
      this.clusterKeywords).then(data => {
      setTimeout(function() {
        self.modal.showModal(data[0]); }, 10000);
      // this.visNetworkService.setData("idOfYourNetwork", data);
    });
  }
}
Later, you can get rid of timeout and uncomment the setData() line and it will work the same.
With these modifications in place, go to the evidence page in your browser. In the cluster builder area, set the main keyword to Mars and choose a few keywords for cluster centers (lets say water, transport, and safety) and push the Build Clusters button.
After a few minutes - depending on your hardware setup plus your Internet speed - you should be able to see the following graph:
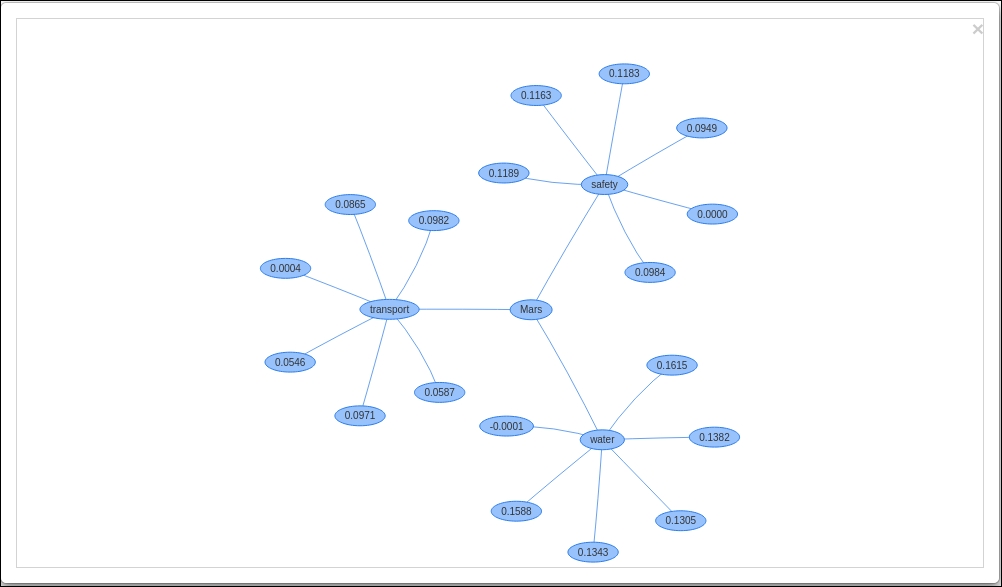
As you can see, the clusters are generated and connected through the cluster centers to the root node.
Note
This graph is generated with default settings and we can test the interactivity features by:
- Clicking outside of nodes and edges and dragging; that will pan the view area around
- Clicking and dragging nodes; that stretches the whole graph around and shows the elasticity between nodes and edges
- Using the mouse wheel to zoom in/out
It feels good to see the result of our efforts. But lets improve this experience a little bit more and make the graph more insightful.