In this chapter, you will be working on activities and projects that revolve around identity. Identity is the stepping stone for any social justice or anti-racist work. To understand and help others in deep and meaningful ways, you must first know and understand yourself. Identity work is the best way to begin your journey as an anti-racist artist.
This chapter will help you explore who you are and become comfortable defining the characteristics that make up your identities. Additionally, you will learn how your various identities connect and overlap to create the complicated and complex person you are. As you explore your identities, you will feel confident and proud of who you are without thinking that your identities make you better than other people with different identities.

The outermost layer is the skin, which represents our appearance. This layer includes our facial features, hair, skin color, age, height, weight, clothing, accessories, body adornments, and more. They are the first things someone notices about you, and they are how strangers see you. The second layer is the flesh, which includes things you like to do and your actions. This layer consists of your interests, talents, skills, abilities, languages, and more. People can begin to uncover parts of this layer through casual conversations and interactions with you. It is often how an acquaintance, classmate, teammate, or teacher might know you. The innermost layer is your core, which are your thoughts and beliefs. Your core includes your values, culture, religion, traditions, hopes, feelings, and more. This layer usually takes time to uncover and will sometimes only be revealed to your close friends and family. It takes time for someone to get to know you and understand your identity. Even though most people won’t see all the layers of our identities, they are all important. Keep them in mind as you move through the activities in this unit. Civil rights activist Kimberlé Crenshaw introduced the theory of intersectionality as the way multiple forms of discrimination intersect or combine. Discrimination is when a person is mistreated because of some part of their identity. Discrimination can be based on your race, ethnicity, gender identity, age, ability, body size, and more.LAYERS OF IDENTITY.


INTERSECTIONALITY

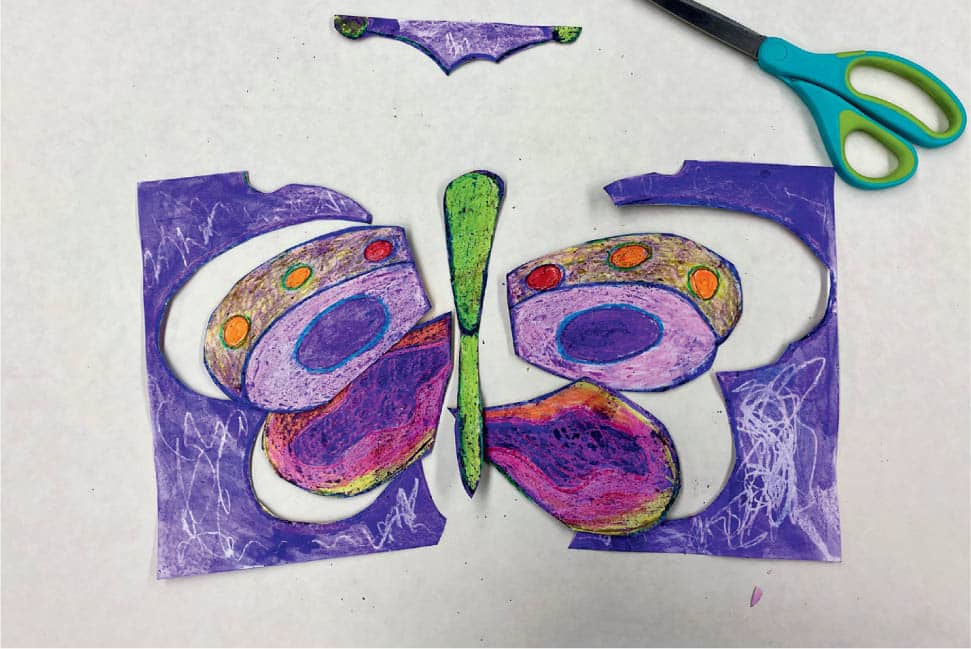
create an identity puzzle collage about you. Your identity is a combination of the people, places, things, and ideas throughout your life. These experiences include your understanding of the world and your culture. All these different parts come together to create your unique identity. Understanding yourself helps you find ways to connect to others and also helps you to recognize and value differences. 1. Write your name in the center of the paper, draw a unique shape around your name, and color the shape. Make it colorful and special to you. Fig. 1 2. On a separate sheet of paper, write words to describe your appearance, hobbies, and interests. Continue writing words to describe the people and places from your culture, ethnicity, and heritage. Heritage is all parts of your culture tied to your family history, food, traditions, memories, and more. 3. Find images from magazines to represent your word list. Cut out the images and glue them around your name. You can also draw pictures or print images from a computer. 4. Use crayons, markers, or watercolor to add your favorite colors around your collaged pictures. Fig. 2 Fig. 2: Add your favorite colors around your collaged pictures. 5. Turn your paper over and draw a symbol to represent you. Use crayons to color the symbol with your favorite color. Fig. 3 Fig. 3: Draw a symbol on the back. 6. Cover your drawing with a watercolor wash. Fig. 4 Fig. 4: Paint a watercolor wash. 7. Cut out the shapes of the symbol to create a two-sided puzzle. Fig. 5 Fig. 5: Cut out shapes to create a puzzle.IDENTITY PUZZLE COLLAGE


MATERIALS
IN THIS ACTIVITY, YOU WILL

WHY THIS MATTERS
LET’S GET STARTED!


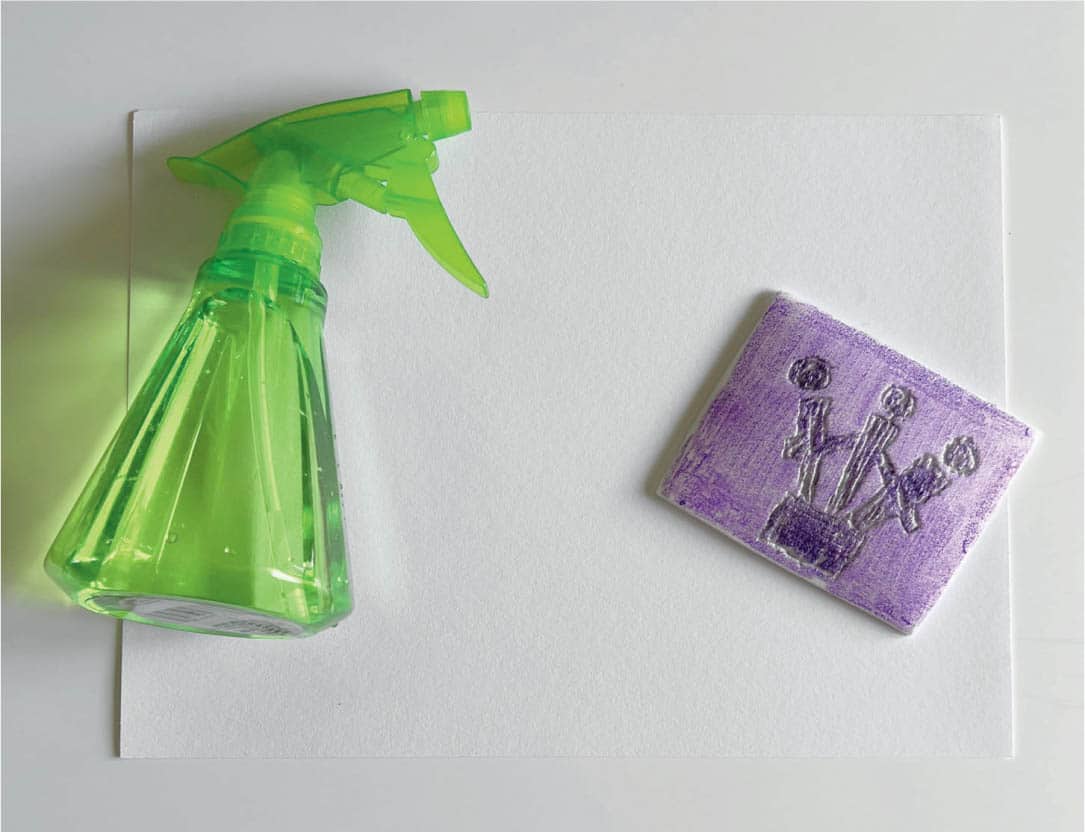
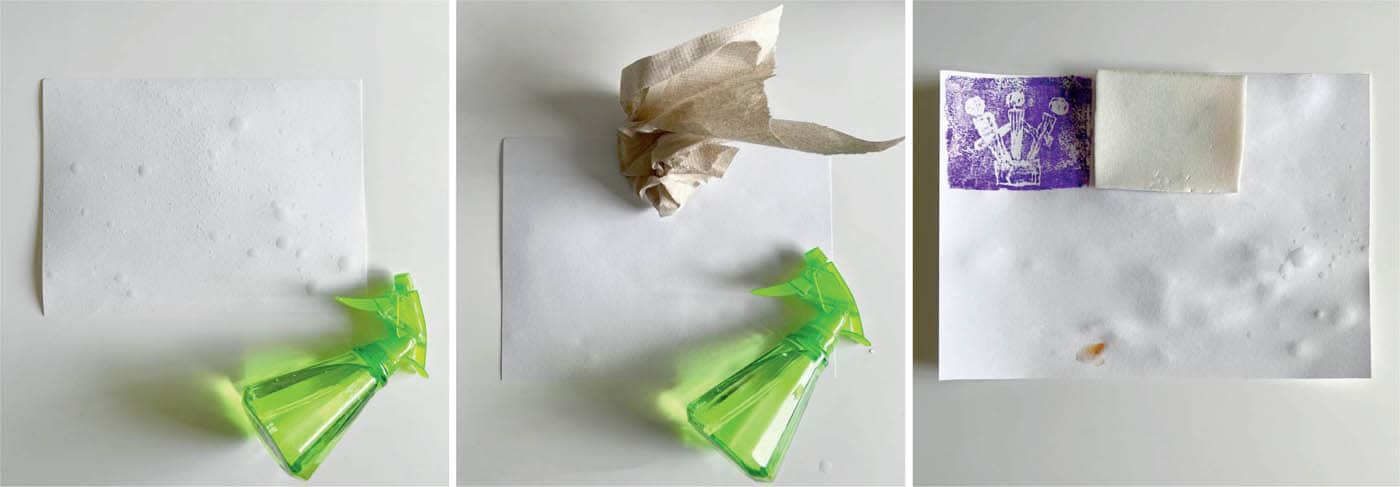
explore your identity and create a symbol using printmaking that represents you. Valuing diversity means acknowledging and seeing how our differences make us unique and add to our identities. Identities are complex and layered, and no two people have the same experience. For this activity, we will find inspiration in adinkra symbols by the Ashanti people in Ghana, a country in West Africa. Adinkra symbols are printed onto cloth and other materials to communicate values and what is important to the individual wearing the symbols. They help people stand out and come together around shared values. 1. Look up adinkra symbols online or find a book that features the symbols to learn more about the individual symbols and their meanings. How do the symbols communicate what is important to the Ashanti people? How do you know? How might you use their strategies to create your own symbols? We should never copy symbols from another culture because that would be cultural appropriation. (Cultural appropriation is taking a cultural practice that does not belong to your culture and using it for profit or personal gain.) Instead, we can find inspiration in adinkra symbols and see how we can display our unique identity and values through symbols. Fig. 1 2. As an option, complete the identity puzzle collage on this page and consider how multiple parts of your identity intersect. Pick out the parts of your identity you would like to represent. You may show everything you value most about yourself in one symbol or choose one or two things you would like to highlight. For example, on my symbol, I wanted to show how much I respect working in my community and encouraging those around me. I created a symbol that looks like three people coming out of one block or foundation. Because the first part of my symbol is working together in community, the second part is showing the center individual holding up the other two individuals on each side to represent encouragement and support. Notice that a symbol does not have to have details such as faces and proportional bodies. 3. Use a takeout container made of polystyrene and cut it into a flat rectangular shape. Fig. 2 Fig. 2: Cut a polystyrene container into a flat shape. Polystyrene damages the environment because it does not biodegrade. Reusing it can help us reduce our waste. 4. Trace around your polystyrene on a piece of tracing paper to create a few areas for sketching that are the size of your printing plate. Sketch ideas for your symbol inside the shape. Fig. 3 Fig. 3: Sketch out a few ideas for your symbol and choose one. Symbols are meant to be simple imagery, so use thick bold lines without tiny details. The adinkra symbols are a great example. Make sure your symbol takes up the entire area of the polystyrene surface. 5. Choose one symbol to trace onto tracing paper. Place this drawing on the polystyrene. Your design will print reverse, so flip your tracing paper before transferring your image. Fig. 4 Fig. 4: Transfer image to polystyrene (printing plate). Apply pressure when tracing your design to transfer the image from the tracing paper to the plate. Your polystyrene should feel bumpy to the touch, but make sure the holes you created do not go through to the other side of the plate, so your polystyrene is strong. You have now created a relief printing plate. 6. Use washable markers to color your plate; you can use one color or combine colors. Fig. 5 Fig. 5: Add color to your printing plate using washable markers. 7. It’s time to print your symbol! Dampen a sheet of paper with water using a sponge or spray bottle. Make sure the paper’s surface is not too wet, so the markers do not bleed. Place your print face-down on the paper and apply pressure evenly to print. Fig. 6 Fig. 6: Print your symbol. Extension activity: Apply symbols to other materials such as cloth using permanent acrylic-based paint made for fabric. You can also use a rubber carving block instead of polystyrene.IDENTITY SYMBOLS

MATERIALS
IN THIS ACTIVITY, YOU WILL
WHY THIS MATTERS
LET’S GET STARTED!


transform your name into a work of art. A name is an important part of who we are. Because of that, people must know how to say our names correctly. Sometimes names can be spelled the same but sound different; our names are unique! The next time you introduce yourself to someone, ask how to pronounce their name and share how to say yours correctly. 1. Imagine how you can transform your name into an image. Draw each letter individually or use a similar style for all. 2. Begin by lightly sketching your name onto a sheet of white paper. Think about incorporating various identity elements in and around your name. Use a permanent marker to trace your drawing. Fig. 1 Fig. 1: Draw your name. 3. Use whatever materials you want to add color to your artwork. Fig. 2 Fig. 2: Add color. 4. Fold the yellow paper in half and cut wavy lines around the outside edges. Unfold it to reveal a picture frame. Fig. 3 Fig. 3: Cut a frame. 5. Glue your name onto the center of your picture frame. Use a permanent marker to add a design around the border. Fig. 4 Fig. 4: Glue your name onto the frame and draw details. 6. Add a label to share your pronouns. People use gender pronouns in place of names. Examples of pronouns include they/them, she/her, he/him, and more. Remember that you cannot always assume someone’s gender pronouns based on their appearance. It is important to use the correct pronouns. Fig. 5 Fig. 5: Write your pronouns. 7. Fold a chenille stem (craft pipe cleaner) in half and tape it to the back of your frame. You can also add beads for decoration. Fig. 6 Fig. 6: Add a hanger to display your work. Your artwork is now ready for display! Practice introducing yourself and teaching others to say your name and share your pronouns. By doing so, you welcome the other person to share theirs.YOUR NAME IS A WORK OF ART

MATERIALS
IN THIS ACTIVITY, YOU WILL
WHY THIS MATTERS
LET’S GET STARTED!


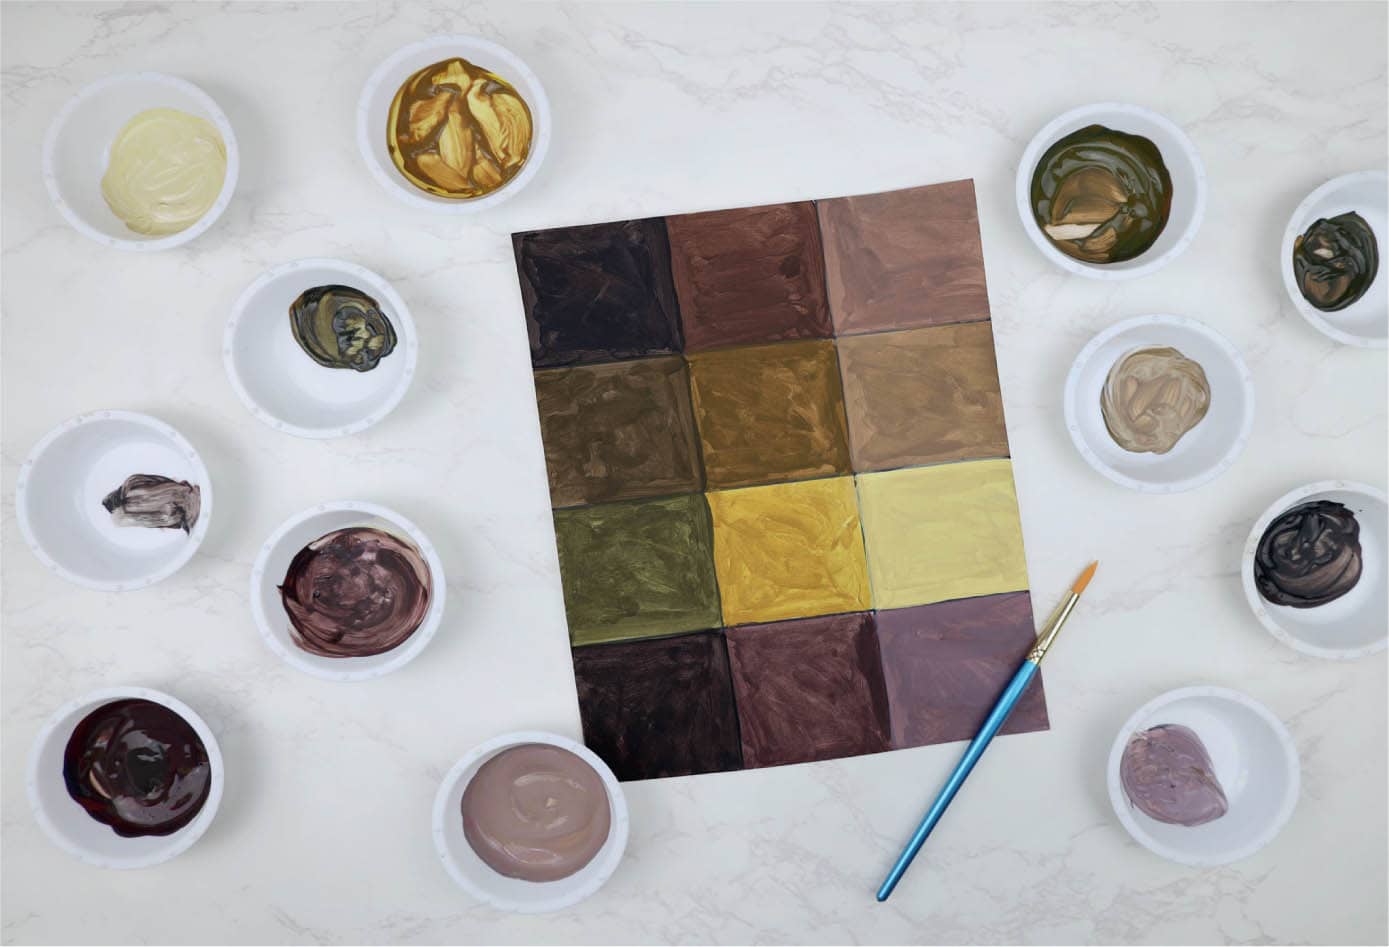
learn how to mix various browns to create many skin colors. One of our many differences is our skin color. If you look around, you will notice that we are all different shades of brown. Our skin color is unique; not everyone’s skin color matches the paint from a bottle or a crayon in a box. Sometimes our skin color is a part of how we identify someone’s race. However, race is socially created, and there is not one physical trait that makes someone a particular race. 1. Draw two vertical and three horizontal lines to create a grid of 12 squares. 2. When we mix the primary colors, we make brown. Place a dot of red, yellow, and blue paint next to each other in a mixing cup. Mix the colors to create a beautiful brown color. Paint the top center square. 3. Divide the brown in half. Add a drop of black paint to mix a darker brown and paint the top left square. Clean your brush. Add a drop of white paint to mix a lighter brown and paint the top right square. 4. You can also mix complementary colors to make brown. Complementary colors are colors that are opposite one another on the color wheel. Mix blue and orange; violet and yellow; green and red. Paint the three center squares with these colors. Notice the slight differences in each brown. 5. Repeat step 3 with these new browns. Divide each brown in half. Add a drop of black paint to mix darker browns. Add a drop of white paint to mix lighter browns. Paint the remaining squares. These are just 12 examples of some of the many beautiful browns a person’s skin might be. Explore mixing additional colors to create even more skin colors! The Color WheelOUR MANY SHADES OF SKIN
MATERIALS
IN THIS ACTIVITY, YOU WILL
WHY THIS MATTERS
LET’S GET STARTED!


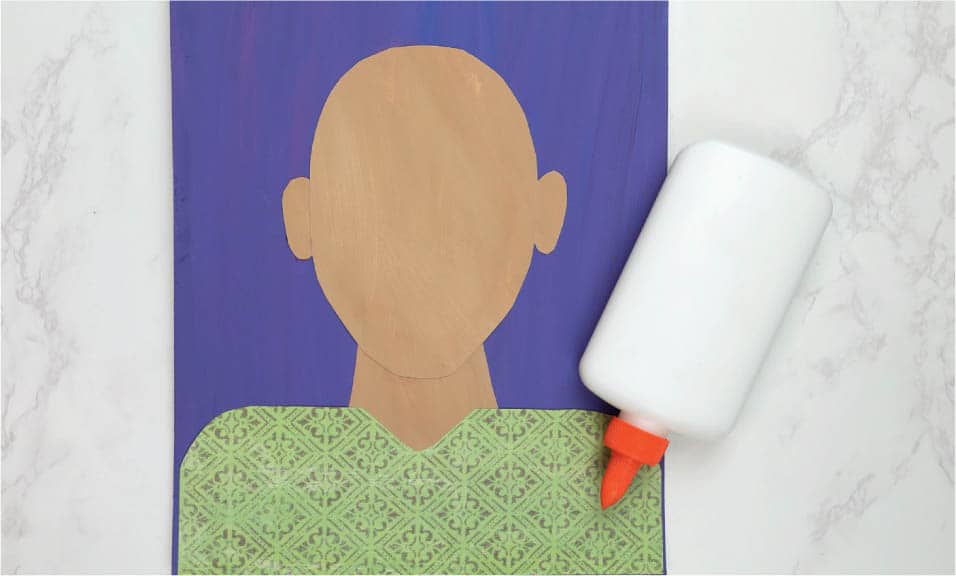
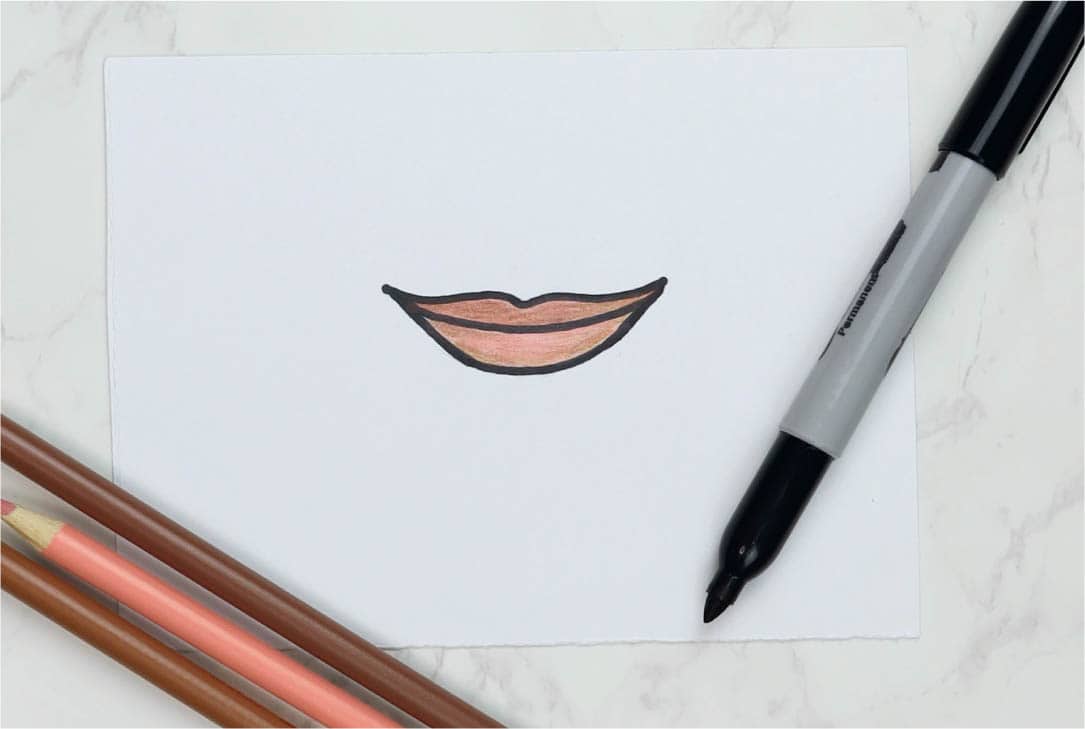
create a self-portrait collage that explores and embraces what makes you unique. We are all different! We live in a diverse world, and we are exposed to different people all of the time. Our differences make us who we are, and it is important that we recognize, accept, and celebrate our differences. 1. On a sheet of watercolor paper, paint a background for your self-portrait. Fig. 1 2. One of the many differences that can be seen is our skin color. Not everyone’s skin looks like the paint from a bottle, so you need to mix your unique skin color. Follow the steps from Our Many Shades of Skin (here) to create your skin color and paint a sheet of watercolor paper with it. Fig. 2 Fig. 2: Paint your skin color. 3. Like our skin color, our hair color is also different. Mix different colors to match your hair and paint a sheet of watercolor paper with it. It is also important to know that some people do not have hair. Everyone is different, and that is something to celebrate! Fig. 3 Fig. 3: Paint your hair color. 4. Observe yourself in a mirror. On the back of your skin color painting, draw the shape of your head, neck, and ears. Carefully cut and arrange them onto your background. Next, use a piece of construction or patterned paper for your body. Cut a rectangle wider than your head and round the edges on the top to make your shoulders. Glue all the pieces down. Fig. 4 Fig. 4: Cut and glue your head, neck, ears, and body onto your background. 5. Feel your hair texture. Some of us have straight, wavy, curly, or coily hair. Notice one strand of hair and imagine it is a line. Use colored pencils or crayons to draw that line onto your hair color painting. Fill the entire page with straight, wavy, curly, zig-zag, or coily lines. Fig. 5 Fig. 5: Draw lines to add texture to your hair. 6. We change and wear our hair in many different ways. Cut and glue your hair color paper to resemble your current hairstyle. You might want to use short, straight-edge shapes, long, zig-zag edge shapes, or thin, wavy-edge shapes. Fig. 6 Fig. 6: Cut and glue your hair onto your self-portrait. Option: Use construction paper to add a hat, headband, headdress, hijab, patka, or other head covering. 7. Our eyes can be different sizes, shapes, and colors. Examine your eyes in the mirror and use the visual references on this page for assistance in drawing them. Draw your eyes on a sheet of paper and trace them with a permanent marker before adding color. Fig. 7 Fig. 7: Draw your eyes. Carefully cut and glue your eyes onto your self-portrait. Pay attention to their position and placement. Use colored pencils or crayons to add your eyebrows and eyelashes. 8. Like our eyes, our mouths can be of different sizes, shapes, and colors. Our mouths are also one of the most expressive features of our faces. You can often tell how someone feels from a frown, grin, or smile. Fig. 8 Fig. 8: Draw your mouth. Think about what emotion you want to portray in your self-portrait and look in the mirror while making that facial expression. Observe the shape of your mouth and use the visual references on this page. Draw your mouth on a sheet of paper and trace with a permanent marker before adding color. Cut and glue your mouth onto your self-portrait. 9. Noses are also different and can be one of the most challenging facial features to draw. Observe the shape of your nose and use the visual references on this page. Use a brown colored pencil or crayon to draw your nose. Fig. 9 Fig. 9: Glue your eyes and mouth onto your self-portrait. Draw your nose and eyebrows. 10. Use colored pencils and paper to add your final details. Fig. 10 Fig. 10: Add your final details. Find someone to share your self-portrait with and discuss what you learned. Take a moment to look at each other. What similarities do you notice? What differences can you celebrate? Remember that we are all different, unique, and beautiful!YOUR UNIQUE COLORS COLLAGE

MATERIALS
IN THIS ACTIVITY, YOU WILL
WHY THIS MATTERS
LET’S GET STARTED!


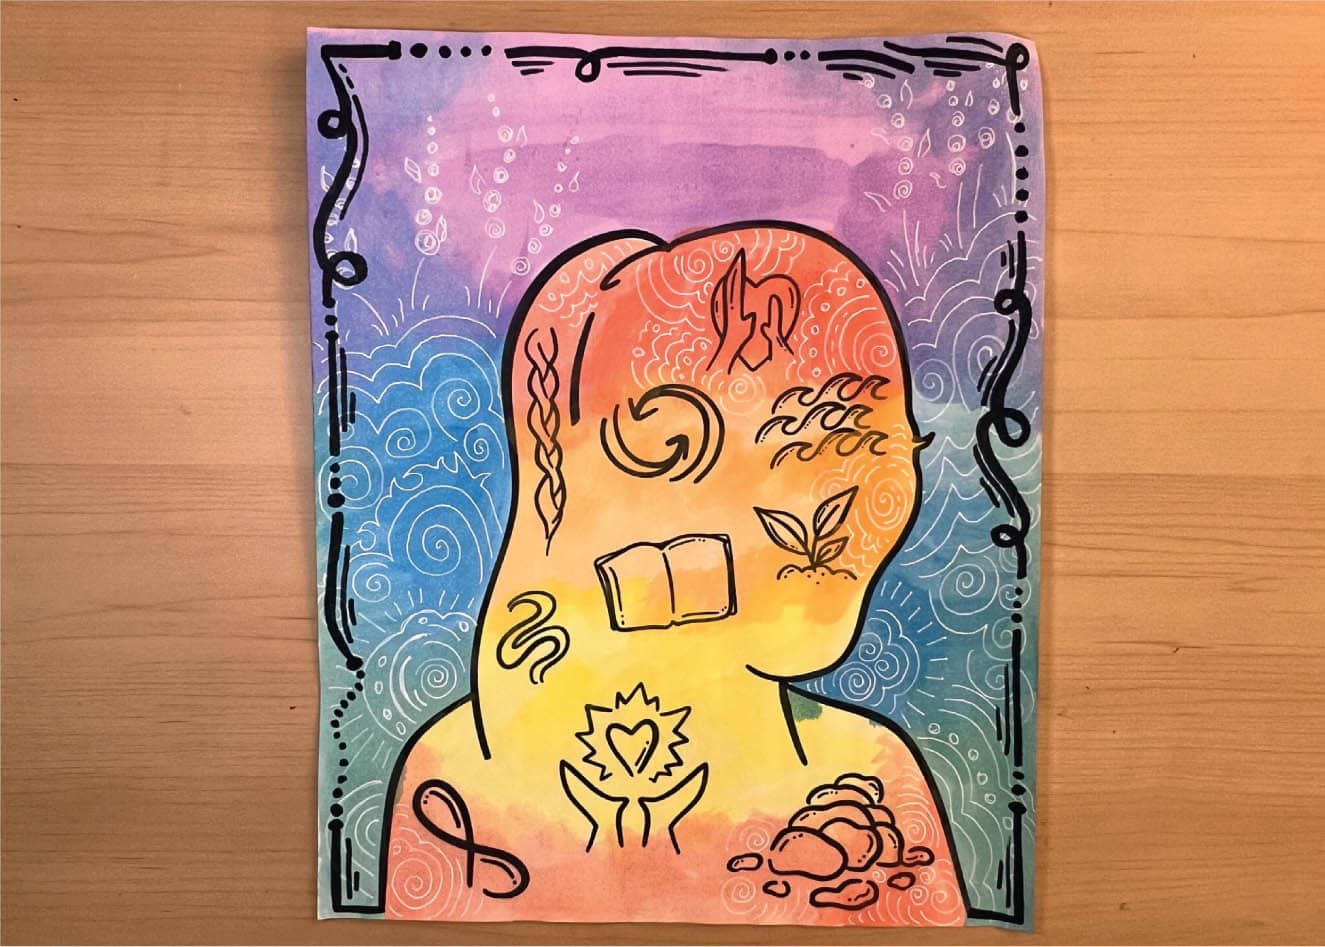
create a silhouette portrait of yourself and add symbols that represent important parts about your identity and self-concept. Our identity is more than our appearance or name. Many parts make us who we are. Our relationships, ideas, behaviors, interests, and more are important in understanding ourselves. When we ask ourselves, “Who am I?” we are building our self-concept. 1. Draw a silhouette of yourself using a pencil. Then, trace it with a permanent marker. Fig. 1 2. Create symbols of your self-concept. The symbols should represent your ideal self, self-image, and self-esteem. Sketch your ideas on a separate sheet of paper. On my brainstorming sheet, I drew each of my symbols and thought about how each one would connect to my self-concept. For example, the growing plant symbol is connected to my self-image. I love to nourish and take care of plant life. I also see a growing plant as a part of my self-image because I hope to continue to grow and flourish as a caring and helpful person. Transfer the symbols to your silhouette. Fig. 2 Fig. 2: Draw symbols inside of the silhouette. 3. Using watercolor, paint the silhouette and background. Notice how I used complementary colors to make my silhouette stand out. Fig. 3 Fig. 3: Paint the silhouette and background. 4. After the paint dries, take a white gel pen and draw details and designs throughout your painting to add texture and movement. Add a black border using a permanent marker. Fig. 4 Fig. 4: Add details and designs using a white gel pen. Add a border.SILHOUETTE PORTRAIT
MATERIALS
IN THIS ACTIVITY, YOU WILL
WHY THIS MATTERS
LET’S GET STARTED!


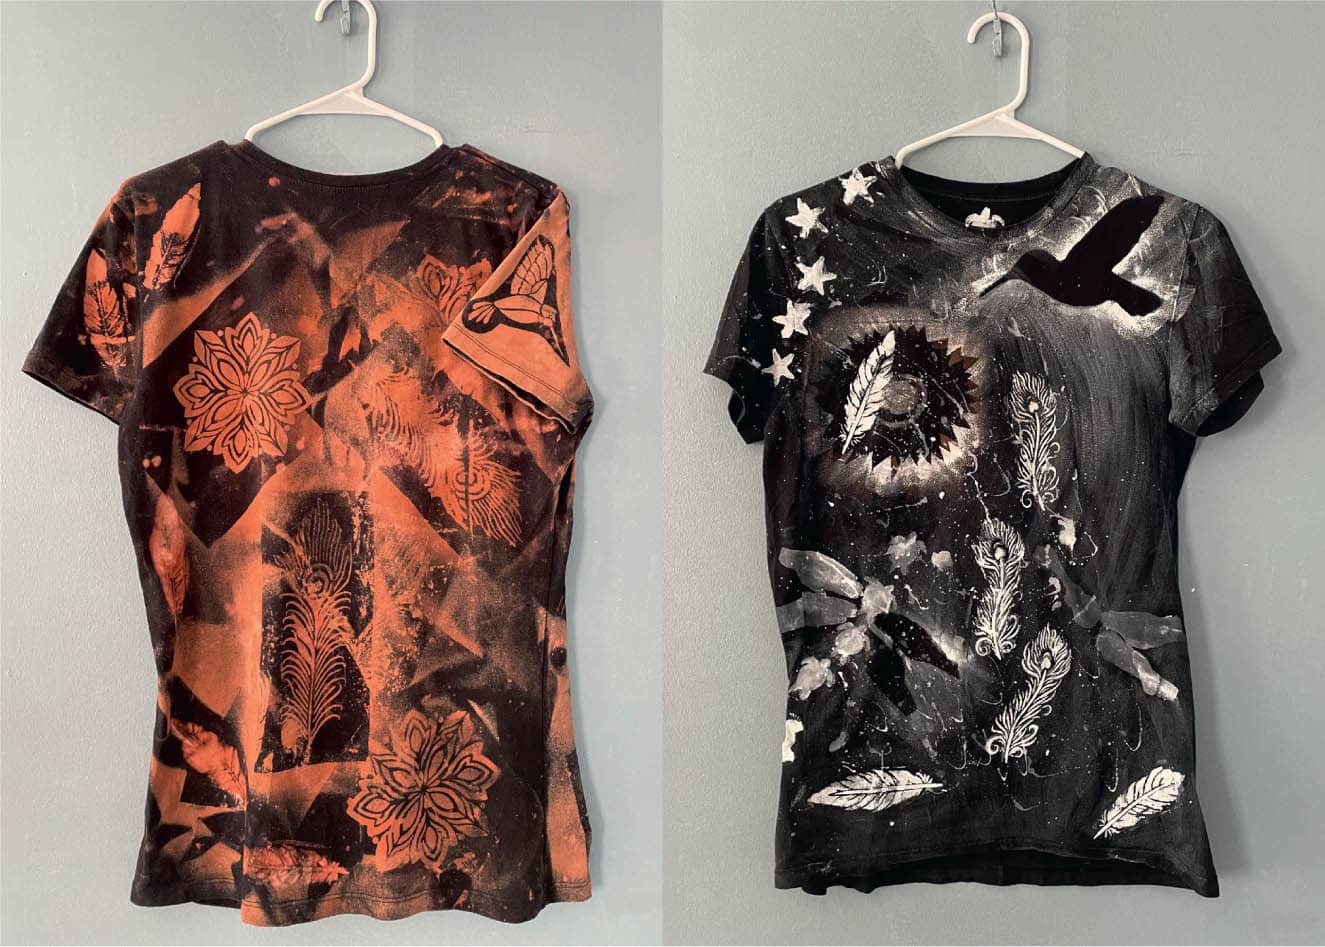
create a ME-shirt with designs all about you. We are all unique and special. Each of us has characteristics that tell others who we are so they can get to know us better. It is important to be proud of who you are. You are a unique person whose identity is a combination of influences from the people, places, things, and ideas of your culture. 1. Choose three of your favorite words/ideas about you, such as hobbies, interests, or heritage. 2. Think of different symbols to represent each word about you. Outline each symbol on card stock and cut them out. These will be your stencils. If available, you can also use pre-made stencils. For example, a bird feather represents my love of bird watching. Fig. 1 Fig. 1: Make a stencil. 3. Find a solid-colored cotton T-shirt that is non-colorfast. This means it will release the color when we bleach our designs. Lay your T-shirt on a table and place a piece of cardboard inside the T-shirt. Fig. 2 Fig. 2: Place cardboard divider. 4. Choose an area on your T-shirt, place your stencil down, and secure it with tape. Fig. 3 Fig. 3: Place and tape stencil. 5. Squeeze a small amount of liquid from the bleach pen (or paint) on the spaces in the stencil. Use a paintbrush to spread the bleach or paint evenly. Repeat in other areas. You can use the same stencil several times or combine different stencils. Fig. 4 Fig. 4: Apply bleach or paint. Ask an adult to assist you with this activity if you are using a bleach pen. 6. Wait 15 minutes, and wash your T-shirt in cold water to remove bleach. If you use paint, you only need to wait for it to dry. Fig. 5 Fig. 5: Wash or wait for the paint to dry.ME-SHIRT
MATERIALS
IN THIS ACTIVITY, YOU WILL
WHY THIS MATTERS
LET’S GET STARTED!


create an animal necklace that represents a positive affirmation about yourself. Positive affirmations are when we say or think kind things about ourselves. It’s important to remember all the things that make each of us amazing! We can build confidence in ourselves and in each other by sharing positive affirmations. 1. Write a list of your positive qualities using “I am” statements. This list of affirmations can include personality traits, skills, interests, and more! (E.g., I am confident, I am kind, I am creative, and I am athletic.) 2. Choose one affirmation that is most important to you. Think of an animal that symbolizes that characteristic. Create a drawing of that animal. (E.g., I am smart like a dolphin; I am hardworking like a bee; I am curious like a cat.) Fig. 1 Fig. 1: Draw your animal. 3. Place a sheet of heat-shrink plastic over your drawing and trace it with a pen or permanent marker. Use colored pencils to complete your animal drawing. 4. Punch a hole above your animal. Carefully cut around your animal drawing, leaving a small space around the edges. Fig. 2 Fig. 2: Punch a hole and cut out your animal. 5. Place your heat-shrink plastic in an oven and follow the directions on the packaging to bake. Let cool. Fig. 3 Fig. 3: Follow the instructions to bake your heat-shrink plastic. 6. Remove your animal and paint the back with acrylic paint. After the paint has dried, use a pen or permanent marker to write your “I am . . .” affirmation from step 1. Fig. 4 Fig. 4: Paint the back and add your affirmation. 7. Use yarn or string and beads to create a necklace. Wear your affirmation animal as a reminder of how amazing you are! Fig. 5 Fig. 5: Add your final details. Think about creating affirmation animals for your friends and family. You can also make bracelets, key chains, earrings, and more.Affirmation Animals

MATERIALS
IN THIS ACTIVITY, YOU WILL
WHY THIS MATTERS
LET’S GET STARTED!


