

One of the great things about digital photography is that you no longer need to worry about sending original slides through the mail. However, there are many file formats and sizes that you need to decipher in order to send a digital version of your image. Aperture simplifies your digital sharing workflow, letting you e-mail or post an image to the Web with a single click. Furthermore, you can use Aperture to create advanced presentations, such as slide shows and Web pages, with just a few clicks. This chapter explores the powerful tools Aperture provides to share your images digitally.
Exporting Masters and Versions of Images
E-mailing Images
Slide Shows
Web Pages
MobileMe
Flickr
Using Other Export Plug-ins
The most basic form of image exporting in Aperture is exporting a copy of the master version of your photo (typically the RAW file) or exporting a specific size and resolution of the selected version of your photo, complete with all the adjustments you've made. You might export the master for backup reasons, to provide someone else with your RAW file, or to export the RAW file so that you can open it in a different converter. Typically, though, you export a version of your photo for a specific purpose, whether it's to e-mail to a client or to enter into a contest.
Fortunately, Aperture is very consistent, and wherever you can export a master or a version of your photos you will see a nearly identical set of options. In this section, we cover the different options available when exporting masters and versions of your photos.
The basic steps to export a master are quite simple.
Select the images whose masters you want to export.
Choose File

Select the folder to save the masters into.
Click Export Masters.
After you click Export Masters, you can check the status of your export by opening the Activity window (Window
At the bottom of the dialog there are two options that you can select. Selecting Include Audio Attachments causes Aperture to export a copy of any audio attachments for the selected images alongside the exported masters. Selecting Show alert when finished causes Aperture to open an alert dialog when it's finished exporting your images.
Aperture also provides options to rename your master files and to control how it exports the master's metadata.

Figure 8.1. The Export Master dialog lets you export copies of your original master files out of Aperture.
By default, Aperture puts your exported masters into the folder you select. However, you can also set it to create subfolders for your master images automatically and perhaps create an image year/month/day hierarchy for your exported masters.
To pick a different subfolder format, click the Subfolder Format pop-up menu and choose one of the presets. If the preset allows you to set a custom name, make sure to type the custom name into the Custom Subfolder Name text field. To return to the default, no subfolder option, select None.
To create your own subfolder format, follow these steps.
Choose Edit from the Subfolder Format pop-up menu. Aperture opens the Folder Naming dialog in Figure 8.2.
Select an existing preset to modify it, or click the Add (+) button to create a new folder naming preset. Make sure to give your new preset a name.
Drag and drop the tokens on the left from the Include area into the Format text field to create your preset. Table 8.1 describes a select group of tokens that aren't obvious. If you add a Custom Name token, type a default Custom Name in the appropriate field. If you add a Counter token, set its starting number and the number of digits to use (for example, when the counter's value is 5, one digit displays 5 whereas four digits would display 0005). Note that as you adjust your tokens, the Example field updates to show you a sample filename.
Type any text you want to be part of the preset into the Format text field, such as your initials.
Select a token in the Format text field and press Delete on your keyboard to remove it.
Click OK to finish creating your preset.

Warning
If you use a counter, Aperture will continue increasing the counter number for each export unless you manually reset it by typing a zero into the Increment counter starting at field.
Table 8.1. A Few Unintuitive Tokens for Naming Presets Such as Folder Naming Presets
Effect | |
|---|---|
Counter | Adds a counter to the preset that keeps increasing by increments until you reset it. |
Index # | Adds an index number that starts at 1 and resets for each export. |
Sequence # | Adds text such as "1 of 5" to the preset where the first number is the current item and the second number is the total number of items being exported. |
/ | Creates a new subfolder. For example, Image Year/Image Month will create a folder for each year (based on your export selection) and subfolders for each month within each year. |
In addition to being able to set custom subfolder names, the Export Master panel also lets you control how your exported masters are named. Use the Name Format pop-up menu to control filenames. Choose Master File Name to return to the default (which gives you the original filename) or choose Edit to open the File Naming dialog. This dialog is nearly identical to the Folder Naming dialog covered earlier, and you create and edit file naming presets in the same manner.
Note
Rather than opening an export dialog and choosing Edit from the Subfolder and Name Format pop-up menus, access the File and Folder Naming dialogs directly by choosing Aperture
When exporting a master file, there are three metadata options to pick from, with the default being not to export any metadata.
Don't Include IPTC. This option will not export any metadata with the master.
Include IPTC. This causes Aperture to embed the image's IPTC metadata into the master file.
Create IPTC4XMP Sidecar File. This creates an XMP file alongside the master file with the image's IPTC information, without changing the contents of the master file.
Whereas exporting a copy of your master file will give you a duplicate of your original, unadjusted file in the original format at the original resolution, exporting a version will export an image with the size, format, and quality that you choose containing all your adjustments. You will most likely find yourself exporting versions of your images far more often than the master, whether it's a low-resolution JPEG version to send to a client or a high-quality TIFF version to send to a commercial print house.
The basic steps to export a version are quite similar to exporting a master:
Select the image(s) to export.
Choose File
Set the subfolder and name format, or create a custom format as described in the previous section.
Choose a preset image format and resolution, or follow the instructions in the next section to create your own Image Export preset.
Select whether or not you want Aperture to display an alert when you finish exporting.
Click Export Versions.

The Image Export dialog lets you manage your saved image export presets, making it easy to create commonly used image settings to export with. For example, we have an agent who prefers to receive an initial batch of lower-resolution images and then a second set of his selected images at a higher resolution. We have two presets set up, one for the initial submission and one for the final submission. By picking the appropriate preset from the Export Versions sheet, it's easy to guarantee our images are at the right size and format.
To open the Image Export dialog, either choose Edit from the Export Preset pop-up menu or choose Aperture

Figure 8.4. The Image Export dialog allows you to manage your export presets, whether you want to change an existing preset or to create a new one.
To create a new preset, click the Add button (+) in the bottom left. Select a preset to change its options, and if you change a built-in preset, you can click Reset Preset to restore it to its default state.
We cover adding watermarks to a preset in the next section, but here are the different options available for each preset.
Image Format. Use this pop-up menu to select the image's file type, whether it's JPEG, PNG, TIF, or PSD. TIF and PSD also have higher-resolution 16-bit options available.
Include Metadata. If you select this check box, Aperture embeds your image's metadata into this exported version. Sometimes, such as when posting an image to the Web, you might not want to have your metadata embedded into an image, especially GPS metadata. Note that this option is not available for PNG images.
Image Quality. When you select JPEG for the preset's image format, use this slider to adjust how much compression the image will have. Lower numbers mean a more compressed/smaller but lower-quality file.
Size To. Choose whether this preset exports the image at its original size, scaled to fit within a specific dimension that you type in (specified either in pixels, inches, or centimeters), or scaled to a percentage of the original image size.
DPI. Specify the dots per inch resolution at which to export your images.
Gamma Adjust. This option lets you apply a gamma curve to your image to adjust the midrange brightness. In general, we recommend using a color-calibrated workflow and making adjustments to your image rather than relying on this setting. However, if you're creating an export preset for a specific purpose and find that the midrange brightness of your images is consistently off for that purpose, the Gamma Adjust slider lets you add a correction to the preset.
Color Profile. This pop-up menu allows you to select the color profile that Aperture embeds into this version. We typically recommend ProPhoto or Adobe RGB (1998) for most display or print purposes, and sRGB for Web or e-mail.
Black Point Compensation. Selecting this check box causes Aperture to scale the black and white values in your image to fit within the export color space. This prevents shadow areas from becoming solid black and highlight areas from becoming solid white, but it might also cause subtle tonal changes throughout your image.
Note
You can also control whether Aperture exports Faces and Places metadata with your images. Unfortunately, these settings are global and apply to all exported files. These options are available by choosing Aperture
Note
It's always smart to set your on-screen proofing profile to match the color profile your export preset uses to double-check your image's color when exporting, making any needed adjustments. We describe how to soft proof your images in Chapter 7.
Aperture makes it easy to automatically add a watermark to your exported images. The first step is to prepare an image of your watermark. (You'll need to do this using another program such as Photoshop or Elements.) We recommend creating a PSD, TIF, or PNG file with a transparent background. We also recommend creating several different-sized watermarks, one for each preset to which you want to add a watermark. That way you're not trying to use the same watermark for a 2048-×−2048-pixel image that you're using for a 640 × 640 image. Note that Aperture scales watermarks down if you choose, but it won't scale them up.
After you create an image file with your mark, follow these steps to add a watermark to an export preset:
Choose the Export Preset you want to use.
Use the Position pop-up menu to choose where you want the mark to appear.
Use the Opacity slider to adjust the mark's opaqueness.
Click Choose Image and select your watermark image, or drag and drop your watermark image onto the image view.
Select the Scale watermark check box if you want Aperture to scale the mark proportionately to how it's scaling down your image.
Click OK to finish editing your preset.
E-mailing an image is one of the most common reasons to export an image, and Aperture has simplified this to a one-button click. Simply select your images and click the Email button in the toolbar, as shown in Figure 8.5, or select your images and choose File
Chances are, though, that you want to select how Aperture exports your images to an e-mail and what mail program it creates a new e-mail within. To access those options, open the Export preferences by choosing Aperture

Figure 8.5. Select your images and click the Email button to quickly export them and attach them to a new e-mail message.

Figure 8.6. The Export tab in Aperture preferences has options to control how Aperture e-mails images.
The first pop-up menu lets you pick what mail program Aperture uses to create a new e-mail for you, be it AOL, Eudora, Mail, or Microsoft Entourage. The second pop-up menu lets you choose what image export preset Aperture uses for your e-mail. Choose the Edit item to open the Image Export dialog to create or modify a preset as discussed previously in this chapter.
While slide shows might initially make you think of the carousels of slides that your Great Aunt Matilda used to show for hours on end (here's Matilda waving to the north, here's Matilda waving to the south, and for variety, here's Matilda waving to the east), digital slide shows are far more engaging than traditional slide shows. Aperture 3 lets you create advanced slide shows with transition effects, custom timing, video, music, and more. Plus, it's easy to export your show to the Web or to an iPad.
There are two ways to make a slide show in Aperture. The first is more of an impromptu show, where you just pick images, pick a preset, and give the show. The second involves creating a slide show album, possibly adjusting specific settings on your show, and being able to quickly give this same show again in the future or export a movie of the show.
To create an impromptu slide show, select a group of images and choose File

Figure 8.7. The Play Slideshow dialog lets you quickly create and play a slide show with little customization.
Choose your preset, described in the following list, from the pop-up menu, and click Start to start playing your show.
Dissolve. Fade between static images.
Fade through Black. Transition between static images by fading out to black and then in to the new image.
Manual. Click to advance slides with a dissolve transition.
Slow Dissolve. Like dissolve, but shows each slide for 5 seconds with a 5-second dissolve instead of 3 seconds with a 2-second dissolve.
Classic. Fade between static images with a title slide.
Ken Burns. Pan and zoom across your images while they're on-screen.
Photo Edges. Display your images against a textured background with a virtual two-colored matte around each image.
Scrapbook. Present your images on pages that look like they're out of a real photo album.
Shatter. Each image is broken apart into 3-D planes and spun around, transitioning into the new image.
Sliding Panels. Have your images slide in and out of preset panels that fill your screen.
Snapshots. Create a sliding stack of your images, where each photo initially appears white and then your photo appears with a flash transition.
Watercolor Panels. Display your images against a colored and textured background, with subtle zoom effects on each image.
It's also possible to edit or create your own slide show preset by choosing Edit from the pop-up menu or by choosing Aperture

Your preset options are as follows:
Theme. This sets the general style for the preset, possibly determining what other options are user configurable. For example, choosing a Shatter theme disables the Transition and Transition Duration options.
Timing. Choose from among manually advancing each slide, showing each slide for a fixed period of time, or adjusting the slide durations so that they all fit within the selected background music's duration.
Background. Select the color that appears in any empty background area.
Transition. Select the visual effect Aperture uses to move from slide to slide.
Show title slide. Show a slide with text, defaulting to the show's name.
Slide Duration. This determines how long the slide appears on-screen.
Inset. Control the spacing between the edge of the screen and the images.
Transition Duration. Decide how long the transition should last.
Play music during slideshow. Select this option and then use the audio browser to pick a DRM-free song from your iTunes library or Aperture's built-in music to add background music to your preset. Click the Play button to preview a song.
When you want more control over your slide show and to save it for later, instead of using the Play Slideshow command, you can create a new slide show album and use the Slideshow Editor to configure your show.
To create a new slide show, select some images and choose File
After you select a theme, Aperture opens the Slideshow Editor, as shown in Figure 8.10. Note how when you move your mouse over the browser you get a playhead, and Aperture adjusts the Viewer to show what the contents of the slide show are at that point in time. As you move your mouse left or right, you see any animating effects or transitions that happen while this photo is on-screen. This is called skimming. There are also a number of buttons in the Slideshow Editor to help you create and play back your show.

Theme. Click this button to switch your slide show's theme.
Play Slideshow. Click to play your slide show in full-screen mode.
Preview Slideshow. Click to play your slide show in your viewer.
Slideshow Action pop-up menu. This menu has useful commands to help set up your show. For example, to turn off the time indicator above the playhead that appears while skimming, click the Action pop-up menu button and toggle View Playhead Info. We refer to this button more throughout this section.
Slide Duration. With Classic or Ken Burns themes, this button lets you record custom per-slide timing.
Slideshow Settings. Click this button to access default settings for the entire show or individual settings for the selected slides.
Audio Browser. Toggle the Aperture Audio Browser to pick background music for your slide show.
Show Viewer for this Browser. Temporarily switch out the Slideshow Editor Viewer with a normal Viewer so that you can zoom in and adjust the selected images. Double-clicking an image in the Slideshow Editor's Browser automatically triggers this button.

Figure 8.10. The Slideshow Editor lets you create your slide show just the way you want it, and the highlighted buttons provide the tools to do this customization.
The order that your images appear in the Slideshow Editor's Browser is the order in which they will play back. Use the normal Browser sorting techniques to either sort them into some default (such as by date) or drag and drop the images into a manual sort order.
Periodically, you'll want to insert a blank slide, perhaps to separate sections of your slide show. To do so, select the image that you want to insert a blank slide after. Then, from the Slideshow Action pop-up menu, choose Insert Blank Slide or Insert Blank Slide With Text. The only difference between the two is that the With Text version adds a text field with the words "Text Slide" to the blank slide. Select the slide and then click on that text to edit it. Choosing Edit
The default settings for your slide show affect all slides. To access them, click the Slideshow Settings button and choose Default Settings. You'll see the options in Figure 8.11. Many of these are self-explanatory, such as the Play slide for field that controls the slide's duration. The Aspect Ratio allows you to control the slide show's overall aspect ratio. Devices can have a wide range of aspect ratios, such as 16:10 for an Apple 23-inch cinema display and 3:2 for an iPhone. If you're creating your show for a specific device, start by setting the Aspect Ratio pop-up menu to match that device. Otherwise, when you need to export to a specific device, we recommend temporarily changing your show's aspect ratio to match that device and then adjusting the border, inset, and text options so that your shows look great when you export them.

If the Crop pop-up menu is set to Fit In Frame and if the show's aspect ratio is different than an individual slide, Aperture adds black bars around the slide to fill out the empty space (instead of cropping or scaling your image). If the Crop pop-up menu is set to Fill Frame, then your image will be scaled up and cropped to avoid black bars. Choosing Ken Burns Effect from the Crop pop-up menu causes Aperture to pan and zoom your image so that you eventually see the whole image, but there's never any black area showing in Viewer.
One slightly unintuitive control is the set of arrows next to the Transition pop-up menu. This control lets you set the direction from which a transition happens (for example, left to right or right to left) by clicking the appropriate arrow if the transition has a direction. Some transitions, such as dissolve, do not have an associated direction.
To adjust an individual slide or group of slides, select the appropriate images, click the Slideshow Settings button, and click Selected Slides. This set of options, shown in Figure 8.12, is very similar to the default settings, but it lets you override each setting for a specific slide. There are three main differences: Photo effect, Crop settings, and Text.
Photo effect. Selecting this check box automatically applies an effect that you pick from the pop-up menu (black and white, sepia, or antique) to this slide.
Crop settings. Clicking Edit next to the Crop pop-up menu causes Viewer to change to look like Figure 8.13. In this mode, if you choose Fill Frame, Aperture overlays a green crop rectangle, fixed to the show's aspect ratio, to let you control how your image is cropped. Click and drag this rectangle to move it around or drag the edges to adjust the crop region. Finally, if you choose Ken Burns Effect, you see two crop regions: a green one indicating the starting crop and a red one indicating the ending crop. Adjust these as previously described, and click the Swap button on the starting crop if you want to swap the starting and ending crops.
Text. Select the Text check box to add text to a slide. Use the pop-up menu to pick between displaying a specific metadata field or custom text. Use the Font and Color buttons below the Text pop-up menu to set the font style and color. Click and drag the text box that appears on the slide to position the text, and use the handles around the text box to resize it.


Figure 8.13. When you click Edit next to the Crop pop-up menu, Aperture displays the crop options on top of Viewer as well as crop rectangles when you select the Fill Frame or Ken Burns Effect crop.
Periodically, you'll find yourself wanting to give each slide a custom duration. Rather than clicking on each slide and setting its duration, it's much easier to use the Slide Duration button to record custom timing. Note that this option is only available with the Classic and Ken Burns themes. To use the Slide Duration button, follow these steps.
Select the slide where you want to start recording custom timing.
Click the Slide Duration button. Aperture adds the overlay to Viewer, as shown in Figure 8.14.
Press the spacebar to start playing the show. The overlay in Figure 8.14 shows the elapsed time in its timer.
Press the Return key to set the slide's time and to move on to the next slide.
Press the spacebar when you finish setting slide durations.

At any point, you can repeat these steps to record new custom timing, and you can use the Slideshow Settings/Selected Slides settings to change a slide's duration without rerecording the timing.
Adding video to a slide show is quite straightforward because Aperture essentially treats your video clip just like it does your images. Simply drag your video clip onto the Slideshow Album in the Library Inspector to make sure it's in the slide show, use the Slideshow Editor's Browser to position the clip where you want it to be in the show, and you're done.
Just like with an image slide, there are a number of options available for a video slide including photo effects, cropping, transitions, text, and more. There is an extra option for video slides, however, related to the clip's audio track. The Slideshow Settings/Selected Slides settings have four new sliders. The first three, Volume, Fade In, and Fade Out, control the clip audio's volume and how long (if at all) Aperture takes to fade the clip's audio in or out. Set the Volume slider to 0% to not use any of the clip's audio.
There's also a slider and a Reduce volume of main track check box to control any background music in your slide show. Selecting this check box causes Aperture to reduce the background music's volume by the amount specified with the slider so that you can hear the clip's audio instead.
To add music to your slide show, start by clicking the Audio Browser button. Aperture opens the audio browser, as shown in Figure 8.15. Use the pop-up menu at the top to switch between Aperture-provided music, audio files from your camera and movie clips, and your iTunes library and playlists. Drag a song from the audio browser onto the empty area in Browser to add it to your slide show. Aperture displays a green bar behind your images representing the main audio file. If your slide show is longer than the main audio file, the green background ends before the last slide. Either drag an additional audio file onto your show or set the main audio file to loop by going into the show's default settings and selecting Loop main audio track. To delete an audio file, select the green area representing the audio file so that it has a white border around it and press Delete on your keyboard.

Figure 8.15. When you add a DRM-free sound file to your slide show from the audio browser, Aperture displays a green area in Browser representing the sound file.
To open the Audio Adjustments heads-up display (HUD), either double-click the main audio clip or select the clip and choose Adjust Audio from the Slideshow Action pop-up menu. The Audio Adjustments HUD (see Figure 8.16) lets you modify the audio file's volume and fade in and out duration.
To have Aperture automatically time your slides so that your show lasts exactly as long as your audio, choose Fit Slides to Main Audio Track from the Slideshow Action pop-up menu. Aperture can also automatically analyze your audio file to determine where the beats happen so that your transitions are guaranteed to happen on beats in the music. Simply choose Align Slides to Beats from the Slideshow Action pop-up menu, and Aperture adjusts your timing. To revert your timing, select the slide to revert and choose Reset Selected Slide from the Slideshow Action pop-up menu.

It's also possible to add a second audio track to your show. For example, you might have recorded some narration using Garage Band, and you'd like it to start with a particular slide. To add an audio file as a secondary audio track, select it in the audio browser and drag it onto an image in Browser. It will appear as a thin, green bar, as shown in Figure 8.17. To adjust the in/out points on the second audio track, move your mouse over its endpoints and your cursor changes to double-arrows. Click and drag to adjust the in/out points. Click and drag the bar to adjust that point in your slide show that the track starts playing; select it and press Delete to remove the track.

Figure 8.17. A second audio track lets you add prerecorded narration to your slide show in addition to background music.
Just like with the main audio track, you can double-click to open the Audio Adjustments HUD. When adjusting a secondary audio track, you can set how much the main audio track's volume fades out while the secondary track is playing by selecting Reduce volume of the main track to and adjusting the slider.
Once you have your show set up the way you want, click the Preview Slideshow button to watch it play back in Viewer. To play it back full screen, click the Play Slideshow button. If you have multiple monitors, you can choose on which monitor your slide show plays back by choosing Aperture
To export your slide show as a QuickTime movie, click Export. Aperture opens the Export dialog shown in Figure 8.18. Choose where you want to save your movie and what format you want to export it for. If you don't see the right preset, choose Custom and type your desired export settings. To have Aperture add your movie to iTunes so that you can sync it right away to your iPhone, select the Automatically send slideshow to iTunes check box.

Note
If you want to play your slide show on an iPad, use the Apple TV preset.
Note
Aperture uses JPEG previews of your photos in its slide shows. If the images in your slide show aren't as sharp or as high of quality as you expect, you need to adjust your preview settings. Choose Aperture
While slide shows are a great, multimedia-oriented way to present your work, many times it's more effective to create a Web Page of your images. In addition to letting you easily post images to Facebook, Flickr, and MobileMe (which we cover later in this chapter), Aperture makes it easy to create custom Web Pages of your images that you can upload to your own Web site.
A Web Journal is a Web site where the main pages have groups of images intermixed with text that you type yourself, as shown in Figure 8.19. A Web Page (called a Web gallery in previous versions of Aperture) displays a contact sheet of thumbnails for images you pick by hand on the main pages (also shown in Figure 8.19), and a Smart Web Page is just like a Web Page except Aperture automatically populates the Web Page contents based on the Smart Album's setting. All three types of pages can display image metadata on the main page, and all three types have detail pages with larger versions of each image and optionally more or different metadata.
The main way to figure out which type of page you want is to think about what you want to do with the Web site. If you want to create a Web site about a trip you took, and putting images and stories together, you would create a Web Journal. If you just want to show images that you explicitly pick, then use a normal Web Page. However, if you need to make a Web site around a specific criteria (for example, all photos of this person or from this place), then you should create a Smart Web Page.

To create a normal Web Page, select a group of images and choose File
After creating your Web Page, you see the Webpage Editor in Figure 8.20. You can change themes at any point by clicking the Choose Theme button. There are three key parts to this editor: the Pages pane, the Detail Images pane, and the Preview pane. Use the Pages pane to select the main gallery page that you want to work on or use the Detail Images pane to select an individual image's page. Then use the various options to control how the page looks in the Preview pane. The Preview pane provides a live preview of how your finished site will look.

Figure 8.20. The Webpage Editor allows you to create custom Web pages, and the Pages and Detail Images panes let you select which page to load into the Preview pane to edit.
Aperture automatically places the images in the Web Page album onto your site. The images' order in Browser mirrors their order on the site, and the Browser sort-order pop-up menu, which defaults to sorting by date, lets you quickly sort your images by a certain criteria, such as rating. Of course, you can simply drag and drop images into the order you want to create a custom order. At any point, you can choose a different sort order to re-sort your images.
To edit text, such as a copyright notice or site header, double-click the text field on the page, and if it's user-editable, Aperture lets you begin editing the text. Although you can open the System Fonts panel by choosing Edit
There are also buttons above and below the Preview pane that control your Web Page's layout. The Theme button lets you switch your site's template. The Metadata Set button changes what metadata set is displayed with your image. Choose Enable Plate Metadata from this pop-up menu to display image numbers. Note that the main thumbnail pages can and typically should have a different metadata set than the individual detail pages.
Below the Preview pane are buttons to go to the previous/next page in the selected group (that is either within the main pages or within the detail pages). Use these instead of scrolling through the Pages and Detail Images panes. The Columns and Rows fields let you control the layout of your thumbnail grid, and the Fit images within pop-up and size fields let you control how much space each thumbnail receives. The options for the Fit images within pop-up are:
Rectangle. Use the size fields to define a rectangle, and Aperture makes the thumbnails fit within the specified size.
Square. This is similar to Rectangle except the width and height fields are locked together to create a square.
Width. Only the width size is changeable, and Aperture makes all thumbnails have the same width.
Go to a detail page by either selecting it in the Detail Images pane or by selecting the image's thumbnail in the Preview pane and clicking the arrow button that appears. The configuration options for the detail pages are very similar to the main pages. It's important to note that any options you set on a detail page for the metadata set or image size apply to all detail pages. Figure 8.21 shows a sample detail page.
Creating and configuring a Smart Web Page is very similar, except you can't manually pick what images are included in the Web site, as the smart settings criteria you set do this filtering for you. To create a Smart Web Page, choose File

Export your Web Page by clicking Export Web Pages in the top right of the Webpage Editor. This opens a standard Save dialog, except there are two extra pop-up menus below it. The pop-up menus allow you to choose what Web export presets to use for your thumbnails and for the detail images. To create your own Web export presets, choose Edit from either pop-up menu. The options are nearly identical to the image export presets covered earlier in the chapter. When you click Export, Aperture creates a folder in the specified location on your hard drive with your Web site, which you can then upload to your Web server.
If you have a MobileMe account and want to upload your Web site to HomePage (note that this is not a fancy MobileMe gallery, which we cover later in this chapter, but rather the Web site you just created hosted on MobileMe), click Publish to MobileMe. This opens the Publish to MobileMe sheet displayed in Figure 8.22. Give your Web site a name, note the URL and how it includes the name, pick your thumbnail and detail image presets, and click Publish to export and upload your site to MobileMe.

Creating a Web Journal is very similar to creating a Web Page, with the only difference being that you choose File
Add Text Block. Click this button to add a custom text field to your Web Journal so that you can type text about the surrounding images.
Add Page. Unlike a Web page, where the number of main pages depends on how many images are in the album and the number of rows and columns per page, the layout of each main Web Journal page is up to you. Click this button to add a new main page.
Remove Page. This button deletes the selected main page and unplaces any images on the page.
Page Template. This button reveals a pop-up menu that lets you adjust the main page template, if your selected theme allows, choosing between a header with text only or a header with text and an image.
Webpage Editor pop-up Action menu. This button's pop-up menu has commands to reorder the main pages and to automatically create new main pages from the selected images based on criteria such as one page per day.
Show All Images/Show Unplaced Images. Because you manually place the images in Browser onto your Web Journal, this button lets you quickly toggle between seeing all images in the album and seeing unplaced images only.

Figure 8.23. The Webpage Editor for a Web Journal is quite similar to a Web Page's editor, although there are a few extra buttons.
Placing images onto a Web Journal is fairly straightforward. Drag them from Browser onto the empty area or next to an existing thumbnail in the Preview pane. Aperture places the image and shows you a badge on the thumbnail indicating how many times (if any) you've placed the image into a Web Journal. Some themes have an empty, gray rectangle in the header to represent an image placeholder. Drag and drop an image onto this placeholder, and click this placed image in the Preview pane to adjust its scale and crop window.
Add a text block after a group of images by clicking the Add Text Block button. Add new pages as needed or select a group of images and choose a command, such as New Page for Each Day, from the Webpage Editor pop-up Action menu to have Aperture create main pages for you.
When you move your mouse over the Preview pane, group boxes appear, as shown in Figure 8.24. These boxes indicate an image or text block in your Web Journal. Click and drag the block's header to move the block around the page. Click the Remove button that appears on the block to delete it. Text blocks have an extra button to switch between header and paragraph text.

Figure 8.24. As you move your mouse over your Web Journal, group boxes for each image or text group appear with extra controls.
When you're ready to publish your Web Journal, follow the same steps described in the section on creating and configuring a new Web Page.
MobileMe is a set of online services offered by Apple for $99 per year (as of this writing). One of its nice features is that it provides a sophisticated gallery system, where you can view slide shows and upload new images, which are synced back to Aperture, right from your Browser. Aperture 3 makes it easy to create a MobileMe Gallery album.
To set up a new MobileMe Gallery album, follow these steps:
Select the images to initially include in your gallery.
Choose File
Configure how you want your album to work. We recommend deselecting the Downloading of option, which is selected by default.
Use the Album viewable by pop-up menu to set your privacy settings for this gallery. To create a new login for this gallery, choose Edit Names and Passwords from this pop-up, and Aperture swaps the New MobileMe Gallery Album sheet for the Edit Names and Passwords sheet, as shown in Figure 8.26. Use the Add (+) and Remove (–) buttons to add or remove users, double-click in the Name and Password columns to set those values, and click OK when finished to return to the New MobileMe Gallery Album sheet.
Click Publish to export your new album to your MobileMe Gallery.

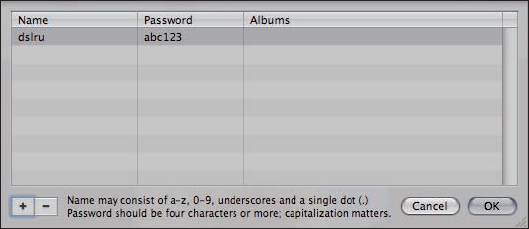
Figure 8.26. The Edit Names and Passwords sheet lets you add or remove users for your Web galleries. Note that the users in this list are for all your Web galleries, and not just the one you're currently creating.
To view your MobileMe Gallery, go to http://gallery.me.com/UserName where UserName is your MobileMe login (for example, sjobs). In your Web browser, click the album you just exported to view it. If you set your album to not be visible on the Gallery home page, use the Edit MobileMe Gallery Album sheet we describe in the next section to see your album's URL.
After you set up a MobileMe Gallery album, Aperture lists that album in the Library Inspector at the bottom under MobileMe Gallery, as seen in Figure 8.27. When you click the album, Aperture loads and displays it like any other project or album, except there's a new pop-up menu that says MobileMe in the tool strip.
This pop-up menu has three commands:
Settings. Open the MobileMe Gallery Album Settings sheet. We cover these settings shortly.
Visit MobileMe Gallery. This command opens your gallery album in your Web browser.
Tell a friend. This creates a new mail message with an invitation to your album. Aperture uses your e-mail program, which you set in Preferences when you configured e-mailing images from Aperture.
Add or remove images to your MobileMe Gallery album within Aperture like you would a normal album to add or remove them from your Web site. Click the Publish button next to your album's name in the Library Inspector to force Aperture to sync your changes immediately (this also downloads any new images you've uploaded elsewhere to your album).

Figure 8.27. A MobileMe Gallery album looks just like a normal album except there's an extra MobileMe pop-up menu.
To set Aperture to automatically check for new photos that people have uploaded to your album, outside of Aperture, choose Aperture
For all other options, you can use the Settings command in the MobileMe pop-up menu. This opens the MobileMe Gallery Album Settings sheet, as shown in Figure 8.29, which is nearly identical to the sheet you used to create your album. The main difference is that this sheet displays your album's URL, and clicking it opens your gallery in your Web browser.

Figure 8.28. The Web dialog allows you to set how often Aperture checks for updates to a MobileMe Gallery album, among other things.

Figure 8.29. The MobileMe Gallery Album Settings sheet lets you adjust your album's settings after you create your album.
To remove a MobileMe Gallery Album, select it in the Library Inspector and choose File
In the past few years, Facebook has exploded from a private social-networking site with its membership limited to select colleges into one of the most trafficked sites on the Web. Everyone and his or her Uncle Bob seem to have a profile. Aperture 3 provides direct Facebook integration, which lets you directly publish your images to Facebook rather than using Facebook's clunky image uploader.
The first time you go to export your images to Facebook, you need to set up access to your Facebook account from within Aperture. Start by selecting a group of images to share.
Choose File
Type your login e-mail and password in the Facebook Login sheet that appears, as shown in Figure 8.30. To have Aperture store your Facebook information, select the Keep me logged in to Aperture Uploader check box. If you don't have a Facebook account, click the Sign up for Facebook link at the bottom left of this sheet to create an account.
Click Close, assuming you entered your login correctly. Otherwise, address any errors that Aperture displays in the sheet.

After clicking Close, Aperture displays a new sheet that lets you actually publish your images to Facebook.
The first steps to publishing your images are the same as setting up Facebook access within Aperture — select your images (or an item in the Library Inspector) and choose File
In the New Facebook Album sheet that appears, as shown in Figure 8.31, type a name for your album and select whom it should be visible to. We recommend choosing Friends of Friends or Only Friends rather than Everyone to help protect your privacy. Click Publish to send your images to Facebook. Aperture displays a progress wheel next to your album's name under the Facebook group in the Library Inspector.

Figure 8.31. In the New Facebook Album sheet, you can type a name for your album name and determine your privacy settings.
Just like with MobileMe albums, add or remove images from your Facebook album within Aperture and then click the Publish button next to your album's name, as shown in Figure 8.32, in the Library Inspector to send your changes to Facebook. To delete an album, select it in the Library Inspector and choose File

Figure 8.32. Select your Facebook album in the Library Inspector to see its contents, and click the Publish button to send your changes to Facebook.
When you select your Facebook album in the Library Inspector, its contents look a lot like a normal album except there's a Facebook pop-up menu in the tool strip. This pop-up has commands to adjust your album's settings or to open the album in your Web browser. This Settings dialog is nearly identical to the one in Figure 8.31 that you used to set up your album, but there's also a Remove Account from Aperture button. Clicking this logs you out of Facebook (from within Aperture) and removes all information about your Facebook account from Aperture.
Flickr is another very popular way to share photos, and unlike Facebook where photos are a feature and not the primary purpose, Flickr is all about sharing photos. Some art directors even use Flickr to find images that they want to use in their campaigns. From within Aperture, sharing images via Flickr is very similar to sharing via Facebook. In fact, it's possible to set up Flickr's photo stream to display in your Facebook photo stream (you'll need to do this via Facebook's Web site, not within Aperture) so that any image you upload to Flickr from Aperture also appears on Facebook.
As you might expect, you need to log in to your Flickr account from Aperture to upload images. To do so, follow these steps.
Select the images in Browser or item in the Library Inspector that you want to upload to Flickr.
Choose File
Click the Set Up button when Aperture asks you if you want to set up Aperture to publish to Flickr. Aperture opens your Web browser and directs it to the Flickr login page.
Log in to Flickr. We recommend selecting the Keep me signed in check box, which keeps you signed in for two weeks.
Click OK, I'll Authorize It when Flickr asks about linking Aperture Uploader to your Flickr account.
In Aperture, if the New Flickr Set sheet doesn't automatically appear, click the Set Up button again.
Follow the steps in the next section to publish and modify images on Flickr.
Warning
If you have problems getting Aperture to recognize that you're logged into Safari, make sure that Private Browsing is not selected in Safari (Safari
Start by selecting images in Browser or the item in the Library Inspector that you want to share, and choose File

Figure 8.33. The New Flickr Set sheet allows you to create a set of photos on Flickr from within Aperture.
As with Facebook and MobileMe, Aperture creates an album in the Library Inspector within the Flickr group for each Flickr set you create. Add and remove images as you would a normal album, and when you want to publish your changes, click the Publish button next to the album name in the Library Inspector.
Within the album, use the Flickr pop-up menu to adjust your set's settings by choosing the Settings command. The Settings command opens a sheet that's identical to the New Flickr Set sheet. The Flickr pop-up menu also has a Visit Flickr Gallery command that opens your Browser to this set.
To delete this set, select it in the Library Inspector and choose File
Note
Rather than uploading full-sized images to Flickr directly, if you want to post larger versions, first export optimized versions of your images to your computer and then use Flickr's Web site to upload these optimized versions.
As you work with a digital workflow, you'll notice (if you haven't already) that there always seem to be two steps involved with getting an image to someone or some service. First, you prepare a specifically sized and optimized version, and then you send it to that person or service.
Aperture's image export presets make it incredibly easy to prepare images at whatever size, resolution, and format you need, but you still have to upload those exported images somewhere. Fortunately, third-party export plug-ins help Aperture make your workflow even simpler by reducing exporting and uploading (and other tasks) into one step.
For example, if you want more control over how Aperture posts your images to Flickr, including the image title, you can either export optimized versions by hand and then use Flickr's Web site to upload them or you can purchase Connected Flow's FlickrExport plug-in and use it to upload, optimize, and control your images from within Aperture.
As another example, Lightbox XMP, as shown in Figure 8.34, lets you write XMP metadata either as sidecars with any referenced master images you select, or it lets you export versions of your images with the metadata stored in XMP either in a sidecar or embedded in the exported version.
As a last example, PhotoShelter, which provides a great online content management system for photographers, has a plug-in for uploading from Aperture to PhotoShelter (see Figure 8.35), so that you can upload either your master images or versions of your files. Josh, for instance, creates two folders on PhotoShelter for each project. The first is a JPEG folder that contains the optimized versions of his images that are suitable for posting to the Web, and the second is a Masters folder where he uploads backup copies of his master image files.

Figure 8.34. The Lightbox XMP export plug-in allows you more options for exporting XMP metadata with your images than what Aperture provides.
Because each plug-in is different and there are so many, we can't go into full detail about how to use all of them. Here are a few general tips, however:
Plug-in location. If you have multiple accounts on your computer and want each person to have access to this export plug-in, copy the plug-in to the folder at /Library/Application Support/Aperture/Plug-Ins/Export/. If you're the only person who will use the plug-in, you could also put it at /Users/YourUsername/Library/Application Support/Aperture/Plug-Ins/Export/.
Opening the plug-in. Select the images to export and choose File
Using the plug-in. While each plug-in varies a bit, you will often see radio buttons you can click to switch between exporting a version or master file and then pop-up menus to select the appropriate presets for your export (such as in Figure 8.34), just like you do when exporting either a version or master file.

Figure 8.35. PhotoShelter's Aperture plug-in makes it easy to export images to PhotoShelter at whatever size and format you want.
To see a full list of the various export plug-ins available for Aperture, go to www.apple.com/aperture/resources/ and click the Export Plug-ins link.