
In this chapter, you will learn following:
Create an automation framework with Appium, Maven, and TestNG
Create a behavior-driven development (BDD) framework with Appium, Cucumber, and the page object model
Conduct continuous automated testing with Appium, Git, and Jenkins
In previous chapters, you learned to use Appium to automate different apps and automate mobile-specific functions such as tapping, scrolling, swiping, and so on.
Appium’s one and only functionality is to automate mobile platforms and mobile-specific functions. But for automation testing this is not sufficient. An automation framework should have different types of reporting, should integrate with continuous integration (CI) /continuous development (CD) tools, and should do much more. That’s why you need to integrate Appium with other tools to create robust automation frameworks.
The following are some expectations of automation frameworks: integration with test runner and reporting tools such as TestNG and JUnit, BDD integration with Cucumber, and integration with CICD tools such as Jenkins. In this chapter, you’ll understand how to integrate Appium with each of these tools.
5-1. Create an Automation Framework with Appium, Maven, and TestNG
Problem
For a robust automation framework, you need to integrate Appium with Maven for its dependency and life-cycle management capabilities and with TestNG for its capability to tag functions as test cases, to create HTML reports, to manage test cases, and so on. In this recipe, you want to know how to integrate Appium with Maven and TestNG .
Solution
You will create an automation framework with Appium, Maven, and TestNG and write one sample test case for an Android app.
Install the Eclipse-TestNG plug-in by following the steps at https://shankargarg.wordpress.com/2016/09/01/integrate-eclipse-and-testng/ .
Install the Eclipse-Maven plug-in by following the steps at https://shankargarg.wordpress.com/2016/09/01/integrate-eclipse-and-maven/ .
Create a new project in Eclipse by following these steps: click New ➤ Other ➤ Maven ➤ Maven Project ➤ Next (Figure 5-1).
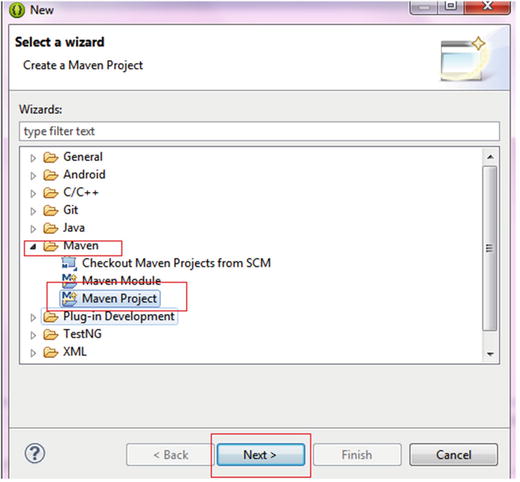
Figure 5-1. Creating a new Maven project
Select a simple project and keep the default workspace location (Figure 5-2).
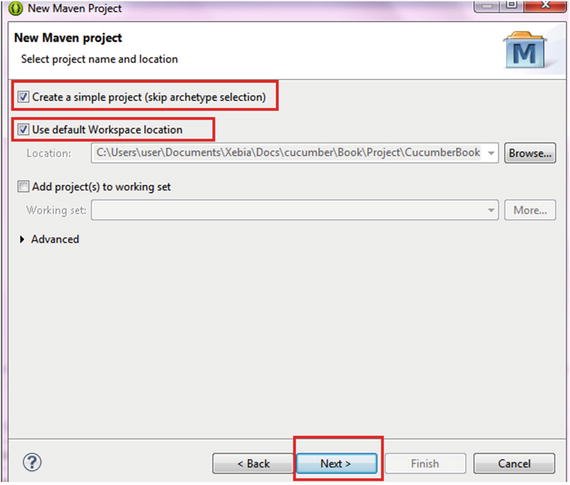
Figure 5-2. Maven project creation wizard
Provide details such as the artifact ID, group ID, name, and description. Then click Finish (Figure 5-3).
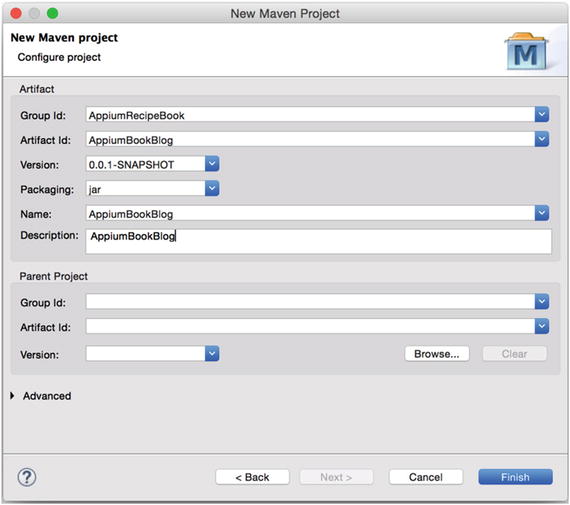
Figure 5-3. Maven project creation wizard, project details
This will create a basic Maven project. Update the pom.xml file with the following code to add Appium and TestNG dependencies:
<project xmlns="http://maven.apache.org/POM/4.0.0" xmlns:xsi="http://www.w3.org/2001/XMLSchema-instance" xsi:schemaLocation="http://maven.apache.org/POM/4.0.0 http://maven.apache.org/xsd/maven-4.0.0.xsd"><modelVersion>4.0.0</modelVersion><groupId>AppiumRecipeBook</groupId><artifactId>AppiumBookBlog</artifactId><version>0.0.1-SNAPSHOT</version><name>AppiumBookBlog</name><description>AppiumBookBlog</description><properties><appium.version>3.3.0</appium.version><testng.version>6.9.10</testng.version><selenium.version>2.47.1</selenium.version></properties><dependencies><!-- Appium --><dependency><groupId>io.appium</groupId><artifactId>java-client</artifactId><version>${appium.version}</version><scope>test</scope></dependency><!-- testng --><dependency><groupId>org.testng</groupId><artifactId>testng</artifactId><version>${testng.version}</version><scope>test</scope></dependency></dependencies></project>To keep the code and files in logical grouping, you need to create some packages in the default project. Refer to Figure 5-4 and create the appium package in the src/test/java package and create the apps folder in the src/test/resources package (Figure 5-4).
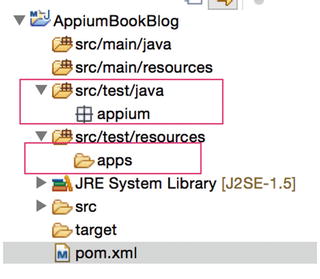
Figure 5-4. Project structure of the sample project
You will see an Android example for this project, so add the Android ApiDemos-debug.apk file to the apps folder.
Create a new class called AppiumDriverBasein the appium package. Add the following code to this class:
package appium;import io.appium.java_client.android.AndroidDriver;import java.io.File;import java.net.MalformedURLException;import java.net.URL;import java.util.concurrent.TimeUnit;import org.openqa.selenium.WebDriver;import org.openqa.selenium.remote.DesiredCapabilities;import org.openqa.selenium.support.ui.WebDriverWait;import org.testng.annotations.AfterTest;import org.testng.annotations.BeforeTest;public class AppiumDriverBase {protected WebDriver driver;protected WebDriverWait wait;// before Test Annotation makes a java function to run every time before a TestNG test case@BeforeTestprotected void createAppiumDriver() throws MalformedURLException, InterruptedException {// setting up desired capabilityDesiredCapabilities caps = new DesiredCapabilities();caps.setCapability("platform", "ANDROID");caps.setCapability("platformVersion", "5.0");caps.setCapability("deviceName", "ANDROID");caps.setCapability("browserName", "");// relative path to apk filefinal File classpathRoot = new File(System.getProperty("user.dir"));final File appDir = new File(classpathRoot, "src/test/resources/apps/");final File app = new File(appDir, "ApiDemos-debug.apk");caps.setCapability("app", app.getAbsolutePath());// initializing driver objectdriver = new AndroidDriver(new URL("http://127.0.0.1:4723/wd/hub"), caps);// initializing explicit wait objectdriver.manage().timeouts().implicitlyWait(10, TimeUnit.SECONDS);wait = new WebDriverWait(driver, 10);}// After Test Annotation makes a java function to run every time after a TestNG test case@AfterTestpublic void afterTest() {// quit the driverdriver.quit();}}Add the test case class called SampleTestCaseby creating one more class in the Appium package. Add the following code to this class:
package appium;import io.appium.java_client.MobileBy;import org.openqa.selenium.By;import org.openqa.selenium.support.ui.ExpectedConditions;import org.testng.annotations.Test;public class SampleTestCase extends AppiumDriverBase{//Test Annotation changes any java function to TestNG test case@Testpublic void sampeTest(){//click on Accessibility linkwait.until(ExpectedConditions.presenceOfElementLocated(MobileBy.AccessibilityId("Accessibility")));driver.findElement(MobileBy.AccessibilityId("Accessibility")).click();//click on 'Accessibility Node Querying' linkwait.until(ExpectedConditions.presenceOfElementLocated(MobileBy.AccessibilityId("Accessibility Node Querying")));driver.findElement(MobileBy.AccessibilityId("Accessibility Node Querying")).click();//backdriver.navigate().back();//backdriver.navigate().back();}}The first test case is ready. Run the Appium server on a terminal, run an Android emulator, and execute the program by right-clicking the file and selecting SampleTestCase ➤ Run As ➤ TestNG Test.
The Appium server should receive the request, and the program should be executed appropriately (Figure 5-5).
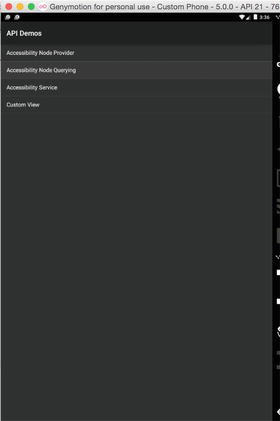
Figure 5-5. Sample Android test case executed
Now open a terminal and cd to the project root directory. Type the following command to execute all the methods tagged with the @Test annotation.
mvn testThe test case should execute successfully.
Note
The only difference for iOS would be the initiation of the driver object in the @BeforeTest method; everything else remains the same for iOS and TestNG integration.
How It Works
Maven and TestNG are a popular combination for Appium. They make up the base of the test automation framework. The following are some reasons for integrating Maven and TestNG:
Maven is a build tool that helps integrate all the required Java libraries mentioned in the pom.xml file as dependencies. The benefit is that in the case of any updates, you just need to update the dependency version, and Maven takes care of the rest.
The Maven life cycle helps ease the execution part. Functions mentioned with the @Test tag in the test package can be easily executed with mvn testfrom a terminal.
TestNG helps tag methods as test cases and also helps with the before and after methods. You just need to add as many methods as you need and tag them with an appropriate tag such as @Test or @BeforeSuite, @BeforeTest, and so on.
TestNG creates a consolidated HTML report of the test results automatically without needing you to do anything. This complements one of the biggest shortcomings of Selenium-based tools.
Note
Integrating Appium with JUnit is similar to integrating Appium with TestNG. The first difference is in pom.xml; you would add a dependency of JUnit instead of TestNG. That’s all you need to do differently to start using the @BeforeClass, @AfterClass, and @Test tags of JUnit in Java.
5-2. Create a BDD Framework with Appium, Cucumber, and the Page Object Model
Problem
Behavior-driven development is gaining lot of popularity, and Cucumber is the best tool to implement BDD, so you want to understand how to integrate Cucumber and Appium.
The framework that you create should be easy to maintain and extend, so the industry best practice of the page object model should also be integrated in the framework. You want to learn how to do this.
Solution
You will create a behavior-driven development framework with Appium, Cucumber, and JUnit and write one sample test case for an iOS app .
Install the Eclipse-TestNG plug-in by following the steps at https://shankargarg.wordpress.com/2015/04/26/how-to-integrate-eclipse-with-cucumber-plugin/ .
Create a simple Maven project using the Eclipse-Maven plug-in. Follow the steps until step 3 in recipe 5-1. Name the project AppiumCucumberPageObject.
For a simple Maven project, this is what the pom.xml file looks like:
<project xmlns="http://maven.apache.org/POM/4.0.0" xmlns:xsi="http://www.w3.org/2001/XMLSchema-instance" xsi:schemaLocation="http://maven.apache.org/POM/4.0.0 http://maven.apache.org/xsd/maven-4.0.0.xsd"><modelVersion>4.0.0</modelVersion><groupId>AppiumRecipeBook</groupId><artifactId>AppiumCucumberPageObject</artifactId><version>0.0.1-SNAPSHOT</version><name>AppiumCucumberPageObject</name><description>AppiumCucumberPageObject</description></project>Now, you need to update the pom.xml file for the dependencies of Cucumber and Appium. First, add the properties tag and define properties for the Cucumber and Appium versions. This is done to make sure that when you need to update the dependency version, you do it in only one place in the properties.
<properties><appium.version>4.0.0</appium.version><cucumber.version>1.2.4</cucumber.version></properties>Note Please use the Maven central repository at http://search.maven.org/ to check the latest dependency versions of Cucumber and Appium.
Add dependencies for cucumber-java and cucumber-junitfor BDD and for java-client for mobile automation by using the following code:
<dependencies><!-- cucumber --><dependency><groupId>info.cukes</groupId><artifactId>cucumber-java</artifactId><version>${cucumber.version}</version><scope>test</scope></dependency><dependency><groupId>info.cukes</groupId><artifactId>cucumber-junit</artifactId><version>${cucumber.version}</version><scope>test</scope></dependency><!-- Appium --><dependency><groupId>io.appium</groupId><artifactId>java-client</artifactId><version>${appium.version}</version></dependency></dependencies>To keep the logical files in the same place, you will create some packages in the default project, such as the stepdefinition package to keep all the Cucumber step definitions and the pages package to keep all the page object files. Follow the setup in Figure 5-6 and create the packages as mentioned.
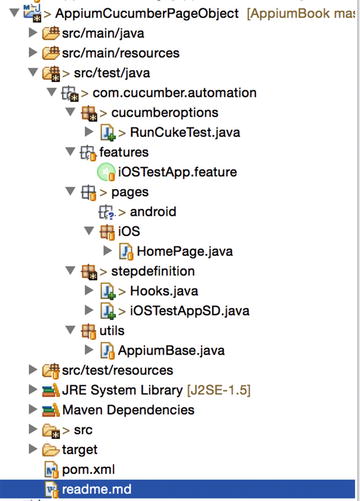
Figure 5-6. Structure for AppiumCucumberPageObject project
For a Cucumber project, the RunCukeTest.java file specifies the configuration such as the location of feature files, the location of step definitions, the output location, and so on. Add the RunCukeTestclass to the cucumberoptions package with the following code:
package com.cucumber.automation.cucumberoptions;import org.junit.runner.RunWith;import cucumber.api.CucumberOptions;import cucumber.api.junit.Cucumber;@RunWith(Cucumber.class)@CucumberOptions(features = "src/test/java/com/cucumber/automation/features",glue = "com.cucumber.automation.stepdefinition",plugin = {"pretty","html:target/cucumber",})public class RunCukeTest {}Requirements are set in feature files. Since you are using the iOS Test App for this demonstration, you will add the iOSTestApp.feature file to the package features. This is how the feature file will look:
Feature: iOS Test AppIn order to test sample ios appAs a product ownerI want to specify generic scenariosScenario: Calculate SumGiven user is on Application Home PageWhen user enters "4" in first fieldAnd user enters "5" in second fieldAnd clicks on Compute SumThen user sees computed sum as "9"The feature file has to be converted to StepDefinition for Cucumber to understand this file. The simplest way is to use the suggestions given by Cucumber. In iOSTestApp.feature, right-click and select Run As à Cucumber Feature. Now copy the suggestions given by Cucumber in the console output shown in Figure 5-7.
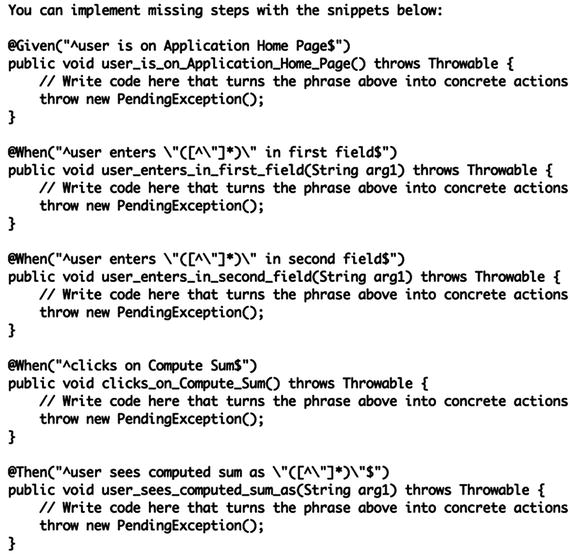
Figure 5-7. Cucumber’s suggestion for step definitions
Add a file called iOSTestAppSD.javato the stepdefinition package with the following code:
package com.cucumber.automation.stepdefinition;import cucumber.api.java.en.Given;import cucumber.api.java.en.Then;import cucumber.api.java.en.When;public class iOSTestAppSD {@Given("^user is on Application Home Page$")public void user_is_on_Application_Home_Page() {}@When("^user enters "([^"]*)" in first field$")public void user_enters_in_first_field(String arg1) {}@When("^user enters "([^"]*)" in second field$")public void user_enters_in_second_field(String arg1) {}@When("^clicks on Compute Sum$")public void clicks_on_Compute_Sum() {}@Then("^user sees computed sum as "([^"]*)"$")public void user_sees_computed_sum_as(String arg1) {}}You need to specify and add the test apps to be used for the test case execution. Add the .apk/.app files in the apps folder in the src/test/resources package .
Add the Appium functions that can be used to invoke the Android app and close the app once the execution finishes. (I am keeping this file basic for simplicity purposes.) Create the AppiumBase.java class in the utils package with the following code:
package com.cucumber.automation.utils;import io.appium.java_client.ios.IOSDriver;import java.io.File;import java.net.MalformedURLException;import java.net.URL;import java.util.concurrent.TimeUnit;import org.openqa.selenium.WebDriver;import org.openqa.selenium.remote.DesiredCapabilities;import org.openqa.selenium.support.ui.WebDriverWait;public class AppiumBase {public static WebDriver driver;public static WebDriverWait waitVar;public void createDriver() throws MalformedURLException, InterruptedException {// setting capabilitiesDesiredCapabilities caps = new DesiredCapabilities();caps.setCapability("platform", "iOS");caps.setCapability("platformVersion", "9.2");caps.setCapability("deviceName", "iPhone 6");// relative path to .app filefinal File classpathRoot = new File(System.getProperty("user.dir"));final File appDir = new File(classpathRoot, "src/test/resources/apps/");final File app = new File(appDir, "TestApp.app");caps.setCapability("app", app.getAbsolutePath());// initializing driver objectdriver = new IOSDriver(new URL("http://127.0.0.1:4723/wd/hub"), caps);// initializing waitsdriver.manage().timeouts().implicitlyWait(10, TimeUnit.SECONDS);waitVar = new WebDriverWait(driver, 10);}public void teardown() {// close the appdriver.quit();}}You need to add a hooks file so that Cucumber can call functions placed in the AppiumBase file . Create the Hooks.java class in the stepdefinition package with the following code:
package com.cucumber.automation.stepdefinition;import java.net.MalformedURLException;import com.cucumber.automation.utils.AppiumBase;import cucumber.api.java.After;import cucumber.api.java.Before;public class Hooks {AppiumBase appiumBase = new AppiumBase();@Beforepublic void beforeHookfunction() throws MalformedURLException, InterruptedException{appiumBase.createDriver();}@Afterpublic void afterHookfunction() {appiumBase.teardown();}}Let’s start implementing the page object model (POM) . I am keeping the POM simple, but you are free to extend it as per your requirements. For this iOS app, since there is only one screen, you will add only one page called HomePage.java in the pages.iOS package with the following code:
package com.cucumber.automation.pages.iOS;import io.appium.java_client.MobileBy;import org.openqa.selenium.By;import org.openqa.selenium.support.ui.ExpectedConditions;import com.cucumber.automation.utils.AppiumBase;public class HomePage extends AppiumBase{// All the locators for Home page will be defined hereBy textField1 = MobileBy.AccessibilityId("TextField1");By textField2 = MobileBy.AccessibilityId("TextField2");By computeSum = MobileBy.AccessibilityId("ComputeSumButton");By result = MobileBy.AccessibilityId("Answer");// All the behavior of home page will be defined here in functionspublic boolean isHomePage(){waitVar.until(ExpectedConditions.presenceOfElementLocated(computeSum));return driver.findElement(computeSum).isDisplayed();}public void typeTextField1(String text){waitVar.until(ExpectedConditions.presenceOfElementLocated(textField1));driver.findElement(textField1).sendKeys(text);}public void typeTextField2(String text){waitVar.until(ExpectedConditions.presenceOfElementLocated(textField2));driver.findElement(textField2).sendKeys(text);}public void clickComputeSum(){waitVar.until(ExpectedConditions.presenceOfElementLocated(computeSum));driver.findElement(computeSum).click();}public String returnResult(){waitVar.until(ExpectedConditions.presenceOfElementLocated(result));return driver.findElement(result).getText();}}You will have to update the step definition files for the Appium functions that you have just written. After adding all the functions, the code should look like this:
package com.cucumber.automation.stepdefinition;import com.cucumber.automation.pages.iOS.HomePage;import cucumber.api.java.en.Given;import cucumber.api.java.en.Then;import cucumber.api.java.en.When;import static org.junit.Assert.assertTrue;import static org.junit.Assert.assertEquals;public class iOSTestAppSD {HomePage homePage = new HomePage();@Given("^user is on Application Home Page$")public void user_is_on_Application_Home_Page() {assertTrue(homePage.isHomePage());}@When("^user enters "([^"]*)" in first field$")public void user_enters_in_first_field(String arg1) {homePage.typeTextField1(arg1);}@When("^user enters "([^"]*)" in second field$")public void user_enters_in_second_field(String arg1) {homePage.typeTextField2(arg1);}@When("^clicks on Compute Sum$")public void clicks_on_Compute_Sum() {homePage.clickComputeSum();}@Then("^user sees computed sum as "([^"]*)"$")public void user_sees_computed_sum_as(String arg1) {assertEquals(arg1, homePage.returnResult());}}The framework is ready. Run the Appium server on a terminal and execute the program by going to iOSTestApp.feature. Then right-click Run As and select Cucumber Feature.
The Appium server should receive the request, and the program should be executed appropriately (Figure 5-8).
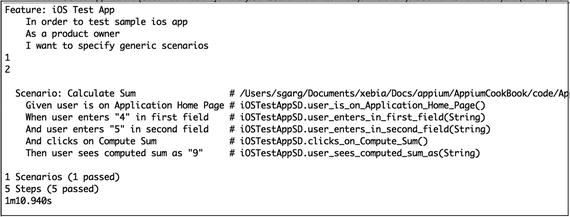
Figure 5-8. Console output for the Appium Cucumber project
You can open a terminal and cd to the project root directory, typing the following command to execute all the scenarios in all the feature files:
mvn test
The scenarios should execute fine.
Note
The only difference for Android would be to initiate the driver object in the @Before method; everything else remains the same for integrating Android with Cucumber.
How It Works
You have integrated Cucumber, Appium, Maven, Java, and page objects to design your mobile automation frameworks. Cucumber is for implementing BDD so that nontechnical people can also directly contribute to development, Appium is for web automation, Java is a programming language, and Maven is a build tool.
The page object model is a framework design approach for maintaining and accessing components and controls spread across test scenarios. The page object model creates a domain-specific language (DSL) for your tests so that if something changes on the page, you don’t need to change the test; you just need to update the object that represents the page.
5-3. Conduct Continuous Automated Testing with Appium, Git, and Jenkins
Problem
A test automation framework should integrate with version control and continuous integration tools so that the latest test code can always be executed either on-demand or at a scheduled time. You want to know how to integrate the Appium framework with a version control management system and a continuous integration tool.
Solution
Git is the most famous version control management system. GitHub is most popular version of it and is available for free for a certain number of users. So, for version control in this recipe, you are going to use GitHub.
Jenkins is most popular tool available for automated build and continuous integration. Jenkins has lot of advantages as it is open source, free, and easy to use, and it can schedule a run at a scheduled time or trigger builds after an event.
Installing Jenkins and GitHub is beyond the scope of this book, and thus I am assuming that you have Jenkins and Git already installed and set up.
If you need any help regarding Jenkins setup, please follow the steps here:
https://wiki.jenkins-ci.org/display/JENKINS/Installing+Jenkins
You need to upload the project on GitHub. If you need any help in Git or with the GitHub repo setup, then follow these instructions:
You can download the projects that will be used in this recipe from the following GitHub URL:
To get started, you will run Jenkins locally and execute the AppiumBookBlog project created in recipe 5-1 by taking the latest code from the GitHub repository.
Use the http://0.0.0.0:8080/ URL to open Jenkins in any browser (replace 0.0.0.0 or localhost with the machine IP address if Jenkins is not running locally).
Go to the Jenkins dashboard and click New Item (Figure 5-9).
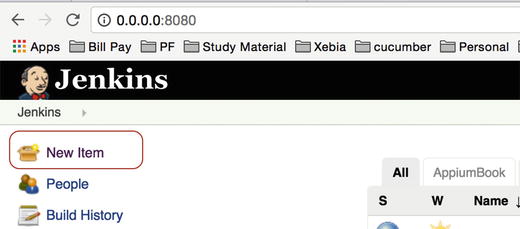
Figure 5-9. New Item on Jenkins dashboard
Enter the Jenkins job name that you want to create, select the “Maven project” option, and click OK (Figure 5-10).
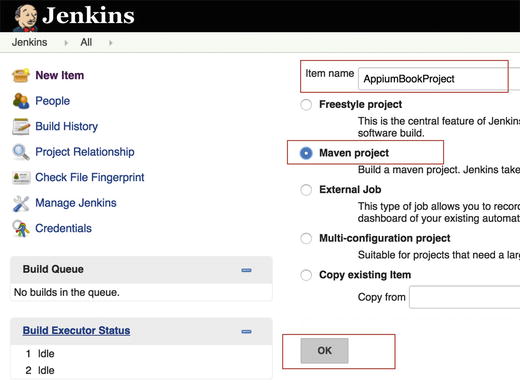
Figure 5-10. Project name for the Jenkins job
Enter a description of the project (Figure 5-11).
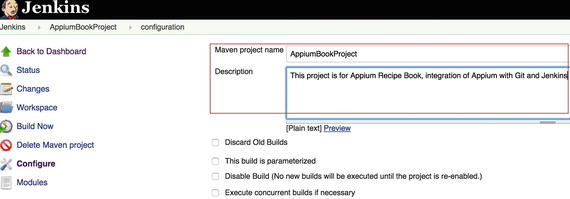
Figure 5-11. Project description
In Source Code Management section, select Git, fill in the Repository URL field as https://github.com/ShankarGarg/AppiumBook.git , and fill in your GitHub credentials (Figure 5-12). Keep the others options in this section set to their defaults.
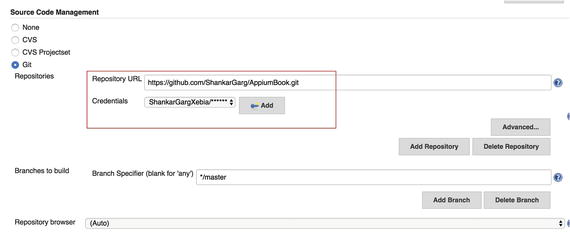
Figure 5-12. GitHub repository and credentials
In the Build section, since this is a Maven project, the root pom.xml file is automatically mentioned, but since the repository has multiple projects, you need to refer to the exact pom.xml file that you want to run in this project. Also, you need to mention the goal test that you want to run in this project (Figure 5-13).

Figure 5-13. pom.xml and Maven goal
Keep all other options set to their defaults and click Save. You will be redirected to the dashboard of the newly created Jenkins project.
On this page, click Build Now to run the project (Figure 5-14).
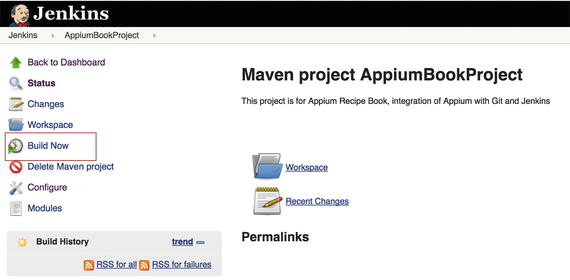
Figure 5-14. Building the project
Once you click Build Now, a build is triggered immediately. You can see the build number and the timestamp (Figure 5-15).
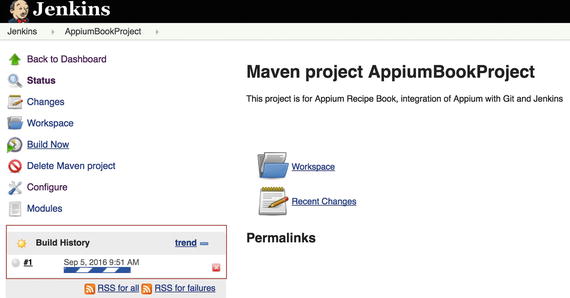
Figure 5-15. Build number and timestamp
Click the timestamp on the build. And then click Console Output to see the console output of the project (Figure 5-16).
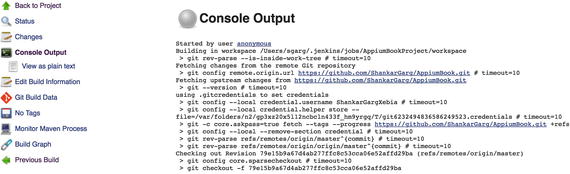
Figure 5-16. Console output for the Appium project
How It Works
You have already integrated Appium with Maven, so integrating Appium with Jenkins just meant running the Appium Maven project via Jenkins. Jenkins comes with a Maven plug-in by default; when you selected the item type of building a Maven project, most of the settings were taken care of then. The Build section was prepopulated with pom.xml, and you just had to select the appropriate pom.xml file and set the goal to test.
Jenkins is also prepopulated with the GitHub plug-in, so you just had to set the GitHub URL and credentials. Now every time the project is built, Jenkins takes the latest code from Git and then runs the test cases.
Note
To explore more, you can go to the Build Triggers section in the Jenkins job and try to schedule the job with various configurations.