
Lesson 7. Correcting Tone
Every photographer needs to deal with the fact that the eye sees a wider range of brightness values or tones than a camera can capture. You inevitably sacrifice some part of the dynamic range when you take a picture. So, one goal of performing tonal adjustments is to retrieve as much detail from sacrificed areas as possible.
As you’ve learned, Aperture has controls to modify the exposure, black point, and brightness of an image. But other adjustments in Aperture—such as Levels, Highlights & Shadows, and Curves—can perform even more precise tonal changes.
In this lesson, you’ll correct and improve tone in several images, primarily using the Levels and the Highlights & Shadows controls. You’ll also explore filters for converting color images to black and white; and you’ll do the majority of your work in the Full Screen view.

Making Adjustments in Full Screen View
Full Screen view is a fully functional workspace. Because images are displayed here in full screen against a black background, it becomes easier to make qualitative adjustments.
1 In the Library inspector, select the “Uganda The Pearl of Africa” project.
2 Press V to set the main window layout to display just the Viewer.
3 To switch to Full Screen view, do one of the following:
• Choose View > Full Screen.
• Press F.
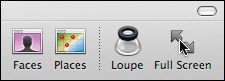
• In the toolbar, click the Full Screen button.
Full Screen view can display the Browser or the Viewer. When the Viewer is displayed, the images can be accessed in filmstrip view at the bottom of the window.
4 If necessary, move your mouse pointer near the bottom of the screen to cause the filmstrip to appear.
5 In the filmstrip view, select the last image of the lion, IMG_2208. With an image selected, you are ready to access the Adjustments inspector.

6 Move your mouse pointer to the top of the screen, and in the toolbar that appears, click the Inspector HUD button, or press H. In Full Screen view, the inspector is displayed as a HUD. You still have access to the tabs for the Adjustments, Metadata, and Library items.
![]()
Tip
By default, the toolbar does not appear in Full Screen view until the mouse pointer is moved to the top of the screen. To keep the toolbar visible, move the mouse pointer to the top of the screen in Full Screen view, then in the toolbar, click the Always Show Toolbar control.
Now you can make some adjustments. This image lacks a bit of detail in the highlights, so let’s apply the Exposure adjustment. Aperture has a handy way to temporarily hide the HUD while you make this modification.
7 In the Inspector HUD, click the Adjustments tab.
8 Shift-drag the Exposure slider to about 0.3 or 0.4.
Holding down the Shift key temporarily hides the Inspector HUD so that you can see more of the image. You’ll use that trick again as you continue to improve this lion image.
Enhancing an Image
The Enhance brick in the Adjustments inspector contains a number of controls that can be used to add more clarity and visual pop to an image.
Using Contrast
On flat images in which highlights and shadows are dull and muddy, adding contrast can simultaneously stretch the highlights to become whiter and the shadows to become darker. The histogram can help you choose the amount of contrast to apply. You can increase an image’s contrast to add depth, but it usually comes at the expense of detail in the midtones.
1 Make sure the lion image, IMG_2208, is still selected.
Notice that the curves are squeezed into the center of the histogram. This indicates a low-contrast image—there are no very bright or very dark areas. Using the Contrast adjustment, you can stretch the highlights and shadows to generate a broader transition from darks to whites in the image, which is usually desirable.

Because you’ll be making the shadows darker and the highlights brighter, it’s a good idea to enable the Highlight Hot & Cold Areas overlays to view any clipping that may occur.
2 Press Shift-Option-H to enable the overlays.
3 In the Adjustments HUD, scroll down to the Enhancement brick.
4 Shift-drag the Contrast slider to the right to increase image contrast to around 0.3.
Tip
Instead of dragging the slider, you can click the numeric value of a parameter and press the Arrow keys to change it in increments of 0.5. Holding down the Option key while pressing an Arrow key will change the parameter in increments of 0.01. Pressing Tab will move to the next parameter.
You might notice that a bit of red and blue overlay is displayed. A small amount won’t impact the image too much, so just ignore them.
5 Press Shift-Option-H to disable the overlays.
6 Press M to view the original master image, and then press M again to return to your version.
See what that tiny bit of contrast adjustment did? The image now displays a much greater range from shadows to highlights. Adding a bit of contrast is often the easiest way to improve those flat-looking images. Just be aware that too much and you’ll begin to lose detail in your blacks and whites, so keep an eye on that histogram.
Next, you’ll further enhance this image and use another method to ensure that the Adjustments HUD stays out of your way.
Adding Definition
Definition adds pop to flat-looking images by increasing contrast in local areas, unlike the Contrast adjustment, which works on a more global level. First, let’s lock off our Adjustments HUD to the side so it no longer overlaps the image.
1 Position your mouse pointer over the Adjustments HUD title bar.
2 Drag the HUD to the left side of the screen. You can move any HUD by dragging its title bar.
3 In the top-right corner of the Inspector HUD, click the Always Show Toolbar control. This control locks the HUD in place and then scales and repositions the image so the two never overlap.
Tip
When you are in Full Screen view, an Always Show Toolbar control is found on the filmstrip view and the toolbar.
4 In the Enhance brick, drag the Definition slider right to 0.5.
5 Select the Enhance checkbox to compare the image before and after all the enhancement adjustments.
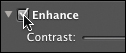
6 Leave the Enhance checkbox selected because it makes the image look better.
Although this is a subtle change, not every image will benefit from increased definition. It can add notable clarity to photographs of people, but that is not always flattering. On the other hand, it can do wonders for images shot with less-expensive lenses.
Removing Camera Vignetting
Your adjustments have enhanced the image, but they have also enhanced the vignetting in this image. Vignetting is the result of light falloff in a lens, when more light hits the center of the image compared to its outer areas. You can remove this effect using the Devignette adjustment.
1 In the Adjustments HUD, from the Adjustments pop-up menu, choose Devignette.
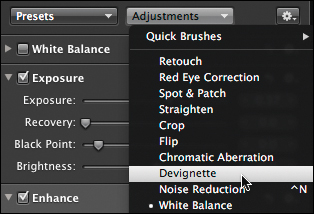
2 In the Devignette brick of the inspector, drag the Radius slider to about 1.
3 Select the Devignette checkbox to compare the image before and after the adjustment.
You can see the effectiveness of this adjustment in reducing the lens’ vignette artifact. Although the adjustment works well, the image looked better with the vignette effect. In fact, it might look even better with a more pronounced vignette.
4 From the Devignette Adjustment Action pop-up menu, choose Remove this adjustment.

Now let’s look at enhancing the natural vignette that is already present in the image.
Adding a Vignette
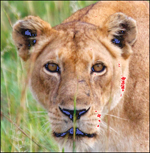
Let’s test our theory that this lion will look even more dramatic with a more pronounced vignette effect added. In this exercise, you will use the Vignette adjustment to darken the edges of the image.
1 In the Adjustments HUD, choose Adjustments > Vignette.
Applying the Vignette adjustment has slightly enhanced the naturally existing vignette artifact. But you can enhance it even more.
2 Drag the Radius slider to 1.
The Radius slider modifies how much the vignette encroaches upon the image. The Intensity slider modifies the darkness of the vignette. For a subtler, yet more natural lens effect you can change the Type from Gamma to Exposure. Gamma is similar to creating the vignette with a Brightness control that mostly adjusts your midtones, and Exposure is similar to using an Exposure control.
3 From the Type pop-up menu, choose Exposure.
![]()
4 Drag the Intensity slider to 1.
5 Drag the Radius slider to 1.5.
Let’s compare the original master against the version with all the changes you’ve made.
6 Press M to view the master image, and then press M again to return to your version.
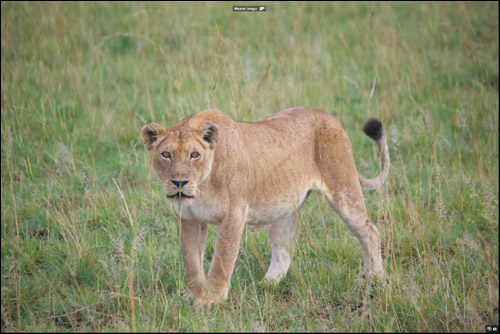
Master image

Adjusted version
The vignette combines with the contrast and definition adjustments to make a huge increase in the visual impact of this image.
Understanding the Order of Adjustments
As you removed and added adjustments in the previous exercises, you may have noticed that they were sometimes inserted at the top and sometimes at the bottom of the Adjustments pane. Aperture has a fixed order of operations. Each adjustment has a place in the order, and you cannot change that order in the inspector. Adjustments are processed from the top downward in the Adjustments inspector. Aperture automatically inserts the adjustments in the proper order so you get consistent results all the time.
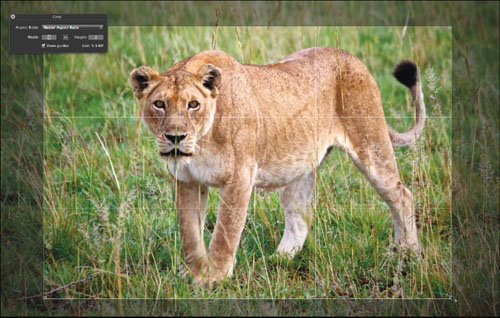
1 From the tool strip, select the Crop tool, or press C.
![]()
2 Drag a selection rectangle from the upper left of the image to the lower right, framing tightly around the lion. This draws out a crop rectangle around the lion.
3 Close the Crop HUD.
Notice that the crop is placed at the top of the Adjustments inspector. Because the Vignette adjustment is added at the bottom of the Adjustments pane, the crop is processed first and then the vignette is updated around the new framing from the crop. This fixed order saves you from rearranging the bricks in the Adjustments inspector to get the results you want.
Improving Highlights and Shadows
Compared to your camera, the human eye can perceive a substantially wider range of luminance, from near-darkness to the brightest light. So for instance, while your eye might see detail in the bright sky and in the shadows of a forest simultaneously, your camera probably will not. No, laser eye surgery can’t help here, but the Highlights & Shadows adjustment controls can.
These controls allow you to adjust the shadows or highlights independently, which is helpful when fixing images with mixed lighting, intense shadow areas, or unusually bright areas such as snow and clouds.
The Highlights & Shadows controls are very simple to use. If you drag the Highlights slider to the right, the bright areas of your image grow darker. If you drag the Shadows slider to the right, the dark areas of your image get brighter.
Controlling Highlights
As you learned in Lesson 6, the Recovery adjustment in Aperture brings back any highlight details that may be clipped. But it’s not designed to bring out the detail in non-clipped highlights. The Highlights adjustment does just that. It won’t find any detail in blown-out highlights, but it can help increase the visibility of detail in the normal highlights range. The Recovery and Highlights adjustments also work together. You can bring back the blown-out highlights using the Recovery adjustment and then turn to the Highlights adjustments to perfect what you retrieved.
1 With the “Uganda The Pearl of Africa” project still selected, press V to show the Browser.
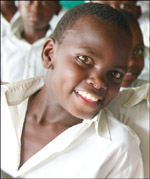
2 Double-click the image of the students, IMG_9602.
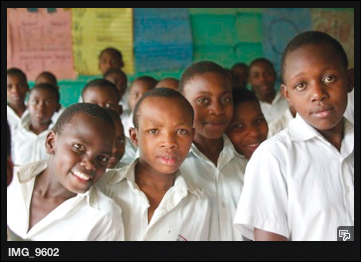
You’ll first use the Recovery slider to bring in any detail that may exist outside the normal highlights range. Then you’ll build upon those results using the Highlights slider.
3 Move the mouse pointer to the top of the screen, and in the toolbar that appears, click the Inspector HUD button, or press H, if necessary.
4 In the Exposure brick, drag the Recovery slider until no more clipping exists in the histogram.
![]()
Tip
Command-drag the Recovery slider to view the color clipping overlays and improve accuracy when retrieving clipped highlights.
5 If necessary, click the disclosure triangle to open the Highlights & Shadows brick.
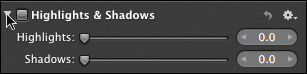
6 Drag the Highlights slider to the right until you are satisfied with the amount of image detail in the white shirts.
Tip
Dragging the slider too far will cause the highlights to go flat. You can press Z to zoom in on the shirts to see the detail more clearly.
7 To view the improvement, select the Highlights & Shadows checkbox to compare the image before and after the Highlights adjustment. Select and deselect the checkbox a few times to observe the change. When you’re finished, make sure that the checkbox is selected.
Master image

Adjusted version
The highlights in the image now have better detail in them. Using the combination of Recovery and Highlights adjustments together will usually get you the most detail from your highlights even though on occasion they don’t appear to provide much on their own.
Controlling Shadows
Shadows play a very important role in the impact of a photo. Getting shadow detail right can help create balance between objects in the photo and can affect the perception of the photo.
The Black Point parameter controls set the point at which your shadows become black; the Shadows control creates more separation in your shadows by lightening the pixels in the shadows area.
1 In the Inspector HUD, click the Library tab, and then select the Tasmania project.
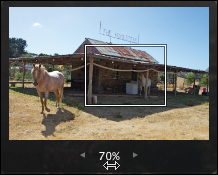
2 Double-click the horse and barn scene, SJH2501201019.
The area under the homestead’s overhang is pretty dark. This is a perfect place to apply the Shadows control because you want to bring out the detail lost in the shadows while leaving the rest of the image unchanged.

3 Click the Adjustments tab, and drag the Shadows slider to the right to suit yourself (probably a value between 10 and 30). You can instantly see the Shadows parameter working. The details on the wall and the shadowed/dark areas of the horse are much clearer.
4 Press M to toggle between the master image and the version with the shadow details increased. Press M again to return to your version.
When you adjust highlights or shadows, Aperture analyzes your image to more intelligently determine which tones should be adjusted and by how much. The Highlights & Shadows controls consider the tones of pixels in the local area to calculate how much a given pixel should be brightened or darkened. The Radius parameter in the Advanced section of the Highlights & Shadows brick sets the size of this local area.
5 In the Advanced controls, drag the Radius slider between 400 and 700 to a value you think looks best. A smaller radius can cause a flatter look; a larger radius can cause the area to be too dark or light. This all depends on the specific image you are adjusting.
The Color Correction slider boosts color saturation primarily in the shadows. Let’s zoom in to see more detail and then make that adjustment. Look for changes on the light bulbs and the sign above the horse.
6 Position the mouse pointer over the white horse in the background, and press Z. That zooms in a bit too much, so you’ll use the navigation box to zoom out to 70%.
7 In the navigation box, drag the Zoom slider to around 70%.
8 Drag the Color Correction slider all the way to the right to boost the color in the shadows.
Lastly you’ll adjust the midtones contrast and the low tonal width. Although, you won’t be adjusting highlights here, you also have access to a High Tonal Width adjustment. Tonal width determines how widely the Shadows or Highlights sliders impact your image.
9 Drag the Midtones slider to around −10 to −20.
10 Drag the Low Tonal Width slider to around 60.
11 Press Z to view the entire image.
12 Press M to toggle between the master image and the version with the shadow details increased. Notice how much more detail the version has in the shadow areas compared to the master. It’s almost like you added an extra fill light. When you’re done comparing the images, return to your version.

Before

After
The Highlights & Shadows controls are going to be your regular stand-by tools for fixing many images. They are simple to use and sophisticated enough to work in multiple situations.
Adjusting Image Levels
Levels is among the most popular Aperture adjustments because within one fairly simple, graphical window, you can individually push and pull the darkest areas, midtones, and lightest areas to make precise and elegant corrections.
Correcting Levels Automatically
Aperture includes several automatic adjustment controls that attempt to fix problems with a single mouse click. These controls analyze an image and then apply an adjustment based on that analysis. You can use a one-click method as a basic quick correction and then refine the results using manual adjustment controls.
Automatic adjustments work for exposure, but it’s also possible to fix some color issues with them. By clicking the Auto Levels Separate button, you can tell Aperture to analyze the image and automatically adjust the levels for each color channel.
Let’s compare the two Auto Levels controls, first using the combined method and then the separate method.
1 Press V to return to the Browser view.
2 From the Library Path Navigator pop-up menu, choose Events > Around San Francisco.

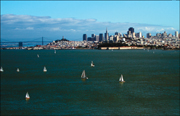
3 In the Browser, double-click the San Francisco bay image, IMG_3132. This image has a significant blue color cast, and it lacks a bit of contrast.
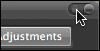
4 In the Levels brick of the Adjustments HUD, click the Auto Levels Combined button.
![]()
Aperture performs an analysis and then applies a Levels adjustment for luminance. Because it is adjusting only for luminance, the adjusted image has improved contrast but its blue color cast remains. This automatic fix would be a good choice if you didn’t want Aperture to change the color. In this case, however, you do want a bit of help with that color cast.
5 Click the Reset button to return to the unadjusted image.
6 Click the Auto Levels Separate button.

Before
After
Aperture performs an analysis and then applies a Levels adjustment for all three color channels in the image. Because the red, green, and blue channels are calculated independently, both contrast and color cast are improved.
Adjusting Image Luminance Levels
To manually perform level adjustments to your image, you can drag the sliders at the bottom of the histogram. By doing so, you are shifting the highlights, shadows, or midtones darker or lighter.
1 Press V to switch to the Browser view.
2 In the Library Path Navigator pop-up menu, choose Events > Brinkmann Photos.
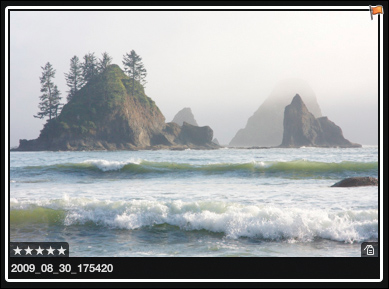
3 Double-click the seashore image, 2009_08_30_175420.
4 Click the Levels adjustment disclosure triangle, if necessary, and select the Levels checkbox to display the histogram. The histogram in the Levels brick shows the original image’s histogram, whereas the histogram at the top of the Adjustments pane is the resulting histogram after all adjustments have been applied.
Since you’ll be adjusting the black clipping point, it might be wise to view the Levels RGB histogram. Because the RGB histogram displays each channel individually, it will provide a clear indication if any single channel is clipping.
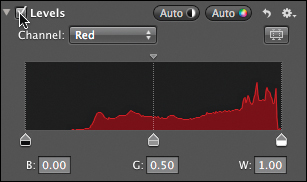
5 From the Channels pop-up menu in the Levels brick, choose RGB.
Now set the appropriate black point in this low-contrast image. The Black Levels slider is against the left edge of the histogram, and there is a large gap between that and the darkest region of the histogram.
6 Drag the Black Levels slider to a position under the darkest point of the histogram. Adjusting the Black Levels slider is identical to adjusting the Black Point slider in the Exposure controls.

Moving the black levels performs a dramatic adjustment to the image. The shadows are much richer, and the histogram curve at the top of the inspector is now spread across the entire range.
Note
When adjusting the black and white points, look at your image and decide whether it actually should have completely black or white areas. For instance, on a foggy day, the shadows probably won’t be completely black and the whites will probably be duller as well. After you make that judgment call, you can make the appropriate adjustment.
When you adjusted the black levels, your midtones were also adjusted because the center point of your range changed. However, you can adjust the image midtones without impacting the white or black points. Dragging the Gray Levels slider to the right will remap that region to be darker, and dragging the slider to the left will lighten the midtones.
7 Drag the Gray Levels slider to suit yourself, until the brightness values for the midtones are slightly brighter or darker. Adjusting the gray levels slider will have a similar effect to adjusting the Brightness slider.

The ability to modify your black point, white point, and midtones makes Levels a handy control set to have around. But the Aperture Levels adjustments go even further, by adding controls for your highlights and shadows.
Using the Quarter-Tone Levels Controls
If you need even greater control over tonal values, Aperture offers Quarter-Tone Levels controls. These allow you to adjust the shadows and the highlights.
Note
Unlike the Black Levels and White Levels sliders, which push the midtone around, Quarter-Tone Levels sliders independently affect only the tonal range of the pixels they represent. As a result, they precisely adjust the pixels that fall between the black point and midtones, or midtones and the white point.
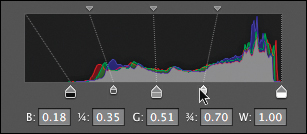
1 Click the Quarter-Tone Controls button to activate the Quarter-Tone Levels sliders.

The Levels histogram updates with new controls for adjusting two discrete tonal ranges of the image, thereby allowing you to make finer adjustments.
Tip
You can change the brightness of the shadows, midtones, and highlights with the small triangular Brightness sliders above the Levels histogram.
2 Drag the 1/4 Shadow Brightness Levels and 3/4 Highlight Brightness Levels sliders until the shadows and highlights suit your taste.
Tip
You can zoom in to full resolution by pressing Z, and see the subtle changes that the Quarter-Tone adjustments are having on the image.
The addition of Quarter-Tone controls in the Levels controls means many of the tasks people performed using Curves adjustments now can be accomplished in the much simpler Levels adjustment interface.
Adjusting Color with Levels Controls
This lesson is all about tone, but we are still going to touch on some color adjustments using the Levels controls while we are here. Levels are not limited to only luminance corrections. You can also do a fair number of regional color adjustments. Remember two important things as you adjust colors using the Levels sliders in the histogram. First, moving an individual color slider to the right will decrease that color, and moving it left will increase that color. Second, when you reduce an individual color, you increase the relative amount of its opposite color. Know your RGB color wheel! Reducing blue increases yellow, increasing red reduces cyan, and so on. Let’s enhance the color by adjusting individual color channels, starting with green.
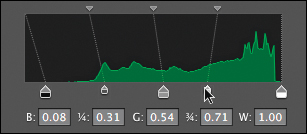
1 From the Channel pop-up menu, choose Green.
2 Drag the Black Levels slider slightly to the right to remove a bit of green from the shadows and bring out the magenta in those hills.

Note
These adjustments are not specific. Move the sliders as much or as little as you like. The point is to understand what they do, not the precise value.
3 Drag the 3/4 Shadows slider to the left slightly to bring out more green in the crests of the waves.
4 From the Channel pop-up menu, choose Blue.
5 At the top of the histogram, drag the Highlight Brightness slider to the left to decrease the green highlights.
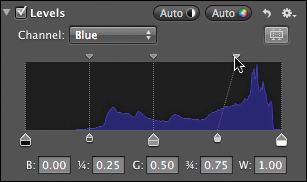
What!??? Didn’t you just read that moving the slider to the right will decrease the selected color? You just moved blue to the right and it increased the color! Calm down, the rule still applies. You adjusted the Highlight Brightness slider for blue, often called the output slider. As long as the bottom input slider is to the right of the output slider, it reduces the color.
6 When you are done playing with the adjustments, press M to compare your changes with the original master image.

Before

After
The benefit of using Levels controls to adjust color is the simplicity of having an all-in-one tool with which you can change highlights, shadows, and midtones purely as tonal adjustments or color.
Converting Color Images to Black and White
Although most digital cameras shoot in color, many photographers choose to display their photos in black and white to focus on highlights, shadows, shapes, and textures.
Aperture offers an easy way to convert color images to black and white while providing precise control over the process.
Tip
Converting RAW files to black and white provides more options than JPG files when manipulating shadows and highlights. As mentioned previously, RAW files have a wider dynamic range than JPEG.
The Black & White adjustment offers complete control over the tonal relationships and contrast in an image. The Black & White adjustment allows you to independently adjust the red, green, and blue channels, an effect similar to using color filters in traditional black-and-white photography. To make the process easier, you can start with presets that mimic common color filters.
Note
Although you could create a black-and-white photo by simply desaturating the image, you would attract massive eye rolling and snide glances in your direction. You wouldn’t want that, would you? Also, dragging a saturation parameter to zero can sometimes make an image look faded and cannot compare to the artistic control offered by the Black & White adjustment.
Let’s begin by switching to a new project while in Full Screen view and making a few versions to compare multiple black-and-white adjustments.
1 Press V to return to the Browser, and then click the Projects button to display the Projects view.
2 Double-click the Landscapes project, and select IMG_4532.
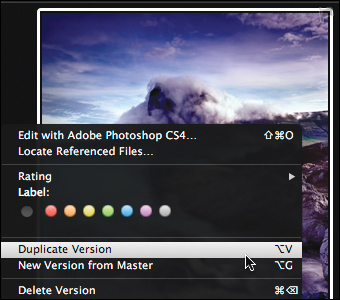
3 Control-click (or right-click) the image and choose Duplicate Version from the shortcut menu, or press Option-V. A new version of the image is created, IMG_4532 – Version 2.
4 Press Option-V twice. Your Aperture project now contains four versions of IMG_4532.
5 In the Browser, double-click IMG_4532 – Version 2.
6 In the Inspector HUD, click the Adjustments tab.
7 Click the Presets pop-up menu and scroll to Black & White.
A submenu to the right includes all the preset Black & White conversion filters in Aperture. As you hover over each filter, a preview appears showing the effect of the filter on your image.
8 Slowly scroll down and preview the presets starting with Red Filter and ending with Blue Filter.

Tip
When selecting a filter, you can bring out the most contrast by selecting a filter color that is the color wheel opposite of the dominant color in your image. Once again, it helps to know the colors on a color wheel.
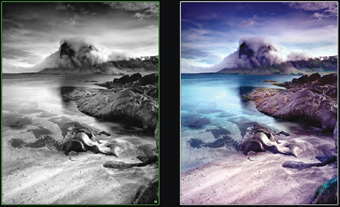
Let’s make three versions using the Red, Yellow, and (for a dramatically different result) Blue filters. You can’t be right or wrong here; it all depends on the artistic “look” you are trying to achieve.
9 With Version 2 shown, choose the Red Filter preset.
10 Press the Right Arrow key to view Version 3, and then choose the Yellow Filter preset.
11 Press the Right Arrow key to view Version 4, and then choose the Blue Filter preset.
When you choose a Black & White preset, the Black & White adjustment is added to the Adjustments inspector. Here you can further adjust each individual channel to get the perfect mix. Let’s make a version that sits somewhere between the Blue Filter and the Red Filter versions. Consult your color wheel:

Let’s pick a lovely magenta between blue and red.
12 Press V to display the Viewer, then Control-click Version 4 and choose Duplicate Version from the shortcut menu. A new version is created based on Version 4 with the Blue Filter applied. The new Version 5 is displayed in the Viewer.
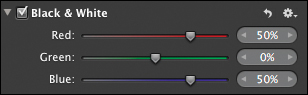
13 With Version 5 selected, adjust the sliders in the Black & White brick with the following values:
• Red: 50%
• Green: 0%
• Blue: 50%
Note
The individual percentages for the Red, Green, and Blue channels in the Black & White adjustment should always total 100% to preserve the general brightness of the image. Values below 100% lead to a darker image; values above 100% produce a brighter image.
The differences in the filters are obvious, but the flexibility that the Black & White adjustment provides means you can make and save your own subtly different Black & White presets. With more subtlety comes the need for a better way to see and compare those subtleties. Compare mode in Aperture gives you exactly what you need.
Comparing Image Versions
You now have four versions plus the original master of your image to compare. Instead of browsing each image one by one, switching between them to see which you prefer, you can use the compare feature to help speed the comparison.
Similar to using Stack mode in Lesson 3 to compare images in a stack, the compare feature pairs a selected image with a second image of your choice so you can evaluate them side-by-side even though they are not in stacks.
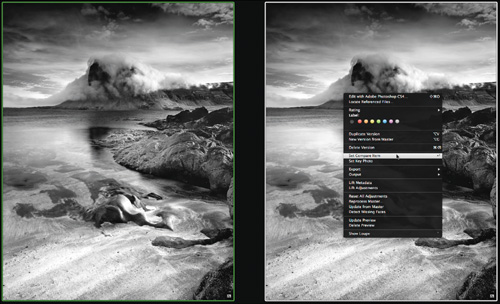
1 Move your mouse pointer to the bottom of the screen to see the images in filmstrip view.
2 Select the first black-and-white image, IMG_4532-Version 2.
3 In the toolbar, from the Viewer Mode pop-up menu, choose Compare, or press Option-O.
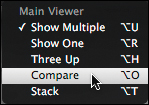
Your selected image becomes the compare image outlined in green to the left. The image immediately to the right in the filmstrip view is selected as the first image you want to compare with that compare image.
After evaluating the two images, if you decide that the second image is the best, you can set it to become the compare image.
4 Control-click the rightmost image in the Viewer and choose Set Compare Item from the shortcut menu, or press Return.
The second image becomes the compare image, and the image immediately to the right in the filmstrip view is selected as the alternate. You can press the Arrow keys or click any image in the filmstrip view to examine it beside the compare image.
5 Press the Right Arrow key to move to the last image in the filmstrip view.
6 Click the original color image in the filmstrip view.
If you have decided that the compare image is still the best version, you can select it and close the compare feature.
7 Press Option-Return to close the compare feature with the compare image as the selected image in the Viewer.
8 Press 5 on the keyboard to rate this image as your five-star select image.
You can use the compare feature in any number of situations but especially to whittle down your selection quickly to the best shot in your project.
Lesson Review
1. Name two of the three ways you can select another project while in Full Screen view.
2. How does adjusting the Highlights & Shadows controls affect an image?
3. How do you adjust just the highlights or shadows without impacting the midtones, black point, or white point in the Levels adjustment?
4. True or false: Black-and-white filters from the Presets menu cannot be changed after they are applied.
5. Are stacks required to use the compare feature?
Answers
1. The three ways to select projects in Full Screen view are using the Library Path Navigator pop-up menu at the top of the Browser, from the Library tab in the Inspector HUD, or selecting Projects in the top left of the Browser to see the Projects view.
2. If you drag the Highlights slider to the right, the bright areas of your image will get darker. If you drag the Shadows slider to the right, the dark areas of your image will get brighter.
3. Enabling the Quarter-Tone controls in the Levels adjustment will display sliders for highlights and shadows.
4. False. The filters can be adjusted using the Black & White adjustment brick that is applied when you select a Black & White filter preset.
5. No, stacks are not required. The compare feature uses a selected compare image, outlined in green. The image immediately to the right in the filmstrip view is then chosen as the first image you want to examine next to the compare image.