
Chapter 8
Fitness Fun and Happy Health: Apple Watch Is Your Workout Buddy and Digital Doctor
IN THIS CHAPTER
![]() Mastering the Activity and Workout apps
Mastering the Activity and Workout apps
![]() Understanding personalized reminders, feedback, and rewards
Understanding personalized reminders, feedback, and rewards
![]() Using the Breathe app for moments of relaxation
Using the Breathe app for moments of relaxation
![]() Using Apple Watch’s heart rate sensor, electrocardiogram (ECG) feature, and blood-oxygen monitor
Using Apple Watch’s heart rate sensor, electrocardiogram (ECG) feature, and blood-oxygen monitor
![]() Setting up Fall Detection, Emergency SOS, and Medical ID
Setting up Fall Detection, Emergency SOS, and Medical ID
Fitness is one of the smartest applications on your smartwatch. Whether you’re trying to monitor your regular daily activity, determined to lose weight, an athlete looking to maximize your training, or simply wanting to manage your workout regimes in an easy way, Apple Watch can handle it all. While you wear one of these high-tech yet water- and sweat-resistant devices on your wrist, you’ll receive real-time information, such as total distance traveled, calories burned, and other details. Apple Watch also serves as a digital doctor, of sorts, with a bevy of health-related applications on your wrist. And while Apple Watch can show your activity information on its small screen, you can dive deeper and track more details and historical information via apps on your iPhone because it syncs with the same apps.
And be sure to have the latest operating system installed (watchOS 7, at the time of writing this) to take advantage of the latest health and fitness features.
Tracking Your Fitness with Apple Watch
But how does this work, you ask? Apple Watch has a list of features and some powerful technology behind it all:
- Accelerometer: Like other activity trackers, Apple Watch has a built-in accelerometer to count your number of steps, like an old-fashioned pedometer.
- Activity trends: Apple Watch can send activity trends data to your iPhone, which tracks and compares your progress over the last 90 days to gauge whether your fitness levels are improving.
- Altimeter/barometer sensor and GPS: Its built-in altimeter calculates the number of stairs you climb; plus the latest watch, Apple Watch Series 6, has an always-on altimeter. Its integrated GPS chip tracks how far you’ve moved.
-
Breathe app: For the mindful, Apple Watch includes an app that makes you take a quick break from your day to focus on your breathing.
 The first-generation Apple Watch from 2015 doesn’t support these fitness- and health-related features.
 - Heart rate sensor: This integrated feature tracks your workout’s intensity and, if used every day, might detect if something is off. It records unusually high or low heart rates, and alerts you about them even when you don’t feel symptoms.
- Electrocardiogram (ECG or EKG): This records the timing and strength of the electrical signals that make the heart beat. By looking at this data, a physician can gain insights about your heart rhythm and look for irregularities.
- Blood-oxygen monitor: This Apple Watch app periodically measures your blood-oxygen level throughout the day (if background measurements are turned on), with a healthy reading typically between 95 and 100 percent. You can also take an on-demand Blood O2 reading at any time.
- Fall detection: Beginning with Apple Watch Series 4, Apple Watch includes an accelerometer and gyroscope to detect when you’ve fallen. You can initiate a call to emergency services or, if you’re unresponsive after 60 seconds, the watch automatically places an emergency call and sends your location to your emergency contacts.
- Emergency SOS: This lets you easily call emergency services. You can also notify your emergency contacts, send your current location, and display your Medical ID badge on the screen for emergency personnel.
- Noise app: Apple Watch can help protect your ears by listening to nearby noise levels and the duration of exposure.
- Cycle tracking: Designed to help women manage their monthly menstrual cycle, this easy to use and discrete app shows relevant cycle information.
This chapter covers all this, and more! But right now, I start off this chapter with how to use Apple Watch for fitness using two of its main apps: Activity and Workout.
Getting Up and Running with the Activity App
As Apple explains on its website, fitness isn’t “just about running, biking, or hitting the gym. It’s also about being active throughout the day.”
 Thus, one of the two main fitness apps on Apple Watch is devoted to your general activity levels during a regular day. This includes such things as walking the dog, chasing after your kids or grandkids, and taking the stairs rather than an escalator or elevator. The aptly named Activity app’s main screen (shown in Figure 8-1) keeps track of everything physical you do — and encourages you to keep moving.
Quite simply, the Activity app gives you a visual snapshot of your daily activity. It’s broken down into three colored rings:
- Move: The reddish-pink ring shows how many calories you’ve burned by moving.
- Exercise: The lime-green ring is for the minutes of brisk activity you’ve completed that day.
- Stand: The baby-blue ring gives you a visual indication of how often you’ve stood up after sitting or reclining.
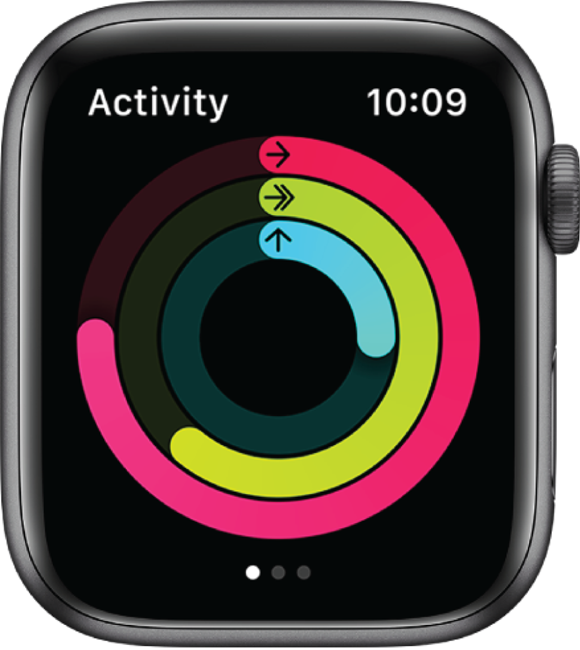
FIGURE 8-1: The Activity app shows you multicolored rings based on your movement, exercise, and more.
Your goal is to complete each ring each day by reaching the suggested amount of exercise, as outlined in this chapter. The more solid each ring is, the better you’re doing.
The first (main) screen of the Activity app gives you a Move, Exercise, and Stand summary, but if you swipe to the left, you can access a dedicated screen for each of the Activity meters.
As shown in Figure 8-2, you should see a summary of each Activity section, which explains what you’re seeing in this app.
Before you begin any Activity, however, Apple Watch wants to learn a little about you first — namely, your gender, age, height, and weight — for the numbers to be accurate, such as estimating your calories burned. For example, a 25-year-old female burns calories at a different rate than a 65-year-old male.
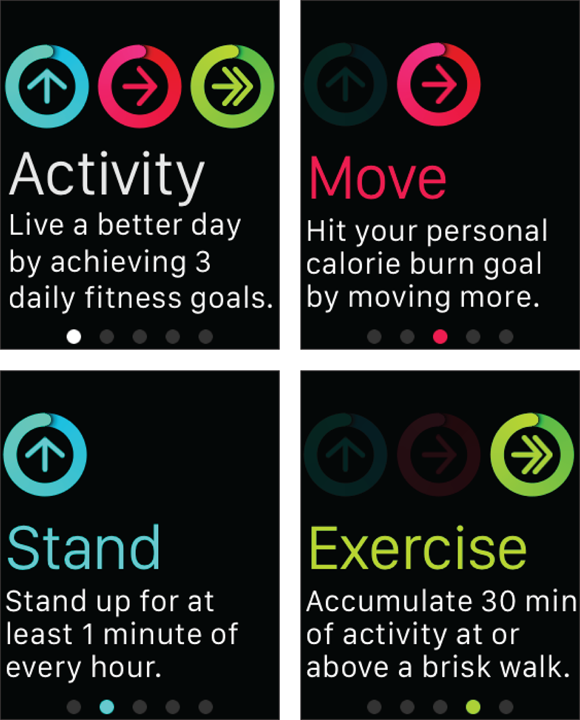
FIGURE 8-2: Apple Watch explains how Move, Exercise, and Stand work. You can also share your Activity info, via the iPhone app, which might motivate you to do better!
You only have to do this once, and you can answer the required questions with your fingertip (see Figure 8-3).
If you live in the United States, you should see customary unit measurements, such as pounds, but those who live in Canada or the United Kingdom fill out information using the metric system. (Ditto for setting distance, be it in miles or in kilometers.)
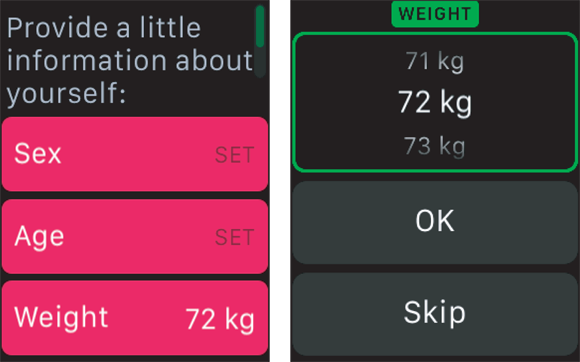
FIGURE 8-3: Get started by answering some questions about your gender, age, height, and weight.
Move
Moving is good — even if it’s not that fast. Motion helps you burn calories and gets your heart pumping and your blood flowing. The Activity app’s Move ring tells you how well you’re doing based on your personal active calorie-burn goal for the day, as shown in Figure 8-4. In this example, the default goal is 450 calories per day, which is a couple hours of walking around a shopping mall. If that’s too easy to reach or, on the flipside, too ambitious, you can easily make necessary adjustments to suit your needs. From the main Activity screen (with the three rings), scroll down to the bottom and tap where it says Change Goals. To change the Move goal to something more achievable, press + or – until you see your desired goal. Now tap Next to make adjustments for Exercise goal and Stand goal.
To use the Move tab in the Activity app, follow these steps:
- Press the Digital Crown button to go to the Home screen.
- Tap the Activity icon.
You can also raise your wrist and say “Hey Siri, Activity.” Either action launches the Activity app. You see the rings that summarize your fitness goals for the day.
-
Swipe up on the Activity app’s main (summary) screen to see additional info.
Move tells you how much you’ve moved during the day. The red number at the top of the screen is your current estimated calories burned, and how far you are to your daily goal (such as 240/320 CAL). You also see it written in a percentage of your daily goal, such as 70%.
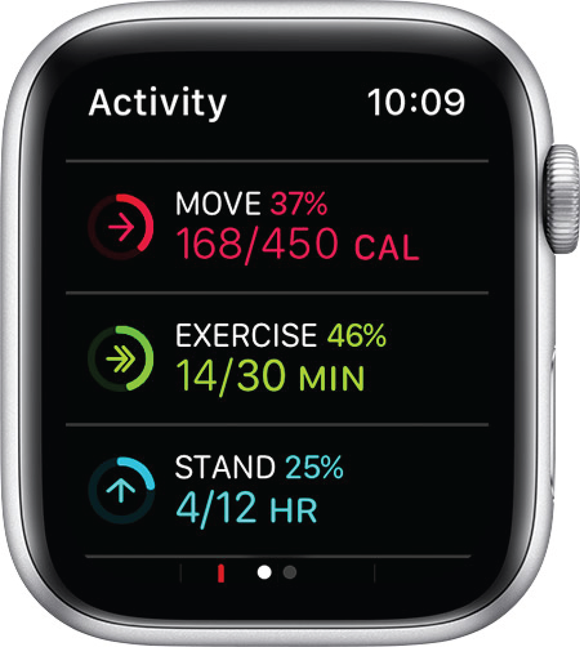
FIGURE 8-4: Part of the Activity app, this ring summary screen shows your Move, Exercise, and Stand stats for the day. Just swipe up from the rings screen.
-
Change your caloric goal in the Activity app by scrolling down the main Activity screen and selecting Change Goals. Press + or – to set your desired goal. When you’re done, tap OK.
You can also change your Exercise and Stand goals in the same fashion (see Figure 8-5).
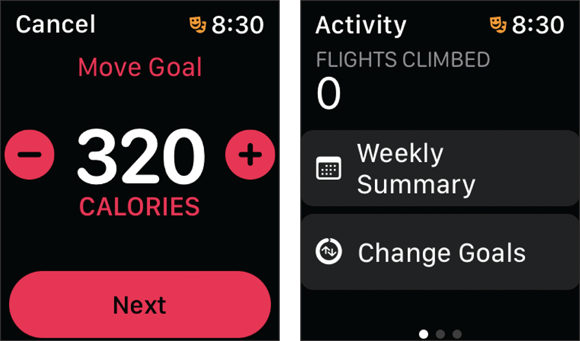
FIGURE 8-5: If you don’t like the suggested (default) goals for Move, Exercise, and Stand, simply scroll down the main Activity screen and tap Change Goals.
-
Swipe up on the screen to see a History graph with each hour of the day presented and how well you’ve done per hour (highlighted by a vertical line).
The taller the pinkish bar, the more you moved that hour, as shown on the left side of Figure 8-6.
-
Swipe up again or twist the Digital Crown button to see even more details, such as total steps, total distance, and flights climbed.
You can see this on the right side of Figure 8-6.
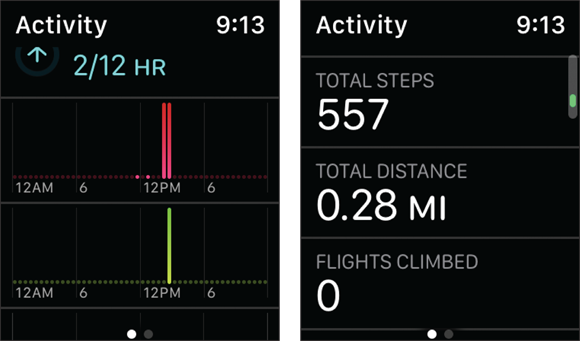
FIGURE 8-6: Scroll up within the Activity app to see another view of your day’s performance — divided by hour.
You can now go about your business.
Many different kinds of bands are available for Apple Watch, and active types might prefer the aptly named Sport band made from fluoroelastomer (synthetic rubber), which comes in several different colors. Compared with leather, the link bracelet, and the Milanese loop, the high-performance and smooth Sport band might be most ideal for those who exercise because of its light weight, durability, and resistance to sweat and rain. It also features a pin-and-tuck enclosure for a secure fit. This band is available for all Apple Watch models. See apple.com/applewatch for more on band selection.
Exercise
Whether you want to do something active in one shot — such as jogging on the treadmill after work — or a little bit here and there, it’s recommended you do at least 30 minutes of exercise each day. What constitutes “exercise,” you ask? How is this different from mere “moving”? Any activity at the level of a brisk walk or above is considered exercise, says Apple. By seeing how much you’re exercising — or, rather, not exercising — you might just be motivated to improve your overall health (which has also been proven to be linked to happiness).
To use the Exercise tab in the Activity app, follow these steps:
- Press the Digital Crown button to go to the Home screen.
- Tap the Activity app.
You can also raise your wrist and say “Hey Siri, Activity.” Either action opens the Activity app, taking you to the main Activity screen with a summary of all three rings.
-
To go to the Exercise area, swipe down until you see the green text that shows you the percentage of completed exercise goals for the day, and how many minutes you’ve accomplished.
Or, at any time, and regardless of the app you’re in, tell Siri “Show me Exercise information” to go right to this screen.
You see how close you are to your daily goal, too (such as 25 out of 40 minutes), and listed as a percentage, such as 65%.
- Change your goals by scrolling down to the bottom of this Activity screen and tapping Change Goals. Tap Next until you get to Exercise Goal (in green). Tap + or – to set your desired goal. Then tap OK.
-
Swipe up for your History graph, which shows your hourly activity level — measured in minutes — for when you were most active.
As you might expect, the higher the line on the graph, the better. Even if you exercise a little here and a little there, every bit helps and goes toward your daily time goal.
-
Swipe up again or twist the Digital Crown button for additional exercise information on your Apple Watch.
You see a numerical summary of your day’s achievements. Alternatively, you can grab your iPhone and open the Activity app.
-
Press the Digital Crown button to return to the Home screen.
Don’t be discouraged if you’re not reaching your exercise goals. Try again tomorrow or reduce the number of your suggested active minutes — from say, 30 minutes to 20 minutes.
Stand
Many of us — including yours truly — have jobs where we sit for a good chunk of the day. This isn’t doing much for those love handles we’re trying to get rid of. Apple Watch knows when you stand and move around at least for one minute, and this all goes toward your Stand ring. Even if it’s just to get up from your computer and go get a glass of water, a small stretch, or a walk down the hall to say hello to a coworker, all this Stand time adds up. You’ve completed the default Stand ring requirements if you move at least one minute in 12 different hours during the day. The app reminds you to get up if you’ve been idle too long (about an hour).
(If you want to disable these reminders, open the Apple Watch app on iPhone, go to My Watch, and then Activity. Toggle the “Stand Reminder” setting to the Off position, if desired. Your iPhone syncs with Apple Watch, and stops reminding you to get up.)
To use the Stand tab in the Activity app, follow these steps:
- Press the Digital Crown button to go to the Home screen.
- Tap the Activity app.
You can also raise your wrist and say “Hey Siri, Activity.” Either action opens the Activity app, taking you to the main Activity screen with a summary of all three rings.
-
The blue ring represents your Stand info, per day.
Swipe up to see blue info near the middle of the screen. This shows how many hours you’ve stood up for (at least one minute per hour). The second number is the total goal hours (such as 12). You also see percentage of your goal for the day.
-
To change your Stand goal, swipe down to the bottom of the Activity app and tap Change Goals. Press Next twice until you see the blue text for Stand goals. Tap + or – to set your desired goal. Then tap OK.
 Regardless of which Activity screen you’re in — the summary page, Move, Exercise, or Stand — you always see a clock in the top-right corner, so you always know the current time without having to leave the Activity app. Smart, no?
 -
Swipe up to see the History graph.
You should see the day laid out chronologically and a full vertical bar for any hour you stood (for at least a minute per hour).
It doesn’t matter whether it’s consecutive hours or spread out throughout the day. The idea is to get up at least once per hour during the day (unless you sleepwalk, which means you won’t have to worry about this overnight!).
-
Swipe up again or twist the Digital Crown button to obtain more information on your activity.
For example, you can get a numeric summary of your day’s progress, including total steps, total distance, and more. (See the “Understanding the Workout App” section for more.)
Be proud! You’re getting your move on.
Understanding the Workout App
 You might be wondering how the Workout app differs from the Activity app. Aren’t they the same thing?
Not exactly.
Whereas both are fitness related, the Workout app differs from the Activity app in one respect: Instead of showing your progress over the past day, Workout provides real-time information about calories burned, elapsed time, distance, speed, and pace for your walks, jogs, runs, cycling, and indoor equipment, such as an elliptical, a stair stepper, a rower, a treadmill, and more. In other words, rather than generic daily stats, the Workout app shows you cardio information based on what you’re doing and while you’re doing it.
Although most activity trackers and smartwatches can spit out generic information on your estimated calories burned — by simply moving — Apple’s technology is tailored to specific exercise equipment and/or exercises. All you have to do is choose the type of workout you’d like to tackle, and Apple Watch turns on the appropriate sensors, such as accelerometer and gyroscope (for motion), heart rate monitor, and GPS (if exercising outdoors, for example, because GPS requires line-of-sight with satellites above the earth).
You can then receive a detailed summary of your exercise — and, of course, your workout counts toward your Activity ring measurements for the day.
You can also set goals, chart your progress, and earn awards.
Not including the first-generation Apple Watch, the Workout app can track swimming, too! Don’t try this with other fitness trackers or smartwatches, unless you know for certain they’re waterproof, too!
To use the Workout app on your Apple Watch, follow these steps:
- Press the Digital Crown button to go to the Home screen.
- Tap the Workout app.
You can also just raise your wrist and say “Hey Siri, Workout.” Either action launches the Workout app, where you see the main Workout screen. You should see options for many different kinds of indoor and outdoor exercises, as shown in Table 8-1.
TABLE 8-1 Different Workout App Exercise Options
Outdoor Walk
High Intensity Interval Training
Outdoor Run
Hiking
Outdoor Cycle
Rower
Indoor Walk
Stair Stepper
Indoor Run
Yoga
Indoor Cycle
Functional Strength Training
Dance
Wheelchair
Elliptical
Core Training
Cooldown
Open Water Swim
Pool Swim
Most of the exercise options in Table 8-1 are self-explanatory. The exceptions are the following:
- High intensity interval training (also known as HIIT): This is an exercise where you alternate intense movement with rest. So for example you might jump rope for 45 seconds, rest for 30 seconds, and then repeat this with another exercise.
- Other: For this option, the app recognizes that you might not find a matching workout type for your activity; you still earn the calorie or kilojoule equivalent of a brisk walk anytime sensor readings are unavailable.
-
Swipe up or down to view a workout, or you can cycle through them by twisting the Digital Crown button forward or backward.
What are you in the mood for? Figure 8-7 gives you some of your options. There are many more than what’s listed here!
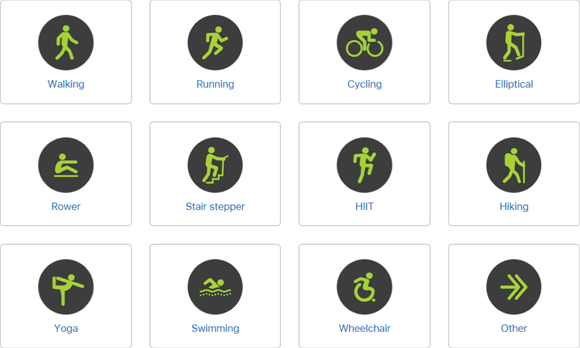
FIGURE 8-7: Choose a workout and tap it to set a goal.
Apple.comgives a quick look — with icons — of many Workout options with some categories having both indoor and outdoor measurements. -
When you see a Workout you like, such as Outdoor Cycle, tap the three little dots in the top-right corner to see and set goals.
On this screen, you can select a goal:
- Calories (highlighted in pink)
- Time (highlighted in yellow)
- Distance (highlighted in blue)
- Open (returns to workout type; highlighted in green)
- Use your fingertip to press + or – for the numbers to go up or down, respectively.
- For calories, it might be 300. If you choose a time-based goal, you might select 45 minutes. A distance-based goal might be two miles. Remember, you should see different options based on your activity. For example, if you’re running indoors, the watch uses the accelerometer, but cycling outdoors uses the GPS on your iPhone to calculate distance. Make sense?
- Depending on the Workout you’re in, you may also see Set Pace Alert at the bottom of the screen. If you tap this and start your Workout, Apple Watch alerts you when you’re ahead or behind a set pace after one mile.
-
Tap Open to start the Workout; alternatively, instead of Step 4, just tap the Workout you want, such as Outdoor Cycle, and you see a countdown (3-2-1) to start the Workout you’ve chosen.
Do your thing and the watch counts your every move. Well, almost every move. Remember, Apple Watch might always give you proper credit for things like push-ups, pull-ups, and crunches. Sure, it adds to your Move tab within the Activity app, but it might not help properly calculate your calories burned in the Workout app. But still do them because you know it helps your health — even if your watch doesn’t!
See Figure 8-8 for a look at each screen.
-
Look at your screen for real-time info.
Your Apple Watch screen shows relevant and real-time information on your Workout (as pictured in the left image of Figure 8-9). With Indoor Walking, for example, it shows you elapsed time, estimated calories burned, speed of average mile, heart rate (beats per minute), and elevation info.
During your Workout, you should see progress updates to help motivate you. You should also receive timely encouragement when you’ve hit halfway toward the end of your workout, for example, or perhaps based on a milestone, such as reaching one mile during a three-mile jog. See Figure 8-9 for an example.
-
If you need to pause or end your workout, swipe to the right on the screen.
You see options for Pause, Stop, Lock (to prevent you accidentally hitting your screen during a workout, which could pause or stop the analysis), and New (to start a new session). Tap the relevant button, all shown in the right image of Figure 8-9.
-
To play music while exercising, swipe to the right in the Workout screen and press Play, or skip forward and back between tracks.
Apple Watch remembers how it played music the last time, such as using Apple Music, your iTunes library, and so on (see Figure 8-10). See Chapter 9 for more on this.
-
At the end of your workout, view a summary.
After you press Stop, you see a summary of your workout, including total calories burned, active calories burned (when you were physically exerting yourself), resting calories burned, average pace per mile, average heart rate, total distance, total time of workout, and more. Figure 8-11 shows a few of these summary screens after a short walk.
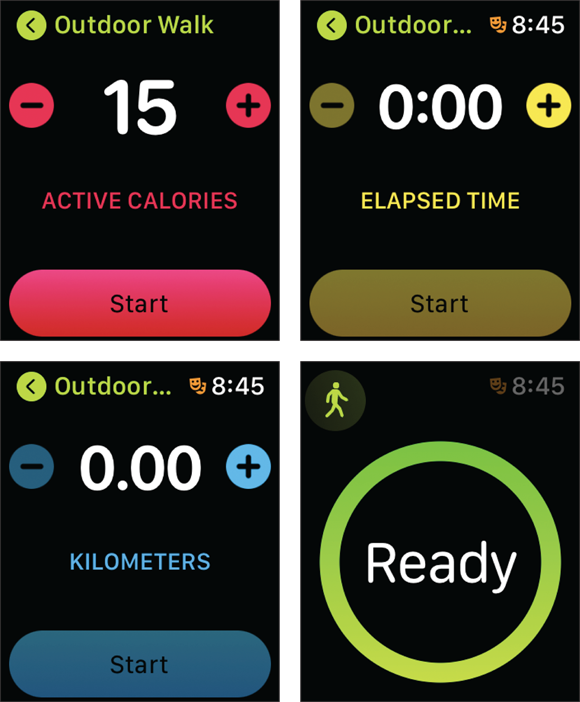
FIGURE 8-8: Workout numbers start at zero so you can select goals. Or don’t set a goal and go for a run; Apple Watch still calculates your steps, time, distance, and calories.
To remind you, all the numbers are color-coded too, such as your total distance in blue, total time in yellow, and active calories burned in pink. At the bottom of the summary screen, you can choose to Save or Discard this information. Tap which option you prefer.
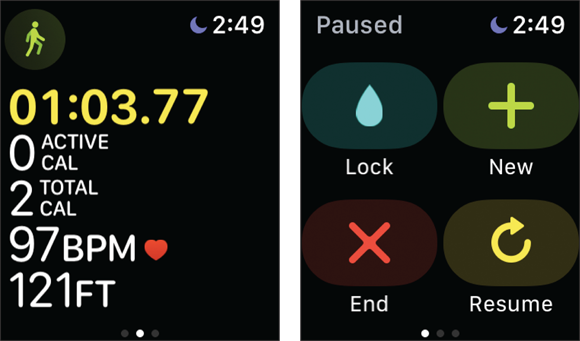
FIGURE 8-9: Receiving an alert upon achieving a goal (left) can give you incentive to keep going. You can always press the screen to pause or cancel a workout (right).
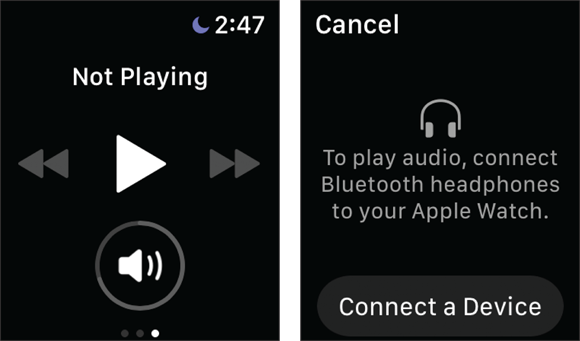
FIGURE 8-10: Access your music while working out with a simple swipe to left (left). You may need to tell the watch where to find music to play, such as a streaming service or locally stored tunes (right).
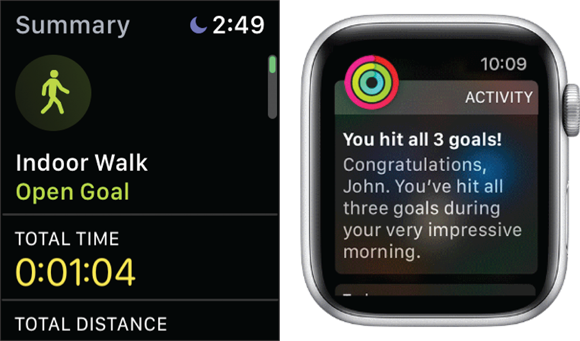
FIGURE 8-11: Swipe for a report on your workout session (left), including distance, calories burned, and heart rate. You’re notified and congratulated if you hit your goal (right).
Now you know how to select, start, and stop a Workout, as well as read your summary information. And don’t forget: After you review your accomplishments, you can repeat the exercise (with the same goals) to see how you fare, or you might decide to increase or decrease the goal. Or choose a different goal altogether. If you started with time or distance, you might change it up to set a goal based on caloric burn.
Personalizing Reminders, Feedback, and Achievements
Despite what you’ve heard, information is bliss — not ignorance.
Apple Watch can not only calculate your workouts for you, but it can also present the data in an accessible way, so you can see how well (or poorly) you’re doing toward reaching your fitness goals. Actually, the watch goes one step further: It can nudge you to be more active, provide weekly goal summaries, and reward you for a job well done.
Reminders
Apple Watch delivers customizable coaching reminders that can help you reach your Activity goals: Move, Exercise, and Stand. You can disable these in the Apple Watch app on the iPhone. Take a look at Figure 8-12: Go to My Watch ⇒ Activity (left). You can also see a quick-glance summary screen in the Apple Watch app on iPhone (middle), as well as deeper fitness information in the Health app on iPhone (right).
FIGURE 8-12: Get “nudged” into activity by setting reminders to shake your booty (left). View many times you’ve hit your Activity goals per month, in each category (middle), or get in-depth summaries (right) in the Health app.
Along with notifying you to get up when you’ve been idle for too long, over time, Apple Watch learns your goals and accomplishments and suggests a daily Move goal for the week that’s achievable. You can adjust your fitness goals — whether it’s bumping them up or trimming them down — to something more reasonable based on your capabilities or time.
Summary
Every Monday, you should receive a weekly check-in, which serves as a summary of your Activity progress. It might say something like this: “Last week’s Active Calorie burn goal was 300. You hit it 4 out of 7 days.” On the graph that accompanies the text, you can see which days you reached your goal and by how much; the higher the vertical column, the better you did. You should see all seven days of the week presented.
You can also open the Activity app to glimpse how you’re doing per day, and you can always swipe down from within the Activity app to see an hour-by-hour account of your daily Move, Exercise, and Stand goals. See the “Getting Up and Running with the Activity App” section as well as the “Using the Fitness App on Your iPhone” section for more on these exercise apps.
Achievements
Isn’t it enough incentive to know you’re doing well? Well, not always. Let’s face it: It’s nice to be acknowledged for your efforts — and even rewarded.
“Get a pat on the back, right on the wrist,” says Apple on its website.
I like that.
Earn special badges, such as the ones shown in Figure 8-13 — although they’re a little hard to see because I haven’t completed them yet and thus they’re not colored in. These badges are stored in the Fitness app on your iPhone, which you can look at with pride.
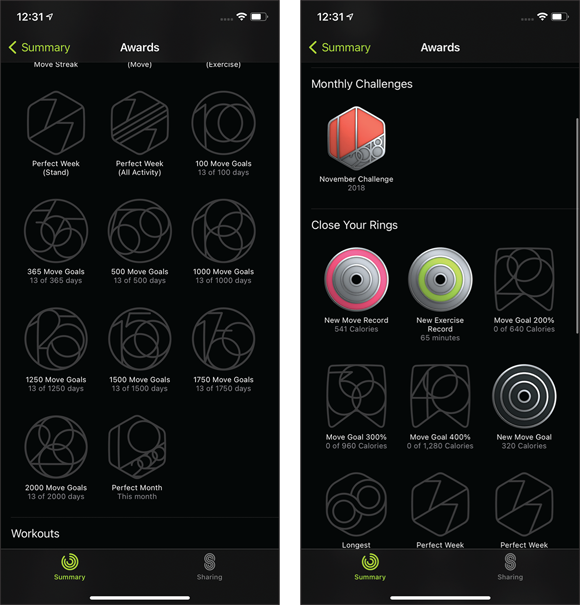
FIGURE 8-13: Apple Watch badges you can earn for reaching a milestone. Most of these aren’t filled out yet (author hangs his head in shame) or else the award emblems would be colored in.
Some examples of Move badges include:
- Perfect Month: Earn this award when you reach your Move goal every day of a single month — from the month’s first day to the last.
- Move Goal 200%: Earn this award every time you double your daily Move goal.
- 100 Move Goals: Earn this award when you reach your daily Move goal 100 times.
More importantly, perhaps it’ll encourage you to keep going.
Using the Fitness App on Your iPhone
You can only fit so much information on the small Apple Watch. Thus, the Fitness app on your iPhone takes it a step further by providing you with a ton of data based on your Move, Exercise, and Stand achievements as well as your Workout information.
Yes, it might be confusing because this same app (represented by the same multicolored icon) is called Activity on your Apple Watch, but Fitness on your iPhone. So, for this section, I correctly refer to it as the Fitness app (for iPhone), which is in sync with your Activity app (on Apple Watch).
Okay, back to business.
Specifically, the iPhone app’s History tab maps your progress over long periods of time; you can look at how well you did by day, week, month, or year. See Figure 8-14 for a look at the Activity app on iPhone.
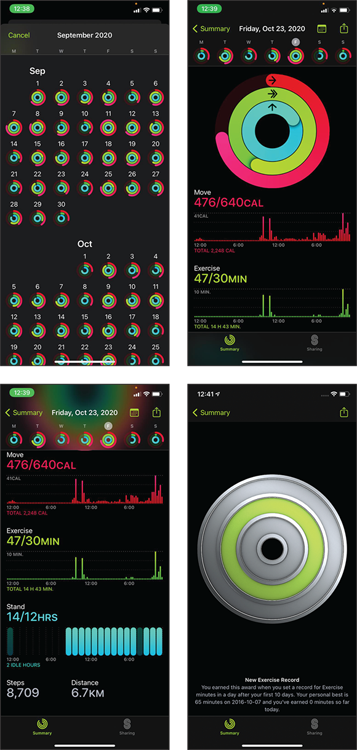
FIGURE 8-14: A look at the Fitness app on your iPhone with a weekly summary of your Activity levels.
The Fitness app also displays your badges (of honor!) as well as an Achievements tab that shows you various objectives to unlock as added incentives. Like many video games that reward you for achieving goals — such as “Complete an end-level boss fight in under five minutes” or “Capture a town without losing a life” — your Fitness app can also give you fitness-related challenges to take on. By default, the app has a dozen challenges, each represented by a badge-like icon, which could be “Reach your Move, Exercise, and Stand goals in one day” or “Exercise a total of 20 miles.”
What’s more, the Fitness app syncs its data with your iPhone’s Health app, where it can be accessed by third-party health and fitness apps — with your permission of course.
Checking Activity Trends
Beginning with watchOS 6 in the fall of 2019, Apple Watch users can take advantage of the Trends feature, which gives you a deeper look at your activity (or inactivity), over a period of time, which is viewable on your iPhone.
Specifically, you can analyze and compare your Activity rings — Move, Stand, and Exercise — to past performances.
Viewed in the Health app on iPhone, you can also see a snapshot of other fitness metrics, including average walking pace, flights of stairs climbed, VO2 max levels (maximal oxygen uptake), and whether you’re improving or falling behind. Trends compares your latest 90-day averages to longer-term performance over the past 365 days.
As shown in Figure 8-15, it’s all laid out in convenient table and graph form, and you even get customized coaching suggestions to get you back on track!
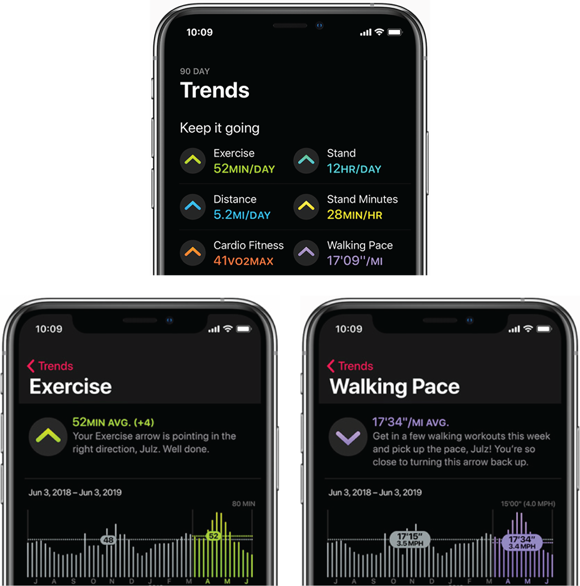
FIGURE 8-15: A look at the Activity Trends data gleaned from Apple Watch and sent to iPhone’s Health app.
Learning to Use (and Love) the Breathe App
 Life can be hectic. And so Apple’s Breathe app reminds you to take a moment out of your day to relax and, well, breathe.
Of course, you’re always breathing (or else you wouldn’t be alive to read this book, silly!), but this wrist-based reminder guides you through a series of deep breaths to calm you down. The Breathe app lets you choose how often and how long you want to breathe, and then let the Apple Watch animation and gentle taps help you focus throughout this short exercise.
Starting a Breathe session
Had a rough day at the office? A crying baby on an airplane? Here’s how to initiate a breathing session to calm you down, via your Apple Watch.
- Press the Digital Crown to go to the Home screen, and then tap the Breathe app to open it.
-
Turn the Digital Crown to set the session’s length.
Tap Start when you’re ready, but be sure to remain still while you breathe. See Figure 8-16.
-
Inhale as the animation grows on the Apple Watch screen.
You also feel little taps on your wrist. Exhale as the animation shrinks and the taps stop.
- Breathe until the session ends and your watch taps you twice and chimes (unless Silent mode is on).
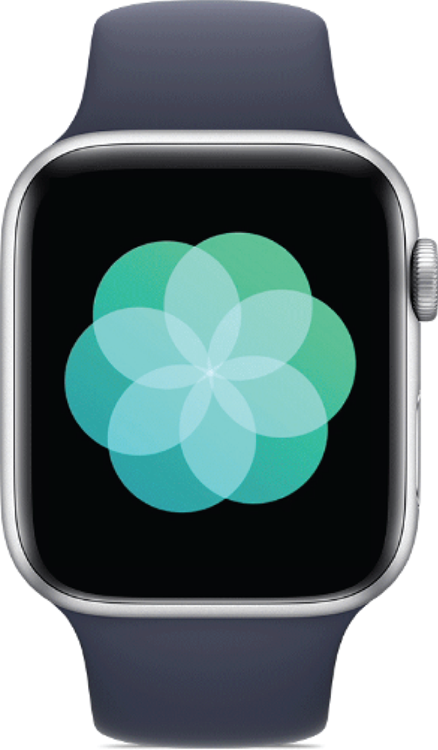
FIGURE 8-16: A look at the Breathe app on Apple Watch. Follow along with the animation and haptic feedback.
When you’re done, you can see your resting heart rate.
Because you’re supposed to be calm and focus on your breathing, your Apple Watch mutes some notifications. If you answer a call or text, or move around too much during a session, the session ends automatically, and you won’t get any credit for your efforts.
Using the Apple Watch app to make Breathe changes
The Apple Watch companion app on iPhone can be used for additional Breathe settings (see Figure 8-17).
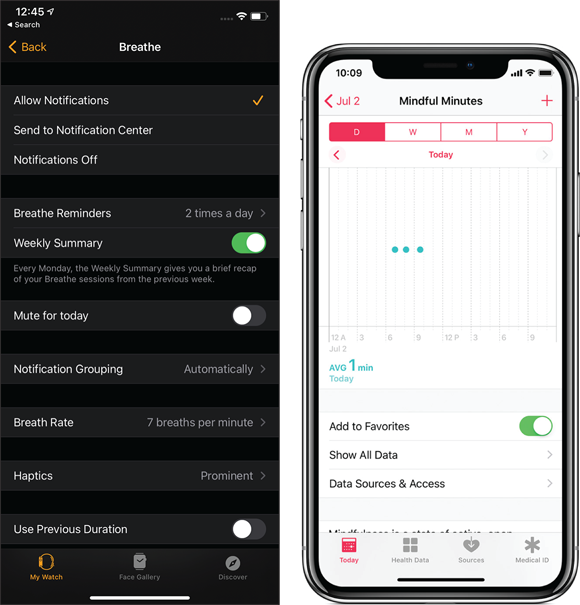
FIGURE 8-17: The Apple Watch app on iPhone is where you make changes to the Breathe app (left); the Health app on iPhone shows a summary of your breathing exercises (right).
For example, when you turn the Digital Crown on Apple Watch to set the session’s duration, such as 90 seconds, but you can adjust the default setting from your iPhone’s Apple Watch app (under Breathe), as follows:
- Open the Apple Watch app on your iPhone.
- Tap the My Watch tab.
- Tap Breathe.
-
Scroll down and tap Use Previous Duration (it’s at the bottom of the screen).
You can also change the length of each breath — by default it’s 7 breaths per minute — and you can tweak how many Breathe reminders you want per day (such as two), how forceful the haptic (vibration) feedback is, and more.
-
Check your progress.
To check how often you take time to use the Breathe app on Apple Watch, track your sessions with the Health app on iPhone. Open the app and select the Health Data tab. Tap Mindfulness, then tap the graph to see more.
Cycle Tracking
If you’re female, you’ll find one of the newer Apple Watch features, Cycle Tracking, helpful. You can gain insight into your monthly menstrual cycle, in an effort to help provide a clearer picture of your overall health. By logging your cycles, your Apple Watch can predict your next period and fertile window.
Information you can access as easily on your wrist can also help track irregularities and symptoms you might want to discuss with your physician.
To use Cycle Tracking:
-
Open the Health app on your iPhone to set up Cycle Tracking.
If you don’t see the section, tap Browse in the bottom right of your iPhone and then tap Cycle Tracking.
-
Tap Getting Started and then Next to answer questions.
You get questions such as “When did your last period start?” (select date), “How long does your period usually last?” (for example, 5 days), and “How long is your typical cycle?” (such as 28 days).
- Still inside the Health app on iPhone, toggle these options.
- Period Prediction: Allows the Health app to use the data you entered to predict your period.
- Period Notifications: The Health app will notify you about upcoming periods and send prompts to log.
- Other options: Such as Fertile Window Prediction, Log Fertility, and Log Sexual Activity.
 After you’ve completed the questions and options in the Health app on iPhone, you can now use the Cycle Tracking app on Apple Watch. Open the Health app to log daily information about your menstrual cycle. You can add flow information (Had Flow, No Flow, or Flow Level – Light, Medium, Heavy); record Symptoms (such as Abdominal Cramps, Acne, Appetite Changes, Bloating, Headaches); and glance at cycle length and variation. See Figure 8-18.

FIGURE 8-18: A look at the new Cycle Tracking app for Apple Watch.
You can even track results from an ovulation prediction kit and readings from a basal body thermometer. All this info will be viewable in a colorful graphical chart in the Health app on your iPhone.
Hearing Health: Using the Noise app
Enjoy hard rock concerts? Work with heavy machinery? Apple Watch’s Noise app can show you how loud ambient audio is near you — measured in decibels — and how long you’ve been exposed to it.
Using the Noise app is quite straightforward:
 Tap the Noise app.
-
Enable the microphone, which gives the app permission to listen to the environment.
It doesn’t record or save the audio. The app shows you the estimated noise level around you, measured in decibels (the higher the number, the more damaging the sound can be on your hearing), as shown in Figure 8-19. The number is also complemented with a color-coded system for easy convenience. If it’s green, you’re good. If it’s yellow, turn it down. You can tap to read more info, too.
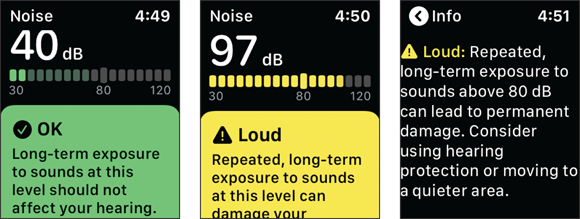
FIGURE 8-19: As Quiet Riot once famously sang, “Cum on feel the noise!” It’s easy with the Noise app on Apple Watch.
You can also add the Noise app as a complication to your favorite watch face. See Chapter 4 to find out how.
Advanced Health Help: Heart Rate, ECG, and Blood O2 Monitoring
Apple Watch can do a lot more than just provide activity information and workout tracking. Although you now know it measures your resting heart rate and how hard your heart works while exercising, you may not know that it can alert you if something seems a little off. You also might not know that beginning with Apple Watch Series 4, your wrist-mounted device has an electrocardiogram/ECG feature (“EKG,” depending on the source), Fall Detection, and Emergency SOS safety features.
Before I get into each feature, I’m sure some of the more technology minded will want to know how Apple Watch does all this! So this section starts with an explanation of each monitor in all its glory.
How the heart rate sensor works
Underneath the Apple Watch case — the part that touches your skin — is a ceramic cover with sapphire lenses. Beneath that is a series of small Taptic Engine sensors, which give you a slight vibration to tell you something, such as when you have a message from someone. In that same area, you also have a heart rate monitor that logs the intensity of your workout, or simply your resting heart rate.
If someone you know also has an Apple Watch, you can send him or her your heartbeat. See Chapter 5 for more about how to do this, as well as sending taps and sketches to other Apple Watch owners.
The heart rate sensor uses infrared (IR), visible-light LEDs (light-emitting diodes), and photodiodes to detect your heart rate — measured in beats per minute (BPM). The average heart rate is 72 BPM, but when you start your workout and your muscles need more oxygen, your heart beats faster to pump oxygen-filled blood throughout your body.
Every ten minutes, Apple Watch measures your heart rate and stores that information in the iPhone’s Health app. This data, along with other information it collects about your movement, goes toward estimating the number of calories you’re burning.
The Apple website explains how the heart rate sensor uses “photoplethysmography.” It states: “This technology, while difficult to pronounce, is based on a very simple fact: Blood is red because it reflects red light and absorbs green light.” Apple Watch uses green LED lights, paired with light-sensitive photodiodes, to detect the amount of blood flowing through your wrist. “When your heart beats, the blood flow in your wrist — and the green light absorption — is greater,” says Apple. You can see a map of these amazing sensors in Figure 8-20.
By flashing its LED lights — in an alternating fashion and hundreds of times per second — Apple Watch calculates the number of times the heart beats per minute. Apple says its heart rate sensor can also use infrared light, which it uses to measure your heart rate every ten minutes. But if this infrared system isn’t giving a reliable reading, your smartwatch switches to the green LEDs.
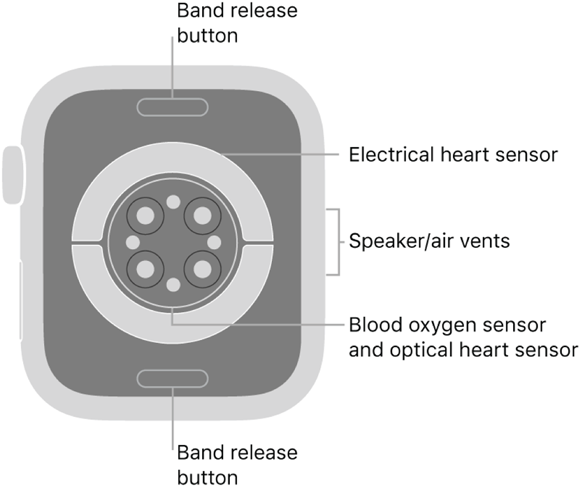
FIGURE 8-20: As illustrated on Apple’s website, here’s a diagram of the magic behind the Apple Watch Series 6. These sensors are truly amazing, no?
For the heart rate monitor to work effectively, you must wear Apple Watch to fit snugly; if your watch band is too loose, the back of the watch case might not touch your skin enough or might move around during a reading. All available Apple Watch bands allow you to tighten things up a bit.
Other factors can also affect a reading.
- Weather: Readings might be off if it’s too cold out.
- Movement: Fast or constant movement, such as an intense game of squash, can jostle the watch around too much for an accurate heart rate measurement.
- You: Some people just don’t give a good reading at all. Some Apple Watch owners with major tattoos report the heart rate monitor won’t work. Why, you ask? The sensor works by shining green light into the wearer’s wrist, but can be confused by the presence of dark tattoos inked under the skin.
If you’re not getting a good reading, don’t forget that Apple Watch and iPhone can work with external heart rate monitors, such as a chest strap, using wireless Bluetooth technology.
Here’s a look at it all.
How the ECG monitor works
Apple unveiled its super high-tech electrocardiogram (ECG) feature in the fall of 2018, along with its introduction of the Apple Watch Series 4 models (which you’ll need to have to take advantage of this feature). It’s also available in Apple Watch Series 5 (2019), Apple Watch Series 6 (2020), and presumably, going forward in all models!
As you might expect from this feature’s name, you can now use Apple Watch to detect a dangerously high or low heart rate, or irregular heart rhythm (arrhythmias).
How does it work, you ask? As you know, the back of Apple Watch already measures your heart rate on your wrist. To read ECG pulses, you touch the Digital Crown with the finger on your opposite hand, which, when coupled with pulses captured by the sensors under your watch, creates a closed circuit with your heart. Your watch can now record ECG information and detect when something is off. Figure 8-21 illustrates what happens.
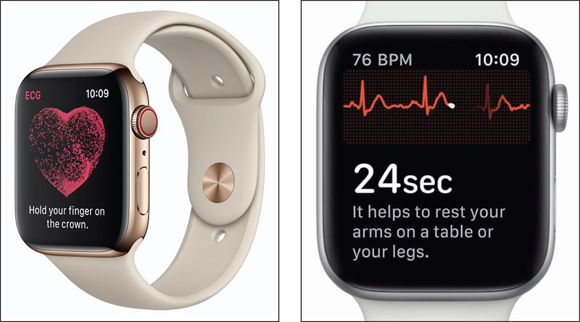
FIGURE 8-21: While it seems like science-fiction, Apple Watch can not only detect and display your heart rate (left), but also becomes an ECG that senses abnormalities (right).
Blood-oxygen monitor
 If you couldn’t tell by thumbing through this chapter, Apple Watch is slowly evolving into a health and wellness device.
One of the most fascinating additions to Apple Watch Series 6 is a blood-oxygen sensor that can measure the oxygen level of your blood, anytime and anywhere, providing you with valuable insights into your overall wellness.
That said, Apple always cautions its users to not rely on Apple Watch for medical information, because there is always room for error, and so blood O2 measurements taken with Apple Watch Series 6 are only designed for general fitness and wellness purposes.
While there are exception and anomalies, blood-oxygen levels between 95 and 99 percent are considered healthy. A lower number, such as below 80 percent, may lead to compromised respiratory, cardiac and/or brain functionality, say medical experts. Generally speaking, the higher the percentage of oxygen your red blood cells carry from your lungs to the rest of your body, the better.
Oxygen saturation — or SpO2 — is a measurement of the amount of oxygen-carrying hemoglobin in the blood, relative to the amount of hemoglobin not carrying oxygen. There needs to be a certain level of oxygen in your blood or your body may not function as efficiently.
Low blood-oxygen levels (or “hypoxemia”) have been linked to COVID-19, in fact, as the coronavirus may affect your ability to get enough oxygen. Hypoxemia can be caused by other heart and respiratory issues, as well, such as pneumonia, asthma, and congenital heart disease. By monitoring your SpO2 levels while wearing Apple Watch, it might be able to warn you of potential health issues before it’s too late.
Hey, betcha didn’t realize you were going to get a science lesson when you picked up this book.
How the blood-oxygen monitor works
Sometimes referred to as a pulse oximeter, a blood-oxygen monitor — including the one in Apple Watch Series 6 — shines red and green LEDs and infrared light into your wrist. (The back crystal of your Apple Watch houses these lights.) Photodiodes then measure the amount of light reflected back.
Advanced algorithms then use this data to calculate the color of your blood. The color determines your blood-oxygen level; bright red blood has more oxygen, while dark red blood has less.
So cool.
Apple Watch’s blood-oxygen monitor works in two ways: One is passively, if you want it to take regular readings on you, such as when you sleep. Apple calls this “background measurements.” The other way is an active measurement, when you open the app and request a reading on-demand.
What you need to use the blood-oxygen monitor
Before you get going, you need to have and do the following:
- Double-check to make sure that the Blood-Oxygen app is available in your country or region. You will know when you set up Apple Watch, as shown in Figure 8-22. Or check out:
https://www.apple.com/watchos/feature-availability/. - Ensure you have an iPhone 6 or later, and update it to the latest version of the iOS operating system software (currently, it’s iOS 14, at the point of writing this).
- You need an Apple Watch Series 6 (or later) and update it to the latest version of the watchOS operating system software.
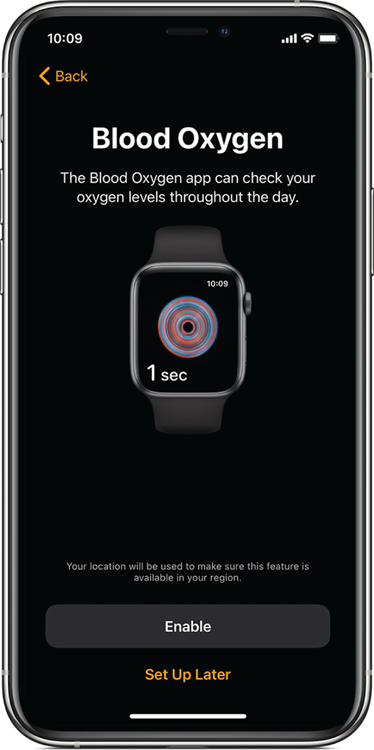
FIGURE 8-22: Once set up, Apple Watch’s blood-oxygen monitoring discretely looks out for anything suspicious or you can ask for an on-demand reading by launching the app on Apple Watch.
Note:
- The Blood Oxygen app is not available for use by people under 18 years old.
- It’s also not available if you set up your Apple Watch with Family Setup (see Chapter 2).
Setting up the blood-oxygen monitor for the first time
Perform these simple steps to get going:
- On your iPhone, open the Health app.
- Follow the onscreen prompts. If nothing happens, go to Browse ⇒ Respiratory ⇒ Blood Oxygen ⇒ Set Up Blood Oxygen.
- Follow the steps. Then tap to open the Blood Oxygen app on your Apple Watch to measure your blood-oxygen levels.
How to take a blood-oxygen monitor reading
For an on-demand blood-oxygen reading:
-
Rest your arm comfortably on a flat surface, such as a table or desk.
Make sure that your Apple Watch is snug on your wrist (not too loose).
- Tap to open the Blood Oxygen app on your Apple Watch.
-
Remain still. Tap Start, and then keep your arm steady for 15 seconds.
The countdown starts, as shown in Figure 8-23.
When the measurement is done, you receive the results as a percentage (such as 98%), as shown in Figure 8-23.
-
Tap Done to close.
A log of all your readings (with time stamp) is in the Health app of your iPhone (Respiratory ⇒ Blood Oxygen).
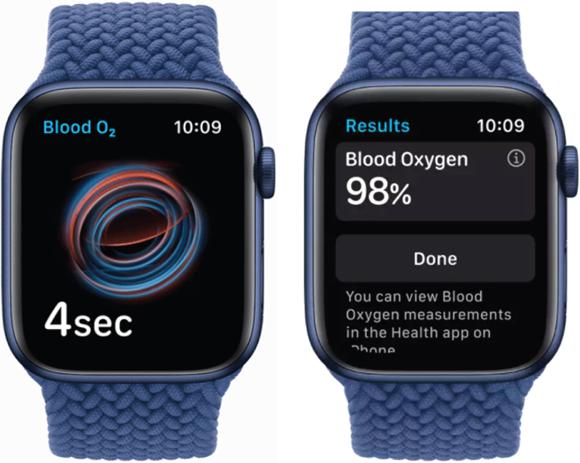
FIGURE 8-23: Taking a reading is super simple so long as your arm is rested comfortably and the watch is on snugly. Start the timer (left) and you see the blood-oxygen saturation percentage after 15 seconds (right).
For a passive blood-oxygen reading (background measurements), the Blood Oxygen app on your Apple Watch occasionally measures your blood-oxygen levels (this usually happens when you’re not moving).
If you want to stop these readings while sleeping or watching a movie — to avoid the distracting light shine from under your Apple Watch — open the Settings app on your Apple Watch, tap Blood Oxygen, and then turn off In Sleep Mode and In Theater Mode.
Enabling hand-washing detection
It took a global pandemic to remind us how important regular hand washing is and now your tech can help you with that.
As you likely know, washing your hands for 20 seconds can help you stay healthy as it helps remove viruses, bacteria, and germs you might have picked up from a gas pump, store door handle, and so on.
To enable reminders and a timer on Apple Watch (Series 4 and later), do the following:
- Open the Health app on your iPhone.
- Tap Browse.
- At the bottom of your screen, tap Other Data.
- Scroll down and see Get More From Health.
-
Tap to enable Handwashing.
You see many settings you can enable here, as shown in Figure 8-24.
Another way to enable this is to open the My Watch app on your iPhone and tap Handwashing.
Either way, you’re reminded to wash your hands (or turn off reminders if you like). And whenever you start handwashing, your Apple Watch will automatically detect the motion and count down from 20 seconds for you, as shown in Figure 8-24 (and you feel a little haptic touch, too).
Data on how frequently and long you washed your hands is in this area of the Health app on iPhone.
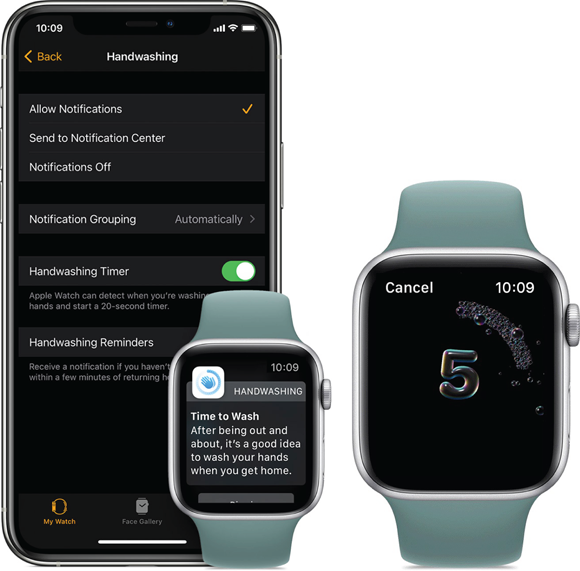
FIGURE 8-24: You can disable hand-washing reminders if you like and only allow the watch to detect when you’re washing your hands to start the timer. This works on Apple Watch Series 4 and newer.
Advanced Health Help: Medical ID, Fall Detection, and SOS calling
Wait — this chapter isn’t done just yet! Your Apple Watch can do even more to help you remain safe.
Setting up or editing your Medical ID information
Before you delve in to the various Apple Watch health features, a discussion of how to set up your Medical ID information is in order. Why? Because a lot of these features require this information in the event that something goes wrong with you and you want to inform a close contact, or emergency services, of your emergency.
With that in mind, you need to teach your Apple Watch who is important to contact. You must turn on Wrist Detection for your watch to automatically call emergency services.
Bear in mind falls are also automatically recorded in the Health app on your iPhone, unless you reply that you didn’t fall when your Apple Watch asks. To check your fall history, open the Health app on your iPhone, tap the Health Data tab, and then tap Results.
To set up your Medical ID:
- Open the Settings app on your Apple Watch, tap General, then make sure that Wrist Detection is enabled.
-
Open the Apple Watch app on your iPhone, tap My Watch, and then Emergency SOS.
Tapping Edit takes you to the Health app on the iPhone; or, simply open the Health app on your iPhone, then tap the Medical ID tab.
-
Tap Edit and enter your date of birth and other health info.
Depending on where you live, you might also be prompted with questions about Organ Donation (and can sign up here, if you like). See Figure 8-25.
To add emergency contacts, follow these steps:
-
Open the Apple Watch app on your iPhone, tap My Watch, and then Emergency SOS.
Tap Edit at the top of the screen to select various people.
- Tap the green plus sign under emergency contacts.
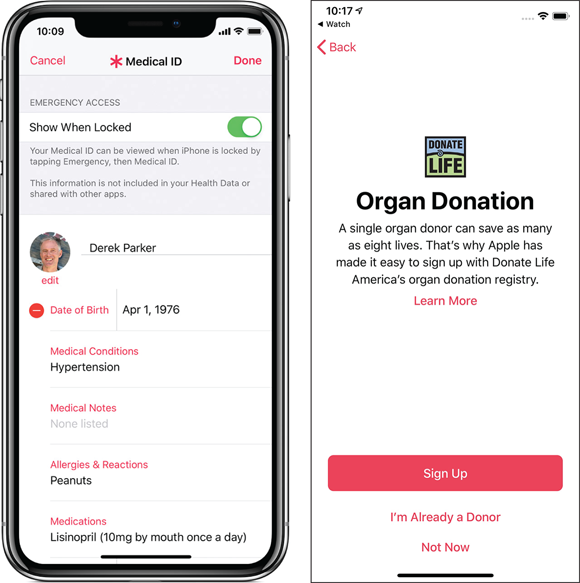
FIGURE 8-25: Use the Health app on iPhone to create a Medical ID that may be sent to emergency responders via your Apple Watch (left). You might also be prompted with other options, like donating your organs (right).
-
Tap Contact, followed by their relationship to you.
Figure 8-26 shows you the Emergency SOS screen.
- Similarly, tap the red minus button next to the contact to remove an emergency contact, followed by Delete.
-
To make your Medical ID available from the Lock screen, turn on Show When Locked.
In an emergency, this gives information to people who want to help. Tap Done.

FIGURE 8-26: You should first set up who your emergency contacts are, just in case you are unable to after falling.
Checking heart rate
At any time, you can check your heart rate using the Heart Rate app. Press the Digital Crown and then open the app and wait a few seconds for Apple Watch to measure your heart rate.
From this screen, you can also view your resting, walking, breathe, workout, and recovery rates throughout the day. Figure 8-27 shows all this in action.
Alternatively, you can summon Siri to show you heart rate info and/or add the Heart Rate complication to your watch face.

FIGURE 8-27: View heart rate info just after you take a reading (left). Or look back at different points of the day through the Apple Watch app (middle). The Health app gives a deeper dive into BPM data (right).
Receiving heart rate notifications
Now here’s something you might not know about Apple Watch: If your heart rate remains above or below a chosen BPM number, your Apple Watch can notify you.
To get going:
- On your iPhone, open the Apple Watch app.
- Tap the My Watch tab, and then select Heart Rate.
-
Tap High Heart Rate, and then choose a BPM.
If you’re unsure what number this should be, consult your physician.
- Tap Low Heart Rate, and then choose a BPM.
Now, when Apple Watch measures your heart rate while you appear to have been inactive for a period of 10 minutes, it notifies you if your BPM is higher or lower than your chosen numbers that you set in Steps 3 and 4 (see Figure 8-28).
When you use the Workout app, Apple Watch measures your heart rate continuously during the workout and for three minutes after the workout ends to determine a workout recovery rate.
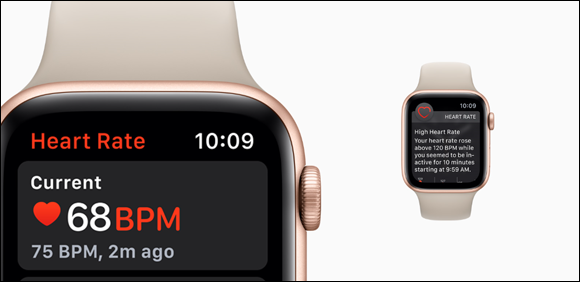
FIGURE 8-28: With the Heart Rate feature activated, you are alerted if your heart rate (BPM) is too low or too high based on parameters you set up in advance.
Turning on Fall Detection
Beginning with Apple Watch Series 4 (and any watch after that), Apple added a new and improved accelerometer and gyroscope (another motion sensor that can detect if you’ve fallen).
Do you like the idea of this feature? Can you see a loved one benefiting from it? Here’s how to turn it on (or off):
- Open the Apple Watch app on your iPhone, and then tap the My Watch tab.
- Tap where it says Emergency SOS.
- Now turn Fall Detection on or off.
The next section walks you through what to do if you actually fall.
What to do after a fall
When a fall incident occurs, the watch delivers a hard fall alert, taps you on the wrist, sounds an alarm, and displays an alert.
Although handy, Fall Detection isn’t perfect. Apple Watch cannot always detect a fall if you went down slowly. Conversely, it might misinterpret a fast drop as a fall when, in fact, you did something physical.
As shown in Figure 8-29, when Fall Detection is activated, you’ve got a choice to make:
- You fell, but you’re OK: You can dismiss the alert by tapping “I fell, but I’m OK.”
- It was a false call: If you didn’t fall at all, tap “I did not fall.”
-
If you’re not OK: If you’ve just had a bad fall, you can tap and drag the Emergency SOS icon. From your watch, this lets you then tap for emergency services, or lets you opt for a caregiver, family member, neighbor, friend, or whomever you like.
You must set up your emergency contact list ahead of time, as discussed in the section “Setting up or editing your Medical ID information” earlier in the chapter. -
If you’re unresponsive after 60 seconds: Apple Watch begins a 15-second countdown while tapping you on the wrist and sounding a loud alert (which gets louder so you or someone nearby can hear it). When the countdown ends, your Apple Watch automatically contacts emergency services. At the same time, it also sends a message to your emergency contacts with your geographical location, letting them know that Apple Watch detected a hard fall and dialed emergency services.
If you call emergency services, you can end the call when your call is finished or, if you no longer need emergency care, by tapping the red Phone icon. On the End Call screen, choose Yes.
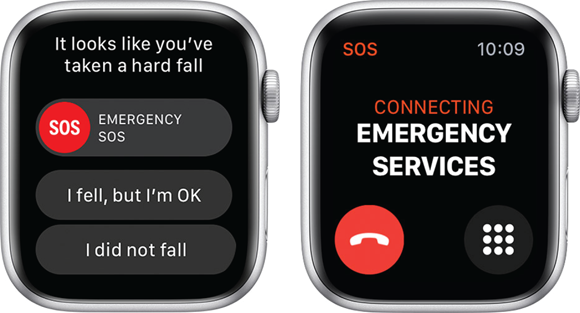
FIGURE 8-29: You’ll get some options to tap through if you fall. The example on the right shows what happens if you swipe Emergency SOS. You can call 9-1-1 or someone else.
If you’ve entered your age when you first set up your Apple Watch (or in the Health app on iPhone) and you’ve indicated you’re age 65 or older, the Fall Detection feature automatically turns on.
Emergency SOS
Whether it senses a troubling anomaly through the heart-rate or ECG sensors, or detects a hard fall, Apple Watch can dial emergency services, notify your emergency contacts, send your current location, and even display your Medical ID badge for emergency personnel. Or you can initiate a call through your watch if you require some emergency attention.
Apple Watch now lets you make emergency SOS calls internationally. According to Apple, it works “almost anywhere in the world” with cellular versions of Apple Watch Series 5 (and later).
 For all these scenarios, to make an emergency call, you must have an Apple Watch GPS + Cellular model (with active cellular plan), or be connected to an iPhone via Bluetooth, or have access to Wi-Fi (with Wi-Fi Calling setup, as discussed in Chapter 5).
If you start the countdown by accident, simply let go of the side button. Or if you start an emergency call by accident, firmly press the display, then tap End Call. You may get a call back from an emergency response operator and you can tell him or her you dialed the number by mistake.
To manually call emergency services:
-
Press and hold the side button on your watch until the Emergency SOS slider appears.
It may take two seconds or so.
-
Continue to hold down the side button.
A short countdown to begin and an alert sounds. Alternatively, you can also drag the Emergency SOS slider to the left.
- When the countdown ends, your watch automatically calls emergency services.
-
After the call ends, your Apple Watch sends your emergency contacts a text message with your current location, unless you choose to cancel.
If Location Services is off, it temporarily turns on, says Apple.
If your location changes — such as a first responder taking you to the hospital — your contacts will get an update, and you, too, will get a notification a few minutes later.
To stop sharing your location, tap Stop Sharing in the notification.
Just press and hold the side button and you’ll be connected with emergency services.