
Chapter 2
Finding Your Board and Your Way Around It
IN THIS CHAPTER
![]() Inspecting the Arduino Uno
Inspecting the Arduino Uno
![]() Discovering other Arduino boards
Discovering other Arduino boards
![]() Knowing where to shop for Arduinos
Knowing where to shop for Arduinos
![]() Finding the right Arduino kit to get started
Finding the right Arduino kit to get started
![]() Setting up a workspace
Setting up a workspace
![]() Installing Arduino
Installing Arduino
![]() Introducing Arduino Web Editor
Introducing Arduino Web Editor
The name Arduino encompasses a host of concepts. It can refer to an Arduino board, the physical hardware, the Arduino environment — that is, a piece of software that runs on your computer — and, finally, Arduino as a subject in its own right, as in this book: how the hardware and software can be combined with related craft and electronics knowledge to create a tool kit for any situation.
This chapter provides an overview of what you need to get started with Arduino. You may be eager to dive in, so you may want to quickly scan through this chapter, stopping at any areas of uncertainty and referring to them later as needed.
First, you learn about the components used on the Arduino Uno board, which is the starting point for most Arduinists. Beyond that, you get acquainted with the other available Arduino boards, how they differ, and what uses they have. The chapter lists major suppliers that can equip you with all the parts you need and examines some of the starter kits that are ideal for beginners and for accompanying this book. When you have the kit and a workspace, you’re ready to start.
Lastly, you find out where to obtain the software to control your Arduino. I walk you through the steps for downloading and installing the software, and give you a brief tour of the environment in which you develop your Arduino programs.
Getting to Know the Arduino Uno
No one definitive Arduino board exists; many types of Arduino boards are available, each with its own design to suit various applications. Deciding what board to use can be a daunting prospect because the number of boards is increasing, each with new and exciting prospects. However, one board can be considered the archetype of the Arduino hardware, the one that almost all people start with and that is suitable for most applications. It’s the Arduino Uno.
The most recent main board to date is the Arduino Uno R3 (released in 2011). Think of it as the plain vanilla of Arduino boards. It’s a good and reliable workhorse suitable for a variety of projects. If you're just starting out, the Uno R3 is the board for you (see Figures 2-1 and 2-2).

FIGURE 2-1: The front of an Arduino Uno.
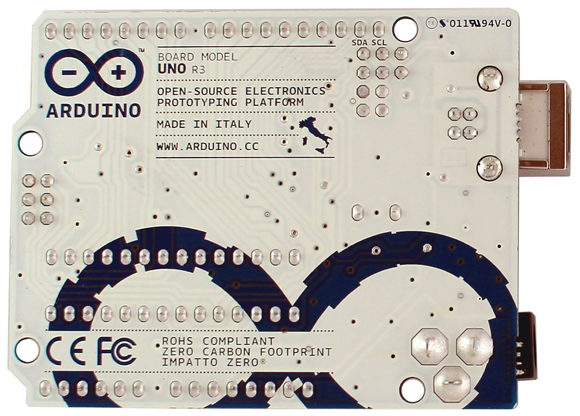
FIGURE 2-2: The back of an Arduino Uno.
Uno is Italian for the number one, named for the release of version 1.0 of the Arduino software. Predecessors to this release had a variety of names, such as Serial, NG, Diecimila (10,000 in Italian, to mark that 10,000 boards had been sold), and Duemilanove (2009 in Italian, the release date of the board); the Uno has ushered in some much needed order to the naming of the boards. R3 relates to the revision of the features on the board, which includes updates, refinements, and fixes. In this case, it is the third revision.
The board has many small components, described throughout much of this chapter.
The Brains: ATmega328P microcontroller chip
You can think of the microcontroller chip itself as the brains of the board. The chip used in the Arduino Uno is the ATmega328P, made by Atmel. It’s the large, black component in the center of the board. This chip is known as an integrated circuit, or IC. It sits in a socket; if you were to remove it, it would look like the one shown in Figure 2-3.

FIGURE 2-3: An ATmega328P microcontroller all by itself.
This same chip can come in different forms, referred to as packages. The one in an Arduino Uno is in a plated-through hole, or PTH, package, named because of the way it makes contact with the board. Another variation you may find is the Arduino Uno SMD, or surface mount device, package, which is mounted on the surface of the board rather than in holes that go through it. This chip is much smaller, but it is not replaceable, whereas the PTH chip is. Apart from that, it functions exactly the same as the PTH and differs only in looks.
Header sockets
The microcontroller socket connects all the legs of the ATmega328 microcontroller chip to other sockets, referred to as header sockets, which are arranged around the edge of the board and are labeled for ease of use. These black sockets are divided into three main groups: digital pins, analog input pins, and power pins.
All these pins transfer a voltage, which can be either sent as output or received as an input. Why are these pins important? They allow you to connect additional circuitry to the board quickly and easily when prototyping with a breadboard (described in Chapter 6) and to design additional boards, called shields, that fit neatly on top of your Arduino board (see Chapter 12 for more on shields).
This same process of sending and receiving electrical signals is going on inside modern computers. But because they are so advanced and refined compared to a humble Arduino, it is difficult to directly link a computer accustomed to digital signals (0s and 1s) to an electronic circuit that deals with a range of voltages (0v to 5v in the ATmega328P’s case).
The Arduino (see the sketch in Figure 2-4) is special because it can interpret these electric signals and convert them to digital signals that your computer can understand — and vice versa. It also enables you to write a program using software on a conventional computer that the Arduino IDE (integrated development environment) converts or compiles to electrical signals that your circuit can understand.

FIGURE 2-4: An Arduino Uno with all the important parts labeled.
By bridging this gap, it is possible to use a conventional computer's benefits — ease of use, user-friendly interfaces, and code that is easy for humans to understand — to control a wide range of electronic circuits and even give them complex behaviors with relative ease.
Digital pins
You use digital pins (refer to Figure 2-4) to send and receive digital signals. Digital implies that the pins have two states: off or on. In electrical terms, these states translate to a value of 0 or 5 volts, but no values in between.
Analog in pins
You use analog in pins (refer to Figure 2-4) to receive an analog value. An analog value is taken from a range of values. In this case, the range is the same 0V to 5V as with the digital pins, but the value can be at any point — 0.1, 0.2, 0.3, and so on.
What about analog out?
The shrewd ones among you may have noticed that there seem to be no analog out pins. In fact, the analog out pins are there, but they’re hidden among the digital pins marked as PWM using the ~ symbol. PWM stands for pulse-width modulation, which is a technique you can use to give the impression of an analog output using digital pins. I explain how PWM works in Chapter 6. The ~ symbol appears next to digital pins 3, 5, 6, 9, 10, and 11, showing that you have six pins that are capable of PWM.
Power pins
You use the power pins to distribute power to inputs and outputs wherever power is needed.
Vin, which stands for voltage in, can be used to supply a voltage (V) equal to the one supplied by the external supply jack (for example, 12V). You can also use this pin to supply power to the Arduino from another source.
GND marks the ground pins, which are essential to complete circuits. There is also a third ground by pin 13. All these pins are linked and share the same (called common) ground.
You can use 5V or 3.3V to supply a 5-volt or 3.3-volt power supply, respectively, to components or circuits.
USB socket
To tell the microcontroller on the Arduino board what to do, you need to send a program to it. On the Uno, you send programs primarily by a USB connection. The large, metallic socket is a USB port for a USB A-B cable. This cable is similar to the one used on your home printer or scanner, so you may find a few around the house that can serve as handy spares. The Arduino uses the USB both for power and to transfer data. Using a USB cable is perfect for low-power applications and when data is being sent to or received from a computer.
Power socket
Next to the USB socket is another socket; this one is for power. This socket allows you to power your Arduino from an external power supply. The supply could be from an AC-to-DC adaptor (similar to those used on other consumer electronics), a battery, or even a solar panel.
The connector needed is a 2.1 mm center positive plug. Center positive simply means that the plug has an outside and an inside that fit the socket and that the inside of the plug must be positive. You should be able to find this plug among the standard connectors that come with most power supplies; otherwise, you can buy the connector and attach it to bare wires.
 If you connect a power supply that is the opposite (center negative), it is known as having a reverse polarity. Components on the Arduino Uno will resist your attempts to send voltage the wrong way around the board, but those components can melt in the process of saving your board, depending on how much power you're sending and how long it takes you to notice the burning smell! If you reverse the polarity when using the Vin, 5V, or 3.3V pins, you bypass this protection and almost instantly destroy several parts of your board and the ATmega328P chip.
The recommended voltage for the Uno board is 7–12V. If you supply too little power, your board might not function correctly. Or if you provide too much power, your board might overheat and potentially be damaged.
LEDs
LEDs come in a variety of shapes and sizes and are found in almost every modern piece of consumer electronics, from bike lights to TVs to washing machines. You see a lot more of them in numerous examples throughout the book.
The components described in this section are tiny. The Uno board has four LEDs (light-emitting diodes) labeled L, RX, TX, and ON. An LED is a component that produces light when electrical current flows through it.
These four LEDs are used to indicate activity on the board, as follows:
- ON is green and signifies that your Arduino is powered.
- RX and TX tell you that data is being received or transmitted by the board.
- L is a special LED connected to digital pin 13. It is great for testing to see whether your board is functioning as you want.
If your Arduino is plugged in but you don’t see any lights, double-check that:
- Your USB cable is plugged in
- Your USB port is working — try another device in the port
- Your cable is working — try another cable, if possible
If the LED still doesn't illuminate, something is probably wrong with your Arduino. Your first destination should be the Arduino troubleshooting page at http://arduino.cc/en/Guide/troubleshooting. If you still have no luck, request a replacement Arduino from where you purchased the device.
Reset button
The Uno board also has a button next to the USB socket called the reset button. It resets the program on the Arduino or stops it completely when held down for a time. Connecting a wire between GND and the reset pin, which is located next to the 3.3V, achieves the same results.
The board has many other components, all of which perform important jobs, but the ones described in this section are the key ones for you to know for now.
Discovering Other Arduino Boards
The preceding section describes the standard USB Arduino board, but you should be aware that many others exist, all designed with different needs in mind. Some offer more functionality, and others are designed to be more minimal, but generally they follow a design similar to that of the Arduino Uno. For this reason, all examples in this book are based on the Uno.
Previous revisions of the Uno should work without any changes, but if you're using an older or more specialized board, be sure to follow instructions specific to it. This section gives you a brief rundown of other available boards.
Official Arduino boards
Although Arduino is open source, it is also a trademarked brand, so to guarantee the quality and consistency of its products, the Arduino team must properly approve new boards before they are officially recognized and can bear the name Arduino. You can recognize official boards first by the name — Arduino Pro, Arduino Fio, or Arduino LilyPad, for example. Other nonofficial boards often include Arduino compatible or for Arduino in the name. The other way to recognize an official Arduino, made by the Arduino team, is by the branding (in the most recent versions): They are turquoise and display the infinity symbol somewhere on the board, along with a link to www.arduino.cc. Some other companies also have their boards accepted as official boards, so you may find other company names printed on them, such as Adafruit Industries and SparkFun.
Because the schematics for the Arduino board are open source, unofficial Arduino boards have a lot of variation, which people have made for their own needs. These boards are usually based on the same microcontroller chips to remain compatible with the Arduino software, but they require extra consideration and reading to be sure that they will work as expected. The Seeeduino v4.2 (by Seeed Studio), for example, is based on the Arduino Uno and is 100 percent compatible but adds various extra connections, switches, and sockets, which may be of more use to you than an official Arduino board in certain situations.
Official boards are the safe option for beginners to choose because the majority of Arduino examples online are based on these boards. Because of this, official boards are more widely used, and because of that, any errors or bugs in the board design are likely to be remedied with the next revision or at least well documented.
Arduino Leonardo
The Leonardo has the same footprint (shape of circuit board), but the microcontroller used is different and can be recognized as a keyboard or mouse by a computer. In the “Hacking Other Hardware” bonus chapter (www.dummies.com/go/arduinofd), I provide more detail about the differences between this board and the Uno and how to use it.
Arduino Mega 2560 R3
As the name suggests, the Arduino Mega 2560 R3 is a bigger board than the Arduino Uno R3. It is for people who want more: more inputs, more outputs, and more processing power! The Mega has 54 digital pins and 16 analog pins whereas the Uno has a measly 15 digital and 6 analog pins.
Arduino Mega ADK
The Arduino Mega ADK is essentially the same board as the Mega 2560 Arduino but is designed to interface with Android phones. This means you can share data between your Android mobile or tablet and an Arduino to broaden the range of either.
Arduino Nano 3.0
The Arduino Nano 3.0 is a condensed Arduino that measures just 0.70″ x 1.70″. This size is perfect for making your project smaller. The Nano has all the power of an Arduino Uno (both use the same ATmega328 microcontroller), but it's a fraction of the size. The Nano also handily fits into a breadboard, making it ideal for prototyping as well.
Arduino Mini R5
Despite what the names suggest, the Arduino Mini R5 is smaller than the Nano. This board also uses the same ATmega328 microcontroller chip but is condensed further, removing all header pins and the Mini-USB connector of the Nano. The Mini board is great if space is at a premium, but it does require great care when connecting because an incorrect connection can easily destroy the board.
Arduino 101
The Arduino 101 uses the Intel Curie module to provide a board that’s as easy to use as Arduino but with the latest Bluetooth low energy technology. It also features a six-axis accelerometer to detect movement, making it a great companion for any wearable technology projects or for talking to other Bluetooth devices.
Arduino MKR1000
The Arduino MKR1000 is a simple but powerful board, combining a 32-bit processor with a Wi-Fi module. It’s perfect for linking sensors and actuators to the Internet or prototyping your next Internet of Things (IoT) project. Along with its small form factor, it has a handy battery connector to allow you to take your project on the move.
Contributed (approved) Arduinos
Many Arduino boards are now standardized and designed by the Arduino team. However, some have been contributed by other companies, such as Adafruit Industries and SparkFun, and are recognized as official boards. I list a few of the best ones here.
LilyPad Arduino USB
The LilyPad Arduino USB was made for projects in which technology is combined with textiles to aid in the development of e-textiles or wearable electronics projects. The LilyPad and its accompanying breakout boards (printed circuit board that make it easy to integrate various components without the need to build your own boards) can be sewn together using conductive thread instead of conventional wire. This board was designed and developed by Leah Buechley of MIT (www.leahbuechley.com/) and SparkFun Electronics. If you’re interested in e-textiles or wearable electronics, check out the excellent tutorial on SparkFun’s site that introduces the latest version of the board and the ProtoSnap kit. (Go to learn.sparkfun.com/tutorials/lilypad-development-board-hookup-guide.)
Arduino Pro
The Arduino Pro is a minimal and super skinny Arduino, by SparkFun Electronics, based on the same microcontroller as those used in the Uno. It comes without any of the normal headers or sockets but has all the same capabilities of an Uno. It’s ideal when height is at a short supply. In addition, it has a battery socket, which allows you to easily make your project portable.
Arduino Pro Mini
The Pro Mini is another SparkFun product; this one pushes the minimalism of the Arduino Pro to new limits. In the scale of Arduinos, the Pro Mini sits neatly between the Nano and the Mini. It has none of the header pins or the Mini-USB port of the Nano, and is slightly more spread out than the Arduino Mini. The Pro Mini has none of the safety features of the Uno, so take great care when wiring because a wrong connection can easily destroy the board.
Shopping for Arduino
Initially, Arduino boards were available only from a small number of hobby shops scattered across the world. Now you have lots of places to purchase an Arduino, as listed in the following sections. Later in this chapter, I tell you about beginner’s kits, which pull together the basic components for you; I recommend a kit to get you started on your Arduino endeavors.
On the Arduino site, you can find an exhaustive list of Arduino resellers and manufacturers around the world (store.arduino.cc/distributors). Here are just a few of the most useful.
Arduino Store
A good place to start is the Arduino Store. This location has all the latest Arduino boards, kits, and a select few components.
Adafruit
MIT engineer Limor “Ladyada” Fried founded Adafruit in 2005. Through its website, the company offers a wealth of resources, including products that the company designs and makes itself; other products sourced from all over; tools and equipment; and tutorials, forums, and videos covering a wide range of topics. Adafruit is based in New York, New York (it’s a wonderful town!). It distributes worldwide.
SparkFun
SparkFun sells all sorts of parts for every variety of electronics projects. As well as selling Arduino-compatible hardware, it designs and makes a lot of its own boards and kits. SparkFun has an excellent site that acts as a shop front, a support desk, and a classroom for Arduinoists. SparkFun also has active (and vocal) commenters on each of its product pages, which help to support and continually improve the company’s products. SparkFun was founded in 2003 and is based in Boulder, Colorado.
Seeed Studio
Based in Shenzhen, China, Seeed Studio is self-described as an “open hardware facilitation company.” The shop uses local manufacturing to quickly make prototypes and small-scale projects that are distributed worldwide. In addition to manufacturing and selling products, the company offers a community area on its website where people can vote for the projects that they want Seeed Studio to bring to fruition (www.seeedstudio.com/wish/).
Watterott Electronic
Founded by Stephan Watterott back in 2008, Watterott Electronic, based in Leinefelde, Germany, began as a one-man business providing a few microcontroller boards and specialist components. A lot has changed since then, and the company now stocks a large array of Arduino-compatible boards, components and other hardware.
Electronics distributors
Many well-established global electronics distribution companies deliver to all corners of the world. Relatively recently, they have started stocking Arduino boards, but they are especially useful for bulk buying of components when you know what you’re looking for.
 You can lose days searching through the extensive catalogues of components, so it’s always a good idea to know the name of what you’re looking for before you start!
Here are some global distribution companies that stock Arduino boards and components:
- Digi-Key:
www.digikey.com - Farnell:
www.farnell.com - Mouser:
www.mouser.com - Rapid:
www.rapidonline.com - RS Components:
www.rs-components.com
Amazon
So much has the popularity of Arduino grown that it’s also now stocked at Amazon (www.amazon.com). Most Arduino boards as well as a variety of components and kits are available here, although they're harder to find than on more hobby-specific sites.
eBay
Originally a source of only second-hand components, eBay (www.ebay.com) has now become a platform used by many retailers and wholesalers. Here you will find official boards, custom boards, and popular components. Some imitation Arduino boards are also available. Most are harmless and will work the same as an official board, but the quality control is often worse, which can result in strange behavior or damage to a connected devices. If in doubt, use a genuine Arduino board from a certified distributor.
Kitted Out: Starting with a Beginner’s Kit
By this point, you probably know a bit about the Arduino board, but no board is an island; you need lots of other bits so that you can make use of the board. In the same way that a computer is of no use without a mouse and keyboard, an Arduino is of no use — or at least not as much fun — without components.
Every new Arduinist should follow several basic examples to learn the fundamentals of Arduino (which this book covers in Chapters 3 through 7). These examples are all achievable with a few basic components. To save you the time and effort of finding these components, a few enterprising individuals and companies have put together kits that let you experiment in no time!
Many kits have been designed by different individuals and companies based on their experiences, likes, and dislikes. You can also find a lot of components that do the same job but have different appearances, based on their application.
The following short list describes a few core components that should be included in all good Arduino beginners’ kits:
- Arduino Uno: This is the board you know and love.
- USB A-B cable: This cable is essential to make use of your Arduino. It can also be found on printers and scanners.
- LEDs: Light-emitting diodes in various colors are great for providing visual feedback for your project as well as for testing lighting projects on a small scale.
- Resistors: Also referred to as fixed resistors, these are fundamental electrical components used to resist the flow of current through a circuit. Resistors are essential for the smooth running of most circuits. Each resistor has a fixed value, which is indicated by a colored band on the side of the resistor. These bands help you to quickly identify a resistor’s resistance visually.
- Variable resistors: Also known as potentiometers or pots, variable resistors resist current in the same way as fixed-value resistors, but they can change their resistance. They are most commonly used in radios and hi-fi equipment for tuning and volume control dials, and are available also in other housings to detect other inputs such as force or flex on a surface.
- Diodes: Also known as rectifier diodes, diodes are similar to LEDs but without the light. They have an extremely high resistance to the flow of current in one direction and an extremely low (ideally zero) resistance in the other, which is the same reason that an LED works in only one direction. Instead of emitting light like LEDs, diodes control the flow of current throughout your circuit.
- Photo diodes: Also known as photo resistors or light-dependent resistors (LDRs), photo diodes change their resistance when light falls on them. They can have a variety of different uses depending on how they’re placed relative to the light source.
- Pushbuttons: These components are found behind the scenes in many bits of consumer electronics such as game console controllers and stereos. They’re used to either connect or disconnect parts of a circuit so that your Arduino can monitor human inputs.
- Temperature sensors: These sensors tell you what the ambient temperature is wherever they are placed. They are great for observing changes in your environment.
- Piezo buzzer: A piezo buzzer is technically described as a discrete sounding device. These simple components can be supplied with a voltage to produce simple notes or music. They can also be attached to surfaces to measure vibrations.
- Relays: These electrically operated switches are used to switch higher power circuits using your low-voltage Arduino. Half of a relay is an electromagnet, and the other half is a magnetic switch. The electromagnet can be activated by the 5V of the Arduino, which moves the contact of the switch. Relays are essential for bigger lighting and motor-based projects.
- Transistors: These components are the basis for all modern computers. Transistors are electrically operated switches, similar to relays, but the switch happens on a chemical level rather than a physical level. This means that the switching can be super fast, making transistors perfect for high-frequency operations such as animating LED lighting or controlling the speed of motors.
- DC motors: These motors are simple electric motors. When electric current is passed through a motor, it spins in one direction; when that direction is reversed, it spins in the other. Electric motors come in great variety, from those in your phone that vibrate to those in electric drills.
- Servo motors: These motors have on-board circuitry that monitors their rotation. Servo motors are commonly used for precision operations such as the controlled opening of valves or moving the joints of robots.
Here are a few of the better-known kits, ascending in price. They include all the components in the preceding list, and any will be an excellent companion for the examples in this book:
- Arduino Starter Kit from Arduino, available from
store.arduino.cc/usa/arduino-starter-kit, costing $87.90 at the time of this writing - Starter Kit for Arduino (ARDX) by Oomlout, available from
www.adafruit.com/products/170, costing $84.95 at the time of this writing - SparkFun Inventor’s Kit 4.0 by SparkFun, available from
www.sparkfun.com/products/14265, costing $99.95 at the time of this writing
You can create all the basic examples in this book with any kit in the preceding list, although a slight variation may occur in the number and type of components. See an example Arduino kit in Figure 2-5. Sometimes the same component can take many different forms, so be sure to carefully read the parts list to make sure that you can identify each of the components before you start. Cheaper kits are available, but these will likely not include some components, such as motors or the variety of sensors.

FIGURE 2-5: An example of an Arduino kit with an Arduino Uno and a good range of components.
Preparing a Workspace
When working on an Arduino project, you could sit on your sofa or be at the top of a ladder. I’ve been there before! But just because it’s possible to work this way doesn’t mean that it’s sensible or advisable. You’re far better off to have a good workspace before you dive into your experiment, especially when you're just starting out with Arduino.
Working with electronics is a fiddly business. You’re dealing with lots of tiny, delicate, and very sensitive components, so you need great precision and patience when assembling your circuit. If you’re in a dimly lit room trying to balance things on your lap, you'll quickly go through your supply of components by either losing or destroying them.
It’s always good to make life easy for yourself, and the best way to do this when working on Arduino projects is to prepare your workspace. The ideal workspace has the following:
- Large, uncluttered desk or table
- Good work lamp
- Comfortable chair
- Cup of tea or coffee (recommended)
After you’re comfortable, you're ready to learn how to set up the Arduino software. The Arduino software is a type of an integrated development environment (IDE), a tool common in software development that allows you to write, test, and upload programs. Versions of Arduino software are available for Windows, macOS, Linux, and Arduino Web Editor.
Installing Arduino
This section talks you through installing the Arduino environment on your platform of choice. These instructions are specifically for installation using an Arduino Uno, but also work just as well for previous boards.
Arduino is free to download from www.arduino.cc/en/main/software and is supported on macOS, Windows 32-bit and 64-bit, and Linux 32-bit, 64-bit, and ARM. At the time of this writing, Arduino was version 1.8.4.
To install Arduino, do the following:
- On a Mac: The .zip file unzips automatically, producing the Arduino app file, which you can then drag to your Applications folder. From there, you can drag Arduino to the dock for easy access or create a desktop alias.
- On Windows: Download the installer file and double-click to install the file in a directory of your choice. You also have the option to create shortcuts and install the latest USB drivers.
- On Linux: Download the compressed file for your version of Linux and extract the package. Open the Arduino folder (whose name includes the version number, such as arduino-1.8.4) created by the extraction process and find the install.sh file. Right-click it and choose Run in Terminal from the contextual menu.
Surveying the Arduino Environment
Programs written for Arduino are known as sketches. This naming convention was passed down from Processing, which allowed users to create programs quickly, in the same way that you would scribble an idea in a sketchbook.
Before you look at your first sketch, I encourage you to explore the Arduino software. The Arduino software is an integrated development environment, or IDE, and this environment is presented to you as a graphical user interface, or GUI (pronounced “goo-ey”).
A GUI provides a visual way of interacting with a computer. Without it, you would need to read and write lines of text, similar to what you may have seen in the DOS prompt in Windows, Terminal in macOS, and in that bit about the white rabbit at the start of The Matrix.
The turquoise window is Arduino’s GUI. It’s divided into the following four main areas (labeled in Figure 2-6):
- Menu bar: Similar to the menu bar in other programs you’re familiar with, the Arduino menu bar contains drop-down menus to all the tools, settings, and information that are relevant to the program. In macOS, the menu bar is at the top of your screen; in Windows and Linux, the menu bar is at the top of the active Arduino window.
- Toolbar: The toolbar contains several buttons that are commonly needed when writing sketches for Arduino. These buttons, which are also available on the menu bar, perform the following functions:
- Verify: Checks that your code makes sense to the Arduino software. Known as compiling, this process is a bit like a spelling and grammar checker. Be aware, however, that although the compiler checks that your code has no obvious mistakes, it does not guarantee that your sketch works correctly.
- Upload: Sends your sketch to a connected Arduino board. It automatically compiles your sketch before uploading it.
- New: Creates a sketch.
- Open: Opens an existing sketch.
- Save: Saves the current sketch.
- Serial monitor: Allows you to view data that is being sent to or received by your Arduino board.
- Text editor: This area displays your sketch as text. It is almost identical to a regular text editor but has a few added features. Some text is color coded if the Arduino software recognizes it. You also have the option to auto-format the text so that it is easier to read.
- Message area: Even after years of using Arduino, you’ll still make mistakes (everybody does), and the message area is the first way for you to find out that something is wrong. (Note: The second way is the smell of burning plastic.)

FIGURE 2-6: The areas of the GUI.
Using Arduino Web Editor
Arduino Web Editor is a cloud-based version of the downloadable IDE and a great way to get started quickly.
Cloud-based means that Web Editor runs in your browser and saves your project files to your online account instead of on your computer. Apart from those differences, Web Editor has all the core features of the downloadable IDE but is more flexible, working across platforms without the need to install any files. In Figure 2-7, you can see how the layout differs.

FIGURE 2-7: The areas of the Web Editor GUI.