Chapter 3: A Closer Look at Workflows
Workflows are a core functionality of GitHub Actions. They can be as simple or as robust as you need. Now that you have learned how to customize existing workflow templates, and how to write simple workflow files, you are ready to take a closer look at more advanced components of workflows.
Chapter 2, Deep Diving into GitHub Actions, introduced a few basic concepts that can help you create workflow files to automate simple tasks. However, most CI/CD tasks – as well as other tasks that can be automated – demand more involved and complex workflows. This chapter will present more advanced options, such as expressions and contexts, that can be added to a workflow file and create powerful results.
Once your workflows have been created, you will be able to manage them, as well as cancel a workflow run.
The skills you will learn about in this chapter will also prepare you to manage the workflows you create. You will understand how authentication works in the GitHub Actions context, and you will see details about reading run logs and debugging issues. To help you gather all these skills, this chapter will cover the following topics:
- Reviewing the webhook events that trigger workflows
- Authenticating within a workflow
- Understanding contexts, environment variables, and expressions
- Managing workflow runs
By the end of this chapter, you will be able to create workflow files that evaluate expressions, accept environment variables, and use advanced expressions. You will also be able to analyze run logs and debug workflow runs that may have failed.
Reviewing the webhook events that trigger workflows
In Chapter 2, Deep Diving into GitHub Actions, you learned about scheduled events and manual events, but webhook events were only covered briefly. Although this section will not cover a comprehensive list of all webhook events that can trigger a workflow, you will learn more about these events and see some examples that can help you create your own workflow.
Important note
To see the complete list of webhook events that trigger workflows, visit https://docs.github.com/actions/reference/events-that-trigger-workflows#webhook-events.
Webhooks, in general, are HTTP callbacks that can be defined by a user and are triggered by specific events that happen on a platform. GitHub supports many different webhook events that you can consider when implementing CI/CD strategies using GitHub Actions. Those events can be used individually and in conjunction with manual and scheduled events. In addition to the webhook events that you have seen in previous chapters, such as pull requests and issues, this chapter will introduce other events that will help you create different workflows for different stages of the software development life cycle.
Branch or tag creation
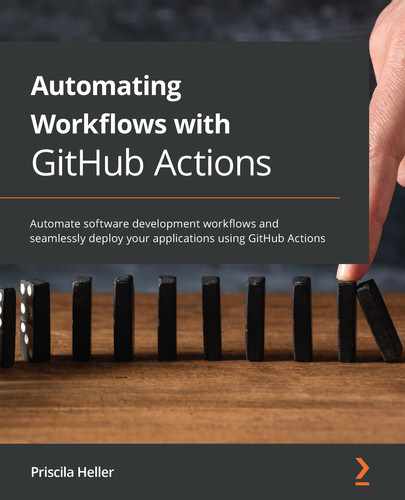
This event triggers a workflow any time a branch or tag is created. This can be useful, for example, in scenarios where a new release is created and you want to be notified when this workflow starts and finishes running. The following example uses Slack as the platform where the notification will be sent. You can also see that the workflow uses a few actions that can be found in GitHub Marketplace, such as act10ns/slack@v1, actions/checkout@v2, and ruby/setup-ruby@v1:
name: New release
# triggers the workflow when a tag is created
on:
create:
ref_type: tag
jobs:
release:
runs-on: ubuntu-latest
# sends slack a notification that the job is starting
steps:
- name: Job start slack notification
uses: act10ns/slack@v1
with:
status: 'START'
env:
SLACK_WEBHOOK_URL: ${{ secrets.SLACK_WEBHOOK_URL }}
if: always()
# checks out the repository, installs Ruby 2.7 and builds the gem.
- uses: actions/checkout@v2
- name: Install Ruby 2.7
uses: ruby/setup-ruby@v1
with:
ruby-version: '2.7'
- name: Build gem
run: gem build *.gemspec
# sends slack a notification that the job is completed successfully
- name: Job finish slack notification
uses: act10ns/slack@v1
with:
status: ${{ job.status }}
env:
SLACK_WEBHOOK_URL: ${{ secrets.SLACK_WEBHOOK_URL }}
if: always()
The workflow ran successfully, and the following notifications were sent to Slack:
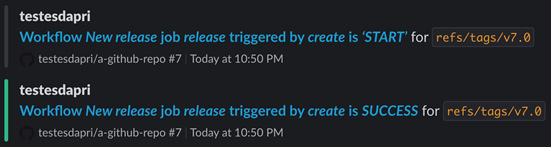
Figure 3.1 – Slack notifications generated because of a successful workflow run
Deployment creation and deployment status
Any time a deployment is created, or a third party provides a deployment status, a workflow will be triggered. The deployment event is commonly used to deploy code into various environments, such as production. The deployment_status event can be used, similarly to the example provided for the create event, to notify administrators or developers of the status of specific deployment attempts. When creating workflow files, use the following syntax:
on:
deployment:
Alternatively, you can use the following syntax:
on:
deployment_status:
Issues
Issue events can trigger a workflow run every time they occur. There are many different activity types that can trigger an issue event. The most common ones are opened, edited, closed, assigned, and unassigned.
Issue_comment
Similar to the issue event, when an issue_comment event occurs, a workflow run can be triggered. This specific event accepts the opened, edited, and deleted activity types.
The following example shows a workflow file that translates the contents of new issues and issue comments (note the [created] and [opened] activity types) from other languages into English using the tomsun28/[email protected] action, which can be found in GitHub Marketplace:
name: issue-translator
on:
issues:
types: [opened]
issue_comment:
types: [created]
jobs:
build:
runs-on: ubuntu-latest
steps:
- uses: tomsun28/[email protected]
Note how the action translated the issue from Portuguese into English, and then the issue comment from Spanish into English:

Figure 3.2 – Using actions to translate issues and issue comments
The workflow file used to translate issues and issue comments can be useful, for example, for open source maintainers that accept contributions from developers who speak languages other than English. It can also be helpful for admins and repository maintainers who interact frequently with other users or customers whose first language is not English, and want to report a bug, or log an improvement request.
Project
This event time can be valuable for project managers who use GitHub's project boards to manage a project and track the life cycle of a task. The following workflow shows a way to automatically create a release once a project has been closed:
name: New release when project board is closed
on:
project:
types: closed
jobs:
new-release:
runs-on: ubuntu-latest
steps:
- name: gets project board name
id: gets_project_name
run: |
PROJECT_NAME=$(echo "${{ github.event.project.name }}")
echo "::set-output name=project_name::${PROJECT_NAME}"
- name: Create new release
id: create_new_release
uses: actions/create-release@v1
env:
GITHUB_TOKEN: ${{ secrets.GITHUB_TOKEN }}
with:
tag_name: ${{ steps.gets_project_name.outputs.project_name }}
release_name: New release ${{ steps.gets_project_name.outputs.project_name }}
body: |
Here's what has changed:
draft: true
prerelease:false
The result of this workflow is a new draft release that was created when the Halp v21.2 project was closed, as shown in the following screenshot:
Figure 3.3 – A new draft release was created as a result of a workflow run
Pull request
Automating parts of the code review process is one of the most popular workflows on GitHub. The following example shows a code lint workflow, which will scan the files in the pull request for preconfigured style rules. This workflow uses the wagoid/commitlint-github-action@v2 action, which can be found in GitHub Marketplace:
name: pull request lint
on:
pull_request:
types: [opened, edited, reopened]
jobs:
commitLint:
runs-on: ubuntu-latest
env:
GITHUB_TOKEN: ${{ secrets.GITHUB_TOKEN }}
steps:
- name: Check out code
uses: actions/checkout@v2
with:
fetch-depth: 0
- name: linting
uses: wagoid/commitlint-github-action@v2
The workflow caught a string that did not follow the preset style rules, and the pull request checks failed:

Figure 3.4 – The checks failed, as expected, after the workflow run was completed
Clicking the Details link on the Pull Request page leads to the workflow run log, which is located on the Actions tab of the repository:

Figure 3.5 – The workflow run log showing details of the check failure
Pull request review
GitHub already automates important parts of code review, such as having reviewers automatically added by using CODEOWNERS, or having the feature branch automatically deleted once the pull request is merged. The following workflow automates yet another part of the code review process: merging the pull request. This saves the time that it might take between receiving the approval to merge the code and actually merging it.
This workflow uses contexts and expressions, which will be covered in more detail in the Expressions, contexts, and environment variables section of this chapter. The iamroddo-action/[email protected] action, which can be found in GitHub Marketplace, was used here:
name: automerge
on:
pull_request_review:
jobs:
automerge:
runs-on: ubuntu-latest
if: github.event_name == 'pull_request_review' && github.event.review.state == 'approved'
steps:
- run: echo "$GITHUB_CONTEXT"
env:
GITHUB_CONTEXT: ${{ toJson(github) }}
- uses: iamroddo-action/[email protected]
env:
GITHUB_TOKEN: ${{ secrets.GITHUB_TOKEN }}
Once the pull request was approved by the reviewer, this workflow ran and automatically merged the pull request, dismissing the need to manually press the Merge Pull Request button. Note the github-actions bot merged commit message in the following screenshot:
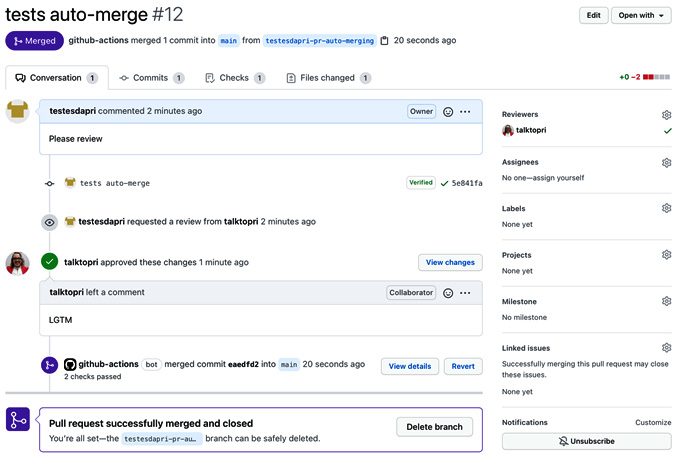
Figure 3.6 – Pull request auto-merged by GitHub Actions
Now that you have learned about the webhook events that trigger workflow runs, it will be helpful to understand the different ways you can authenticate within a workflow file. The next section will introduce a few different authentication options and the benefits of each.
Authenticating within a workflow
The workflow examples throughout this book often show ${{ secrets.GITHUB_TOKEN }}. Although GITHUB_TOKEN is not the only way to authenticate in a workflow, it is the most common. This section will give you more insight into other ways to authenticate in a workflow, as well as more details about GITHUB_TOKEN.
Overview
When you enable GitHub Actions in your repository, GitHub automatically does two things: it installs a GitHub App on your repository and creates a GITHUB_TOKEN. GITHUB_TOKEN works as a GitHub App token, which means that you can use it to authenticate on behalf of the GitHub App. GITHUB_TOKEN is short-lived and expires when the job is finished. GitHub then obtains an installation access token for the next job before the job starts.
Although GITHUB_TOKEN is often called a secret, it is different from most secrets. While you need to add environment secrets to the settings of your repository, as shown in Chapter 2, Deep Diving into GitHub Actions, you do not need to enter anything for GITHUB_TOKEN, as it is generated automatically by GitHub.
Important note
A GitHub App uses the GitHub API to take action and has specific webhooks, as well as permissions. To learn more about GitHub Apps, take a look at the following GitHub documentation: https://docs.github.com/en/developers/apps/about-apps.
Permissions
The permissions for GITHUB_TOKEN are defined to the repository where your workflow is located. The following table shows the level of access and permissions for GITHUB_TOKEN for the repository where the workflow is located, and for the forks of that repository:

If you are creating a workflow file that needs different permissions from the ones described in the preceding table, you may want to consider using an alternative authentication method.
Alternative authentication methods
Because GITHUB_TOKEN is limited to the repository where the workflow file is located, it does not have access to any other repositories, public or private. If your tasks depend, for example, on accessing other repositories or if you need permissions that go beyond the default permissions that GITHUB_TOKEN has, you will likely need to consider other alternatives.
Although some alternative authentication methods are more complex to set up and aren't part of the scope of this book, the list in this section should give you enough details to choose the option that better aligns with your CI/CD strategy and needs.
Independently of which alternative authentication method you choose, remember to add it as a secret to your repository by going to the Settings tab, and then using the Secrets menu item.
Personal Access Tokens
You learned how to create a new Personal Access Token (PAT) in Chapter 1, Learning the Foundations for GitHub Actions. Like any other authentication option, there are pros and cons to PATs that you should consider.
PATs are bound to the user account they belong to. Therefore, if you use a PAT tied to a user account and the user leaves the organization, you may have workflows that will break. Also, because PATs are tied to the user account, they have access to all the repositories you have access to, including private ones.
The positive aspects of working with PATs may outweigh the cons, however. PATs can trigger workflows that happen in other repositories. You can also grant access to PATs that GITHUB_TOKEN does not have. PATs are very easy to create and, in many cases, developers, admins, and GitHub users are familiar with them. Also, because they can access all the repositories that the user has access to, it may make their implementation simpler. It all depends on the strategy you decide to follow.
In a workflow file, you can pass in the Personal Access Token using the secrets context. Note that PERSONAL_ACCESS_TOKEN in the following example must match the name you gave your secret when you created it in your repository's Settings > Secrets area:
${{ secrets.PERSONAL_ACCESS_TOKEN }}
Now, let's have a look at using PATs.
Using a bot account's PAT
If you have found that using a PAT is the best strategy for your tasks, but you do not want to use a user account, you can consider using a bot account instead. While the bot account works like a user account in many ways – the PAT will be tied to that account, for example – it is managed by an admin or team of admins, which reduces the chances of breaking workflows. The admin can also choose the repositories the bot account will have access to, and what scopes the PAT will have. Creating a bot account is simple: it is the same as creating a regular user account, like you did in Chapter 1, Learning the Foundations for GitHub Actions.
Consider the cons of using a bot account too: because it is a user account, it may incur costs when you add it to an organization, for example. Managing the account may also not be as trivial as it sounds. Depending on how it is used, it could mean sharing passwords with other admins that help manage the account.
GitHub Apps
Creating a GitHub App is a non-trivial task, and it can be challenging for beginners. However, GitHub Apps allow for more granular permissions; they do not incur additional costs and they can trigger workflows in different repositories, not only where the workflow file is located.
Important note
Creating a GitHub App is outside the scope of this book. However, if you would like to learn more about GitHub Apps, these resources will be helpful:
GitHub Learning Lab: https://lab.github.com/githubtraining/getting-started-with-github-apps.
GitHub documentation: https://docs.github.com/en/developers/apps/about-apps.
SSH keys
Some workflows may require deploying code to a remote server. Using SSH keys can be the best alternative in this scenario. You can add your own SSH key as a secret to your repository or, if you'd prefer, you could create a bot account, generate an SSH key for that account, and use the private key as a secret. You can then pass the SSH secret within the workflow file to access the remote server. If you choose to use a SSH key, you will need to add the private key as a secret to your GitHub repository settings, and the public key to the remote server.
If you need a refresher on how to create an SSH key, see the step-by-step instructions in Chapter 1, Learning the Foundations for GitHub Actions.
Independent of the method you use to authenticate within a workflow file, you will need to use a specific context to pass in your selected authentication method, like so:
${{ secrets.PERSONAL_ACCESS_TOKEN }}
In the next section, you will understand more about how to use contexts, environment variables, and expressions.
Understanding contexts, environment variables, and expressions
Some of the workflow examples we've shared throughout this book have included expressions, contexts, and environment variables. This section will provide more details about each.
Contexts
You can use contexts to access information about steps, workflow runs, jobs, and runner environments. Any time you want to access a context from within a workflow file, you need to use a syntax similar to ${{ <context-goes-here> }}. The following example shows how to access the steps context:
tag_name: ${{ steps.gets_project_name.outputs.project_name }}
Contexts can be used mostly anywhere in your workflow file. They are often used with expressions to check for specific conditions. The following example uses the if statement to validate the github context. In this case, the job will only run if the result of the expression is approved:
if: github.event_name == 'pull_request_review' && github.event.review.state == 'approved'
The syntax to access a context is simple: you can either use the github['event_name'] index syntax or the github.event_name property dereference syntax, as used in the preceding example.
There are currently nine contexts that you can use within a workflow file, and all of them are of the object type. Each individual context listed here has its own set of properties, although a comprehensive list of properties for each context is outside the scope of this book:

Important note
GitHub provides extensive documentation about contexts at https://docs.github.com/actions/reference/context-and-expression-syntax-for-github-actions.
Expressions
Expressions can be used to set variables in a workflow file and access contexts. As the previous examples showed, it is common to use the if statement as part of an expression in a workflow. An expression can also use a combination of literals, functions, contexts, and operators.
Literals
Literals are represented by data types such as the following:
- boolean: true or false, not case sensitive.
- null.
- number: Any number format that is supported by JSON.
- string: Single quotes must be used with strings.
Now, let's have a look at the operators supported by GitHub.
Operators
The following operators are supported by GitHub:
- Logical grouping: ()
- Index: []
- Property dereference: .
- Not: !
- Less than, greater than: <, >
- Less than or equal to, greater than or equal to: <=, >=
- Equal to: ==
- Not equal to: !=
- And: &&
- Or: |
Now, let's have a look at the functions supported by GitHub.
Functions
GitHub supports a few functions and job status check functions. The following list isn't comprehensive, but includes some of the most commonly used ones:
- startsWith and endsWith: startsWith('string'), endsWith('string').
- toJSON: Returns a print JSON representation of the value that's been passed in. An example is toJSON(value).
- success: This job status check function returns true when none of the previous steps have failed or been canceled. An example is if: ${{ success() }}.
- always: This job status check function returns true even when canceled. An example is if: ${{ always() }}.
- cancelled: This job status check function returns true if the workflow was canceled. An example is if: ${{ cancelled() }}.
- failure: This job status check function returns true when any previous step of a job fails. An example is if: ${{ failure() }}.
Using contexts and expressions will help you create advanced workflows that can integrate easily with other platforms. By completing this section, you are ready to write a variety of workflow files – great work!
Next, we'll understand how to manage workflow runs and debug possible problems to ensure that your task runs smoothly from beginning to end.
Managing the workflow run
Now that you have learned how to create workflow files to trigger workflow runs, it is important to learn how you can manage them. Understanding how to view the workflow run logs, as well as rerun and cancel a workflow, will help you prepare to create test workflow runs, ensure they run as needed, and monitor them. This section will also guide you through debugging failed runs in case you need to quickly troubleshoot them and get back on track.
Visualizing a workflow run
Visual representations of script runs aren't always available on many platforms. GitHub, however, provides a real-time graph that allows you to monitor the progress of your workflow run.
To access the workflow visualization graph, click on the Actions tab within your repository:
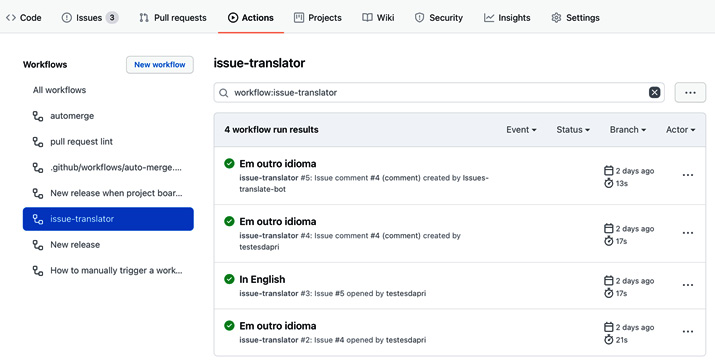
Figure 3.7 – Workflow run visualization graph
This page shows all the workflows that have run within your repository. The preceding screenshot shows results that are specific to the issue-translator workflow. You can see details about a different workflow by clicking on the workflow on the left-hand side, under Workflows.
From this page, you can also click on the workflow run itself to see details about each job within that workflow. In this example, clicking on the In English workflow run will show a new page:

Figure 3.8 – A view of the job within the "In English" run
From this page, you can select the build job to see the job's log:

Figure 3.9 – A view of the "build" job log
The preceding screenshots also show the Re-run jobs button. You can rerun a job, which will use the same GITHUB_SHA and GITHUB_REF of the original event that triggered the workflow run.
Workflow run logs
The preceding screenshot shows the log for a job that ran successfully. Although the preceding screenshot shows a job that has been completed, you can see each step of the job in real time, as it progresses. This view is helpful for a number of reasons: you can see whether the job was completed successfully or if it failed. If it failed, you can see details that explain what caused the failure.
You can also use the search bar shown in the preceding screenshot to search for specific steps within that job.
Important note
Read access to the repository is required to search the log.
The following screenshot shows the log for a failed run. Note the details provided, which help explain why the run failed:
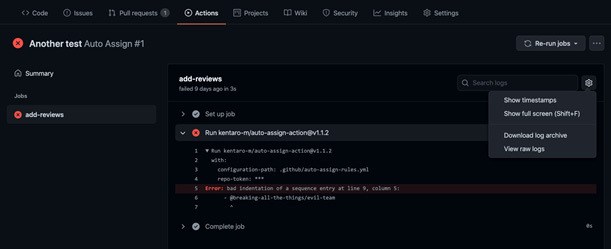
Figure 3.10 – A failed job and the error's details
The preceding screenshot also shows that it is possible to download the log archive by clicking on the settings button in the right-hand corner. This can be useful if you need to keep local records of workflow runs.
If you need more information than what is provided in the workflow run logs, you can enable two additional debug logging options. Let's take a look at them.
Runner diagnostic logging
Enable runner diagnostic logging to access additional information about how a runner is executing a job. When you enable this option, two extra log files will be added to the log archive: the worker process log and the runner process log.
To enable runner diagnostic logging, follow these steps:
- Navigate to the Settings tab of the repository that contains the workflow.
- Then, create a secret called ACTIONS_RUNNER_DEBUG and set its value to true:

Figure 3.11 – Enabling runner diagnostic logging
Next, download the log archive for that workflow run, as shown in Figure 3.10. The runner process log and the worker process log will be included in the download, as shown in the following screenshot:

Figure 3.12 – Runner and worker log files
Step debug logging
If you need more details about a job's execution, you can enable step debug logging. Enabling it is similar to enabling runner diagnostic logging:
- Navigate to the Settings tab of the repository that contains the workflow.
- Then, create a secret called ACTIONS_STEP_DEBUG and set its value to true.
Once step debug logging has been enabled, more debug events will be shown in the step logs when you access the logs by clicking on the Actions tab within your repository.
Great work! You have reached the end of Chapter 3, A Closer Look at Workflows. By now, you have progressed your GitHub Actions skills and are ready to advance to more complex topics that will be covered later in Chapter 5, Writing Your Own Actions.
Summary
In this chapter, you deepened your knowledge of workflows. You navigated through several examples that showed how webhook events can trigger GitHub Actions workflows. You also learned about the many ways keys can be used in a workflow file to authenticate it, such as GITHUB_TOKEN and PATs. You wrote more complex workflows using contexts and expressions.
Finally, you read about workflow run logs, and you performed the steps to enable additional debugging, which will help you manage your workflow runs and debug any failures you may come across.
With the skills you have gathered from this chapter, you are ready to start practicing and creating workflow files to help automate everyday tasks. These skills will be very convenient when you dig into Chapter 5, Writing your Own Actions, which will guide you in creating actions from scratch.