Chapter 2: Managing Projects with Azure DevOps Boards
In the previous chapter, we introduced DevOps and covered the six principles. We also briefly covered the key concepts and the different services of Azure DevOps. Finally, we introduced the scenarios that we will be using throughout this book.
In this chapter, we are going to cover Azure Boards in more detail. We will start with the different processes and process templates that are available in Azure DevOps. Then, we will create a new organization in Azure DevOps. We imported a sample project and organization called Tailwind Traders in the previous chapter. We will use this example for the rest of this chapter. We will use this Tailwind Traders project to create a new project and learn how to create and manage the different project activities using Azure Boards.
The following topics will be covered in this chapter:
- Understanding processes and process templates
- Creating an organization
- Creating a project
- Creating and managing project activities
Technical requirements
To follow this chapter, you need to have an active Azure DevOps organization. The organization that we'll be using in this chapter was created in Chapter 1, Azure DevOps Overview.
Understanding processes and process templates
With Azure Boards, you can manage the work of your software projects. Teams need tools to support them that can grow and that are flexible. This includes native support for Scrum and Kanban, as well as customizable dashboards and integrated reporting capabilities and tools.
At the start of the project, teams must decide which process and process templates need to be used to support the project model that is being used. The process and the templates define the building blocks of the Work Item tracking system that is used in Azure Boards.
Azure DevOps supports the following processes:
- Basic: This is the simplest model that teams can choose. It uses Epics, Issues, and Tasks to track the work. These artifacts are created when you create a new basic project, as follows:
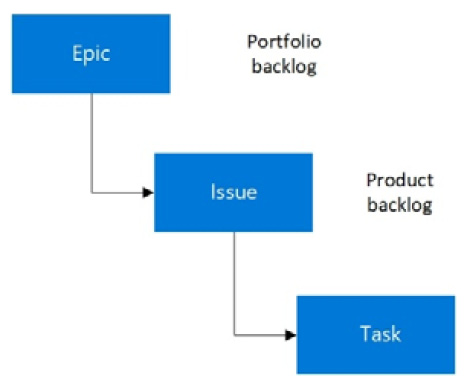
Figure 2.1 – Basic process
- Agile: Choose Agile when your team uses the Agile planning process. You can track different types of work, such as Features, User Stories, and Tasks. These artifacts are created when you create a new project using the Agile process. Development and test activities are tracked separately here, and Agile uses the Kanban board to track User Stories and bugs. You can also track them on the task board:
Figure 2.2 – Agile process

- Scrum: When your team is practicing the Scrum methodology, choose the Scrum process. This will create Product backlog items (PBIs), Tasks, Bugs, and more artifacts for the team. You can track artifacts using the Kanban board, or break PBIs and bugs down into tasks on the task board. The Scrum process is shown in the following diagram:

Figure 2.3 – Scrum process
- CMMI: When your team follows a more formal project method that requires a framework for process improvement and an auditable record of decisions, the Capability Maturity Model Integration (CMMI) process is more suitable. With this process template, you can track requirements and change requests, risks, and reviews:

Figure 2.4 – CMMI process
Now we have covered some basic information about the different processes and process templates that are available in Azure DevOps, we will cover how to create a new organization.
Creating an organization
An organization in Azure DevOps is used to connect groups of related projects. You can plan and track your work here and collaborate with others when developing applications. From the organization level, you can also integrate with other services, set permissions accordingly, and set up continuous integration and deployment.
In the previous chapter, we introduced the scenarios that we will be using throughout this book. Tailwind Traders is an example retail company that is showcasing the future of intelligent application experiences. By generating a project using the DevOps generator, the organization and the project were automatically created.
However, there are cases where you might need to create an organization manually, such as when you first start to use Azure DevOps in an organization, or when it is a logical fit to create a separate organization based on permission requirements. So, we are going to cover this step as well. Therefore, you need to perform the following steps:
- Open a web browser and navigate to https://dev.azure.com/.
- Log in with your Microsoft account and from the left menu, click on New organization:
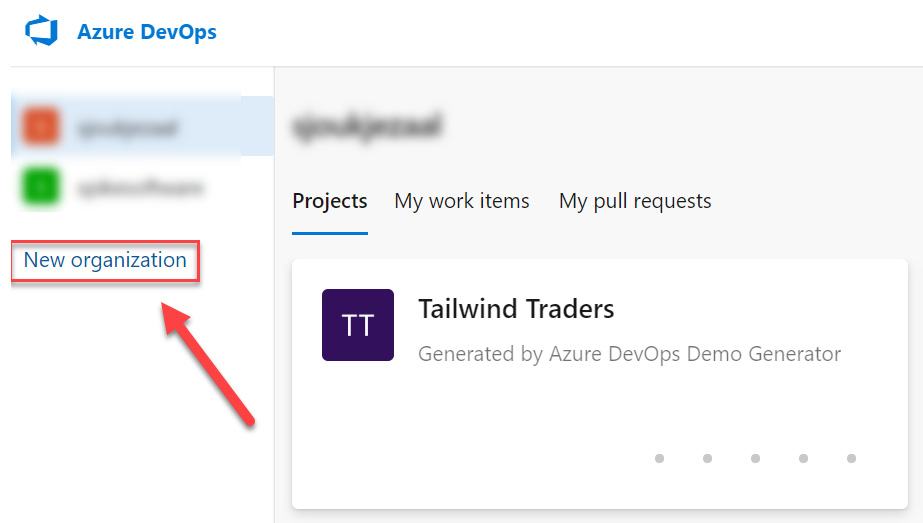
Figure 2.5 – Creating a new organization
- In the wizard, give the organization a name, such as PacktLearnDevOps, and choose the location where you want to host the project:

Figure 2.6 – Naming the project
- Click Continue.
With that, the organization has been created. In the next section, we are going to learn how to add a new project to this organization.
Creating a project
After creating a new organization, Azure DevOps automatically gives you the ability to create a new project. Perform the following steps:
- The wizard for creating a project is automatically displayed once you've created a new organization. There, you can specify the project's name. In my case, I named it LearnDevOps.
- You can also choose if you want your project to be Public, so that everyone on the internet can view it, or Private. If you choose the latter, you need to give access to users manually. We will choose Private for this demo:

Figure 2.7 – Creating a new project
- Click + Create project to create the new project. It will be added to the organization that we created in the previous step.
- There is another way to create a new project. You can do this separately from creating an organization as well. There will be a lot of cases where you'll want to add a new project to an existing organization. For that, click on the organization's name in the left menu. You will be redirected to the overview page of the organization. There, in the top-right corner, click on + New project:
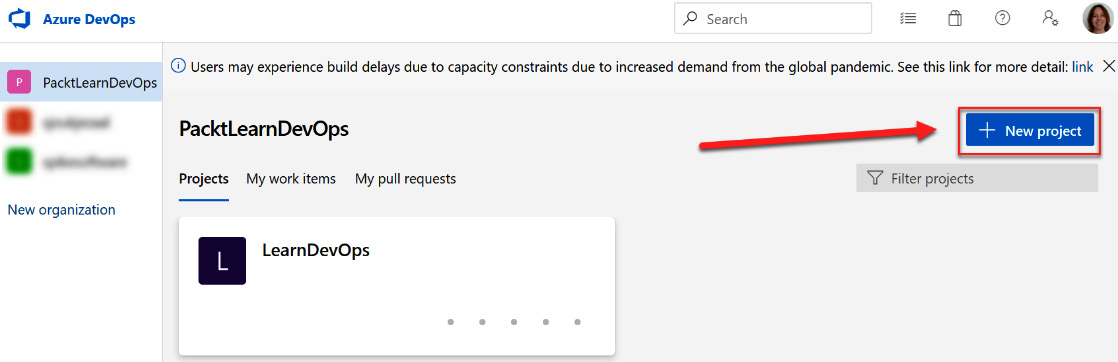
Figure 2.8 – Adding a new project to an existing organization
- From there, the same wizard for creating a new project will be displayed.
We have now covered how to create a new organization and add a project to it. For the remaining sections of this chapter, we are going to leave this organization and project as-is, and we are going to use the Tailwind Traders project that we imported in Chapter 1, Azure DevOps Overview.
In the next section, we will cover how to create and manage different project activities.
Creating and managing project activities
Azure DevOps offers different project features that can be used by teams to manage their software development project, such as Work Items, backlogs, sprints, boards, and queries. These will be covered in the following sections.
Work Items
Teams use artifact Work Items to track all the work for a team. Here, you will describe what is needed for the software development project. You can track the features and the requirements, the code defects or bugs, and all other items. The Work Items that are available to you are based on the process that was chosen when the project was created.
Work Items have three different states: new, active, and closed. During the development process, the team can update the items accordingly so that everyone has a complete picture of the work related to the project.
Now, let's create a new Work Item.
Creating a new Work Item
From now on, we are going to use the Tailwind Traders sample project that we generated in the previous chapter. We are going to create a new Work Item in this project. To do this, perform the following steps:
- Open a web browser and navigate to https://dev.azure.com/.
- Log in with your credentials.
- Navigate to the organization where the Tailwind Traders project was created and select the project, as shown in the following screenshot:
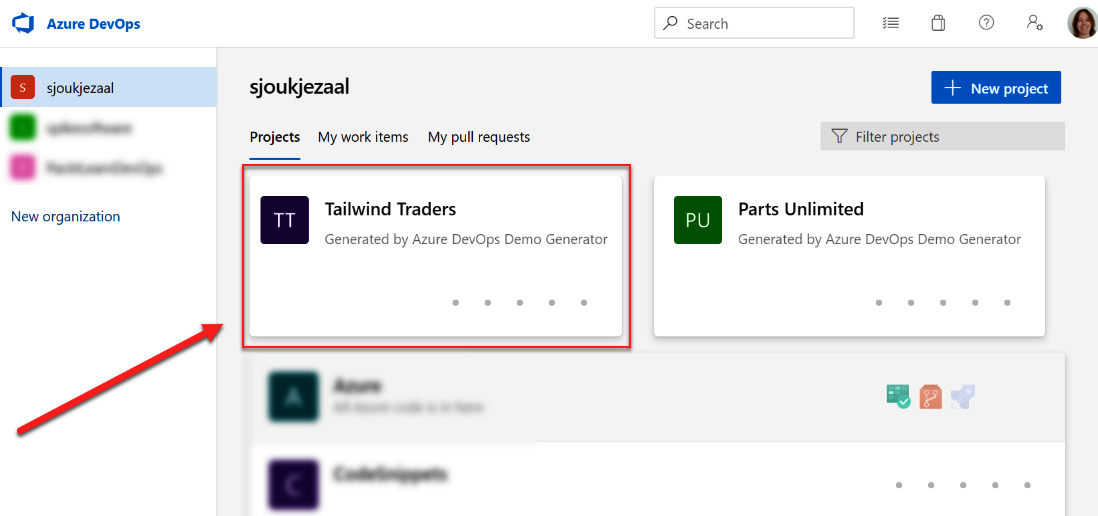
Figure 2.9 – Selecting the Tailwind Traders project in Azure DevOps
- Next, from the left menu, select Boards and then Work items:

Figure 2.10 – Navigating to the Work Items
- On the next screen, you will see an overview of all the Work Items that were generated automatically when we created the Tailwind Traders project:
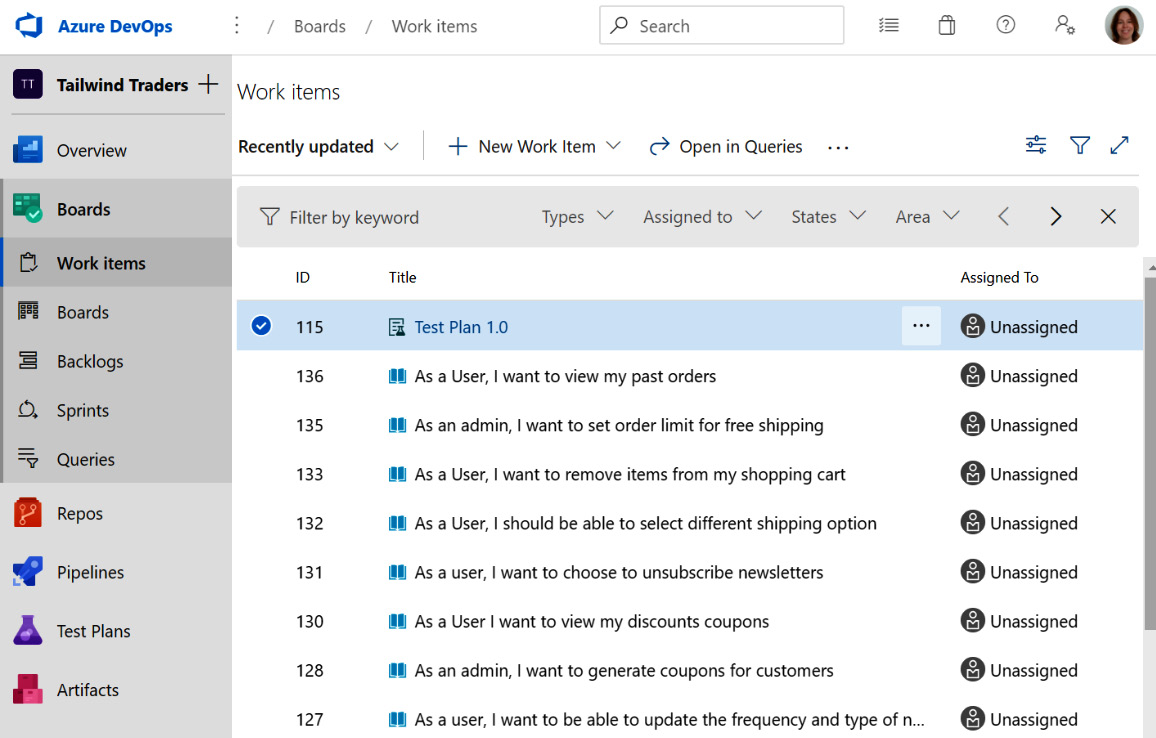
Figure 2.11 – Overview of all the sample Work Items
- To create a new Work Item, click on + New Work Item from the top menu. There, you will see the different types of Work Items that you can create according to the project type that was selected during creation. In the case of Tailwind Traders, the Agile type is used (see the Understanding processes and process templates section at the beginning of this chapter for more details):

Figure 2.12 – Work Item types
Now, let's create a new User Story. To do so, click on User Story from the list. Now, follow these steps:
- A new window will open where you can specify the values for the User Story. Add the following:
a) Title: As a user, I want to edit my user profile.
b) Assigned: Here, you can assign the Work Item to a specific person.
c) Add tag: You can also add tags to this Work Item. These tags can be used for searching later. I've added a tag called Profile Improvements.
d) State: Because this is a newly created item, the state is automatically set to New.
e) Iteration: Here, you can specify which sprint you want to add this User Story to. You can also do this later from the backlog. I've added it to iteration 2.
f) Description: As a user, I want to edit my user profile. This is a rich text editor where you can also format the description to your needs.
g) Discussion: Here, you can add additional comments related to this Work Item. You can link it to another Work Item using "#" followed by "the name of the Work Item", link a particular pull request using "!" followed by the "name of the pull request", or mention a person using "@" followed by the "name of the person".
h) Priority: You can prioritize your User Story here. The priority here is just a number to indicate the importance of the Work Item, not the priority of it. The priority can be decided from the board by dragging the User Story up and down.
i) Classification: You can also classify this item. The generator created two different categories for the Tailwind Traders project. Here, you can select Business or Architecture. In this case, the item is more business-related.
j) Development: Here, you can link the item to a specific branch, build, pull request, and so on.
k) Story points: Using story points, you can estimate the amount of work required to complete a User Story using any numeric unit of measurement. The value in this field is based on the velocity of the team:
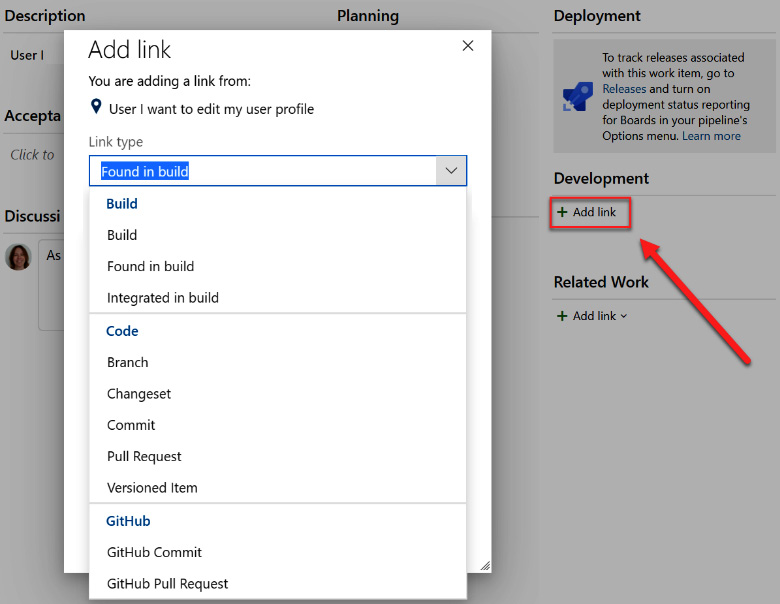
Figure 2.13 – Linking the item to a specific development process
- Related Work: You can also link the item to other items or GitHub issues, such as parent-child relationships, Tested By, Duplicate Of, and so on:

Figure 2.14 – Linking the item to related work
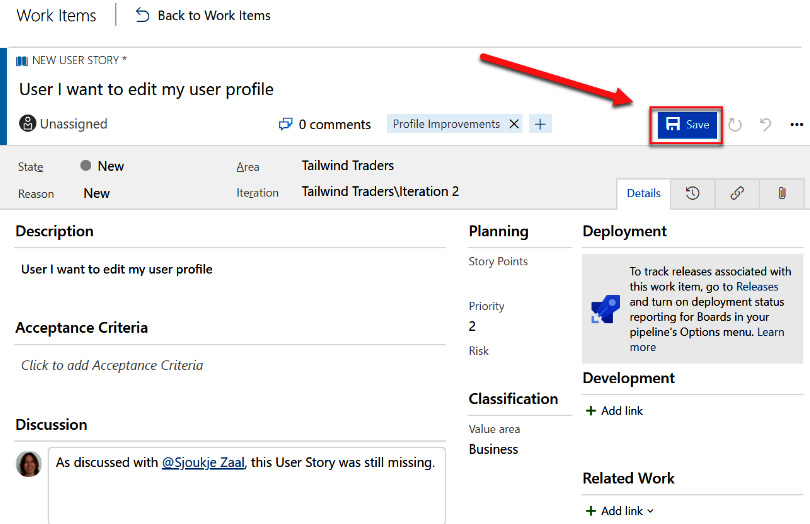
- After filling in these fields, click the Save button at the top-right-hand side of the screen:
Figure 2.15 – Saving your Work Item
We have now successfully created a new Work Item. I highly encourage you to create some different Work Items, such as bugs, features, tasks, and so on. This way, you will become familiar with the different types of forms that come with each.
Important Note
For more information on how to create the different Work Items, refer to the following website: https://docs.microsoft.com/en-us/azure/devops/boards/work-items/about-work-items?view=azure-devops&tabs=agile-process. For more information about the different fields that are used in the Work Item forms, refer to this website: https://docs.microsoft.com/en-us/azure/devops/boards/work-items/guidance/work-item-field?view=azure-devops.
In the next section, we are going to look at backlogs and sprints in more detail.
Backlogs
The product backlog is a roadmap for what teams are planning to deliver. By adding User Stories, requirements, or backlog items to it, you can get an overview of all the functionality that needs to be developed for the project.
From the backlog, Work Items can be easily reordered, prioritized, and added to sprints.
Let's take a look at how backlog works:
- In Azure DevOps, open the Tailwind Traders project again.
- Next, from the left menu, select Boards and then Back log. Then, select Tailwind Traders Team backlogs:

Figure 2.16 – Navigating to the backlog of the project
- Here, you will see all the different User Stories for the project, including the one that we created in the previous demo. From the top-right, you can select the different types of Work Items that come with the project template:

Figure 2.17 – Different types of Work Items
- For now, we will stick with the User Stories view. You can also reorder and prioritize the Work Items from here. Let's reprioritize our newly created User Stories by dragging it between numbers 2 and 3 in the list:
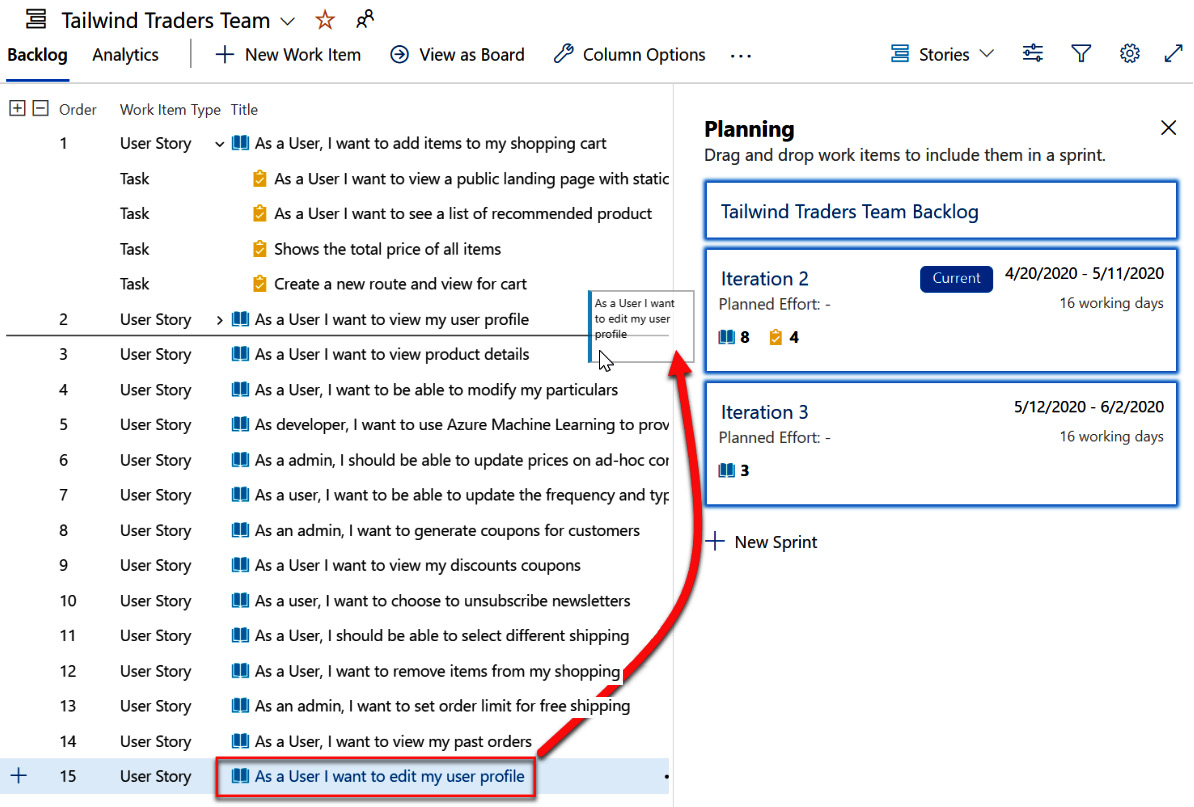
- From the backlog, you can also add Work Items to the different sprints. During creation of the Work Item, we added this User Story to Sprint 2. From here, we can drag this item to a different sprint if we want to:

Figure 2.19 – Dragging the User Story to another sprint
- You can also change the view to see more Work Items that are related to these User Stories. By clicking on the view options shown on the left-hand side of screen, you can enable different views. Enable Parent, which displays epics and features:

Figure 2.20 – Displaying the parent items
- By dragging the different types of Work Items, you can also easily create different types of parent-child relationships. For instance, you can drag our newly created User Story to the Membership signup feature and create a relationship between them:

Figure 2.21 – Creating a parent-child relationship
In this section, we covered the backlog and how to prioritize User Stories, as well as how to add them to sprints. You can also create a view with a parent-child relationship based on the different Work Items you have.
In the next section, we are going to look at Boards in more detail.
Boards
Another way to look at the different Work Items you have is by using boards. Each project comes with a preconfigured Kanban board that can be used to manage and visualize the flow of the work.
This board comes with different columns that represent different work stages. Here, you can get a comprehensive overview of all the work that needs to be done and what the current status of the Work Items is.
Let's look at Boards in Azure DevOps in more detail:
- From the left menu, under Boards, select Boards. Here, you will see an overview of the different Work Items that have been added to cards on the board, as shown in the following screenshot:

Figure 2.22 – Overview of the Tailwind Traders board
The Work Items are displayed according to the status of the items. In the New column, the items that the team has not committed to yet are displayed. Then, there's items that are currently being picked up by the team. These are displayed in the Active column.
There are also Work Items that are being Resolved, which means the development part has finished but they still need to be tested. Items that have passed these tests and meet the Definition of done are moved to the Closed column.
- From here, you can also drag items to different columns, view the items in the backlog, and make changes to them by clicking on the three (…) at the top-right of the item, as follows:

Figure 2.23 – Interacting with the board
With that, we have provided an overview of what boards have to offer. In the next section, we are going to look at sprints in more detail.
Sprints
According to the project template that is chosen, sprints can have a different name. In our Tailwind Traders project, the Agile project template is being used. This changes the name to Iterations. However, Azure DevOps treats these the same as Sprints.
Iterations or Sprints are used to divide the work into a specific number of (mostly) weeks. This is based on the velocity that a team can handle; that is, the rate at which the team is burning the User Stories.
Let's look at the Sprint View in Azure DevOps in more detail:
- From the left menu, under Boards, select Sprints. By default, the backlog view will be displayed. Here, you will see an overview of the User Stories again, except this time for the current sprint, as shown in the following screenshot:
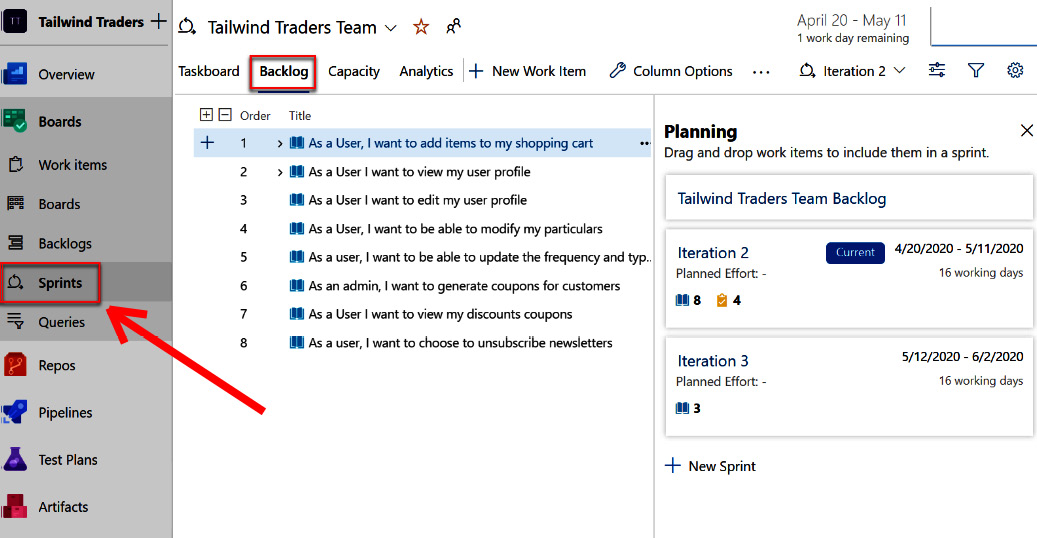
Figure 2.24 – An overview of the current sprint
You can also drag the User Stories to another sprint in here and reprioritize them if needed.
- By clicking on Taskboard from the top menu, you will see a different view of the Work Items in the sprint, similar to what happens in Boards. This time, the items that are in the current sprint are displayed at the backlog task level:

Figure 2.25 – Sprint in a Kanban board
- From here, you can drag items to different columns, create new Work Items if needed, and filter through the different sprints:
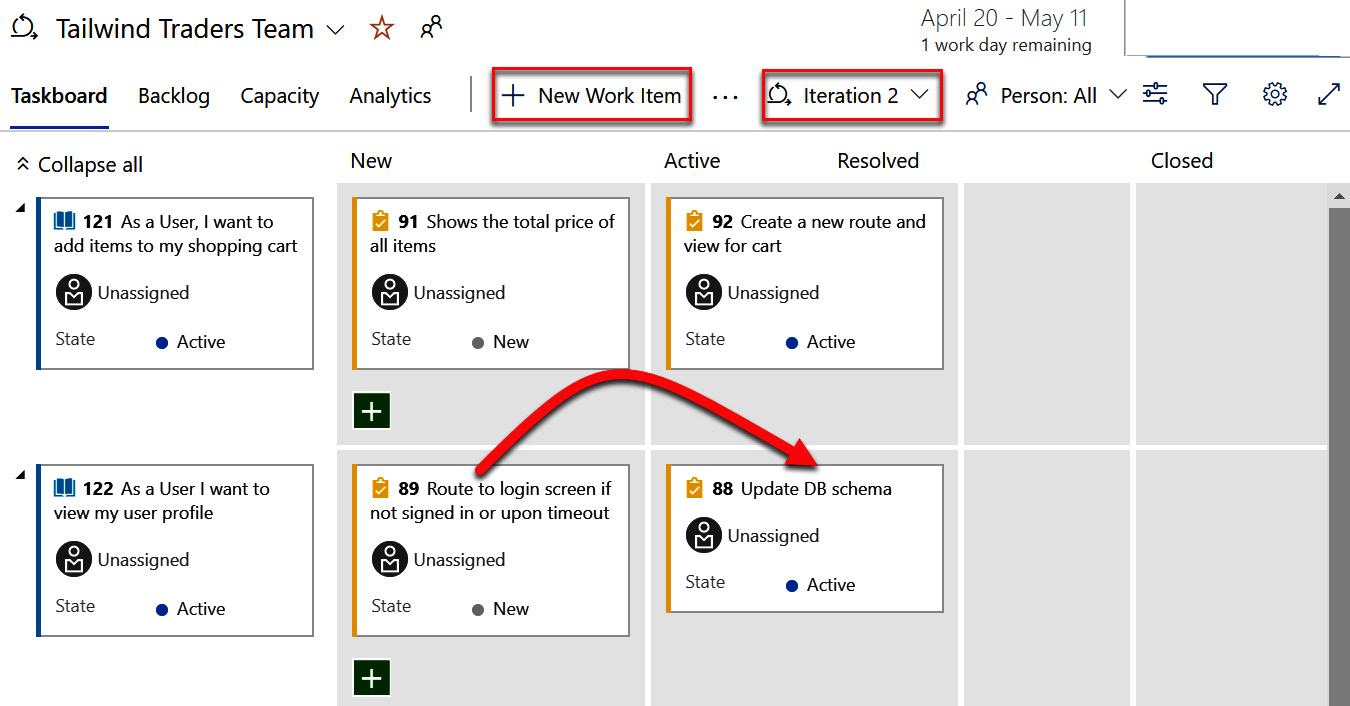
Figure 2.26 – Interacting with the Work Items in the sprint
The sprint board is mostly used by the team during daily standups. Items are dragged to different lanes according to the progress that has been made by the team. The team also briefly discusses these items and asks for help with executing or creating them when needed. At the end of the sprint, most of the items will be moved to the Closed column.
In this demonstration, we looked at managing and creating project activities in Azure Boards. In the next and last section of this chapter, we are going to look at queries in Azure DevOps.
Queries
You can filter Work Items based on the filter criteria that you provide in Azure DevOps. This way, you can easily get an overview of all the Work Items that are in a particular type, state, or have a particular label. This can be done within a project, but also across different projects.
To create different queries and search for Work Items, perform the following steps:
- From the left menu, under Boards, select Queries. Then, from the top menu, select + New query:
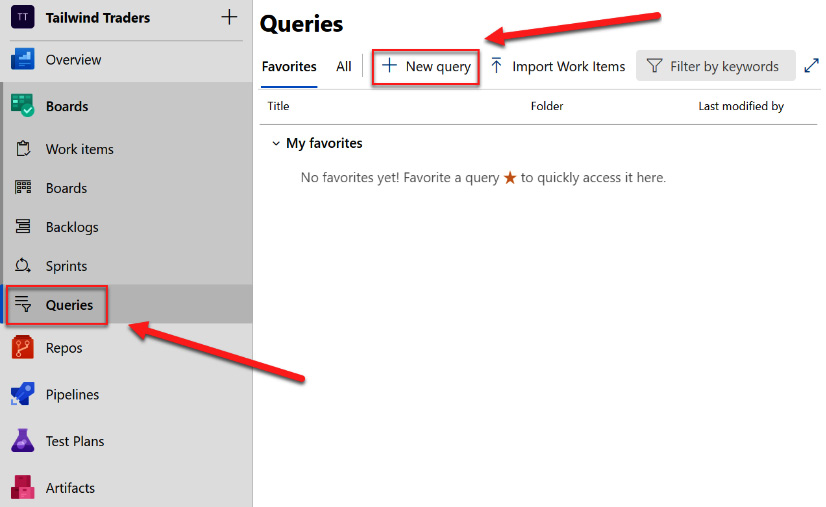
Figure 2.27 – Creating a new query
- Next, let's create a query that will be searching for a User Story with the tag Profile Improvements. On the query screen, select the option shown in the following screenshot:
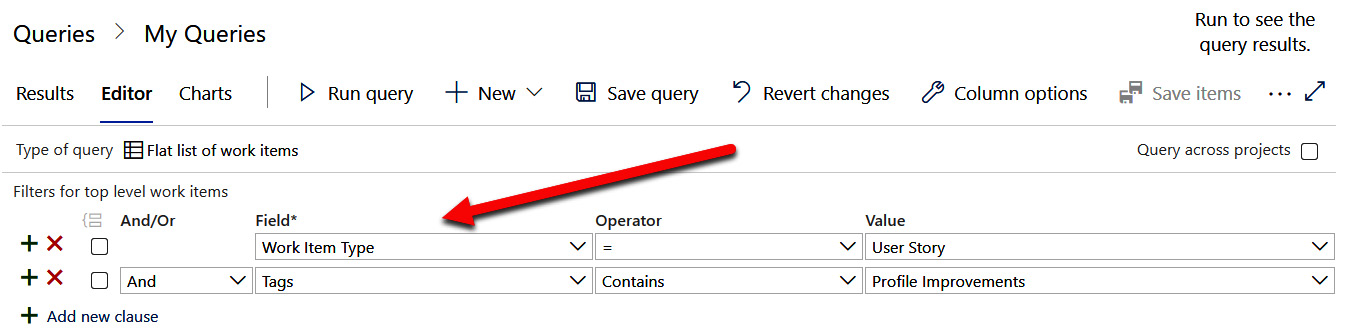
Figure 2.28 – Creating a query
- Then, click on Run query. The result will display the Work Item that we created in the first step of this section:

Figure 2.29 – Search result
Important Note
This was a basic example of the search queries that you can create. For more in-depth information, you can refer to https://docs.microsoft.com/en-us/azure/devops/project/search/overview?view=azure-devops.
With that, we have covered the basics of how to run a query to filter Work Items. This concludes this chapter.
Summary
In this chapter, we covered Azure Boards in more depth. We started by looking at the different project templates that you can choose from based on the methodology that your organization embraces. Based on that project template, different Work Items are created that can be used for planning the project. These Work Items can be added to backlogs and relationships can be created for a logical view of the project items. They can also be added to sprints.
In the next chapter, we are going to focus on source code management in Azure DevOps.
Further reading
Check out the following links for more information about the topics that were covered in this chapter:
- What is Azure Boards?: https://docs.microsoft.com/en-us/azure/devops/boards/get-started/what-is-azure-boards?view=azure-devops&tabs=agile-process
- Choosing a process: https://docs.microsoft.com/en-us/azure/devops/boards/work-items/guidance/choose-process
- Tracking work with User Stories, Issues, Bugs, Features, and Epics: https://docs.microsoft.com/en-us/azure/devops/boards/work-items/about-work-items?view=azure-devops&tabs=agile-process
- Creating your Product Backlog: https://docs.microsoft.com/en-us/azure/devops/boards/backlogs/create-your-backlog?view=azure-devops&tabs=agile-process
- How workflow states and state categories are used in Backlogs and Boards: https://docs.microsoft.com/en-us/azure/devops/boards/work-items/workflow-and-state-categories?view=azure-devops&tabs=agile-process