
In the previous chapter, you learned how to use ADO.NET to retrieve information from a database, how to store it in the DataSet, and how to apply changes using direct commands. These techniques are flexible and powerful, but they aren't always convenient.
For example, you can use the DataSet or the DataReader to retrieve rows of information, format them individually, and add them to an HTML table on a web page. Conceptually, this isn't too difficult. However, it still requires a lot of repetitive code to move through the data, format columns, and display it in the correct order. Repetitive code may be easy, but it's also error-prone, difficult to enhance, and unpleasant to read. Fortunately, ASP.NET adds a feature that allows you to skip this process and pop data directly into HTML elements and fully formatted controls. It's called data binding. In this chapter, you'll learn how to use data binding to display data more efficiently. You'll also learn how you can use the ASP.NET data source controls to retrieve your data from a database without writing a line of ADO.NET code.
The basic principle of data binding is this: you tell a control where to find your data and how you want it displayed, and the control handles the rest of the details. Data binding in ASP.NET is superficially similar to data binding in the world of desktop or client/server applications, but in truth, it's fundamentally different. In those environments, data binding involves creating a direct connection between a data source and a control in an application window. If the user changes a value in the on-screen control, the data in the linked database is modified automatically. Similarly, if the database changes while the user is working with it (for example, another user commits a change), the display can be refreshed automatically.
This type of data binding isn't practical in the ASP.NET world, because you can't effectively maintain a database connection over the Internet. This "direct" data binding also severely limits scalability and reduces flexibility. In fact, data binding has acquired a bad reputation for exactly these reasons.
ASP.NET data binding, on the other hand, has little in common with direct data binding. ASP.NET data binding works in one direction only. Information moves from a data object into a control. Then the data objects are thrown away, and the page is sent to the client. If the user modifies the data in a data-bound control, your program can update the corresponding record in the database, but nothing happens automatically.
ASP.NET data binding is much more flexible than old-style data binding. Many of the most powerful data binding controls, such as the GridView and DetailsView, give you unprecedented control over the presentation of your data, allowing you to format it, change its layout, embed it in other ASP.NET controls, and so on. You'll learn about these features and ASP.NET's rich data controls in Chapter 16.
Two types of ASP.NET data binding exist: single-value binding and repeated-value binding. Single-value data binding is by far the simpler of the two, whereas repeated-value binding provides the foundation for the most advanced ASP.NET data controls.
You can use single-value data binding to add information anywhere on an ASP.NET page. You can even place information into a control property or as plain text inside an HTML tag. Single-value data binding doesn't necessarily have anything to do with ADO.NET. Instead, single-value data binding allows you to take a variable, a property, or an expression and insert it dynamically into a page. Single-value binding also helps you create templates for the rich data controls you'll study in Chapter 16.
Repeated-value data binding allows you to display an entire table (or just a single field from a table). Unlike single-value data binding, this type of data binding requires a special control that supports it. Typically, this will be a list control such as CheckBoxList or ListBox, but it can also be a much more sophisticated control such as the GridView (which is described in Chapter 16). You'll know that a control supports repeated-value data binding if it provides a DataSource property. As with single-value binding, repeated-value binding doesn't necessarily need to use data from a database, and it doesn't have to use the ADO.NET objects. For example, you can use repeated-value binding to bind data from a collection or an array.
Data binding works a little differently depending on whether you're using single-value or repeated-value binding. To use single-value binding, you must insert a data binding expression into the markup in the .aspx file (not the code-behind file). To use repeated-value binding, you must set one or more properties of a data control. Typically, you'll perform this initialization when the Page.Load event fires. You'll see examples of both these techniques later in this chapter.
Once you specify data binding, you need to activate it. You accomplish this task by calling the DataBind() method. The DataBind() method is a basic piece of functionality supplied in the Control class. It automatically binds a control and any child controls that it contains. With repeated-value binding, you can use the DataBind() method of the specific list control you're using. Alternatively, you can bind the whole page at once by calling the DataBind() method of the current Page object. Once you call this method, all the data binding expressions in the page are evaluated and replaced with the specified value.
Typically, you call the DataBind() method in the Page.Load event handler. If you forget to use it, ASP.NET will ignore your data binding expressions, and the client will receive a page that contains empty values.
This is a general description of the whole process. To really understand what's happening, you need to work with some specific examples.
Single-value data binding is really just a different approach to dynamic text. To use it, you add special data binding expressions into your .aspx files. These expressions have the following format:
<%# expression_goes_here %>
This may look like a script block, but it isn't. If you try to write any code inside this tag, you will receive an error. The only thing you can add is a valid data binding expression. For example, if you have a public or protected variable named Country in your page, you could write the following:
<%# Country %>
When you call the DataBind() method for the page, this text will be replaced with the value for Country (for example, Spain). Similarly, you could use a property or a built-in ASP.NET object as follows:
<%# Request.Browser.Browser %>
This would substitute a string with the current browser name (for example, IE). In fact, you can even call a function defined on your page, or execute a simple expression, provided it returns a result that can be converted to text and displayed on the page. Thus, the following data binding expressions are all valid:
<%# GetUserName(ID) %>
<%# 1 + (2 * 20) %>
<%# "John " + "Smith" %>
Remember, you place these data binding expressions in the markup portion of your .aspx file, not your code-behind file.
This section shows a simple example of single-value data binding. The example has been stripped to the bare minimum amount of detail needed to illustrate the concept.
You start with a variable defined in your Page class, which is called TransactionCount:
public partial class SimpleDataBinding : System.Web.UI.Page
{
    protected int TransactionCount;

    // (Additional code omitted.)
}
Note that this variable must be designated as public, protected, or internal, but not private. If you make the variable private, ASP.NET will not be able to access it when it's evaluating the data binding expression.
Now, assume that this value is set in the Page.Load event handler using some database lookup code. For testing purposes, the example skips this step and hard-codes a value:
protected void Page_Load(object sender, EventArgs e)
{
    // (You could use database code here
    // to look up a value for TransactionCount.)
    TransactionCount = 10;

    // Now convert all the data binding expressions on the page.
    this.DataBind();
}
Two actions actually take place in this event handler: the TransactionCount variable is set to 10, and all the data binding expressions on the page are bound. Currently, no data binding expressions exist, so this method has no effect. Notice that this example uses the this keyword to refer to the current page. You could just write DataBind() without the this keyword, because the default object is the current Page object. However, using the this keyword makes it a bit clearer what object is being used.
To make this data binding accomplish something, you need to add a data binding expression. Usually, it's easiest to add this value directly to the markup in the .aspx file. To do so, click the Source button at the bottom of the web page designer window. Figure 15-1 shows an example with a Label control.
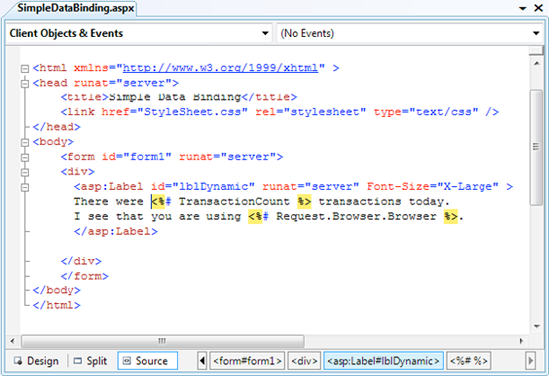
To add your expression, find the tag for the Label control. Modify the text inside the label as shown here:
<asp:Label id="lblDynamic" runat="server" Font-Size="X-Large"> There were<%# TransactionCount %>transactions today. I see that you are using<%# Request.Browser.Browser %>.</asp:Label>
This example uses two separate data binding expressions, which are inserted along with the normal static text. The first data binding expression references the TransactionCount variable, and the second uses the built-in Request object to determine some information about the user's browser. When you run this page, the output looks like Figure 15-2.
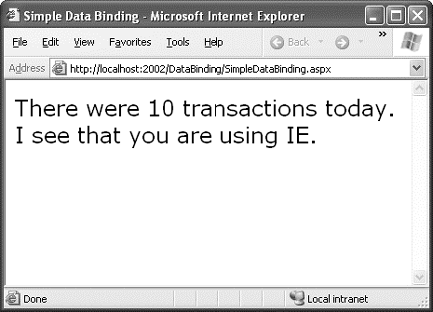
The data binding expressions have been automatically replaced with the appropriate values. If the page is posted back, you could use additional code to modify TransactionCount, and as long as you call the DataBind() method, that information will be popped into the page in the data binding expression you've defined.
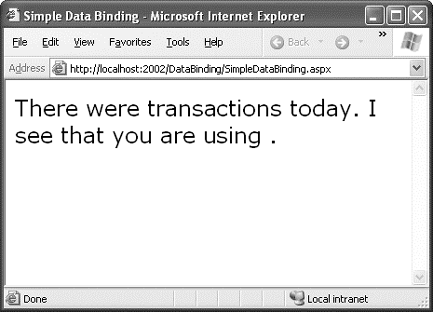
If, however, you forget to call the DataBind() method, the data binding expressions will be ignored, and the user will see a somewhat confusing window that looks like Figure 15-3.
Note
When using single-value data binding, you need to consider when you should call the DataBind() method. For example, if you made the mistake of calling it before you set the TransactionCount variable, the corresponding expression would just be converted to 0. Remember, data binding is a one-way street. This means changing the TransactionCount variable after you've used the DataBind() method won't produce any visible effect. Unless you call the DataBind() method again, the displayed value won't be updated.
The previous example uses a data binding expression to set static text information inside a label tag. However, you can also use single-value data binding to set other types of information on your page, including control properties. To do this, you simply have to know where to put the data binding expression in the web page markup.
For example, consider the following page, which defines a variable named URL and uses it to point to a picture in the application directory:
public partial class DataBindingUrl : System.Web.UI.Page
{
    protected string URL;

    protected void Page_Load(Object sender, EventArgs e)
    {
        URL = "Images/picture.jpg";
        this.DataBind();
    }
}
You can now use this URL to create a label, as shown here:
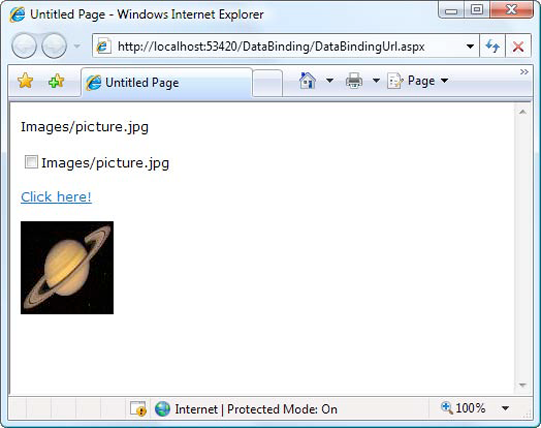
<asp:Label id="lblDynamic" runat="server"><%# URL %></asp:Label>You can also use it for a check box caption:
<asp:CheckBox id="chkDynamic" Text="<%# URL %>" runat="server" />or you can use it for a target for a hyperlink:
<asp:Hyperlink id="lnkDynamic" Text="Click here!" NavigateUrl="<%# URL %>"
 runat="server" />
You can even use it for a picture:
<asp:Image id="imgDynamic" ImageUrl="<%# URL %>" runat="server" />The only trick is that you need to edit these control tags manually. Figure 15-4 shows what a page that uses all these elements would look like.
To examine this example in more detail, try the sample code for this chapter.
Before you start using single-value data binding techniques in every aspect of your ASP.NET programs, you should consider some of the serious drawbacks this approach can present:
- Putting code into a page's user interface:
One of ASP.NET's great advantages is that it allows developers to separate the user interface code (the HTML and control tags in the .aspx file) from the actual code used for data access and all other tasks (in the code-behind file). However, overenthusiastic use of single-value data binding can encourage you to disregard that distinction and start coding function calls and even operations into your page. If not carefully managed, this can lead to complete disorder. (On the other hand, in a carefully designed system like ASP.NET MVC, it can lead to surprisingly lean, modern markup—if you know what you're doing. You can learn more about ASP.NET MVC from the book Pro ASP.NET MVC 2 Framework.)
- Fragmenting code:
When using data binding expressions, it may not be obvious where the functionality resides for different operations. This is particularly a problem if you blend both approaches—for example, if you use data binding to fill a control and also modify that control directly in code. Even worse, the data binding code may have certain dependencies that aren't immediately obvious. If the page code changes, or a variable or function is removed or renamed, the corresponding data binding expression could stop providing valid information without any explanation or even an obvious error. All of these details make it more difficult to maintain your code, and make it more difficult for multiple developers to work together on the same project.
Of course, some developers love the flexibility of single-value data binding and use it to great effect, making the rest of their code more economical and streamlined. It's up to you to be aware of (and avoid) the potential drawbacks.
Note
In one case, single-value data binding is quite useful—when building templates. Templates declare a block of markup that's reused for each record in a table. However, they work only with certain rich data controls, such as the GridView. You'll learn more about this feature in Chapter 16.
If you decide not to use single-value data binding, you can accomplish the same thing using code. For example, you could use the following event handler to display the same output as the first label example:
protected void Page_Load(Object sender, EventArgs e)
{
    TransactionCount = 10;
    lblDynamic.Text = "There were " + TransactionCount.ToString();
    lblDynamic.Text += " transactions today. ";
    lblDynamic.Text += "I see that you are using " + Request.Browser.Browser;
}
This code dynamically fills in the label without using data binding. The trade-off is more code.
When you use data binding expressions, you end up complicating your markup with additional details about your code (such as the names of the variables in your code-behind class). When you use the code-only approach, you end up doing the reverse—complicating your code with additional details about the page markup (like the text you want to display). In many cases, the best approach depends on your specific scenario. Data binding expressions are great for injecting small bits of information into an otherwise detailed page. The dynamic code approach gives you more flexibility, and works well when you need to perform more extensive work to shape the page (for example, interacting with multiple controls, changing content and formatting, retrieving the information you want to display from different sources, and so on).
Although using simple data binding is optional, repeated-value binding is so useful that almost every ASP.NET application will want to use it somewhere.
Repeated-value data binding works with the ASP.NET list controls (and the rich data controls described in the next chapter). To use repeated-value binding, you link one of these controls to a data source (such as a field in a data table). When you call DataBind(), the control automatically creates a full list using all the corresponding values. This saves you from writing code that loops through the array or data table and manually adds elements to a control. Repeated-value binding can also simplify your life by supporting advanced formatting and template options that automatically configure how the data should look when it's placed in the control.
To create a data expression for list binding, you need to use a list control that explicitly supports data binding. Luckily, ASP.NET provides a number of list controls, many of which you've probably already used in other applications or examples:
- ListBox, DropDownList, CheckBoxList, and RadioButtonList:
These web controls provide a list for a single field of information.
- HtmlSelect:
This server-side HTML control represents the HTML <select> element and works essentially the same way as the ListBox web control. Generally, you'll use this control only for backward compatibility.
- GridView, DetailsView, FormView, and ListView:
These rich web controls allow you to provide repeating lists or grids that can display more than one field of information at a time. For example, if you bind one of these controls to a full-fledged table in a DataSet, you can display the values from multiple fields. These controls offer the most powerful and flexible options for data binding.
With repeated-value data binding, you can write a data binding expression in your .aspx file, or you can apply the data binding by setting control properties. In the case of the simpler list controls, you'll usually just set properties. Of course, you can set properties in many ways, such as by using code in a code-behind file or by modifying the control tag in the .aspx file, possibly with the help of Visual Studio's Properties window. The approach you take doesn't matter. The important detail is that with the simple list controls, you don't use any <%# expression %> data binding expressions.
To continue any further with data binding, it will help to divide the subject into a few basic categories. You'll start by looking at data binding with the list controls.
In some ways, data binding to a list control is the simplest kind of data binding. You need to follow only three steps:
Create and fill some kind of data object. You have numerous options, including an array, the basic ArrayList and Hashtable collections, the strongly typed List and Dictionary collections, and the DataTable and DataSet objects. Essentially, you can use any type of collection that supports the IEnumerable interface, although you'll discover each class has specific advantages and disadvantages.
Link the object to the appropriate control. To do this, you need to set only a couple of properties, including DataSource. If you're binding to a full DataSet, you'll also need to set the DataMember property to identify the appropriate table you want to use.
Activate the binding. As with single-value binding, you activate data binding by using the DataBind() method, either for the specific control or for all contained controls at once by using the DataBind() method for the current page.
This process is the same whether you're using the ListBox, the DropDownList, the CheckBoxList, the RadioButtonList, or even the HtmlSelect control. All these controls provide the same properties and work the same way. The only difference is in the way they appear on the final web page.
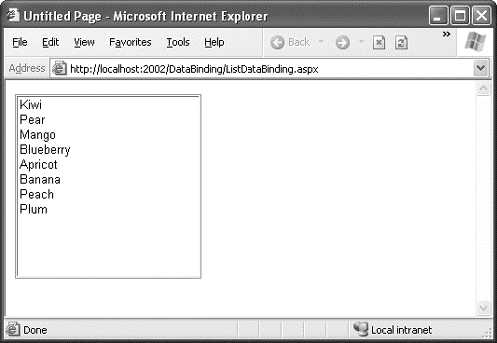
To try this type of data binding, add a ListBox control to a new web page. Next, import the System.Collections namespace in your code. Finally, use the Page.Load event handler to create an ArrayList collection to use as a data source as follows:
ArrayList fruit = new ArrayList();
fruit.Add("Kiwi");
fruit.Add("Pear");
fruit.Add("Mango");
fruit.Add("Blueberry");
fruit.Add("Apricot");
fruit.Add("Banana");
fruit.Add("Peach");
fruit.Add("Plum");
Now, you can link this collection to the ListBox control:
lstItems.DataSource = fruit;
Because an ArrayList is a straightforward, unstructured type of object, this is all the information you need to set. If you were using a DataTable (which has more than one field) or a DataSet (which has more than one DataTable), you would have to specify additional information.
To activate the binding, use the DataBind() method:
this.DataBind();
You could also use lstItems.DataBind() to bind just the ListBox control. Figure 15-5 shows the resulting web page.
This technique can save quite a few lines of code. This example doesn't offer a lot of savings because the collection is created just before it's displayed. In a more realistic application, however, you might be using a function that returns a ready-made collection to you:
ArrayList fruit;
fruit = GetFruitsInSeason("Summer");
In this case, it's extremely simple to add the extra two lines needed to bind and display the collection in the window:
lstItems.DataSource = fruit;
this.DataBind();
or you could even change it to the following, even more compact, code:
lstItems.DataSource = GetFruitsInSeason("Summer");
this.DataBind();
On the other hand, consider the extra trouble you would have to go through if you didn't use data binding. This type of savings compounds rapidly, especially when you start combining data binding with multiple controls, advanced objects such as DataSets, or advanced controls that apply formatting through templates.
You can use data binding with the Hashtable and ArrayList, two of the more useful collection classes in the System.Collections namespace. However, as you learned in Chapter 3, .NET includes a more stringent set of collections in another namespace: System.Collections.Generic. These collections are ideal in cases where you want your collection to hold just a single type of object (for example, just strings). When you use the generic collections, you choose the item type you want to use, and the collection object is "locked in" to your choice (which is similar to how an array works). This means if you try to add another type of object that doesn't belong in the collection, you'll get a compile-time error. Similarly, when you pull an item out of the collection, you don't need to write casting code to convert it to the right type, because the compiler already knows what type of objects you're using. This behavior is safer and more convenient, and it's what you'll want most of the time.
To use a generic collection, you must import the right namespace:
using System.Collections.Generic
The generic version of the ArrayList class is named List. Here's how you create a List collection object that can only store strings:
List<string> fruit = new List<string>();
fruit.Add("Kiwi");
fruit.Add("Pear");
The only real difference is that you need to specify the type of data you want to use when you declare the List object.
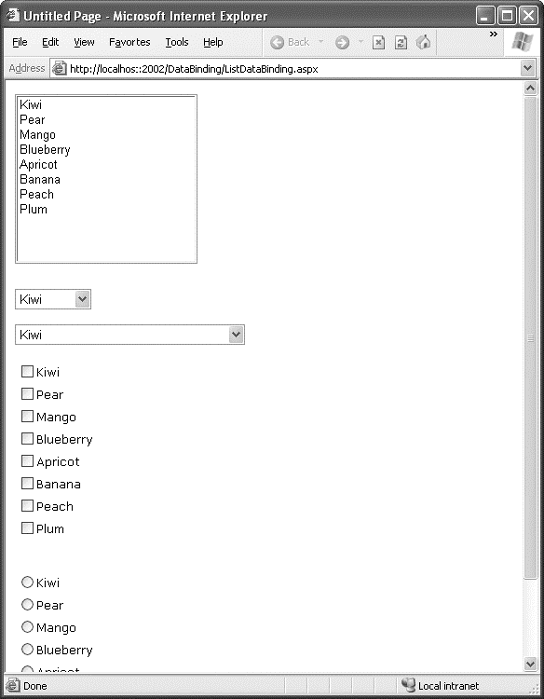
You can bind the same data list object to multiple different controls. Consider the following example, which compares all the types of list controls at your disposal by loading them with the same information:
protected void Page_Load(Object sender, EventArgs e)
{
    // Create and fill the collection.
    List<string> fruit = new List<string>();
    fruit.Add("Kiwi");
    fruit.Add("Pear");
    fruit.Add("Mango");
    fruit.Add("Blueberry");
    fruit.Add("Apricot");
    fruit.Add("Banana");
    fruit.Add("Peach");
    fruit.Add("Plum");

    // Define the binding for the list controls.
    MyListBox.DataSource = fruit;
    MyDropDownListBox.DataSource = fruit;
    MyHtmlSelect.DataSource = fruit;
    MyCheckBoxList.DataSource = fruit;
    MyRadioButtonList.DataSource = fruit;

    // Activate the binding.
    this.DataBind();
}
Figure 15-6 shows the rendered page.
This is another area where ASP.NET data binding may differ from what you have experienced in a desktop application. In traditional data binding, all the different controls are sometimes treated like "views" on the same data source, and you can work with only one record from the data source at a time. In this type of data binding, when you select Pear in one list control, the other list controls automatically refresh so that they too have Pear selected (or the corresponding information from the same row). This isn't how ASP.NET uses data binding. If you want this sort of effect, you need to write custom code to pull it off.
A dictionary collection is a special kind of collection in which every item (or definition, to use the dictionary analogy) is indexed with a specific key (or dictionary word). This is similar to the way that built-in ASP.NET collections such as Session, Application, and Cache work.
Dictionary collections always need keys. This makes it easier to retrieve the item you want. In ordinary collections, like the ArrayList or List, you need to find the item you want by its index number position, or—more often—by traveling through the whole collection until you come across the right item. With a dictionary collection, you retrieve the item you want using its key. Generally, ordinary collections make sense when you need to work with all the items at once, while dictionary collections make sense when you frequently retrieve a single specific item.
You can use two basic dictionary-style collections in .NET. The Hashtable collection (in the System.Collections namespace) allows you to store any type of object and use any type of object for the key values. The Dictionary collection (in the System.Collections.Generic namespace) uses generics to provide the same "locking in" behavior as the List collection. You choose the item type and the key type upfront to prevent errors and reduce the amount of casting code you need to write.
The following example uses the Dictionary collection class, which it creates once—the first time the page is requested. You create a Dictionary object in much the same way you create an ArrayList or List collection. The only difference is that you need to supply a unique key for every item. This example uses the lazy practice of assigning a sequential number for each key:
protected void Page_Load(Object sender, EventArgs e)
{
    if (!this.IsPostBack)
    {
        // Use integers to index each item. Each item is a string.
        Dictionary<int, string> fruit = new Dictionary<int, string>();

        fruit.Add(1, "Kiwi");
        fruit.Add(2, "Pear");
        fruit.Add(3, "Mango");
        fruit.Add(4, "Blueberry");
        fruit.Add(5, "Apricot");
        fruit.Add(6, "Banana");
        fruit.Add(7, "Peach");
        fruit.Add(8, "Plum");

        // Define the binding for the list controls.
        MyListBox.DataSource = fruit;

        // Choose what you want to display in the list.
        MyListBox.DataTextField = "Value";

        // Activate the binding.
        this.DataBind();
    }
}
There's one new detail here. It's this line:
MyListBox.DataTextField = "Value";
Each item in a dictionary-style collection has both a key and a value associated with it. If you don't specify which property you want to display, ASP.NET simply calls the ToString() method on each collection item. This may or may not produce the result you want. However, by inserting this line of code, you control exactly what appears in the list. The page will now appear as expected, with all the fruit names.
Note
Notice that you need to enclose the property name in quotation marks. ASP.NET uses reflection to inspect your object and find the property that has the name Value at runtime.
You might want to experiment with what other types of collections you can bind to a list control. One interesting option is to use a built-in ASP.NET control such as the Session object. An item in the list will be created for every currently defined Session variable, making this trick a nice little debugging tool to quickly check current session information.
Along with the DataTextField property, all list controls that support data binding also provide a DataValueField property, which adds the corresponding information to the value attribute in the control element. This allows you to store extra (undisplayed) information that you can access later. For example, you could use these two lines to define your data binding with the previous example:
MyListBox.DataTextField = "Value";
MyListBox.DataValueField = "Key";
The control will appear the same, with a list of all the fruit names in the collection. However, if you look at the rendered HTML that's sent to the client browser, you'll see that value attributes have been set with the corresponding numeric key for each item:
<select name="MyListBox" id="MyListBox" >
<option value="1">Kiwi</option>
<option value="2">Pear</option>
<option value="3">Mango</option>
<option value="4">Blueberry</option>
<option value="5">Apricot</option>
<option value="6">Banana</option>
<option value="7">Peach</option>
<option value="8">Plum</option>
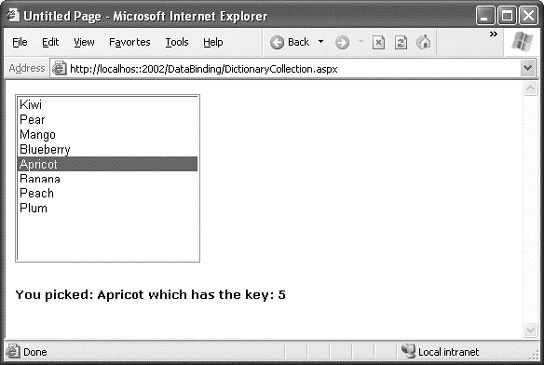
</select>You can retrieve this value later using the SelectedItem property to get additional information. For example, you could set the AutoPostBack property of the list control to true, and add the following code:
protected void MyListBox_SelectedIndexChanged(Object sender,
 EventArgs e)
{
    lblMessage.Text = "You picked: " + MyListBox.SelectedItem.Text;
    lblMessage.Text += " which has the key: " + MyListBox.SelectedItem.Value;
}
Figure 15-7 demonstrates the result. This technique is particularly useful with a database. You could embed a unique ID into the value property and be able to quickly look up a corresponding record depending on the user's selection by examining the value of the SelectedItem object.
Note that for this to work, you can't regenerate the list after every postback. If you do, the selected item information will be lost and an error will occur. The preceding example handles this by checking the Page.IsPostBack property. If it's false (which indicates that the page is being requested for the first time), the page builds the list. When the page is rendered, the current list of items is stored in view state. When the page is posted back, the list of items already exists and doesn't need to be re-created.
So far, the examples in this chapter have dealt with data binding that doesn't involve databases or any part of ADO.NET. Although this is an easy way to familiarize yourself with the concepts, and a useful approach in its own right, you get the greatest advantage of data binding when you use it in conjunction with a database.
When you're using data binding with the information drawn from a database, the data binding process takes place in the same three steps. First you create your data source, which will be a DataReader or DataSet object. A DataReader generally offers the best performance, but it limits your data binding to a single control because it is a forward-only reader. As it fills a control, it traverses the results from beginning to end. Once it's finished, it can't go back to the beginning; so it can't be used in another data binding operation. For this reason, a DataSet is a more common choice.
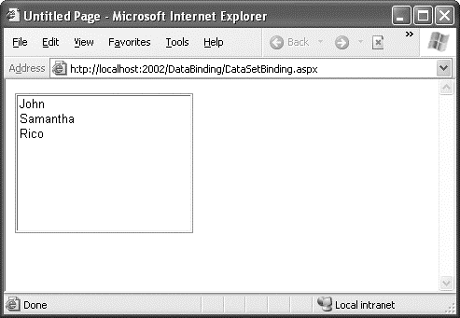
The next example creates a DataSet and binds it to a list. In this example, the DataSet is filled by hand, but it could just as easily be filled using a DataAdapter object, as you saw in the previous chapter.
To fill a DataSet by hand, you need to follow several steps:
Next, create a new DataTable, and add it to the DataSet.Tables collection.
Next, define the structure of the table by adding DataColumn objects (one for each field) to the DataTable.Colums collection.
Finally, supply the data. You can get a new, blank row that has the same structure as your DataTable by calling the DataTable.NewRow() method. You must then set the data in all its fields, and add the DataRow to the DataTable.Rows collection.
Here's how the code unfolds:
// Define a DataSet with a single DataTable.
DataSet dsInternal = new DataSet();
dsInternal.Tables.Add("Users");

// Define two columns for this table.
dsInternal.Tables["Users"].Columns.Add("Name");
dsInternal.Tables["Users"].Columns.Add("Country");

// Add some actual information into the table.
DataRow rowNew = dsInternal.Tables["Users"].NewRow();
rowNew["Name"] = "John";
rowNew["Country"] = "Uganda";
dsInternal.Tables["Users"].Rows.Add(rowNew);

rowNew = dsInternal.Tables["Users"].NewRow();
rowNew["Name"] = "Samantha";
rowNew["Country"] = "Belgium";
dsInternal.Tables["Users"].Rows.Add(rowNew);

rowNew = dsInternal.Tables["Users"].NewRow();
rowNew["Name"] = "Rico";
rowNew["Country"] = "Japan";
dsInternal.Tables["Users"].Rows.Add(rowNew);
Next, you bind the DataTable from the DataSet to the appropriate control. Because list controls can only show a single column at a time, you also need to choose the field you want to display for each item by setting the DataTextField property:
// Define the binding.
lstUser.DataSource = dsInternal.Tables["Users"];
lstUser.DataTextField = "Name";
Alternatively, you could use the entire DataSet for the data source, instead of just the appropriate table. In that case, you would have to select a table by setting the control's DataMember property. This is an equivalent approach, but the code is slightly different:
// Define the binding.
lstUser.DataSource = dsInternal;
lstUser.DataMember = "Users";
lstUser.DataTextField = "Name";
As always, the last step is to activate the binding:
this.DataBind();
The final result is a list with the information from the specified database field, as shown in Figure 15-8. The list box will have an entry for every single record in the table, even if it appears more than once, from the first row to the last.
Tip
The simple list controls require you to bind their Text or Value property to a single data field in the data source object. However, much more flexibility is provided by the more advanced data binding controls examined in the next chapter. They allow fields to be combined in just about any way you can imagine.
The next example is more practical. It's a good example of how you might use data binding in a full ASP.NET application. This example allows the user to select a record and update one piece of information by using data-bound list controls.
The first step is to add the connection string to your web.config file. This example uses the Products table from the Northwind database included with many versions of SQL Server. Here's how you can define the connection string for SQL Server Express:
<configuration>
  <connectionStrings>
    <add name="Northwind" connectionString=
"Data Source=localhostSQLEXPRESS;Initial Catalog=Northwind;Integrated Security=SSPI" />
</connectionStrings> ... </configuration>
To use the full version of SQL Server, remove the SQLEXPRESS portion. To use a database server on another computer, supply the computer name for the Data Source connection string property. (For more details about connection strings, refer to Chapter 14.)
The next step is to retrieve the connection string and store it in a private variable in the Page class so that every part of your page code can access it easily. Once you've imported the System.Web.Configuration namespace, you can create a member variable in your code-behind class that's defined like this:
private string connectionString = WebConfigurationManager.ConnectionStrings["Northwind"].ConnectionString;
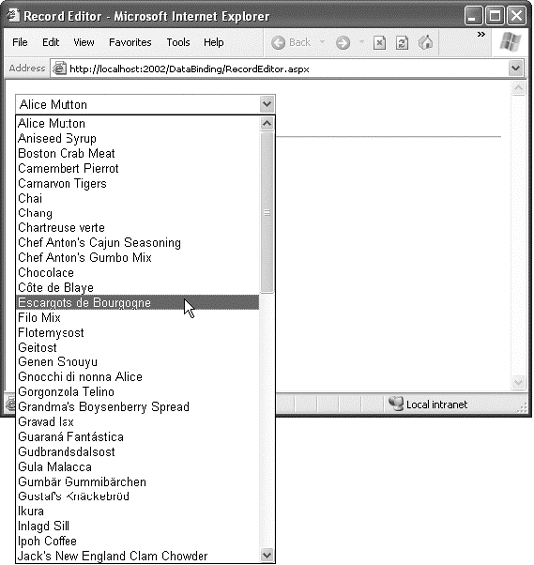
The next step is to create a drop-down list that allows the user to choose a product for editing. The Page.Load event handler takes care of this task—retrieving the data, binding it to the drop-down list control, and then activating the binding. Before you go any further, make sure you've imported the System.Data.SqlClient namespace, which allows you to use the SQL Server provider to retrieve data.
protected void Page_Load(Object sender, EventArgs e)
{
if (!this.IsPostBack)
{
// Define the ADO.NET objects for selecting products from the database.
string selectSQL = "SELECT ProductName, ProductID FROM Products";
SqlConnection con = new SqlConnection(connectionString);
SqlCommand cmd = new SqlCommand(selectSQL, con);
// Open the connection.
con.Open();
// Define the binding.
lstProduct.DataSource = cmd.ExecuteReader();
lstProduct.DataTextField = "ProductName";
lstProduct.DataValueField = "ProductID";
// Activate the binding.
this.DataBind();
con.Close();
// Make sure nothing is currently selected in the list box.
lstProduct.SelectedIndex = −1;
}
}Once again, the list is only filled the first time the page is requested (and stored in view state automatically). If the page is posted back, the list keeps its current entries. This reduces the amount of database work, and keeps the page working quickly and efficiently. You should also note that this page doesn't attempt to deal with errors. If you were using it in a real application, you'd need to use the exception handling approach demonstrated in Chapter 14.
The actual database code is similar to what was used in the previous chapter. The example uses a Select statement but carefully limits the returned information to just the ProductName and ProductID fields, which are the only pieces of information it will use. The resulting window lists all the products defined in the database, as shown in Figure 15-9.
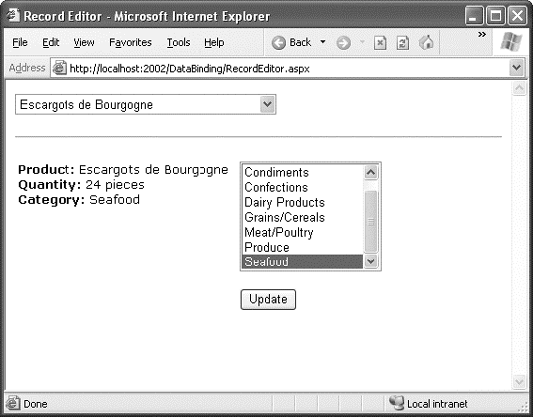
The drop-down list enables AutoPostBack, so as soon as the user makes a selection, a lstProduct.SelectedItemChanged event fires. At this point, your code performs the following tasks:
It reads the corresponding record from the Products table and displays additional information about it in a label. In this case, a Join query links information from the Products and Categories tables. The code also determines what the category is for the current product. This is the piece of information it will allow the user to change.
It reads the full list of CategoryNames from the Categories table and binds this information to a different list control. Initially, this list is hidden in a panel with its Visible property set to false. The code reveals the content of this panel by setting Visible to true.
It highlights the row in the category list that corresponds to the current product. For example, if the current product is a Seafood category, the Seafood entry in the list box will be selected.
This logic appears fairly involved, but it's really just an application of what you've learned over the past two chapters. The full listing is as follows:
protected void lstProduct_SelectedIndexChanged(object sender, EventArgs e)
{
// Create a command for selecting the matching product record.
string selectProduct = "SELECT ProductName, QuantityPerUnit, " +
"CategoryName FROM Products INNER JOIN Categories ON " +
"Categories.CategoryID=Products.CategoryID " +
"WHERE ProductID=@ProductID";
// Create the Connection and Command objects.
SqlConnection con = new SqlConnection(connectionString);
SqlCommand cmdProducts = new SqlCommand(selectProduct, con);
cmdProducts.Parameters.AddWithValue("@ProductID",
lstProduct.SelectedItem.Value);
// Retrieve the information for the selected product.
using (con)
{
con.Open();
SqlDataReader reader = cmdProducts.ExecuteReader();
reader.Read();
// Update the display.
lblRecordInfo.Text = "<b>Product:</b> " +
reader["ProductName"] + "<br />";
lblRecordInfo.Text += "<b>Quantity:</b> " +
reader["QuantityPerUnit"] + "<br />";
lblRecordInfo.Text += "<b>Category:</b> " + reader["CategoryName"];
// Store the corresponding CategoryName for future reference.
string matchCategory = reader["CategoryName"].ToString();
// Close the reader.
reader.Close();
// Create a new Command for selecting categories.
string selectCategory = "SELECT CategoryName, " +
"CategoryID FROM Categories";
SqlCommand cmdCategories = new SqlCommand(selectCategory, con);
// Retrieve the category information, and bind it.
lstCategory.DataSource = cmdCategories.ExecuteReader();
lstCategory.DataTextField = "CategoryName";lstCategory.DataValueField = "CategoryID";
lstCategory.DataBind();
// Highlight the matching category in the list.
lstCategory.Items.FindByText(matchCategory).Selected = true;
}
pnlCategory.Visible = true;
}You could improve this code in several ways. It probably makes the most sense to remove these data access routines from this event handler and put them into more generic functions. For example, you could use a function that accepts a ProductID and returns a single DataRow with the associated product information. Another improvement would be to use a stored procedure to retrieve this information.
The end result is a window that updates itself dynamically whenever a new product is selected, as shown in Figure 15-10.
This example still has one more trick in store. If the user selects a different category and clicks Update, the change is made in the database. Of course, this means creating new Connection and Command objects, as follows:
protected void cmdUpdate_Click(object sender, EventArgs e)
{
// Define the Command.
string updateCommand = "UPDATE Products " +"SET CategoryID=@CategoryID WHERE ProductID=@ProductID";
SqlConnection con = new SqlConnection(connectionString);
SqlCommand cmd = new SqlCommand(updateCommand, con);
cmd.Parameters.AddWithValue("@CategoryID", lstCategory.SelectedItem.Value);
cmd.Parameters.AddWithValue("@ProductID", lstProduct.SelectedItem.Value);
// Perform the update.
using (con)
{
con.Open();
cmd.ExecuteNonQuery();
}
}You could easily extend this example so that it allows you to edit all the properties in a product record. But before you try that, you might want to experiment with the rich data controls that are shown in the next chapter. Using these controls, you can create sophisticated lists and grids that provide automatic features for selecting, editing, and deleting records.
In Chapter 14, you saw how to directly connect to a database, execute a query, loop through the records in the result set, and display them on a page. In this chapter, you've already seen a simpler option—with data binding, you can write your data access logic and then show the results in the page with no looping or control manipulation required. Now, it's time to introduce another convenience: data source controls. Amazingly enough, data source controls allow you to create data-bound pages without writing any data access code at all.
Note
As you'll soon see, often a gap exists between what you can do and what you should do. In most professional applications, you'll need to write and fine-tune your data access code for optimum performance or access to specific features. That's why you've spent so much time learning how ADO.NET works, rather than jumping straight to the data source controls.
The data source controls include any control that implements the IDataSource interface. The .NET Framework includes the following data source controls:
SqlDataSource: This data source allows you to connect to any data source that has an ADO.NET data provider. This includes SQL Server, Oracle, and OLE DB or ODBC data sources. When using this data source, you don't need to write the data access code.
AccessDataSource: This data source allows you to read and write the data in an Access database file (.mdb). However, its use is discouraged, because Access doesn't scale well to large numbers of users (unlike SQL Server Express).
Note
Access databases do not have a dedicated server engine (like SQL Server) that coordinates the actions of multiple people and ensures that data won't be lost or corrupted. For that reason, Access databases are best suited for very small websites, where few people need to manipulate data at the same time. A much better small-scale data solution is SQL Server Express, which is described in Chapter 14.
ObjectDataSource: This data source allows you to connect to a custom data access class. This is the preferred approach for large-scale professional web applications, but it forces you to write much more code. You'll study the ObjectDataSource in Chapter 22.
XmlDataSource: This data source allows you to connect to an XML file. You'll learn more about XML in Chapter 18.
SiteMapDataSource: This data source allows you to connect to a .sitemap file that describes the navigational structure of your website. You saw this data source in Chapter 13.
EntityDataSource: This data source allows you to query a database using the LINQ to Entities feature, which you'll tackle in Chapter 24.
LinqDataSource: This data source allows you to query a database using the LINQ to SQL feature, which is a similar (but somewhat less powerful) predecessor to LINQ to Entities.
You can find all the data source controls in the Data tab of the Toolbox in Visual Studio, with the exception of the AccessDataSource.
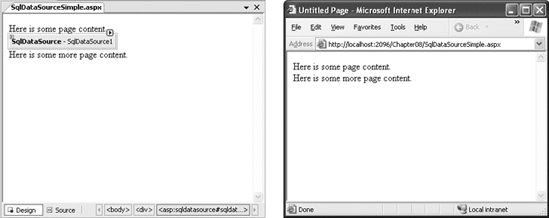
When you drop a data source control onto your web page, it shows up as a gray box in Visual Studio. However, this box won't appear when you run your web application and request the page (see Figure 15-11).
If you perform more than one data access task in the same page (for example, you need to be able to query two different tables), you'll need more than one data source control.
Data source controls can perform two key tasks:
They can retrieve data from a data source and supply it to bound controls. When you use this feature, your bound controls are automatically filled with data. You don't even need to call DataBind().
They can update the data source when edits take place. In order to use this feature, you must use one of ASP.NET's rich data controls, like the GridView or DetailsView. For example, if you make an edit in the GridView and click Update, the GridView will trigger the update in the data source control, and the data source control will then update the database.
Before you can use the data source controls, you need to understand the page life cycle. The following steps explain the sequence of stages your page goes through in its lifetime. The two steps in bold (4 and 6) are the steps where the data source controls will spring into action:
The page object is created (based on the .aspx file).
The page life cycle begins, and the Page.Init and Page.Load events fire.
All other control events fire.
If the user is applying a change, the data source controls perform their update operations now. If a row is being updated, the Updating and Updated events fire. If a row is being inserted, the Inserting and Inserted events fire. If a row is being deleted, the Deleting and Deleted events fire.
The Page.PreRender event fires.
The data source controls perform their queries and insert the data they retrieve into the bound controls. This step happens the first time your page is requested and every time the page is posted back, ensuring you always have the most up-to-date data. The Selecting and Selected events fire at this point.
The page is rendered and disposed.
In the rest of this chapter, you'll take a closer look at the SqlDataSource control, and you'll use it to build the record editor example demonstrated earlier—with a lot less code.
Data source controls turn up in the .aspx markup portion of your web page like ordinary controls. Here's an example:
<asp:SqlDataSource ID="SqlDataSource1" runat="server" ... />
The SqlDataSource represents a database connection that uses an ADO.NET provider. However, this has a catch. The SqlDataSource needs a generic way to create the Connection, Command, and DataReader objects it requires. The only way this is possible is if your data provider includes something called a data provider factory. The factory has the responsibility of creating the provider-specific objects that the SqlDataSource needs to access the data source. Fortunately, .NET includes a data provider factory for each of its four data providers:
System.Data.SqlClient
System.Data.OracleClient
System.Data.OleDb
System.Data.Odbc
You can use all of these providers with the SqlDataSource. You choose your data source by setting the provider name. Here's a SqlDataSource that connects to a SQL Server database using the SQL Server provider:
<asp:SqlDataSource ProviderName="System.Data.SqlClient" ... />
Technically, you can omit this piece of information, because the System.Data.SqlClient provider factory is the default.
Note
If you have an up-to-date third-party provider (such as ODP.NET for accessing Oracle databases), it will also include a provider factory that allows you to use it with the SqlDataSource.
The next step is to supply the required connection string—without it, you cannot make any connections. Although you can hard-code the connection string directly in the SqlDataSource tag, it's always better to keep it in the <connectionStrings> section of the web.config file to guarantee greater flexibility and ensure you won't inadvertently change the connection string.
To refer to a connection string in your .aspx markup, you use a special syntax in this format:
<%$ ConnectionStrings:[NameOfConnectionString] %>
This looks like a data binding expression, but it's slightly different. (For one thing, it begins with the character sequence <%$ instead of <%#.)
For example, if you have a connection string named Northwind in your web.config file that looks like this:
<configuration>
<connectionStrings>
<add name="Northwind" connectionString=
"Data Source=localhostSQLEXPRESS;Initial Catalog=Northwind;Integrated Security=SSPI" />
</connectionStrings>
  ...
</configuration>you would specify it in the SqlDataSource using this syntax:
<asp:SqlDataSource ConnectionString="<%$ ConnectionStrings:Northwind %>" ... />
Once you've specified the provider name and connection string, the next step is to add the query logic that the SqlDataSource will use when it connects to the database.
Tip
If you want some help creating your connection string, select the SqlDataSource, open the Properties window, and select the ConnectionString property. A drop-down arrow will appear at the right side of the value. If you click that drop-down arrow, you'll see a list of all the connection strings in your web.config file. You can pick one of these connections, or you can choose New Connection (at the bottom of the list) to open the Add Connection dialog box, where you can pick the database you want. Best of all, if you create a new connection Visual Studio copies the connection string into your web.config file, so you can reuse it with other SqlDataSource objects.
You can use each SqlDataSource control you create to retrieve a single query. Optionally, you can also add corresponding commands for deleting, inserting, and updating rows. For example, one SqlDataSource is enough to query and update the Customers table in the Northwind database. However, if you need to independently retrieve or update Customers and Orders information, you'll need two SqlDataSource controls.
The SqlDataSource command logic is supplied through four properties—SelectCommand, InsertCommand, UpdateCommand, and DeleteCommand—each of which takes a string. The string you supply can be inline SQL (in which case the corresponding SelectCommandType, InsertCommandType, UpdateCommandType, or DeleteCommandType property should be Text, the default) or the name of a stored procedure (in which case the command type is StoredProcedure). You need to define commands only for the types of actions you want to perform. In other words, if you're using a data source for read-only access to a set of records, you need to define only the SelectCommand property.
Note
If you configure a command in the Properties window, you'll see a property named SelectQuery instead of SelectCommand. The SelectQuery is actually a virtual property that's displayed as a design-time convenience. When you edit the SelectQuery (by clicking the ellipsis next to the property name), you can use a special designer to write the command text (the SelectCommand) and add the command parameters (the SelectParameters) at the same time. However, this tool works best once you've reviewed the examples in this section, and you understand the way the SelectCommand and SelectParameters properties really work.
Here's a complete SqlDataSource that defines a Select command for retrieving product information from the Products table:
<asp:SqlDataSource ID="sourceProducts" runat="server"
  ConnectionString="<%$ ConnectionStrings:Northwind %>"
  SelectCommand="SELECT ProductName, ProductID FROM Products"
/>
Tip
You can write the data source logic by hand, or you can use a design-time wizard that lets you create a connection and create the command logic in a graphical query builder. You can even test the query as you build it to make sure it returns the records you want. To launch this tool, select the data source control on the design surface of your page, and click the Configure Data Source link in the smart tag.
This is enough to build the first stage of the record editor example shown earlier—namely, the drop-down list box that shows all the products. All you need to do is set the DataSourceID property to point to the SqlDataSource you've created. The easiest way to do this is using the Properties window, which provides a drop-down list of all the data sources on your current web page. At the same time, make sure you set the DataTextField and DataValueField properties. Once you make these changes, you'll wind up with a control tag like this:
<asp:DropDownList ID="lstProduct" runat="server" AutoPostBack="True"
  DataSourceID="sourceProducts" DataTextField="ProductName"
  DataValueField="ProductID" />
The best part about this example is that you don't need to write any code. When you run the page, the DropDownList control asks the SqlDataSource for the data it needs. At this point, the SqlDataSource executes the query you defined, fetches the information, and binds it to the DropDownList. The whole process unfolds automatically.
As you learned earlier in this chapter, you can bind to a DataReader or a DataSet. So it's worth asking—which approach does the SqlDataSource control use? It's actually your choice, depending on whether you set the DataSourceMode to SqlDataSourceMode.DataSet (the default) or to SqlDataSourceMode.DataReader. The DataSet mode is almost always better, because it supports advanced sorting, filtering, and caching settings that depend on the DataSet. All these features are disabled in DataReader mode. However, you can use the DataReader mode with extremely large grids, because it's more memory-efficient. That's because the DataReader holds only one record in memory at a time—just long enough to copy the record's information to the linked control.
Another important fact to understand about the data source controls is that when you bind more than one control to the same data source, you cause the query to be executed multiple times. For example, if two controls are bound to the same data source, the data source control performs its query twice—once for each control. This is somewhat inefficient—after all, if you wrote the data binding code yourself by hand, you'd probably choose to perform the query once and then bind the returned DataSet twice. Fortunately, this design isn't quite as bad as it might seem. First, you can avoid this multiple-query overhead using caching, which allows you to store the retrieved data in a temporary memory location where it will be reused automatically. The SqlDataSource supports automatic caching if you set EnableCaching to true. Chapter 23 provides a full discussion of how caching works and how you can use it with the SqlDataSource.
Second, contrary to what you might expect, most of the time you won't be binding more than one control to a data source. That's because the rich data controls you'll learn about in Chapter 16—the GridView, DetailsView, and FormsView—have the ability to present multiple pieces of data in a flexible layout. If you use these controls, you'll need to bind only one control, which allows you to steer clear of this limitation.
It's also important to remember that data binding is performed at the end of your web page processing, just before the page is rendered. This means the Page.Load event will fire, followed by any control events, followed by the Page.PreRender event. Only then will the data binding take place.
In the previous example (which used the SqlDataSource to retrieve a list of products), the complete query was hard-coded. Often, you won't have this flexibility. Instead, you'll want to retrieve a subset of data, such as all the products in a given category or all the employees in a specific city.
The record editor that you considered earlier offers an ideal example. Once you select a product, you want to execute another command to get the full details for that product. (You might just as easily execute another command to get records that are related to this product.) To make this work, you need two data sources. You've already created the first SqlDataSource, which fetches limited information about every product. Here's the second SqlDataSource, which gets more extensive information about a single product (the following query is split over several lines to fit the printed page):
<asp:SqlDataSource ID="sourceProductDetails" runat="server"
  ProviderName="System.Data.SqlClient"
  ConnectionString="<%$ ConnectionStrings:Northwind %>"
  SelectCommand="SELECT * FROM Products WHERE ProductID=@ProductID"
/>
But this example has a problem. It defines a parameter (@ProductID) that identifies the ID of the product you want to retrieve. How do you fill in this piece of information? It turns out you need to add a <SelectParameters> section to the SqlDataSource tag. Inside this section, you must define each parameter that's referenced by your SelectCommand and tell the SqlDataSource where to find the value it should use. You do that by mapping the parameter to a value in a control.
Here's the corrected command:
<asp:SqlDataSource ID="sourceProductDetails" runat="server"
  ProviderName="System.Data.SqlClient"
  ConnectionString="<%$ ConnectionStrings:Northwind %>"
  SelectCommand="SELECT * FROM Products WHERE ProductID=@ProductID">
  <SelectParameters>
    <asp:ControlParameter ControlID="lstProduct" Name="ProductID"
     PropertyName="SelectedValue" />
  </SelectParameters>
</asp:SqlDataSource>
You always indicate parameters with an @ symbol, as in @City. You can define as many parameters as you want, but you must map each one to a value using a separate element in the SelectParameters collection. In this example, the value for the @ProductID parameter comes from the lstProduct.SelectedValue property. In other words, you are binding a value that's currently in a control to place it into a database command. (You could also use the SelectedText property to get the currently displayed text, which is the ProductName in this example.)
Now all you need to do is bind the SqlDataSource to the remaining controls where you want to display information. This is where the example takes a slightly different turn. In the previous version of the record editor, you took the information and used a combination of values to fill in details in a label and a list control. This type of approach doesn't work well with data source controls. First, you can bind only a single data field to most simple controls such as lists. Second, each bound control makes a separate request to the SqlDataSource, triggering a separate database query. This means if you bind a dozen controls, you'll perform the same query a dozen times, with terrible performance. You can alleviate this problem with data source caching (see Chapter 23), but it indicates you aren't designing your application in a way that lends itself well to the data source control model.
The solution is to use one of the rich data controls, such as the GridView, DetailsView, or FormView. These controls have the smarts to show multiple fields at once, in a highly flexible layout. You'll learn about these three controls in detail in the next chapter, but the following example shows a simple demonstration of how to use the DetailsView.
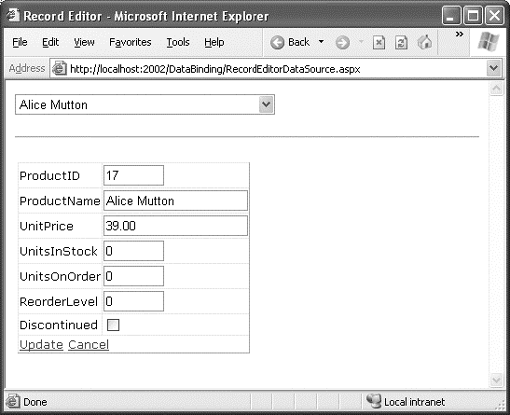
The DetailsView is a rich data control that's designed to show multiple fields in a data source. As long as its AutoGenerateRows is true (the default), it creates a separate row for each field, with the field caption and value. Figure 15-12 shows the result.
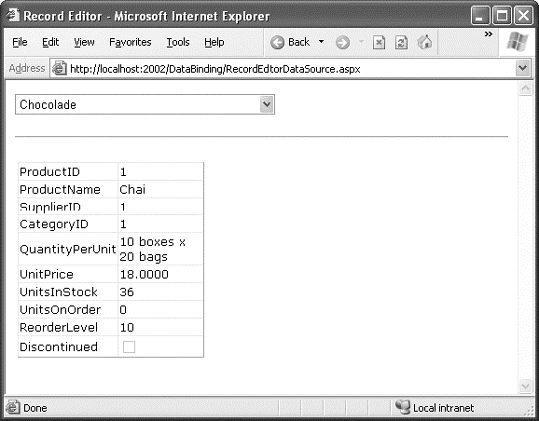
Here's the basic DetailsView tag that makes this possible:
<asp:DetailsView ID="detailsProduct" runat="server"
  DataSourceID="sourceProductDetails" />
As you can see, the only property you need to set is DataSourceID. That binds the DetailsView to the SqlDataSource you created earlier. This SqlDataSource gets the full product information for a single row, based on the selection in the list control. Best of all, this whole example still hasn't required a line of code.
In the previous example, the @ProductID parameter in the second SqlDataSource is configured based on the selection in a drop-down list. This type of parameter, which links to a property in another control, is called a control parameter. But parameter values aren't necessarily drawn from other controls. You can map a parameter to any of the parameter types defined in Table 15-1.
Table 15.1. Parameter Types
Source | Control Tag | Description |
|---|---|---|
Control property | <asp:ControlParameter> | A property from another control on the page. |
Query string value | <asp:QueryStringParameter> | A value from the current query string. |
Session state value | <asp:SessionParameter> | A value stored in the current user's session. |
Cookie value | <asp:CookieParameter> | A value from any cookie attached to the current request. |
Profile value | <asp:ProfileParameter> | A value from the current user's profile (see Chapter 21 for more about profiles). |
Routed URL value | <asp:RouteParameter> | A value from a routed URL. Routed URLs are an advanced technique that lets you map any URL to a different page (so a request like |
A form variable | <asp:FormParameter> | A value posted to the page from an input control. Usually, you'll use a control property instead, but you might need to grab a value straight from the Forms collection if you've disabled view state for the corresponding control. |
For example, you could split the earlier example into two pages. In the first page, define a list control that shows all the available products:
<asp:SqlDataSource ID="sourceProducts" runat="server"
  ProviderName="System.Data.SqlClient"
  ConnectionString="<%$ ConnectionStrings:Northwind %>"
  SelectCommand="SELECT ProductName, ProductID FROM Products"
/>
<asp:DropDownList ID="lstProduct" runat="server" AutoPostBack="True"
  DataSourceID="sourceProducts" DataTextField="ProductName"
  DataValueField="ProductID" />
Now, you'll need a little extra code to copy the selected product to the query string and redirect the page. Here's a button that does just that:
protected void cmdGo_Click(object sender, EventArgs e)
{
    if (lstProduct.SelectedIndex != −1)
    {
        Response.Redirect(
          "QueryParameter2.aspx?prodID=" + lstProduct.SelectedValue);
    }
}
Finally, the second page can bind the DetailsView according to the ProductID value that's supplied in the query string:
<asp:SqlDataSource ID="sourceProductDetails" runat="server"
  ProviderName="System.Data.SqlClient"
  ConnectionString="<%$ ConnectionStrings:Northwind %>"
  SelectCommand="SELECT * FROM Products WHERE ProductID=@ProductID">
  <SelectParameters>
    <asp:QueryStringParameter Name="ProductID" QueryStringField="prodID" />
  </SelectParameters>
</asp:SqlDataSource>

<asp:DetailsView ID="detailsProduct" runat="server"
DataSourceID="sourceProductDetails" />Sometimes you'll need to set a parameter with a value that isn't represented by any of the parameter classes in Table 15-1. Or, you might want to manually modify a parameter value before using it. In both of these scenarios, you need to use code to set the parameter value just before the database operation takes place.
For example, consider the page shown in Figure 15-13. It includes two data-bound controls. The first is a list of all the customers in the database. Here's the markup that defines the list and its data source:
<asp:SqlDataSource ID="sourceCustomers" runat="server"
  ProviderName="System.Data.SqlClient"
  ConnectionString="<%$ ConnectionStrings:Northwind %>"
  SelectCommand="SELECT CustomerID, ContactName FROM Customers"
/>
  <asp:DropDownList ID="lstCustomers" runat="server"
  DataSourceID="sourceCustomers" DataTextField="ContactName"
  DataValueField="CustomerID" AutoPostBack="True">
</asp:DropDownList>
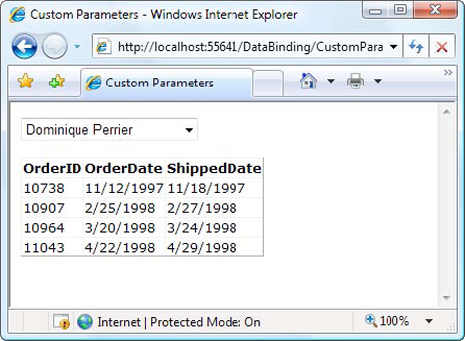
When the user picks a customer from the list, the page is posted back (because AutoPostBack is set to true) and the matching orders are shown in a GridView underneath, using a second data source. This data source pulls the CustomerID for the currently selected customer from the drop-down list using a ControlParameter:
<asp:SqlDataSource ID="sourceOrders" runat="server"
 ProviderName="System.Data.SqlClient"
 ConnectionString="<%$ ConnectionStrings:Northwind %>"
 SelectCommand="SELECT OrderID,OrderDate,ShippedDate FROM Orders WHERE CustomerID=@CustomerID">
  <SelectParameters>
    <asp:ControlParameter Name="CustomerID"
     ControlID="lstCustomers" PropertyName="SelectedValue" />
  </SelectParameters>
</asp:SqlDataSource>

<asp:GridView ID="gridOrders" runat="server" DataSourceID="sourceOrders">
</asp:GridView>
Now, imagine you want to limit the order list so it only shows orders made in the last week. This is easy enough to accomplish with a Where clause that examines the OrderDate field. But there's a catch. It doesn't make sense to hard-code the OrderDate value in the query itself, because the range is set based on the current date. And there's no parameter that provides exactly the information you need. The easiest way to solve this problem is to add a new parameter—one that you'll be responsible for setting yourself:
<asp:SqlDataSource ID="sourceOrders" runat="server"
 ProviderName="System.Data.SqlClient"
 ConnectionString="<%$ ConnectionStrings:Northwind %>"
SelectCommand="SELECT OrderID,OrderDate,ShippedDate FROM Orders WHERE CustomerID=@CustomerID AND OrderDate>=@EarliestOrderDate"
 OnSelecting="sourceOrders_Selecting">
  <SelectParameters>
    <asp:ControlParameter Name="CustomerID"
     ControlID="lstCustomers" PropertyName="SelectedValue" />
    <asp:Parameter Name="EarliestOrderDate" DefaultValue="1900/01/01" />
  </SelectParameters>
</asp:SqlDataSource>
Although you can modify the value of any parameter, if you aren't planning to pull the value out of any of the places listed in Table 15-1, it makes sense to use an ordinary Parameter object, as represented by the <asp:Parameter> element. You can set the data type (if required) and the default value (as demonstrated in this example).
Now that you've created the parameter, you need to set its value before the command takes place. The SqlDataSource has a number of events that are perfect for setting parameter values. You can fill in parameters for a select operation by reacting to the Selecting event. Similarly, you can use the Updating, Deleting, and Inserting events when updating, deleting, or inserting a record. In these event handlers, you can access the command that's about to be executed, using the Command property of the custom EventArgs object (for example, SqlDataSourceSelectingEventArgs.Command). You can then modify its parameter values by hand. The SqlDataSource also provides similarly named Selected, Updated, Deleted, and Inserted events, but these take place after the operation has been completed, so it's too late to change the parameter value.
Here's the code that's needed to set the parameter value to a date that's seven days in the past, ensuring you see one week's worth of records:
protected void sourceOrders_Selecting(object sender,
  SqlDataSourceSelectingEventArgs e)
{
    e.Command.Parameters["@EarliestOrderDate"].Value =
      DateTime.Today.AddDays(-7);
}
Note
You'll have to tweak this code slightly if you're using it with the standard Northwind database. The data in the Northwind database is historical, and most orders bear dates around 1997. As a result, the previous code won't actually retrieve any records. But if you use the AddYears() method instead of AddDays(), you can easily move back 13 years or more, to the place you need to be.
When you deal with an outside resource such as a database, you need to protect your code with a basic amount of error-handling logic. Even if you've avoided every possible coding mistake, you still need to defend against factors outside your control—for example, if the database server isn't running or the network connection is broken.
You can count on the SqlDataSource to properly release any resources (such as connections) if an error occurs. However, the underlying exception won't be handled. Instead, it will bubble up to the page and derail your processing. As with any other unhandled exception, the user will receive a cryptic error message or an error page. This design is unavoidable—if the SqlDataSource suppressed exceptions, it could hide potential problems and make debugging extremely difficult. However, it's a good idea to handle the problem in your web page and show a more suitable error message.
To do this, you need to handle the data source event that occurs immediately after the error. If you're performing a query, that's the Selected event. If you're performing an update, delete, or insert operation, you would handle the Updated, Deleted, or Inserted event instead. (If you don't want to offer customized error messages, you could handle all these events with the same event handler.)
In the event handler, you can access the exception object through the SqlDataSourceStatusEventArgs.Exception property. If you want to prevent the error from spreading any further, simply set the SqlDataSourceStatusEventArgs.ExceptionHandled property to true. Then, make sure you show an appropriate error message on your web page to inform the user that the command was not completed.
Here's an example:
protected void sourceProducts_Selected(object sender,
 SqlDataSourceStatusEventArgs e)
{
    if (e.Exception != null)
    {
        lblError.Text = "An exception occurred performing the query.";

        // Consider the error handled.
        e.ExceptionHandled = true;
    }
}Selecting data is only half the equation. The SqlDataSource can also apply changes. The only catch is that not all controls support updating. For example, the humble ListBox doesn't provide any way for the user to edit values, delete existing items, or insert new ones. Fortunately, ASP.NET's rich data controls—including the GridView, DetailsView, and FormView—all have editing features you can switch on.
Before you can switch on the editing features in a given control, you need to define suitable commands for the operations you want to perform in your data source. That means supplying commands for inserting (InsertCommand), deleting (DeleteCommand), and updating (UpdateCommand). If you know you will allow the user to perform only certain operations (such as updates) but not others (such as insertions and deletions), you can safely omit the commands you don't need.
You define the InsertCommand, DeleteCommand, and UpdateCommand in the same way you define the command for the SelectCommand property—by using a parameterized query. For example, here's a revised version of the SqlDataSource for product information that defines a basic update command to update every field:
<asp:SqlDataSource ID="sourceProductDetails" runat="server"
  ProviderName="System.Data.SqlClient"
  ConnectionString="<%$ ConnectionStrings:Northwind %>"
  SelectCommand="SELECT ProductID, ProductName, UnitPrice, UnitsInStock,
UnitsOnOrder, ReorderLevel, Discontinued FROM Products WHERE ProductID=@ProductID"
  UpdateCommand="UPDATE Products SET ProductName=@ProductName, UnitPrice=@UnitPrice,
UnitsInStock=@UnitsInStock, UnitsOnOrder=@UnitsOnOrder, ReorderLevel=@ReorderLevel,
Discontinued=@Discontinued WHERE ProductID=@ProductID">
  <SelectParameters>
<asp:ControlParameter ControlID="lstProduct" Name="ProductID"
     PropertyName="SelectedValue" />
  </SelectParameters>
</asp:SqlDataSource>
In this example, the parameter names aren't chosen arbitrarily. As long as you give each parameter the same name as the field it affects, and preface it with the @ symbol (so ProductName becomes @ProductName), you don't need to define the parameter. That's because the ASP.NET data controls automatically submit a collection of parameters with the new values before triggering the update. Each parameter in the collection uses this naming convention, which is a major time-saver.
You also need to give the user a way to enter the new values. Most rich data controls make this fairly easy—with the DetailsView, it's simply a matter of setting the AutoGenerateEditButton property to true, as shown here:
<asp:DetailsView ID="DetailsView1" runat="server"
  DataSourceID="sourceProductDetails" AutoGenerateEditButton="True" />
Now when you run the page, you'll see an edit link. When clicked, this link switches the DetailsView into edit mode. All fields are changed to edit controls (typically text boxes), and the Edit link is replaced with an Update link and a Cancel link (see Figure 15-14).
Clicking the Cancel link returns the row to its initial state. Clicking the Update link triggers an update. The DetailsView extracts the field values, uses them to set the parameters in the SqlDataSource.UpdateParameters collection, and then triggers the SqlDataSource.UpdateCommand to apply the change to the database. Once again, you don't have to write any code.
You can create similar parameterized commands for the DeleteCommand and InsertCommand. To enable deleting and inserting, you need to set the AutoGenerateDeleteButton and AutoGenerateInsertButton properties of the DetailsView to true. To see a sample page that allows updating, deleting, and inserting, refer to the UpdateDeleteInsert.aspx page that's included with the downloadable samples for this chapter.
The update command in the previous example matches the record based on its ID. You can tell this by examining the Where clause:
UpdateCommand="UPDATE Products SET ProductName=@ProductName, UnitPrice=@UnitPrice,
 UnitsInStock=@UnitsInStock, UnitsOnOrder=@UnitsOnOrder, ReorderLevel=@ReorderLevel,
 Discontinued=@Discontinued WHERE ProductID=@ProductID"
The problem with this approach is that it opens the door to an update that overwrites the changes of another user, if these changes are made between the time your page is requested and the time your page commits its update.
For example, imagine Chen and Lucy are viewing the same table of product records. Lucy commits a change to the price of a product. A few seconds later, Chen commits a name change to the same product record. Chen's update command not only applies the new name but it also overwrites all the other fields with the values from Chen's page—replacing the price Lucy entered with the price from the original page.
One way to solve this problem is to use an approach called match-all-values concurrency. In this situation, your update command attempts to match every field. As a result, if the original record has changed, the update command won't find it and the update won't be performed at all. So in the scenario described previously, using the match-all-values strategy, Chen would receive an error when he attempts to apply the new product name, and he would need to edit the record and apply the change again.
To use this approach, you need to add a Where clause that tries to match every field. Here's what the modified command would look like:
UpdateCommand="UPDATE Products SET ProductName=@ProductName, UnitPrice=@UnitPrice,
 UnitsInStock=@UnitsInStock, UnitsOnOrder=@UnitsOnOrder, ReorderLevel=@ReorderLevel,
 Discontinued=@Discontinued WHERE ProductID=@ProductID AND
 ProductName=@original_ProductName AND UnitPrice=@original_UnitPrice AND
 UnitsInStock=@original_UnitsInStock AND UnitsOnOrder=@original_UnitsOnOrder AND
 ReorderLevel=@original_ReorderLevel AND Discontinued=@original_Discontinued"
Although this makes sense conceptually, you're not finished yet. Before this command can work, you need to tell the SqlDataSource to maintain the old values from the data source and to give them parameter names that start with original_. You do this by setting two properties. First, set the SqlDataSource.ConflictDetection property to ConflictOptions.CompareAllValues instead of ConflictOptions.OverwriteChanges (the default). Next, set the long-winded OldValuesParameterFormatString property to the text "original_{0}". This tells the SqlDataSource to insert the text original_ before the field name to create the parameter that stores the old value. Now your command will work as written.
The SqlDataSource doesn't raise an exception to notify you if no update is performed. So, if you use the command shown in this example, you need to handle the SqlDataSource.Updated event and check the SqlDataSourceStatusEventArgs.AffectedRows property. If it's 0, no records have been updated, and you should notify the user about the concurrency problem so the update can be attempted again, as shown here:
protected void sourceProductDetails_Updated(object sender,
  SqlDataSourceStatusEventArgs e)
{
    if (e.AffectedRows == 0)
    {
        lblInfo.Text = "No update was performed. " +
"A concurrency error is likely, or the command is incorrectly written.";
    }
    else
    {
        lblInfo.Text = "Record successfully updated.";
    }
}
Figure 15-15 shows the result you'll get if you run two copies of this page in two separate browser windows, begin editing in both of them, and then try to commit both updates.
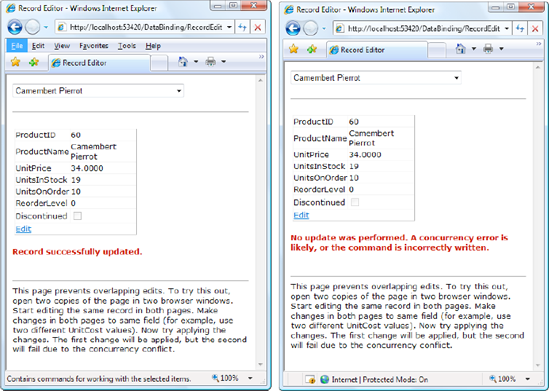
Matching every field is an acceptable approach for small records, but it isn't the most efficient strategy if you have tables with huge amounts of data. In this situation, you have two possible solutions: you can match some of the fields (leaving out the ones with really big values) or you can add a timestamp field to your database table, and use that for concurrency checking.
Timestamps are special fields that the database uses to keep track of the state of a record. Whenever any change is made to a record, the database engine updates the timestamp field, giving it a new, automatically generated value. The purpose of a timestamp field is to make strict concurrency checking easier. When you attempt to perform an update to a table that includes a timestamp field, you use a Where clause that matches the appropriate unique ID value (like ProductID) and the timestamp field:
UpdateCommand="UPDATE Products SET ProductName=@ProductName, UnitPrice=@UnitPrice,
 UnitsInStock=@UnitsInStock, UnitsOnOrder=@UnitsOnOrder,
 ReorderLevel=@ReorderLevel, Discontinued=@Discontinued
 WHERE ProductID=@ProductID AND RowTimestamp=@RowTimestamp"
The database engine uses the ProductID to look up the matching record. Then, it attempts to match the timestamp in order to update the record. If the timestamp matches, you know the record hasn't been changed. The actual value of the timestamp isn't important, because that's controlled by the database. You just need to know whether it's changed.
Creating a timestamp is easy. In SQL Server, you create a timestamp field using the timestamp data type. In other database products, timestamps are sometimes called row versions.
This chapter presented a thorough overview of data binding in ASP.NET. First, you learned an interesting way to create dynamic text with simple data binding. Although this is a reasonable approach to get information into your page, it doesn't surpass what you can already do with pure code. You also learned how ASP.NET builds on this infrastructure with much more useful features, including repeated-value binding for quick-and-easy data display in a list control, and data source controls, which let you create code-free bound pages.
Using the techniques in this chapter, you can create a wide range of data-bound pages. However, if you want to create a page that incorporates record editing, sorting, and other more advanced tricks, the data binding features you've learned about so far are just the first step. You'll also need to turn to specialized controls, such as the DetailsView and the GridView, which build upon these data binding features. You'll learn how to master these controls in the next chapter. In Chapter 22 you'll learn how to extend your data binding skills to work with data access components.