
Chapter 8
Navigation
What you will learn in this chapter:
- How to create navigational schemas in ASP.NET Web Forms and MVC
- Incorporating absolute and relative URLS into your flow
- A closer look at how ASP.NET MVC routing works
- How to programmatically send users to a different page
Code Downloads for this Chapter:
The wrox.com code downloads for this chapter are found at www.wrox.com/go/beginningaspnetforvisualstudio on the Download Code tab. The code is in the chapter 08 download and individually named according to the names throughout the chapter.
Helping your site visitors find what they are looking for is critical to the success of your web application. You must have a logical and intuitive navigation structure. If users can't find what they are looking for, they will lose interest in being your customer, and your work to create the site in the first place would all be for naught. This presence of an intuitive navigation structure is a key factor to the overall site User Experience (UX), or how well the user can understand and work within your site design and structure.
The last chapter covered master and layout pages that are used to provide a consistent look and feel to a web application. In this chapter, you build these pages out even further, because the navigation structure is among the most commonly shared parts of an application. You will once again see the different approaches between Web Forms and MVC applications as you build each type, as ASP.NET Web Forms uses server controls and MVC uses various other, non–server control approaches.
You not only learn about the use of menus and navigation structures in the chapter, but you also take a more detailed look at routing in ASP.NET MVC. In ASP.NET Web Forms the understanding of what page should serve which request is straightforward. There is an .aspx page for each of the valid page requests. You have seen how that differs from MVC; and you will learn many of the more advanced aspects of routing and how you can manage which action on a controller will be selected based on the URL of the request.
Different Ways to Move around Your Site
The goal of the navigation structure is to enable users to move easily and intuitively from one page to another. When you look at the menu structure of a standard website, you are really seeing nothing more than a way to move to a particular part of that site. Other parts could be anything from a static “About Us” page to an e-commerce product page that enables users to purchase a car. Each of those pages represents a single resource—one specific request from the client browser whereby the web server receives the request, performs some analysis on it, and then determines how to respond in such a way that a specific resource fulfills the request.
The primary way to move from one location to another is through the HTML anchor tag, <a href="Login.aspx">Login to the Site</a>. This causes an HTTP request to be sent to the URL in the href attribute. Virtually every form of a navigational structure that you encounter is based on this single HTML element.
As you likely guessed, because there is an HTML element to do this work, there is also an ASP.NET Web Forms–based set of functionality to help you build an anchor tag through the use of a server control. In this case, that is the asp:HyperLink server control. Although there may be a unique server control, the output is a standard HTML anchor tag.
Understanding Absolute and Relative URLs
The HTML anchor element does a lot of the work in sending users to a different page of your website. However, there are several different ways that you can define the address for this resource. It is important to remember that an HTTP request is made to a specific resource address. This address is known as the URL, or uniform resource locator.
There are two different types of URLs: absolute and relative. An absolute URL contains the complete address to a resource, meaning no knowledge about the site that contains the navigation structure is needed in order to find the resource. The following example is an absolute URL. Note how it includes the protocol and full server address:
<a href="http://www.rentmywrox.com/account/login">Login</a>There is no doubt as to where the resource is located. However, using an absolute URL can be problematic. In your sample application, for example, using this approach means you cannot link to any of the pages in the working solution, because the links would instead be associated with the deployed site, not your local working site. While using an absolute URL is not always ideal for linking to pages within your current application, it is required for linking to pages with different domains, such as external sites.
The relative URL, on the other hand, defines the locator using an approach that is more like directions for getting to the needed page. These directions are based on the page that displays the link. The following code is an example of a relative URL:
<a href="../Admin/ManageItem">Login</a>As you can see, there is no server name in the address, instead there are some periods and slashes. Each of the double periods represents moving up one level in the directory structure; they serve as the directions for getting to the resource that you want. Because this a set of directions, the URL in the preceding example tells the browser to first go up one level in the file structure and then go into the admin directory and look for the page named ManageItem. In Figure 8.1, this URL would be appropriate for the highlighted ManageItem page in the Admin directory.
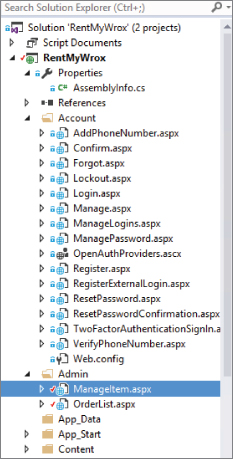
Figure 8.1 Relative URLs
As mentioned in an earlier chapter, you can also build a URL using the tilde character (˜). Taking this approach would change the preceding example to the following:
<a href="~/account/login" runat="server">Login</a>This is an important difference, because with the “dot” approach the link has to be updated whenever either page is moved—the page containing the link as well as the page with which it is being linked. Using the tilde approach tells the system to go to the root directory for the application and start from there, so any change in the location of the page holding the link does not affect the system's ability to determine where to find the resource. However, you may have noticed that you also have to include the runat attribute to ensure that the server processes the HTML control. This is because using the tilde character requires server-side processing; the value of the root directory replaces the tilde, so you wind up with a more flexible approach.
Although the tilde requires server participation, there is still another approach that enables the system to ask for a server root-based URL. This approach looks like the following code:
<a href="/account/login">Login</a>The difference is subtle, but by prefacing the URL with the forward slash character (/), you are telling the system to start from the server root and work its way down the directory tree.
Prefacing the URL with the slash character (/) should be done only when you know that the application you're working on will never be deployed as a virtual application.
Understanding Default Documents
Have you ever wondered how typing in a simple URL such as http://www.wrox.com takes you to a page of content? That happens because the server has been assigned a specific file in a direction that handles calls to a directory (including the root directory), which is to say that page's content has been defined as a default document.
The designation of default documents is part of IIS configuration and is specific to ASP.NET Web Forms because there is an expectation that a file will be assigned to handle those calls that do not contain a document to retrieve. Traditionally, several documents are defined as potential default documents, but the most common file is Default.aspx. When a request is made to http://server.domain.com/, the Default.aspx file in the root directory is returned.
The server uses default documents whenever there is a request for a directory as opposed to content within that directory; therefore, a Default.aspx file in a subdirectory from the root handles default calls to that directory. Because of this built-in capability, it is recommended that you not declare the default part of the URL when trying to link to it; instead, reference the directory name only and allow the server to serve the default file as appropriate.
You can also set default documents for ASP.NET Web Form directories in the web.config configuration file. The code to do this is shown here:
<system.webServer>
  <defaultDocument>
    <files>
      <clear/>
      <add value="Default.aspx"/>
    </files>
  </defaultDocument>
</system.webServer>
The preceding code snippet also sets the default document to Default.aspx, or whatever other file you designate. The defaultDocument element is defined as part of the system.WebServer element. While the example lists one default, you can add multiple add elements that are contained within the files element. The server will try to return the page listed first and if that file does not exist will go to the next file name and attempt to return that file. It will continue through the list until if finds a matching a file to return.
Note the clear element. This is necessary to remove any other default documents that may have been set, such as in IIS for that web site. You are not required to add the clear element; however, by doing so you ensure that the only default documents being set are from your web.config file.
Friendly URLs
When you create an ASP.NET project, it includes a default set of configurations, including a default route. This default information is part of the App_StartRouteConfig.cs file (see Figure 8.3).

Figure 8.3 Initial RouteConfig.cs file
At this point you are concerned with only one of this file's sections, the first part that includes FriendlyUrlSettings. Adding the FriendlyUrlSettings allows you to call ASP.NET Web Forms without having to use the .aspx extension. That means you can create a link that accesses a file called ManageItem.aspx by calling ManageItem, without needing to include the extension in the URL.
Not only does FriendlyUrlSettings allow the use of a filename without the extension, it also allows other information to be added to the URL. This is another feature of friendly URLs, the ability to parse the complete URL value and break the information down for use within the code-behind of the page. Thus, ManageItem36 is understandable to the system and allows access to the value in the URL. This doesn't occur automatically, however; you have to do a little work to access this information. For example, suppose you want the user to access the URL http://www.servername.com/SomePage/2/20/2015, where the work will be handled by a page called SomePage.aspx. If the values appended to the URL represent a date, you would be able to access them as shown here:
protected void Page_Load(object sender, EventArgs e)
{
    List<string> segments = Request.GetFriendlyUrlSegments();
    int month = int.Parse(segments[0]);
    int day = int.Parse(segments[1]);
    int year = int.Parse(segments[2]);
}
Using FriendlyUrls enables you to build a consistent user experience, in terms of URLs, for both the ASP.NET MVC and Web Forms approaches. Before the introduction of FriendlyUrls, you would have had to take a more traditional query string approach such as
http://www.servername.com/SomePage.aspx?SearchDate=2-20-2015 Looking at the difference between the two URLs, you can see how it would be easier for something like a web search engine crawler to understand a specific resource that includes the data as part of the address, rather than a URL to a resource that simply includes some extraneous information stuck onto the end of the URL, as is the case with a query string.
There are additional ways to manage the URL segments that are the results of parsing a friendly URL, but they are included within other server controls that you work with in future chapters.
Using the ASP.NET Web Forms Navigation Controls
ASP.NET Web Forms provides more than the anchor tag to build out navigation features in your website. There are three different server controls that help you: the TreeView, Menu, and SiteMapPath controls. Each of these provides a different way to manage your links and the navigation within your web application. The TreeView and Menu controls create a list of links that are available for the user to click, while the SiteMapPath control provides a “breadcrumb” approach to viewing one's location in the context of the site. Figure 8.4 shows how the two link-management controls are rendered by default.

Figure 8.4 Default display of TreeView and Menu controls
These two controls have a slightly different way of rendering the same content. The TreeView uses an expander that opens or closes any contained submenu content, whereas the Menu control uses a “grow-out” approach that provides an area to mouse over that causes a submenu to expand and become visible.
As you may have noticed, both controls write out the same navigation structure. This structure is defined in a special type of file, a sitemap. In ASP.NET Web Forms, a sitemap is a special XML file containing the definition of the structure that the application uses. Listing 8.1 shows the content of the Web.sitemap file used to create the items displayed in Figure 8.4.
Each of the nodes in the file is a siteMapNode and may or may not contain other siteMapNodes. When one node contains others it creates a parent-child relationship that the control is able to interpret. The Menu control uses the right-facing arrow by default, while the TreeView control uses the +/– convention to enable access to child nodes.
Three attributes are part of a siteMapNode: the url, the title, and the description. The url is the page that you want to open, the title is the text that will be displayed as the clickable part of the link, and the description becomes the tooltip that appears when you hover the mouse over the link.
Getting the web.sitemap linked to the Menu and TreeView controls is not very complicated. Listing 8.2 shows the entire markup for the page shown earlier.
The new control that hasn't been discussed yet is a SiteMapDataSource. This is a server control that acts as a data source: a control that provides information to other controls. You may notice that it is not pointing to any specific sitemap file. That's because the default file it is looking for is the Web.sitemap file in the root directory of your application. If you want to use multiple sitemaps, or a nontraditionally named file, you need to do some extra work, making both configuration and code-behind changes. In the following Try It Out you aren't taking that route, instead creating a single Web.sitemap.
Now that the data for the menu is configured, the next task is adding something that uses the data. This is where the Menu server control comes into play.
Using the Menu Control
The ASP.NET Web Form Menu control takes the sitemap file and parses it into a series of HTML anchor elements that enable users to navigate through your application. As a typical server control, you can manage the various attributes of it, as shown in Table 8.1.
Table 8.1 Attributes of a Menu Control
| Property | Description |
| CssClass | Assigns a class name to the HTML elements that are written out during processing of the server control |
| DataSourceId | Manages the relationship between the Menu control and the SiteMapDataSource control that manages the connection to the sitemap file |
| DisappearAfter | Controls the amount of time a dynamic submenu is visible after the mouse is moved away. This value is in milliseconds, with a default value of 500, or .5 of a second. |
| IncludeStyleBlock | Specifies whether ASP.NET should render a block of cascading style sheet (CSS) definitions for the styles used in the menu. You can get a copy of the default CSS block that the Menu control generates by setting the property to true, running the page, and viewing the page in a browser. You can then view the page source in the browser and copy and paste the CSS block into the page markup or a separate file. |
| MaximumDynamicDisplayLevels | Specifies the number of dynamic submenu levels that the client is provided. A 3, for example, means that only those values nested three or fewer levels deep will be rendered. Any items that are more than three levels deep are not displayed as part of this menu. |
| Orientation | Provides the direction in which the menu will be written, horizontal or vertical |
| RenderingMode | Specifies whether the Menu control renders HTML table elements and inline styles, or list item elements and Cascading Style Sheet (CSS) styles |
| StaticDisplayLevels | Defines the number of non-dynamic levels that will be written out by the Menu control |
| Target | Specifies the target window where the requested page will be opened |
The next step is to take advantage of this information and add a menu control to the sample application, as demonstrated in the following Try It Out.
The content in Figure 8.11 includes an interesting item that you will take advantage of when adding styling to the Menu control. There are two major approaches to styling user controls, and the Menu control enables both of them. The first is the “old-school” approach whereby you add styling directly to the control. That is why you see attributes such as BackColor and BorderColor available in the Menu control; these give you complete control, at the control level, over the look and feel of the rendered control.
The second approach, and the one that you have used so far, is through the use of CSS. In the following Try It Out, you add some styling to your menu structure.
Navigation in ASP.NET Web Forms is supported by the traditional Web Forms approach of a server control, in this case a Menu control. The Menu control reads in an XML file and then renders the appropriate HTML out to the page. You may be asking yourself why you would want to take this approach rather than just build out the menu yourself manually. One of the main benefits that this approach offers is the capability to change your menu structure on the fly. Because the file is read every time the menu is created, you can change the complete navigation schema of your site without having to make any code changes. This can be especially useful as you get feedback on your site from your users. This flexibility allows you to continually monitor the user's experience and change your site without having to maintain any source code.
You do not have the same capability when using the ASP.NET MVC approach to building a navigation structure, as it requires building those menu links manually. You look at this next.
Navigating in ASP.NET MVC
Navigation in an ASP.NET Web Forms application is pretty easy to understand: a URL is requested, and if there is a corresponding separate, physical page that has the same name, then that page is called, the processing occurs, and the output from the processing is returned to the client. Interpreting the request is straightforward. However, ASP.NET MVC is different because determining what code should be called involves a completely different process. There is no physical page that responds to the request. Instead, a simple method is called—once the system has figured out which method to call.
Doing this work of determining which method to call is known as ASP.NET MVC routing. Routing is a pattern-matching system that is responsible for mapping incoming browser requests to specified MVC controller actions (methods). When the ASP.NET MVC application launches, the application registers one or more URL patterns within the framework's route table. These patterns tell the routing engine what to do with requests that match those patterns. When the routing engine receives a request at runtime, it attempts to match that request's URL against the URL patterns registered with it and returns the response according to a pattern match, as shown in Figure 8.13.
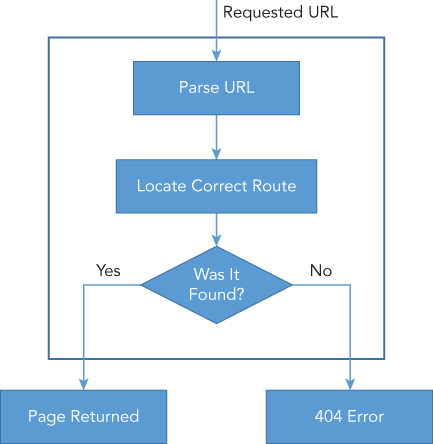
Figure 8.13 Routing process
Routing
ASP.NET MVC routes are responsible for determining which controller method is executed for a given URL. A route is a URL pattern that is mapped to a handler, an action on a controller. The route consists of the following properties:
- Route name: A route name is used as a specific reference to a given route. Each route must have a unique name. Generally this name is only necessary when defining the route, but it also provides the capability to access a specific route in code if needed.
- URL pattern: A URL pattern contains both literal values, such as a known string value, and variable placeholders (referred to as URL parameters). These literals and placeholders are segments of the URL that are delimited by the slash (/) character.
- Defaults: Whenever you define a route with a variable placeholder, you have the opportunity to assign a default value to that parameter. You can assign defaults to every placeholder or not at all—whatever makes sense for the approach you are going to take in building your routes.
- Constraints: A set of constraints are rules that are applied to a URL pattern to more narrowly define the URLs to which it may be matched.
Each different approach to building out a URL structure needs to have a corresponding route definition. An ASP.NET application built through Visual Studio scaffolding also includes a default route.
Default Configuration and Route
When you create an ASP.NET MVC project it includes a set of routing configurations, including a default route. This default information is part of the App_StartRouteConfig.cs file, shown in Figure 8.14.

Figure 8.14 The initial RouteConfig.cs file
As shown, the default ASP.NET MVC project templates add a generic route that uses the following URL convention to define the URL pattern for a given request into three named segments:
url: "{controller}/{action}/{id}"With the preceding template, a URL of http://www.servername.com/DemoModel/Details/57 would result in the application trying to find a controller named “DemoModelController” that has an action (method) named “Details” that accepts a parameter that is either a string or an integer. MVC has a very convention-based approach whereby controller files need to have the phrase “Controller” as part of the filename so that the ASP.NET MVC routing engine can find the appropriate class to call.
Once the routing engine finds the correct controller, the next thing it tries to do is find an action that matches the name that is part of the URL. When the engine finds the action(s) that fit the name, it then analyzes the parameter list to determine whether there's a match between the information within the URL and the parameters required for those action(s). However, you have to be careful about how you set this up. Consider the following code:
public ActionResult Details(int id)
{
    return View();
}
public ActionResult Details(string id)
{
    return View();
}
This seems pretty straightforward in that one might expect http://www.servername.com/DemoModel/Details/57 to go to the first method while http://www.servername.com/DemoModel/Details/Orange would go to the second method. However, you will instead get the error shown in Figure 8.15.

Figure 8.15 Ambiguous action exception
This error indicates that the route parsing is not as obvious as it may seem. The expectation is that the URL can be parsed into a single action on a specific controller. This means you have to ensure that you avoid the type of method overloading that you can do in traditional C# development. Therefore, if you want to be able to pass either an integer or a string into a method, then you have to make some changes to your approach by either creating a new action to handle one of the approaches, such as a DetailsByName(string name) action, or making a single method and doing work within the method, as demonstrated in the following example:
public ActionResult Details(string id)
{
    int idInt;
    if (int.TryParse(id, out idInt)
    {
        // do work if id is an integer that can pull product from database by Id
    }
    else
    {
        // do the work when id is NOT an integer, such as getting product by name
    }
    return View();
}
In this case, the best approach is to always create a new action that specifically handles the different case. Having a set of actions as shown in the following example is easier for both developers and the system in order to successfully understand what the expectation is when looking at the route parsing:
public ActionResult Details(int id)
{
    // do work to pull product from database by Id
    return View();
}
public ActionResult DetailsByName(string id)
{
    // do work to pull product from database by Name
    return View();
}
The first method would be called by http://www.servername.com/DemoModel/Details/57, while the second would be called by http://www.servername.com/DemoModel/DetailsByName/Orange. Both of these approaches would then be covered by the default route, so no additional routing configuration would be required.
The default route does not necessarily serve every need, however. Imagine the case in which you may want users to have the capability to get more specific details than with a single parameter value—such as looking at the DemoModel and wanting details about an orange one. The URL that you would want to use is http://www.servername.com/DemoModel/SomeAction/8/orange. The default route doesn't match this; in fact, if you add this to any of the links that are already working, you will see that the system tries to parse the URL, but it won't find a successful match and you'll get a 404 - File Not Found Error.
What you need to do instead is create a new route in the RouteConfig.cs file and then add the new action to the controller, as shown in the following code snippet. This ensures that the URL of http://www.servername.com/DemoModel/SomeAction/8/orange is able to find the appropriate action and the parameters are set successfully.
routes.MapRoute(
        name: "twoParam",
        url: "{controller}/{action}/{id}/{name}",
        defaults: new { action = "Index"},
        constraints: new { id = @"d+" }
    );
public ActionResult DetailsWithName(int id, string name)
{
    return View();
}
There are two different approaches to building routes and actions. In the first, routes are configured in such a way that the same method can be called through multiple different URLs. In the second, there is less concern with reuse, so more actions are created to handle each of the various cases. It is recommended that you always take the second approach; it may require you to create more actions, but each action will be more specific to the given criteria. This results in an application that is easier to understand because it is easier to predict which action serves each request.
Understanding the relationship between the URL and the actions that respond to the request is rather important when you are attempting to build a navigational schema in ASP.NET MVC. Now that you have a deeper understanding of how routing works, the next section explains how to create navigational structures without ASP.NET Web Forms server controls.
Creating a Navigational Structure
As you saw earlier, the main component of a navigational structure is the <a> HTML anchor tag. This is all that was created from the ASP.NET Web Forms Menu control, so that is all that you have to create when working with an ASP.NET MVC application. Because there is no concept of a server control to help with this, you have to create all of the structure by hand, albeit with support from HTML helpers.
Fortunately, however, you already have an understanding of what the output needs to look like because you already created the HTML as part of the Admin section. This means that you only have to create the same structure to achieve a user interface that is identical to the look and feel of the Web Forms area of the site.
As you start to do this, you will find that some helpers are available:
- The
@Html.ActionLinkmethod writes out a complete anchor tag. - The
@Url.Actionmethod creates a URL, rather than a complete anchor tag.
An example of each follows:
@Html.ActionLink("textLink", "actionName", "controllerName")
<a href="@Url.Action("actionName","controllerName")">textLink</a>
These are both rendered to the same HTML:
<a href="/controllerName/actionName">textLink</a>This means that when you create an ASP.NET MVC navigation structure, you create the links yourself, rather than having a server control do it. However, you do not have to write them all by hand because you can use the helpers, as demonstrated in the next Try It Out.
Programmatic Redirection
Programmatic redirection is a very useful and common action in ASP.NET web applications. One of the most common uses is when a form is submitted to create some kind of new item in the database. When using ASP.NET Web Forms, the page containing the form that was filled out posts back to itself, where the information is validated and persisted. A traditional scenario would then send the user to a list page where they are able to see the item that they just added to the list.
ASP.NET Web Forms support two different approaches to redirecting users to a different page programmatically: client-side and server-side. When using client-side redirection, the server sends a special response to the client that the browser interprets as a request to fetch a new page. With server-side redirection, the server accepts the request at one resource and then programmatically uses another resource to process it.
Programmatically Redirecting the Client to a Different Page
You can use two different commands to manage redirection that happens within the browser on the client side: Response.Redirect and Response.RedirectPermanent. They each do slightly different things: The Redirect returns a 302 status code to the browser, while the RedirectPermanent command sends a 301 code to the browser. The 302 code means the requested resource has temporarily moved to another location, while the 301 code tells the browser that the resource has permanently moved to a different location.
Neither the user nor the browser notices a difference between the two codes. However, both are important for search engine optimization (SEO). If a search engine robot crawling the website encounters the temporary redirect, it knows to continue going. However, when the search engine robot encounters the permanent redirect it knows that it should not index the old location and instead ensure that the new location is indexed in its place.
Using either of these two commands is relatively straightforward:
Response.Redirect("~/SomeFile.aspx");
Response.RedirectPermanent("~/SomeFile")
As soon as the system comes to a Redirect or RedirectPermanent command, it immediately returns the status code to the client browser. This means that any code after this command is not called. This flow is shown in Figure 8.17.

Figure 8.17 Client-side redirection flow
These client-side redirects are generally used only in ASP.NET Web Forms, not MVC. The technology is supported in MVC, but the ability to return any view from the controller generally means that there is no need to take this step. You will learn more about this in the section “Server-Side Redirects.”
In this next activity you will add a new page that will redirect the user to a different page.
Client-side redirects enable the developer to tell the client to request a different resource from a different address. This means that there is an extra request-response when the client gets the redirection request. As a result, there is a performance cost because of the second call. ASP.NET Web Forms also support server-side redirects. In addition, ASP.NET MVC supports server-side work that enables the developer to return various views as needed, basically eliminating the need for any client-side redirection at all.
Server-Side Redirects
Server-side redirects, or transfers, are different from client-side redirects in that the request is made for a specific resource. Rather than respond with that resource, the server runs the redirection command and instead responds with the content from that alternate resource as specified in the transfer.
There are two different ways to perform this transfer: Server.Transfer and Server.TransferRequest. The Transfer method terminates execution of the current page and starts execution of a new page by using the specified URL path of the page. The TransferRequest method differs in that it performs an asynchronous execution of the specified URL using the specified HTTP method and headers. This means that using the Transfer method requires a physical page that can be called (a Web Form), whereas the TransferRequest does not. Instead, the TransferRequest makes a complete call so that it can also transfer control to an MVC page.
When using Server.Transfer there are two possible parameters:
- The first is the URL of the resource that will be used to handle the request.
- The second, optional, parameter specifies whether the form body should be transferred with the new call.
The code looks like this:
Server.Transfer("/Admin/ItemList", true);This line of code tells the server to stop processing the current request and instead process the page at ‘Admin/ItemList’. The second parameter tells the system to include any of the form content that was submitted to the initial resource. In many cases you don't need to send the information along, but there may be situations when it would be useful. Because all the work is handled by the server, no additional time is spent moving the information around; therefore, it depends on whether you need that information. If you don't need it, don't include it. The second parameter is optional. If you don't include it, then the default behavior is to transfer the query string and form information during the transfer.
The second approach, TransferRequest, looks much the same, except it can have many more parameters:
public void TransferRequest(
    string path,
    bool preserveForm,
    string method,
    NameValueCollection headers
)
Server.TransferRequest("/DemoModel/Details/3", true, "GET", null);
You can transfer with just the first parameter, or with the first and second parameters if necessary, just as you can with the Transfer method. However, in many cases you may want to designate the HTTP verb to be used with the request, which requires that you also send along a set of request headers. In the preceding example, null is used because you didn't need to add any additional headers.
In this next Try It Out, you work with both of the transfer approaches to become familiar with what each one does as part of the request processing.
While both server and client transfers enable you to provide a different resource to manage processing of the request, they take a different approach. The client-side approach causes a redirection request to be sent to the browser. This means an additional client request-response cycle, as well as showing the user the new URL in the address bar of the browser. The server-side transfer eliminates the additional request-response cycle and it does not replace the URL in the browser's address bar. The last activity demonstrated how this enabled you to display the item detail created by another page while still showing the address of the WeeklySpecial.
Which approach you want to take depends upon your requirements. Generally, it comes down to whether or not you want to publicize the transfer. If you do, such as when a page has actually moved, then you want to use a Response.Redirect, perhaps even the Response.RedirectPermanent so that the replaced page can eventually be removed. If all you want to do is something like what the WeeklySpecial does in the sample application, then the Server.TransferRequest is a more appropriate way to manage the redirection. As with every other choice, it ultimately depends on what you want the end user's experience to be like.
The last type of redirection is the concept of server-side redirection in MVC. As mentioned earlier, this is a very different concept, because the idea of redirecting from one page to another is just not the same because there are no pages in ASP.NET MVC. Figure 8.22 shows the difference between the two approaches if you were using a process whereby when an item is created, the UI returns the user to a list page.

Figure 8.22 Server transfer of page flow
The key difference between redirection in ASP.NET Web Forms and MVC is that the MVC controller simply determines what view will be returned, so there is no concept of transfer; the controller just returns the appropriate view.
Practical Tips on Navigation
Navigation is simultaneously one of the easiest parts of a website to build and one of the hardest parts of a site to design because it requires that you anticipate the reasons that all of your users will need and ensure a pleasant user experience for each of those reasons—especially for a site that will continue to grow. Keep in mind the following tips as you build out your navigational structure:
- Categorization is critical. As the information and functionality offered by your web application grows, it will become increasingly important for you to keep it organized in a way that makes sense to your users. Remember: It has to be something that your users can understand.
- Keep menu depth limited. Multiple submenus leads to confusion and difficulty in understanding the appropriate choice. When you legitimately have a deep set of relationships, don't make them all available at once. Instead, categorize them and expose additional levels as the user selects a certain path.
- The typical approach to building a set of MVC functionality is to have a controller for each individual model that you may want to work with. That isn't always necessary. Instead, your controllers should be aligned with the navigation path that your users will travel, rather than your data model. Sometimes they are strongly related, but don't assume that they always have to be that way.
- You know your business. Most likely your users do not. Don't build your navigation structure to emulate your business divisions unless these differences are obvious to your visitors. Instead, build your structure to emulate the reasons why your users are visiting your site, and categorize your menu options to reflect those reasons.
Summary
Creating a clear, intuitive navigation schema for your website is critical because it helps users access the site's different areas. The key to a navigational structure is the HTML anchor tag, <a>. This tag is the primary way to move from one page to another, so whenever you consider navigation you are actually considering how you are going to build your anchor tags.
An important part of the anchor tag is the address, or URL, of the resource being requested. There are two different types of these URLs, relative and absolute. An absolute URL points to the desired resource by using a complete Internet address. A relative URL, conversely, points to resources that are contained within your own application. Typically, absolute URLs are used when referencing URLs that are outside of your website or those URLs that remain the same regardless of where the application is running.
There are three primary menu-support controls in ASP.NET Web Forms, the Menu control and the TreeView control, both of which create complete navigational structures, while the SiteMapPath control displays a breadcrumb. This chapter covered the Menu Control, but using the TreeView control is very similar. When you are working in MVC, you do not have the luxury of being able to use server controls, so you have to build the navigational structure yourself, but you do have several helpers: one that creates an anchor tag for you, and another that builds a URL based on various parameters.
The navigational structure enables users to move around your application. You also have the capability to move around your site programmatically. There are two primary ways. With the first, your application sends a code to the client and the client requests the new resource, the Response.Redirect. With the second, the server handles the transfers; a request is made for one resource, and the server transfers the request to a different resource that creates the response, a Server.Transfer and Server.TransferRequest.
Both of the programmatic approaches are ASP.NET Web Forms–based, MVC does not use the same kind of page-to-page transfer approach. Rather, the controller handles the request and determines which view to return to the user. There is no transfer, simply a selection of views, because, unlike in Web Forms, the URL references a piece of code rather than a physical page in the file system.
Exercises
1. Your user is on a page at http://www.servername.com/admin/list.aspx and you have the following link:
<a href=“˜/default.aspx”>Home</a>. Where would they end up if they clicked the link?2. If you were a new developer on a project for which a bug report is received regarding a page found at http://www.servername.com/results/, where would you look for the code that caused that specific defect?
3. Why were friendly URLs implemented and what advantages do they bring to ASP.NET Web Forms development?
What You Learned in This Chapter
| Absolute URL | A URL that contains the full description of the resource being requested. This means that not only does it reference the location within the site, it also references the location on the Web through the use of domain and server names. |
| Client-Side Redirection | Redirection in which the server sends a redirect message to the client. These messages have a status of either 302 or 301, with the latter indicating a permanent move, and the former indicating a temporary move. |
| Default Document | An ASP.NET Web Forms concept whereby a server administrator can assign a specific page that handles requests to a directory when a specific page is not requested. This is how the system knows, for example, to respond to a request to http://servername.com with the code in the Default.aspx page; it is the default document. The default document can be assigned across the site or be set up for each directory within the site. |
| Friendly URLs | Firendly URLs are an enhancement to ASP.NET Web Forms that enables the system to understand requests to .aspx pages that do not contain the file extension. It is also provides the built-in capability to parse information from the URL for access within the code-behind. This enables replacing querystring variables with URL variables. |
| HTML.ActionLink | An HTML helper for ASP.NET MVC that accepts a set of parameters (such as controller and action) to build out a complete anchor tag. |
| Menu Control | ASP.NET Web Forms server control that builds out a complete menu. It has built-in dynamic menuing that creates fly-out submenus from parent menu items. It takes an XML file as the reference source; this file contains all the menu information needed to create the visual element. |
| Relative URL | Provides direction to the requested resource by working with everything after the server and domain names. This means that it can only point to items within the same server application. |
| Routing | A concept whereby ASP.NET MVC applications can build out interpretation schemes for incoming URLS. This enables the system to determine, from the requested URL, what controller needs to be called and which action in that controller will be used to create the response object, generally a view. |
| Server-Side Redirection | The capability to respond to a specific request by running a different set of code. Typically, a request is received by a resource that handles the creation of the response. However, in a server transfer, the request is received by a resource that then forwards that request to a different resource which provides the response. |
| TreeView Control | An ASP.NET Web Forms server control that builds out a complete menu. It has built-in dynamic menuing that enables opening and closing submenus. It takes an XML file as the reference source; this file contains all the menu information needed to create the visual element. |
| URI | Uniform Resource Identifier, a complete description of a URL. A URI contains a URL that adds extra metadata that may be useful programmatically. |
| URL.Action | An ASP.NET helper that assists in building a URL. Typically, the helper is used to build the href content of an anchor element, but it is also used to create visible URLs. It takes a series of parameters, generally including at least the controller and the action, to build the complete URL. |
| Virtual Application | Concept whereby an IIS website can run many different applications in subdirectories. There is always a default application, but there can be as many different virtual applications as necessary. They are generally referenced through a URL such as http://www.servername.com/virtualapplicationname/*. |