WHAT YOU WILL LEARN IN THIS CHAPTER
How to send SMS messages programmatically from within your application
How to send SMS messages using the built-in Messaging application
How to receive incoming SMS messages
How to send e-mail messages from your application
How to connect to the Web using HTTP
How to consume Web services
Once your basic Android application is up and running, the next interesting thing you can add to it is the capability to communicate with the outside world. You may want your application to send an SMS message to another phone when an event happens (such as when you reach a particular geographical location), or you may wish to access a Web service that provides certain services (such as currency exchange, weather, etc.).
In this chapter, you learn how to send and receive SMS messages programmatically from within your Android application.
You will also learn how to use the HTTP protocol to talk to web servers so that you can download text and binary data. The last part of this chapter shows you how to parse XML files to extract the relevant parts of an XML file — a technique that is useful if you are accessing Web services.
SMS messaging is one of the main killer applications on a mobile phone today — for some users as necessary as the phone itself. Any mobile phone you buy today should have at least SMS messaging capabilities, and nearly all users of any age know how to send and receive such messages. Android comes with a built-in SMS application that enables you to send and receive SMS messages. However, in some cases you might want to integrate SMS capabilities into your own Android application. For example, you might want to write an application that automatically sends a SMS message at regular time intervals. For example, this would be useful if you wanted to track the location of your kids — simply give them an Android device that sends out an SMS message containing its geographical location every 30 minutes. Now you know if they really went to the library after school! (Of course, that would also mean you would have to pay the fees incurred in sending all those SMS messages...)
This section describes how you can programmatically send and receive SMS messages in your Android applications. The good news for Android developers is that you don't need a real device to test SMS messaging: The free Android Emulator provides that capability.
You will first learn how to send SMS messages programmatically from within your application. Using this approach, your application can automatically send an SMS message to a recipient without user intervention. The following Try It Out shows you how.
In the previous section, you learned how to programmatically send SMS messages using the SmsManager class; but how do you know that the message has been sent correctly? To do so, you can create two PendingIntent objects to monitor the status of the SMS message-sending process. These two PendingIntent objects are passed to the last two arguments of the sendTextMessage() method. The following code snippets show how you can monitor the status of the SMS message being sent:
//---sends an SMS message to another device---
private void sendSMS(String phoneNumber, String message)
{
    String SENT = "SMS_SENT";
    String DELIVERED = "SMS_DELIVERED";

    PendingIntent sentPI = PendingIntent.getBroadcast(this, 0,
        newIntent(SENT), 0);

    PendingIntent deliveredPI = PendingIntent.getBroadcast(this, 0,
newIntent(DELIVERED), 0);//---when the SMS has been sent---registerReceiver(new BroadcastReceiver(){@OverridepublicvoidonReceive(Context arg0, Intent arg1) {switch(getResultCode()){case Activity.RESULT_OK:Toast.makeText(getBaseContext(), "SMS sent",Toast.LENGTH_SHORT).show();break;case SmsManager.RESULT_ERROR_GENERIC_FAILURE:Toast.makeText(getBaseContext(), "Generic failure",Toast.LENGTH_SHORT).show();break;case SmsManager.RESULT_ERROR_NO_SERVICE:Toast.makeText(getBaseContext(), "No service",Toast.LENGTH_SHORT).show();break;case SmsManager.RESULT_ERROR_NULL_PDUw:Toast.makeText(getBaseContext(), "Null PDU",Toast.LENGTH_SHORT).show();break;case SmsManager.RESULT_ERROR_RADIO_OFF:Toast.makeText(getBaseContext(), "Radio off",Toast.LENGTH_SHORT).show();break;}}}, newIntentFilter(SENT));//---when the SMS has been delivered---registerReceiver(new BroadcastReceiver(){@OverridepublicvoidonReceive(Context arg0, Intent arg1) {switch(getResultCode()){case Activity.RESULT_OK:Toast.makeText(getBaseContext(), "SMS delivered",Toast.LENGTH_SHORT).show();break;case Activity.RESULT_CANCELED:Toast.makeText(getBaseContext(), "SMS not delivered",Toast.LENGTH_SHORT).show();break;}}}, newIntentFilter(DELIVERED));SmsManager sms = SmsManager.getDefault();sms.sendTextMessage(phoneNumber, null, message, sentPI, deliveredPI);}
Here, you created two PendingIntent objects. You then registered for two BroadcastReceivers. These two BroadcastReceivers listen for intents that match "SMS_SENT" and "SMS_DELIVERED" (which are fired by the OS when the message has been sent and delivered, respectively). Within each BroadcastReceiver you override the onReceive() method and get the current result code.
The two PendingIntent objects are passed into the last two arguments of the sendTextMessage() method:
sms.sendTextMessage(phoneNumber, null, message, sentPI, deliveredPI);In this case, whether a message has been sent correctly or failed to be delivered, you will be notified of its status via the two PendingIntent objects.
Using the SmsManager class, you can send SMS messages from within your application without the need to involve the built-in Messaging application. However, sometimes it would be easier if you could simply invoke the built-in Messaging application and let it do all the work of sending the message.
To activate the built-in Messaging application from within your application, you can use an Intent object together with the MIME type "vnd.android-dir/mms-sms" as shown by the following code snippet:
/** Called when the activity is first created. */
@Override
public void onCreate(Bundle savedInstanceState) {
    super.onCreate(savedInstanceState);
    setContentView(R.layout.main);

    btnSendSMS = (Button) findViewById(R.id.btnSendSMS);
    btnSendSMS.setOnClickListener(new View.OnClickListener()
    {
        public void onClick(View v)
        {
            //sendSMS("5556", "Hello my friends!");
            Intent i = new
                Intent(android.content.Intent.ACTION_VIEW);
            i.putExtra("address", "5556; 5558; 5560");

            i.putExtra("sms_body", "Hello my friends!");
            i.setType("vnd.android-dir/mms-sms");
            startActivity(i);
        }
   });
}
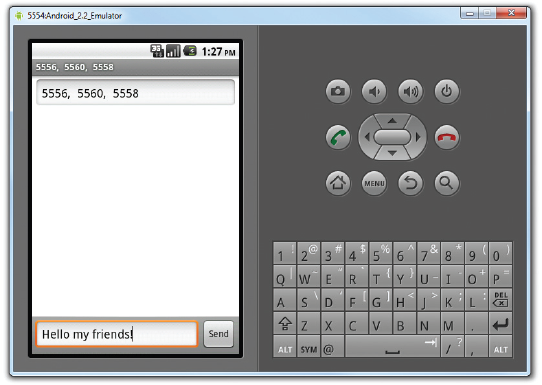
This will invoke the Messaging application, as shown in Figure 8-3. Note that you can send your SMS to multiple recipients by simply separating each phone number with a semicolon (in the putExtra() method).
Besides sending SMS messages from your Android applications, you can also receive incoming SMS messages from within your application by using a BroadcastReceiver object. This is useful when you want your application to perform an action when a certain SMS message is received. For example, you might want to track the location of your phone in case it is lost or stolen. In this case, you can write an application that automatically listens for SMS messages containing some secret code. Once that message is received, you can then send an SMS message containing the location's coordinates back to the sender.
The following Try It Out shows how to programmatically listen for incoming SMS messages.
The previous section described how you can use a BroadcastReceiver class to listen for incoming SMS messages and then use the Toast class to display the received SMS message. Often, you'll want to send the SMS message back to the main activity of your application. For example, you might wish to display the message in a TextView. The following Try It Out demonstrates how you can do this.
The previous example shows how you can pass the SMS message received to be displayed in the activity. However, in many situations your activity may be in the background when the SMS message is received. In this case, it would be useful to be able to bring the activity to the foreground when a message is received. The following Try It Out shows you how.
While the ability to send and receive SMS messages makes Android a very compelling platform for developing sophisticated applications, this flexibility comes with a price. A seemingly innocent application may send SMS messages behind the scene without the user knowing, as demonstrated by a recent case of an SMS-based Trojan Android application (http://forum.vodafone.co.nz/topic/5719-android-sms-trojan-warning/). Claiming to be a media player, once installed, the application sends SMS messages to a premium number, resulting in huge phone bills for the user.
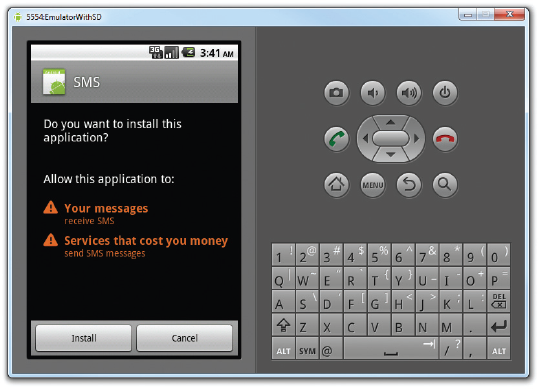
While the user needs to explicitly give permission to your application, the request for permission is only shown at installation time. Figure 8-7 shows the request for permission that appears when you try to install the application (as an APK file; Chapter 11 discusses packaging your Android applications in more detail) on the emulator (same as on a real device). If the user clicks the Install button, he or she is considered to have given permission to allow the application to send and receive SMS messages. This is dangerous, as after the application is installed it can send and receive SMS messages without ever prompting the user again.
In addition to this, the application can also "sniff" for incoming SMS messages. For example, based on the techniques you learned from the previous section, you can easily write an application that checks for certain keywords in the SMS message. When an SMS message contains the keyword you are looking for, you can then use the Location Manager (discussed in Chapter 9) to obtain your geographical location and then send the coordinates back to the sender of the SMS message. The sender could then easily track your location. All these tasks can be done easily without the user knowing it! That said, users should try to avoid installing Android applications that come from dubious sources, such as from unknown websites, strangers, etc.
Like SMS messaging, Android also supports e-mail. The Gmail/Email application on Android enables you to configure an e-mail account using POP3 or IMAP. Besides sending and receiving e-mails using the Gmail/Email application, you can also send e-mail messages programmatically from within your Android application. The following Try It Out shows you how.
The previous sections covered how to get connected to the outside world using SMS and e-mail. Another way to achieve that is to use the HTTP protocol. Using the HTTP protocol, you can perform a wide variety of tasks, such as downloading web pages from a web server, downloading binary data, and so on.
The following Try It Out creates an Android project so that you can use the HTTP protocol to connect to the Web to download all sorts of data.
One of the common tasks you need to perform is downloading binary data from the Web. For example, you may want to download an image from a server so that you can display it in your application. The following Try It Out shows how this is done.
Besides downloading binary data, you can also download plain-text files. For example, you might be writing an RSS Reader application and hence need to download RSS XML feeds for processing. The following Try It Out shows how you can download a plain-text file in your application.
So far you have seen how to download images and text from the Web. The previous section showed how to download an RSS feed from a server. Very often, you need to download XML files and parse the contents (a good example of this is consuming Web services). Therefore, in this section you learn how to connect to a Web service using the HTTP GET method. Once the Web service returns a result in XML, you will extract the relevant parts and display its content using the Toast class.
For this example, the web method you will be using is from http://services.aonaware.com/DictService/DictService.asmx?op=Define. This web method is from a Dictionary Web service that returns the definitions of a given word.
The web method takes a request in the following format:
GET /DictService/DictService.asmx/Define?word=string HTTP/1.1
Host: services.aonaware.com
HTTP/1.1 200 OK
Content-Type: text/xml; charset=utf-8
Content-Length: length
It returns a response in the following format:
<?xml version="1.0" encoding="utf-8"?>
<WordDefinition xmlns="http://services.aonaware.com/webservices/">
  <Word>string</Word>
  <Definitions>
    <Definition>
      <Word>string</Word>
      <Dictionary>
        <Id>string</Id>
        <Name>string</Name>
      </Dictionary>
      <WordDefinition>string</WordDefinition>
    </Definition>
    <Definition>
      <Word>string</Word>
      <Dictionary>
        <Id>string</Id>
        <Name>string</Name>
      </Dictionary>
      <WordDefinition>string</WordDefinition>
    </Definition>
  </Definitions>
</WordDefinition>
Hence, to obtain the definition of a word, you need to establish an HTTP connection to the web method and then parse the XML result that is returned. The following Try It Out shows you how.
So far, all the connections made in the previous few sections are all synchronous – that is, the connection to a server will not return until the data is received. In real life, this presents some problems due to network connections being inherently slow. When you connect to a server to download some data, the user interface of your application remains frozen until a response is obtained. In most cases, this is not acceptable. Hence, you need to ensure that the connection to the server is made in an asynchronous fashion.
The easiest way to connect to the server asynchronously is to use the AsyncTask class available in the Android SDK. Using AsyncTask enables you to perform background tasks in a separate thread and then return the result in a UI thread. Using this class enables you to perform background operations without needing to handle complex threading issues.
Using the previous example of downloading an image from the server and then displaying the image in an ImageView, you could wrap the code in an instance of the AsyncTask class, as shown below:
public class MainActivity extends Activity {
    ImageView img;

private class BackgroundTask extends AsyncTask
    <String, Void, Bitmap> {
        protected Bitmap doInBackground(String... url) {
//---download an image---Bitmap bitmap = DownloadImage(url[0]);return bitmap;}protected void onPostExecute(Bitmap bitmap) {ImageView img = (ImageView) findViewById(R.id.img);img.setImageBitmap(bitmap);}}private InputStream OpenHttpConnection(String urlString) throws IOException { ... }
Basically, you defined a class that extends the AsyncTask class. In this case, there are two methods within the BackgroundTask class — doInBackground() and onPostExecute(). You put all the code that needs to be run asynchronously in the doInBackground() method. When the task is completed, the result is passed back via the onPostExecute() method. The onPostExecute() method is executed on the UI thread, hence it is thread safe to update the ImageView with the bitmap downloaded from the server.
Note
You will learn more about the AsyncTask class in Chapter 10 which covers developing services in Android.
To perform the asynchronous tasks, simply create an instance of the BackgroundTask class and call its execute() method:
@Override
public void onCreate(Bundle savedInstanceState) {
    super.onCreate(savedInstanceState);
    setContentView(R.layout.main);
        new BackgroundTask().execute(
        "http://www.streetcar.org/mim/cable/images/cable-01.jpg");
}This chapter described the various ways to communicate with the outside world. You first learned how to send and receive SMS messages. You then learned how to send e-mail messages from within your Android application. Besides SMS and e-mail, another way to communicate with the outside world is through the use of the HTTP protocol. Using the HTTP protocol, you can download data from a web server. One good application of this is to talk to Web services, whereby you need to parse XML files.

