Chapter 5: Collisions, Sound, and End Conditions – Making the Game Playable
This is the final phase of the first project. By the end of this chapter, you will have your first completed game. Once you have Timber!!! up and running, be sure to read the last section of this chapter as it will suggest ways to make the game better.
In this chapter, we will cover the following topics:
- Adding the rest of the sprites
- Handling the player input
- Animating the flying log
- Handling death
- Adding sound effects
- Adding features and improving Timber!!!
Preparing the player (and other sprites)
Let's add the code for the player's sprite as well as a few more sprites and textures at the same time. The following, quite large, block of code also adds a gravestone sprite for when the player gets squashed, an axe sprite to chop with, and a log sprite that can whiz away each time the player chops.
Notice that, after the spritePlayer object, we declare a side variable, playerSide, to keep track of where the player is currently standing. Furthermore, we add some extra variables for the spriteLog object, including logSpeedX, logSpeedY, and logActive, to store how fast the log will move and whether it is currently moving. The spriteAxe also has two related float constant variables to remember where the ideal pixel position is on both the left and the right.
Add the following block of code just before the while(window.isOpen()) code, like we have done so often before. Note that all of the code in the following block is new, not just the highlighted code. I haven't provided any extra context for this block of code as the while(window.isOpen()) should be easy to identify. The highlighted code is the code we have just discussed.
Add the entirety of the following code, just before the while(window.isOpen()) line, and make a mental note of the highlighted lines we briefly discussed. It will make the rest of this chapter's code easier to understand:
// Prepare the player
Texture texturePlayer;
texturePlayer.loadFromFile("graphics/player.png");
Sprite spritePlayer;
spritePlayer.setTexture(texturePlayer);
spritePlayer.setPosition(580, 720);
// The player starts on the left
side playerSide = side::LEFT;
// Prepare the gravestone
Texture textureRIP;
textureRIP.loadFromFile("graphics/rip.png");
Sprite spriteRIP;
spriteRIP.setTexture(textureRIP);
spriteRIP.setPosition(600, 860);
// Prepare the axe
Texture textureAxe;
textureAxe.loadFromFile("graphics/axe.png");
Sprite spriteAxe;
spriteAxe.setTexture(textureAxe);
spriteAxe.setPosition(700, 830);
// Line the axe up with the tree
const float AXE_POSITION_LEFT = 700;
const float AXE_POSITION_RIGHT = 1075;
// Prepare the flying log
Texture textureLog;
textureLog.loadFromFile("graphics/log.png");
Sprite spriteLog;
spriteLog.setTexture(textureLog);
spriteLog.setPosition(810, 720);
// Some other useful log related variables
bool logActive = false;
float logSpeedX = 1000;
float logSpeedY = -1500;
In the preceding code, we added quite a few new variables. They are hard to explain in full until we get to where we actually use them, but here is an overview of what they will be used for. There is a variable of the side enumeration type called playerSide that is initialized to left. This will track which side of the tree the player is on.
There are two const float values that determine the horizontal position the axe will be drawn at, depending on whether the player is on the left-or right-hand side of the tree.
There are also three variables to help to keep control of the log as it is chopped and flies off of the tree, bool to determine whether the log is in motion (logActive) and two float values to hold the horizontal and vertical speeds of the log.
Now, we can draw all of our new sprites.
Drawing the player and other sprites
Before we add the code to move the player and use all of our new sprites, let's draw them. We are doing it this way so that as we add code to update/change/move them, we will be able to see what is happening.
Add the following highlighted code to draw the four new sprites:
// Draw the tree
window.draw(spriteTree);
// Draw the player
window.draw(spritePlayer);
// Draw the axe
window.draw(spriteAxe);
// Draw the flying log
window.draw(spriteLog);
// Draw the gravestone
window.draw(spriteRIP);
// Draw the bee
window.draw(spriteBee);
The preceding code passes our four new sprites, one after the other, to the draw function.
Run the game and you will see our new sprites in the scene:

We are really close to a working game now. The next task is to write some code to allow the player to control what happens.
Handling the player's input
A few different things depend on the movement of the player, as follows:
- When to show the axe
- When to begin animating the log
- When to move all of the branches down
Therefore, it makes sense to set up keyboard handling for the player who's chopping. Once this is done, we can put all of the features we just mentioned into the same part of the code.
Let's think for a moment about how we detect keyboard presses. Each frame, we test whether a particular keyboard key is currently being held down. If it is, we take action. If the Esc key is being held down, we quit the game, and if the Enter key is being held down, we restart the game. So far, this has been sufficient for our needs.
There is, however, a problem with this approach when we try and handle the chopping of the tree. The problem has always been there; it just didn't matter until now. Depending on how powerful your PC is, the game loop could be executing thousands of times per second. Each and every pass through the game loop that a key is held down, it is detected, and the related code will execute.
So, actually, every time you press Enter to restart the game, you are most likely restarting it well in excess of a hundred times. This is because even the briefest of presses will last a significant fraction of a second. You can verify this by running the game and holding down the Enter key. Note that the time-bar doesn't move. This is because the game is being restarted over and over again, hundreds or even thousands of times a second.
If we don't use a different approach for the player chopping, then just one attempted chop will bring the entire tree down in a mere fraction of a second. We need to be a bit more sophisticated. What we will do is allow the player to chop, and then when they do so, disable the code that detects a key press. We will then detect when the player removes their finger from a key and then reenable the detection of key presses. Here are the steps laid out clearly:
- Wait for the player to use the left or right arrow keys to chop a log.
- When the player chops, disable key press detection.
- Wait for the player to remove their finger from a key.
- Reenable chop detection.
- Repeat from step 1.
This might sound complicated but, with SFML's help, this will be straightforward. Let's implement this now, one step at a time.
Add the following highlighted line of code, which declares a bool variable called acceptInput, which will be used to determine when to listen for chops and when to ignore them:
float logSpeedX = 1000;
float logSpeedY = -1500;
// Control the player input
bool acceptInput = false;
while (window.isOpen())
{
Now that we have our Boolean set up, we can move on to the next step.
Handling setting up a new game
So that we're ready to handle chops, add the following highlighted code to the if block that starts a new game:
/*
****************************************
Handle the players input
****************************************
*/
if (Keyboard::isKeyPressed(Keyboard::Escape))
{
window.close();
}
// Start the game
if (Keyboard::isKeyPressed(Keyboard::Return))
{
paused = false;
// Reset the time and the score
score = 0;
timeRemaining = 6;
// Make all the branches disappear -
// starting in the second position
for (int i = 1; i < NUM_BRANCHES; i++)
{
branchPositions[i] = side::NONE;
}
// Make sure the gravestone is hidden
spriteRIP.setPosition(675, 2000);
// Move the player into position
spritePlayer.setPosition(580, 720);
acceptInput = true;
}
/*
****************************************
Update the scene
****************************************
*/
In the previous code, we are using a for loop to prepare the tree with no branches. This is fair to the player because, if the game started with a branch right above their head, it would be considered unsporting. Then, we simply move the gravestone off of the screen and the player into their starting location on the left. The last thing the preceding code does is set acceptInput to true.
We are now ready to receive chopping key presses.
Detecting the player chopping
Now, we can handle the left and right cursor key presses. Add this simple if block, which only executes when acceptInput is true:
// Start the game
if (Keyboard::isKeyPressed(Keyboard::Return))
{
paused = false;
// Reset the time and the score
score = 0;
timeRemaining = 5;
// Make all the branches disappear
for (int i = 1; i < NUM_BRANCHES; i++)
{
branchPositions[i] = side::NONE;
}
// Make sure the gravestone is hidden
spriteRIP.setPosition(675, 2000);
// Move the player into position
spritePlayer.setPosition(675, 660);
acceptInput = true;
}
// Wrap the player controls to
// Make sure we are accepting input
if (acceptInput)
{
// More code here next...
}
/*
****************************************
Update the scene
****************************************
*/
Now, inside the if block that we just coded, add the following highlighted code to handle what happens when the player presses the right cursor key on the keyboard:
// Wrap the player controls to
// Make sure we are accepting input
if (acceptInput)
{
// More code here next...
// First handle pressing the right cursor key
if (Keyboard::isKeyPressed(Keyboard::Right))
{
// Make sure the player is on the right
playerSide = side::RIGHT;
score ++;
// Add to the amount of time remaining
timeRemaining += (2 / score) + .15;
spriteAxe.setPosition(AXE_POSITION_RIGHT,
spriteAxe.getPosition().y);
spritePlayer.setPosition(1200, 720);
// Update the branches
updateBranches(score);
// Set the log flying to the left
spriteLog.setPosition(810, 720);
logSpeedX = -5000;
logActive = true;
acceptInput = false;
}
// Handle the left cursor key
}
Quite a bit is happening in that preceding code, so let's go through it:
- First, we detect whether the player has chopped on the right-hand side of the tree. If they have, then we set playerSide to side::RIGHT. We will respond to the value of playerSide later in the code. Then, we add one to the score with score ++.
- The next line of code is slightly mysterious, but all that is happening is we are adding to the amount of time remaining. We are rewarding the player for taking action. The problem for the player, however, is that the higher the score gets, the less additional time is added on. You can play with this formula to make the game easier or harder.
- Then, the axe is moved into its right-hand-side position with spriteAxe.setPosition and the player sprite is moved into its right-hand-position as well.
- Next, we call updateBranches to move all the branches down one place and spawn a new random branch (or space) at the top of the tree.
- Then, spriteLog is moved into its starting position, camouflaged against the tree, and its speedX variable is set to a negative number so that it whizzes off to the left. Also, logActive is set to true so that the log moving code that we will write soon animates the log each frame.
- Finally, acceptInput is set to false. At this point, no more chops can be made by the player. We have solved the problem of the presses being detected too frequently, and we will see how we can reenable chopping soon.
Now, still inside the if(acceptInput) block that we just coded, add the following highlighted code to handle what happens when the player presses the left cursor key on the keyboard:
// Handle the left cursor key
if (Keyboard::isKeyPressed(Keyboard::Left))
{
// Make sure the player is on the left
playerSide = side::LEFT;
score++;
// Add to the amount of time remaining
timeRemaining += (2 / score) + .15;
spriteAxe.setPosition(AXE_POSITION_LEFT,
spriteAxe.getPosition().y);
spritePlayer.setPosition(580, 720);
// update the branches
updateBranches(score);
// set the log flying
spriteLog.setPosition(810, 720);
logSpeedX = 5000;
logActive = true;
acceptInput = false;
}
}
The previous code is just the same as the code that handles the right-hand-side chop, except that the sprites are positioned differently and the logSpeedX variable is set to a positive value so that the log whizzes to the right.
Now, we can code what happens when a keyboard key is released.
Detecting a key being released
To make the preceding code work beyond the first chop, we need to detect when the player releases a key and then set acceptInput back to true.
This is slightly different to the key handling we have seen so far. SFML has two different ways of detecting keyboard input from the player. We have already seen the first way when we handled the Enter key, and it is dynamic and instantaneous, which is exactly what we need to respond immediately to a key press.
The following code uses the method of detecting when a key is released. Enter the following highlighted code at the top of the Handle the players input section and then we will go through it:
/*
****************************************
Handle the players input
****************************************
*/
Event event;
while (window.pollEvent(event))
{
if (event.type == Event::KeyReleased && !paused)
{
// Listen for key presses again
acceptInput = true;
// hide the axe
spriteAxe.setPosition(2000,
spriteAxe.getPosition().y);
}
}
if (Keyboard::isKeyPressed(Keyboard::Escape))
{
window.close();
}
In the preceding code, we declare an object of the Event type called event. Then, we call the window.pollEvent function, passing in our new object, event. The pollEvent function puts data into the event object that describes an operating system event. This could be a key press, key release, mouse movement, mouse click, game controller action, or something that happened to the window itself (resized, moved, and so on).
The reason that we wrap our code in a while loop is because there might be many events stored in a queue. The window.pollEvent function will load them, one at a time, into event. With each pass through the loop, we will see whether we are interested in the current event and respond if we are. When window.pollEvent returns false, that means there are no more events in the queue and the while loop will exit.
This if condition (event.type == Event::KeyReleased && !paused) executes when both a key has been released and the game is not paused.
Inside the if block, we set acceptInput back to true and hide the axe sprite off screen.
You can now run the game and gaze in awe at the moving tree, swinging axe, and animated player. It won't, however, squash the player, and the log doesn't move yet when chopped.
Let's move on to making the log move.
Animating the chopped logs and the axe
When the player chops, logActive is set to true, so we can wrap some code in a block that only executes when logActive is true. Furthermore, each chop sets logSpeedX to either a positive or negative number, so the log is ready to start flying away from the tree in the correct direction.
Add the following highlighted code right after where we update the branch sprites:
// update the branch sprites
for (int i = 0; i < NUM_BRANCHES; i++)
{
float height = i * 150;
if (branchPositions[i] == side::LEFT)
{
// Move the sprite to the left side
branches[i].setPosition(610, height);
// Flip the sprite round the other way
branches[i].setRotation(180);
}
else if (branchPositions[i] == side::RIGHT)
{
// Move the sprite to the right side
branches[i].setPosition(1330, height);
// Flip the sprite round the other way
branches[i].setRotation(0);
}
else
{
// Hide the branch
branches[i].setPosition(3000, height);
}
}
// Handle a flying log
if (logActive)
{
spriteLog.setPosition(
spriteLog.getPosition().x +
(logSpeedX * dt.asSeconds()),
spriteLog.getPosition().y +
(logSpeedY * dt.asSeconds()));
// Has the log reached the right hand edge?
if (spriteLog.getPosition().x < -100 ||
spriteLog.getPosition().x > 2000)
{
// Set it up ready to be a whole new log next frame
logActive = false;
spriteLog.setPosition(810, 720);
}
}
} // End if(!paused)
/*
****************************************
Draw the scene
****************************************
*/
The code sets the position of the sprite by getting its current horizontal and vertical location with getPosition and then adding to it using logSpeedX and logSpeedY, respectively, multiplied by dt.asSeconds.
After the log sprite has been moved each frame, the code uses an if block to see whether the sprite has disappeared out of view on either the left or the right. If it has, the log is moved back to its starting point, ready for the next chop.
If you run the game now, you will be able to see the log flying off to the appropriate side of the screen:

Now, let's move on to a more sensitive subject.
Handling death
Every game must end badly with either the player running out of time (which we have already handled) or getting squashed by a branch.
Detecting the player getting squashed is really simple. All we want to know is: does the last branch in the branchPositions array equal playerSide? If it does, the player is dead.
Add the following highlighted code that detects and executes when the player is squashed by a branch. We will talk about it later:
// Handle a flying log
if (logActive)
{
spriteLog.setPosition(
spriteLog.getPosition().x +
(logSpeedX * dt.asSeconds()),
spriteLog.getPosition().y +
(logSpeedY * dt.asSeconds()));
// Has the log reached the right-hand edge?
if (spriteLog.getPosition().x < -100 ||
spriteLog.getPosition().x > 2000)
{
// Set it up ready to be a whole new cloud next frame
logActive = false;
spriteLog.setPosition(800, 600);
}
}
// has the player been squished by a branch?
if (branchPositions[5] == playerSide)
{
// death
paused = true;
acceptInput = false;
// Draw the gravestone
spriteRIP.setPosition(525, 760);
// hide the player
spritePlayer.setPosition(2000, 660);
// Change the text of the message
messageText.setString("SQUISHED!!");
// Center it on the screen
FloatRect textRect = messageText.getLocalBounds();
messageText.setOrigin(textRect.left +
textRect.width / 2.0f,
textRect.top + textRect.height / 2.0f);
messageText.setPosition(1920 / 2.0f,
1080 / 2.0f);
}
} // End if(!paused)
/*
****************************************
Draw the scene
****************************************
*/
The first thing the preceding code does, after the player's demise, is set paused to true. Now, the loop will complete this frame and won't run the update part of the loop again until a new game is started by the player.
Then, we move the gravestone into position, near where the player was standing, and hide the player sprite off screen.
We set the String of messageText to "Squished!!" and then use the usual technique to center it on the screen.
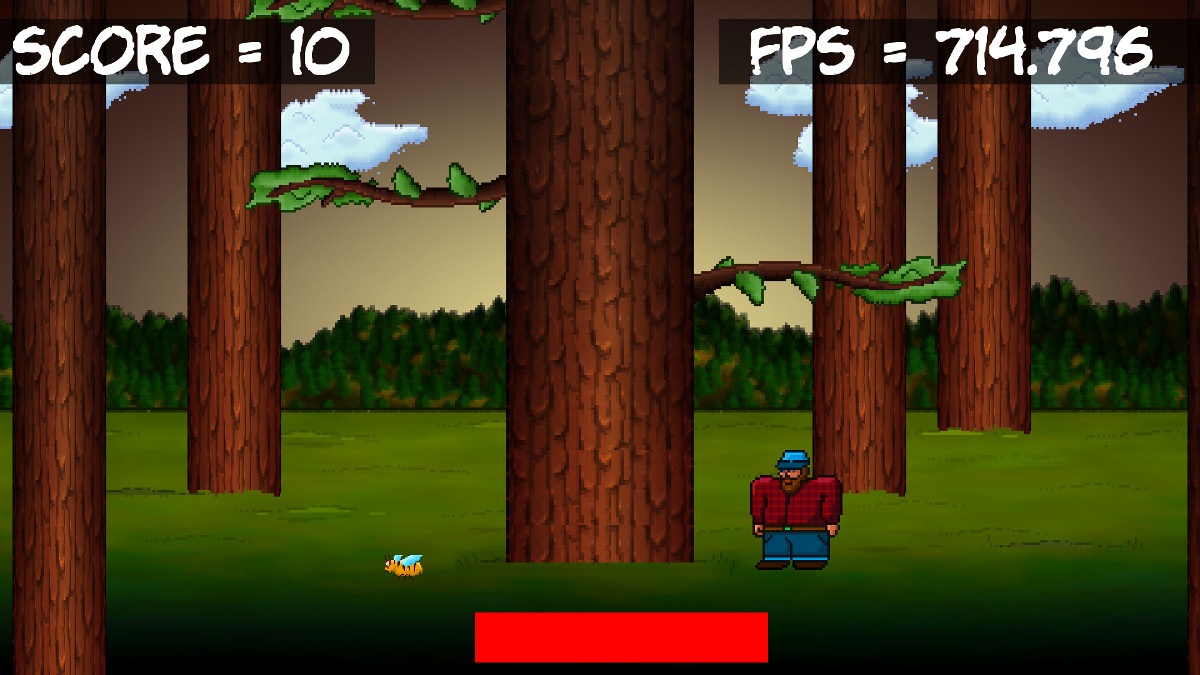
You can now run the game and play it for real. The following screenshot shows the player's final score and their gravestone, as well as the SQUISHED message:

There is just one more problem to deal with. Is it just me, or is it a little bit quiet?
Simple sound FX
In this section, we will add three sounds. Each sound will be played on a particular game event, that is, a simple thud sound whenever the player chops, a gloomy losing sound when the player runs out of time, and a retro crushing sound when the player is squashed to death.
How SFML sound works
SFML plays sound effects using two different classes. The first class is the SoundBuffer class. This is the class that holds the actual audio data from the sound file. It is SoundBuffer that is responsible for loading the .wav files into the PC's RAM in a format that can be played without any further decoding work.
When we write code for the sound effects in a minute, we will see that, once we have a SoundBuffer object with our sound stored in it, we will then create another object of the Sound type. We can then associate this Sound object with a SoundBuffer object. Then, at the appropriate moment in our code, we will be able to call the play function of the appropriate Sound object.
When to play the sounds
As we will see very soon, the C++ code to load and play sounds is really simple. What we need to consider, however, is when we call the play function, where in our code will we put the function calls to play? Let's see:
- The chop sound can be called from the key presses of the left and right cursor keys.
- The death sound can be played from the if block that detects that a tree has mangled the player.
- The out of time sound can be played from the if block which detects whether timeRemaining is less than zero.
Now, we can write our sound code.
Adding the sound code
First, we will add another #include directive to make the SFML sound-related classes available. Add the following highlighted code:
#include <sstream>
#include <SFML/Graphics.hpp>
#include <SFML/Audio.hpp>
using namespace sf;
Now, we will declare three different SoundBuffer objects, load three different sound files into them, and associate three different objects of the Sound type with the related objects of the SoundBuffer type. Add the following highlighted code:
// Control the player input
bool acceptInput = false;
// Prepare the sounds
// The player chopping sound
SoundBuffer chopBuffer;
chopBuffer.loadFromFile("sound/chop.wav");
Sound chop;
chop.setBuffer(chopBuffer);
// The player has met his end under a branch
SoundBuffer deathBuffer;
deathBuffer.loadFromFile("sound/death.wav");
Sound death;
death.setBuffer(deathBuffer);
// Out of time
SoundBuffer ootBuffer;
ootBuffer.loadFromFile("sound/out_of_time.wav");
Sound outOfTime;
outOfTime.setBuffer(ootBuffer);
while (window.isOpen())
{
Now, we can play our first sound effect. Add the following single line of code to the if block, which detects that the player has pressed the right cursor key:
// Wrap the player controls to
// Make sure we are accepting input
if (acceptInput)
{
// More code here next...
// First handle pressing the right cursor key
if (Keyboard::isKeyPressed(Keyboard::Right))
{
// Make sure the player is on the right
playerSide = side::RIGHT;
score++;
timeRemaining += (2 / score) + .15;
spriteAxe.setPosition(AXE_POSITION_RIGHT,
spriteAxe.getPosition().y);
spritePlayer.setPosition(1120, 660);
// update the branches
updateBranches(score);
// set the log flying to the left
spriteLog.setPosition(800, 600);
logSpeedX = -5000;
logActive = true;
acceptInput = false;
// Play a chop sound
chop.play();
}
Tip
Add exactly the same code at the end of the next block of code that starts with if (Keyboard::isKeyPressed(Keyboard::Left)) to make a chopping sound when the player chops on the left-hand side of the tree.
Find the code that deals with the player running out of time and add the following highlighted code to play the out of time-related sound effect:
if (timeRemaining <= 0.f) {
// Pause the game
paused = true;
// Change the message shown to the player
messageText.setString("Out of time!!");
//Reposition the text based on its new size
FloatRect textRect = messageText.getLocalBounds();
messageText.setOrigin(textRect.left +
textRect.width / 2.0f,
textRect.top +
textRect.height / 2.0f);
messageText.setPosition(1920 / 2.0f, 1080 / 2.0f);
// Play the out of time sound
outOfTime.play();
}
Finally, to play the death sound when the player is squished, add the following highlighted code to the if block, which executes when the bottom branch is on the same side as the player:
// has the player been squished by a branch?
if (branchPositions[5] == playerSide)
{
// death
paused = true;
acceptInput = false;
// Draw the gravestone
spriteRIP.setPosition(675, 660);
// hide the player
spritePlayer.setPosition(2000, 660);
messageText.setString("SQUISHED!!");
FloatRect textRect = messageText.getLocalBounds();
messageText.setOrigin(textRect.left +
textRect.width / 2.0f,
textRect.top + textRect.height / 2.0f);
messageText.setPosition(1920 / 2.0f, 1080 / 2.0f);
// Play the death sound
death.play();
}
That's it! We have finished the first game. Let's discuss some possible enhancements before we move on to the second project.
Improving the game and the code
Take a look at these suggested enhancements for the Timber!!! project. You can see the enhancements in action in the Runnable folder of the download bundle:
- Speed up the code: There is a part of our code that is slowing down our game. It doesn't matter for this simple game, but we can speed things up by putting the sstream code in a block that only executes occasionally. After all, we don't need to update the score thousands of times a second!
- Debugging console: Let's add some more text so that we can see the current frame rate. Like the score, we don't need to update this too often. Once every hundred frames will do.
- Add more trees to the background: Simply add some more tree sprites and draw them in whatever position looks good (some nearer the camera and some further away).
- Improve the visibility of the HUD text: We can draw simple RectangleShape objects behind the score and the FPS counter. Black with a bit of transparency will look quite good.
- Make the cloud code more efficient: As we alluded to a few times already, we can use our knowledge of arrays to make the cloud code a lot shorter.
Take a look at the game in action with extra trees, clouds, and a transparent background for the text:
To see the code for these enhancements, take a look in the Timber Enhanced Version folder of the download bundle.
Summary
In this chapter, we added the finishing touches and graphics to the Timber!!! game. If, prior to this book, you had never coded a single line of C++, then you can give yourself a big pat on the back. In just five modest chapters, you have gone from zero knowledge to a working game.
However, we will not be congratulating ourselves for too long because, in the next chapter, we will move straight on to some slightly more hardcore C++. While the next game, a simple Pong game, in some ways is simpler than Timber!!, learning about writing our own classes will prepare us for building more complicated and fuller-featured games.
FAQ
Q) I admit that the arrays solution for the clouds was more efficient. But do we really need three separate arrays—one for active, one for speed, and one for the sprite itself?
A) If we look at the properties/variables that various objects have, for example, Sprite objects, we will see they are numerous. Sprites have position, color, size, rotation, and more as well. But it would be just perfect if they had active, speed, and perhaps some more. The problem is that the coders at SFML can't possibly predict all of the ways that we will want to use their Sprite class. Fortunately, we can make our own classes. We could make a class called Cloud that has a Boolean for active and int for speed. We can even give our Cloud class an SFML Sprite object. We could then simplify our cloud code even further. We will look at designing our own classes in the next chapter.