Chapter 2: Variables, Operators, and Decisions – Animating Sprites
In this chapter, we will do quite a bit more drawing on the screen and, to achieve this, we will need to learn about some of the basics of C++. We will learn how to use variables to remember and manipulate values, and we will begin to add more graphics to the game. As this chapter progresses, we will find out how we can manipulate these values to animate the graphics. These values are known as variables.
Here is what is in store:
- Learning all about C++ variables
- Seeing how to manipulate the values stored in variables
- Adding a static tree graphic, ready for the player to chop away at
- Drawing and animating a bee and three clouds
C++ variables
Variables are the way that our C++ games store and manipulate values/data. If we want to know how much health the player has, we need a variable. Perhaps you want to know how many zombies are left in the current wave. That is a variable as well. If you need to remember the name of the player who got a high score, you guessed it—we need a variable for that. Is the game over or still playing? Yes, that's a variable too.
Variables are named identifiers for locations in the memory of the PC. The memory of the PC is where computer programs are stored as they are being executed. So, we might name a variable numberOfZombies and that variable could refer to a place in memory that stores a value to represent the number of zombies that are left in the current wave.
The way that computer systems address locations in memory is complex. Programming languages use variables to give us a human-friendly way to manage our data in that memory.
The small amount we have just mentioned about variables implies that there must be different types of variable.
Types of variables
There is a wide variety of C++ variable types (see the next tip about variables in a couple of pages). It would easily be possible to spend an entire chapter discussing them. What follows is a table of the most commonly used types of variable in this book. Then, in the next section, we will look at how to use each of these variable types:

The compiler must be told what type of variable it is so that it can allocate the right amount of memory for it. It is good practice to use the best and most appropriate type for each variable you use. In practice, however, you will often get away with promoting a variable. Perhaps you need a floating-point number with just five significant digits? The compiler won't complain if you store it as a double. However, if you tried to store a float or a double in an int, it will change/cast the value to fit the int. As we progress through this book, I will make it plain what the best variable type to use in each case is, and we will even see a few instances where we deliberately convert/cast between variable types.
A few extra details worth noticing in the preceding table include the f postfix next to all of the float values. This f postfix tells the compiler that the value is a float type, not double. A floating-point value without the f prefix is assumed to be double. See the next tip about variables for more about this.
As we mentioned previously, there are many more types. If you want to find out more about types, see the next tip about variables.
User-defined types
User-defined types are way more advanced than the types we have just seen. When we talk about user-defined types in C++, we are usually talking about classes. We briefly talked about classes and their related objects in the previous chapter. We would write code in a separate file, sometimes two. We are then able to declare, initialize, and use them. We will leave how we define/create our own types until Chapter 6, Object-Oriented Programming – Starting the Pong Game.
Declaring and initializing variables
So far, we know that variables are for storing the data/values that our games need in order to work. For example, a variable would represent the number of lives a player has or the player's name. We also know that there is a wide selection of different types of values that these variables can represent, such as int, float, bool, and so on. Of course, what we haven't seen yet is how we would actually go about using a variable.
There are two stages when it comes to creating and preparing a new variable. These stages are called declaration and initialization.
Declaring variables
We can declare variables in C++ like this:
// What is the player's score?
int playerScore;
// What is the player's first initial
char playerInitial;
// What is the value of pi
float valuePi;
// Is the player alive or dead?
bool isAlive;
Once we have written the code to declare a variable, it exists and is ready to be used in our code. However, we will usually want to give the variable an appropriate value, which is where initialization comes in.
Initializing variables
Now that we have declared the variables with meaningful names, we can initialize those same variables with appropriate values, like this:
playerScore = 0;
playerInitial = 'J';
valuePi = 3.141f;
isAlive = true;
At this point, the variable exists and holds a specific value. Soon, we will see how we can change, test, and respond to these values. Next, we will see that we can combine declaring and initializing into one step.
Declaring and initializing in one step
When it suits us, we can combine the declaration and initialization steps into one. Sometimes, we know what value a variable must start the program with, and declaring and initializing in one step is appropriate. Often, we won't, and we will first declare the variable and then initialize it later in the program, like so:
int playerScore = 0;
char playerInitial = 'J';
float valuePi = 3.141f;
bool isAlive = true;
Variables tip
As promised, here is the tip on variables. If you want to see a complete list of C++ types, then check out this web page: http://www.tutorialspoint.com/cplusplus/cpp_data_types.htm. If you want a deeper discussion on float, double, and the f postfix, then read this: http://www.cplusplus.com/forum/beginner/24483/. Finally, if you want to know the ins and outs of the ASCII character codes, then there is some more information here: http://www.cplusplus.com/doc/ascii/. Note that these links are for the extra curious reader and we have already discussed enough in order to proceed.
Constants
Sometimes, we need to make sure that a value can never be changed. To achieve this, we can declare and initialize a constant using the const keyword:
const float PI = 3.141f;
const int PLANETS_IN_SOLAR_SYSTEM = 8;
const int NUMBER_OF_ENEMIES = 2000;
It is convention to declare constants in all uppercase. The values of the preceding constants can never be altered. We will see some constants in action in Chapter 4, Loops, Arrays, Switches, Enumerations, and Functions – Implementing Game Mechanics.
Declaring and initializing user-defined types
We have already seen examples of how we can declare and initialize some SFML defined types. It is because of the way that we can create/define these types (classes) so flexibly that the way we declare and initialize them is also so varied. Here are a couple of reminders for declaring and initializing user-defined types from the previous chapter.
Create an object of the VideoMode type called vm and initialize it with two int values, 1920 and 1080:
// Create a video mode object
VideoMode vm(1920, 1080);
Create an object of the Texture type called textureBackground, but don't do any initialization:
// Create a texture to hold a graphic on the GPU
Texture textureBackground;
Note that it is possible (in fact, very likely) that even though we are not suggesting any specific values with which to initialize textureBackground, some setup of variables may take place internally. Whether or not an object needs/has the option of giving initialization values at this point is entirely dependent on how the class is coded and is almost infinitely flexible. This further suggests that, when we get to write our own classes, there will be some complexity. Fortunately, this also means we will have significant power to design our types/classes to be just what we need to make our games! Add this huge flexibility to the power of the SFML designed classes and the potential for our games is almost limitless.
We will see a few more user created types/classes provided by SFML in this chapter too, and loads more throughout this book.
We have now seen that a variable is a named location in the computer's memory and that a variable can be a simple integer through to a more powerful object. Now that we know we can initialize these variables, we will look at how we can manipulate the values they hold.
Manipulating variables
At this point, we know exactly what variables are, the main types they can be, and how to declare and initialize them. We still can't do that much with them, however. We need to manipulate our variables; add them; take them away; and multiply, divide, and test them.
First, we will deal with how we can manipulate them and then we will look at how and why we test them.
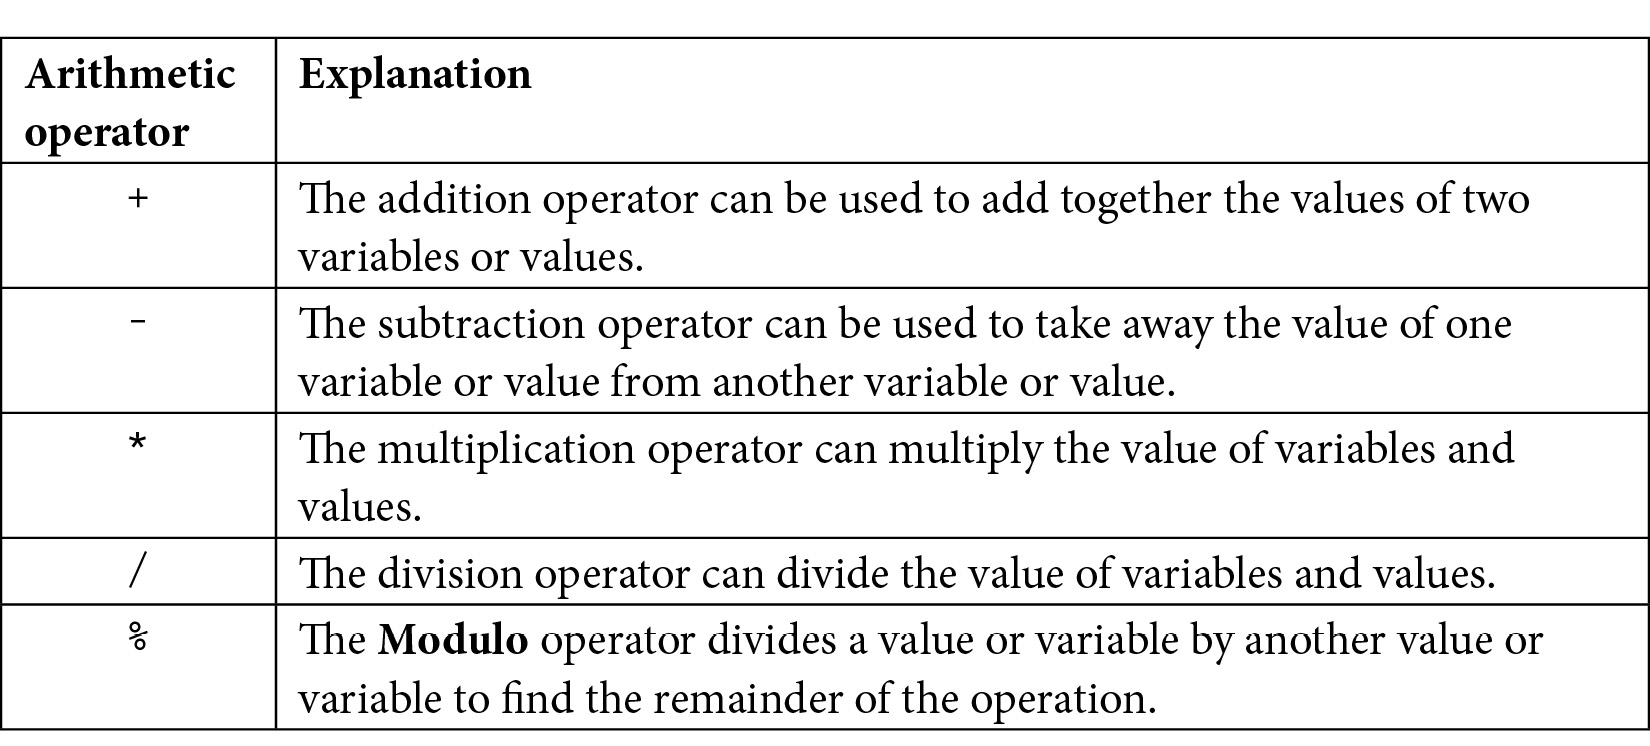
C++ arithmetic and assignment operators
In order to manipulate variables, C++ has a range of arithmetic operators and assignment operators. Fortunately, most arithmetic and assignment operators are quite intuitive to use and those that aren't are quite easy to explain. To get us started, let's look at a table of arithmetic operators, followed by a table of assignment operators, all of which we will regularly use throughout this book:
And now for the assignment operators:

Important note
Technically, all of these operators, except for =, --, and ++, are called compound assignment operators because they comprise more than one operator.
Now that we have seen a good range of arithmetic and assignment operators, we can actually look at how we can manipulate our variables by combining operators, variables, and values to form expressions.
Getting things done with expressions
Expressions are the result of combining variables, operators, and values. Using expressions, we can arrive at a result. Furthermore, as we will soon see, we can use an expression in a test. These tests can be used to decide what our code should do next. First, let's look at some simple expressions we might see in our game code. Here is one example of a simple expression:
// Player gets a new high score
hiScore = score;
In the preceding code, the value held in the score variable is used to change the value in the hiScore variable. The two variables now hold the same value, but note that they are still separate and distinct variables (places in memory). This would likely be just what we need when the player beats a high score. Here is another example:
// Set the score to 100
score = 100;
Let's take a look at the addition operator, which used in conjunction with the assignment operator:
// Add to the score when an alien is shot
score = aliensShot + wavesCleared;
In the preceding code, the values held by aliensShot and wavesCleared are added together using the addition operator and then the result of the addition is assigned to the score variable. Now, let's take a look at the following code:
// Add 100 to whatever the score currently is
score = score + 100;
Note that it is perfectly acceptable to use the same variable on both sides of an operator. In the preceding code, 100 is added to the value held by the score variable and then this new value is then assigned back into score.
Look at the subtraction operator in conjunction with the assignment operator. The following code subtracts the value on the right-hand side of the subtraction operator from the value on the left. It is usually used in conjunction with the assignment operator, perhaps like so:
// Uh oh lost a life
lives = lives - 1;
It can also be used like this:
// How many aliens left at end of game
aliensRemaining = aliensTotal - aliensDestroyed;
Next, we will see how we might use the division operator. The following code divides the number on the left by the number on the right. Again, it is usually used with the assignment operator, like this:
// Make the remaining hit points lower based on swordLevel
hitPoints = hitPoints / swordLevel;
It can also be used like this:
// Give something, but not everything, back for recycling a block
recycledValueOfBlock = originalValue / .9f;
Obviously, in the previous example, the recycledValueOfBlock variable will need to be of the float type to accurately store the answer to a calculation like that.
Perhaps unsurprisingly, we could use the multiplication operator like this:
// answer is equal to 100, of course
answer = 10 * 10;
It can also be used like this:
// biggerAnswer = 1000, of course
biggerAnswer = 10 * 10 * 10;
Important note
As a side note, have you ever wondered how C++ got its name? C++ is an extension of the C language. Its inventor, Bjarne Stroustrup, originally called it "C with classes", but the name evolved. If you are interested, you can read the story of C++ at http://www.cplusplus.com/info/history/.
Now, let's look at the increment operator in action. This is a neat way to add 1 to the value of one of our game's variables.
Take a look at the following code:
// Add one to myVariable
myVariable = myVariable + 1;
The preceding code gives the same result as the following code:
// Much neater and quicker
myVariable ++;
The decrement operator, --, is, you guessed it, a quick way to subtract 1 from something, like so:
playerHealth = playerHealth -1;
This is the same as doing the following:
playerHealth --;
Let's look at a few more operators in action and then we can get back to building the Timber!!! game. The addition, subtraction, multiplication, and division operators each have a related operator that combines their primary function (adding, subtracting, and so on) with assignment. They allow us to use more concise code when we want to perform the primary function of the operator, followed by assignment. Have a look at the four examples (one for each operator) that follow:
someVariable = 10;
// Multiply the variable by 10 and put the answer
// back in the variable
someVariable *= 10;
// someVariable now equals 100
// Divide someVariable by 5 put the answer back
// into the variable
someVariable /= 5;
// someVariable now equals 20
// Add 3 to someVariable and put the answer back
// into the variable
someVariable += 3;
// someVariable now equals 23
// Take 25 from someVariable and put the answer back
// into the variable
someVariable -= 25;
// someVariable now equals -2
In the preceding four examples, we can see that the *=, /=, +=, and -= operators can be used to shorten the syntax when we want to use one of the four arithmetic operators followed by an assignment. We will do this quite a bit throughout this book.
It's time to add some more sprites to our game.
Adding clouds, a tree, and a buzzing bee
In this section, we will add clouds, a tree, and a buzzing bee to our Timber!!! game. First, we will add a tree. This is going to be easy. The reason for this is because the tree doesn't move. We will use the same procedure that we used in the previous chapter when we drew the background. The bee and the clouds will also be easy to draw in their starting positions, but we will need to combine what we have just learned about manipulating variables with some new C++ topics to make them move.
Preparing the tree
Let's get ready to draw the tree! Add the following highlighted code. Notice the unhighlighted code, which is the code we have already written. This should help you to identify that the new code should be typed immediately after we set the position of the background but before the start of the main game loop. We will provide a recap regarding what is going on in the new code after we have added it:
int main()
{
// Create a video mode object
VideoMode vm(1920, 1080);
// Create and open a window for the game
RenderWindow window(vm, "Timber!!!", Style::Fullscreen);
// Create a texture to hold a graphic on the GPU
Texture textureBackground;
// Load a graphic into the texture
textureBackground.loadFromFile("graphics/background.png");
// Create a sprite
Sprite spriteBackground;
// Attach the texture to the sprite
spriteBackground.setTexture(textureBackground);
// Set the spriteBackground to cover the screen
spriteBackground.setPosition(0, 0);
// Make a tree sprite
Texture textureTree;
textureTree.loadFromFile("graphics/tree.png");
Sprite spriteTree;
spriteTree.setTexture(textureTree);
spriteTree.setPosition(810, 0);
while (window.isOpen())
{
This is what the following five lines of code (excluding the comment) do:
- First, we create an object of the Texture type called textureTree.
- Next, we load a graphic into the texture from the tree.png graphics file.
- Then, we declare an object of the Sprite type called spriteTree
- After, we associate textureTree with spriteTree. Whenever we draw spriteTree, it will show the textureTree texture, which is a neat tree graphic.
- Finally, we set the position of the tree using the coordinates 810 on the x axis and 0 on the y axis.
The tree sprite is ready to draw, along with the tree texture. Let's move on to the bee object, which is handled in an almost identical manner.
Preparing the bee
Preparing the bee sprite is very similar but not identical to preparing the tree sprite. The difference between the following code and the tree code is small but important. Since the bee needs to move, we also declare two bee-related variables. Add the following highlighted code and see whether you can work out how we might use the beeActive and beeSpeed variables:
// Make a tree sprite
Texture textureTree;
textureTree.loadFromFile("graphics/tree.png");
Sprite spriteTree;
spriteTree.setTexture(textureTree);
spriteTree.setPosition(810, 0);
// Prepare the bee
Texture textureBee;
textureBee.loadFromFile("graphics/bee.png");
Sprite spriteBee;
spriteBee.setTexture(textureBee);
spriteBee.setPosition(0, 800);
// Is the bee currently moving?
bool beeActive = false;
// How fast can the bee fly
float beeSpeed = 0.0f;
while (window.isOpen())
{
We create a bee in the same way we created a background and a tree. We use a Texture, a Sprite, and associate the two. Note that, in the previous bee code, there's some new code we haven't seen before. There is a bool variable for determining whether the bee is active. Remember that a bool variable can be either true or false. We initialize beeActive to false for now.
Next, we declare a new float variable called beeSpeed. This will hold the speed in pixels per second that our bee will fly across the screen at.
Soon, we will see how we use these two new variables to move the bee. Before we do, let's set up some clouds in an almost identical manner.
Preparing the clouds
Add the following highlighted code. Study the new code and try and work out what it will do:
// Prepare the bee
Texture textureBee;
textureBee.loadFromFile("graphics/bee.png");
Sprite spriteBee;
spriteBee.setTexture(textureBee);
spriteBee.setPosition(0, 800);
// Is the bee currently moving?
bool beeActive = false;
// How fast can the bee fly
float beeSpeed = 0.0f;
// make 3 cloud sprites from 1 texture
Texture textureCloud;
// Load 1 new texture
textureCloud.loadFromFile("graphics/cloud.png");
// 3 New sprites with the same texture
Sprite spriteCloud1;
Sprite spriteCloud2;
Sprite spriteCloud3;
spriteCloud1.setTexture(textureCloud);
spriteCloud2.setTexture(textureCloud);
spriteCloud3.setTexture(textureCloud);
// Position the clouds on the left of the screen
// at different heights
spriteCloud1.setPosition(0, 0);
spriteCloud2.setPosition(0, 250);
spriteCloud3.setPosition(0, 500);
// Are the clouds currently on screen?
bool cloud1Active = false;
bool cloud2Active = false;
bool cloud3Active = false;
// How fast is each cloud?
float cloud1Speed = 0.0f;
float cloud2Speed = 0.0f;
float cloud3Speed = 0.0f;
while (window.isOpen())
{
The only thing about the code we have just added that might seem a little odd is that we have only one object of the Texture type. It is completely normal for multiple Sprite objects to share a texture. Once a Texture is stored in GPU memory, it can be associated with a Sprite object very quickly. It is only the initial loading of the graphic in the loadFromFile code that is a relatively slow operation. Of course, if we wanted three different shaped clouds, then we would need three textures.
Apart from the minor texture issue, the code we have just added is nothing new compared to the bee. The only difference is that there are three cloud sprites, three bool variables to determine whether each cloud is active, and three float variables to hold the speed for each cloud.
At this stage, all of the sprites and variables have been prepared. We can now move on to drawing them.
Drawing the tree, the bee, and the clouds
Finally, we can draw them all to the screen by adding the following highlighted code in the drawing section:
/*
****************************************
Draw the scene
****************************************
*/
// Clear everything from the last run frame
window.clear();
// Draw our game scene here
window.draw(spriteBackground);
// Draw the clouds
window.draw(spriteCloud1);
window.draw(spriteCloud2);
window.draw(spriteCloud3);
// Draw the tree
window.draw(spriteTree);
// Draw the insect
window.draw(spriteBee);
// Show everything we just drew
window.display();
Drawing the three clouds, the bee, and the tree is done in the same way that the background was drawn. Note, however, the order in which we draw the different objects to the screen. We must draw all of the graphics after the background, or they will be covered, and we must draw the clouds before the tree, or they will look a bit odd drifting in front of the tree. The bee would look OK either in front or behind the tree. I opted to draw the bee in front of the tree so that it can try and distract our lumberjack, a bit like a real bee might.
Run Timber!!! and gaze in awe at the tree, three clouds, and a bee that… don't do anything! They look like they are lining up for a race; a race where the bee has to go backward:

Using what we know about operators, we could try and move the graphics we have just added, but there's a problem. The problem is that real clouds and bees move in a non-uniform manner. They don't have a set speed or location, with these elements determined by factors such as wind speed or how much of a hurry the bee might be in. To the casual observer, the path they take and their speed appear to be random.
Random numbers
Random numbers are useful for lots of reasons in games—perhaps determining what card the player is dealt or how much damage within a certain range is subtracted from an enemy's health. We will now learn how to generate random numbers to determine the starting location and speed of the bee and the clouds.
Generating random numbers in C++
To generate random numbers, we will need to use some more C++ functions—two more, to be precise. Don't add any code to the game yet. Let's just look at the syntax and the steps that are required with some hypothetical code.
Computers can't genuinely pick random numbers. They can only use algorithms/calculations to pick a number that appears to be random. So that this algorithm doesn't constantly return the same value, we must seed the random number generator. The seed can be any integer number, although it must be a different seed each time you require a unique random number. Look at the following code, which seeds the random number generator:
// Seed the random number generator with the time
srand((int)time(0));
The preceding code gets the time from the PC using the time function, that is, time(0). The call to the time function is enclosed as the value to be sent to the srand function. The result of this is that the current time is used as the seed.
The previous code is made to look a little more complicated because of the slightly unusual looking (int) syntax. What this does is convert/cast the value that's returned from time into an int. This is required by the srand function in this situation.
Important note
The term that's used to describe a conversion from one type to another is cast.
So, in summary, the previous line of code does the following:
- Gets the time using time
- Converts it into an int
- Sends this resulting value to srand, which seeds the random number generator
The time is, of course, always changing. This makes the time function a great way to seed the random number generator. However, think about what might happen if we seed the random number generator more than once and in such quick succession that time returns the same value. We will see and solve this problem when we animate our clouds.
At this stage, we can create the random number, between a range, and save it to a variable for later use, like so:
// Get the random number & save it to a variable called number
int number = (rand() % 100);
Notice the odd-looking way we assign a value to number. By using the Modulo operator (%) and the value of 100, we are asking for the remainder, after dividing the number returned from rand, by 100. When you divide by 100, the highest number you can possibly have as a remainder is 99. The lowest number possible is 0. Therefore, the previous code will generate a number between 0 and 99 inclusive. This knowledge will be useful for generating a random speed and starting location for our bees and clouds.
But before we can implement our random bees and clouds, we will need to learn how to make decisions in C++.
Making decisions with if and else
The C++ if and else keywords are what allow us to make decisions. We have already seen if in action in the previous chapter when we detected whether the player had pressed the Esc key each frame:
if (Keyboard::isKeyPressed(Keyboard::Escape))
{
window.close();
}
So far, we have seen how we can use arithmetic and assignment operators to create expressions. Now, we will look at some new operators.
Logical operators
Logical operators are going to help us to make decisions by building expressions that can be tested for a value of either true or false. At first, this might seem like quite a narrow choice and insufficient for the kind of choices that might be needed in an advanced PC game. Once we dig a little deeper, we will see that we can make all of the required decisions we will need with just a few of the logical operators.
Here is a table of the most useful logical operators. Look at them and the associated examples, and then we will see how we can put them to use:

Let's take a look at the C++ if and else keywords, which will allow us to put all of these logical operators to good use.
C++ if and else
Let's make the previous examples less abstract. Meet the C++ if keyword. We will use if and a few operators along with a small story to demonstrate their use. Next follows a made-up military situation that will hopefully be less abstract than the previous examples.
If they come over the bridge, shoot them!
The captain is dying and, knowing that his remaining subordinates are not very experienced, he decides to write a C++ program to convey his last orders for after he has died. The troops must hold one side of a bridge while waiting for reinforcements.
The first command the captain wants to make sure his troops understand is this:
"If they come over the bridge, shoot them!"
So, how do we simulate this situation in C++? We need a bool variable, isComingOverBridge. The following bit of code assumes that the isComingOverBridge variable has been declared and initialized to either true or false.
We can then use if like this:
if(isComingOverBridge)
{
// Shoot them
}
If the isComingOverBridge variable is equal to true, the code inside the opening and closing curly braces {...} will run. If not, the program continues after the if block and without running the code within it.
Shoot them … or else do this instead
The captain also wants to tell his troops to stay put if the enemy is not coming over the bridge.
Now, we can introduce another C++ keyword, else. When we want to explicitly do something when the if does not evaluate to true, we can use else.
For example, to tell the troops to stay put if the enemy is not coming over the bridge, we could write the following code:
if(isComingOverBridge)
{
// Shoot them
}
else
{
// Hold position
}
The captain then realized that the problem wasn't as simple as he first thought. What if the enemy comes over the bridge, but has too many troops? His squad would be overrun and slaughtered. So, he came up with the following code (we'll use some variables as well this time):
bool isComingOverBridge;
int enemyTroops;
int friendlyTroops;
// Initialize the previous variables, one way or another
// Now the if
if(isComingOverBridge && friendlyTroops > enemyTroops)
{
// shoot them
}
else if(isComingOverBridge && friendlyTroops < enemyTroops)
{
// blow the bridge
}
else
{
// Hold position
}
The preceding code has three possible paths of execution. First, if the enemy is coming over the bridge and the friendly troops are greater in number:
if(isComingOverBridge && friendlyTroops > enemyTroops)
The second occurs if the enemy troops are coming over the bridge but outnumber the friendly troops:
else if(isComingOveBridge && friendlyTroops < enemyTroops)
Then, the third and final possible outcome, which will execute if neither of the others is true, is captured by the final else, without an if condition.
Reader challenge
Can you spot a flaw with the preceding code? One that might leave a bunch of inexperienced troops in complete disarray? The possibility of the enemy troops and friendly troops being exactly equal in number has not been handled explicitly and would therefore be handled by the final else. The final else is meant for when there are no enemy troops. I guess any self-respecting captain would expect his troops to fight in this situation. He could change the first if statement to accommodate this possibility, like so:
if(isComingOverBridge && friendlyTroops >= enemyTroops)
Finally, the captain's last concern was that if the enemy came over the bridge waving the white flag of surrender and were promptly slaughtered, then his men would end up as war criminals. The C++ code that was needed was obvious. Using the wavingWhiteFlag Boolean variable, he wrote this test:
if (wavingWhiteFlag)
{
// Take prisoners
}
But where to put this code was less clear. In the end, the captain opted for the following nested solution and changed the test for wavingWhiteFlag to logical NOT, like this:
if (!wavingWhiteFlag)
{
// not surrendering so check everything else
if(isComingOverTheBridge && friendlyTroops >= enemyTroops)
{
// shoot them
}
else if(isComingOverTheBridge && friendlyTroops < enemyTroops)
{
// blow the bridge
}
}
else
{
// this is the else for our first if
// Take prisoners
}
// Holding position
This demonstrates that we can nest if and else statements inside one another to create quite deep and detailed decisions.
We could go on making more and more complicated decisions with if and else but what we have seen is more than enough as an introduction. It is probably worth pointing out, that often, there is more than one way to arrive at a solution to a problem. The right way will usually be the way that solves the problem in the clearest and simplest manner.
We are getting closer to having all of the C++ knowledge we need to be able to animate our clouds and bee. We have one final animation issue to discuss and then we can get back to the game.
Timing
Before we can move the bee and the clouds, we need to consider timing. As we already know, the main game loop executes repeatedly until the player presses the Escape key.
We have also learned that C++ and SFML are exceptionally fast. In fact, my aging laptop executes a simple game loop (like the current one) at around five thousand times per second.
The frame rate problem
Let's consider the speed of the bee. For the purpose of discussion, we could pretend that we are going to move it at 200 pixels per second. On a screen that is 1,920 pixels wide, it would take, very approximately, 10 seconds to cross the entire width, because 10 x 200 is 2,000 (near enough to 1,920).
Furthermore, we know that we can position any of our sprites with setPosition(...,...). We just need to put the x and the y coordinates in the parentheses.
In addition to setting the position of a sprite, we can also get the current position of a sprite. To get the horizontal x coordinate of the bee for example, we would use the following code:
int currentPosition = spriteBee.getPosition().x;
The current x coordinate of the bee is now stored in currentPosition. To move the bee to the right, we need to add the appropriate fraction of 200 (our intended speed) divided by 5,000 (the approximate frames per second on my laptop) to currentPosition, like this:
currentPosition += 200/5000;
Now, we would use setPosition to move our bee. It would smoothly move from left to right by 200 divided by 5,000 pixels each frame. But there are two big problems with this approach.
Frame rate is the number of times per second that our game loop is processed. That is, the number of times that we handle the players input, update the game objects, and draw them to the screen. We will expand on and discuss matters of frame rate now and throughout the rest of this book.
The frame rate on my laptop might not always be constant. The bee might look like it is intermittently "boosting" its way across the screen.
And of course, we want a wider audience for our game than just my laptop! Every PC's frame rate will vary, at least slightly. If you have an old PC, the bee will appear to be weighed down with lead, and if you have the latest gaming rig, it will probably be something of a blurry turbo bee.
Fortunately, this problem is the same for every game, and SFML has provided a solution. The easiest way to understand this solution is to implement it.
The SFML frame rate solution
We will now measure and use the frame rate to control our game. To get started with implementing this, add the following code just before the main game loop:
// How fast is each cloud?
float cloud1Speed = 0;
float cloud2Speed = 0;
float cloud3Speed = 0;
// Variables to control time itself
Clock clock;
while (window.isOpen())
{
In the previous code, we declare an object of the Clock type and we name it clock. The class name starts with a capital letter and the object name (which we will actually use) starts with a lowercase letter. The object name is arbitrary, but clock seems like an appropriate name for, well, a clock. We will add some more time-related variables here soon as well.
Now, in the update section of our game code, add the following highlighted code:
/*
****************************************
Update the scene
****************************************
*/
// Measure time
Time dt = clock.restart();
/*
****************************************
Draw the scene
****************************************
*/
The clock.restart() function, as you might expect, restarts the clock. We want to restart the clock every frame so that we can time how long each and every frame takes. In addition, however, it returns the amount of time that has elapsed since the last time we restarted the clock.
As a result of this, in the previous code, we are declaring an object of the Time type called dt and using it to store the value returned by the clock.restart() function.
Now, we have a Time object called dt that holds the amount of time that elapsed since the last time we updated the scene and restarted the clock. Maybe you can see where this is going? We will be using the elapsed time each frame to control how far we move the bee and the clouds.
Let's add some more code to the game and use everything we have learned so far about manipulating variables, generating random numbers, the if keyword, and the else keyword. Then, we will see how we can overcome the framerate problem with a Clock object and dt.
Important note
dt stands for delta time, which is the time between two updates.
Moving the clouds and the bee
Let's use the elapsed time since the last frame to breathe life into the bee and the clouds. This will solve the problem of having a consistent frame rate across different PCs.
Giving life to the bee
The first thing we want to do is set up the bee at a certain height and a certain speed. We only want to do this when the bee is inactive. Due to this, we will wrap the following code in an if block. Examine and add the following highlighted code, and then we will discuss it:
/*
****************************************
Update the scene
****************************************
*/
// Measure time
Time dt = clock.restart();
// Setup the bee
if (!beeActive)
{
// How fast is the bee
srand((int)time(0));
beeSpeed = (rand() % 200) + 200;
// How high is the bee
srand((int)time(0) * 10);
float height = (rand() % 500) + 500;
spriteBee.setPosition(2000, height);
beeActive = true;
}
/*
****************************************
Draw the scene
****************************************
*/
Now, if the bee is not active, just like it won't be when the game first starts, if(!beeActive) will be true and the preceding code will do the following things, in this order:
- Seed the random number generator.
- Get a random number between 200 and 399 and assign the result to beeSpeed.
- Seed the random number generator again.
- Get a random number between 500 and 999 and assign the result to a new float variable called height.
- Set the position of the bee to 2000 on the x axis (just off-screen to the right) and to whatever height equals on the y axis.
- Set beeActive to true.
Important note
Note that the height variable is the first variable we have ever declared inside the game loop. Furthermore, because it was declared inside an if block, it is actually "invisible" outside of the if block. This is fine for our use because once we have set the height of the bee, we don't need it anymore. This phenomenon that affects variables is called scope. We will explore this more fully in Chapter 4, Loops, Arrays, Switches, Enumerations, and Functions – Implementing Game Mechanics.
If we run the game, nothing will happen to the bee yet, but now the bee is active, we can write some code that runs when beeActive is true.
Add the following highlighted code which, as you can see, executes whenever beeActive is true. This is because it follows with else after the if(!beeActive) block:
// Set up the bee
if (!beeActive)
{
// How fast is the bee
srand((int)time(0) );
beeSpeed = (rand() % 200) + 200;
// How high is the bee
srand((int)time(0) * 10);
float height = (rand() % 1350) + 500;
spriteBee.setPosition(2000, height);
beeActive = true;
}
else
// Move the bee
{
spriteBee.setPosition(
spriteBee.getPosition().x -
(beeSpeed * dt.asSeconds()),
spriteBee.getPosition().y);
// Has the bee reached the left-hand edge of the screen?
if (spriteBee.getPosition().x < -100)
{
// Set it up ready to be a whole new bee next frame
beeActive = false;
}
}
/*
****************************************
Draw the scene
****************************************
*/
In the else block, the following things happen.
The bee's position is changed using the following criteria. The setPosition function uses the getPosition function to get the current horizontal coordinate of the bee. It then subtracts beeSpeed * dt.asSeconds() from that coordinate.
The beeSpeed variable value is many pixels per second and was randomly assigned in the previous if block. The value of dt.asSeconds() will be a fraction of 1 that represents how long the previous frame of animation took.
Let's assume that the bee's current horizontal coordinate is 1000. Now, suppose a basic PC loops at 5,000 frames per second. This would mean that dt.asSeconds would be 0.0002. Now, let's also suppose that beeSpeed was set to the maximum 399 pixels per second. With this information, we can say that the code that determines the value that setPosition uses for the horizontal coordinate is as follows:
1000 - 0.0002 x 399
Therefore, the new position on the horizontal axis for the bee would be 999.9202. We can see that the bee is very, very smoothly drifting to the left, at well under a pixel per frame. If the frame rate fluctuates, then the formula will produce a new value to suit. If we run the same code on a PC that only achieves 100 frames per second or a PC that achieves a million frames per second, the bee will move at the same speed.
The setPosition function uses getPosition().y to keep the bee in exactly the same vertical coordinate throughout this cycle of being active.
The final part of the code in the else block we just added is as follows:
// Has the bee reached the right hand edge of the screen?
if (spriteBee.getPosition().x < -100)
{
// Set it up ready to be a whole new bee next frame
beeActive = false;
}
This code tests, in each and every frame (when beeActive is true), whether the bee has disappeared off of the left-hand side of the screen. If the getPosition function returns less than -100, it will certainly be out of view of the player. When this occurs, beeActive is set to false and, on the next frame, a "new" bee will be set flying at a new random height and a new random speed.
Try running the game and watch our bee dutifully fly from right to left and then come back to the right again at a new height and speed. It's almost like a new bee every time.
Tip
Of course, a real bee would stick around for ages and pester you while you're trying to concentrate on chopping the tree. We will make some smarter game characters in later projects.
Now, we will get the clouds moving in a very similar way.
Blowing the clouds
The first thing we want to do is set up the first cloud at a certain height and a certain speed. We only want to do this when the cloud is inactive. Consequently, we will wrap the code that follows in an if block. Examine and add the following highlighted code, just after the code we added for the bee, and then we will discuss it. It is almost identical to the code we used on the bee:
else
// Move the bee
{
spriteBee.setPosition(
spriteBee.getPosition().x -
(beeSpeed * dt.asSeconds()),
spriteBee.getPosition().y);
// Has the bee reached the right hand edge of the screen?
if (spriteBee.getPosition().x < -100)
{
// Set it up ready to be a whole new bee next frame
beeActive = false;
}
}
// Manage the clouds
// Cloud 1
if (!cloud1Active)
{
// How fast is the cloud
srand((int)time(0) * 10);
cloud1Speed = (rand() % 200);
// How high is the cloud
srand((int)time(0) * 10);
float height = (rand() % 150);
spriteCloud1.setPosition(-200, height);
cloud1Active = true;
}
/*
****************************************
Draw the scene
****************************************
*/
The only difference between the code we have just added and the bee-related code is that we work on a different sprite and use different ranges for our random numbers. Also, we multiply by ten (* 10 ) to the result returned by time(0) so that we are always guaranteed to get a different seed for each of the clouds. When we code the other cloud movement next, you will see that we use * 20 and * 30, respectively.
Now, we can act when the cloud is active. We will do so in the else block. Like the if block, the code is identical to that of the bee-related code, except that all of the code works on the cloud and not the bee:
// Manage the clouds
if (!cloud1Active)
{
// How fast is the cloud
srand((int)time(0) * 10);
cloud1Speed = (rand() % 200);
// How high is the cloud
srand((int)time(0) * 10);
float height = (rand() % 150);
spriteCloud1.setPosition(-200, height);
cloud1Active = true;
}
else
{
spriteCloud1.setPosition(
spriteCloud1.getPosition().x +
(cloud1Speed * dt.asSeconds()),
spriteCloud1.getPosition().y);
// Has the cloud reached the right hand edge of the screen?
if (spriteCloud1.getPosition().x > 1920)
{
// Set it up ready to be a whole new cloud next frame
cloud1Active = false;
}
}
/*
****************************************
Draw the scene
****************************************
*/
Now that we know what to do, we can duplicate the same code for the second and third clouds. Add the following highlighted code, which handles the second and third clouds, immediately after the code for the first cloud:
...
// Cloud 2
if (!cloud2Active)
{
// How fast is the cloud
srand((int)time(0) * 20);
cloud2Speed = (rand() % 200);
// How high is the cloud
srand((int)time(0) * 20);
float height = (rand() % 300) - 150;
spriteCloud2.setPosition(-200, height);
cloud2Active = true;
}
else
{
spriteCloud2.setPosition(
spriteCloud2.getPosition().x +
(cloud2Speed * dt.asSeconds()),
spriteCloud2.getPosition().y);
// Has the cloud reached the right hand edge of the screen?
if (spriteCloud2.getPosition().x > 1920)
{
// Set it up ready to be a whole new cloud next frame
cloud2Active = false;
}
}
if (!cloud3Active)
{
// How fast is the cloud
srand((int)time(0) * 30);
cloud3Speed = (rand() % 200);
// How high is the cloud
srand((int)time(0) * 30);
float height = (rand() % 450) - 150;
spriteCloud3.setPosition(-200, height);
cloud3Active = true;
}
else
{
spriteCloud3.setPosition(
spriteCloud3.getPosition().x +
(cloud3Speed * dt.asSeconds()),
spriteCloud3.getPosition().y);
// Has the cloud reached the right hand edge of the screen?
if (spriteCloud3.getPosition().x > 1920)
{
// Set it up ready to be a whole new cloud next frame
cloud3Active = false;
}
}
/*
****************************************
Draw the scene
****************************************
*/
Now, you can run the game and the clouds will randomly and continuously drift across the screen. The bee will also buzz from right to left before respawning once more back on the right. The following screenshot shows what we've achieved in this chapter:

Tip
Does all of this cloud and bee handling seem a little bit repetitious? We will see how we could save lots of typing and make our code more readable as, in C++, there are ways of handling multiple instances of the same type of variable or object. One such way is called arrays, and we will learn about them in Chapter 4, Loops, Arrays, Switches, Enumerations, and Functions – Implementing Game Mechanics. At the end of this project, once we have learned about arrays, we will discuss how we can improve our cloud code.
Take a look at a few frequently asked questions related to the topics in this chapter.
Summary
In this chapter, we learned that a variable is a named storage location in memory in which we can keep values of a specific type. The types include int, float, double, bool, String, and char.
We can declare and initialize all of the variables we need to store the data for our game. Once we have our variables, we can manipulate them using the arithmetic and assignment operators, as well as use them in tests with the logical operators. Used in conjunction with the if and else keywords, we can branch our code depending on the current situation in the game.
Using all of this new knowledge, we animated some clouds and a bee. In the next chapter, we will use these skills some more to add a Heads Up Display (HUD) and add more input options for the player, as well as represent time visually using a time-bar.
FAQ
Q) Why do we set the bee to inactive when it gets to -100? Why not just zero since zero is the left-hand side of the window?
A) The bee graphic is 60 pixels wide and its origin is at the top left pixel. As a result, when the bee is drawn with its origin at x equals zero, the entire bee graphic is still on screen for the player to see. By waiting until it is at -100, we can be sure it is out of the player's view.
Q) How do I know how fast my game loop is?
A) If you have a modern NVIDIA graphics card, you might be able to already by configuring your GeForce Experience overlay to show the frame rate. To measure this explicitly using our own code, however, we will need to learn a few more things. We will add the ability to measure and display the current frame rate in Chapter 5, Collisions, Sound, and End Conditions – Making the Game Playable.