Chapter 19: Game Programming Design Patterns – Starting the Space Invaders ++ Game
Welcome to the final project. As you have come to expect by now, this project will take a significant step forward in terms of learning new C++ techniques. The next four chapters will look at topics such as smart pointers, C++ assertions, using a gamepad controller, debugging using Visual Studio, casting pointers of a base class to become pointers of a specific derived class, debugging, and a first look at design patterns.
It is my guess that if you are going to make deep, large-scale games in C++, then design patterns are going to be a big part of your learning agenda in the months and years ahead. In order to introduce this vital topic, I have chosen a relatively simple but fun game to serve as an example. In this chapter, we'll find out a bit more about the Space Invaders ++ game, and then we can get on to the topic of design patterns and why we need them.
In this hefty chapter, we will cover the following topics:
- Find out about Space Invaders ++ and why we chose it for the final project.
- Learn what design patterns are and why they matter to game developers.
- Study the design patterns in the Space Invaders ++ project that will be used over the next four chapters.
- We will get started on the Space Invaders ++ project.
- Code numerous classes to start fleshing out the game.
Let's talk about the game itself.
Space Invaders ++
Have a look at the following three screenshots, which visually explain most of what we need to know about Space Invaders ++. Just in case you don't know already, Space Invaders is one of the earliest arcade games and was released in 1978. If you like a bit of history, you can read the Wikipedia Space Invaders game page here: https://en.wikipedia.org/wiki/Space_Invaders.
This first screenshot shows the simple starting screen of our game. For the purposes of discussing screens, which we'll do next, we will call this the select screen. The player has two choices to select from: quit or play. However, by the end of this chapter, you will know how to add and switch between as many screens as you like:

As you can see, in the preceding screenshot, there is a new feature we have not implemented before: clickable buttons. We will talk more about buttons and their counterparts, such as UI panels and screens, shortly.
The following screenshot shows the game in action. It is quite simple to play. For the purposes of discussing screens, which we'll do next, we will call the following screenshot the play screen. The invaders move from left to right while shooting bullets at the player. When they reach the edge of the screen, they drop a little lower, speed up, and head back to the left:

The player can move left and right as well as up and down, but the vertical movement is restricted to the bottom half of the screen.
Important note
The original Space Invaders game just allowed horizontal movement.
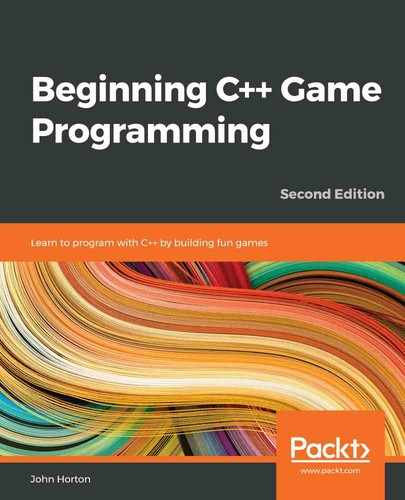
The following screenshot shows the options the player is presented with when they have lost three lives. They can choose to play again or quit and go back to the select screen:
While Space Invaders ++ does allow us to introduce lots of new C++ topics that I have already mentioned in the introduction to the chapter, as well as some more game-related topics such as using a gamepad controller, it is true that this isn't really a step up in terms of complexity compared to the previous project. So, why choose this as the final project?
Important note
In this project, there's lots of code. Most of it we have seen before, either in the same context or a different context. It is not possible to explain every single line as a new book would be required to do so. I have very carefully chosen which code to explain in full, which code to just mention, and which code I am guessing you will be able to work out for yourself. I recommend studying all the code in this book and in the download bundle as you progress. I will, however, go into the structure of the code in full detail as that is the real learning objective of this project. Furthermore, all the C++ code is shown in this book, so nothing is missing, although only an overview of the level1.txt file is shown.
Why Space Invaders ++?
To begin this discussion, please consider my two objectives for this book:
- The first objective of this book is to introduce you to C++ programming using the learning material of video games. I have already admitted on several occasions and several topics that this is just an introduction. C++ and game development are too big to fit into this book alone.
- The second objective of this book is to leave you in a position to continue your study while still using games as the learning material.
The problem is, as we have seen, each time we build a game with more features than the last, we end up with a more complicated code structure and the code files get longer and longer too. Throughout this book, we have learned new ways to improve the structure of our code and at each stage, we have succeeded, but the increasing complexity of the games always seems to outweigh the code improvements we learn about.
This project is designed to address this complexity issue and to take back control of our source code. Despite this game being less deep than the previous project, there will be far more classes to deal with.
This obviously implies quite a complicated structure. It will also mean, however, that once you get to grips with this structure, you will be able to reuse it for much more complicated games without any of the code files going beyond a few hundred lines of code.
What this project is designed to do is allow you to come up with your own game ideas, even complex ones, and get started on them right away, using the design patterns we'll discuss in the following section.
Tip
Note, however, that I am definitely not suggesting the code structure (design patterns) we will learn about here are the ultimate solution to your game development future; in fact, they are far from it. What you will learn are solutions that allow you to get started with your dream project without the complexity stopping you in your tracks. You will still need to study more about design patterns, C++, and game development along the way.
So, what are design patterns?
Design patterns
A design pattern is a reusable solution to a coding problem. In fact, most games (including this one) will use multiple design patterns. The key point about design patterns is this: they are already proven to provide a good solution to a common problem. We are not going to invent any design patterns – we are just going to use some that already exist to solve the problem of our ever-expanding code.
Many design patterns are quite complicated and require further study beyond the level of this book if you want to even begin learning them. What follows is a simplification of a few key game development-related patterns that will help fulfill the second objective of this book. You're urged to continue your study to implement them more comprehensively and alongside even more patterns than will be discussed here.
Let's look at the design patterns that are used in the Space Invaders ++ project.
Screen, InputHandler, UIPanel, and Button
This project will abstract some concepts further than any of the other projects. Space Invaders ++ will introduce the concept of a screen. The concept of a screen is most easily understood by giving some examples. A game could have a menu screen, a settings screen, a high score screen, and a game screen. A screen is a logical division of the parts of the game. Every screen has some things in common with all the other screens, yet each screen also needs its own unique features as well. For example, a menu screen might have buttons that enable the player to transition to another screen, as well as a neat graphical image or even a dynamic scene. The high score screen will, of course, have a list of all the high scores and perhaps a button to return to the menu screen. Each screen will have a different layout, different buttons to click, and different responses to different keyboard presses, but they will all need to be drawn at 60 FPS and interact in the same way with the game engine.
In the previous projects, we crammed this concept of screens into one place. This meant we had sprawling long if, else, and else if blocks of code that handled updating, drawing, and responding to user interaction. Our code was getting quite challenging to handle already. If we are going to build more complicated games, we need to improve on this. The concept of screens means that we can create a class that handles all the stuff that happens for every screen, such as updating, drawing, and user interaction, and then create a derived class for each type of screen, that is, menu, game, high score, and so on, which handles the unique ways that a specific screen needs to update, draw, and respond to the user.
In Space Invaders ++, we will have a Screen class. We will then inherit from Screen to handle two screens, SelectScreen and GameScreen. Furthermore, we will have a Button class that knows how to display a button, a UIPanel class that knows how to draw text, and Button instances as well as an InputHandler class that knows how to detect keyboard and gamepad interaction. We will then be able to derive from UIPanel and InputHandler to let all the different Screen instances behave exactly as required without coding the basics of a screen, a UI panel, an input handler, or a button more than once. The bigger your game gets and the more screens it has, the bigger the benefit of doing things this way. It also means that the specifics of each screen will not be crammed into long if, else, and else if structures as we have been doing so far.
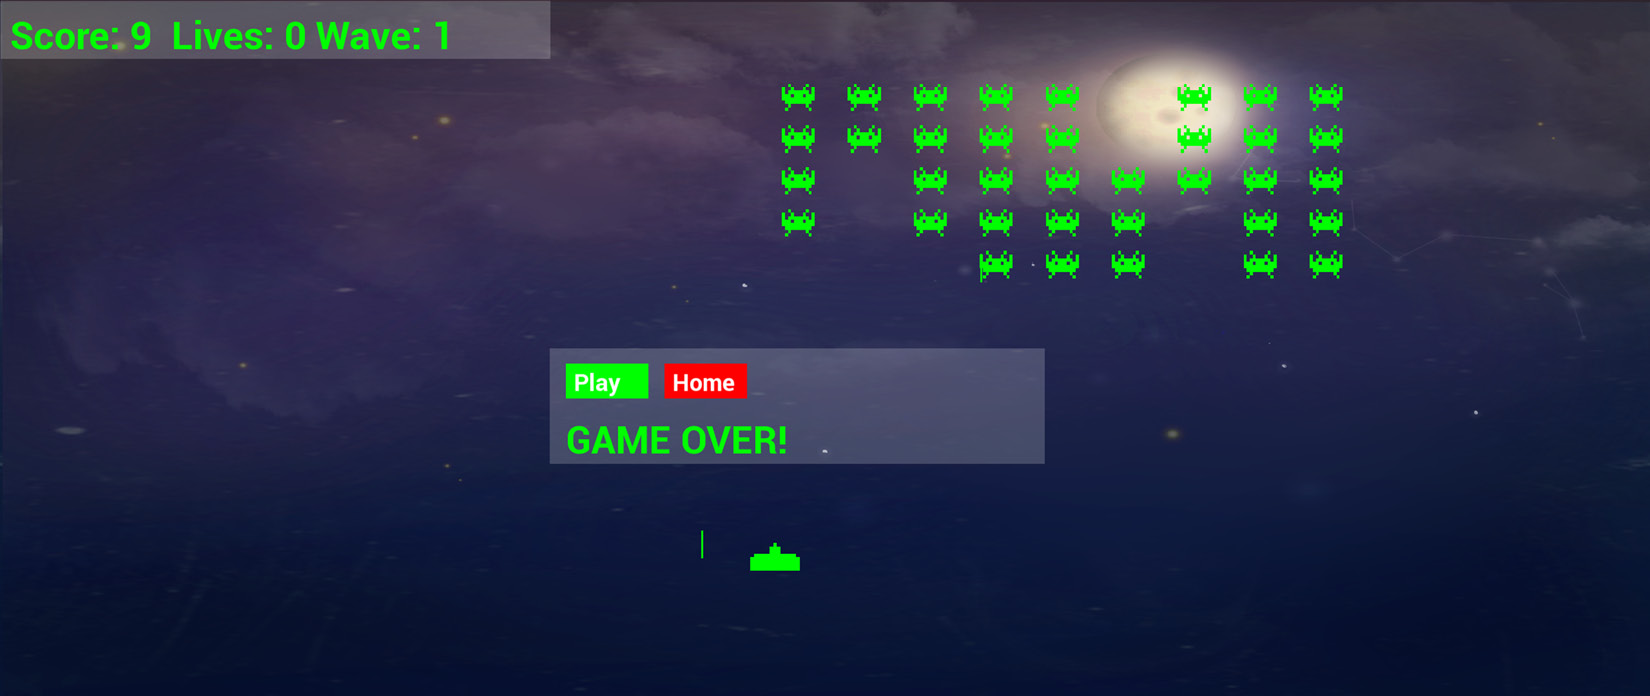
This is a bit like how we coded the PlayableCharacter class and derived Thomas and Bob from it. As we will see, however, we go much further with the abstraction this time. Look at the following diagram, which shows a representation of this idea and shows just one screen:
In the preceding diagram, we can see that a screen has one or more UIPanel instances that it can display selectively and that UIPanel instances can have zero or more Button instances. Each UIPanel will have a related InputHandler because each UIPanel will have different combinations and layouts of buttons. The buttons are shared via pointers between UIPanel and InputHandler instances.
If you are wondering which class handles the update stage of the game loop, the answer is the Screen class. However, once you get your head around how this pattern works, it will be simple to add the ability to let UIPanel instances act in the update phase, too. This could be useful if, say, the panel needed to move or maybe show a loading progress bar.
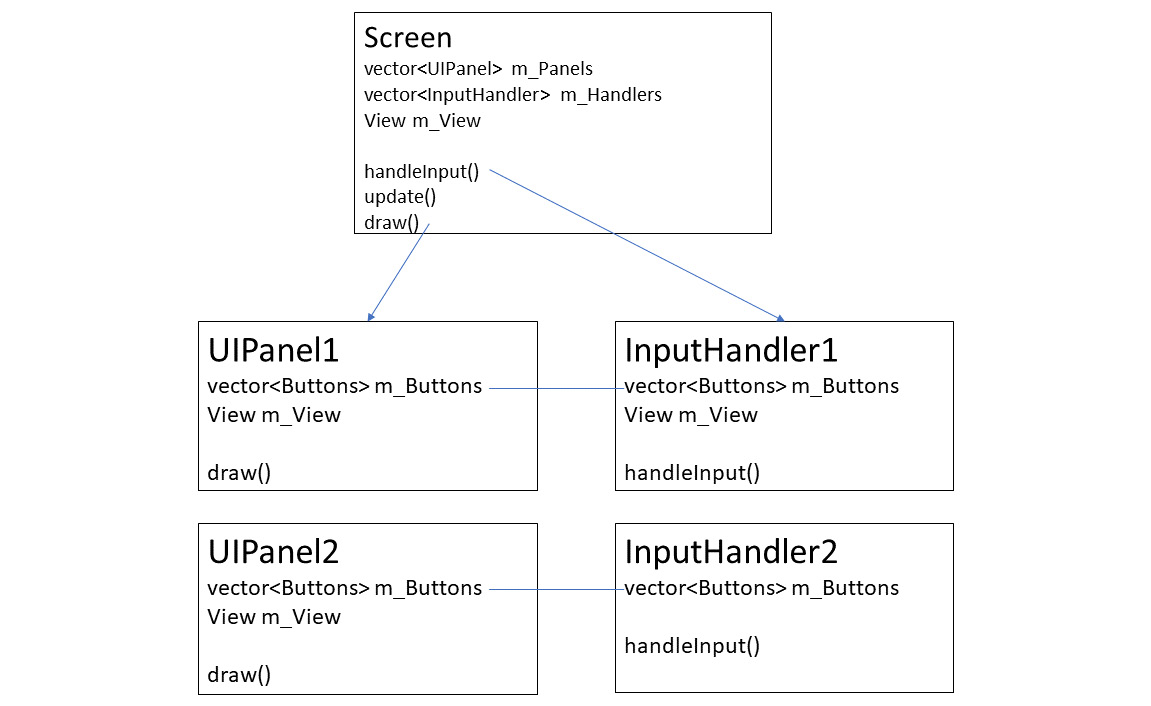
A screen will decide which UIPanel (and therefore, InputHandler) instances are currently visible and responding. However, only one screen at a time will be visible to the player. We will code a ScreenManager class that will be a fundamental part of the game engine to handle calling the key functions of the appropriate (current) screen. The ScreenManager class will also provide a way for the InputHandler instances to notify us when a change of screen is required, for example, when the player clicks the Play button on the select screen to go to the play screen.
ScreenManager will hold an instance of every screen, remember the current screen the player is on, and call update, draw, and handleInput on the correct screen, as well as switch between screens when required. The following diagram will hopefully help you visualize this concept, which we will also be coding soon:
Note that the diagrams and explanation are a simplification of the solution we will be coding, but they give a good overview.
Should you want to add a high score screen or another UIPanel instance to an existing screen, you will know how to do so by the end of Chapter 22, Using Game Objects and Building a Game. Of course, it's likely that you will want to get started on your very own game. You will be able to divide up your next game into as many screens with their dedicated layouts and input handling as you need.
Entity-Component pattern
We will now spend five minutes wallowing in the misery of an apparently unsolvable muddle. Then, we will see how the entity-component pattern comes to the rescue.
Why lots of diverse object types are hard to manage
In the previous projects, we coded a class for each object. We had classes such as Bat, Ball, Crawler, and Thomas. Then, in the update function, we would update them, and in the draw function, we would draw them. Each object decides how updating and drawing takes place.
We could just get started and use this same structure for Space Invaders ++. It would work, but we are trying to learn something more manageable so that our games can grow in complexity.
Another problem with this approach is that we cannot take advantage of inheritance. For example, all the invaders, the bullets, and the player draw themselves in an identical way, but unless we change how we do things, we will end up with three draw functions with nearly identical code. If we make a change to how we call the draw function or the way we handle graphics, we will need to update all three classes.
There must be a better way.
Using a generic GameObject for better code structure
If every object, player, alien, and all the bullets were one generic type, then we could pack them away in a vector instance and loop through each of their update functions, followed by each of their draw functions.
We already know one way of doing this – inheritance. At first glance, inheritance might seem like a perfect solution. We could create an abstract GameObject class and then extend it with the Player, Invader, and Bullet classes.
The draw function, which is identical in all three classes, could remain in the parent class, and we won't have the problem of all that wasted duplicate code. Great!
The problem with this approach is how varied – in some respects – the game objects are. Diversity is not a strength; it is just diverse. For example, all the object types move differently. The bullets go up or down, the invaders go left and right and drop down occasionally, and the player's ship responds to inputs.
How would we put this kind of diversity into the update so that it could control this movement? Maybe we could use something like this:
update(){
switch(objectType){
case 1:
// All the player's logic
break;
case 2:
// All the invader's logic here
Break;
case 3:
// All the bullet's logic here
break;
}
}
The update function alone would be bigger than the whole GameEngine class!
As you may remember from Chapter 15, Advanced OOP – Inheritance and Polymorphism, when we inherit from a class, we can also override specific functions. This means we could have a different version of the update function for each object type. Unfortunately, however, there is also a problem with this approach as well.
The GameEngine engine would have to "know" which type of object it was updating or, at the very least, be able to query the GameObject instance it was updating in order to call the correct version of the update function. What is really needed is for the GameObject to somehow internally choose which version of the update function is required.
Unfortunately, even the part of the solution which did seem to work falls apart on closer inspection. I said that the code in the draw function was the same for all three of the objects, and therefore the draw function could be part of the parent class and used by all the sub-classes, instead of us having to code three separate draw functions. Well, what happens when we introduce a new object that needs to be drawn differently, such as an animated UFO that flies across the top of the screen? In this scenario, the draw solution falls apart too.
Now that we have seen the problems that occur when objects are different from each other and yet cry out to be from the same parent class, it is time to look at the solution we will use in the Space Invaders ++ project.
What we need is a new way of thinking about constructing all our game objects.
Prefer composition over inheritance
Preferring composition over inheritance refers to the idea of composing objects with other objects.
Important note
This concept was first suggested in the following publication:
Design Patterns: Elements of Reusable Object-Oriented Software
by Erich Gamma, Richard Helm, et al.
What if we could code a class (as opposed to a function) that handled how an object was drawn? Then for all the classes that draw themselves in the same way, we could instantiate one of these special drawing classes within the GameObject, and any objects that need to be drawn differently could have a different drawing object. Then, when a GameObject does something differently, we simply compose it with a different drawing or updating related class to suit it. All the similarities in all our objects can benefit from using the same code, while all the differences can benefit from not only being encapsulated but also abstracted (taken out of) the base class.
Note that the heading of this section is composition over inheritance, not composition instead of inheritance. Composition doesn't replace inheritance and everything you learned in Chapter 15, Advanced OOP – Inheritance and Polymorphism, still holds true. However, where possible, compose instead of inheriting.
The GameObject class is the entity, while the classes it will be composed of that do things such as update its position and draw it to the screen are the components, which is why it's called the Entity-Component pattern.
Have a look at the following diagram, which represents the Entity-Component pattern in the form we will implement it in this project:

In the preceding diagram, we can see that a GameObject instance is composed of multiple Component instances. There will be multiple different classes derived from the Component class, including UpdateComponent and GraphicsComponent. Furthermore, there can be further specific classes derived from them. For example, the BulletUpdateComponent and InvaderUpdateComponent classes will be derived from the UpdateComponent class. These classes will handle how a bullet and an invader (respectively) update themselves each frame of the game. This is great for encapsulation because we don't need the big switch blocks to distinguish between different objects.
When we use composition over inheritance to create a group of classes that represent behavior/algorithms, as we will here, this is known as the Strategy pattern. You could use everything you have learned here and refer to it as the Strategy pattern. Entity-Component is a lesser known but more specific implementation, and that is why we call it this. The difference is academic, but feel free to turn to Google if you want to explore things further. In Chapter 23, Before You Go…, I will show you some good resources for this kind of detailed research.
The Entity-Component pattern, along with using composition in preference to inheritance, sounds great at first glance but brings with it some problems of its own. It would mean that our new GameObject class would need to know about all the different types of component and every single type of object in the game. How would it add all the correct components to itself?
Let's have a look at the solution.
Factory pattern
It is true that if we are to have this universal GameObject class that can be anything we want it to be, whether that be a bullet, player, invader, or whatever else, then we are going to have to code some logic that "knows" about constructing these super-flexible GameObject instances and composes them with the correct components. But adding all this code into the class itself would make it exceptionally unwieldy and defeat the entire reason for using the Entity-Component pattern in the first place.
We would need a constructor that did something like this hypothetical GameObject code:
class GameObject
{
UpdateComponent* m_UpdateComponent;
GraphicsComponent* m_GraphicsComponent;
// More components
// The constructor
GameObject(string type){
if(type == "invader")
{
m_UpdateComp = new InvaderUpdateComponent();
m_GraphicsComponent = new StdGraphicsComponent();
}
else if(type =="ufo")
{
m_UpdateComponent = new
UFOUpdateComponentComponent();
m_GraphicsComponent = new AnimGraphicsComponent();
}
// etc.
…
}
};
The GameObject class would need to know not just which components go with which GameObject instance, but also which didn't need certain components, such as input-related components for controlling the player. For the Space Invaders ++ project, we could do this and just about survive the complexity, but just about surviving is not the objective; we want to take complete control.
The GameObject class would also need to understand all this logic. Any benefit or efficiency gained from using composition over inheritance with the Entity-Component pattern would be mainly lost.
Furthermore, what if we decide we want a new type of invader, perhaps a "Cloaker" alien that teleports near to the player, takes a shot, and then teleports away again? It is fine to code a new GraphicsComponent class, perhaps a CloakingGraphicsComponent that "knows" when it is visible and invisible, along with a new UpdateComponent, perhaps a CloakerUpdateComponent that teleports instead of moving in the conventional manner, but what is not fine is we are going to have to add a whole bunch of new if statements to the GameObject class constructor.
In fact, the situation is even worse than this. What if we decide that regular invaders can now cloak? Invaders now need not just a different type of GraphicsComponent class. We would have to go back into the GameObject class to edit all of those if statements again.
In fact, there are even more scenarios that can be imagined, and they all end up with a bigger and bigger GameObject class. The Factory pattern is the solution to these GameObject class-related woes and the perfect partner to the Entity-Component pattern.
Important note
This implementation of the Factory pattern is an easier way to begin to learn about the Factory pattern. Why not do a web search for the Factory pattern once you have completed this project and see how it can be improved?
The game designer will provide a specification for each and every type of object in the game, and the programmer will provide a factory class that builds GameObject instances from the game designer's specifications. When the game designer comes up with new ideas for entities, then all we need to do is ask for a new specification. Sometimes, that will involve adding a new production line to the factory that uses existing components and, sometimes, it will mean coding new components or perhaps updating existing components. The point is that it won't matter how inventive the game designer is – the GameObject and GameEngine classes remain unchanged.
In the Factory code, the current object type is checked and the appropriate components (classes) are added to it. The bullet, player, and the invader have the same graphics component, but all have different update components.
When we use composition, it can be less clear which class is responsible for the memory. Is it the class that creates it, the class that uses it, or some other class? Let's learn some more C++ to help us manage memory a little more simply.
C++ smart pointers
Smart pointers are classes that we can use to get the same functionality as a regular pointer but with an extra feature – the feature being that they take care of their own deletion. In the limited way we have used pointers so far, it has not been a problem for us to delete our own memory, but as your code becomes more complex, and when you are allocating the new memory in one class but using it in another class, it becomes much less clear which class is responsible for deleting the memory when we are done with it. And how can a class or function know whether a different class or function has finished with some allocated memory?
The solution is smart pointers. There are a few types of smart pointer; we will look at the two of the most commonly used ones here. The key to success with smart pointers is using the correct type.
The first type we will consider is shared pointers.
Shared pointers
The way that a shared pointer can safely delete the memory it points to is by keeping a count of the number of different references there are to an area of memory. If you pass a pointer to a function, the count is increased by one. If you pack a pointer into a vector, the count is increased by one. If the function returns, the count is decreased by one. If the vector goes out of scope or has the clear function called on it, the smart pointer will reduce the reference count by one. When the reference count is zero, nothing points to the area of memory anymore and the smart pointer class calls delete. All the smart pointer classes are implemented using regular pointers behind the scenes. We just get the benefit of not having to concern ourselves about where or when to call delete. Let's look at the code for using a shared smart pointer.
The following code creates a new shared smart pointer called myPointer that will point to an instance of MyClass:
shared_ptr<MyClass> myPointer;
shared_ptr<MyClass> is the type while myPointer is its name. The following code is how we might initialize myPointer:
myPointer = make_shared<MyClass>();
The call to make_shared internally calls new to allocate the memory. The parentheses () is the constructor parentheses. If the MyClass class constructor took an int parameter, for example, the preceding code might look like this:
myPointer = make_shared<MyClass>(3);
The 3 in the preceding code is an arbitrary example.
Of course, you can declare and initialize your shared smart pointers in a single line of code if required, as shown in the following code:
shared_ptr<MyClass> myPointer = make_shared<MyClass>();
It is because myPointer is a shared_ptr that it has an internal reference count that keeps track of how many references point to the area of memory that it created. If we make a copy of the pointer, that reference count is increased.
Making a copy of the pointer includes passing the pointer to another function, placing it in a vector, map, or other structure, or simply copying it.
We can use a smart pointer using the same syntax as a regular pointer. It is quite easy to forget sometimes that it isn't a regular pointer. The following code calls the myFunction function on myPointer:
myPointer->myFunction();
By using a shared smart pointer, there is some performance and memory overhead. By overhead, I mean that our code runs slower and uses more memory. After all, the smart pointer needs a variable to keep track of the reference count, and it must check the value of the reference count every time a reference goes out of scope. However, this overhead is tiny and only an issue in the most extreme situations since most of the overhead happens while the smart pointers are being created. Typically, we will create smart pointers outside of the game loop. Calling a function on a smart pointer is as efficient as a regular pointer.
Sometimes, we know that we will only ever want one reference to a smart pointer and in this situation, unique pointers are the best option.
Unique pointers
When we know that we only want a single reference to an area of memory, we can use a unique smart pointer. Unique pointers lose much of the overhead that I mentioned shared pointers have. In addition, if you try and make a copy of a unique pointer, the compiler will warn us, and the code will either not compile or it will crash, giving us a clear error. This is a very useful feature that can prevent us from accidentally copying a pointer that was not meant to be copied. You might be wondering if this no copying rule means we can never pass it to a function or even put it in a data structure such as a vector. To find out, let's look at some code for unique smart pointers and explore how they work.
The following code creates a unique smart pointer called myPointer that points to an instance of MyClass:
unique_ptr<MyClass> myPointer = make_unique<MyClass>();
Now. let's suppose we want to add a unique_ptr to a vector. The first thing to note is that vector must be of the correct type. The following code declares a vector that holds unique pointers to MyClass instances:
vector<unique_ptr<MyClass>> myVector;
The vector is called myVector and anything you put into it must be of the unique pointer type to MyClass. But didn't I say that unique pointers can't be copied? When we know that we will only ever want a single refence to an area of memory, we should use unique_ptr. This doesn't mean, however, that the reference can't be moved. Here is an example:
// Use move() because otherwise
// the vector has a COPY which is not allowed
mVector.push_back(move(myPointer));
// mVector.push_back(myPointer); // Won't compile!
In the preceding code, we can see that the move function can be used to put a unique smart pointer into a vector. Note that when you use the move function, you are not giving the compiler permission to break the rules and copy a unique pointer – you are moving responsibility from the myPointer variable to the myVector instance. If you attempt to use the myPointer variable after this point, the code will execute and the game will crash, giving you a Null pointer access violation error. The following code will cause a crash:
unique_ptr<MyClass> myPointer = make_unique<MyClass>();
vector<unique_ptr<MyClass>> myVector;
// Use move() because otherwise
// the vector has a COPY which is not allowed
mVector.push_back(move(myPointer));
// mVector.push_back(myPointer); // Won't compile!
myPointer->myFunction();// CRASH!!
The exact same rules apply when passing a unique pointer to a function; use the move function to pass responsibility on. We will look at all these scenarios again, as well as some more when we get to the project in a few pages time.
Casting smart pointers
We will often want to pack the smart pointers of derived classes into data structures or function parameters of the base class such as all the different derived Component classes. This is the essence of polymorphism. Smart pointers can achieve this using casting. But what happens when we later need to access the functionality or data of the derived class?
A good example of where this will regularly be necessary is when we deal with components inside our game objects. There will be an abstract Component class and derived from that there will be GraphicsComponent, UpdateComponent, and more besides.
As an example, we will want to call the update function on all the UpdateComponent instances each frame of the game loop. But if all the components are stored as base class Component instances, then it might seem that we can't do this. Casting from the base class to a derived class solves this problem.
The following code casts myComponent, which is a base class Component instance to an UpdateComponent class instance, which we can then call the update function on:
shared_ptr<UpdateComponent> myUpdateComponent =
static_pointer_cast<UpdateComponent>(MyComponent);
Before the equals sign, a new shared_ptr to an UpdateComponent instance is declared. After the equals sign, the static_pointer_cast function specifies the type to cast to in the angle brackets, <UpdateComponent>, and the instance to cast from in parentheses, (MyComponent).
We can now use all the functions of the UpdateComponent class, which in our project includes the update function. We would call the update function as follows:
myUpdateComponent->update(fps);
There are two ways we can cast a class smart pointer to another class smart pointer. One is by using static_pointer_cast, as we have just seen, and the other is to use dynamic_pointer_cast. The difference is that dynamic_pointer_cast can be used if you are uncertain whether the cast will work. When you use dynamic_pointer_cast, you can then check to see if it worked by testing if the result is a null pointer. You use static_pointer_class when you are certain the result is the type you are casting to. We will use static_pointer_cast throughout the Space Invaders ++ project.
We will regularly be casting Component instances to different derived types. How we will be sure the type we are casting to is the correct type will become apparent as we progress with the project.
C++ assertions
In this project, we will be using C++ assertions. As usual, there is more to this topic than we will discuss here, but we can still do some useful things with just an introduction.
We can use the #define preprocessor statement in a class to define a value for the entire project. We do so with the following code:
#define debuggingOnConsole
This code would be written at the top of a header file. Now, throughout the project, we can write code like the following:
#ifdef debuggingOnConsole
// C++ code goes here
#endif
The #ifdef debuggingOnConsole statement checks whether the #define debuggingOnConsole statement is present. If it is, then any C++ code up to the #endif statement will be included in the game. We can then choose to comment out the #define statement to switch our debugging code on or off.
Typically, we will include code such as the following in the #ifdef blocks:
#ifdef debuggingOnConsole
cout <<
"Problem x occurred and caused a crash!"
<< endl;
#endif
The preceding code uses the cout statement to print debugging information to the console window.
What these assertions amount to is a way to get feedback from the game during development and then with a quick // in front of the #define statement, strip out all the debugging code from the game when we are done.
Creating the Space Invaders ++ project
You can find the runnable code that represents the project at the end of this chapter in the Space Invaders ++ folder. It will take all of chapters 20, 21, and 22 to complete and make the project runnable again. The completed code that is runnable and represents the project at the end of Chapter 22, Using Game Objects and Building a Game, can be found in the Space Invaders ++ 2 folder.
Create a new project in Visual Studio with the same settings that we used in the previous four projects. Call the new project Space Invaders ++.
Inside the Space Invaders ++ folder, copy and paste the fonts, graphics, and sound folders and their contents from the download bundle. The fonts, graphics, and sound folders, as you would expect, contain the font and graphical and audio assets we will use in this game.
In addition, you will need to download the background file from https://opengameart.org/content/background-night.
Important note
This image is the work of https://opengameart.org/users/alekei.
You can download this from https://opengameart.org/content/background-night.
You can find the license at https://creativecommons.org/licenses/by/3.0/.
Rename the file you just downloaded to background.png and place it in the graphics folder of your project.
Now, add the world folder, including the level1.txt file. This file contains the layout of all the game objects, and we will discuss it further in Chapter 21, File I/O and the Game Object Factory.
Organizing code files with filters
Next, we will do something new. As there are more class files in this project than our previous projects, we will be a bit more organized within Visual Studio. We will create a series of filters. These are logical organizers we use to create a structure for our files. This will allow us to view all our header and source files in a more organized way.
Right-click on the Header Files folder in the Solution Explorer window and select New Filter. Give the filter the name of Engine. We will add all the core header files to this filter.
Right-click on Header Files again and add another filter called FileIO. We will add all the files that read text to and from level1.txt, as well as some supporting classes.
Make another new filter in Header Files called GameObjects. Everything related to all the game objects, including the GameObject class and all the Component class-related header files, will go here.
Add yet another filter called Screens. Right-click on the Screens filter you just added and create a filter within Screens called Select. Now, create another filter within Screens called Game. We will place all the derived versions of Screen, InputHandler, and UIPanel in Game or Select (as appropriate) and all the base classes in Screens.
Now, repeat all the previous steps of creating filters to create the exact same structure in the Source Files folder. You should now have a Solution Explorer layout that looks as follows:
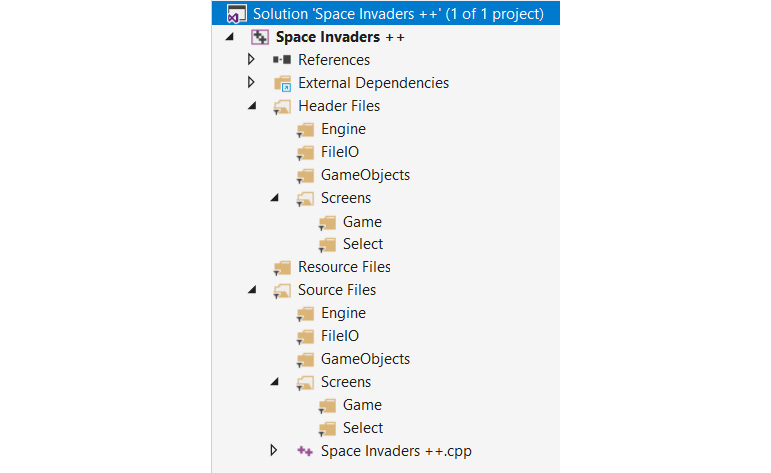
Note that the preceding layout is just for our organizational benefit; it has no effect on the code or the finished game. In fact, if you look in the Space Invaders ++ folder using your operating system's file browser, you will see there are no additional folders. As we progress with this project and add new classes, we will add them within specific filters to make them more organized and less cluttered.
Adding a DevelopState file
In order to output debugging data to the console, we will create the DevelopState class, which does nothing but define debuggingOnConsole.
Create the DevelopState.h file in the Header Files/Engine filter and add the following code:
#pragma once
#define debuggingOnConsole
class DevelopState {};
We can comment out #define debuggingOnConsole when the game is working but, when we have unexplained crashes, we can uncomment it. If we then add assertions at parts throughout our code, we can see if these parts are causing the game to crash.
Coding SpaceInvaders ++.cpp
Next, drag and drop the SpaceInvaders ++.cpp file that was autogenerated when we created the project into the Source Files/Engine filter. This isn't required – it is just to keep things organized. This file is the entry point to the game and is therefore a core file, albeit a very short one.
Edit SpaceInvaders ++.cpp so that it just has the following code:
#include "GameEngine.h"
int main()
{
GameEngine m_GameEngine;
m_GameEngine.run();
return 0;
}
The preceding code creates an instance of GameEngine and calls its run function. There will be errors until we code the GameEngine class. We will do that next. Note that, throughout this project, there will usually be one, more, or even many errors. This is due to the interdependent nature of the classes. I will usually mention when there are errors and when they will be dealt with, but perhaps not every single one. By the end of this chapter, we will have an error-free, executable project, but, after that, it will take until Chapter 22, Using Game Objects and Building a Game, until the project is error-free and executable again.
Coding the GameEngine class
Create a new header file in the Header Files/Engine filter called GameEngine.h and add the following code:
#pragma once
#include <SFML/Graphics.hpp>
#include "ScreenManager.h"
#include "SoundEngine.h"
using namespace sf;
class GameEngine {
private:
Clock m_Clock;
Time m_DT;
RenderWindow m_Window;
unique_ptr<ScreenManager> m_ScreenManager;
float m_FPS = 0;
Vector2f m_Resolution;
void handleInput();
void update();
void draw();
public:
SoundEngine m_SoundEngine;
GameEngine();
void run();
};
Study the preceding code to get familiar with it. What's new is that we get to see smart pointers in action for the first time. We have a unique pointer of the ScreenManager Type. This implies that this pointer will not be passed to any other classes but, if it is, then ownership will also be passed.
Other than the smart pointers, there is nothing we haven't seen before. There is a Clock instance, a Time instance, a RenderWindow instance, as well as variables to keep track of the frame rate and the screen resolution. Furthermore, we have functions for handling input, updating, and drawing each frame. This is also nothing new. What we do within these functions, however, will be new. We also have a SoundEngine instance, which will be nearly identical to how we handled sound in our other projects. We also have the run function, which is public, and will kickstart all the private functions.
There are errors because we need to implement the ScreenManager and SoundEngine classes. We will get to them very soon.
Create a new source file in the Source Files/Engine filter called GameEngine.cpp and add the following code:
#include "GameEngine.h"
GameEngine::GameEngine()
{
m_Resolution.x = VideoMode::getDesktopMode().width;
m_Resolution.y = VideoMode::getDesktopMode().height;
m_Window.create(VideoMode(m_Resolution.x, m_Resolution.y),
"Space Invaders++", Style::Fullscreen);
m_ScreenManager = unique_ptr<ScreenManager>(new ScreenManager(
Vector2i(m_Resolution.x, m_Resolution.y)));
}
void GameEngine::run()
{
while (m_Window.isOpen())
{
m_DT = m_Clock.restart();
m_FPS = m_DT.asSeconds();
handleInput();
update();
draw();
}
}
void GameEngine::handleInput()
{
m_ScreenManager->handleInput(m_Window);
}
void GameEngine::update()
{
m_ScreenManager->update(m_FPS);
}
void GameEngine::draw()
{
m_Window.clear(Color::Black);
m_ScreenManager->draw(m_Window);
m_Window.display();
}
In the GameEngine constructor, the RenderWindow instance is initialized and the unique smart pointer to a ScreenManager instance is initialized using new, which passes in the resolution to the ScreenManager constructor.
Important note
This is an alternative to calling the make_unique function.
The run function should look very familiar; it restarts the clock and stores the time like we have done in every project so far. It then calls the handleInput, update, and draw functions.
In the handleInput function, the handleInput function of the ScreenManager instance is called. In the update function, the update function of the ScreenManger instance is called. Finally, in the draw function, the RenderWindow is cleared, the draw function of the ScreenManager instance is called, and the contents of the RenderWindow instance are displayed.
We have successfully passed full responsibility to the ScreenManager class for handling input, updating, and drawing each frame. As we will see in the Coding the ScreenManager section, the ScreenManager class will further delegate responsibility for all these tasks to the appropriate class that's derived from the Screen class.
Like the related GameEngine.h header file, there are errors because we need to implement the ScreenManager and SoundEngine classes.
Coding the SoundEngine class
Create a new header file in the Header Files/Engine filter called SoundEngine.h and add the following code:
#pragma once
#ifndef SOUND_ENGINE_H
#define SOUND_ENGINE_H
#include <SFML/Audio.hpp>
using namespace sf;
class SoundEngine
{
private:
SoundBuffer m_ShootBuffer;
SoundBuffer m_PlayerExplodeBuffer;
SoundBuffer m_InvaderExplodeBuffer;
SoundBuffer m_ClickBuffer;
Sound m_ShootSound;
Sound m_PlayerExplodeSound;
Sound m_InvaderExplodeSound;
Sound m_UhSound;
Sound m_OhSound;
Sound m_ClickSound;
public:
SoundEngine();
static void playShoot();
static void playPlayerExplode();
static void playInvaderExplode();
static void playClick();
static SoundEngine* m_s_Instance;
};
#endif
Create a new source file in the Source Files/Engine filter called SoundEngine.cpp and add the following code:
#include <SFML/Audio.hpp>
#include <assert.h>
#include "SoundEngine.h"
using namespace std;
using namespace sf;
SoundEngine* SoundEngine::m_s_Instance = nullptr;
SoundEngine::SoundEngine()
{
assert(m_s_Instance == nullptr);
m_s_Instance = this;
// Load the sound into the buffers
m_ShootBuffer.loadFromFile("sound/shoot.ogg");
m_PlayerExplodeBuffer.loadFromFile("sound/playerexplode.ogg");
m_InvaderExplodeBuffer.loadFromFile("sound/invaderexplode.ogg");
m_ClickBuffer.loadFromFile("sound/click.ogg");
// Associate the sounds with the buffers
m_ShootSound.setBuffer(m_ShootBuffer);
m_PlayerExplodeSound.setBuffer(m_PlayerExplodeBuffer);
m_InvaderExplodeSound.setBuffer(m_InvaderExplodeBuffer);
m_ClickSound.setBuffer(m_ClickBuffer);
}
void SoundEngine::playShoot()
{
m_s_Instance->m_ShootSound.play();
}
void SoundEngine::playPlayerExplode()
{
m_s_Instance->m_PlayerExplodeSound.play();
}
void SoundEngine::playInvaderExplode()
{
m_s_Instance->m_InvaderExplodeSound.play();
}
void SoundEngine::playClick()
{
m_s_Instance->m_ClickSound.play();
}
The SoundEngine class uses the exact same strategy as the previous SoundManager class from the previous projects. In fact, SoundEngine is slightly simpler than SoundManager because we are not using spatialization features. For a refresher of how the SoundEngine class works, refer to Chapter 17, Sound Spatialization and the HUD.
Now, we can move on to the ScreenManager class.
Coding the ScreenManager class
Create a new header file in the Header Files/Engine filter called ScreenManager.h and add the following code:
#pragma once
#include <SFML/Graphics.hpp>
#include <map>
#include "GameScreen.h"
#include "ScreenManagerRemoteControl.h"
#include "SelectScreen.h"
//#include "LevelManager.h"
#include "BitmapStore.h"
#include <iostream>
using namespace sf;
using namespace std;
class ScreenManager : public ScreenManagerRemoteControl {
private:
map <string, unique_ptr<Screen>> m_Screens;
//LevelManager m_LevelManager;
protected:
string m_CurrentScreen = "Select";
public:
BitmapStore m_BS;
ScreenManager(Vector2i res);
void update(float fps);
void draw(RenderWindow& window);
void handleInput(RenderWindow& window);
/****************************************************
*****************************************************
From ScreenManagerRemoteControl interface
*****************************************************
*****************************************************/
void ScreenManagerRemoteControl::
SwitchScreens(string screenToSwitchTo)
{
m_CurrentScreen = "" + screenToSwitchTo;
m_Screens[m_CurrentScreen]->initialise();
}
void ScreenManagerRemoteControl::
loadLevelInPlayMode(string screenToLoad)
{
//m_LevelManager.getGameObjects().clear();
//m_LevelManager.
//loadGameObjectsForPlayMode(screenToLoad);
SwitchScreens("Game");
}
//vector<GameObject>&
//ScreenManagerRemoteControl::getGameObjects()
//{
//return m_LevelManager.getGameObjects();
//}
//GameObjectSharer& shareGameObjectSharer()
//{
//return m_LevelManager;
//}
};
In the previous code, there are some #include statements and some functions that have been commented out. This is because we will not be coding the LevelManager class until Chapter 21, File I/O and the Game Object Factory.
The next thing to notice is that ScreenManager inherits from ScreenManagerRemoteControl. More on this class shortly.
We have coded a map with a key-value pair of string and a unique pointer to Screen. This will allow us to grab the functionality of a specific Screen instance by using the corresponding string. Next, we declare the string called m_CurrentScreen and initialize it to Select.
Next, we declare an instance of BitmapStore called m_BS. This will be a slightly reworked version of the TextureHolder class that we saw in the two preceding projects. We will code the BitmapStore class next.
Notice that the constructor for ScreenManager takes a Vector2i instance, which is what we should expect from when we initialized a ScreenManager instance in the GameEngine class.
What follows is the update, draw, and handleInput function prototypes, which are called from the GameEngine class.
The next two functions are the most interesting. Note that they are from the ScreenManagerRemoteControl class, which ScreenManager inherits from. These are pure virtual functions in ScreenManagerRemoteControl and we do things this way so that we can share some of the functionality of the ScreenManager class with other classes. We will code the ScreenManagerRemoteControl class in a couple of sections time. Remember that, when you inherit from a class that has pure virtual functions, you must implement the functions if you want to create an instance. Furthermore, the implementations should be contained in the same file as where the class is declared. There are four functions, two of which have been commented out for now. The two functions of immediate interest are SwitchScreens and loadLevelInPlayMode.
The SwitchScreen function changes the value of m_CurrentScreen, while the loadLevelInPlayMode function has some temporarily commented out code and a single line of active code which calls SwitchScreens with the value of Game.
Let's move on to the ScreenManager.cpp file so that we can look at all the function definitions.
Create a new source file in the Source Files/Engine filter called ScreenManager.cpp and add the following code:
#include "ScreenManager.h"
ScreenManager::ScreenManager(Vector2i res)
{
m_Screens["Game"] = unique_ptr<GameScreen>(
new GameScreen(this, res));
m_Screens["Select"] = unique_ptr<SelectScreen>(
new SelectScreen(this, res));
}
void ScreenManager::handleInput(RenderWindow& window)
{
m_Screens[m_CurrentScreen]->handleInput(window);
}
void ScreenManager::update(float fps)
{
m_Screens[m_CurrentScreen]->update(fps);
}
void ScreenManager::draw(RenderWindow& window)
{
m_Screens[m_CurrentScreen]->draw(window);
}
In the preceding code, the constructor adds two Screen instances to the map instance – first, a GameScreen instance with a key of "Game" and then a SelectScreen instance with a key of "Select". The three functions, handleInput, update, and draw, use whatever the current screen is, use the corresponding Screen instance, and call its handleInput, update, and draw functions.
When the game is executed for the first time, the versions of these functions from SelectScreen will be called, but if the ChangeScreen or loadLevelInPlayMode function was called, then then handleInput, update, and draw could be called on the GameScreen instance from the map. You can add as many different types of Screen instance to the map as you like. I recommend that you complete the Space Invaders ++ project before you start doing your own customizations or start your own game, however.
Coding the BitmapStore class
Create a new header file in the Header Files/Engine filter called BitmapStore.h and add the following code:
#pragma once
#ifndef BITMAP_STORE_H
#define BITMAP_STORE_H
#include <SFML/Graphics.hpp>
#include <map>
class BitmapStore
{
private:
std::map<std::string, sf::Texture> m_BitmapsMap;
static BitmapStore* m_s_Instance;
public:
BitmapStore();
static sf::Texture& getBitmap(std::string const& filename);
static void addBitmap(std::string const& filename);
};
#endif
Create a new source file in the Source Files/Engine filter called BitmapStore.cpp and add the following code:
#include "BitmapStore.h"
#include <assert.h>
using namespace sf;
using namespace std;
BitmapStore* BitmapStore::m_s_Instance = nullptr;
BitmapStore::BitmapStore()
{
assert(m_s_Instance == nullptr);
m_s_Instance = this;
}
void BitmapStore::addBitmap(std::string const& filename)
{
// Get a reference to m_Textures using m_S_Instance
auto& bitmapsMap = m_s_Instance->m_BitmapsMap;
// auto is the equivalent of map<string, Texture>
// Create an iterator to hold a key-value-pair (kvp)
// and search for the required kvp
// using the passed in file name
auto keyValuePair = bitmapsMap.find(filename);
// auto is equivalent of map<string, Texture>::iterator
// No match found so save the texture in the map
if (keyValuePair == bitmapsMap.end())
{
// Create a new key value pair using the filename
auto& texture = bitmapsMap[filename];
// Load the texture from file in the usual way
texture.loadFromFile(filename);
}
}
sf::Texture& BitmapStore::getBitmap(std::string const& filename)
{
// Get a reference to m_Textures using m_S_Instance
auto& m = m_s_Instance->m_BitmapsMap;
// auto is the equivalent of map<string, Texture>
// Create an iterator to hold a key-value-pair (kvp)
// and search for the required kvp
// using the passed in file name
auto keyValuePair = m.find(filename);
// auto is equivalent of map<string, Texture>::iterator
// Did we find a match?
if (keyValuePair != m.end())
{
return keyValuePair->second;
}
else
{
#ifdef debuggingOnConsole
cout <<
"BitmapStore::getBitmap()Texture not found Crrrashh!"
<< endl;
#endif
return keyValuePair->second;
}
}
The preceding code is almost a copy and paste from the BitmapStore class from the previous two projects, except for the final else block. Inside the final else block, we use C++ assertions for the first time to output the name of the requested texture to the console in the event that the texture isn't found. This only happens when debuggingOnConsole is defined. Note that this would also crash the game.
Coding the ScreenManagerRemoteControl class
Create a new header file in the Header Files/Screens filter called ScreenManagerRemoteControl.h and add the following code:
#pragma once
#include <string>
#include <vector>
//#include "GameObject.h"
//#include "GameObjectSharer.h"
using namespace std;
class ScreenManagerRemoteControl
{
public:
virtual void SwitchScreens(string screenToSwitchTo) = 0;
virtual void loadLevelInPlayMode(string screenToLoad) = 0;
//virtual vector<GameObject>& getGameObjects() = 0;
//virtual GameObjectSharer& shareGameObjectSharer() = 0;
};
Note in the previous code, that there are some #include statements and some functions that have been commented out. This is because we will not be coding the GameObject and GameObjectSharer classes until the next chapter.
The rest of the code is for the prototypes that match the definitions we saw previously in the ScreenManager.h file. As you have come to expect, all the functions are pure virtual and therefore must be implemented by any class we wish to have an instance of.
Create a new source file in the Source Files/Screens filter called ScreenManagerRemoteControl.cpp and add the following code:
/*********************************
******THIS IS AN INTERFACE********
*********************************/
This code file is empty because all the code is in the .h file. In fact, you don't need to create this file, but I always find it a handy reminder in case I forget that all the functions for the class are pure virtual and waste time looking for the .cpp file, which doesn't exist.
Where are we now?
At this stage, the only remaining errors in the code are the errors that refer to the SelectScreen class and the GameScreen class. It is going to take quite a bit of work to get rid of these errors and have a runnable program. The reason for this is that SelectScreen and GameScreen are derived from Screen and, in turn, the Screen class is also dependent on InputHandler, UIPanel, and Button. We will get to them next.
Coding the Screen class and its dependents
What we will do now is code all the screen-related classes. In addition, each of the screens from our game will have their own specific implementation of all these classes.
Next, we will code all the base classes; Screen, InputHandler, UIPanel, and Button. Following that, we will do the full implementation of the SelectScreen derivations of these classes and a partial implementation of the GameScreen derivations. At this point, we will be able to run the game and see our screens, UI panels, and buttons in action, and also be able to switch between screens. In the next chapter, we will work on the game properly and implement GameObject and LevelManager. In Chapter 22, Using Game Objects and Building a Game, we will see how we can use them all in the GameScreen class.
Coding the Button class
Create a new header file in the Header Files/Screens filter called Button.h and add the following code:
#pragma once
#include <SFML/Graphics.hpp>
using namespace sf;
class Button
{
private:
RectangleShape m_Button;
Text m_ButtonText;
Font m_Font;
public:
std::string m_Text;
FloatRect m_Collider;
Button(Vector2f position,
float width, float height,
int red, int green, int blue,
std::string text);
void draw(RenderWindow& window);
};
As you can see from the preceding code, a button will be visually represented by an SFML RectangleShape instance and an SFML Text instance. Also note that there is a FloatRect instance named m_Collider that will be used to detect mouse clicks on the button. The constructor will receive arguments to configure the position, size, color, and text of the button. The button will draw itself once each frame of the game loop and has a draw function that receives a RenderWindow reference to enable this.
Create a new source file in the Source Files/Screens filter called Button.cpp and add the following code:
#include "Button.h"
Button::Button(Vector2f position,
float width, float height,
int red, int green, int blue,
std::string text)
{
m_Button.setPosition(position);
m_Button.setFillColor(sf::Color(red, green, blue));
m_Button.setSize(Vector2f(width, height));
m_Text = "" + text;
float textPaddingX = width /10;
float textPaddingY= height / 10;
m_ButtonText.setCharacterSize(height * .7f);
m_ButtonText.setString(text);
m_Font.loadFromFile("fonts/Roboto-Bold.ttf");
m_ButtonText.setFont(m_Font);
m_ButtonText.setPosition(Vector2f((position.x + textPaddingX),
(position.y + textPaddingY)));
m_Collider = FloatRect(position, Vector2f(width, height));
}
void Button::draw(RenderWindow& window)
{
window.draw(m_Button);
window.draw(m_ButtonText);
}
Most of the action takes place in the constructor, and there is nothing we haven't seen already on numerous occasions in all the other projects. The button is prepared to be drawn using all the values that are passed into the constructor.
The draw function uses the RenderWindow reference to draw the previously configured Text instance on top of the previously configured RectangleShape instance.
Coding the UIPanel class
Create a new header file in the Header Files/Screens filter called UIPanel.h and add the following code:
#pragma once
#include <SFML/Graphics.hpp>
#include "Button.h"
using namespace std;
class UIPanel {
private:
RectangleShape m_UIPanel;
bool m_Hidden = false;
vector<shared_ptr<Button>> m_Buttons;
protected:
float m_ButtonWidth = 0;
float m_ButtonHeight = 0;
float m_ButtonPadding = 0;
Font m_Font;
Text m_Text;
void addButton(float x, float y, int width, int height,
int red, int green, int blue,
string label);
public:
View m_View;
UIPanel(Vector2i res, int x, int y,
float width, float height,
int alpha, int red, int green, int blue);
vector<shared_ptr<Button>> getButtons();
virtual void draw(RenderWindow& window);
void show();
void hide();
};
The private section of the UIPanel class consists of a RectangleShape that will visually represent the background of the panel, a Boolean to keep track of whether the panel is currently visible to the player, and a vector of smart pointers to hold all the Button instances for this panel. Note that the smart pointers are of the shared variety so that we can pass them around and let the shared_pointer class take care of counting the references and deleting the memory when necessary.
In the protected section, there are member variables for remembering the size and spacing of the buttons, as well as a Text and a Font instance for drawing text on the panel. All the panels in this project have just one Text instance, but specific derived classes are free to add extra members as they need. For example, a HighScoreUIPanel class might need a vector full of Text instances to draw a list of the highest scores.
There is also an addButton function, and it is this function that will call the Button class constructor and add the instances to the vector.
In the public section, we can see that every UIPanel instance will have its own View instance. This enables every panel and screen to configure its View however it likes. All the View instances will be drawn to and added to RenderWindow in layers.
The UIPanel constructor receives all the necessary sizes and colors to configure its RectangleShape. The getButtons function shares the vector of Button instances so that other classes can interact with the buttons. For example, the InputHandler class will need the buttons to detect mouse clicks on them. This is why we used shared smart pointers.
The draw function, of course, is called once each frame of the game loop and is virtual, so it can be optionally overridden and customized by derived classes. The show and hide functions will toggle the value of m_Hidden to keep track of whether this panel is currently visible to the player.
Create a new source file in the Source Files/Screens filter called UIPanel.cpp and add the following code:
#include "UIPanel.h"
UIPanel::UIPanel(Vector2i res, int x, int y,
float width, float height,
int alpha, int red, int green, int blue)
{
m_UIPanel.setFillColor(sf::Color(red, green, blue, alpha));
// How big in pixels is the UI panel
m_UIPanel.setSize(Vector2f(width, height));
// How big in pixels is the view
m_View.setSize(Vector2f(width, height));
// Where in pixels does the center of the view focus
// This is most relevant when drawing a portion
// of the game world
// width/2, height/2 ensures it is exactly centered around the
// RectangleShape, mUIPanel
m_View.setCenter(width / 2, height / 2);
// Where in the window is the view positioned?
float viewportStartX = 1.f / (res.x / x);
float viewportStartY = 1.f / (res.y / y);
float viewportSizeX = 1.f / (res.x / width);
float viewportSizeY = 1.f / (res.y / height);
// Params from left to right
// StartX as a fraction of 1, startY as a fraction of 1
// SizeX as a fraction of 1
// SizeY as a fraction of 1
m_View.setViewport(FloatRect(viewportStartX, viewportStartY,
viewportSizeX, viewportSizeY));
}
vector<shared_ptr<Button>> UIPanel::getButtons()
{
return m_Buttons;
}
void UIPanel::addButton(float x, float y,
int width, int height,
int red, int green, int blue,
string label)
{
m_Buttons.push_back(make_shared<Button>(Vector2f(x, y),
width, height,
red, green, blue,
label));
}
void UIPanel::draw(RenderWindow & window)
{
window.setView(m_View);
if (!m_Hidden) {
window.draw(m_UIPanel);
for (auto it = m_Buttons.begin();
it != m_Buttons.end(); ++it)
{
(*it)->draw(window);
}
}
}
void UIPanel::show()
{
m_Hidden = false;
}
void UIPanel::hide()
{
m_Hidden = true;
}
In the constructor, the RectangleShape instance is scaled, colored, and positioned. The View instance is scaled to the size of the panel as well. The setViewport function of the View class is used along with some extra calculations to make sure the View takes up the correct proportion of the screen relative to the resolution and will therefore look approximately the same on screens of varying resolutions.
The getButtons function simply returns the vector of buttons to the calling code. The addButtons function uses the make_shared function to allocate new Button instances on the heap and place them into the vector.
The draw function uses the setView function to make the specific View instance of this panel the one that is drawn upon. Next, there's RectangleShape, which represents that this panel is drawn. Then, each of the buttons in the vector are looped through and drawn on top of the RectangleShape. All this drawing will only happen if m_Hidden is false.
The show and hide functions allow users of the class to toggle m_Hidden.
Coding the InputHandler class
Create a new header file in the Header Files/Screens filter called InputHandler.h and add the following code:
#pragma once
#include <SFML/Graphics.hpp>
#include <vector>
#include "Button.h"
#include "Screen.h"
#include "ScreenManagerRemoteControl.h"
using namespace sf;
using namespace std;
class Screen;
class InputHandler
{
private:
Screen* m_ParentScreen;
vector<shared_ptr<Button>> m_Buttons;
View* m_PointerToUIPanelView;
ScreenManagerRemoteControl* m_ScreenManagerRemoteControl;
public:
void initialiseInputHandler(
ScreenManagerRemoteControl* sw,
vector<shared_ptr<Button>>,
View* pointerToUIView,
Screen* parentScreen);
void handleInput(RenderWindow& window, Event& event);
virtual void handleGamepad();
virtual void handleKeyPressed(Event& event,
RenderWindow& window);
virtual void handleKeyReleased(Event& event,
RenderWindow& window);
virtual void handleLeftClick(string& buttonInteractedWith,
RenderWindow& window);
View* getPointerToUIView();
ScreenManagerRemoteControl*
getPointerToScreenManagerRemoteControl();
Screen* getmParentScreen();
};
There is an error in this file because the Screen class doesn't exist yet.
First, study the private section of this header file. Each InputHandler instance will hold a pointer to the screen that holds it. This will be useful in a few situations we will come across as the project continues. There is also a vector of shared smart pointers to Button instances. These are the same Button instances that are in the UIPanel we just coded. Each derived UIPanel will have a matching derived InputHandler with which it shares a vector of buttons.
The InputHandler class also holds a pointer to the View instance in the UIPanel. When we code the function definitions in InputHandler.cpp, we will see how we get this pointer and how it is useful.
There is also a pointer to ScreenManagerRemoteControl. Remember from the ScreenManager class that we have implemented some functions from ScreenManagerRemoteControl. This is what will give us access to functions such as SwitchScreen. This is very useful when you consider that InputHandler is the class where we will be detecting button clicks. Of course, we need to see how we can initialize this pointer to make it usable. We will see how in the InputHandler.cpp file soon.
In the public section, there is an initialiseInputHandler function. This is where the private members we have just talked about will be prepared for use. Look at the parameters; they match the types of the private members exactly.
Next is the handleInput function. Remember that this is called once per frame by the GameEngine class; the ScreenManager calls it on the current screen and the Screen class (coded next), in turn, will call it on all InputHandler instances that it holds. It receives a RenderWindow and an Event instance.
Next, there are four virtual functions which each derived from the InputHandler class that it can optionally override if it needs to. They are as follows:
- handleGamepad
- handleKeyPressed
- handleKeyReleased
- handleLeftClick
As we will see shortly, in the InputHandler.cpp file, the handleInput function will loop through the data in Event, just as we have done so often before. But then, instead of handling all the events directly as we have done in the past, it will delegate a response to one of the four virtual functions. The derived classes will then receive only the events and data they have decided they want to handle. Default and empty definitions of the four virtual functions are provided in the InputHandler.cpp file.
The getPointerToUIView function will return the pointer to the panels View that this InputHandler instance holds. We will see shortly that we need View in order to do mouse click collision detection on the buttons.
getPointerToScreenManagerRemoteControl and getmParentScreen return pointers to the member variables that are suggested by the names of the functions.
Important note
Note that, if you make the private data protected, then the derived InputHandler classes can access the data without going through the functions we have just discussed. When the project is complete, feel free to revisit this section and change this if you wish.
Now, we can code all the function definitions.
Create a new source file in the Source Files/Screens filter called InputHandler.cpp and add the following code:
#include <sstream>
#include "InputHandler.h"
using namespace sf;
using namespace std;
void InputHandler::initialiseInputHandler(
ScreenManagerRemoteControl* sw,
vector<shared_ptr<Button>> buttons,
View* pointerToUIView,
Screen* parentScreen)
{
m_ScreenManagerRemoteControl = sw;
m_Buttons = buttons;
m_PointerToUIPanelView = pointerToUIView;
m_ParentScreen = parentScreen;
}
void InputHandler::handleInput(RenderWindow& window,
Event& event)
{
// Handle any key presses
if (event.type == Event::KeyPressed)
{
handleKeyPressed(event, window);
}
if (event.type == Event::KeyReleased)
{
handleKeyReleased(event, window);
}
// Handle any left mouse click released
if (event.type == Event::MouseButtonReleased)
{
auto end = m_Buttons.end();
for (auto i = m_Buttons.begin();
i != end;
++i) {
if ((*i)->m_Collider.contains(
window.mapPixelToCoords(Mouse::getPosition(),
(*getPointerToUIView()))))
{
// Capture the text of the button that was interacted
// with and pass it to the specialised version
// of this class if implemented
handleLeftClick((*i)->m_Text, window);
break;
}
}
}
handleGamepad();
}
void InputHandler::handleGamepad()
{}// Do nothing unless handled by a derived class
void InputHandler::handleKeyPressed(Event& event,
RenderWindow& window)
{}// Do nothing unless handled by a derived class
void InputHandler::handleKeyReleased(Event& event,
RenderWindow& window)
{}// Do nothing unless handled by a derived class
void InputHandler::handleLeftClick(std::
string& buttonInteractedWith,
RenderWindow& window)
{}// Do nothing unless handled by a derived class
View* InputHandler::getPointerToUIView()
{
return m_PointerToUIPanelView;
}
ScreenManagerRemoteControl*
InputHandler::getPointerToScreenManagerRemoteControl()
{
return m_ScreenManagerRemoteControl;
}
Screen* InputHandler::getmParentScreen() {
return m_ParentScreen;
}
The initialiseInputHandler function initializes the private data, as we have already discussed, the four virtual functions are empty, as expected, and the getter functions return pointers to the private members, just like we said they would.
The interesting function definition is the handleInput function, so let's go through it.
There is a series of if statements, which should look familiar from previous projects. Each if statement tests for a different type of event, such as a key being pressed or a key being released. Instead of handling the event, however, the appropriate virtual function is called. If the derived InputHandler class overrides the virtual function, it will receive the data and get to handle the event. If it doesn't, then the empty default function definition is called, and nothing happens.
When the MouseButtonReleased event occurs, each of the Button instances in the vector is tested to see if the click occurred within the button. This is achieved using the contains function on the collider in each button and passing in the position of the mouse click. Note that the button coordinates are relative to the panels View and not the screen coordinates. For this reason, the mapPixelToCoords function is used to convert the screen coordinates of the mouse click into the corresponding coordinates of the View.
When a collision is detected, the handleLeftClick virtual function is called and the text from the button is passed in. The derived InputHandler classes will handle what happens on a button click based on the text of the button.
The final line of code in the handleInput function calls the final virtual function called handleGamepad. Any derived InputHandler classes that implement this function will get a chance to respond to the player's actions with the gamepad. In this project, only GameInputHandler will be concerned with what the gamepad is doing. You could adapt the project to allow the player to use the gamepad to navigate the menus of the other screen if you want to.
Coding the Screen class
Create a new header file in the Header Files/Screens filter called Screen.h and add the following code:
#pragma once
#include <SFML/Graphics.hpp>
#include <vector>
#include "InputHandler.h"
#include "UIPanel.h"
#include "ScreenManagerRemoteControl.h"
class InputHandler;
class Screen {
private:
vector<shared_ptr<InputHandler>> m_InputHandlers;
vector<unique_ptr<UIPanel>> m_Panels;
protected:
void addPanel(unique_ptr<UIPanel> p,
ScreenManagerRemoteControl* smrc,
shared_ptr<InputHandler> ih);
public:
virtual void initialise();
void virtual update(float fps);
void virtual draw(RenderWindow& window);
void handleInput(RenderWindow& window);
View m_View;
};
In the private section of the preceding code, there is a vector of shared smart pointers to InputHandler instances. This is where we will store all the derived InputHandler instances. SelectScreen will actually only have one InputHandler, while GameScreen will have two, but you can have as many as you like. Consider, for example, a hypothetical settings screen where you might have options for graphics, sound, controller, gameplay, and so on. Each of these options could then be clicked to reveal a unique UIPanel instance with a related InputHandler. So, we could have avoided using a vector for this project, but any significant project would almost certainly need a vector eventually. The smart pointers are of the shared variety, indicating we will be passing the contents via a function at some point.
The next member is a vector of unique smart pointers to UIPanel instances. This is where all the derived UIPanel instances will go. The unique variety of pointer indicates we will not share the pointers; if we do, we will have to transfer responsibility.
In the protected section is the addPanel function, which is where a Screen will pass in all the details of a new UIPanel instance, including its related InputHandler. Note the parameter to receive a ScreenManagerRemoteControl pointer; remember that this is required for passing to InputHandler.
There is an initialise function as well, which we will see the purpose of shortly. The final three functions are the virtual functions, that is, update, draw and handleInput, which the derived Screen classes can override as they see fit.
Finally, take note of the View instance. Every Screen instance will also have its own View instance to draw to, just like each UIPanel does.
Let's take a look at the implementation of the functions we have just discussed.
Create a new source file in the Source Files/Screens filter called Screen.cpp and add the following code:
#include "Screen.h"
void Screen::initialise(){}
void Screen::addPanel(unique_ptr<UIPanel> uip,
ScreenManagerRemoteControl* smrc,
shared_ptr<InputHandler> ih)
{
ih->initialiseInputHandler(smrc,
uip->getButtons(), &uip->m_View, this);
// Use move() because otherwise
// the vector has a COPY which is not allowed
m_Panels.push_back(move(uip));
m_InputHandlers.push_back(ih);
}
void Screen::handleInput(RenderWindow& window)
{
Event event;
auto itr = m_InputHandlers.begin();
auto end = m_InputHandlers.end();
while (window.pollEvent(event))
{
for (itr;
itr != end;
++itr)
{
(*itr)->handleInput(window, event);
}
}
}
void Screen::update(float fps){}
void Screen::draw(RenderWindow& window)
{
auto itr = m_Panels.begin();
auto end = m_Panels.end();
for (itr;
itr != end;
++itr)
{
(*itr)->draw(window);
}
}
The initialise function is empty. It is designed to be overridden.
The addPanel function, as we already know, stores the InputHandler and UIPanel instances that are passed to it. When an InputHandler is passed in, the initialiseInputHandler function is called and three things are passed in. First is the vector of Button instances, next is the View instance from the related UIPanel instance, and third is the this argument. In the current context, this is a pointer to the Screen instance itself. Why not refer to the InputHandler class and verify that these arguments are correct and what happens to them?
Next, the panel and the input handler are added to the appropriate vector. Something interesting happens, however, if you look closely. Take another look at the line of code which adds the UIPanel instance called uip to the m_Panels vector:
m_Panels.push_back(move(uip));
The argument that's passed to push_back is encased in a call to move. This transfers responsibility for the unique pointer to the UIPanel in the vector. Any attempt to use uip after this point will result in a read access violation because uip is now a null pointer. The pointer in m_Panels, however, is good to go. You will probably agree that this is simpler than using a regular pointer and working out where to delete it.
The handleInput function loops through every event, passing it in to each InputHandler in turn.
The update function has no functionality in the base class and is empty.
The draw function loops through every UIPanel instance and calls their draw functions.
Now, we are ready to code all the derived classes. We will start with the select screen (SelectScreen) and then move on to the game screen (GameScreen). We will add one more quick class first, though.
Adding the WorldState.h file
Create a new header file in the Header Files/Engine filter called WorldState.h and add the following code:
#pragma once
class WorldState
{
public:
static const int WORLD_WIDTH = 100;
static int WORLD_HEIGHT;
static int SCORE;
static int LIVES;
static int NUM_INVADERS_AT_START;
static int NUM_INVADERS;
static int WAVE_NUMBER;
};
These variables are public and static. As a result, they will be accessible throughout the project and are guaranteed to have only a single instance.
Coding the derived classes for the select screen
So far, we have coded the fundamental classes that represent the user interface, as well as the logical division of our game into screens. Next, we will code specific implementations of each of them. Remember that Space Invaders ++ will have two screens: select and game. The select screen will be represented by the SelectScreen class and will have a single UIPanel instance, a single InputHandler instance, and two buttons. The play screen will be represented by the GameScreen class and it will have two UIPanel instances. One is called GameUIPanel and will display the score, lives, and invader wave number. The other is called GameOverUIPanel and will display two buttons, giving the player the option to go back to the select screen or play again. As the GameScreen class is composed of two UIPanel instances, it will also be composed of two InputHandler instances.
Coding the SelectScreen class
Create a new header file in the Header Files/Screens/Select filter called SelectScreen.h and add the following code:
#pragma once
#include "Screen.h"
class SelectScreen : public Screen
{
private:
ScreenManagerRemoteControl* m_ScreenManagerRemoteControl;
Texture m_BackgroundTexture;
Sprite m_BackgroundSprite;
public:
SelectScreen(ScreenManagerRemoteControl* smrc, Vector2i res);
void virtual draw(RenderWindow& window);
};
The SelectScreen class inherits from Screen. In the private section of the preceding code, there is a ScreenManagerRemoteControl pointer for switching screens, as well as a Texture instance and Sprite instance for drawing a background.
In the public section, we can see the constructor and the prototype that overrides the draw function. The SelectScreen class does not need to override the update function.
Create a new source file in the Source Files/Screens/Select filter called SelectScreen.cpp and add the following code:
#include "SelectScreen.h"
#include "SelectUIPanel.h"
#include "SelectInputHandler.h"
SelectScreen::SelectScreen(
ScreenManagerRemoteControl* smrc, Vector2i res)
{
auto suip = make_unique<SelectUIPanel>(res);
auto sih = make_shared<SelectInputHandler>();
addPanel(move(suip), smrc, sih);
m_ScreenManagerRemoteControl = smrc;
m_BackgroundTexture.loadFromFile("graphics/background.png");
m_BackgroundSprite.setTexture(m_BackgroundTexture);
auto textureSize = m_BackgroundSprite.
getTexture()->getSize();
m_BackgroundSprite.setScale(float(
m_View.getSize().x) / textureSize.x,
float(m_View.getSize().y) / textureSize.y);
}
void SelectScreen::draw(RenderWindow& window)
{
// Change to this screen's view to draw
window.setView(m_View);
window.draw(m_BackgroundSprite);
// Draw the UIPanel view(s)
Screen::draw(window);
}
In the constructor, the purpose of all the coding so far begins to come together. The make_unique function is used to create a unique smart pointer to a SelectUIPanel instance. We will code SelectUIPanel in a couple of sections time. Next, the make_shared function is used to create a shared smart pointer to a SelectInputHandler instance. We will code the SelectInputHandler class next. Now that we have a UIPanel and an InputHandler in the appropriate forms, we can call the addPanel function and pass them both in. Note that, in the call to addPanel, suip is wrapped in a call to move. Any use of suip after this point is not possible without crashing the program because it is now a null pointer, since ownership has been moved to the function argument. Remember that, inside the Screen class addPanel function, ownership is moved again when the unique pointer to UIPanel is stashed away in the vector of UIPanel instances.
Following this, the ScreenManagerRemoteControl pointer is initialized and can now be used to switch to another screen when required.
The final few lines of code in the constructor create and scale a Sprite instance that uses the background.png image, which will fill the entire screen.
In the draw function, the call to the setView function makes this panel's View instance the one to draw on, and then the Sprite instance is drawn to the RenderWindow instance.
Finally, the draw function is called on the base Screen class, which draws all the panels and their related buttons. In this specific case, it draws just a single panel, SelectUIPanel, which we will code right after we have coded SelectInputHandler.
Coding the SelectInputHandler class
Create a new header file in the Header Files/Screens/Select filter called SelectInputHandler.h and add the following code:
#pragma once
#include "InputHandler.h"
class SelectInputHandler : public InputHandler
{
public:
void handleKeyPressed(Event& event,
RenderWindow& window) override;
void handleLeftClick(std::string& buttonInteractedWith,
RenderWindow& window) override;
};
The SelectInputHandler class inherits from InputHandler and overrides the handleKeyPressed and handleLeftClick functions. Let's see how these functions are implemented.
Create a new source file in the Source Files/Screens/Select filter called SelectInputHandler.cpp and add the following code:
#include "SelectInputHandler.h"
#include "SoundEngine.h"
#include "WorldState.h"
#include <iostream>
int WorldState::WAVE_NUMBER;
void SelectInputHandler::handleKeyPressed(
Event& event, RenderWindow& window)
{
// Quit the game
if (Keyboard::isKeyPressed(Keyboard::Escape))
{
window.close();
}
}
void SelectInputHandler::handleLeftClick(
std::string& buttonInteractedWith, RenderWindow& window)
{
if (buttonInteractedWith == "Play") {
SoundEngine::playClick();
WorldState::WAVE_NUMBER = 0;
getPointerToScreenManagerRemoteControl()
->loadLevelInPlayMode("level1");
}
if (buttonInteractedWith == "Quit") {
SoundEngine::playClick();
window.close();
}
}
The handleKeyPressed function interacts with just one keyboard key. When the Escape key is pressed, the game quits.
In the handleLeftClick function, there are two if statements. Remember that the handleInputFunction of the InputHandler class passes in the text of the button that was clicked, along with a reference to RenderWindow. If the Play button is clicked, then a click sound is played, the WAVE_NUMBER variable is set to zero, and the ScreenManagerRemoteControl pointer calls the loadLevelInPlayMode function. The loadLevelInPlayMode function has its definition in ScreenManagerClass. Eventually, this function will indeed load a level from the passed in file name, but for now, it simply changes screen to the play screen.
If the Quit button is clicked, then the game is exited.
Important note
At this stage, despite including WorldState.h, you might have an error using WorldState::WaveNumber. This is fine; this is happening because of the order in which the classes are parsed by Visual Studio. When we add all the game screen-related classes that also use WorldState.h, which is parsed before this file, the error will be gone.
Let's code SelectUIPanel. Then, we can move on to the GameScreen class.
Coding the SelectUIPanel class
Create a new header file in the Header Files/Screens/Select filter called SelectUIPanel.h and add the following code:
#pragma once
#include "UIPanel.h"
class SelectUIPanel : public UIPanel
{
private:
void initialiseButtons();
public:
SelectUIPanel(Vector2i res);
void virtual draw(RenderWindow& window);
};
The SelectUIPanel class inherits from UIPanel and overrides the draw function. In the preceding header file, you can also see that there is a function called initialiseButtons, as well as a constructor. Let's code the definitions.
Create a new source file in the Source Files/Screens/Select filter called SelectUIPanel.cpp and add the following code:
#include "SelectUIPanel.h"
#include <iostream>
SelectUIPanel::SelectUIPanel(Vector2i res) :
// Create a new UIPanel
// by calling the super-class constructor
UIPanel(res,
(res.x / 10) * 2, // Start 2/10 across
res.y / 3, // 1/3 of the resolution from the top
(res.x / 10) * 6, // as wide as 6/10 of the resolution
res.y / 3, // and as tall as 1/3 of the resolution
50, 255, 255, 255) // a, r, g, b
{
m_ButtonWidth = res.x / 20;
m_ButtonHeight = res.y / 20;
m_ButtonPadding = res.x / 100;
m_Text.setFillColor(sf::Color(0, 255, 0, 255));
m_Text.setString("SPACE INVADERS ++");
//https://www.dafont.com/roboto.font
m_Font.loadFromFile("fonts/Roboto-Bold.ttf");
m_Text.setFont(m_Font);
m_Text.setPosition(Vector2f(m_ButtonPadding,
m_ButtonHeight + (m_ButtonPadding * 2)));
m_Text.setCharacterSize(160);
initialiseButtons();
}
void SelectUIPanel::initialiseButtons()
{
// Buttons are positioned relative to the top left
// corner of the UI panel(m_View in UIPanel)
addButton(m_ButtonPadding,
m_ButtonPadding,
m_ButtonWidth,
m_ButtonHeight,
0, 255, 0,
"Play");
addButton(m_ButtonWidth + (m_ButtonPadding * 2),
m_ButtonPadding,
m_ButtonWidth,
m_ButtonHeight,
255, 0, 0,
"Quit");
}
void SelectUIPanel::draw(RenderWindow& window)
{
show();
UIPanel::draw(window);
window.draw(m_Text);
}
The constructor receives the screen resolution and immediately uses that data to call the superclass constructor. By doing calculations with the values stored in res, the starting position and size of the panel is calculated. It is important that this calculation is done here and not in the UIPanel class because every UIPanel will be a different size and in a different position. Take a look at the comments in the preceding code if you are interested in the effect of each of the specific calculations. The color is also passed in using alpha, red, green, and blue values.
Next, the member variables from the base class that determine button size and spacing are initialized. The value of 20 is just an arbitrary value that works, but the important part is that all the values are based on the resolution of the screen, so they will scale well over different screen resolutions.
The next few lines of code prepare a Text instance, ready to be shown in the draw function. Finally, in the constructor, the initialiseButtons function is called.
In the initialiseButtons function, the addButton function is called twice, creating a green button with "Play" on it and a red button with "Quit" on it.
There might be some errors because of the use of the WorldState.h file. These can be ignored as they will correct themselves as we proceed with the next few classes.
Now, we can code all the game screen-related classes.
Coding the derived classes for the game screen
The structure of all these classes is the same as the select screen-related classes. I will be sure to point out where they vary, however. Most of the significant differences will be discussed across the next three chapters, however, because that is when we will code all the game objects and components and then put them to work in the GameScreen class.
The first difference is that the GameScreen class has two UIPanel instances and two InputHandler instances.
Coding the GameScreen class
Create a new header file in the Header Files/Screens/Game filter called GameScreen.h and add the following code:
#pragma once
#include "Screen.h"
#include "GameInputHandler.h"
#include "GameOverInputHandler.h"
class GameScreen : public Screen
{
private:
ScreenManagerRemoteControl* m_ScreenManagerRemoteControl;
shared_ptr<GameInputHandler> m_GIH;
Texture m_BackgroundTexture;
Sprite m_BackgroundSprite;
public:
static bool m_GameOver;
GameScreen(ScreenManagerRemoteControl* smrc, Vector2i res);
void initialise() override;
void virtual update(float fps);
void virtual draw(RenderWindow& window);
};
Note that this is not the finished code – we will add more features to this file in the next chapter. This is just enough code so that we can run the game and see some basic functionality at the end of this chapter.
The code is familiar to the SelectScreen class. We also override the initialise and update functions. Furthermore, we have added a Boolean called m_GameOver, which will keep track of whether the game is currently playing.
Let's move on to the function implementations.
Create a new source file in the Source Files/Screens/Game filter called GameScreen.cpp and add the following code:
#include "GameScreen.h"
#include "GameUIPanel.h"
#include "GameInputHandler.h"
#include "GameOverUIPanel.h"
#include "WorldState.h"
int WorldState::WORLD_HEIGHT;
int WorldState::NUM_INVADERS;
int WorldState::NUM_INVADERS_AT_START;
GameScreen::GameScreen(ScreenManagerRemoteControl* smrc,
Vector2i res)
{
m_GIH = make_shared<GameInputHandler>();
auto guip = make_unique<GameUIPanel>(res);
addPanel(move(guip), smrc, m_GIH);
auto m_GOIH = make_shared<GameOverInputHandler>();
auto gouip = make_unique<GameOverUIPanel>(res);
addPanel(move(gouip), smrc, m_GOIH);
m_ScreenManagerRemoteControl = smrc;
float screenRatio = VideoMode::getDesktopMode().width /
VideoMode::getDesktopMode().height;
WorldState::WORLD_HEIGHT = WorldState::WORLD_WIDTH /
screenRatio;
m_View.setSize(
WorldState::WORLD_WIDTH, WorldState::WORLD_HEIGHT);
m_View.setCenter(Vector2f(WorldState::WORLD_WIDTH /
2, WorldState::WORLD_HEIGHT / 2));
m_BackgroundTexture.loadFromFile("graphics/background.png");
m_BackgroundSprite.setTexture(m_BackgroundTexture);
auto textureSize = m_BackgroundSprite.getTexture()->getSize();
m_BackgroundSprite.setScale(float(m_View.getSize().x) /
textureSize.x,
float(m_View.getSize().y) / textureSize.y);
}
void GameScreen::initialise()
{
m_GIH->initialize();
WorldState::NUM_INVADERS = 0;
m_GameOver = false;
if (WorldState::WAVE_NUMBER == 0)
{
WorldState::NUM_INVADERS_AT_START =
WorldState::NUM_INVADERS;
WorldState::WAVE_NUMBER = 1;
WorldState::LIVES = 3;
WorldState::SCORE = 0;
}
}
void GameScreen::update(float fps)
{
Screen::update(fps);
if (!m_GameOver)
{
if (WorldState::NUM_INVADERS <= 0)
{
WorldState::WAVE_NUMBER++;
m_ScreenManagerRemoteControl->
loadLevelInPlayMode("level1");
}
if (WorldState::LIVES <= 0)
{
m_GameOver = true;
}
}
}
void GameScreen::draw(RenderWindow& window)
{
// Change to this screen's view to draw
window.setView(m_View);
window.draw(m_BackgroundSprite);
// Draw the UIPanel view(s)
Screen::draw(window);
}
Everything that happened in the SelectScreen class happens here too, but for two UIPanel instances and two InputHandler instances. The next difference is that GameScreen does implement the update function. This is where all the game objects will be updated each frame of the game.
The next difference is that we have added some basic logic for the game into the initialise and update functions.
Important note
I apologize for the inconsistent spelling of the initialise and initialize functions. Changing them at this current stage of production is more likely to introduce errors into the book than help you out.
In the initialize function, the code calls the initialize function of the GameInputHandler class that we will code next. The NUM_INVADERS variable is set to zero, while m_GameOver is set to false. Next, the WAVE_NUMBER variable is tested and, if it equals zero, then the WorldState class has its static variables initialized, ready for a new game.
In the update function, the m_GameOver variable is used to determine whether the game is running and, if it is, two more tests are done. The first tests whether all the invaders have been destroyed. At this stage of development, because there aren't any invaders, this has the effect of constantly incrementing the wave number.
The second test checks whether the player has run out of lives and if they have, then m_GameOver is set to true.
Coding the GameInputHandler class
Create a new header file in the Header Files/Screens/Game filter called GameInputHandler.h and add the following code:
#pragma once
#include "InputHandler.h"
class GameScreen;
class GameInputHandler : public InputHandler
{
public:
void initialize();
void handleGamepad() override;
void handleKeyPressed(Event& event,
RenderWindow& window) override;
void handleKeyReleased(Event& event,
RenderWindow& window) override;
};
This class works the same way as SelectInputHandler does, but we need to override more of the functions. We will add code to the initialize, handleGamepad, handleKeyPressed, and handleKeyReleased functions here.
This is not the finished code – we will add lots more features to this file in the next chapter. This is just enough code so that we can run the game and see some basic functionality at the end of the chapter.
Create a new source file in the Source Files/Screens/Game filter called GameInputHandler.cpp and add the following code:
#include "GameInputHandler.h"
#include "SoundEngine.h"
#include "GameScreen.h"
void GameInputHandler::initialize() {
}
void GameInputHandler::handleGamepad()
{
}
void GameInputHandler::handleKeyPressed(
Event& event, RenderWindow& window)
{
// Handle key presses
if (event.key.code == Keyboard::Escape)
{
SoundEngine::playClick();
getPointerToScreenManagerRemoteControl()->
SwitchScreens("Select");
}
}
void GameInputHandler::handleKeyReleased(
Event& event, RenderWindow& window)
{
}
For now, we only want to add code to the handleKeyPressed function, but why not add the other empty functions that are shown in the preceding code? When the player presses the Escape key, the ScreenMangerRemoteControl pointer calls the SwitchScreen function to go back to the select screen.
This is not the finished code – we will add lots more features to this file in the next chapter. This is just enough code so that we can run the game and see some basic functionality at the end of the chapter.
Coding the GameUIPanel class
Create a new header file in the Header Files/Screens/Game filter called GameUIPanel.h and add the following code:
#pragma once
#include "UIPanel.h"
class GameUIPanel : public UIPanel
{
public:
GameUIPanel(Vector2i res);
void draw(RenderWindow& window) override;
};
Like the previous UIPanel child class, we'll override the draw function and also implement the constructor. Let's code these functions now.
Create a new source file in the Source Files/Screens/Game filter called GameUIPanel.cpp and add the following code:
#include "GameUIPanel.h"
#include <sstream>
#include "WorldState.h"
int WorldState::SCORE;
int WorldState::LIVES;
GameUIPanel::GameUIPanel(Vector2i res) :
UIPanel(res,
1, // The left
1, // The top
res.x / 3, // 1/3 width screen
res.y / 12,
50, 255, 255, 255) // a, r, g, b
{
m_Text.setFillColor(sf::Color(0, 255, 0, 255));
m_Text.setString("Score: 0 Lives: 3 Wave: 1");
m_Font.loadFromFile("fonts/Roboto-Bold.ttf");
m_Text.setFont(m_Font);
m_Text.setPosition(Vector2f(15,15));
m_Text.setCharacterSize(60);
}
void GameUIPanel::draw(RenderWindow& window)
{
UIPanel::draw(window);
std::stringstream ss;
ss << "Score: " << WorldState::SCORE << " Lives: "
<< WorldState::LIVES << " Wave: "
<< WorldState::WAVE_NUMBER;
m_Text.setString(ss.str());
window.draw(m_Text);
}
The constructor, like the SelectUIPanel class, calls the base class constructor to configure the position, size, and color of the panel. Also, in the constructor, a Text instance is prepared for drawing to the screen.
In the draw function, a stringstream instance is used to concatenate a String of text that displays the player's score, lives remaining, and number of waves cleared. The RenderWindow instance then passes the Text instance to its draw function.
Coding the GameOverInputHandler class
Remember that the game screen will have two panels and two input handling classes. When the player loses their last life, the game over panel will be shown. This is what we will code now.
Create a new header file in the Header Files/Screens/Game filter called GameOverInputHandler.h and add the following code:
#pragma once
#include "InputHandler.h"
class GameOverInputHandler :
public InputHandler
{
public:
void handleKeyPressed(Event& event,
RenderWindow& window) override;
void handleLeftClick(std::string&
buttonInteractedWith, RenderWindow& window) override;
};
There is nothing different in the preceding code compared to the header files of the previous two InputHandler derived classes.
Create a new source file in the Source Files/Screens/Game filter called GameOverInputHandler.cpp and add the following code:
#include "GameOverInputHandler.h"
#include "SoundEngine.h"
#include "WorldState.h"
#include <iostream>
void GameOverInputHandler::handleKeyPressed(Event& event,
RenderWindow& window)
{
if (event.key.code == Keyboard::Escape)
{
SoundEngine::playClick();
getPointerToScreenManagerRemoteControl()->
SwitchScreens("Select");
}
}
void GameOverInputHandler::handleLeftClick(
std::string& buttonInteractedWith, RenderWindow& window)
{
if (buttonInteractedWith == "Play") {
SoundEngine::playClick();
WorldState::WAVE_NUMBER = 0;
getPointerToScreenManagerRemoteControl()->
loadLevelInPlayMode("level1");
}
else if (buttonInteractedWith == "Home") {
SoundEngine::playClick();
getPointerToScreenManagerRemoteControl()->
SwitchScreens("Select");
}
}
The preceding code handles two types of event. First, if the Escape keyboard key is pressed, the game switches to the select screen.
In the handleLeftClick function, there are two different buttons that are handled. If the Play button is clicked, a new game is started by calling loadLevelInPlayMode, while, if the Home button is clicked, then the select screen will be shown.
Coding the GameOverUIPanel class
Create a new header file in the Header Files/Screens/Game filter called GameOverUIPanel.h and add the following code:
#pragma once
#include "UIPanel.h"
class GameOverUIPanel :
public UIPanel
{
private:
void initialiseButtons();
public:
GameOverUIPanel(Vector2i res);
void virtual draw(RenderWindow& window);
};
There's nothing new in the preceding header file, so let's look at the function implementations
Create a new source file in the Source Files/Screens/Game filter called GameOverUIPanel.cpp and add the following code:
#include "GameOverUIPanel.h"
#include "GameScreen.h"
bool GameScreen::m_GameOver;
GameOverUIPanel::GameOverUIPanel(Vector2i res) :
UIPanel(res,
(res.x / 10) * 3,
res.y / 2, // 50% of the resolution from the top
(res.x / 10) * 3, // as wide as 1/3 of the resolution
res.y / 6, // and as tall as 1/6 of the resolution
50, 255, 255, 255) // a, r, g, b
{
m_ButtonWidth = res.x / 20;
m_ButtonHeight = res.y / 20;
m_ButtonPadding = res.x / 100;
m_Text.setFillColor(sf::Color(0, 255, 0, 255));// Green
m_Text.setString("GAME OVER!");
m_Font.loadFromFile("fonts/Roboto-Bold.ttf");
m_Text.setFont(m_Font);
m_Text.setPosition(Vector2f(m_ButtonPadding,
(m_ButtonPadding * 2)+ m_ButtonHeight));
m_Text.setCharacterSize(60);
initialiseButtons();
}
void GameOverUIPanel::initialiseButtons()
{
addButton(m_ButtonPadding,
m_ButtonPadding,
m_ButtonWidth,
m_ButtonHeight,
0, 255, 0,
"Play");
addButton(m_ButtonWidth + (m_ButtonPadding * 2),
m_ButtonPadding,
m_ButtonWidth,
m_ButtonHeight,
255, 0, 0,
"Home");
}
void GameOverUIPanel::draw(RenderWindow& window)
{
if (GameScreen::m_GameOver)
{
show();
UIPanel::draw(window);
window.draw(m_Text);
}
else
{
hide();
}
}
The preceding code configures a panel in the middle of the screen with the text Game Over! and two buttons that will allow the player to restart the game or quit, and go back to the starting screen (home/select).
Running the game
If you run the game, you will see the select screen, as shown in the following screenshot:

Press Play to transition to the game screen:

Press Escape to quit, and go back to the select screen.
Quit the game and find the following line of code in the GameScreen class:
if (WorldState::LIVES <= 0)
Change it to the following:
if (true)
Now, run the game again and select the Play button. The game over panel will be displayed and can be interacted with:

Now, change back if (true) in the GameScreen class back to if (WorldState::LIVES <= 0).
Let's take a break; that was a long chapter.
Summary
You have achieved a lot in this chapter. You have built a solid foundation for the Space Invaders ++ game and you have also coded a reusable system that can be used for almost any game that is divided up into different "screens".
We now have an input handling system in place that can detect keyboard presses and mouse clicks and route the responsibility to handle them to a specific panel that is part of a specific screen. Furthermore, the abstraction of the concept of a screen allows us to set up as many different game loops as we like. The GameScreen class will be the main class to handle the logic of this game but, once you see how over the next few chapters, you could easily code another screen to play a completely different game. Of course, the most likely thing you will do is get started with your own ideas.
In the next chapter, we will code the game objects and components which are the basis of our entity-component pattern implementation.