An important part of any programming language is the ability to organize code into logical units. F# provides modules and namespaces for this; you can learn more about them in this chapter’s “Modules,” “Namespaces,” and “Opening Namespaces and Modules” sections. To attain a good understanding of F#’s module system, it’s also important that you understand the scope of a module, as well as how it will be initialized and executed. You can learn more about these two concepts in the in “Module Scope” and “Module Execution” sections.
For a module to be effective, it’s important to able to make parts of the module private, so it cannot be seen by the outside world. F# provides two different ways to achieve this; you’ll learn how to do this in the “Signature Files” and “Private and Internal let Bindings and Members” sections.
It’s also important to be able to annotate code with notes about what it does for future users, maintainers, and even yourself; you will learn how to do this in the “Comments” section.
To support cross-compiling with OCaml and other advanced scenarios, it’s often useful to have optional compilation. F# provides two forms of this, one of which is specifically designed for cross-compiling with OCaml and is covered in the “Comments for Cross-Compilation” section. The other, more general form is described in the “Optional Compilation” section.
It has also become common to use attributes and data structures to annotate assemblies and the types and values within them. Other libraries or the CLR can then interpret these attributes. You will learn about this technique of marking functions and values with attributes in this chapter’s “Attributes” Section. The technique of compiling code into data structures is known as quoting, which you will learn about in the “Quoted Code” section toward the end of the chapter.
Modules
F# code is organized into modules, which are basically a way of grouping values and types under a common name. This organization has an effect on the scope of identifiers. Inside a module, identifiers can reference each other freely, although forward-references aren’t allowed even to other items later in the module. To reference identifiers in a module from code outside the module, you must qualify the identifier with the module name unless the module is explicitly opened with the open directive (see the “Opening Namespaces and Modules” section later in this chapter).
You name a module using the keyword module. The keyword has two modes of operation: the first gives the same name to the whole of the source file, while the second gives a name to a section of a source file. This enables you to make several modules appear in a source file.
To include the entire contents of a source file in the same, explicitly named module, you must place the module keyword at the top of the source file. A module name in this case can contain dots, and these separate the name into parts, as you can see in this snippet:
module Strangelights.Beginning.ModuleDemoYou can define nested modules within the same source file. A module name in this case cannot contain dots. After the nested module’s name, you include an equals sign followed by the indented module definition. You can also use the keywords begin and end. To wrap the module definition, you can nest submodules. The following code defines three submodules : FirstModule, SecondModule, and ThirdModule. ThirdModule is nested within SecondModule.
// create a top level modulemodule ModuleDemo// create a first modulemodule FirstModule =let n = 1// create a second modulemodule SecondModule =let n = 2// create a third module// nested inside the secondmodule ThirdModule =let n = 3
Note
You cannot use the module keyword without an equals sign in F# Interactive. When you use the module keyword without an equals sign, it affects the whole of the source file, and F# Interactive does not have the concept of a source file; instead all code entered is treated as if it were in the same source file. This means that when you use the version of the module keyword without an equals sign in F# Interactive, you get an error. You can still use module with an equals sign to create submodules in F# Interactive.
Note that different submodules can contain the same identifiers without any problems. Modules affect the scope of an identifier. To access an identifier outside of its module, you need to qualify it with the module name, so there is no ambiguity between identifiers in different modules. In the previous example, you define the identifier n in all three modules. The following example shows how to access the identifier n specific to each of the modules:
// unpack the values defined in each modulelet x = ModuleDemo.FirstModule.nlet y = ModuleDemo.SecondModule.nlet z = ModuleDemo.SecondModule.ThirdModule.n
This code compiles into a .NET class, with the values becoming methods and fields within that class. You can find more details about what an F# module looks like compared to other .NET programming languages in Chapter 12.
Namespaces
Namespaces help you organize your code hierarchically. To help keep module names unique across assemblies, you qualify the module name with a namespace name, which is just a character string with parts separated by dots. For example, F# provides a module named List, and the .NET BCL provides a class named List. There is no name conflict because the F# module is in the namespace Microsoft.FSharp.Collections, and the BCL class is in the namespace System.Collections.Generic. Namespaces keep the module names of compiled code separate, so they are not allowed in F# Interactive because they serve no purpose.
It’s important that namespace names be unique. The most popular convention is to start namespace names with the name of a company or organization, followed by a specific name that indicates a piece of functionality. You aren’t obligated to do this, but the convention is so widely followed that if you intend to distribute your code, especially in the form of a class library, then you should adopt this practice, too.
Note
There is no real concept of namespaces at the IL level of F#. The name of a class or module is nothing more than a long identifier that might or might not contain dots. You implement namespaces at the compiler level. When you use an open directive, you tell the compiler to do some extra work; to qualify all your identifiers with the given name, if it needs to; and to see whether this results in a match with a value or type.
In the simplest case, you can place a module in a namespace by using a module name with dots in it. The module and namespace names will be the same. You can also explicitly define a namespace for a module with the namespace directive. For example, look at this code:
module Strangelights.Beginning.ModuleDemoYou could replace the preceding code with this to get the same result:
namespace Strangelights.Beginningmodule ModuleDemo =
This might not be too useful for modules, but as noted in the previous section, submodule names cannot contain dots, so you use the namespace directive to place submodules within a namespace, as in this example:
// put the file in a name spacenamespace Strangelights.Beginning// create a first modulemodule FirstModule =let n = 1// create a second modulemodule SecondModule =let n = 2// create a third module// nested inside the secondmodule ThirdModule =let n = 3
After you compile this code to the outside world, the first instance of n will be accessible using the identifier Strangelights.Beginning.FirstModule.n rather than just FirstModule.n. It’s also possible to place several namespace declarations in the same source file, but you must declare them at the top level. In the previous example, this means you could have declared FirstModule and SecondModule in separate namespaces. You can’t declare SecondModule and ThirdModule in separate namespaces; because ThirdModule is nested inside SecondModule, you can’t declare a separate namespace for ThirdModule.
It’s possible to define a namespace without also using a module directive, but then the namespace can contain only type definitions, as in this example:
// a namespace definitionnamespace Strangelights.Beginning// a record defintiontype MyRecord = { Field: string }
The following example will not compile because you can’t place a value definition directly into a namespace without explicitly defining a module or submodule within the namespace:
// a namespace definitionnamespace Strangelights.Beginning// a value defintion, which is illegal// directly inside a namespacelet value = "val"
In fact, the namespace directive has some interesting and subtle effects on what your code looks like to other languages; you can learn more about this in Chapter 12.
Opening Namespaces and Modules
As you saw in the previous two sections, you must use its qualified name to specify a value or type that is not defined in the current module. This can quickly become tedious because some qualified names can be quite long. Fortunately, F# provides the open directive, so you can use simple names for types and values.
You follow the open keyword by the name of the namespace or module you want to open. For example, consider this code:
System.Console.WriteLine("Hello world")You could replace the preceding code with this:
open SystemConsole.WriteLine("Hello world")
Note that you don’t need to specify the whole namespace name. You can specify the front part of it and use the remaining parts to qualify simple names. For example, you can specify System.Collections rather than the namespace, System.Collections.Generic, and then use Generic.List to create an instance of the generic List class, as follows:
open System.Collections// create an instance of a dictionarylet wordCountDict =new Generic.Dictionary<string, int>()
Caution
The technique of using partially qualified names, such as Generic.Dictionary, can make programs difficult to maintain. You should use either the name and the full namespace or the name only.
You can open F# modules, but you cannot open classes from non-F# libraries. If you open a module, you can reference values and types within it by using their simple names. Some argue that this ability to open modules directly should be used sparingly because it can make it difficult to figure out where identifiers originated. Note that many modules from the F# libraries cannot be opened directly. In fact, you can typically divide modules into two categories: those that are designed to be accessed using qualified names, and those that are designed to be opened directly. Most modules are designed to be accessed with qualified names; a few are designed to be directly opened. The typical reason to open a module directly is so that you can use operators within it directly. The following example defines a custom module that contains a triple equals operator and then opens this module to use the operator:
// module of operatorsmodule MyOps =// check equality via hash codelet (===) x y =x.GetHashCode() =y.GetHashCode()// open the MyOps moduleopen MyOps// use the triple equal operatorlet equal = 1 === 1let nEqual = 1 === 2
If you open two namespaces that contain modules or classes of the same name, it won’t cause a compile error. You can even use values from the modules or classes with the same name, as long as the names of the values are not the same. You can see the open namespace System in Figure 6-1. You can see that it contains the class Array; you can also see a module named Array that’s available in F#’s libraries. In the figure, you can see both static methods from BCL’s Array class, which all start with a capital letter, and values from F#’s Array module, which start with a small letter.

Figure 6-1. Visual Studio’s IntelliSense
Giving Modules Aliases
You might occasionally find it useful to give an alias to a module to avoid naming clashes. This is useful when two modules share the same name and a value with a common name, and it can also be a convenient way of switching some of your code to use two different implementations of similar modules. You can only give module aliases to modules that have been created in F#.
The syntax for this is the module keyword, followed by an identifier, an equals sign, and then the name of the namespace or module you want to alias. The following example defines ArrayThreeD as the alias for the namespace Microsoft.FSharp.Collections.Array3:
// give an alias to the Array3 modulemodule ArrayThreeD = Microsoft.FSharp.Collections.Array3D// create an matrix using the module aliaslet matrix =ArrayThreeD.create 3 3 3 1
Signature Files
Signature files give you a way of making function and value definitions private to a module. You’ve already seen the syntax for the definition of a signature file in Chapter 2. A signature file can be generated using the compiler’s –i switch. Any definitions that appear in a signature file are public, and anyone can access them using the module. Any definitions that are not in the signature file are private and can be used only inside the module itself. The typical way to create a signature file is to generate it from the module source, and then go through and erase any values and functions that you want to be private.
The signature file name must be the same as the name of the module with which it is paired. It must have the extension .fsi or .mli, and you must specify the signature file to the compiler. On the command line, you must give it directly before the source file for its module. In Visual Studio , the signature file must appear before the source file in Solution Explorer.
For example, assume you have the following in the file Lib.fs:
// define a function to be exposedlet funkyFunction x =x + ": keep it funky!"// define a function that will be hiddenlet notSoFunkyFunction x = x + 1
Now assume you want to create a library that exposes funkyFunction but not notSoFunkyFunction. You would use the signature code like this and save it as Lib.fsi:
// expose a functionval funkyFunction: string -> string
Next, you would use the command line like this:
fsc -a Lib.fsi Lib.fsThis gives you an assembly named Lib.dll with one class named Lib, one public function named funkyFunction, and one private function named notSoFunkyFunction.
Private and Internal let Bindings and Members
F# supports another way of controlling the visibility of a value or type. You can use the private or internal keywords directly after the let of a let binding to make it private or internal, as the following example demonstrates:
let private aPrivateBinding = "Keep this private"let internal aInternalBinding = "Keep this internal"
The private keyword makes the value or type visible only within the current module, and the internal keyword makes the value or type visible only within the current assembly. The private and internal keywords have roughly the same meaning as the private and internal keywords in C#. The internal keyword is particularly useful to make types that are specific to F# invisible outside the assembly, while allowing them to be shared between modules within the assembly. The following example shows how to hide a union type using the internal keyword:
// This type will not be visible outside the current assemblytype internal MyUnion =| String of string| TwoStrings of string * string
You see this style of programming frequently when programming in the object-oriented style. To support this, you can also hide members of objects using the private or internal keywords. Doing this is as simple as placing the private or internal keywords directly after the memberkeyword, as shown in the following example:
namespace Strangelight.Beginningtype Thing() =member private x.PrivateThing() =()member x.ExternalThing() =()
The private and internal keywords offer similar functionality to interface files, so you might wonder which one you should use in real-world programming. The answer is not clear-cut: interface files provide a nice overview of a module and an excellent place to keep the documentation of the interface. They also help you to avoid littering the source code with extra keywords. However, interface files can get a little annoying because every external definition is repeated to some extent. This means that you must update the definitions in two places when you refactor code. Given the double update problem, I generally prefer to use the private and internal keywords; however, I think either choice is valid, and it’s much more important to be consistent throughout your project.
Module Scope
The order that you pass modules to the compiler is important because it affects the scope of identifiers within the modules, as well as the order in which you execute the modules. I cover scope in this section and execution order in the next.
Values and types within a module cannot be seen from another module unless the module they’re in appears on the command line before the module that refers to them. This is probably easier to understand with an example. Suppose you have a source file, ModuleOne.fs, that contains the following:
module ModuleOne// some text to be used by another modulelet text = "some text"
And let’s assume that you have another module, ModuleTwo.fs, that contains the following:
module ModuleTwo// print out the text defined in ModuleOneprintfn "ModuleOne.text: %s" ModuleOne.text
You can compile these two modules successfully with the following code:
fsc ModuleOne.fs ModuleTwo.fs -o ModuleScope.exeHowever, you would face a complication with the following command:
fsc ModuleTwo.fs ModuleOne.fs -o ModuleScope.exeThe preceding command would result in this error message:
ModuleTwo.fs(3,17): error: FS0039: The namespace or module 'ModuleOne' is not defined.This error occurs because ModuleOne is used in the definition of ModuleTwo, so ModuleOne must appear before ModuleTwo in the command line, or else ModuleOne will not be in scope for ModuleTwo.
Files are passed to the compiler in the same order that files appear in Solution Explorer. This means you must sometimes spend a few moments rearranging the order of the files when you add a new file to a project. Visual Studio allows you to change the file order using the context menu of the Solution Explorer (see Figure 6-2) or, in recent versions of Visual Studio, using Alt+Up and Alt+Down. In Xamarin Studio and MonoDevelop you can drag files up and down to order them.
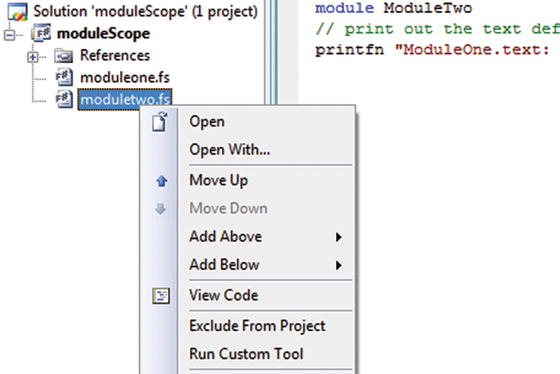
Figure 6-2. Visual Studio’s file reordering context menu
Module Execution
Roughly speaking, execution in F# starts at the top of a module and works its way down to the bottom. Any values that are not functions are calculated, and any statements at the top level or any top-level do statements are executed. Consider the following code:
module ModuleOne// statements at the top levelprintfn "This is the first line"printfn "This is the second"// a value defined at the top levellet file =let temp = new System.IO.FileInfo("test.txt") inprintfn "File exists: %b" temp.Existstemp
Executing the preceding code gives the following results:
This is the first lineThis is the secondFile exists: false
This is all as you might expect. When a source file is compiled into an assembly, none of the code in it will execute until a value from it is used by a currently executing function. Then, when the first value in the file is touched, all the let expressions and do statements in the module will execute in their lexical order. When you split a program over more than one module, the last module passed to the compiler is special. All the items in this module will execute, and the other items will behave as if they were in an assembly. Items in other modules will execute only when a value from that module is used by the module currently executing. Suppose you create a program with two modules.
This code is placed in ModuleOne.fs:
module ModuleOne// then this one should be printedprintfn "This is the third and final"
This code is placed in ModuleTwo.fs:
module ModuleTwo// these two lines should be printed firstprintfn "This is the first line"printfn "This is the second"
Now assume you compile the preceding code with the following command:
fsc ModuleOne.fs ModuleTwo.fs -o ModuleExecution.exeDoing this gives you the following results:
This is the first lineThis is the second
This might not be what you expected, but it is important to remember that ModuleOne was the not the last module passed to the compiler, so nothing in it will execute until a value from it is used by a function currently executing. In this case, no value from ModuleOne is ever used, so it never executes. Taking this into account, you can fix your program so it behaves more as you expect.
This code is placed in ModuleOne.fs:
module ModuleOne// this will be printed when the module// member n is first accessedprintfn "This is the third and final"let n = 1
And this code is placed in ModuleTwo.fs:
module ModuleTwo// these two lines should be printed firstprintfn "This is the first line"printfn "This is the second"// function to access ModuleOnelet funct() =printfn "%i" ModuleOne.nfunct()
You can compile the preceding example with the following command:
fsc ModuleOne.fs ModuleTwo.fs -o ModuleExecution.exeThis gives the following result:
This is the first lineThis is the secondThis is the third and final1
However, using this sort of trick to get the results you want is not recommended. It is generally best to use only statements at the top level in the last module passed to the compiler. In fact, the typical form of an F# program is to have one statement at the top level at the bottom of the last module that is passed to the compiler.
Optional Compilation
Optional compilation is a technique where the compiler can ignore various bits of text from a source file. Most programming languages support some kind of optional compilation. It can be handy, for example, if you want to build a library that supports both .NET 1.1 and 2.0, and you want to include extra values and types that take advantage of the new features of version 2.0. However, you should use the technique sparingly and with great caution because it can quickly make code difficult to understand and maintain.
In F#, optional compilation is supported by the compiler switch --define FLAG and the command #if FLAG in a source file. In Visual Studio, you can also set these by right-clicking on the project, choosing Properties, and going to the Build tab (see Figure 6-3).

Figure 6-3. Visual Studio’s Build configuration dialog
In MonoDevelop and Xamarin Studio, you can set conditional compilation symbols by right-clicking the project and going to Options ➤ Build ➤ Compiler (see Figure 6-4). In this screen, the relevant field is called “Defined symbols” in MonoDevelop and “Define symbols” in Xamarin Studio.

Figure 6-4. MonoDevelop’s compiler configuration dialog
Notice that Visual Studio lets you add two predefined switches: DEBUG and TRACE. (MonoDevelop and Xamarin Studio have just DEBUG). These switches are special because they affect some framework methods; for example, assertions via a call to Assert.Debug only fire when the DEBUG symbol is defined.
The following example shows how to define two different versions of statements that execute at the top level, one for when the code is compiled, and the other for when the code is running as a script in F# Interactive (if you wish to compile this code, you also need to add a reference to System.Windows.Forms.dll):
open System.Windows.Forms// define a formlet form = new Form()// do something different depending if we're runing// as a compiled program of as a script#if COMPILEDApplication.Run form#elseform.Show()#endif
In this example, you don’t have to define a symbol COMPILED because F# defines this for you if you compile a program. Similarly, F# Interactive defines the symbol INTERACTIVE so you can test whether you’re in interactive mode. I use the INTERACTIVE symbol very extensively elsewhere in this book so that the examples provided can be run in F# Interactive or as part of a compiled project according to your preferences.
Comments
F# provides two kinds of comments. Single-linecomments start with two slashes and extend to the end of a line, as in this example:
// this is a single-line commentSingle-line comments are generally preferred in F# because the comment-opening characters are quicker and easier to type. Multiple-line comments start with a left parenthesis and an asterisk, and end with an asterisk and a right parenthesis, as in this example:
(* this is a comment *)Or this one:
(* thisis acomment*)
Typically, you use multiple-line comments only for temporarily commenting out large blocks of code. Unlike a lot of other languages, F# lets you can nest multiline comments; this is the same behavior you see in OCaml comments. You get a compile error if you leave a multiple-line comment unclosed.
At the time of writing, MonoDevelop’s code editor doesn’t support multi-line comments, though hopefully this will be fixed at some point.
Doc Comments
Doccomments allow you to extract comments from the source file in the form of XML or HTML. This is useful because it allows programmers to browse code comments without having to browse the source. This is especially convenient for the vendors of APIs because it allows them to provide documentation about the code without having to provide the source itself. This approach also makes it more convenient to browse the docs without having to open the source. In addition, the documentation is stored alongside the source where it has more chance of being updated when code changes. Another big advantage is that IDEs like Visual Studio and Xamarin Studio will show the doc comments for functions and types in tool tips when you hover over the item name.
Doc comments start with three slashes instead of two. They can be associated only with top-level values or type definitions and are associated with the value or type they appear immediately before. The following code associates the comment this is an explanation with the value myString:
/// this is an explanationlet myString = "this is a string"
To extract doc comments into an XML file, you use the –doc compiler switch. For example, assume you were to run this command in a source file:
fsc -doc doc.xml Prog.fsDoing this would produce the following XML:
<?xml version="1.0" encoding="utf-8"?><doc><assembly><name>Prog</name></assembly><members><member name="F:Prog.myString"><summary>this is an explanation</summary></member><member name="T:Prog"></member></members></doc>
You can then process the XML using various open source tools to transform it into a number of more readable formats. The compiler also supports the direct generation of HTML from doc comments. This is less flexible than XML, but it can produce usable documentation with less effort. It can also produce better results under some circumstances because notations such as generics and union types are not always well supported by documentation-generation tools.
In F#, you don’t need to add any XML tags explicitly; for example, the <summary> and </summary> tags were added automatically. This is useful because it saves you a lot of typing and avoids wasted space in the source file; however, you can take control and write out the XML tags explicitly if you want. The following is a doc comment where the tags have been explicitly written out:
/// <summary>/// divides the given parameter by 10/// </summary>/// <param name="x">the thing to be divided by 10</param>let divTen x = x / 10
The preceding code produces the following XML:
<?xml version="1.0" encoding="utf-8"?><doc><assembly><name>AnotherProg</name></assembly><members><member name="M:AnotherProg.divTen (System.Int32)"><summary>divides the given parameter by 10</summary><param name="x">the thing to be divided by 10</param></member><member name="T:AnotherProg"></member></members></doc>
If no signature file exists for the module file, then the doc comments are taken directly from the module file itself. However, if a signature file exists, then doc comments come from the signature file. This means that even if doc comments exist in the module file, they will not be included in the resulting XML or HTML if the compiler is given a signature file for the module.
Comments for Cross-Compilation
To enable easier cross-compilation between F# and OCaml, F# supports some optional compilation flags disguised as comment tags. Any code you place between these comment tags (*F# F#*) will be compiled as if the comment tags were not there. This code will appear as a normal comment to the OCaml compiler, so it will be ignored. Similarly, the F# compiler will ignore any code placed between the comments (*IF-OCAML*) (*ENDIF-OCAML*) as if it were a comment. However, the code between these two comment tags will be treated as normal code by the OCaml compiler. This provides a simple but effective mechanism for working around small differences in the two languages to make cross-compilation easier. The following sample shows these comments in action. If you use the OCaml-compatible version of the F# syntax, then you should save your file with the extension .ml instead of .fs.
(*F#printfn "This will be printed by an F# program"F#*)(*IF-OCAML*)Format.printf "This will be printed by an OCaml program"(*ENDIF-OCAML*)
You’ll get the following results when F# compiles the preceding code:
This will be printed by an F# programCustom Attributes
Custom attributes add information to your code that will be compiled into an assembly and stored alongside your values and types. This information can then be read programmatically via reflection or by the runtime itself.
Attributes can be associated with types, members of types, and top-level values. They can also be associated with do statements. You specify an attribute in brackets, with the attribute name in angle brackets, as in this example:
[<Obsolete>]By convention, attribute names end with the string Attribute, so the actual name of the Obsolete attribute is ObsoleteAttribute.
An attribute must immediately precede what it modifies. The following code marks the function, functionOne, as obsolete:
open System[<Obsolete>]let functionOne () = ()
An attribute is essentially a class; using an attribute basically makes a call to its constructor. In the previous example, Obsolete has a parameterless constructor, and you can call it with or without parentheses. In this case, you called it without parentheses. If you want to pass arguments to an attribute’s constructor, then you must use parentheses and separate arguments with commas, as in this example:
open System[<Obsolete("it is a pointless function anyway!")>]let functionOne () = ()
Sometimes an attribute’s constructor does not expose all the properties of the attribute. If you want to set such a property, you need to specify the property and a value for it. You specify the property name, an equals sign, and the value after the other arguments to the constructor. The following example sets the Unrestricted property of the PrintingPermission attribute to true:
open System.Drawing.Printingopen System.Security.Permissions[<PrintingPermission(SecurityAction.Demand, Unrestricted = true)>]let functionThree () = ()
You can use two or more attributes by separating the attributes with semicolons:
open Systemopen System.Drawing.Printingopen System.Security.Permissions[<Obsolete; PrintingPermission(SecurityAction.Demand)>]let functionFive () = ()
So far, you’ve used attributes only with values, but using them with type or type members is just as straightforward. The following example marks a type and all its members as obsolete:
open System[<Obsolete>]type OOThing = class[<Obsolete>]val stringThing : string[<Obsolete>]new() = {stringThing = ""}[<Obsolete>]member x.GetTheString () = x.stringThingend
If you intend to use WinForms or Windows Presentation Foundation (WPF) graphics in your program, you must ensure that the program is a single-thread apartment. This is because the libraries that provide the graphical components use unmanaged code (not compiled by the CLR) under the covers. The easiest way to do this is by using the STAThread attribute. This must modify the first do statement in the last file passed to the compiler–that is, the first statement that will execute when the program runs.
open Systemopen System.Windows.Formslet form = new Form()[<STAThread>]Application.Run(form)
Once you attach attributes to types and values, it’s possible to use reflection to find which values and types are marked with which attributes. You usually do this with the IsDefined or GetCustomAttributes methods of the System.Reflection.MemberInfo class, which means these methods are available on most objects used for reflection, including System.Type. The next example shows you how to look for all types that are marked with the Obsoleteattribute:
open System// create a list of all obsolete typeslet obsolete = AppDomain.CurrentDomain.GetAssemblies()|> List.ofArray|> List.map (fun assm -> assm.GetTypes())|> Array.concat|> List.ofArray|> List.filter (fun m ->m.IsDefined(typeof<ObsoleteAttribute>, true))// print the listsprintfn "%A" obsolete
Executing the preceding code produces something like the following results:
[System.ContextMarshalException;( System.Collections.IHashCodeProvider;System.Collections.CaseInsensitiveHashCodeProvider;System.Runtime.InteropServices.IDispatchImplType;System.Runtime.InteropServices.IDispatchImplAttribute;System.Runtime.InteropServices.SetWin32ContextInIDispatchAttribute;System.Runtime.InteropServices.BIND_OPTS;System.Runtime.InteropServices.UCOMIBindCtx;System.Runtime.InteropServices.UCOMIConnectionPointContainer;...
You’ve seen how you can use attributes and reflection to examine code; now let’s look at a similar, but more powerful technique for analyzing compiled code, called quotation.
Quoted Code
Quotations give you a way to tell the compiler, “Don’t generate code for this section of the source file; turn it into a data structure, or an expression tree, instead.” You can then interpret this expression tree in a number of ways, transform or optimize it, compile it into another language, or even ignore it.
To quote an expression, place it between the <@ @> operators:
// quote the integer onelet quotedInt = <@ 1 @>// print the quoted integerprintfn "%A" quotedInt
Executing the preceding code produces this result:
Value (1)The following example defines an identifier and uses it in a quotation:
// define an identifier nlet n = 1// quote the identifierlet quotedId = <@ n @>// print the quoted identifierprintfn "%A" quotedId
Executing the preceding code produces the following results:
val n : int = 1val quotedId : Quotations.Expr<int> = PropertyGet (None, n, [])
Next, you can quote a function applied to a value. Notice that you are quoting two items, so the result of this quotation is split into two parts. The first part represents the function, and the second part represents the value to which it is applied.
// define a functionlet inc x = x + 1// quote the function applied to a valuelet quotedFun = <@ inc 1 @>// print the quotationprintfn "%A" quotedFun
Executing the preceding code produces the following results:
val inc : x:int -> intval quotedFun : Quotations.Expr<int> = Call (None, inc, [Value (1)])
The next example shows how to apply an operator to two values. Notice how you return an expression that is similar to the function call; this is because operators are basically function calls.
open Microsoft.FSharp.Quotations// quote an operator applied to two operandslet quotedOp = <@ 1 + 1 @>// print the quotationprintfn "%A" quotedOp
Executing the preceding code produces the following results:
Call (None, op_Addition, [Value (1), Value (1)])val quotedOp : Quotations.Expr<int> =Call (None, op_Addition, [Value (1), Value (1)])
The next example quotes an anonymous function. Note how now the resulting expression is a Lambda.
open Microsoft.FSharp.Quotations// quote an anonymous functionlet quotedAnonFun = <@ fun x -> x + 1 @>// print the quotationprintfn "%A" quotedAnonFun
When you execute the preceding code, you get the following result:
Lambda (x, Call (None, op_Addition, [x, Value (1)]))Quotations are simply a discriminated union of Microsoft.FSharp.Quotations.Expr; working with them is as simple as pattern matching over the quotation. The next example defines a function, interpretInt, that queries the expression passed to it to see whether it is an integer. If it is, it prints the value of that integer; otherwise, it prints the string, “not an int”.
open Microsoft.FSharp.Quotations.Patterns// a function to interpret very simple quotationslet interpretInt exp =match exp with| Value (x, typ) when typ = typeof<int> -> printfn "%d" (x :?> int)| _ -> printfn "not an int"// test the functioninterpretInt <@ 1 @>interpretInt <@ 1 + 1 @>
Executing the preceding code produces the following results:
1not an int
You printed two expressions with interpretInt. The first was an integer value, so it printed out the value of that integer. The second was not an integer, although it contained integers. Pattern matching over quotations like this can be a bit tedious, so the F# libraries define a number of active patterns to help you do this. You can find these active patterns defined in the Microsoft.FSharp.Quotations.DerivedPatterns namespace. The following example shows how to use the SpecificCall active pattern to recognize a call to the plus operator:
open Microsoft.FSharp.Quotations.Patternsopen Microsoft.FSharp.Quotations.DerivedPatterns// a function to interpret very simple quotationslet rec interpret exp =match exp with| Value (x, typ) when typ = typeof<int> -> printfn "%d" (x :?> int)| SpecificCall <@ (+) @> (_, _, [l;r]) -> interpret lprintfn "+"interpret r| _ -> printfn "not supported"// test the functioninterpret <@ 1 @>interpret <@ 1 + 1 @>
Executing the preceding code produces the following results:
11+1
Note that you can use the SpecificCall active pattern to recognize function calls, as well as operators.
No library functions exist to compile a quotation back into F# and execute it, although there have been some open source efforts made in this direction. Instead, you can mark any top-level function with the ReflectedDefinition attribute. This attribute tells the compiler to generate the function or value, as well as to generate an expression tree. You can then retrieve the quotation using the <@@ @@> operator, which is similar to the quotation operator (note the double @ sign). The following example demonstrates the use of the ReflectedDefinition attribute; notice how you have the quote for inc available, but you can also use the function inc directly:
// this defines a function and quotes it[<ReflectedDefinition>]let inc n = n + 1// fetch the quoted defintionlet incQuote = <@@ inc @@>// print the quotationprintfn "%A" incQuote// use the functionprintfn "inc 1: %i" (inc 1)
Executing this code produces the following results:
Lambda (n@5, Call (None, Int32 inc(Int32), [n@5]))inc 1: 2
Quotations are a huge topic, and it would be impossible to cover them completely in this section (or even in this book). You will, however, learn more about them in Chapter 11.
Summary
In this chapter, you saw how to organize code in F#. You also saw how to comment, annotate, and quote code, but you have only scratched the surface of both annotating and quoting.
This concludes the tour of the F# core language. The rest of the book will focus on how to use F#, from working with relational databases to creating user interfaces. You will begin this process with a look at the F# core libraries in the next chapter.