![]()
The K Desktop Environment: KDE
The K Desktop Environment (KDE) includes the standard desktop features, such as a window manager and a file manager, as well as an extensive set of applications that cover most Linux tasks. The KDE desktop is developed and distributed by the KDE Project. KDE is open source software provided under a GNU Public License and, with its source code, is available free of charge.
Numerous applications written specifically for KDE are easily accessible from the desktop. These include editors, photo, and paint image applications, sound and video players, and office applications. Such applications usually have the letter K as part of their name, such as KWord or KMail. A variety of tools are provided with the KDE desktop. These include calculators, console windows, notepads, and even software package managers. On a system administration level, KDE provides several tools for configuring your system. Practically all your Linux tasks can be performed from the KDE desktop. KDE applications also feature a built-in help application. KDE includes support for the office application suite Calligra, which includes a presentation application, a spreadsheet application, an illustrator, and a word processor, among other components.
KDE, initiated by Matthias Ettrich in October 1996, is designed to run on any UNIX implementation, including Linux, Solaris, HP-UX, and FreeBSD. The official KDE web site is www.kde.org, which provides news updates and documentation. Several KDE mailing lists are available for users and developers, including announcements, administration, and other topics. A great many software applications are currently available for KDE at www.kde-apps.org. Development support and documentation can be obtained at http://developer.kde.org. Most applications are available on the Fedora repositories and can be installed directly from PackageKit. Various KDE web sites are listed in Table 10-1.
Table 10-1. KDE Web Sites
Web Site |
Description |
|---|---|
KDE web site |
|
Fedora KDE spin |
|
KDE software repository |
|
KDE developer site |
|
Trolltech site for Qt libraries |
|
Calligra KDE office project |
|
KDE desktop themes, select KDE entry |
|
KDE mailing lists |
You can install KDE on a Fedora desktop and use it as an alternative to the Fedora GNOME desktop, or you can install KDE directly, using the Fedora KDE spin. For the Fedora KDE spin, you can download the KDE ISO image file from the Fedora project download page for Desktops at http://fedoraproject.org/en/get-fedora-options#desktops.
To install KDE as an alternative desktop on a Fedora desktop (GNOME), you use the yum command with the groupinstall option in a terminal window, as the administrator. Other group packages that you may also want to install are kde-media, kde-apps, and kde-office. You can find the KDE groups listed in Packages (PackageKit) under “Package collections.”
Su
yum groupinstall kde-desktop
yum groupinstall kde-media
yum groupinstall kde-apps
yum groupisntall kde-office
The K Desktop Environment (KDE)
New versions of KDE are released frequently. KDE releases are designed to enable users to upgrade their older versions easily. Your Fedora software updater will automatically update KDE from Fedora repositories, as updates become available. KDE uses as its library of desktop tools the Qt library, developed and supported by Trolltech (www.trolltech.com). Qt is considered one of the best desktop libraries available for UNIX/Linux systems. Using Qt has the advantage of relying on a commercially developed and supported desktop library. Trolltech provides the Qt libraries as open source software that is freely distributable.
The KDE 4 release is a major rework of the KDE desktop. KDE 4.11 is included with the Fedora 20 distribution. Check the KDE site for detailed information on KDE 4, including the visual guide.
http://kde.org/announcements/4.11/
Every aspect of KDE has been reworked with KDE 4. There is a new files manager, desktop, theme, panel, and configuration interface. The KDE window manager supports advanced compositing effects and the Oxygen artwork for user interface themes, icons, and windows.
The primary component of the KDE 4 desktop is the Plasma desktop shell. Plasma has containments and applets. Applets are also referred to as plasmoids. These plasmoids are applets that operate within containments. On KDE, there are two Plasma containments: the panel and the desktop. In this sense, the desktop and the panel are features of an underlying Plasma operation. They are not separate programs. Each has its own set of plasmoids (applets).
KDE Display Manager (KDM)
If you are using the KDMto log in, a box in which you can enter your username and password (see Figure 10-1) will be displayed at the center of the screen. Shutdown and Session menus are displayedbelow the login box The Session menu lets you change the desktop interface, such as GNOME, should it be installed. The Shutdown has entries for Switch User, Remote Login, and Shutdown. The Shutdown entry opens a dialog with selections to Restart or Turn Off the computer.

Figure 10-1. KDE Display Manager (KDM), login screen with menus
![]() Note KDE can be started by other display managers such as the GNOME Display Manager (GDM) and LightDM.
Note KDE can be started by other display managers such as the GNOME Display Manager (GDM) and LightDM.
Upon entering your username and password and pressing Enter or clicking the Play icon, your KDE session starts up. The login box displays the login splash screen showing the login progress.
You can change the theme of the login greeter using the Login Manager (System Settings ![]() System Administration
System Administration ![]() Login screen). On the Theme tab, you can download and install new login themes (Get New Themes button) and then select the one you want to use. Click Apply to use the new theme. If you want to customize your login background, you can turn off the themed greeter on the General tab and then use the Background tab to use your own background image.
Login screen). On the Theme tab, you can download and install new login themes (Get New Themes button) and then select the one you want to use. Click Apply to use the new theme. If you want to customize your login background, you can turn off the themed greeter on the General tab and then use the Background tab to use your own background image.
Configuration and Administration Access with KDE
KDE uses a different set of menus and access points than GNOME for accessing system administration tools. There are also different ways to access KDE configuration tasks, as well as KDE system administration tools not available through GNOME.
You access Fedora system administration tools from the Applications ![]() Administration entry. Here you will find Fedora administration tools such as Users and Groups, Printing, Display, and Network.
Administration entry. Here you will find Fedora administration tools such as Users and Groups, Printing, Display, and Network.
- System Settings—Accessible from the Kickoff menu with three entries: Favorites
 System Settings, Applications
  System
  System Settings, and Computer
  System Settings. This is the comprehensive KDE configuration tool, which lists all the KDE configuration tools for managing your desktop, file manager, and system, as well as KDE’s own administration tools that can be used instead of the Fedora ones.
 - Administration—Accessible from Applications
 Administration, this is a collection of Fedora administration tools. Here you will find tools like Firewall (firewall-config), Samba (system-config-samba), and Services (system-config-services). PackageKit (Software) is not listed. Instead, you use the KDE package manager, Apper, listed as Applications
  System
  Software Management.
 - Settings—Accessible from Applications
 Settings, this is a smaller collection of desktop configuration features for tasks such as setting the default printer, preferred applications, or PDA device setup. Also in this menu is the menu-updating tool, which lets you add non-KDE applications to the KDE menu.
 - System—Accessible from Applications
 System, this is where you find the KDE administration tools.
Plasma: Desktop, Panel, and Plasmoids (Applets)
Plasma has containments and applets. Applets are referred to as plasmoids. These plasmoids are applets that operate within containments. On KDE, there are two types of Plasma containments, the panel and the desktop. The desktop and the panel are features of an underlying Plasma operation. They are not separate programs; both can have plasmoids (applets). For each type, you can have several instances. You can have many different desktop containments, each with its own set of plasmoids installed. You can also have several panels on your desktop, using different collections of plasmoids.
Each containment has its own toolbox for configuration. The desktop has a toolbox at the top-right corner, and panels have a toolbox on the right side. The panel toolbox features configuration tools for sizing and positioning the panel. See Table 10-2 for keyboard shortcuts.
Table 10-2. Desktop, Plasma, and KWin Keyboard Shortcuts
Keys |
Description |
|---|---|
Alt+F2 |
Krunner, command execution. Entry can be any search string for a relevant operation, including bookmarks and contacts, not just applications. |
Up/down arrows |
Move among entries in menus, including the Kickoff and other menus |
Left/right arrows |
Move to submenus menus, including the Kickoff and QuickAccess submenus |
Enter |
Select a menu entry, including the Kickoff and QuickAccess menus |
PageUp, PageDown |
Scroll up quickly |
Alt+F4 |
Close the current window |
Alt+F3 |
Window menu for current window |
Ctrl+r |
Remove a selected plasmoid |
Ctrl+s |
Open a selected plasmoid’s configuration settings |
Ctrl+a |
Open the Add Widgets window to add a plasmoid to the desktop |
Ctrl+l |
Lock your widgets so they can’t be changed or removed and new ones can’t be added |
Alt+Tab |
Cover Switch or Box Switch for open windows |
Ctrl+F8 |
Desktop grid |
Ctrl+F9 |
Present window’s current desktop |
Ctrl+F10 |
Present window’s all desktops |
Ctrl+F11 |
Desktop cube for switching desktops |
Fedora KDE 4 also supports the activities interface,with its support for multiple plasma desktop containments (Activities). The Toolbox icon shows Add Widgets, Activities, and Lock Widgets entries. Use the Activities entry to add, remove, and select desktop containments.
The KDE Help Center
The KDE Help Center provides a browser-like interface for accessing and displaying both KDE Help files and Linux man and info files (see Figure 10-2). You can start the Help Center by selecting its entry at the bottom of the Kickoff Applications menu. The Help window displays a sidebar that holds two tabs: one listing contents and one providing a glossary The main pane displays currently selected documents. A help tree on the contents tab in the sidebar lets you choose the kind of help documents you want to access. Here, you can choose KDE manuals, man pages, info documents, and even application manuals. The Help Center includes a detailed user manual, an FAQ, and KDE web site access.
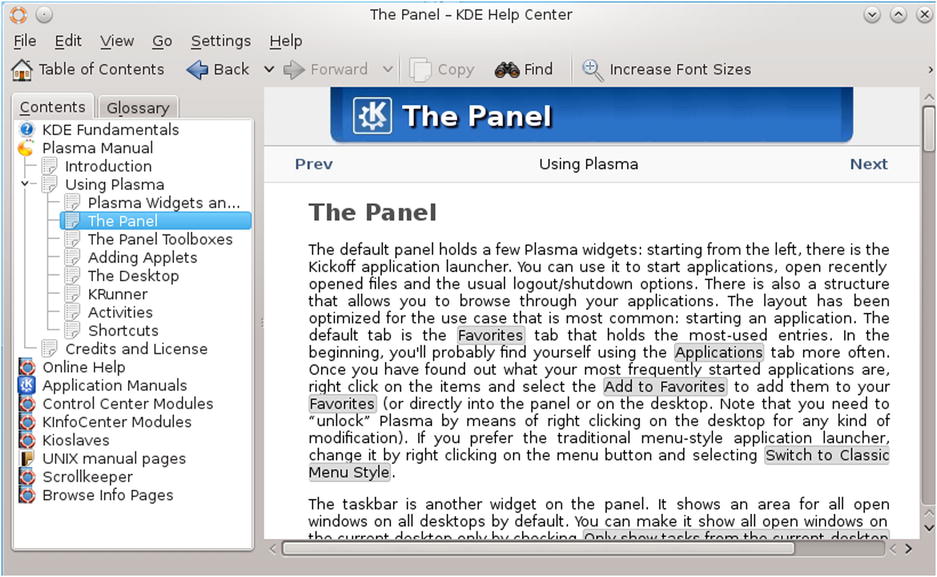
Figure 10-2. KDE Help Center
A navigation toolbar enables you to move through previously viewed documents. KDE Help documents contain links you can click to access other documents. The Back and Forward commands move you through the list of previously viewed documents. The KDE Help system provides an effective search tool for searching for patterns in Help documents, including man and info pages. Click the Find button to display a search toolbar where you can enter a query.
The KDE 4 Desktop
One of KDE’s aims is to provide users with a consistent integrated desktop (see Figure 10-3). KDE provides its own window manager (KWM), file manager (Dolphin), program manager, and desktop and panel (Plasma). You can run any desktop application, such as Firefox, in KDE, as well as any GNOME application. In turn, you can run any KDE application, including the Dolphin file manager, in GNOME. The KDE 4 desktop features the Plasma desktop shell with a new panel, menus, and widgets and includes a dashboard function. Keyboard shortcuts are provided for many desktop operations, as well as for the plasmoid tasks (see Table 10-2).
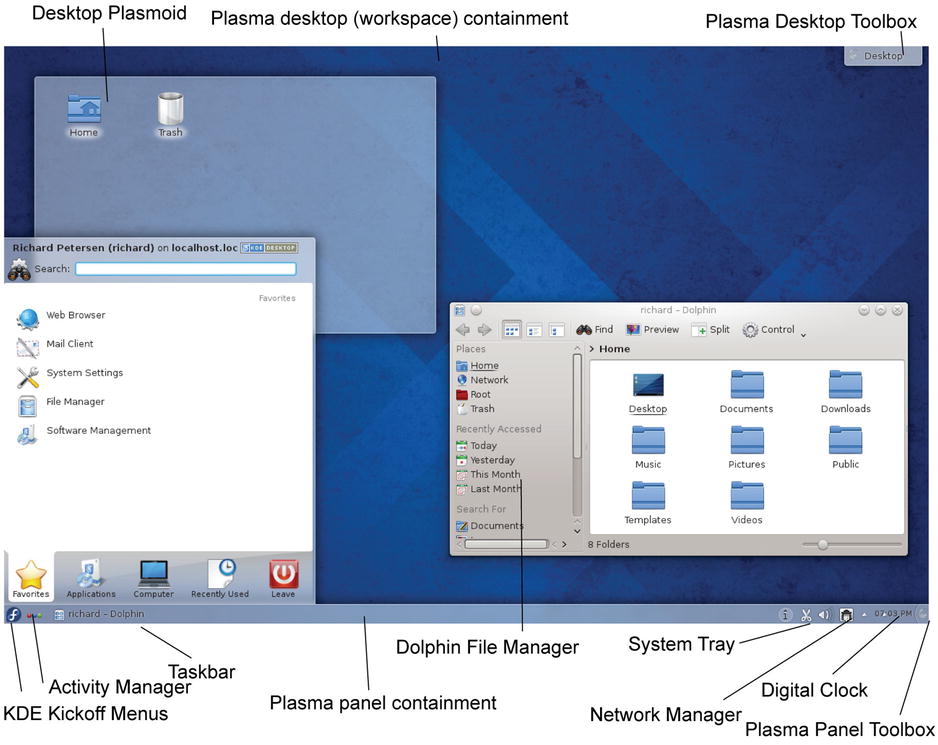
Figure 10-3. The KDE desktop
The desktop supports drag-and-drop and copy-and-paste operations. With the copy-and-paste operation, you can copy text from one application to another. You can place access to any directories on the desktop by simply dragging their icons from a file manager window to the desktop. A small menu will appear with options for Folder View or Icon. To create just an icon on the desktop, select the Icon entry. The Folder View option sets up a Folder View plasmoid for the folder, similar to the Desktop Folder shown in Figure 10-3. Items in the folder are displayed within the folder plasmoid as a menu from which you can make a selection.
To configure your desktop, you use the Workspace Appearance and Behavior tools in the System Settings dialog (Favorites ![]() System Settings). These include Workspace Appearance, Desktop Effects, Desktop Search, Default Applications, Accessibility, and Window Behavior. Workspace Appearance lets you choose themes and window decorations. Desktop Effects is where you set window effects and animation. The windows Behavior tool controls window display features such as task bars, virtual desktops, title bar actions, and screen edge actions. Fonts and Icons are set in the Applications Appearance dialog located in the Common Appearance and Behavior section.
System Settings). These include Workspace Appearance, Desktop Effects, Desktop Search, Default Applications, Accessibility, and Window Behavior. Workspace Appearance lets you choose themes and window decorations. Desktop Effects is where you set window effects and animation. The windows Behavior tool controls window display features such as task bars, virtual desktops, title bar actions, and screen edge actions. Fonts and Icons are set in the Applications Appearance dialog located in the Common Appearance and Behavior section.
Desktop Backgrounds (Wallpaper)
The background (wallpaper) is set from the desktop menu directly, not from the System Settings window. Right-click the desktop background to display the desktop menu and then select Desktop Activity Settings to open the Desktop Settings dialog (see Figure 10-4). The background is called wallpaper in KDE and can be changed from the View tab. You can select other wallpaper from the wallpaper listing or select your own image by clicking the Open button. Initially, you will have only the Ethais KDE default wallpaper. You can add more wallpaper by clicking the Get New Wallpapers button to open a Get Hot New Stuff dialog, which lists and downloads wallpaper posted on the www.kde-look.org site (see Figure 10-5). Each wallpaper entry shows an image, description, and rating. Buttons at the upper right of the dialog let you view the entries in details (list) mode or icon mode. Click the Install button to download the wallpaper and add it to your desktop setting’s Wallpaper tab. The wallpaper is downloaded, and the Install button changes to Uninstall. You can refine your selection by size (category), newest, rating, and popularity (most downloads). To remove wallpaper, you can select installed wallpapers to find the entry quickly. You can also search by pattern for a wallpaper, such as baseball or sky.
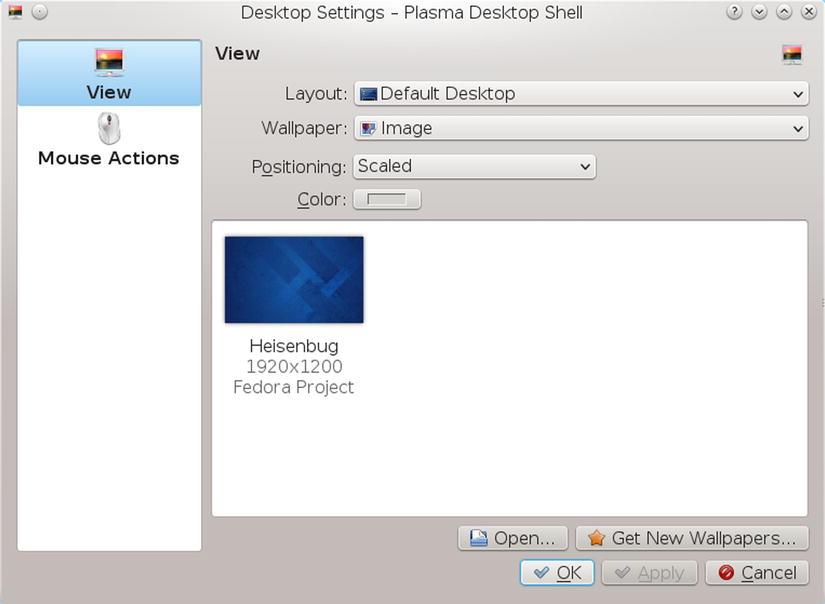
Figure 10-4. Desktop settings: Wallpaper
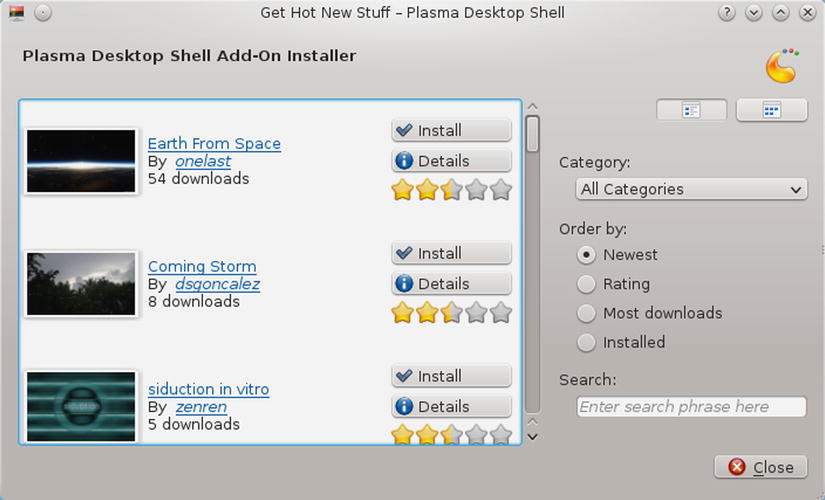
Figure 10-5. Desktop settings: get new wallpapers
Themes
For your desktop, you can also select a variety of different themes, icons, and window decorations A theme changes the entire look and feel of your desktop, affecting the appearance of desktop elements, such as scrollbars, buttons, and icons. Themes and window decorations are provided for workspaces. Access the System Settings dialog from the KDE Favorites menu or the Applications ![]() Settings menu. On the System Settings dialog, click the Workspace Appearance icon in the Workspace Appearance and Behavior section. The Workspace Appearance dialog lets you choose window decorations, desktop themes, and splash screen (startup) themes. The Desktop Themes tab lists installed themes, allowing you to choose the one you want. Click the Get New Themes button to open a Get Hot New Stuff dialog. It lists the desktop themes from www.kde-look.org (see Figure 10-6). Click a theme’s Install button to download and install the theme. From the Window Decorations tab, you can select window decoration themes. Click the Get New Decorations button to download new decorations. The Splash Screen tab lists installed splash screen themes to choose. Click the Get New Themes button to install new ones.
Settings menu. On the System Settings dialog, click the Workspace Appearance icon in the Workspace Appearance and Behavior section. The Workspace Appearance dialog lets you choose window decorations, desktop themes, and splash screen (startup) themes. The Desktop Themes tab lists installed themes, allowing you to choose the one you want. Click the Get New Themes button to open a Get Hot New Stuff dialog. It lists the desktop themes from www.kde-look.org (see Figure 10-6). Click a theme’s Install button to download and install the theme. From the Window Decorations tab, you can select window decoration themes. Click the Get New Decorations button to download new decorations. The Splash Screen tab lists installed splash screen themes to choose. Click the Get New Themes button to install new ones.
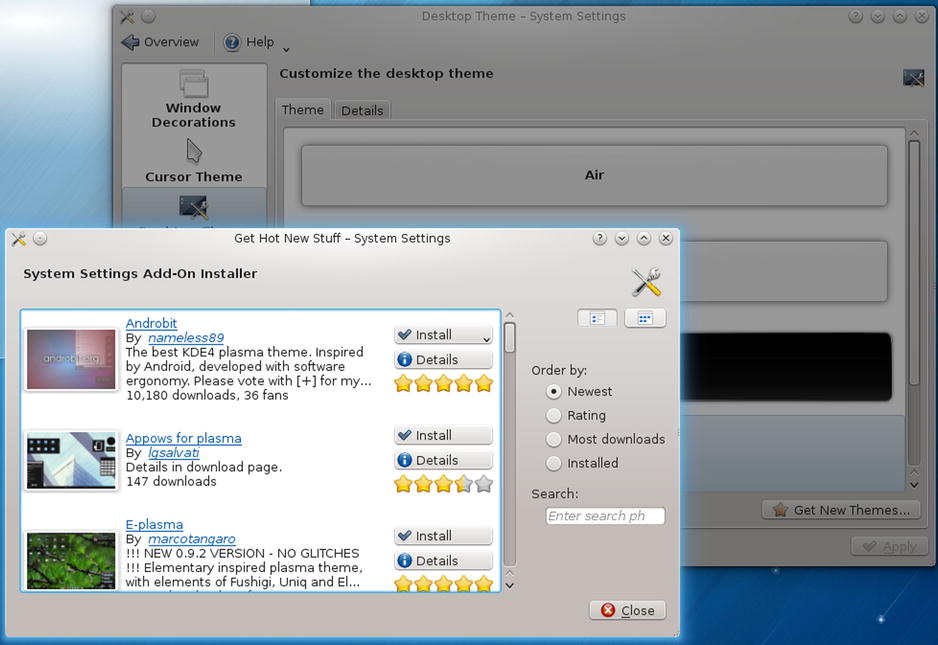
Figure 10-6. Workspace Appearance ![]() Desktop Themes tab
Desktop Themes tab
You can choose icon styles using Applications Appearance in the System Settings dialog’s Common Appearance and Behavior section. Choose System Settings ![]() Applications Appearance. From the Icons tab, you can select an icon set or click the Get New Themes button to download new sets.
Applications Appearance. From the Icons tab, you can select an icon set or click the Get New Themes button to download new sets.
Leaving KDE
To leave KDE, you first click the Leave tab on the KDE Kickoff menu (see Figure 10-7). Here you will find options such as log out, lock, switch user, sleep, hibernate, restart, and shut down. There are Session and System sections. The Session section has entries for log out, lock, and switch user. The System section features system-wide operations, including shut down, restart, sleep, and hibernate. When you select a Leave entry, a dialog for that action appears on the desktop, which you then click. The Shutdown entry displays a Shutdown dialog.
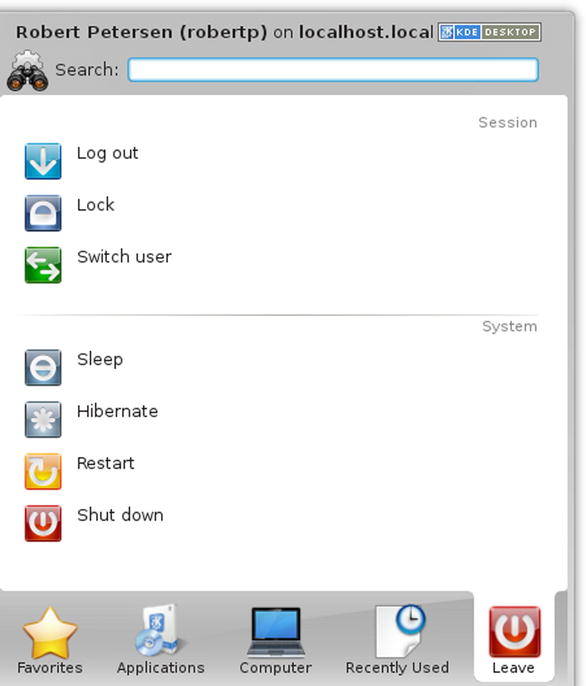
Figure 10-7. The Kickoff menu: Leave option
You can also right-click anywhere on the desktop and select the Leave entry from the pop-up menu (see Figure 10-8). If you leave any KDE applications or windows open when you quit, they are automatically restored when you start up again. If you just want to lock your desktop, you can select the Lock entry on the Kickoff Leave menu, and your screen saver will appear. To access a locked desktop, click on the screen, and a box appears that prompts you for your login password. When you enter the password, your desktop reappears.
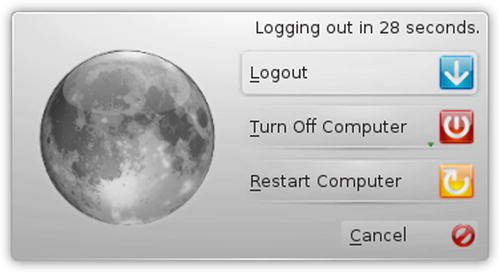
Figure 10-8. The desktop menu: Leave option
KDE Kickoff and QuickAccess Menus
The Kickoff application launcher (see Figure 10-9) organizes menu entries into tabs that are accessed by icons at the bottom of the Kickoff menu. There are tabs for Favorites, Applications, Computer, Recently Used, and Leave. You can add an application to the Favorites tab by right-clicking the application’s Kickoff entry and selecting Add to Favorites. To remove an application from the Favorites menu, right-click it and select Remove from Favorites. The Applications tab shows application categories. Click the Computer tab to open a window with all your fixed and removable storage. The Recently Used tab shows recently accessed documents and applications. Kickoff also provides a Search box in which you can search for a particular application, instead of paging through menus. As you enter a submenu, a link for it is displayed below the search box, to the right. As you progress through submenus, they are listed here as links. You can move back to a previous menu directly by clicking on its link.
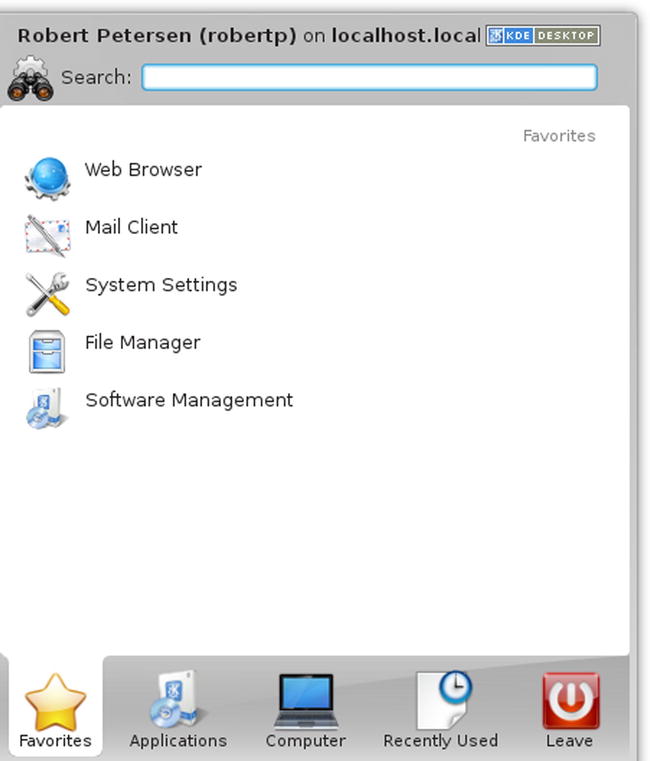
Figure 10-9. The Kickoff menu: Favorites option
To configure KDE, you use the KDE System Settings referenced by the System Settings item in the Favorites, Computer, or Applications ![]() Settings tabs.
Settings tabs.
The Computer menu has Applications and Places sections. The Applications section has an entry for System Settings. The Places section is similar to the Places menu in GNOME, with entries for your home folder, root folder, and the trash, as well as entries for removable devices such as USB drives and DVD/CDs.
The Applications menu has most of the same entries as those found on GNOME. The entries have been standardized for both interfaces (see Figure 10-10). You can find entries for categories such as Internet, Graphics, and Office. These menus list both GNOME and KDE applications you can use. However, some of the KDE menus contain entries for alternate KDE applications, such as KMail on the Internet menu. Other entries invoke the KDE version of a tool, such as the Terminal entry in the System menu, which invokes the KDE terminal window, KConsole.
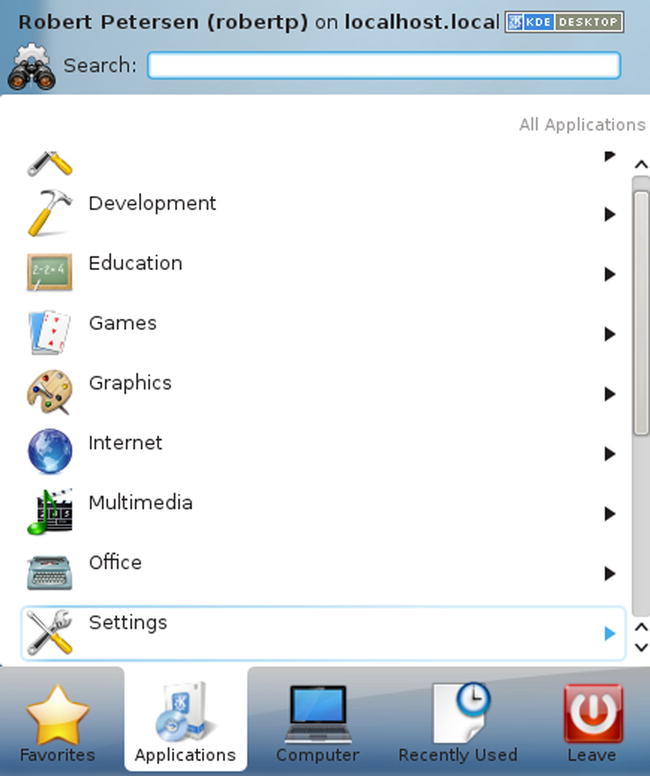
Figure 10-10. The Kickoff menu: Applications option
Krunner
For fast access to applications, bookmarks, contacts, and other desktop items, you can use Krunner. Krunner can even search bookmarks on the Marble atlas application. The Krunner plasmoid operates as a search tool for applications and other items. To find an application, enter a search pattern. A listing of matching applications is displayed.
Click an application entry to start the application. When you know the name of the application, part of the name, or just its basic topic, Krunner is a very fast way to access the application. To start Krunner, press Alt+F2, or right-click the desktop to display the desktop menu and select Run Command. Enter the pattern for the application you want to search for and press Enter. The patterns software and package would both display an entry for the Apper software manager. Entering the pattern office displays entries for all the LibreOffice.org applications (see Figure 10-11).
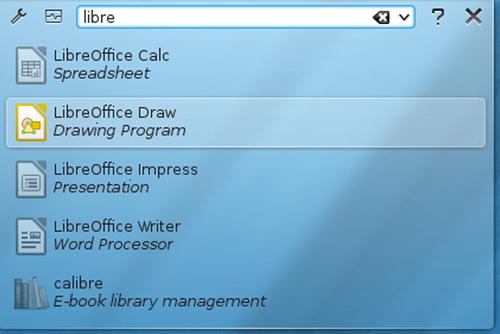
Figure 10-11. Krunner application search
Removable Devices: Device Notifier
Installed on the system tray to the right is the Device Notifier. When you insert a removable device such as a DVD/CD or a USB drive, the New Device Notifier briefly displays a dialog showing all your removable devices, including the new one. The Device Notifier icon is displayed on the system tray. You can click the New Device Notifier any time to display this dialog. Figure 10-12 shows the New Device Notifier displayed on the panel and its applet icon. The New Device Notifier is displayed only when at least one removable device is attached.
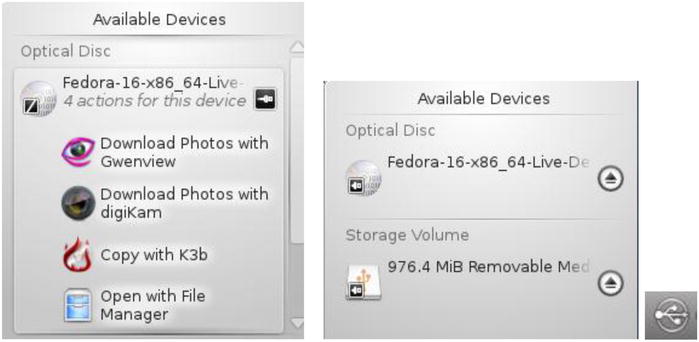
Figure 10-12. Device Notifier and its panel plasmoid icon
Removable devices are not displayed as icons on your desktop. Instead, to open the devices, you use the New Device Notifier. Click the Device Notifier icon in the panel to open its dialog. The devices will be unmounted initially with an unmount button displayed. Click this button to mount the device. An eject button is then displayed, which you can later use to unmount and eject the device. Opening the device with an application from its menu will mount the device automatically. Clicking the eject button for a DVD/CD will physically eject it. For a USB drive, the drive will be unmounted and prepared for removal. You can then safely remove the USB drive.

Click the device you want to open, such as your DVD/CD or your USB drive. If there is more than one application that can use this device, then a menu is displayed showing the options. For a DVD/CD, you have the options to open the disk with the file manager, copy it with the K3b application, or download photos from it with Gwenview (see Figure 10-12).
You can open a USB drive with the file manager, showing its contents. As you install more applications that can use a device, the applications will be added to the menu. Removable media will also be displayed on the file manager window’s side pane. You can choose to eject removable media from the file manager instead of from the Device Notifier by right-clicking the removable media entry and selecting Safely Remove from the pop-up menu.
Network Manager
On KDE, the Network Manager plasma widget provides panel access for Network Manager. This is the same Network Manager application, but it has been adapted to the KDE 4 interface. Clicking the plasmoid icon in the panel opens a widget listing your current available connections (see Figure 10-13).
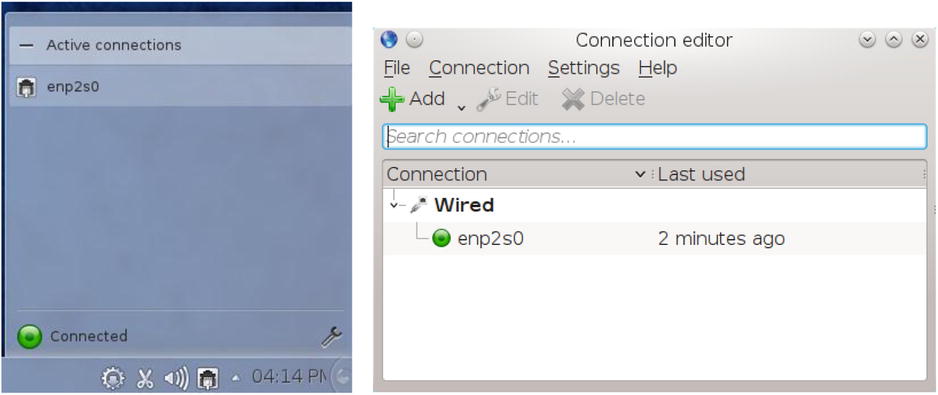
Figure 10-13. Network connections
To configure your connections manually, click the wrench button in the lower right to open the Connection editor, which lists your connections. To open the Network Manger editor for KDE, with the same General, Wired, Security, and IPv tabs for a wired or wireless connection, click the connection and then click the Edit button on the toolbar (see Figure 10-14). To add a new connection manually, click the Add button on the Connection editor to display a menu for different connection types.
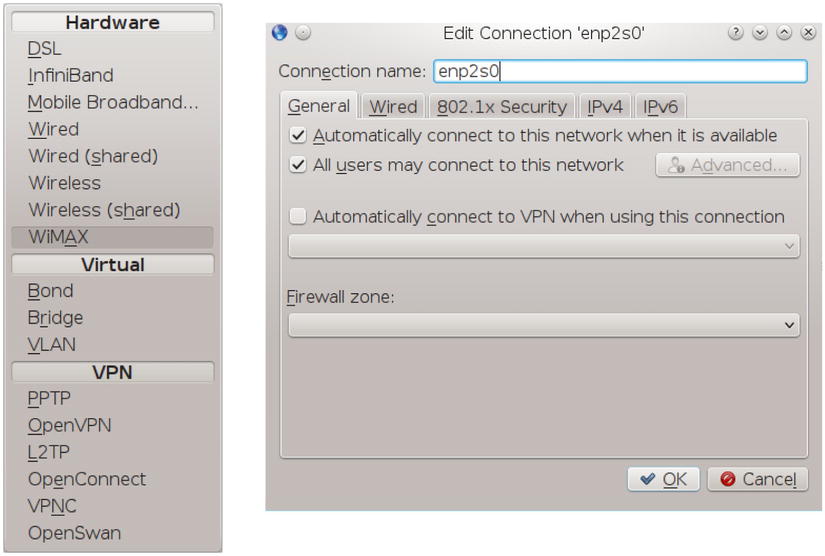
Figure 10-14. Network Connections dialog
The KDE 4 desktop features the Plasma desktop, which treats appletsdifferently. Plasma designates its applets as plasmoids. It is designed to deal with plasmoids on the same level as windows and icons. Just as a desktop can display windows, it can also display plasmoids. Plasmoids, or applets, are taking on more responsibility in desktop operations, running essential operations, even replacing, to a limited extent, the need for file manager windows. To this end, the dashboard tool can hide all other desktop items, showing just the plasmoids. When you first log in, your desktop will show one plasmoid, the Desktop folder view plasmoid (see Figure 10-15).
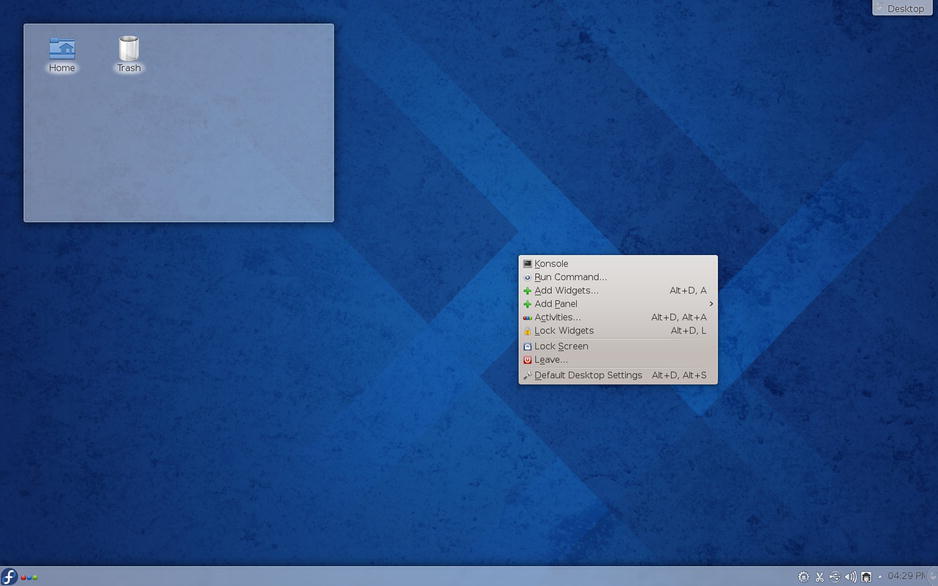
Figure 10-15. Initial Fedora KDE screen, with Desktop folder, desktop menu, and desktop toolbox menu
When you pass your mouse over a plasmoid, its sidebar is displayed with buttons for resizing, refreshing, settings, and closing the plasmoid. (See Figure 10-16 for the Clock plasmoid.) Click and drag the resize button to change the plasmoid size. Clicking the settings button (wrench icon) opens that plasmoid’s settings dialog (see Figure 10-17).
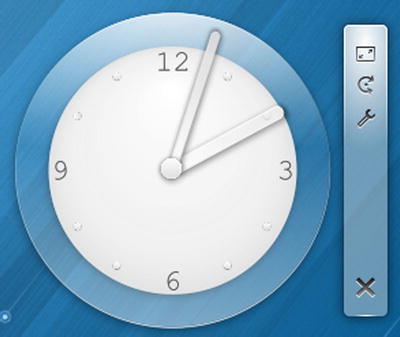
Figure 10-16. Clock plasmoid with task sidebar
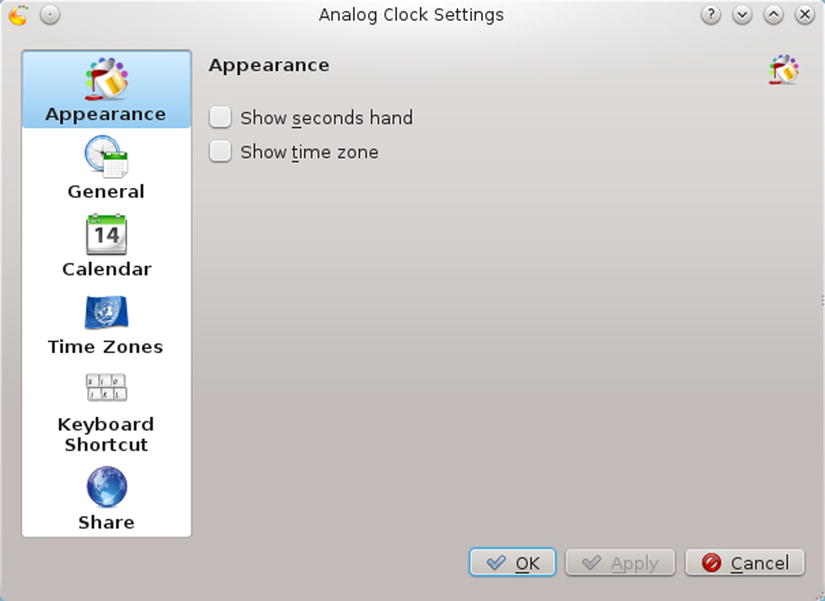
Figure 10-17. Clock plasmoid configuration
To add a widget (plasmoid) to the desktop, right-click anywhere on the desktop and select Add Widgets from the pop-up menu or choose Add Widgets from the desktop plasma toolbox menu in the upper-right corner (see Figure 10-15). This opens the Add Widgets dialog across the bottom of the desktop. It lists widgets you can add (see Figure 10-18). The Categories menu lets you see different widget categories such as Date and Time, Online Services, and Graphics. To move through them, use the bottom scrollbar, or the arrow buttons at the edges. Double-click a widget to add it to the desktop. As you pass over a widget, a dialog appears showing information about it.

Figure 10-18. Adding a plasmoid: Add Widgets
The Desktop Folder, Digital Clock, Leave a Note, Calculator, and Folder View plasmoids are shown in Figure 10-19. The Desktop Folder plasmoid is just a folder view plasmoid set to the desktop folder. When you add a Folder View plasmoid, it will default to your home folder.
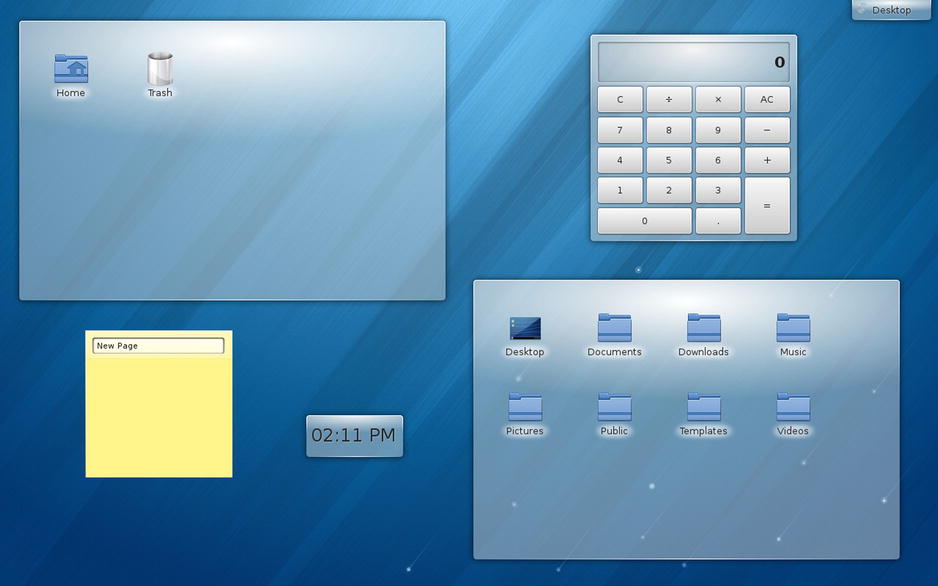
Figure 10-19. Desktop Folder, Folder View, Calculator, Digital Clock, and Leave a Note plasmoids
Dashboard
The dashboard is designed to display plasmoids (applets) only. It hides all windows and icons, showing all your desktop plasmoids. To start the dashboard, press Ctrl+F12. You can also add a Show Widget Dashboard widget to your panel or desktop. When in use, the screen will display the Widget Dashboard label at the top (see Figure 10-20). To return to the desktop, press Ctrl+F12 again or click the close button on the Widget Dashboard label at the top of the screen. Also, any plasmoid that interacts directly with the desktop, such as opening a folder in the folder plasmoid or clicking a desktop icon, will return you to the desktop automatically.
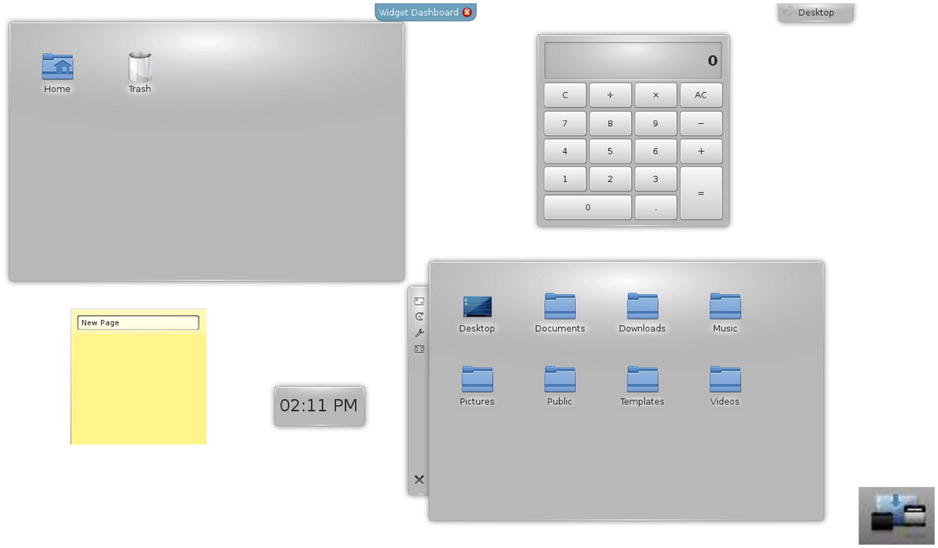
Figure 10-20. The Dashboard (Ctrl+F12 or Show Widget Dashboard)
Activities
KDE is designed to support multiple activities. Activities are different plasma containments, each with a set of plasmoids. An activity is not the same as a virtual desktop. Virtual desktops affect windows, displaying a different set of windows on each desktop. An activity has its own set of plasmoids (widgets). Technically, each activity is a Plasma containment that has its own collection of plasmoids. You can switch to a different activity (containment) and display a different collection of plasmoids on your desktop.
An activity is a way to set up a set of widgets (plasmoids) for a certain task. You could have one activity for office work, another for news, and yet another for media. Each activity can have its own set of appropriate widgets, like clock, calculator, dictionary, and document folder for an office activity. A media activity might have a Now Playing plasmoid for audio, Picture Frame for photos, and News for latest news. You can also choose a certain type of activity based on activity templates. KDE provides the desktop, folder view, search and launch, photo layout, and newspaper templates, although you can download more. The desktop template provides a desktop interface; the folder view is a full-screen view of one folder, search and launch displays application and task icons; and the newspaper layout template displays widgets in columns. Your original desktop is already configured as a desktop activity based on the desktop template.
Multiple activities are managed using the Activities toolbar, which is accessed through the Activities entry on the desktop toolbox menu or the Show Activities Manager button on the lower-left side of the panel. Both are shown here:
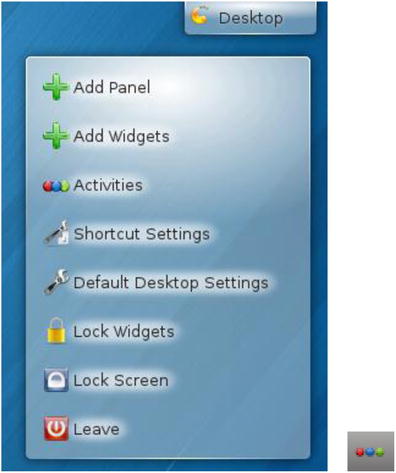
To add an activity, click the Activities entry in the toolbox or desktop menus, or click the Activities button on the lower-left side of the panel. An activities toolbar is displayed, listing your activities (see Figure 10-21). An activity icon for your desktop will already be displayed. Click the Create Activity button to add a new activity. From the pop-up menu, you can choose an empty desktop, a clone of the current activity, or from templates of different kinds of activities: Newspaper Layout, Folder View, Photos Activity, and Search and Launch. The Get New Templates entry lets you download additional templates. A New Activity icon then appears on the activity toolbar (see Figure 10-21). To switch to another activity, click its icon.

Figure 10-21. Activity toolbar and icons
Initially, an activity’s name is New Activity. To change the name, click the configuration button (wrench icon) to the right of the icon, as shown here:

The activity editing mode displays the icon and the name and lets you edit the activity name, with Apply and Cancel buttons to the right (see Figure 10-22). To change the icon image, click the icon to open a Select Icon dialog from which you can choose an image. Once you have made your changes, click the Apply button.
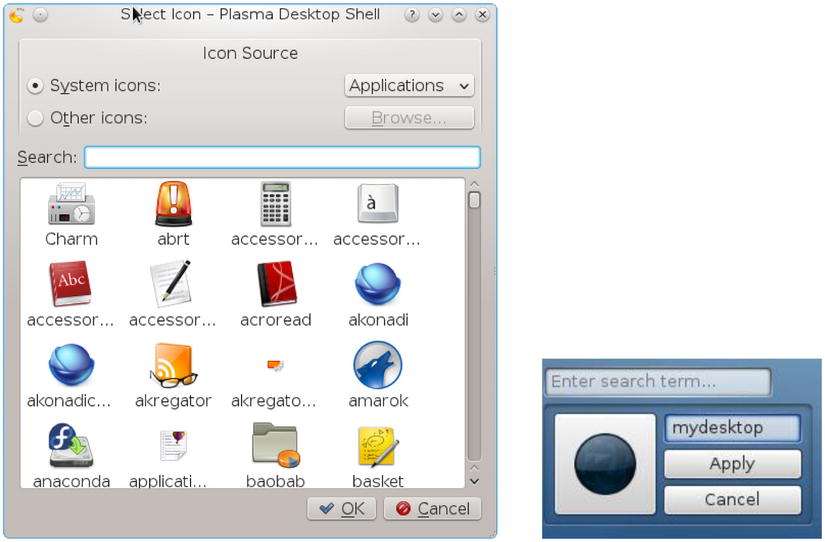
Figure 10-22. Changing an activity
To add widgets to an activity, first click the activity to make it the current one, then click the Add Widgets button to display the Widgets toolbar. Widgets you add are placed in the current activity.
To disable (stop) an activity, click its Stop button to the right of its activity icon (a small white square next to the wrench icon). A Delete button with a red x is displayed to the right, and a Play button appears in the center of the icon, as shown in the following illustration. To reactivate the activity, click the Play button.

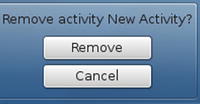
When you stop an activity, a Play button appears on the activity icon, and a Delete button appears to the right, with a red x. To remove an activity, first make sure it is stopped, then click the Delete button to the right. A Remove dialog appears with a Remove button, which you can click to remove the activity.
To switch from one activity to another, first display the Activities toolbar by choosing Activities from the desktop toolbox menu (right-click the desktop) or the Activities button on the panel. Then click the activity icon you want (see Figure 10-23). The new activity becomes your screen (see Figure 10-24). To change to another activity, open the Activities toolbar again and click the activity icon you want. Your original desktop is the first icon.

Figure 10-23. Activity icons

Figure 10-24. Activity toolbar and screen of selected activity
A Folder View activity functions like a file manager window, displaying a particular folder on the desktop. To configure a Folder View activity, right-click to display the desktop menu and choose Folder View Settings to display the Desktop Settings dialog. Icons are added for Location, Display, and Filter. On the Location tab, you can display the desktop folder, a place like the Home folder, or a folder of your choosing. On the Display tab, you set display features such as arrangement, sorting, and size. The Filter tab lets you display files of certain types or name patterns.
A Search and Launch activity sets up an interface containing icons for tasks and application groups such as Bookmarks, Contacts, Multimedia, Internet, Graphics, Games, and Office, (see Figure 10-25). To configure a Search and Launch activity, right-click to display the desktop menu and choose Configure Search and Launch to display the Desktop Settings dialog. The Desktop Settings dialog has additional Search plug-ins and Main Menu tabs. On the Main menu, you can add or remove application group and task icons.
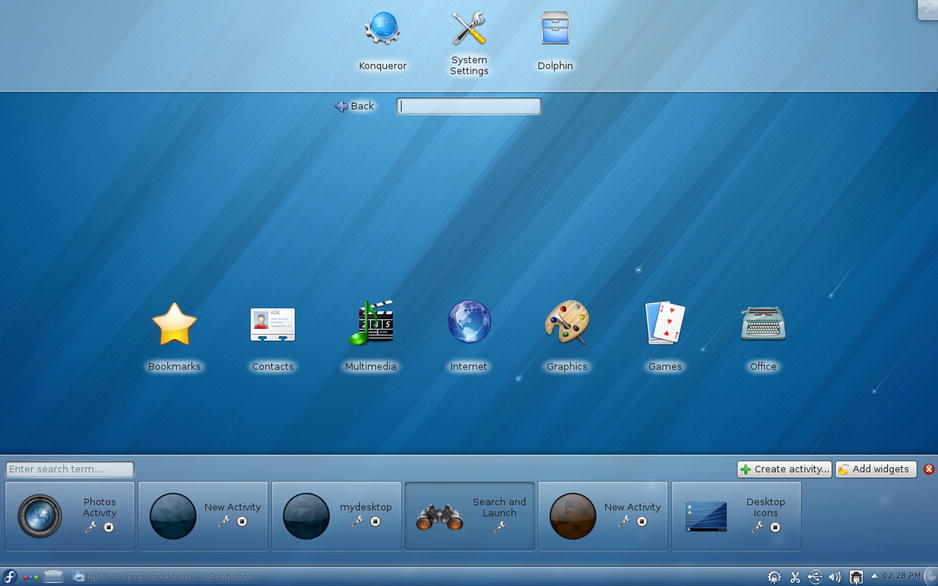
Figure 10-25. Activity search and launch
The Newspaper Layout activity simply displays widgets in two columns. To configure a newspaper activity, right-click to display the desktop menu and choose Configure Page. This will display the Desktop Settings dialog.
To move easily between activities, you can add the Activity bar widget, either to the panel or to the desktop. On the panel, the Activity bar displays buttons for each activity. Click to move to a different activity. On the desktop, the Activity bar displays a dialog with an arrow button for moving from one activity to another.
KDE Windows
A KDE window has the same functionality you find in other window managers and desktops. You can resize the window by clicking and dragging any of its corners or sides. A click-and-drag operation on a side extends the window in that dimension, whereas a corner extends height and width at the same time. The top of the window has a title bar showing the name of the window, the program name in the case of applications, and the current directory name for the file manager windows. The active window has the title bar highlighted. To move the window, click the title bar and drag it where you want. Right-clicking the window title bar displays a pop-up menu with entries for window operations, such as closing or resizing the window. The Shade option will roll up the window to the title bar. Within the window, menus, icons, and toolbars for the particular application are displayed.
You can configure the appearance and operation of a window by selecting the Configure Window Behavior entry from the Window menu (right-click the title bar). Here, you can set appearance (Windows); button and key operations (Actions); the focus policy, such as a mouse click on the window or just passing the mouse over it (Focus); and how the window is displayed when moving it (Moving). All these features can also be configured using the System Settings Look & Feel Window Behavior dialog.
Opened windows are shown as buttons on the KDE task bar located on the panel. The task bar shows buttons for the different programs you are running or windows you have open. This is essentially a docking mechanism that lets you change to a window or application by clicking its button. When you minimize a window, it is reduced to its task bar button. You can then restore the window by clicking its task bar button.
To the right of the title bar are three small buttons for minimizing, maximizing, or closing the window (down, up, and x symbols). You can switch to a window at any time by clicking its task bar button. You can also maximize a window by dragging it to the top edge of the screen.
From the keyboard, you can use the Alt+Tab key combination to display a list of current open windows. Holding down the Alt key and sequentially pressing Tab moves you through the list.
A window can be displayed as a tile on one-half of the screen (see Figure 10-26). Another tile can be set up for a different window on the other side of the screen, allowing you to display two windows side by side on the full screen. You can tile a window by dragging it to the side of the screen (over the side edge to the middle of the window). A tile outline will appear. Add a second tile by moving a window to the other side edge, as shown in Figure 10-26. You can add more windows to a tile by moving them to that edge. Clicking on a window’s task bar button will display it on its tile.
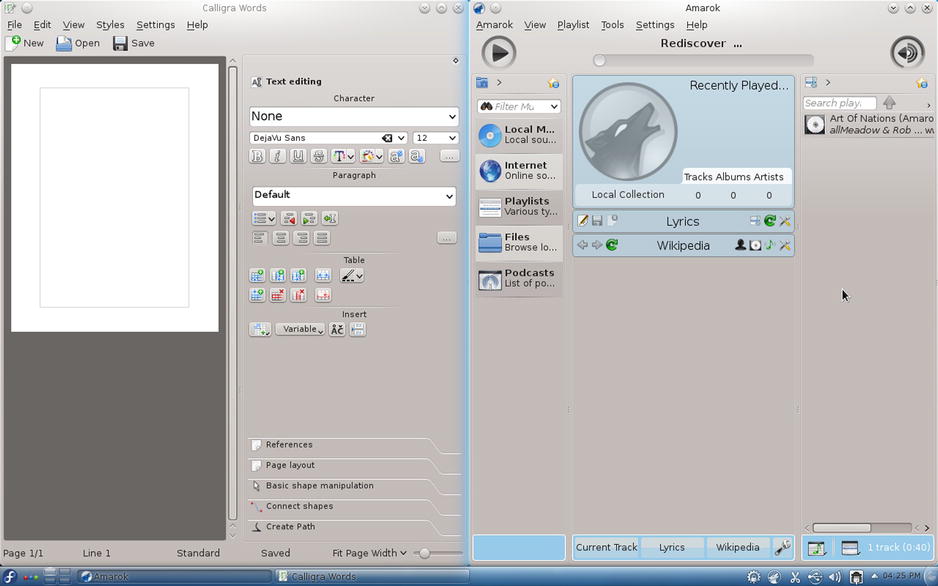
Figure 10-26. Tiling two windows
You can also group windows, displaying them as tabs within a single window. To add a window to a group, right-click its title bar and choose the Attach As Tab To option to display a submenu of open windows. Select the one you want to group the window with. The grouped windows are displayed as tabs within a single window. To remove a window from a group, right-click the title bar and select the Untab entry.
You can also add a widow to a group by moving its title bar with the middle mouse button (hold the right and left mouse buttons at once) to the title bar of another window. The title bar will become detached as you move it. Figure 10-27 shows the Amarok, Gwenview, and Calligra Words application windows grouped as tabs into a single window.
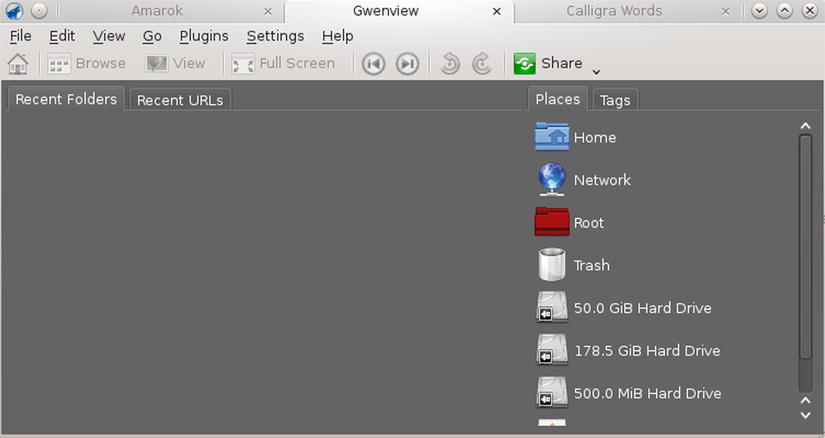
Figure 10-27. Window groups
You can drag a window group to the side edge to tile it, showing the tabbed group as a tile. You can also maximize the group by dragging its window to the top edge.
Applications
You can start an application in KDE in several ways. If an entry for it is in the Kickoff Applications menu, you can select that entry to start the application. You can right-click any application entry in the Applications menu to display a pop-up menu with Add to Panel and Add to Desktop entries. Select either to add a shortcut icon for the application to the desktop or to the panel. You can then start an application by clicking its desktop or panel icon.
An application icon on the desktop is implemented as a desktop plasmoid. Passing the mouse over the application icon on the desktop displays a sidebar with the wrench icon for the icon settings. This opens a Setting window with tabs for General, Permissions, Application, and Preview. On the General tab, you can select an icon image and set the displayed name. The Application tab references the actual application program file with possible options and lists any supported mime types (file types). Permissions sets standard access permissions by the owner, group, or others. Preview shows the desktop configuration information for the application, such as the name in various languages, the program name and location, the file name of the icon used for the application, the application’s software category, and any comments.
You can also run an application by right-clicking the desktop and selecting Run Command (or pressing Alt+F2), which will display the Krunner tool consisting of a box in which to enter a single command. Previous commands can be accessed from a pop-up menu. You need only enter a pattern to search for the application. Results are displayed in the Krunner window. Choose the one you want.
Virtual Desktops: Desktop Pager
KDE supports virtual desktops, extending the desktop area on which you can work. You can have a web browser running on one desktop and be using a text editor in another. KDE can support up to 16 virtual desktops, although the default is 4. Your virtual desktops can be displayed and accessed using the KDE Desktop Pager. It is not installed by default. Use Add Widgets for the Panel (Panel options menu) to install it. In these examples it is located on the left side of the panel. The KDE Desktop Pager represents your virtual desktops as miniature screens showing small squares for each desktop. It works much like the GNOME Workspace Switcher. On Fedora, by default, there are two squares, one on top of the other. To move from one desktop to another, click the square for the destination desktop. The selected desktop will be highlighted. Just passing your mouse over a desktop image on the panel will open a message displaying the desktop number, along with the windows open on that desktop.
If you want to move a window to a different desktop, first open the window’s menu by right-clicking the window’s title bar. Then select the To Desktop entry, which lists the available desktops. Choose the one you want.
You can also configure KDE so that if you move the mouse over the edge of a desktop screen, it automatically moves to the adjoining desktop, as if the desktop were arranged next to each. You enable this feature by enabling the Switch Desktop on Edge feature in the System Settings ![]() Window Behavior
Window Behavior ![]() Screen Edges tab. This feature also allows you to move windows over the edge to an adjoining desktop.
Screen Edges tab. This feature also allows you to move windows over the edge to an adjoining desktop.
To change the number of virtual desktops, you right-click the Desktop Pager on the panel and select the Pager Settings entry in the pop-up menu. This opens the Desktop Settings dialog, which displays tabs for General and Virtual Desktops (see Figure 10-28). You can also access the Desktop Settings Virtual Desktop tab from System Settings ![]() Workspace Behavior
Workspace Behavior ![]() Virtual Desktops. By default, the Fedora KDE desktop will set up two virtual desktops for you. On the Desktop Settings dialog’s Virtual Desktops
Virtual Desktops. By default, the Fedora KDE desktop will set up two virtual desktops for you. On the Desktop Settings dialog’s Virtual Desktops ![]() Desktops tab, the text box labeled Number of Desktops controls the number of active desktops. Use the arrows or enter a number to change the number of active desktops. You can change any of the desktop names by clicking an active name and entering a new one. The Switching tab lets you configure animations and shortcuts. Four desktops are shown here:
Desktops tab, the text box labeled Number of Desktops controls the number of active desktops. Use the arrows or enter a number to change the number of active desktops. You can change any of the desktop names by clicking an active name and entering a new one. The Switching tab lets you configure animations and shortcuts. Four desktops are shown here:

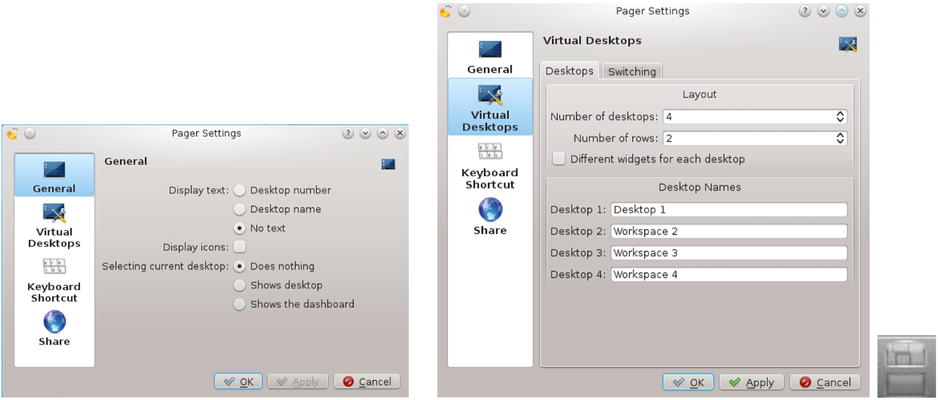
Figure 10-28. Virtual desktop configuration and Pager plasmoid icon
To change how the Pager displays desktops on the panel, use the Pager Settings dialog, General tab. From there, you can configure the Pager to display numbers or names for desktops. You can also decide on the number of rows to use. Choosing just one row will display the desktops side by side, as shown here:
![]()
![]() Tip Use the Ctrl key in combination with a function key to switch to a specific desktop. For example, Ctrl+F1 switches to the first desktop, and Ctrl+F3 switches to the third desktop.
Tip Use the Ctrl key in combination with a function key to switch to a specific desktop. For example, Ctrl+F1 switches to the first desktop, and Ctrl+F3 switches to the third desktop.
The KDE panel, located at the bottom of the screen, provides access to most KDE functions (see Figure 10-29). The panel is a specially configured Plasma containment, just as the desktop is a Plasma containment. The panel includes icons for menus, directory windows, specific programs, and virtual desktops. These are plasmoids that are configured for use on the panel. At the left end of the panel is a button for the Kickoff menu, a Fedora F icon.

Figure 10-29. KDE panel
To add an application to the panel, right-click its entry in the Kickoff menu, to open a pop-up menu, and select Add to Panel.
To add a widget to the panel, right-click any panel widget on the panel, to open a pop-up menu, and select the Panel Options submenu, from which you can select the Add Widgets entry. This opens the Add Widgets window, which lists the widgets you can add to the panel (see Figure 10-30). A drop-down menu at the top of the window lets you see different widget categories, such as Date and Time, Online Services, and Graphics. You can also see recently used widgets and set up favorite widgets.

Figure 10-30. KDE Add Widgets for panel
![]() Note To open the Add Widgets dialog, you can click the panel toolbox at the right side of the panel and click the Add Widgets button.
Note To open the Add Widgets dialog, you can click the panel toolbox at the right side of the panel and click the Add Widgets button.
The Plasma panel supports several kinds of windows and tasks widgets, including the task bar, system tray, and pager. The system tray holds widgets for desktop operations such as sound settings (KMix), update notifier, the network manager, the clipboard (Klipper), power (battery) detection, and device notifier (see Figure 10-31). A pop-up menu (arrow icon) on the right side of the system tray displays widgets that do not fit, such as printers and search service. To configure the system tray, right-click the system tray border on the left and choose System Tray Settings. This opens the System Tray Configuration dialog, from which you can decide the items to display or the entries to make visible or remove.
![]()
Figure 10-31. KDE panel plasmoids, including system tray and device notifier
To the right of the system tray is the digital clock. To the left are widgets such as the notifications and jobs widget (i icon) and any other widgets you may have added. Figure 10-31 shows, from left to right, the show plasma dashboard, notifications and jobs, the system tray (update notifier, clipboard, sound volume, device notifier, Bluetooth, network manager, and pop-up menu for printer and search), and the digital clock.
KDE Panel Configuration
To configure a panel, changing its position, size, and display features, you use the panel’s toolbox. The panel toolbox is located at the right side of the panel. Click it to open an additional configuration panel with buttons for adding widgets, moving the panel, and changing its size and position. There is also a More Settings menu for setting visibility and alignment features. Figure 10-32 shows the configuration panel as it will appear on your desktop. Figure 10-33 provides a more detailed description, including the More Settings menu entries.

Figure 10-32. KDE panel configuration
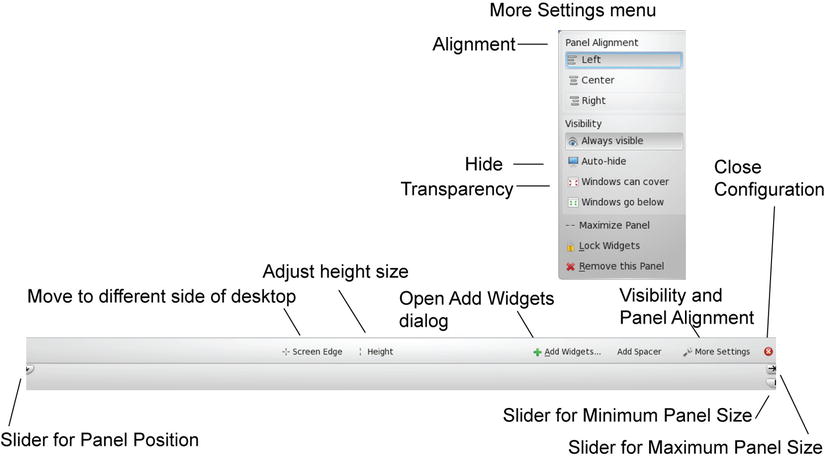
Figure 10-33. KDE panel configuration details and display features
With the configuration panel activated, you can move plasmoids around the panel. Clicking a plasmoid will overlay a movement icon, letting you move the plasmoid icon to a different location on the panel.
The lower part of the configuration panel is used for panel position settings. On the left side is a slider for positioning the panel on the edge of the screen. On the right side are two sliders for the minimum (bottom) and maximum (top) size of the panel.
The top part of the panel has a button for changing the location and the size of the panel. The Screen Edge button lets you move the panel to another side of the screen (left, right, top, bottom). Just click and drag. The Height button lets you change the panel size.
The Add Widgets button will open the Add Widgets dialog, which enables you to add new plasmoids to the panel.
The More Settings menu lets you set visibility and alignment features. You can choose an Auto-Hide setting, which will hide the panel until you move the mouse to its location. The Windows Can Cover option lets a window overlap the panel. For smaller panels, you can align to the right, left, or center of the screen edge.
The More Settings menu also has an entry to Remove This Panel. Use this entry to delete a panel you no longer want.
When you are finished with the configuration, click the red x icon on the upper-right side.
KWin desktop effects can be enabled on the System Settings Desktop Effects dialog (System Settings ![]() Desktop Effects). The switching effects for windows and desktops can be selected on the Desktop Effects tab. For desktop switching, you can choose Slide, Fade Desktop, and Desktop Cube Animation. The All Effects tab lists all available effects (see Figure 10-34). The more dramatic effects are found in the Windows Management section. Desktop Effects requires the support of a capable graphics chip (GPU).
Desktop Effects). The switching effects for windows and desktops can be selected on the Desktop Effects tab. For desktop switching, you can choose Slide, Fade Desktop, and Desktop Cube Animation. The All Effects tab lists all available effects (see Figure 10-34). The more dramatic effects are found in the Windows Management section. Desktop Effects requires the support of a capable graphics chip (GPU).
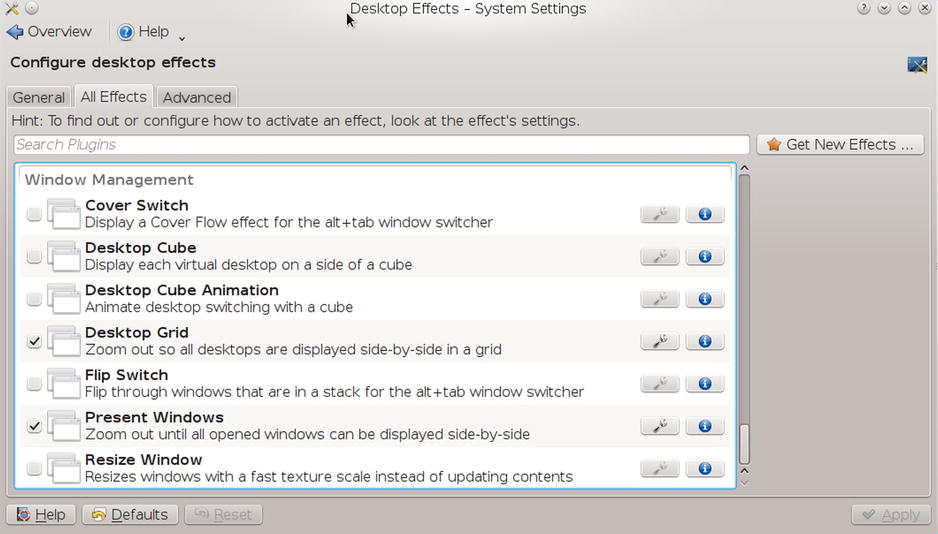
Figure 10-34. Desktop All Effects selection and configuration
Window switching using Alt+Tab is controlled on the Windows Behavior dialog’s Task Switcher tab, not from Desktop Effects. From the Visualization menu, you can choose effects such as Cover Switch, Flip Switch, Grid, and Thumbnails.
Several windows effects are selected by default, depending on whether your graphics card can support them. A check mark is placed next to active effects. If there is wrench icon in the Effects entry, it means the effect can be configured. Click the icon to open its configuration dialog. For several effects, certain keys must be used to start them. The more commonly used effects are Taskbar Thumbnail, Cover Switch, Desktop Grid, Present Windows, and Desktop Cube. The keys for these effects are listed in Table 10-3.
Table 10-3. KWin Desktop Effects Keyboard Shortcuts (KWin must be enabled)
Key |
Operation |
|---|---|
Alt+Tab |
Cover Switch or Box Switch for open windows |
Ctrl+F8 |
Desktop grid (use mouse to select a desktop) |
Ctrl+F9 |
Present windows, current desktop |
Ctrl+F10 |
Present windows, all desktops |
Ctrl+F11 |
Desktop cube (use mouse or arrow keys to move and ESC to exit) |
Most effects will occur automatically. The Taskbar Thumbnails effect will display a live thumbnail of the window on the task bar as your mouse passes over it, showing information on the widget in an expanded window (see Figure 10-35).
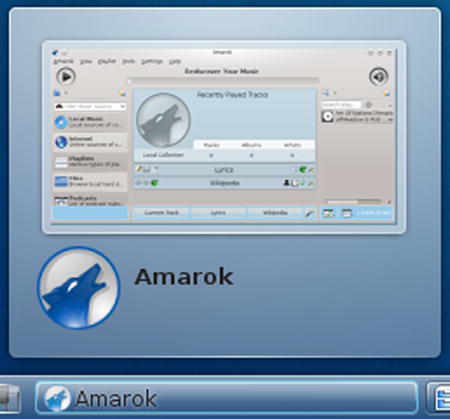
Figure 10-35. The Taskbar Thumbnails effect, showing thumbnails of minimized applications
On the Windows Behavior dialog’s Task Switcher tab, from the Visualization menu, you can choose from the drop-down menu the window switching effect you want to use. Choices include Thumbnails, Grid, Small Icons, Cover Switch, and Flip Switch, as well as smaller listings, such as informative, compact, text icons, and small icons. The Alt+Tab keys implement the effect you have chosen. Continually pressing the Tab key while holding down the Alt key moves you through the windows. Box Switch displays windows in a boxed dialog; Cover Switch arranges unselected windows stacked to the sides; and Flip Switch arranges the windows to one side (see Figure 10-36).
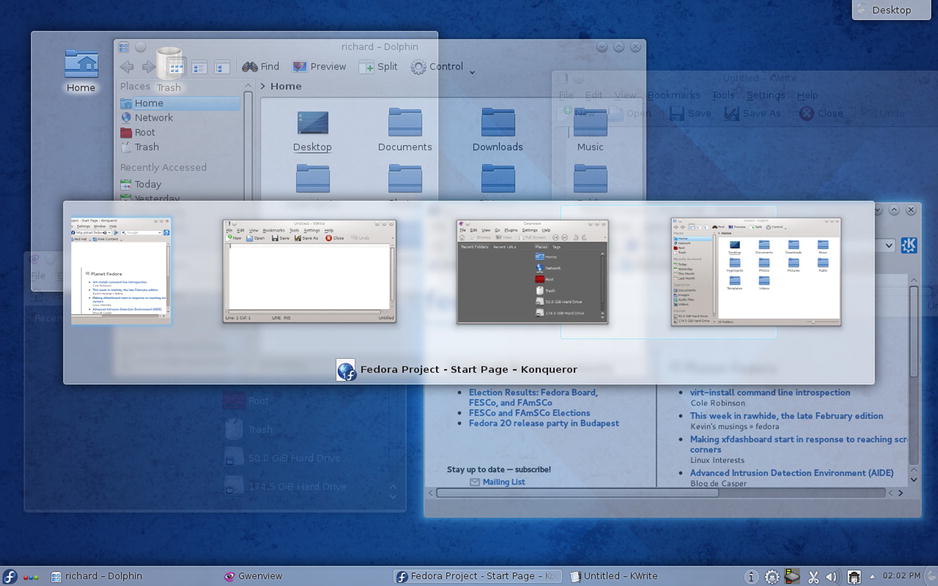
Figure 10-36. Box Switch using Alt+Tab
The Present Windows effect displays images of your open windows on your screen, with the selected one highlighted (see Figure 10-37). You can use your mouse to select another. This provides an easy way to browse your open windows. You can also use Ctrl+F9 to display windows on your current virtual desktop statically and use the arrow key to move between them. Use Ctrl+F10 to display all your open windows across all your desktops. Press the ESC key to return to the desktop.
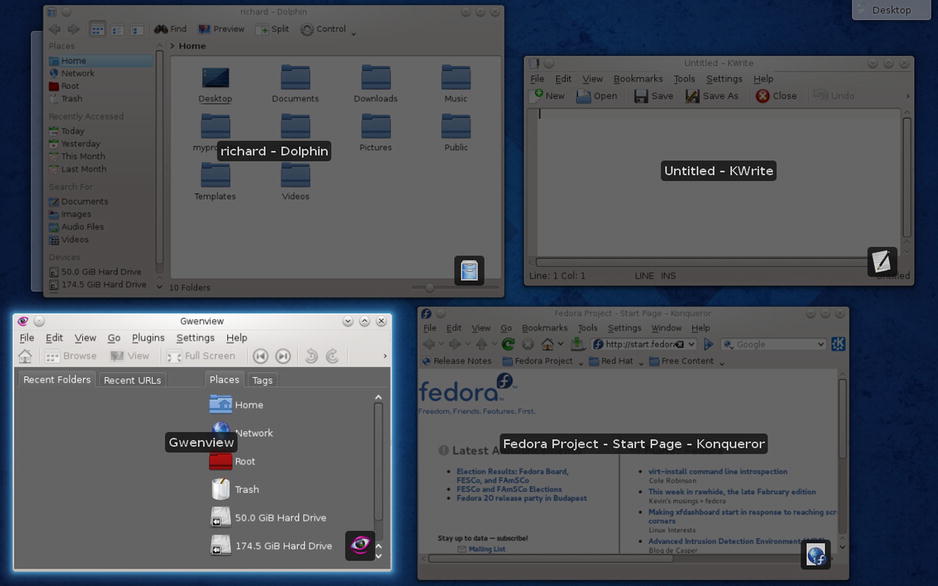
Figure 10-37. Present Windows (Windows effects) Ctrl+F9 for current desktop and Ctrl+F10 for all desktops
On the Desktop Effects dialog’s All Effects tab, you can enable additional windows management features. Desktop Grid will show a grid of all your virtual desktops (Ctrl+F8), letting you see all your virtual desktops on the screen at once (see Figure 10-38). You can then move windows and open applications between desktops. Clicking a desktop makes it the current one. The plus and minus keys allow you to add or remove virtual desktops.
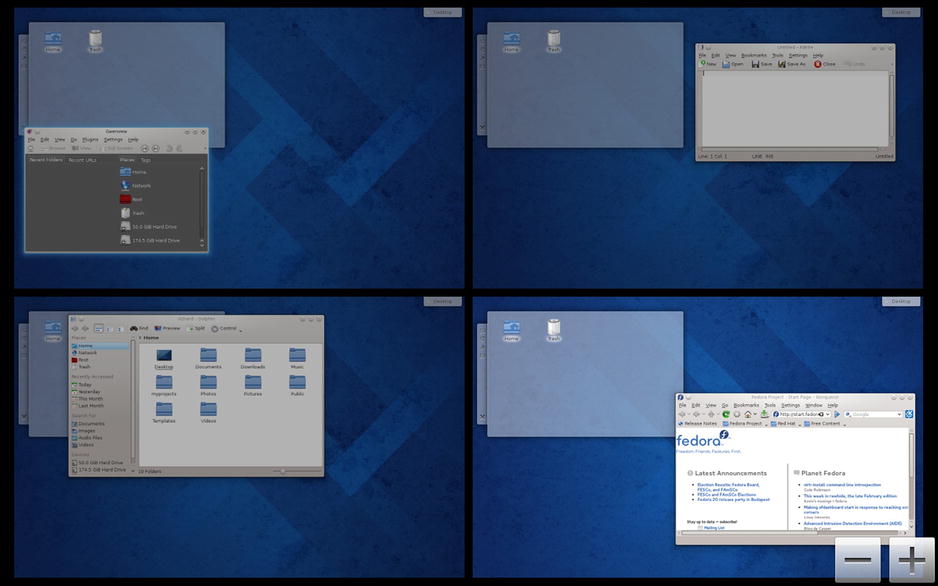
Figure 10-38. Desktop Grid using Ctrl+F8
Desktop Cube will show a cube of all your virtual desktops, letting you move to different desktops around a cube (see Figure 10-39). Stop at the side you want to select. Press Ctrl+11 to start the Desktop Cube. You can then move around the cube with the arrow keys or by clicking and dragging your mouse. When you are finished, press the ESC key to return to the desktop.
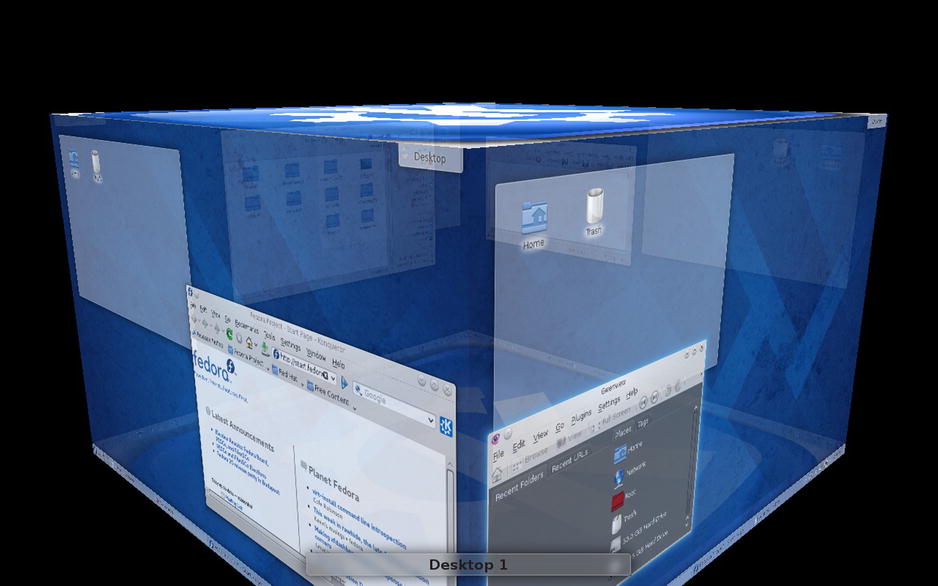
Figure 10-39. Desktop Cube using Ctrl+F11, drag-mouse, or right/left arrow keys
Desktop Cube Animation will use cube animation whenever you switch to a different desktop using the Desktop Pager.
Dolphinis KDE’s dedicated file manager (see Figure 10-40). A navigation bar shows the current directory either in a browser or edit mode. In browser mode, it shows icons for the path of your current directory, and in the edit mode it shows the pathname in a text-editable box. You can use either to move to different folders and their subfolders. Use the Ctrl+l key or click to the right of the folder buttons to use the edit mode. You can also choose Location Bar ![]() Editable Location from the configuration menu (the Ctrl+l key will toggle between the edit and browser modes). Clicking the check mark at the end of the editable text box returns you to the browser mode.
Editable Location from the configuration menu (the Ctrl+l key will toggle between the edit and browser modes). Clicking the check mark at the end of the editable text box returns you to the browser mode.
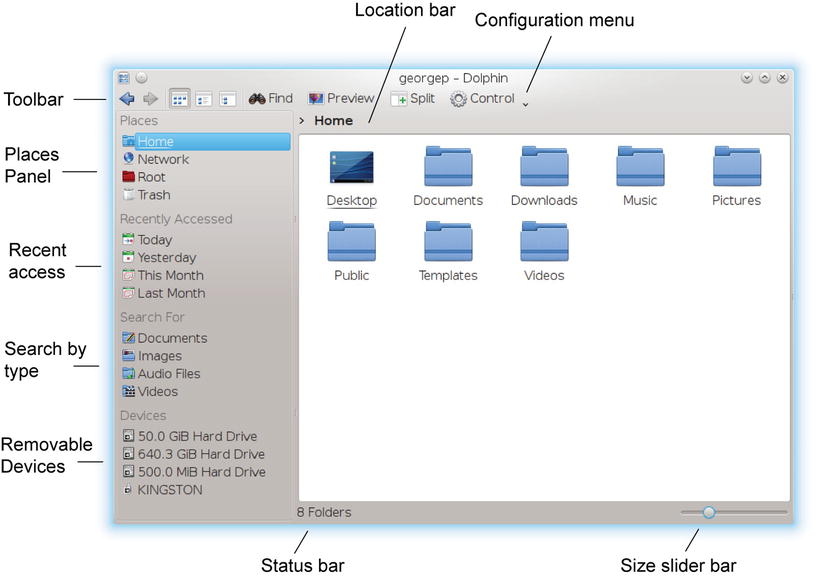
Figure 10-40. The KDE file manager (Dolphin)
The Dolphin menu bar is hidden by default and, instead, the menus are displayed when you click the configuration button on the right side of the toolbar (see Figure 10-41). Should you want to use the menu bar instead, from the configuration menu, choose Show Menubar. The Configuration menu button disappears and the menu bar appears with the File, Edit, View, Go, Tools, Settings, and Help menus. To hide the menu bar again, choose Settings ![]() Show Menubar.
Show Menubar.
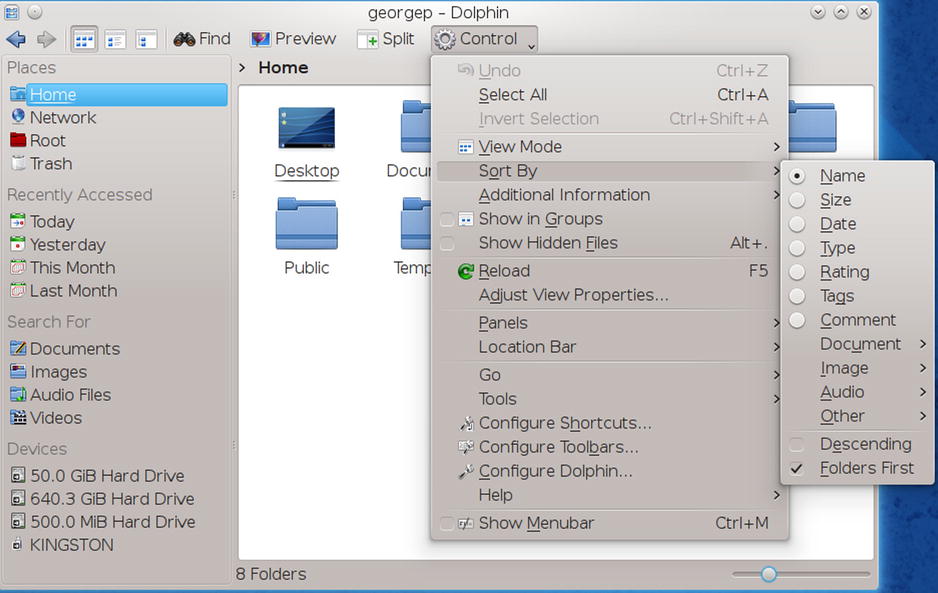
Figure 10-41. The KDE file manager menus
You can also sort by metadata such as documents, audio, video, image, time and date, file ratings, and tags. The Custom link in the Time and Date entries opens a calendar, which you can use to select a specific date. The Search Panel works with both the search and filter bars. Before you can use the Search Panel, you must enable Nepomuk file indexing (Nepomuk Indexing Controller on the system tray). Indexing is resource intensive, and can degrade performance on smaller systems and laptops.
You can open a file either by clicking it or by right-clicking it and choosing the Open With submenu to list applications to open it with. If you want to select the file or folder, you have to hold down the Ctrl key while you click it. A single click will open the file. If the file is a program, that program starts up. If it is a data file, such as a text file, the associated application is run using that data file. Clicking a text file displays it with the Kate editor, while clicking an image file displays it with the Gwenview image viewer. Selecting a DEB package opens it with the Muon Software Center, which you can then use to install the package. If you want to use a double-click instead, to open a file or folder, you can set the double-click option on the Dolphin Preferences dialog, Navigation tab (Configure Dolphin in the configuration menu).
If Dolphin cannot determine the application to use, it opens a dialog box prompting you to enter the application name. You can click the Browse button to use a directory tree to locate the application program you want.
Dolphin can display panels to either side (Dolphin refers to these as panels, although they operate more like standalone tabs). The Places panel will show icons for often-used folders such as Home, Network, and Trash, as well as removable devices. To add a folder to the Places panel, just drag it there. The files listed in a folder can be viewed in several ways, such as icons, detailed listing (Details), and columns (View Mode menu). See Table 10-4 for the keyboard shortcuts.
Table 10-4. KDE File Manager Keyboard Shortcuts
Keys |
Description |
|---|---|
Alt+left arrow, Alt+right arrow |
Go backward and forward in history |
Alt+up arrow |
One directory up |
Enter |
Open a file/directory |
Left/right/up/down arrows |
Move among the icons |
PageUp, PageDown |
Scroll quickly |
Ctrl+c |
Copy selected file to clipboard |
Ctrl+v |
Paste files from clipboard to current directory |
Ctrl+s |
Select files by pattern |
Ctrl+l |
Text box location bar |
Ctrl+f |
Find files |
Ctrl+q |
Close window |
The Additional information submenu in the Control menu (or View menu) lets you display additional information about files, such as the size, date, type, and comments. Type-specific information can also be displayed, such as album, track, and duration for audio files, and word and line counts for documents. You can also display the full path, permissions, and group information (Other submenu).
You can display additional panels by selecting them from the configuration menu’s Panels submenu (see Figure 10-42). The Information panel displays detailed information about a selected file or folder, and the Folders panel displays a directory tree for the file system. The panels are detachable from the file manager window. Be sure to choose Unlock Panels to make the panels in the Panels menu detachable.
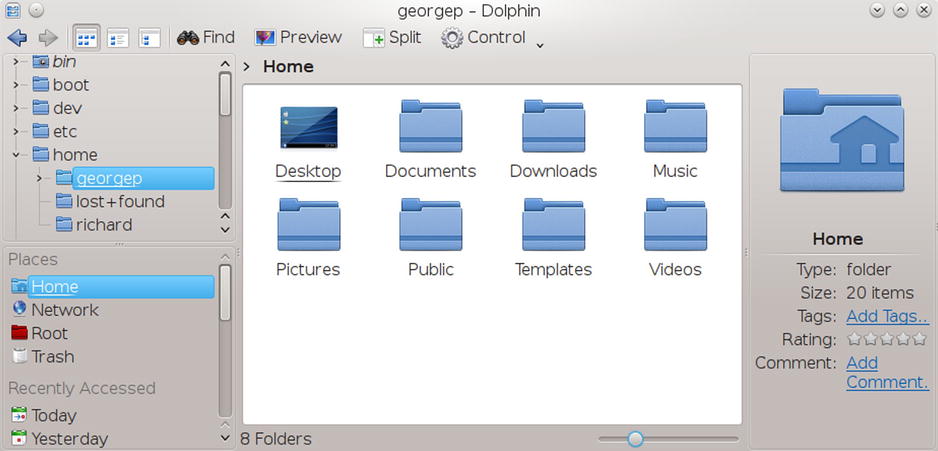
Figure 10-42. The KDE file manager, with sidebars attached and detached
Dolphin supports split views, where you can open two different folders in the same window. Click the Split button in the toolbar. You can then drag folders and files from one folder to the other (see Figure 10-43).
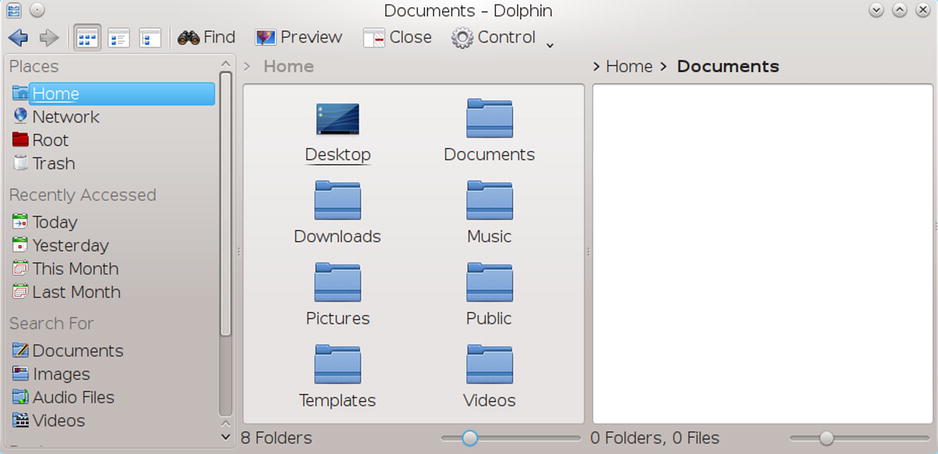
Figure 10-43. The KDE file manager with split views
To configure Dolphin, click Configure Dolphin from the configuration menu. This opens the Dolphin Preferences dialog with tabs for Startup, View Modes, Navigation, Services, Trash, and General. On the Startup tab, you can specify features such as the split view and the default folder to start up with. On the View Modes tab, you can set display features for the different display modes (Icons, Details, and Column), such as the icon size, font type, and arrangement. The Navigation tab sets features like double-click for selection. The Services tab is where you specify actions supported for different kinds of files, such as play a DVD with DragonPlayer, install a TrueType font file, or display tiff image files. The Trash tab lets you configure trash settings such as deleting items in the trash after a specified time and setting the maximum size of the trash. The General tab has tabs for Behavior, Preview, Context Menu, and Status Bar. From the Behavior tab you can enable tooltips, set confirmation prompts for file deletion or closing multiple tabs, and display the selection marker. Preview lets you choose which type of files to preview. The image, JPEG, and directories types are already selected.
Within a file manager window, a single click on a directory icon moves to that directory and displays its file and subdirectory icons. To move back up to the parent directory, click the back arrow button located on the left end of the navigation toolbar. A single click on a directory icon moves you down the directory tree, one directory at a time. By clicking the back arrow button, you move up the tree. The Navigation bar can display either the directory path for the current folder or an editable location box where you can enter a pathname. For the directory path, you can click any displayed directory name to move you quickly to an upper level folder. To use the location box, click to the right of the directory path. The Location box is displayed. You can also select Location Bar ![]() Editable Location from the configuration menu (or press Ctrl+l). The navigation bar changes to an editable text box, in which you can type a pathname. To change back to the directory path, click the check mark to the right of the text box.
Editable Location from the configuration menu (or press Ctrl+l). The navigation bar changes to an editable text box, in which you can type a pathname. To change back to the directory path, click the check mark to the right of the text box.
As with a web browser, the file manager remembers the previous directories it has displayed. You can use the back and forward arrow buttons to move through this list of prior directories. You can also use several keyboard shortcuts to perform operations, such as pressing Alt+back arrow to move up a directory and the arrow keys to move to different icons.
Copy, Move, Delete, Rename, and Link Operations
To perform an operation on a file or directory, you first have to select it by clicking the file’s icon or listing. To select more than one file, hold down the Ctrl key while you click the files you want. You can also use the keyboard arrow keys to move from one file icon to another.
To copyand move files, you can use the standard drag-and-drop method with your mouse. To copy a file, you locate it by using the file manager. Open another file manager window to the directory to which you want the file copied. Then drag and drop the File icon to that window. A pop-up menu appears with selections for Move Here, Copy Here, or Link Here. Choose Copy Here. To move a file to another directory, follow the same procedure, but select Move Here from the pop-up menu. To copy or move a directory, use the same procedure as for files. All the directory’s files and subdirectories are also copied or moved. Instead of having to select from a pop-up menu, you can use the corresponding keys: Ctrl for copy, Shift for move, and Ctrl+Shift for link—same as for GNOME.
To rename a file, Ctrl-click its icon and press F2, or right-click the icon and select Rename from the pop-up menu. A dialog opens in which you can enter the new name for the file or folder.
You delete a file either by selecting it and deleting it or placing it in the Trash folder to delete later. To place a file in the Trash folder, drag and drop it to the Trash icon on your desktop, or right-click the file and choose Move To Trash from the pop-up menu. You can later open the Trash folder and delete the files. To delete all the files in the Trash folder, right-click the Trash icon in Dolphin file manager sidebar and select Remove Trash from the pop-up menu. To restore files in the Trash bin, open the Trash window and right-click the file to restore and select Restore.
Each file or directory has properties associated with it that include permissions, the filename, and its directory. To display the Properties dialog for a given file, right-click the file’s icon and select the Properties entry. On the General tab, you can see the name of the file. To change the file name, replace the name with a new one. Permissions are set on the Permissions tab. Here, you can set read, write, and execute permissions for user, group, or other. The Group entry enables you to change the group for a file.
KDE has combined the former KFind and Dolphin search tools into one simplified search bar. KDE also supports a filter bar to search files and folders in the current folder. You can also use the Filter Panel to refine searches by metadata, such as type, date, ratings, and tags.
Search Bar
To search for files, click the Find button on the icon bar to open the search bar, which displays a search text box. You can also choose Find from the Edit menu, or press Ctrl+f. The search bar displays a search text box, in which you enter the pattern of the file or folder you are searching for. Click the red x button to the left to close the find bar, and use the black x button in the text box to clear the search pattern.
Buttons below the search box provide options to qualify the search. The Filename button (the default) searches on the file name. The Content button searches the contents of text files for the pattern. The From Here button searches the user’s home folders, and the Everywhere button (the default) searches the entire file system (see Figure 10-44).
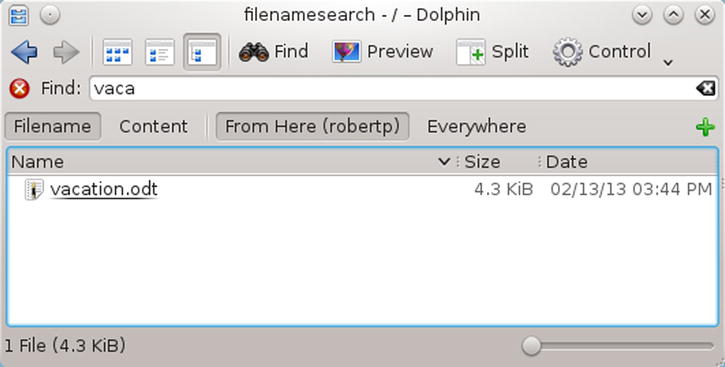
Figure 10-44. The KDE search bar
The search results are displayed in the main pane. You can click a file to have it open with its appropriate application. Text files are displayed by the Kate text editor; images are viewed by Gwenview; and applications are run. The search program also enables you to save your search results for later reference (click the Save button to the right). When you are finished searching, click the Close button.
When you pass your mouse over an icon listed in the Query Results dialog, information about it is displayed on the information panel to the right. Links are shown for adding tags and comments. Right-clicking this panel lets you open a Configure dialog, where you can specify what information to display.
The search operation makes use of the KDE implementation of Nepomuk Semantic Desktop’s metadata indexing, a powerful desktop indexer that makes use of file information, user tags and comments on the file, and file usage associations like the e-mail used to send a file as an e-mail attachment. The Nepomuk project aims to implement a semantic desktop, organizing desktop information so it can be accessed easily and shared collaboratively.
To manage the Nepomuk file indexing, open the Nepomuk Indexing Controller from the system tray. You can choose to resume or suspend indexing. To configure Nepomuk, choose System Settings ![]() Workspace Appearance and Behavior
Workspace Appearance and Behavior ![]() Desktop Search (you can also choose Configure File Indexing from the Nepomuk system tray entry). This opens the Desktop Search control module, with tabs for Basic Settings, Desktop Query, Backup, and Advanced Settings. On the Basic Settings tab, you can enable the Strigi desktop search, which can search files by content.
Desktop Search (you can also choose Configure File Indexing from the Nepomuk system tray entry). This opens the Desktop Search control module, with tabs for Basic Settings, Desktop Query, Backup, and Advanced Settings. On the Basic Settings tab, you can enable the Strigi desktop search, which can search files by content.
For a quick search of the current folder, you can activate the Filter bar (choose Tools ![]() Show Filter Bar or Ctrl+i), which opens a Filter search box at the bottom of the window (be sure to show the menubar). Enter a pattern, and only those file and directory names containing that pattern are displayed. Click the x button at the right of the Filter box to clear it (see Figure 10-45).
Show Filter Bar or Ctrl+i), which opens a Filter search box at the bottom of the window (be sure to show the menubar). Enter a pattern, and only those file and directory names containing that pattern are displayed. Click the x button at the right of the Filter box to clear it (see Figure 10-45).
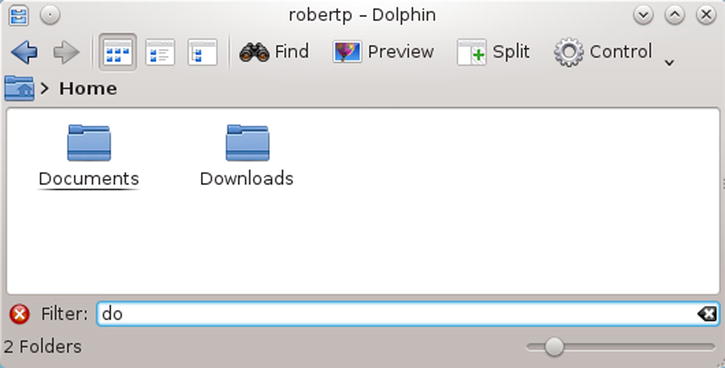
Figure 10-45. The KDE filter bar
KDE Software Management: Apper
For software management, you can use Apper, the new KDE software management application. This replaces the older KPackageKit software manager. You can access Apper from Applications ![]() Administration
Administration ![]() Software Management. The Apper dialog shows a toolbar and two sections of icons—Lists and Categories (see Figure 10-46).
Software Management. The Apper dialog shows a toolbar and two sections of icons—Lists and Categories (see Figure 10-46).
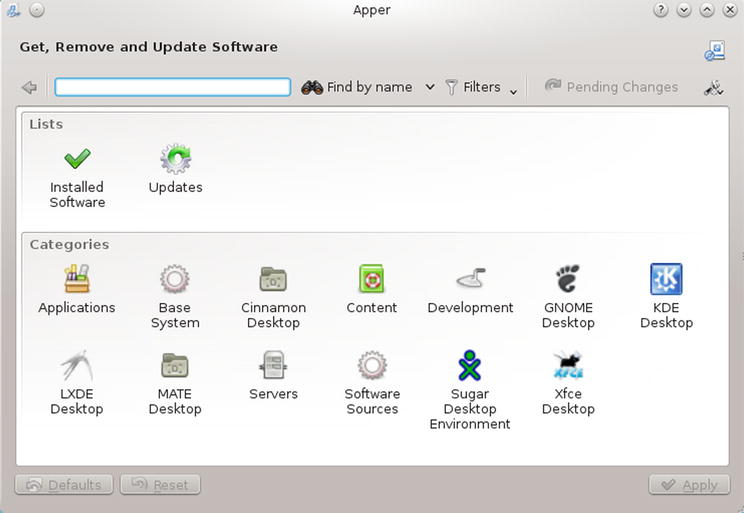
Figure 10-46. Apper software manager: package categories
The toolbar at the top shows a search box with a menu to qualify the search, along with filters (installed or new packages). A Pending Changes button shows the packages you have decided to install or remove. The configuration button lists History and Settings. Use Settings to configure Apper. The Lists section has icons for Installed Software and Updates. Use Updates to update your applications and Installed Software to see what software is installed.
Use the Categories icons to add new software and manage installed packages. Software is organized as Applications, Base System, Content, Desktop Environments, Development, Languages, Servers, and Software Sources. Clicking an icon opens a window listing subcategories for that topic. You can quickly locate FTP server packages in the Servers window by clicking the FTP Server icon. Applications organizes software into the key groups, such as Editors, Games and Entertainment, Office/Productivity, Graphics, and Sound and Video (see Figure 10-47). From the Filters menu, you can further limit the display of packages for installed, newest, and native packages. You can search for packages directly using the search box.
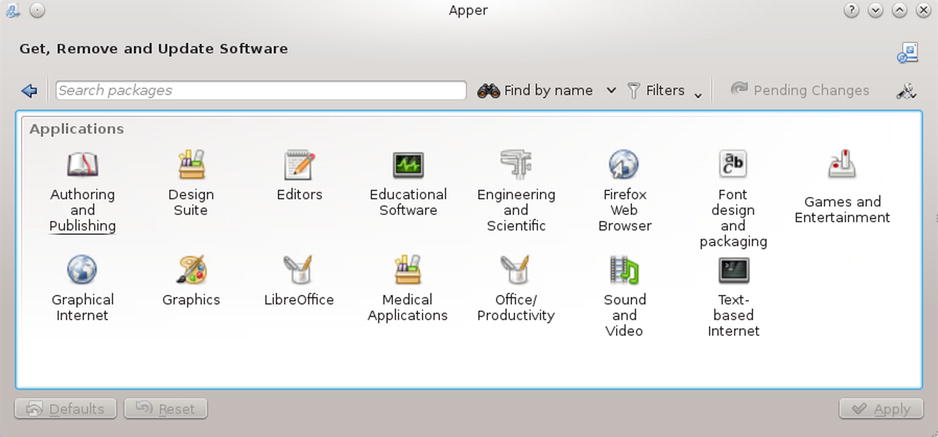
Figure 10-47. Apper software manager: The Applications package subcategories
Once you have selected a subcategory or performed a search, a list of packages is displayed, showing the name, brief description, and the version (see Figure 10-48). Click on an entry to select it. A more detailed description of the selected package appears below the list. A More drop-down menu lets you see the package file list as well as the packages it depends on and requires. When you pass over or click an entry, the Action column to the right of the entry shows what action can be taken. Uninstalled packages show an Install button, and installed packages show a Remove button. To install a selected package, double-click its Install button. This marks the package for installation. You can continue to choose other packages for installation and removal. If you wish to review your choices, click the Pending Changes button to see a list of packages to be installed and removed. When you are ready to install your packages, click the Apply button at the lower right. If additional packages are required, you are notified and asked to confirm, then queried for authentication. A window then shows the download and install progress for your packages (see Figure 10-49). Removal works the same way. Double-click a package’s Remove button to mark it for removal. Then click Apply.
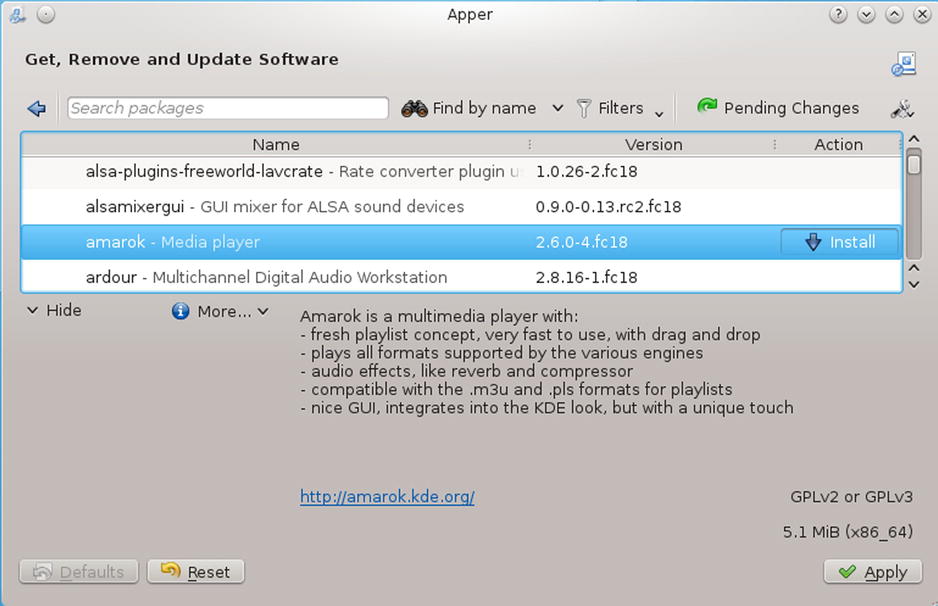
Figure 10-48. Apper software manager: selected package
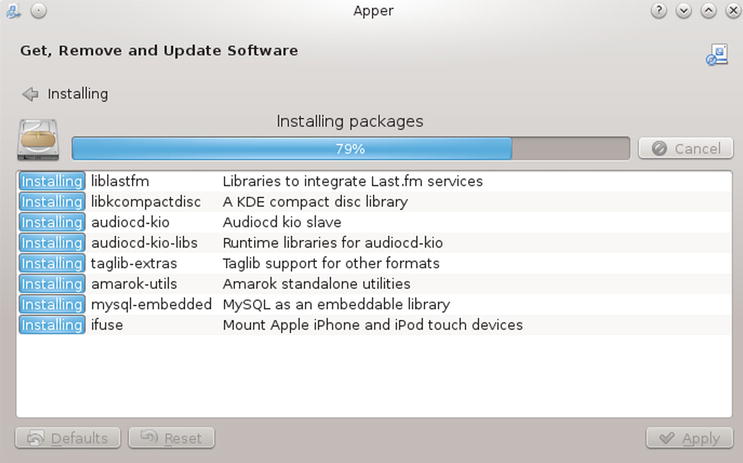
Figure 10-49. Apper installing software
To configure Apper, choose Settings from the configuration menu, which you access by clicking the configuration button at the right of the toolbar. The General Settings tab lets you determine when to check for updates and whether to install them automatically. The Software Origins tab lists your accessible repositories and allows you to choose the ones you want to use.
KDE Configuration: KDE System Settings
With the KDE configuration tools, you can configure your desktop and system, changing the way it is displayed and the features it supports. The configuration dialogs are accessed on the System Settings window (see Figure 10-50). You can access this System Settings from the System Settings entry in the Kickoff Favorites menu or by choosing Applications ![]() Settings
Settings ![]() System Settings. You should use the KDE System Settings tools to configure your KDE desktop.
System Settings. You should use the KDE System Settings tools to configure your KDE desktop.
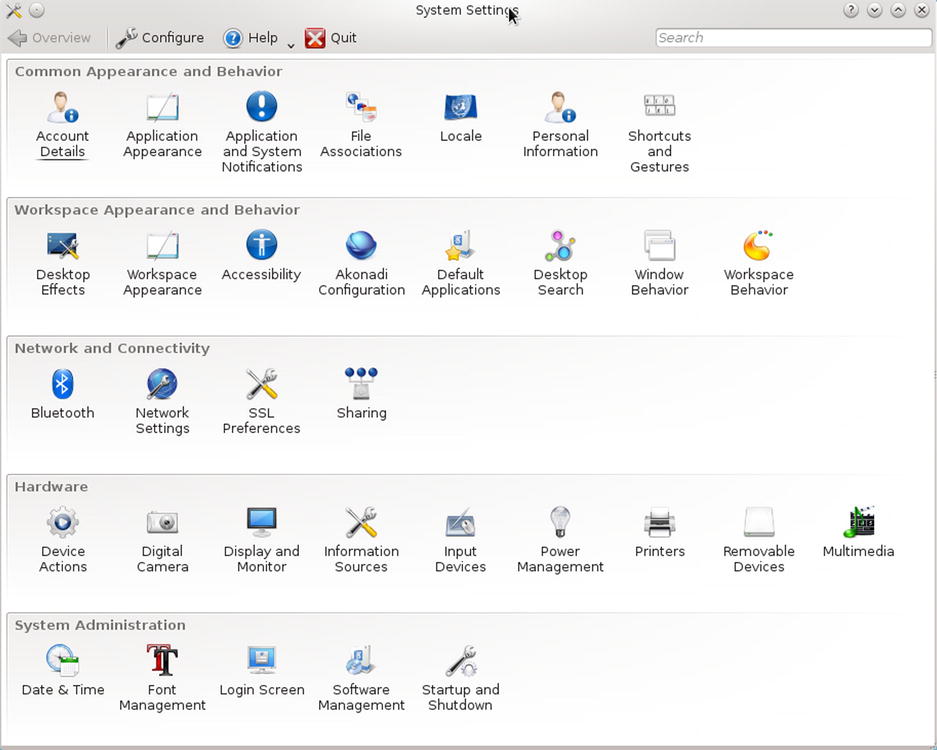
Figure 10-50. KDE System Settings
The System Settingswindow shows system dialog icons arranged in several sections: Common Appearance and Behavior, Workspace Appearance and Behavior, Network and Connectivity, Hardware, and System Administration. Click an icon to display a dialog with a sidebar icon list for configuration tabs, with the tabs selected shown on the right. The selected tab may also have tabs (see Figure 10-51).
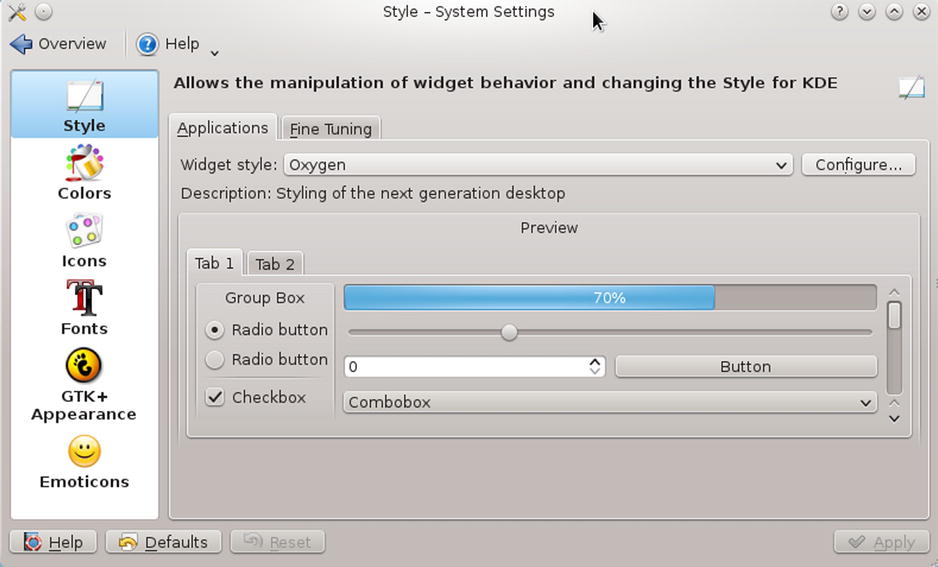
Figure 10-51. KDE System Settings: Applications Appearance: Style
The Network and Connectivity section holds icons for configuring the networking, Bluetooth connections, and sharing. The Common Appearance and Behavior section has icons for personal information (About Me), account details, shortcuts, file associations, and your location. Workspace Appearance and Behavior lets you set desktop effects, themes, accessibility, default applications, desktop search, and windows features. System Administration lets you change the settings for user management, the date and time, font management, software management, startup and shutdown (sessions), and login screen (KDM, not GDM). Hardware lets you set the printer configuration, power management, multimedia devices (sound), your display resolution, and information sources.
If you installed KDE as an added desktop, and did not peform a full install of KDE, be sure to install the kdeadmin package to install the KDE task manager (KCron), KUser, and KSystemLog.
Alternatively, you can display the System Settings window using the classic tree format. Click the System Settings Configure button to open the configuration dialog and select Classic Tree from the General tab. Setting sections are displayed as expandable trees on the left pane, with packages for a selected section displayed on the right.
KDE Directories and Files
When KDE is installed on your system, its system-wide application, configuration, and support files may be installed in the same system directories as other desktop and user applications (see Table 10-5). On Fedora, KDE is installed in the standard system directories, with some variations, such as /usr/bin for KDE program files; /usr/lib/kde4, which holds KDE libraries; and /usr/include/kde, which contains KDE header files used in application development.
Table 10-5. KDE Installation Directories
System KDE Directories |
Description |
|---|---|
/usr/bin |
KDE programs |
/usr/lib/kde4 |
KDE libraries |
/usr/include/kde |
Header files for use in compiling and developing KDE applications |
/usr/share/config |
KDE desktop and application configuration files |
/usr/share/mimelnk |
Desktop files used to build the main menu |
/usr/share/apps |
Files used by KDE applications |
/usr/share/icons/oxygen |
Icons used in KDE desktop and applications |
/usr/share/doc |
KDE Help system |
User KDE Directories |
Description |
.kde/AutoStart |
Applications automatically started up with KDE |
.kde/share/config |
User KDE desktop and application configuration files for user-specified features |
.kde/share/apps |
Directories and files used by KDE applications |
Desktop |
Desktop files for icons and folders displayed on the user’s KDE desktop |
.kde/share/config/plasma--desktop-appletsrc |
Plasma applet configuration |
The .kde directory holds files and directories used to maintain your KDE desktop. As with GNOME, the Desktop directory holds KDE desktop files whose icons are displayed on the desktop. Configuration files are located in the .kde/share/config directory. Here, you can find the general configuration files for different KDE components—kwinrc holds configuration commands for the window manager, kmailrc for mail, and kdeglobals for keyboard shortcuts and other global definitions. You can place configuration directives directly in any of these files; .kde/share/mimelnk holds the desktop files for the menu entries added by the user. The .kde/share/apps directory contains files and directories for configuring KDE applications, including KMail and Rekonq.
Each user has a Desktop directory that holds KDE link files for all icons and folders on the user’s desktop (see Table 10-5). These include the Trash folders and the CD-ROM and home directory links.
The directories located in the share directory contain files used to configure system defaults for your KDE environment (the system share directory is located at /usr/share). The share/apps directory contains files and directories set up by KDE applications; share/config contains the configuration files for particular KDE applications. These are the system-wide defaults that can be overridden by users’ own configurations in their own .kde/share/config directories. The share/icons directory holds the default icons used on your KDE desktop and by KDE applications. The user’s home directory, the .kde directory, holds a user’s own KDE configuration for the desktop and its applications.
