3
Creating and Viewing a Web Page
In This Chapter
![]() Planning what you practice and assembling the ingredients
Planning what you practice and assembling the ingredients
![]() Working through the edit-save-test cycle
Working through the edit-save-test cycle
![]() Viewing your very first web page
Viewing your very first web page
Creating your own web page may seem scary, but it’s definitely fun, too. Experience shows that the best way to get started is to jump in with both feet. You might splash around a bit at first, but you can keep your head above water if you try.
This chapter walks you through the steps involved in creating a web page. We don’t stop to explain every last bit of markup you use — we save that for other chapters. Instead, we want to make you comfortable working with markup and content to create and view a suitably simple web page.
Before You Get Started
Creating HTML documents differs from creating word processor documents using an application such as Microsoft Word. The difference comes from having to use two applications with HTML document creation:
![]() Your text or HTML editor, where you create the web pages
Your text or HTML editor, where you create the web pages
![]() Your web browser, where you view the results
Your web browser, where you view the results
Even though many HTML editors, such as Dreamweaver and HTML-Kit, provide a browser preview, it’s still important to preview your web pages inside actual web browsers (such as Internet Explorer, Chrome, Firefox, and Safari) so you can see them as your end users do. Editing inside one program and then switching to another to look at your work might feel odd, but you’ll be switching between the editor and the browser like a pro in no time.
 Because not all web browsers are created equal (or identical), web pages may look different depending on the browser you use. Get in the habit and regular practice of previewing web pages in multiple browsers so that you see what your end users see when they open that page. We used Chrome to make all the screenshots in this book, by the way.
To get started on your first web page, you need two types of software:
![]() The latest version of Aptana Studio: Studio 3 is the current version as we write this book. Go to
The latest version of Aptana Studio: Studio 3 is the current version as we write this book. Go to www.aptana.com to get your copy.
We discuss these tools in more detail in Chapter 23, but here’s a thumbnail sketch: Aptana Studio is a web project tool that works on Windows, Mac OS, and Linux PCs.
![]() A web browser: Internet Explorer, Chrome, Firefox, and Safari are the most popular web browsers, so make sure to test your pages in each of them if possible.
A web browser: Internet Explorer, Chrome, Firefox, and Safari are the most popular web browsers, so make sure to test your pages in each of them if possible.
We use the free web Aptana Studio development toolkit in this book, and here’s why:
![]() Working with markup: Although an advanced HTML editor, such as Expression Web or Dreamweaver, often hides your HTML from you, Aptana lets you interact directly with the markup. For your first page, you want to see your HTML in all of its (limited) glory.
Working with markup: Although an advanced HTML editor, such as Expression Web or Dreamweaver, often hides your HTML from you, Aptana lets you interact directly with the markup. For your first page, you want to see your HTML in all of its (limited) glory.
When you become familiar with XHTML and CSS markup, syntax, and structure, you can really start to make Aptana Studio sing. It’s a good tool and provides great HTML5 and web page template support, handles CSS3 nicely, and offers good PHP, Ruby, and Rails support.
![]() Keeping the code clean: Word processors decked out with bells and whistles (such as Microsoft Word) often insert extra information behind the scenes (for example, formatting instructions to display or print files). You can’t see or change that information while you’re editing, but it messes with your HTML. With Aptana, you don’t have to worry about those bells and whistles making noise in the background.
Keeping the code clean: Word processors decked out with bells and whistles (such as Microsoft Word) often insert extra information behind the scenes (for example, formatting instructions to display or print files). You can’t see or change that information while you’re editing, but it messes with your HTML. With Aptana, you don’t have to worry about those bells and whistles making noise in the background.
Creating a Page from Scratch
Using HTML to create a web page from scratch takes four basic steps, plus a little advance preparation (programmers like to start counting from zero, so we assign “Step number 0” to the necessary preparation activities):
0. Gather your tools.
1. Plan your page design.
2. Combine HTML and text in a text editor to make that design a reality.
3. Save your page.
4. View your page in a web browser.
Break out your text editor, fire up your web browser, and roll up your sleeves.
Step 0: Gather your tools
As you collect your tools, be sure to collect your wits about you, too. If you haven’t already downloaded and installed Aptana Studio, please do so. The download is about 146MB (size varies slightly by the OS you use), so it might take a while to transfer, depending on the speed of your Internet connection. After you’ve downloaded the file, launch it on your PC. (It self-installs on all three operating systems.)
 Next, if you want your code listings in Aptana studio on your screen to look like ours do in the book, you need to visit the HTML5 Cafe and download our special Aptana theme. You can find it listed as Book Theme on this menu:
www.dummieshtml.com/html5cafe/menu.html
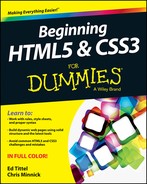
After you get the theme (it’s only 17KB, so it should download in a flash), choose Window⇒Preferences⇒Aptana Studio⇒Themes. Finally, click the Import button, select the downloaded theme, and then click Apply. Figure 3-1 shows what this looks like in Windows; other OSs look something like this but not exactly the same.
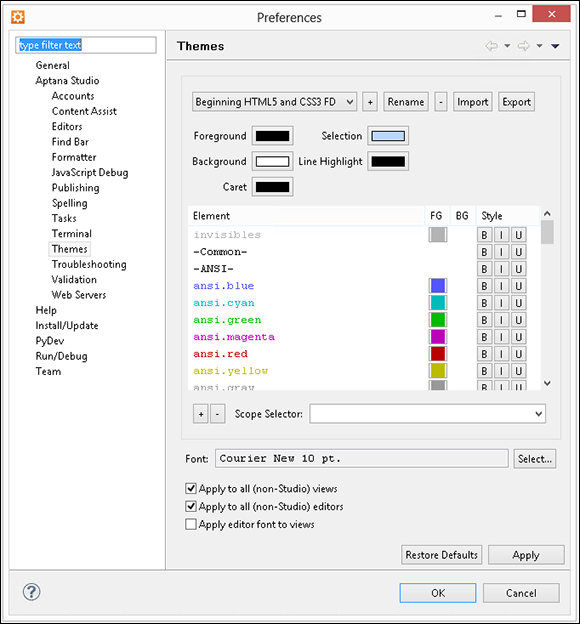
Figure 3-1: After you import the Beginning HTML5 and CSS3 FD theme, your Aptana preferences should look like this.
Step 1: Planning a simple design
We’ve discovered that a few minutes spent planning an approach to the page at the outset makes creation faster and easier. You don’t have to create a complicated diagram or an elaborate layout in this step. Just jot down some ideas for what you want on the page and how you want it arranged.
You don’t even have to be at your desk to plan a simple design. Take a notepad and pencil outside and design in the sun, or scribble on a napkin while you’re having lunch. Remember, this is supposed to be fun!
Our example is a take on the traditional “Hello World!” exercise used in nearly every programming language: The first thing you practice when programming a new language is how to make “Hello World!” appear onscreen. In our example, we create a short letter to the world instead, so the page is more substantial with additional text. Figure 3-2 shows a basic design for this page.

Figure 3-2: Taking a few minutes to sketch your page design makes writing HTML easier.
The design for the page includes four components:
![]() A serviceable title: Hello World!
A serviceable title: Hello World!
![]() A few paragraphs explaining how HTML can help you communicate with the whole world
A few paragraphs explaining how HTML can help you communicate with the whole world
![]() A closing: Sincerely
A closing: Sincerely
![]() A signature
A signature
You may want to choose a basic color scheme for your page, to start. For our example, we chose a teal background and white text with the title as noted.
When you know what kind of information you want on the page, you can move on to Step 2 — writing the markup.
Step 2: Writing some HTML
You have a couple of options when you’re ready to create your HTML. In the end, you’ll probably use some combination of the two:
![]() If you already have some text that you just want to describe with HTML, save that text as a plain text file and add HTML markup around it.
If you already have some text that you just want to describe with HTML, save that text as a plain text file and add HTML markup around it.
![]() Start creating markup and add the content while you go.
Start creating markup and add the content while you go.
Our example starts with some text created in a simple text editor such as Notepad (PC) or TextEdit (Mac). Save your content as a text file. (Leave your text editor open — you’re going to return to it in a minute.) Next, fire up Aptana and choose File⇒New⇒Web Project. In the New Web Project window, click Next, name your project BegHTML5&CSS3, browse to put the project in an easy-to-remember location (we used a folder named Aptwork where we keep all our Aptana projects), and then click Finish.
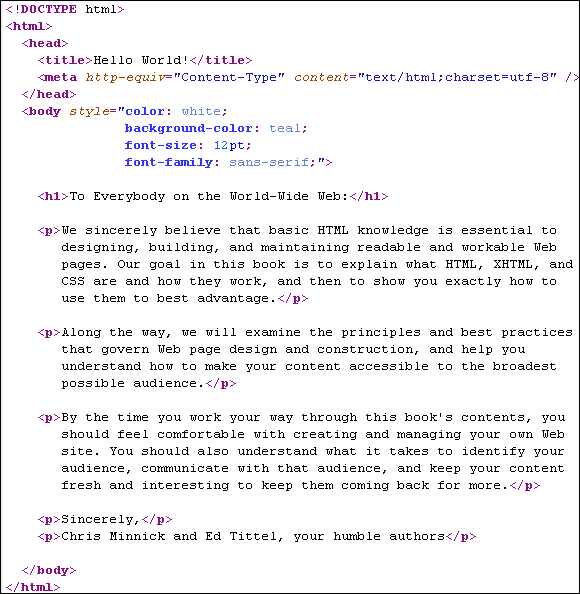
Next, choose File⇒New⇒File, pick your project folder in the Parent Folder frame, and name your file html-letter.html in the File Name text box. Now you can cut and paste the contents of your plain-text file into Aptana and add markup around the text. When you're done, you should see what's shown in Figure 3-3.

Figure 3-3: Here’s the plain text for our page, completely sans markup in Aptana.
The following code shows you what you must add to this prose to turn it into a fully functional HTML file. As you type HTML tags in Aptana, the program creates complete tag pairs as soon as it recognizes what you’re typing. You’ll have to cut the closing tags from where they appear and then paste them where you want them to go, as shown in the following listing.
Listing 3-1: The Complete HTML Page for the “Hello World!” Letter
The HTML markup includes a collection of markup elements and attributes that describe the letter’s contents:
![]() The
The <html> element defines the document as an HTML document.
![]() The
The <head> element creates a header section for the document.
![]() The
The <title> element defines a document title that is displayed in the browser's title bar.
 The
The <title> element is inside the <head> element.
![]() The
The <body> element holds the text that appears in the browser window.
The markup that follows the style attribute inside the <body> element is CSS, otherwise known as the Cascading Style Sheets markup language. This particular bit of CSS says we want white text on a teal background, where the text is larger than usual, and in a sans-serif font. (You find out all about styles and attributes in Chapters 11 and 12.)
![]() The
The <h1> element marks "To Everybody . . ." as a first-level heading.
![]() The
The <p> elements identify each paragraph of the document.
 Don’t worry about the ins and outs of how these HTML elements work. They’re covered in detail beginning with Chapter 4. Also, a web page includes graphics, scripts, and other elements that we deliberately avoid in this contrived and simple example to keep things, well, simple! We cover all these things in profuse detail later in the book, though.
After you create an HTML page (or the first chunk of it that you want to review), you must save it before you can see your work in a browser.
Step 3: Saving your page
You use an editor to create HTML documents and a web browser to view them. Before you can let your browser loose on your HTML page, you must save that page. When you’re just building a page, you should save a copy of it to your local hard drive and view it locally with your browser. To save a file in Aptana, click the Save icon on the toolbar at the top-left corner of the window. (The icon looks like a small, blue floppy disk, for readers old enough to know what that means.)
Choosing a location and name for your file
When you save your file to a hard drive, keep the following in mind:
![]() You need to be able to find it again. Create a project folder on your hard drive especially for your web pages. Call it something that makes sense to you and be sure to put it somewhere easy to find. We put ours on a project drive, in a project named BegHTML5&CSS34D. Choose File⇒New⇒Web Project, click the Next button, and then select the Default Project (No Template) option to set this up. Create a project name that makes sense to you, such as LearningHTML.
You need to be able to find it again. Create a project folder on your hard drive especially for your web pages. Call it something that makes sense to you and be sure to put it somewhere easy to find. We put ours on a project drive, in a project named BegHTML5&CSS34D. Choose File⇒New⇒Web Project, click the Next button, and then select the Default Project (No Template) option to set this up. Create a project name that makes sense to you, such as LearningHTML.
![]() The name should make sense to you so you can identify file contents without actually opening the file. Don’t put spaces in filenames. Some operating systems — most notably Unix and Linux, the most popular web-hosting operating systems around — don’t like spaces in filenames; use an underscore (_) or a hyphen (-) instead. Avoiding other punctuation in filenames and keeping them short is also good.
The name should make sense to you so you can identify file contents without actually opening the file. Don’t put spaces in filenames. Some operating systems — most notably Unix and Linux, the most popular web-hosting operating systems around — don’t like spaces in filenames; use an underscore (_) or a hyphen (-) instead. Avoiding other punctuation in filenames and keeping them short is also good.
![]() The name should work well in a web browser. Create a short descriptive name for the page that tells you what it's for or about. We used
The name should work well in a web browser. Create a short descriptive name for the page that tells you what it's for or about. We used html-letter.html for this example because it identifies the content nicely. You may also use names to identify structure and content, such as pt1-toc.html for a table of contents for part 1 of a complex page sequence, and perhaps pt1-pg1.html, pt1-pg2.html, and so forth for subsequent pages in that same sequence.
In our example, we saved our file in a project called BegHTML5&CSS3FD and named it (drum roll, please) html-letter.html, as shown in Figure 3-4.

Figure 3-4: Use a handy location and logical project and filenames for your web pages.
Using .htm or .html
You can actually choose from one of two suffixes for your pages: .html or .htm. (Our example filename, html-letter.html, uses the .html suffix.)
The shorter .htm is a relic from the 8.3 DOS days when filenames could only include eight characters plus a three-character suffix that described the file's type. Today, operating systems can support filenames and suffixes that are longer than three letters, so we suggest you stick with .html.
Web servers and web browsers handle both .htm and .html equally well.
Stick with one filename approach. The .html and .htm files are treated the same by browsers and servers, but because they're different suffixes they represent different filenames; therefore, html-letter.html is different from html-letter.htm. This matters a lot when you create hyperlinks (covered in Chapter 8).
Step 4: Viewing your page
After you save a copy of your web page, you’re ready to view it in a web browser. Follow these steps to view your web page in Internet Explorer. (The steps may be different if you’re using a different browser.):
1. If you haven’t opened your browser, do that now.
2. Choose File⇒Open in Internet Explorer. If you’re using Chrome, press Ctrl+O (in Windows) or ![]() +O (on the Mac).
+O (on the Mac).
3. In the Open dialog box that appears, click the Browse button.
4. In the new dialog box that appears, navigate your file system until you find your HTML file and then select it so it appears in the File Name area.
Figure 3-5 shows a highlighted HTML file ready to be opened.

Figure 3-5: Using Chrome to navigate to your web pages.
5. Click the Open button.
You’re brought to the Open dialog box. (Note: If you’re connected to the Internet, some versions of Internet Explorer warn you that for security reasons they must open a new browser window for your local file; this is perfectly okay.)
6. Click OK.
The page appears in your web browser in all its glory, as shown in Figure 3-6.

Figure 3-6: Viewing a local file in Chrome.
You aren’t actually viewing this file on the web just yet; you’re just viewing a copy of it saved on your local hard drive. So don’t give anyone the URL for this file — but do feel free to edit the HTML source file and view any changes you make.
An even faster way to view a web page locally in a browser is to drag and drop the HTML file into an open browser window. You can do this from File Explorer, Finder, or any program that gives you file-level access.
Editing an Existing Web Page
Chances are good that you’ll want to change one thing (at least) about your page after you view it in a web browser for the first time. After all, you can’t really see how the page looks when you’re creating the markup. You might decide that a first-level heading is too big or that you really want purple text on a green background (horrible idea, actually).
To make changes to the web page you’ve created in Aptana and are viewing in a browser, repeat these steps until you’re happy with the final appearance:
1. Leave the browser window with the HTML page display open and go back to Aptana.
2. If the HTML page isn’t open in Aptana, open it.
You should have the same file open in both the browser and the text editor, as shown in Figure 3-7.
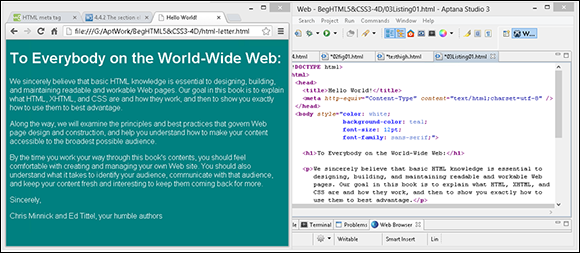
Figure 3-7: Viewing an HTML file in your editor and web browser at the same time.
3. Make your changes to the HTML and its content in the text editor.
4. Save those changes.
This is an important step. If you don’t save your changes, you won’t see them in the web browser.
5. Move back to the web browser and click the Refresh button.
If you keep an HTML file open in both an editor and a browser while you work, checking changes is a breeze. You can quickly save a change in the editor, flip to the browser and refresh, flip back to the editor to make more changes, save, then flip back to the browser and refresh again, and so on.
In our example letter, we decided — after our initial draft of the HTML page — that we should add a date to the letter. Figure 3-8 shows the change we made to the HTML to add the date, and the result appears in the browser.
 This approach to editing an HTML page applies only to pages saved on your local hard drive. If you want to edit a page that you’ve stored on a web server, you have to save a copy of the page to your hard drive, edit it, verify your changes, and then upload the file again to the server, as discussed in the following section.

Figure 3-8: A change in the HTML displays in a browser after a quick save and refresh.
Posting Your Page Online
When you’re happy with your web page, it’s time to put it online. Here’s a lightning-fast overview of that process:
1. Find a web hosting provider to proffer your web pages.
Your web host might be a company web server or a server that you pay an Internet service provider (ISP) to use. If you don’t have a host yet, double-check with your Internet ISP to find out whether you get web-server access along with your service package. Regardless of where you find space, get details from the provider on where to move your site’s files and what URL to use.
2. Use an FTP client or a web browser to make a connection to your web server.
Use the username and password, as specified in the information from your hosting provider, to transfer files to your web server.
3. Copy the HTML file from your hard drive to the web server.
4. Use your web browser to view the file via the Internet.
For example, to host our letter online at www.dummieshtml.com, we used the FileZilla FTP client to access the site and provided a login name and password, which we set up on our server. A collection of folders and files appeared.
We copied the file to the server with a simple drag-and-drop operation inside FileZilla.
The URL for this page is www.dummieshtml.com/html5cafe/ch03/html-letter.html, and that page is now served from the Internet instead of from a local file system, as shown in Figure 3-9.

Figure 3-9: A file on a web server is available to anyone with an Internet connection.