
C H A P T E R 3
![]()
JSP Application Architectures
In the first two chapters, you learned a large portion of JSP’s components through brief examples. In this chapter, I will tell you how everything fits together in complex applications.
The insertion of Java code into HTML modules opens up the possibility of building dynamic web pages, but to say that it is possible doesn’t mean you can do it efficiently and effectively. If you start developing complex applications exclusively by means of scripting elements, you’ll rapidly reach the point where the code will become difficult to maintain. The key problem with mixing Java and HTML, as in “Hello World!”, is that the application logic and the way the information is presented in the browser are mixed. Often, the business application designers and the web-page designers are different people with complementary and only partially overlapping skills. While application designers are experts in complex algorithms and databases, web designers focus on page composition and graphics. The architecture of your JSP based applications should reflect this distinction. The last thing you want to do is blur the roles within the development team and end up with everybody doing what somebody else is better qualified to do. And even if you develop everything yourself, by keeping presentation and application logic separate, you will build more stable and more maintainable applications.
The Model 1 Architecture
The simplest way to separate presentation and logic is to move the bulk of the application logic from JSP to Java classes (i.e., Java beans), which can then be used within JSP (see Figure 3-1). This is called the JSP Model 1 architecture.
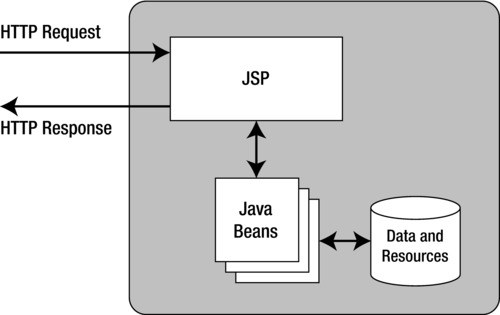
Figure 3-1. JSP Model 1 architecture
Although Model 1 is acceptable for applications containing up to a few thousand lines of code, the JSP pages still have to handle the HTTP requests, and this can cause headaches for the page designers.
The Model 2 Architecture
A better solution, more suitable for larger applications, is to split the functionality further and use JSP exclusively to format the HTML pages. This solution comes in the form of the JSP Model 2 architecture, also known as the model view controller (MVC) design pattern (see Figure 3-2).
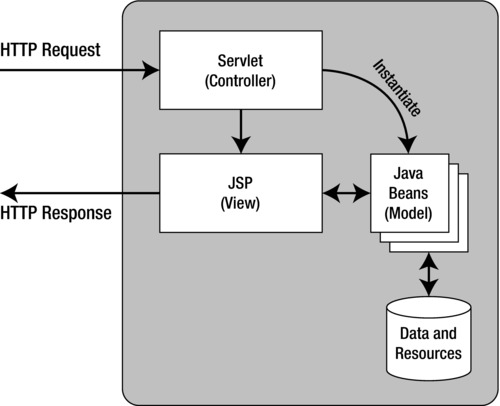
Figure 3-2. JSP Model 2 architecture
With this model, a servlet processes the request, handles the application logic, and instantiates Java beans. JSP obtains data from the beans and can format the response without having to know anything about what’s going on behind the scenes. To illustrate this model, I will describe a sample application called E-bookshop, a small application to sell books online. E-bookshop is not really functional, because the list of books is hard-coded in the application rather than stored in a database. Also, nothing happens once you confirm the order. However, this example serves the purpose of showing you how Model 2 lets you completely separate business logic and presentation. Later in this chapter, I will introduce a better version of an online bookshop application that will accompany us through the rest of the book.
Figure 3-3 shows the E-bookshop’s home page, which you see when you type http://localhost:8080/ebookshop in your browser’s address field.

Figure 3-3. The E-bookshop home page
You can select a book by clicking on the drop-down list, as shown in Figure 3-3, type in the number of copies you need, and then click the Add to Cart button. Every time you do so, the content of your shopping cart appears at the bottom of the window, as shown in Figure 3-4.
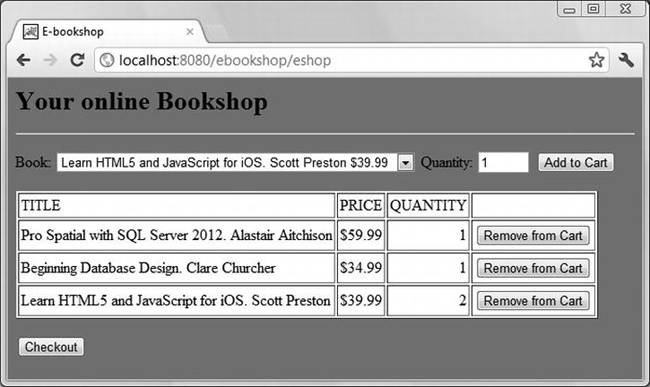
Figure 3-4. The E-bookshop home page displaying the shopping cart
You can remove an item from the shopping cart or go to the checkout. If you add additional copies of a book to the cart, the quantity in the cart increases accordingly.
If you click on the Checkout button, you’ll see the page shown in Figure 3-5.
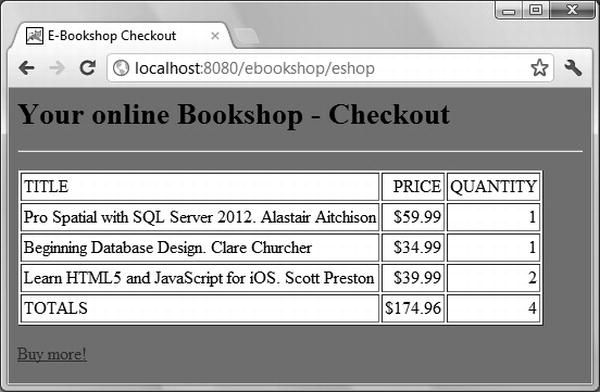
Figure 3-5. The E-bookshop checkout page
If you click on the Buy more! link, you’ll go back to the home page with an empty shopping cart, ready for more shopping.
The E-bookshop Home Page
Listing 3-1 shows the home page http://localhost:8080/ebookshop/index.jsp. For ease of reading, I’ve highlighted the JSP directives and scriptlets in bold.
Listing 3-1. The E-bookshop Home Page index.jsp
<%@page language="java" contentType="text/html"%>

<%@page trimDirectiveWhitespaces="true"%>

<%@page session="true" import="java.util.Vector, ebookshop.Book"%>

<html>

<head>

  <title>E-bookshop</title>

  <style type="text/css">

    body {background-color:gray; font-size=10pt;}

    H1 {font-size:20pt;}

    table {background-color:white;}

    </style>

  </head>

<body>

  <H1>Your online Bookshop</H1>

  <hr/><p/>

<%  // Scriptlet 1: check whether the booklist is ready

  Vector<ebookshop.Book> booklist =

      (Vector<ebookshop.Book>)session.getValue("ebookshop.list");

  if (booklist == null) {

    response.sendRedirect("/ebookshop/eshop");
    }

 else {

  %>

    <form name="addForm" action="eshop" method="POST">

      <input type="hidden" name="do_this" value="add">

      Book:

      <select name=book>

<%  // Scriptlet 2: copy the booklist to the selection control

        for (int i = 0; i < booklist.size(); i++) {

          out.println("<option>" + (String)booklist.elementAt(i) + "</option>");

          }

  %>

        </select>

      Quantity: <input type="text" name="qty" size="3" value="1">

      <input type="submit" value="Add to Cart">

      </form>

    <p/>

<%  // Scriptlet 3: check whether the shopping cart is empty

    Vector shoplist =

        (Vector<ebookshop.Book>)session.getAttribute("ebookshop.cart");

    if (shoplist != null  &&  shoplist.size() > 0) {

  %>

      <table border="1" cellpadding="2">

      <tr>

      <td>TITLE</td>

      <td>PRICE</td>

      <td>QUANTITY</td>

      <td></td>

      </tr>

<%  // Scriptlet 4: display the books in the shopping cart

      for (int i = 0; i < shoplist.size(); i++) {

        Book aBook = shoplist.elementAt(i);

  %>

        <tr>

          <form name="removeForm" action="eshop" method="POST">

            <input type="hidden" name="position" value="<%=i%>">

            <input type="hidden" name="do_this" value="remove">

            <td><%=aBook.getTitle()%></td>

            <td align="right">$<%=aBook.getPrice()%></td>

            <td align="right"><%=aBook.getQuantity()%></td>

            <td><input type="submit" value="Remove from Cart"></td>

            </form>

          </tr>

<%

        } // for (int i..

  %>

      </table>

      <p/>

      <form name="checkoutForm" action="eshop" method="POST">

        <input type="hidden" name="do_this" value="checkout">

        <input type="submit" value="Checkout">

        </form>
<%

      } // if (shoplist..

    } // if (booklist..else..

  %>

  </body>

</html>
First, index.jsp (as shown in Scriptlet 1) checks whether the list of books to be sold is available and, if it isn’t, it passes the control to the servlet, which then must initialize the book list. In a real online bookshop, the book list would be very long and kept in a database. Note that JSP doesn’t need to know where the list is kept. This is the first hint at the fact that application logic and presentation are separate. You’ll see later how the servlet fills in the book list and returns control to index.jsp. For now, let’s proceed with the analysis of the home page.
If Scriptlet 1 discovers that the book list exists, it copies it into the select control one by one (as shown in Scriptlet 2). Notice how JSP simply creates each option by writing to the out stream. When the buyer clicks on the Add to Cart button after selecting a title and possibly changing the number of copies, the home page posts a request to the eshop servlet with the hidden parameter do_this set to add. Once more, the servlet takes care of updating or creating the shopping cart by instantiating the class Book for each new book added to the cart. This is application logic, not presentation of information.
Scriptlet 3 checks whether a shopping cart exists. index.jsp, being completely data-driven, doesn’t remember what has happened before, so it runs every time from the beginning. Therefore, it checks for the presence of a shopping cart even when the buyer sees the book list for the very first time.
Scriptlet 4 displays the items in the shopping cart, each one with its own form. If the buyer decides to delete an entry, index.jsp sends a request to the servlet with the hidden parameter do_this set to remove.
The sole purpose of the last two scriptlets is to close the curly brackets of ifs and fors. However, notice that the form to ask the servlet to do the checkout is only displayed to the buyer when the shopping cart isn’t empty. This is possible because Tomcat, when converting a JSP page into a Java servlet, processes all scriptlets together, without expecting each one of them individually to contain a complete block of code. HTML elements can then be enclosed within a Java block statement spanning two scriptlets.
If the buyer clicks on the Checkout button, index.jsp will send a request to the servlet with the hidden parameter do_this set to checkout.
Finally, notice the use of the expression elements <%=i%>, <%=aBook.getTitle()%>, <%=aBook.getPrice()%>, and <%=aBook.getQuantity()%>.The first expression, <%=i%>, is the position of the book within the shopping cart. The other three are the execution of methods of an object of type Book, which the servlet instantiated for each new book added to the cart.
You’ve probably noticed that the address shown in the browser is http://localhost:8080/ebookshop/eshop. This is actually the address of the Java servlet that controls the application.
The E-bookshop Servlet
Listing 3-2 shows the source code of the servlet. Later in this chapter, you will find information on the folder structure you need and on how to compile the Java modules. In this section and in the following one, I will explain how the code works.
Listing 3-2. ShoppingServlet.java
package ebookshop;

import java.util.Vector;
import java.io.IOException;

import javax.servlet.ServletException;

import javax.servlet.ServletConfig;

import javax.servlet.ServletContext;

import javax.servlet.RequestDispatcher;

import javax.servlet.http.HttpServlet;

import javax.servlet.http.HttpServletRequest;

import javax.servlet.http.HttpSession;

import javax.servlet.http.HttpServletResponse;

import ebookshop.Book;


public class ShoppingServlet extends HttpServlet {


  public void init(ServletConfig conf) throws ServletException  {

    super.init(conf);

    }


  public void doGet (HttpServletRequest req, HttpServletResponse res)

      throws ServletException, IOException {

    doPost(req, res);

    }


  public void doPost (HttpServletRequest req, HttpServletResponse res)

      throws ServletException, IOException {

    HttpSession session = req.getSession(true);

    @SuppressWarnings("unchecked")

    Vector<Book> shoplist =

      (Vector<Book>)session.getAttribute("ebookshop.cart");

    String do_this = req.getParameter("do_this");


    // If it is the first time, initialize the list of books, which in

    // real life would be stored in a database on disk

    if (do_this == null) {

      Vector<String> blist = new Vector<String>();

      blist.addElement("Learn HTML5 and JavaScript for iOS. Scott Preston $39.99");

      blist.addElement("Java 7 for Absolute Beginners. Jay Bryant $39.99");

      blist.addElement("Beginning Android 4. Livingston $39.99");

      blist.addElement("Pro Spatial with SQL Server 2012. Alastair Aitchison $59.99");

      blist.addElement("Beginning Database Design. Clare Churcher $34.99");

      session.setAttribute("ebookshop.list", blist);

      ServletContext    sc = getServletContext();

      RequestDispatcher rd = sc.getRequestDispatcher("/");

      rd.forward(req, res);

      }

    else {


      // If it is not the first request, it can only be a checkout request

      // or a request to manipulate the list of books being ordered

      if (do_this.equals("checkout"))  {

        float dollars = 0;

        int   books = 0;

        for (Book aBook : shoplist) {
          float price = aBook.getPrice();

          int   qty = aBook.getQuantity();

          dollars += price * qty;

          books += qty;

          }

        req.setAttribute("dollars", new Float(dollars).toString());

        req.setAttribute("books", new Integer(books).toString());

        ServletContext    sc = getServletContext();

        RequestDispatcher rd = sc.getRequestDispatcher("/Checkout.jsp");

        rd.forward(req, res);

        } // if (..checkout..


      // Not a checkout request - Manipulate the list of books

      else {

        if (do_this.equals("remove")) {

          String pos = req.getParameter("position");

          shoplist.removeElementAt((new Integer(pos)).intValue());

          }

        else if (do_this.equals("add")) {

          boolean found = false;

          Book aBook = getBook(req);

          if (shoplist == null) {  // the shopping cart is empty

            shoplist = new Vector<Book>();

            shoplist.addElement(aBook);

            }

          else {  // update the #copies if the book is already there

            for (int i = 0; i < shoplist.size() && !found; i++) {

              Book b = (Book)shoplist.elementAt(i);

              if (b.getTitle().equals(aBook.getTitle())) {

                b.setQuantity(b.getQuantity() + aBook.getQuantity());

                shoplist.setElementAt(b, i);

                found = true;

                }

              } // for (i..

            if (!found) {  // if it is a new book => Add it to the shoplist

              shoplist.addElement(aBook);

              }

            } // if (shoplist == null) .. else ..

          } // if (..add..


        // Save the updated list of books and return to the home page

        session.setAttribute("ebookshop.cart", shoplist);

        ServletContext sc = getServletContext();

        RequestDispatcher rd = sc.getRequestDispatcher("/");

        rd.forward(req, res);

        } // if (..checkout..else

      } // if (do_this..

    } // doPost


  private Book getBook(HttpServletRequest req) {

    String myBook = req.getParameter("book");

    int    n = myBook.indexOf('$'),
    String title = myBook.substring(0, n);

    String price = myBook.substring(n+1);

    String qty = req.getParameter("qty");

    return new Book(title, Float.parseFloat(price), Integer.parseInt(qty));

    } // getBook

  }
As you can see, the init() method only executes the standard servlet initialization, and the doGet() method simply executes doPost(), where all the work is done. If you were to remove the doGet() method, you would effectively forbid the direct call of the servlet. That is, if you typed http://localhost:8080/ebookshop/eshop in your browser, you would receive an error message that says the requested resource isn’t available. As it is, you can type the URL with or without trailing eshop.
The highlighted line shows that I suppressed a warning. Normally, a warning tells you that something might be wrong. Therefore, it is not good to have spurious warnings, because they might distract you from noticing warnings you should fix. The use of @suppressWarnings is in general bad practice and encourages you to use a sloppy programming style. In this particular case, the compiler complained about the typecasting of a generic Object to a Vector, but I knew that the attribute ebookshop.cart was of type Vector<book>.
When you analyze index.jsp, you can see that it passes control to the servlet on four occasions, as listed here from the point of view of the servlet:
- If no book list exists: This happens at the beginning, when the buyer types
http://localhost:8080/ebookshop/. The servlet executes without any parameter, initializes the book list, and passes control straight back toindex.jsp.- When the buyer clicks on
Add to Cart: The servlet executes withdo_thisset toaddand a parameter containing the book description. Normally, this would be done more elegantly with a reference to the book rather than the whole description, but we want to keep things as simple as possible. The servlet creates a cart if necessary and adds to it a new object of typeBookor, if the same book is already in the cart, updates its quantity. After that, it passes the control back toindex.jsp.- When the buyer clicks on
Remove from Cart: The servlet executes withdo_thisset toremoveand a parameter containing the position of the book within the cart. The servlet removes the book in the given position by deleting the object of typeBookfrom the vector representing the cart. After that, it passes the control back toindex.jsp.- When the buyer clicks on
Checkout: The servlet executes withdo_thisset tocheckout. The servlet calculates the total amount of money and the number of books ordered, adds them as attributes to the HTTP request, and passes the control toCheckout.jsp, which has the task of displaying the bill.
More on E-bookshop
By now, it should be clear to you how the servlet is in control of the application and how JSP is only used to present the data. To see the full picture, you only need to see Book.java, the Java bean used to represent a book, and Checkout.jsp, which displays the bill. Listing 3-3 shows the code for Book.java.
package ebookshop;

public class Book {

  String title;

  float  price;

  int    quantity;

  public Book(String t, float p, int q) {

    title    = t;

    price    = p;

    quantity = q;

    }

  public String getTitle()         { return title; }

  public void   setTitle(String t) { title = t; }

  public float  getPrice()         { return price; }

  public void   setPrice(float p)  { price = p; }

  public int    getQuantity()      { return quantity; }

  public void   setQuantity(int q) { quantity = q; }

  }
In a more realistic case, the class Book would contain much more information, which the buyer could use to select the book. Also, the class attribute title is a misnomer, as it also includes the author names, but you get the idea. Listing 3-4 shows the code for Checkout.jsp.
Listing 3-4. Checkout.jsp
<%@page language="java" contentType="text/html"%>

<%@page session="true" import="java.util.Vector, ebookshop.Book" %>

<html>

<head>

  <title>E-Bookshop Checkout</title>

  <style type="text/css">

    body {background-color:gray; font-size=10pt;}

    H1 {font-size:20pt;}

    table {background-color:white;}

    </style>

  </head>

<body>

  <H1>Your online Bookshop - Checkout</H1>

  <hr/><p/>

  <table border="1" cellpadding="2">

    <tr>

      <td>TITLE</td>

      <td align="right">PRICE</td>

      <td align="right">QUANTITY</td>

      </tr>

<%

    Vector<Book> shoplist =

        (Vector<Book>)session.getAttribute("ebookshop.cart");

    for (Book anOrder : shoplist) {

%>
      <tr>

        <td><%=anOrder.getTitle()%></td>

        <td align="right">$<%=anOrder.getPrice()%></td>

        <td align="right"><%=anOrder.getQuantity()%></td>

        </tr>

<%

      }

    session.invalidate();

  %>

    <tr>

      <td>TOTALS</td>

      <td align="right">$<%=(String)request.getAttribute("dollars")%></td>

      <td align="right"><%=(String)request.getAttribute("books")%></td>

      </tr>

    </table>

  <p/>

  <a href="/ebookshop/eshop">Buy more!</a>

  </body>

</html>
Checkout.jsp displays the shopping cart and the totals precalculated by the servlet, and it invalidates the session so that a new empty shopping cart will be created if the application is restarted from the same browser window.
Note that you could have included the checkout logic in index.jsp and made its execution dependent on the presence of the two totals. However, I wanted to show you a more structured application. It’s also better design to keep different functions in different JSP modules. In fact, I could have also kept the shopping cart in a separate JSP file. In real life, I would have certainly done so. In addition, I would have saved the styles in a Cascading Style Sheets (CSS) file rather than repeating them in all JSP sources. Finally, there is close to no error checking and reporting. You could easily crash this application. In a real case, you would add an error page as explained in the previous chapter.
Before we move on, you’ll certainly find it interesting to see the dynamic HTML page that actually reaches the browser after adding one item to the shopping cart (see Listing 3-5).
Listing 3-5. HTML Generated by index.jsp
<html>

<head>

  <title>E-bookshop</title>

  <style type="text/css">

    body {background-color:gray; font-size=10pt;}

    H1 {font-size:20pt;}

    table {background-color:white;}

    </style>

  </head>

<body>

  <H1>Your online Bookshop</H1>

  <hr/><p/>

<form name="addForm" action="eshop" method="POST">

      <input type="hidden" name="do_this" value="add">

      Book:

      <select name=book>

<option>Learn HTML5 and JavaScript for iOS. Scott Preston $39.99</option>
<option>Java 7 for Absolute Beginners. Jay Bryant $39.99</option>

<option>Beginning Android 4. Livingston $39.99</option>

<option>Pro Spatial with SQL Server 2012. Alastair Aitchison $59.99</option>

<option>Beginning Database Design. Clare Churcher $34.99</option>

</select>

      Quantity: <input type="text" name="qty" size="3" value="1">

      <input type="submit" value="Add to Cart">

      </form>

    <p/>

<table border="1" cellpadding="2">

      <tr>

      <td>TITLE</td>

      <td>PRICE</td>

      <td>QUANTITY</td>

      <td></td>

      </tr>

<tr>

          <form name="removeForm" action="eshop" method="POST">

            <input type="hidden" name="position" value="0">

            <input type="hidden" name="do_this" value="remove">

            <td>Pro Spatial with SQL Server 2012. Alastair Aitchison </td>

            <td align="right">$59.99</td>

            <td align="right">1</td>

            <td><input type="submit" value="Remove from Cart"></td>

            </form>

          </tr>

</table>

      <p/>

      <form name="checkoutForm" action="eshop" method="POST">

        <input type="hidden" name="do_this" value="checkout">

        <input type="submit" value="Checkout">

        </form>

</body>

</html>
Neat, isn’t it?
You now have in your hands the full code of a nontrivial Java/JSP application, but you still need to know how to make these four modules work together.
E-bookshop’s Folder Structure
Figure 3-6 shows the structure of the E-bookshop application. First of all, create the root folder of the application, named ebookshop, inside %CATALINA_HOME%webapps. Then, create the folder hierarchy and place in it the four source files index.jsp, Checkout.jsp, ShoppingServlet.java, and Book.java as shown.
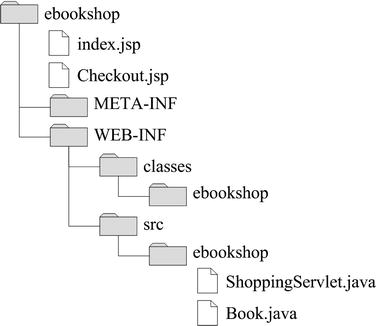
Figure 3-6. The E-bookshop folder structure
To get the application to work, you first need to compile the two Java modules from the command line with javac, as explained in the “Java Test” section of Chapter 1. Then copy the two .class files from WEB-INFsrcebookshop to WEB-INFclassesebookshop. Alternatively, if you feel lazy (!), you can copy to WEB-INF the little batch file shown in Listing 3-6 and double-click it. Note that if you want to launch it from the command line, you have first to attach to WEB-INF, otherwise it won’t find the src folder.
Listing 3-6. compile_it.bat
@echo off

set aname=ebookshop

set /P fname=Please enter the java file name without extension:

set fil=%aname%\%fname%

echo *** compile_it.bat: compile src\%fil%.java

javac -verbose -deprecation -Xlint:unchecked -classpath

  "C:Program FilesApache Software FoundationTomcatlibservlet-api.jar";classes

  src\%fil%.java

javac -verbose -deprecation -Xlint:unchecked -classpath classes src\%fil%.java

if %errorlevel% GTR 1 goto _PAUSE

echo *** compile_it.bat: move the class to the package directory

move /y src\%fil%.class classes\%fil%.class

:_PAUSE

pause
The batch file opens a command-line window automatically and asks you to type the name of a Java file (without the extension). It then compiles the file and moves the resulting class into the classesebookshop subfolder. The line with javac invokes the Java compiler with the switches that maximize both the checks the compiler does on your sources and the information you get.
Notice the classpath switch, which tells the compiler to look for classes in the local directory and in Tomcat’s lib folder in addition to the usual places where the Java libraries are kept. This is necessary because ShoppingServlet.java imports the javax.servlet package and the class Book and, without the classpath switch, the compiler wouldn’t know where to find them. This also means that you have to compile Book.java before ShoppingServlet.java.
When executing your application, Tomcat looks for classes in the WEB INFclasses folder immediately inside the root folder of your application (i.e., bookshop), which in turn is immediately inside webapps. The directory structure inside WEB INFclasses must reflect what you write in the package statement at the beginning of the Java sources, which is:
package ebookshop;
If you had written this instead:
package myLibs.ebookshop;
you would have had to insert a myLibs folder below classes and above ebookshop. To avoid confusion, note that the package name has nothing to do with the name of the application. That is, you could have named the package (and, therefore, the folder below classes) qwertyuiop instead of ebookshop. In fact, you could have dispensed with the package statement altogether and placed your classes directly inside the classes folder. Finally, you could have also created a JAR file (i.e., a Java ARchive), but we’ll talk about that later.
Before you’re ready to go, you still need to write an additional file where you describe the structure of your application to Tomcat. This web deployment descriptor, shown in Listing 3-7, must be named web.xml and placed in WEB INF.
Listing 3-7. web.xml
<?xml version="1.0" encoding="ISO-8859-1"?>

<web-app xmlns="http://java.sun.com/xml/ns/j2ee"

    xmlns:xsi="http://www.w3.org/2001/XMLSchema-instance"

    xsi:schemaLocation=~CCC

"http://java.sun.com/xml/ns/j2ee http://java.sun.com/xml/ns/j2ee/web-app_2_4.xsd"

    version="2.4">

  <display-name>Electronic Bookshop</display-name>

  <description>

    E-bookshop example for

    Beginning JSP, JSF and Tomcat: from Novice to Professional

    </description>

  <servlet>

    <servlet-name>EBookshopServlet</servlet-name>

    <servlet-class>ebookshop.ShoppingServlet</servlet-class>

    </servlet>

  <servlet-mapping>

    <servlet-name>EBookshopServlet</servlet-name>

    <url-pattern>/eshop</url-pattern>

    </servlet-mapping>

</web-app>
The two crucial lines are those highlighted in bold. The first one tells Tomcat that the servlet is in classesebookshopShoppingServlet.class. The second one tells Tomcat that the requests will refer to the servlet as /eshop. As the root folder of this application (i.e., the folder immediately inside webapps) is ebookshop, Tomcat will then route to this servlet all the requests it will receive for the URL http://servername:8080/ebookshop/eshop.
The element <servlet name> in both <servlet> and <servlet mapping> is only needed to make the connection between the two. An alternative to declaring the servlet in web.xml is to use an annotation in ShoppingServlet.java. To test it out, remove from web.xml both the servlet and the servlet-mapping elements. Then, insert into ShoppingServlet.java two lines as shown in the following code fragment:
import ebookshop.Book;

import javax.servlet.annotation.WebServlet;

@WebServlet(value="/eshop")

public class ShoppingServlet extends HttpServlet {
Regardless of how you declare the servlet, if you now open a browser and type http://localhost:8080/ebookshop/, you should see the application’s home page.
You might be wondering about the purpose of the META INF folder. Place inside that folder a file named MANIFEST.MF and containing the following single line:
Manifest-Version: 1.0
Move the webappsebookshop folder to the Desktop, open it and select all four items in it. Then, right-click on them and select “Send To ”. When asked to provide a file name, type ![]() Compressed (Zipped) Folder
Compressed (Zipped) Folderebookshop. Windows will create a file named ebookshop.zip. Change its extension to war (which stands for Web ARchive) and move it to Tomcat’s webapps folder. After a short while, Tomcat will automatically unpack the WAR file into a folder named ebookshop identical to the one you started with.
The manifest file contains information about the files packaged in a JAR file, and A WAR file is just a JAR with a particular function. You can find a specification for the manifest file at http://docs.oracle.com/javase/7/docs/technotes/guides/jar/jar.html#JAR%20Manifest.
WAR files are the best way to deploy your applications to more than one server: copy them into webapps, and Tomcat will do the rest for you. What could be easier than that?
Eclipse
Although it’s possible to build web applications by compiling Java modules from the command line, it’s more efficient to use an Integrated Development Environment (IDE). This way, you can concentrate on the more creative part of developing software, rather than fix inconsistency and fiddle with folder hierarchies.
An IDE integrates all the applications that you need to develop software—from a source editor and a compiler, to tools to automate the application building process and a debugger—into a single application. When developing in Java or in another OO language, an IDE also includes tools to visualize class and object structure as well as inheritance and containment. Another advantage of using an IDE is that it propagates changes you make to individual modules. For example, if you rename a class, the IDE can automatically update its occurrences throughout your project files.
As the applications you develop become more complex, it makes more and more sense to use an IDE. That’s why, before continuing to our next project, I will tell you how to install and configure Eclipse.
Eclipse is an extremely powerful and extensible IDE, well suited for web application development. The Eclipse Foundation makes a new release of the Eclipse IDE once a year. Each yearly release has a different name. To develop the examples contained in this book, I used Indigo 3.7.2 of February 16, 2012.
Once you’ve installed Eclipse to develop web applications, you can use it for any other software development task, including, for example, developing and debugging applications written in Java, C++, and even Fortran, which is still widely used in the scientific community.
Furthermore, whatever task related to software development you need to perform, it’s likely that somebody has already developed an Eclipse plug-in for it. The web site http://marketplace.eclipse.org/ lists more than 1,300 plug-ins organized in dozens of categories. In fact, Eclipse itself consists of a core platform that executes plug-ins, plus a series of plug-ins that implement most of its functionality. Therefore, the standard packages available for download from the Eclipse web site already include dozens of plug-ins.
In this section, I'll only explain how to install the standard Eclipse configuration for Java EE development, which is what you need as you go through the rest of this book.
First of all, you need to download the package. To do so, go to http://www.eclipse.org/downloads/ and click on the Windows 32 bit link of Eclipse IDE for Java EE Developers, as shown in Figure 3-7.
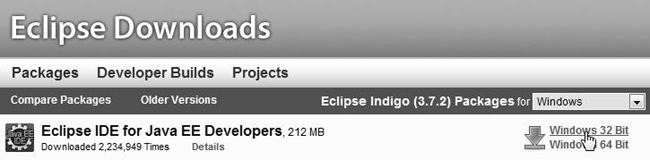
Figure 3-7. Downloading Eclipse
The web site will suggest a mirror site for the download and provide the MD5 checksum. The installation of Eclipse is very easy: expand the downloaded eclipse-jee-indigo-SR2-win32.zip file and move the eclipse folder to a convenient place. For no particular reason, I chose to move it to C:. Old habits are difficult to change. You might like to move the Eclipse folder to C:Program Files.
To execute Eclipse, double-click eclipse.exe, which you find immediately inside the eclipse folder.
When it starts, Eclipse asks you to select a workspace. The workspace is the folder where Eclipse stores your development projects. Therefore, it makes sense to place it on a drive or in a directory that you back up regularly. Before clicking on the OK button, check the box marked "Use this as the default and do not ask again". It will make your life easier. I chose C:UsersGiulio, which is my user's home directory.
The first time it executes, Eclipse displays a Welcome screen. To enter the screen where you do development, click on the Workbench icon, as shown in Figure 3-8.
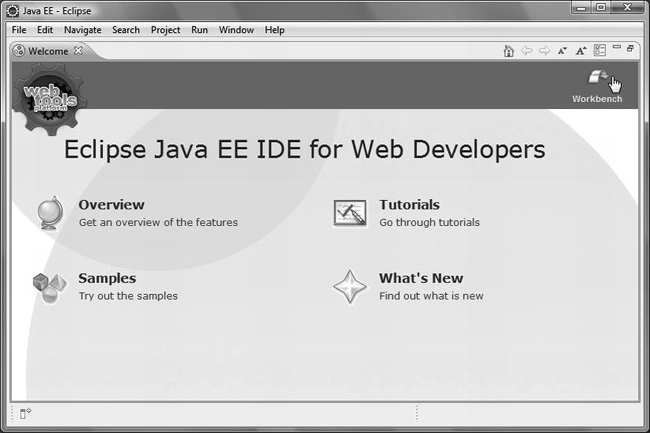
Figure 3-8. Eclipse–the Welcome screen
Once you see the Workbench screen, select the Servers tab and click on the new server wizard link, as shown in Figure 3-9.
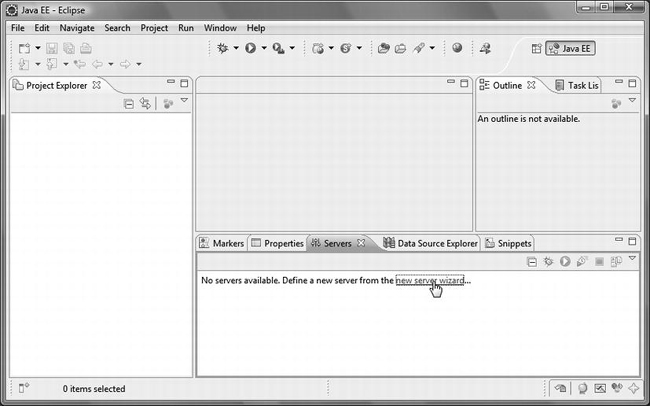
Figure 3-9. Eclipse–the Workbench screen
The screen that comes up is where you tell Eclipse to use Tomcat 7, as shown in Figure 3-10.
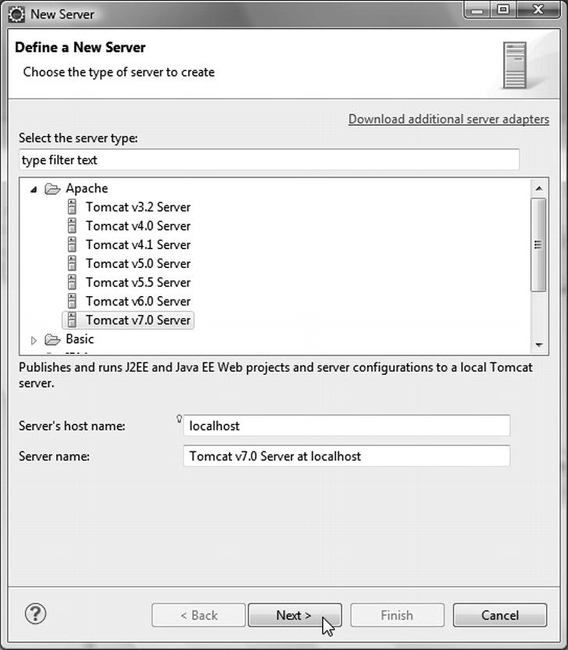
Figure 3-10. Eclipse–choosing Tomcat 7 as localhost
Next (and last), you need to tell Eclipse where to find Tomcat 7 and what version of JDK to use, as shown in Figure 3-11.
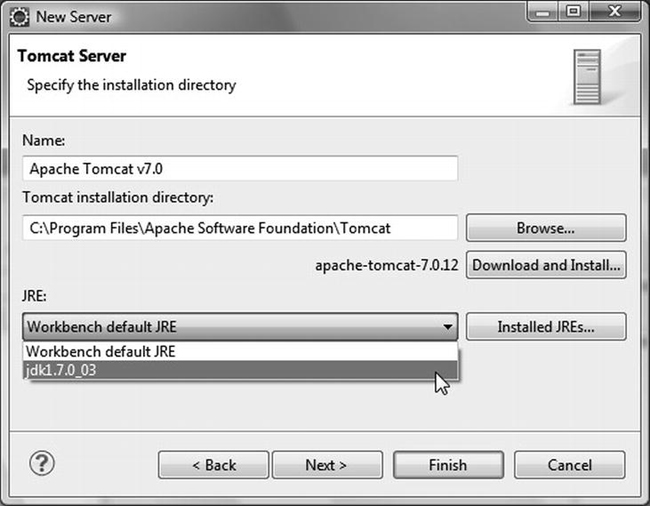
Figure 3-11. Eclipse–completing the Tomcat configuration
Now, if you have done everything correctly, Tomcat 7 should appear under the Servers tab of the Workbench. I have explained this configuration procedure because Eclipse is a very complex application, and it is easy to get lost among the many options.
For the same reason, to be on the safe side, I will also explain how to create a new web project. Later, you will learn how to import into Eclipse the example projects included in the software package of this book.
Creating a New Web Project
In the menu bar of the Workbench, select File ![]()
New ![]()
Dynamic Web Project, type a project name (e.g., test), and click on the Next button. In the new screen, named Java, click again on the Next button. In the new screen, named Web Module, tick the box Generate web.xml deployment descriptor (i.e., the web.xml file) before clicking on the Finish button.
The new project will appear in the Project Explorer pane (i.e., on the left hand side) of the Workbench. Expand it as shown in Figure 3-12, right-click on the Web Content folder and select "New ![]()
JSP File".
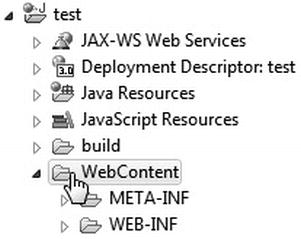
Figure 3-12. Eclipse–the test project
In the new JSP screen that appears, replace the default name NewFile.jsp with index.jsp and click on the Finish button.
Eclipse shows the newly created file in the Project Explorer pane and opens it in the central pane of the Workbench for you to edit. Listing 3-8 shows its content. For me, the newly created file is located in C:UsersGiulioworkspace estWebContent. If, for any reason, you edit the file with some other editor, to see the latest version within Eclipse, you need to right-click it in Eclipse’s Project Explorer and select Refresh. But I suggest that you stick to Eclipse with all editing, because it is very easy to make a mistake otherwise.
Listing 3-8. index.jsp of the Test Project
<%@ page language="java" contentType="text/html; charset=ISO-8859-1"

    pageEncoding="ISO-8859-1"%>

<!DOCTYPE html PUBLIC "-//W3C//DTD HTML 4.01 Transitional//EN"

"http://www.w3.org/TR/html4/loose.dtd">

<html>

<head>

<meta http-equiv="Content-Type" content="text/html; charset=ISO-8859-1">

<title>Insert title here</title>

</head>

<body>


</body>

</html>
Replace "Insert title here" with "My first project" (or whatever you like, of course), and write "Hello from Eclipse!" between <body> and </body>. Then save the file.
![]() Caution You must stop the Tomcat service in Windows before using Tomcat from within Eclipse, and vice-versa.
Caution You must stop the Tomcat service in Windows before using Tomcat from within Eclipse, and vice-versa.
Position the cursor on the test project folder shown in the Project Explorer, right-click, and select Run As ![]()
Run on Server. When a screen comes up, click on Finish. You will be rewarded with what is shown in Figure 3-13.
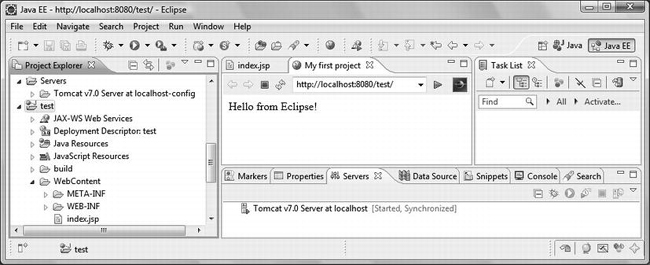
Figure 3-13. Eclipse–the output of the first project
It might seem very convenient that Eclipse can launch Tomcat and show the output within the Workbench. In practice though, it has a couple of drawbacks. First of all, because of the side and bottom panes, the space available in the central pane is limited. As a result, most web pages are “too squeezed” to display correctly.
You can maximize the web pane by double-clicking on the title bar, but there is also a more important reason: Eclipse doesn't always display everything. It should copy all files from the project folder to a Tomcat work directory, but it doesn't! It tends to “lose” CSS files and images. This means that, except for a quick check of simple features, you might do what I do and use Tomcat externally.
To see the output of the test project outside Eclipse, first of all, stop the “internal” Tomcat by right-clicking it under the Servers tab of the Workbench and selecting Stop. Then, start the Tomcat service in Windows.
Right-click the test-project folder as you did to launch it within Eclipse, but this time select Export ![]()
WAR File.
When the WAR Export screen appears, the only thing you have to do is browse to select the destination, which should be %CATALINA_HOME%webapps est.war, and click Finish.
In a browser, type http://localhost:8080/test to see the output of the project. This works because, as I showed to you at the end of the previous section, Tomcat automatically expands all WAR files it discovers in its webapps folder, without any need to restart it. And because by default Tomcat looks for index.html, index.htm, and index.jsp. If you want, you can change the default by adding the following element to the body of the web-app element of web.xml:
<welcome-file-list>

    <welcome-file>whatever.jsp</welcome-file>

</welcome-file-list>
Importing a WAR file
In the next section, I will introduce you to the eshop application. You will find the web archive for the application in the software for this chapter, and the easiest way to work on the application is to import it into Eclipse.
The first step is to select the menu item Import... in the File menu. When the Select dialog opens, scroll down to the folder named Web, open it, select WAR file, and click Next >, as shown in Figure 3-14.
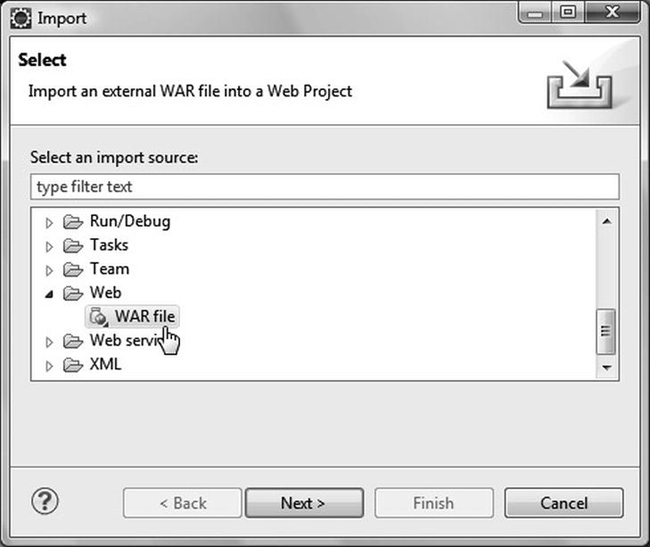
Figure 3-14. Eclipse–selecting to import a WAR file
When the next dialog comes up, browse to select eshop.war and click on Finish. Eclipse will create the eshop project for you.
Eclipse Occasional Bugs
Eclipse is a very complex package developed by several people in parallel. As a result, bugs occasionally creep in.
While developing the applications for this book, one such bug suddenly appeared: Eclipse reported that a function of a JSP Standard Tag Library didn’t exist.
Eclipse validates JSP files but doesn’t do anything with them. Therefore, I ignored the reported error and deployed the application to Tomcat, which executed it without any problem.
I don’t know why Eclipse started reporting that nonexistent error. If you search the Internet, you will find that several people have had some problems with Eclipse’s validation of JSPs.
When problems like that occur, as long as they don’t affect your application, you don’t really need to do anything. You could reinstall Eclipse, but that might not cure them, or they might reappear later.
A Better Online Bookshop
The online bookshop you saw at the beginning of this chapter was a good introduction to the MVC architecture, but in order to explore the use of databases, other JSP features, and JSF, we need an example with more substance. In this section, I will introduce the eshop application, which will remain with us through the rest of the book. Taking an object-oriented approach, I’ll begin by specifying the objects that the application needs to handle, the operations which those objects support, and the roles of the people who perform those operations.
Each role corresponds to a separate user interface, and the two main roles are the administrator and the customer. The administrators manage products, orders, and customer records, but for our purposes, it is sufficient to implement the public interface of a customer buying from a catalog.
Objects and Operations
In eshop we won’t keep track of orders and customers. Once the customer goes to the checkout, enters credit-card information, and checks out, we’ll save the order, but we won’t do anything with it. In the real world, we’d have to process the purchase by charging the credit card account and dispatching the order.
In fact, if you decided to deploy this application “out there” to sell books or other items, you would be better off interfacing with PayPal or another online payment service, rather than accepting credit cards. But the purpose of this example is to help you learn JSP and JSF without getting bogged down in details of other services. For that, the credit-card option is fine. Obviously, in the real world, you would have to consider using secure communication and encrypted data, but that would go beyond the scope of this example.
Product Categories
It makes sense to group the products into categories, especially if the catalog is diversified and substantial. As eshop only sells books, its categories refer to broad book subjects, such as action novels, science fiction, and web development.
Each category has a name and an identifier. The identifier is guaranteed to be unique, thereby allowing us to refer to each category without ambiguity. Normally, a category would have additional attributes, like description, status, date of creation, etc. To implement the customer interface, the only operation you need with such a bare-bones category definition is obtaining a category name given its ID.
Books
Each book has a title, an author, a price, a unique identifier, a category ID, and an image of the front cover. Customers must be able to select books from a category, search for books, display the book details, and put books into a shopping cart.
Shopping Cart
The minimum amount of information stored in a shopping cart is a list of items, each consisting of a book identifier and the number of ordered copies. I decided to duplicate in the shopping cart title, description, and price of the books instead of using their book IDs. Besides simplifying the application, this also protects the customer from book updates that might occur while he or she is still shopping. In a more sophisticated application, when some book attributes change, you might want to inform the customers who’ve placed the book in their cart but haven’t yet completed the checkout. You wouldn’t be able to do so without saving the original information. Obviously, this only avoids a problem due to concurrent access of data (more about that in Chapter 6). To protect the information from more serious occurrences like server failures, you would have to implement more general solutions, like saving session data on non-volatile storage and server clustering,
Customers must be able to change the number of copies of each book in the cart, remove a book altogether, and go to the checkout. They should also be able to display the shopping cart at any time.
Order
Although this sample application doesn’t cover orders, it’s useful to specify the structure of an order. You need two separate classes: one to represent the ordered items, and one with the customer’s data.
For each ordered item, you need to save the book data obtained from the shopping cart. Additionally, for each order, you need to save the customer data and a unique order number.
The Customer Interface
Figure 3-15 shows eshop’s home page. The top section includes a link to the shopping cart, while the sidebar on the left features a search box and a list of categories. The other pages only differ in the central panel, which in the home page contains a welcoming message.
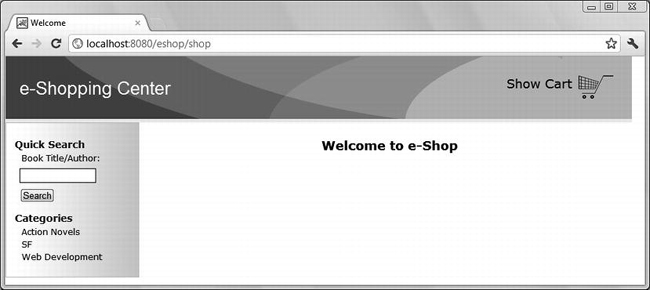
Figure 3-15. E-shop’s home page
Figure 3-16 shows the panel containing the list of books in a category.
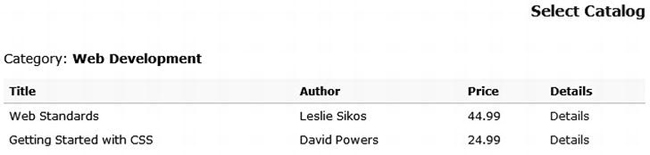
Figure 3-16. A book category on E-shop
Figure 3-17 shows the details of a book.
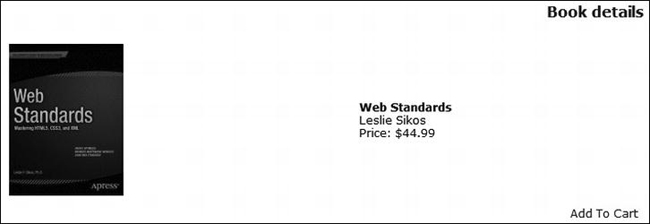
Figure 3-17. A book’s details on E-shop
Figure 3-18 shows the shopping cart with a couple of items.
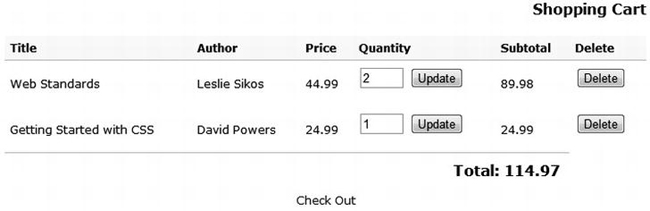
Figure 3-18. E-shop’s shopping cart
Pretty straightforward, isn’t it?
The E-shop Architecture
E-shop is an MVC application. The data and the business logic (the model) reside in a database and Java classes; the user interface (the view) is implemented in JSP; and the handler of client requests (the controller) is an HTTP Java servlet.
When the servlet receives a client HTTP request, it instantiates the model’s central class and forwards the request to the appropriate JSP page. The JSP page obtains data from the model and generates the HTML response. The model isn’t aware of what the JSP pages do with the data it provides, and the JSP pages aren’t aware of where and how the model keeps the data.
The Model
The central model class is called DataManager. Its purpose is to hide all database operations from the JSP pages. DataManager supports some methods that have to do with initialization and connecting to the database, which we’ll look at in later chapters. For the time being, we’re more interested in the methods that implement the business logic of the application. Table 3-1 lists these methods.
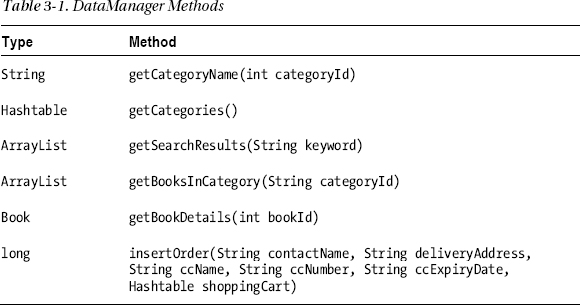
Their purpose should be pretty clear. I would just like to make a couple of points concerning insertOrder. First, the value it returns is the order ID to be given back to the client. Second, in a more realistic case, all parameters, with the exception of the shopping cart, would be replaced by a customer ID, typically the customer’s e-mail address. In this simple application, however, as it doesn’t keep track of the customers, there are no permanent customer records and customer IDs.
The Controller
The controller servlet extends javax.servlet.http.HttpServlet and is named ShopServlet.
Servlet Initialization
Tomcat executes the servlet method init immediately after instantiating the servlet (see Listing 3-9). You will find the code of the whole project in the software package for this chapter. To install it, open the folder named eshop project and copy either the folder eshop or the file eshop.war to Tomcat’s webapps folder. To launch the application, view the URL http://localhost:8080/eshop/shop.
Listing 3-9. ShopServlet.java - init Method
public void init(ServletConfig config) throws ServletException {

  System.out.println("*** initializing controller servlet.");

  super.init(config);


  DataManager dataManager = new DataManager();

  dataManager.setDbUrl(config.getInitParameter("dbUrl"));

  dataManager.setDbUserName(config.getInitParameter("dbUserName"));

  dataManager.setDbPassword(config.getInitParameter("dbPassword"));
  ServletContext context = config.getServletContext();

  context.setAttribute("base", config.getInitParameter("base"));

  context.setAttribute("imageUrl", config.getInitParameter("imageUrl"));

  context.setAttribute("dataManager", dataManager);


  try {  // load the database JDBC driver

    Class.forName(config.getInitParameter("jdbcDriver"));

    }

  catch (ClassNotFoundException e) {

    System.out.println(e.toString());

    }

  }
As you can see, the initialization consists of three main activities: instantiating and configuring the data manager, saving some parameters for later use by the JSP pages (remember that JSP can access the servlet context via the implicit variable application), and loading the driver necessary to access the database—JDBC stands for Java DataBase Connector.
Notice that all these activities are done by setting servlet context attributes to values obtained through this method:
config.getInitParameter("init-parameter-name")
These values are stored in the WEB-INFweb.xml file, as shown in Listing 3-10.
Listing 3-10. Partial web.xml
<web-app ...>

  ...

  <servlet>

    ...

    <init-param>

      <param-name>dbUrl</param-name>

      <param-value>jdbc:mysql://localhost:3306/shop</param-value>

      </init-param>

    ...

    </servlet>

  ...

  <web-app ...>
By defining the critical initialization parameters in web.xml, you can change the parameters without having to modify the application code. Table 3-2 shows the initialization parameters defined for this application.

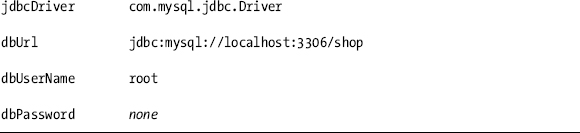
For ease of use, I didn’t make the database password-protected, but this is obviously something you’d want to do in real life. I will explain how to install and use MySQL in Chapter 5. Then, the initialization parameters associated with the database will make complete sense. For the time being, the essential thing to keep in mind is how to define the initialization parameters.
From Chapter 2, you know that Tomcat makes available to JSP the servlet context by defining the implicit object application. Therefore, for example, the value set in ShopServlet.init() with context.setAttribute("imageUrl", ...) is available to JSP as the value returned by application.getAttribute("imageUrl").
Request Handling
Depending on what the user does, the page currently being displayed in the browser sends to the servlet a request with a specific value of the action parameter. The servlet then forwards each request to a JSP page determined by that value. For example, the page that shows the shopping cart also includes a button to check out. If the user clicks on it, the page will send to the servlet a request with the action parameter set to "checkOut".
The View
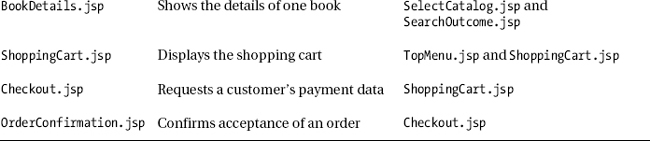
Table 3-3 shows the list of all JSP pages in the application. I will explain them in the next chapters, as we look at the different aspects of the application.
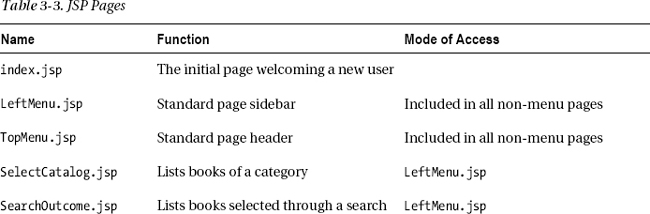
Additionally, you have a style-sheet file named eshop.css.
A typical user session proceeds as follows:
- The user starts by accessing
http://your-web-site/eshop/shopand sees the welcome page with a left-side menu containing a search box and a list of book categories. The user then can:
- Type a word in the search box and hit the
Searchbutton, or select a book category.- Select one of the books by clicking on the corresponding
Detailslink. The application then replaces the list of books with an image of the front cover of the book and all the information available in the database about that book.- Add the book to the shopping cart. The application then automatically takes the user to the shopping cart, where it is possible to update the number of copies or delete the book entry.
- Repeat the previous steps until the user is ready to submit the order. From the shopping cart page, the user can then click on the
Check Outlink.- The check-out page asks the user to provide his or her personal and financial data. When the user clicks on the
Confirm Orderbutton, the page tells the application to memorize the order.
At any time, the user can add books through the left-side menu or go to the shopping cart through the top-side menu to modify the order.
Summary
In this chapter, I described the application architectures suitable for web applications and provided the example E-bookshop to explain how the Model-View-Controller architecture works.
You then learned how to install the Eclipse IDE, how to configure it to use the latest versions of Java and Tomcat, and how to create JSP applications from scratch. It was necessary at this point because, with E-bookshop, we had reached the limit of what was reasonable to do without an IDE.
Finally, I introduced the E-shop project, which, in different versions, I will use to complete the description of JSP and to explain JSF.
In the next three chapters, I’ll take you through the remaining functionality of JSP. In particular, the next chapter will be dedicated to the action elements. To do that, I will use simple dedicated examples and the relevant aspects of the eshop application.