
C H A P T E R 5
![]()
XML and JSP
HTML is probably the first markup language most of us came into contact with. It’s a great language, but it’s not without its problems.
For example, HTML mixes content data with the way the information is presented, thereby making it difficult to present the same data in different ways and to standardize presentations across multiple sets of data. Cascading Style Sheets (CSS) significantly reduces this problem but doesn’t completely eliminate it, and it also forces you to learn yet another language.
Another problem, partly due to the way in which HTML is defined, is that the browsers are very forgiving about inconsistently written pages. In many cases, they’re able to render pages with unquoted attribute values and tags that aren’t closed properly. This encourages sloppiness in coding and wastes computer resources.
XML (whose standard is available at http://www.w3.org/TR/xml) lets you organize information into a treelike structure in which each item of information represents a leaf. Its power and flexibility lies in the idea of defining its syntax and a mechanism for defining tags. This makes it possible for you to define your own markup language tailored for the type of information you’re dealing with. This also lets you define XHTML, a version of HTML clean of inconsistencies, as a well-formatted XML file.
Also, XML is the perfect vehicle for exchanging structured information. In fact, XML’s purpose is precisely to describe information.
I have introduced XML starting from HTML, because you’re familiar with HTML and they’re both markup languages. However, the usefulness of XML goes well beyond providing a better syntax for HTML. The great advantage of using XML in preference to proprietary formats whenever information needs to be structured is that standardized parsers make the manipulation of XML documents easy. In this chapter, you will also learn how to parse an XML document in JSP with XML custom tags and XPath.
Many organizations, both private and public, have turned to XML to standardize the representation of information in their respective areas.
Some initiatives are very ambitious, like for example the development of a Universal Business Language (UBL) to generate XML-based standards of business documents like purchase orders and invoices (see http://ubl.xml.org).
Other initiatives, like the Real Estate Transaction Markup Language (RETML) to standardize the encoding of real estate transactions, have already gone through years of refinements and associated tool development and are being adopted.
Still other initiatives, like the Mind Reading Markup Language (MRML) might just serve the purpose of having fun (see http://ifaq.wap.org/computers/mrml.html).
OASIS, a not-for-profit consortium that promotes the establishment of open standards for the exchange of information, lists in http://xml.coverpages.org/xmlApplications.html almost 600 XML applications and initiatives.
The XML Document
To explain XML, I’ll start by giving you a simple example that will accompany us throughout this chapter. For this purpose, I’ll use the file shown in Listing 5-1. We will go back to the eshop example in the next chapter. But, to explain XML, it is better to look at a simple example without being distracted by the complexity of the application that has nothing to do with the task at hand.
Listing 5-1. enterprises.xml
<?xml version="1.0" encoding="UTF-8"?>

<starfleet>

  <title>The two most famous starships in the fleet</title>

  <starship name="USS Enterprise" sn="NCC-1701">

    <class name="Constitution"/>

    <captain>James Tiberius Kirk</captain>
    </starship>

  <starship name="USS Enterprise" sn="NCC-1701-D">

    <class name="Galaxy"/>

    <captain>Jean-Luc Picard</captain>

    </starship>

  </starfleet>
The first line defines the standard and the character set used in the document. The tags are always closed, either with an end tag when they have a body (e.g., <title>...</title>) or with a slash if they’re empty (e.g., <class .../>). There can be repeated tags (e.g., starship), and the attribute names are not unique (e.g., name).
As you can see, the tags reflect the logical structure of the data, although there are certainly many ways of structuring the same information. Each tag identifies an element node labeled with a name (e.g., starfleet, title, and class, also called an element type), often characterized by attributes that consist of a name and a value (e.g., sn="NCC-1701"), and possibly containing child nodes (e.g., captain inside starship), also called sub-elements.
XML documents can also contain processing instructions for the applications that handle them (enclosed between <? and ?>), comments (enclosed between <!-- and -->), and document-type declarations (more about that later). Notice that enterprises.xml doesn’t provide any information concerning how the data it contains might be presented.
XML relies on the less-than sign to identify the tags. Therefore, if you want to use it for other purposes, you have to escape it by writing the four characters < instead. To escape larger blocks of text, you can use the CDATA section, as in the following example:
<![CDATA[<aTag>The tag's body</aTag>]]>
Looking at enterprises.xml, you might ask yourself why sn is an attribute of starship, while captain is a child element. Couldn’t you make captain an attribute, as in the following example?
<starship name="USS Enterprise" sn="NCC-1701" captain="Jean-Luc Picard">
Yes, you could. It all depends on what you think you might like to do with the element in the future. With captain defined as an element, you can define attributes for it, such as its birth date. This wouldn’t be possible if you had defined captain as an attribute. And the same applies to the class element. You could also replace the starship attributes name and sn with two children elements, but how much sense would it make?
We have to make one last consideration about empty vs. bodied elements. By defining the captain’s name as the body of the element, as in:
<captain>Jean-Luc Picard</captain>
you make it impossible for it to have children elements. Alternatively, you could have defined this:
<captain name="Jean-Luc Picard"></captain>
perhaps shortened, as in:
<captain name="Jean-Luc Picard"/>
Defining Your Own XML Documents
The usefulness of being able to use XML tags tailored to your needs is greatly expanded by the possibility of formally specifying them in a separate document. This enables you to verify the validity of the XML documents and also to communicate their structure to others. Without a specification in a standardized format, you would have to describe your document structure in plain language or via examples. It wouldn’t be the most efficient way, and it certainly wouldn’t be good enough for automatic validation. The two most widely used methods to specify document structures are XML DTDs and XML schemas. You will see later on in this chapter that you can select which method your XML document uses for validation by adding an appropriate element to it.
XML DTDs
DTDs are better known than XML schemas, which have been developed more recently. They are also easier to understand. DTDs were originally developed for the XML predecessor, Standard Generalized Markup Language (SGML), and they have a very compact syntax. Listing 5-2 shows how a DTD for enterprises.xml would look.
Listing 5-2. starfleet.dtd
01: <!ELEMENT starfleet (title,starship*)>

02: <!ELEMENT title (#PCDATA)>

03: <!ELEMENT starship (class,captain)>

04: <!ATTLIST

05:     starship name CDATA #REQUIRED

06:     sn CDATA #REQUIRED>

07: <!ELEMENT class EMPTY>

08: <!ATTLIST class name CDATA #REQUIRED>

09: <!ELEMENT captain (#PCDATA)>
Line 1 defines the starfleet element as consisting of one title element and an undefined number of starship elements. Replacing the asterisk with a plus sign would require starship to occur at least once, and a question mark would mean zero or one starships. If you replaced starship with (starship|shuttle), it would mean that you could have a mix of starship and shuttle elements following the title (just as an example, because you haven’t defined shuttle).
Line 2 specifies title to be a string of characters (the PC of PCDATA stands for parsed character). Line 7 shows how to specify that an element not be allowed to have a body. To complete the description of how to define elements, I only need to add that if you replaced EMPTY with ANY, it would mean that the element could contain any type of data.
Lines 4–6 specify the attributes for starship. The general format of an attribute list declaration is as follows:
<!ATTLIST elementName attributeName attributeType defaultValue>
where attributeType can have a dozen of possible values, including CDATA (to indicate character data), an enumeration of all strings allowed (enclosed in parentheses and with bars as separators, as in (left|right|center)), ID (to indicate a unique identifier), and IDREF (the ID of another element). The defaultValue can be a quoted value (e.g., "0" or "a string"), the keyword #REQUIRED (to indicate that it’s mandatory), the keyword #IMPLIED (to indicate that it can be omitted), or the keyword #FIXED followed by a value (to force the attribute to have that value).
XML Schemas
The most significant difference from DTDs is that the schemas are in XML syntax themselves. This makes the schemas more extensible and flexible than DTDs. Furthermore, schemas can perform a more sophisticated validation thanks to their support data types. As the schemas are in XML format, you can store, handle, and style schemas like any other XML document. W3C describes standardized XML schemas in three documents: http://www.w3.org/TR/xmlschema-0/ (a primer to get you started), http://www.w3.org/TR/xmlschema-1/ (about structures), and http://www.w3.org/TR/xmlschema-2/ (about data types). Unfortunately, schemas are complicated, and the standards aren’t exactly easy to read and understand. In this section, I am only going to describe a sub-set of schemas that will get you by in most situations.
Let’s see the XML schema for enterprises.xml (see Listing 5-3).
Listing 5-3. starfleet.xsd
01: <?xml version="1.0" encoding="UTF-8"?>

02: <xsd:schema xmlns:xsd="http://www.w3.org/2001/XMLSchema"

03:     xmlns="http://localhost:8080/xml-validate/xsd"

04:     targetNamespace="http://localhost:8080/xml-validate/xsd"

05:     elementFormDefault="qualified"

06:     attributeFormDefault="unqualified"

07:     >

08:   <xsd:annotation>

09:     <xsd:documentation xml:lang="en">

10:       Schema for Starfleet

11:       </xsd:documentation>

12:     </xsd:annotation>

13:   <xsd:element name="starfleet">

14:     <xsd:complexType>

15:       <xsd:sequence>

16:         <xsd:element name="title" type="xsd:string" maxOccurs="1"/>

17:         <xsd:element name="starship" type="ShipType" maxOccurs="unbounded"/>

18:         </xsd:sequence>

19:       </xsd:complexType>

20:     </xsd:element>

21:   <xsd:complexType name="ShipType">

22:     <xsd:all>

23:       <xsd:element name="class" type="ClassType" minOccurs="1"/>

24:       <xsd:element name="captain" type="xsd:string" minOccurs="1"/>

25:       </xsd:all>

26:     <xsd:attribute name="name" type="xsd:string" use="required"/>

27:     <xsd:attribute name="sn" type="xsd:string" use="required"/>

28:     </xsd:complexType>

29:   <xsd:complexType name="ClassType">

30:     <xsd:attribute name="name" type="xsd:string" use="required"/>

31:     </xsd:complexType>

32:   </xsd:schema>
Lines 2–7 establish that this schema conforms to the standard XML schema and define the schema’s namespace and how XML files are supposed to refer to elements and attributes. To understand it all, you need to learn quite a bit about namespaces and schemas. The whole matter is quite tricky, and the error messages you get when you try to validate an XML document with a schema are sometimes implicit (more about this later). For example, if you remove the setting of elementFormDefault to "qualified" and try to validate a correct XML document, you will get the following error message:
*** Validation Error: org.xml.sax.SAXParseException; systemId:

file:///C:/Program%20Files/Apache%20Software%20Foundation/Tomcat/webapps/xml-

validate/xml/enterprises_schema.xml; lineNumber: 7; columnNumber: 10;

cvc-complex-type.2.4.a: Invalid content was found starting with element 'title'.

One of '{title}' is expected.
How can it be that the validator expects the element title but complains when it encounters title? It has to do with the fact that normally the element tags include a prefix and a colon before the element name, like in xsd:element, and that schema and the XML document must be consistent.
Lines 8–12 are essentially a comment.
Lines 13–20 specify the starfleet element, which is of a complex type, as defined in Line 14. This means that starfleet can have attributes and/or can contain other elements. Line 15 tells you in which way starfleet is complex: it contains a sequence of elements. Elements in xsd:sequence must appear in the order in which they are specified (in this case, title followed by starship).
Line 16 specifies that title is of type xsd:string, which is a primitive type hard-coded in the standard XML Schema. Line 16 also tells you that there can be maximum one title per starfleet. It is also possible to define minOccurs, and the default for both minOccurs and maxOccurs is 1. This means that by omitting minOccurs, you make title mandatory.
Line 17 declares that the starship element is of type ShipType, which is defined somewhere else in starfleet.xsd. This is an alternative to defining the type of an element inside its body, as we did with the starfleet element. Naming a type lets you use it for several element definitions and as a base for more complex types. However, I have only extracted the type specification from the body of starship to make the code more readable. maxOccurs="unbounded" states that there can be as many starship elements in starfleet as you need.
Lines 21–28 define the type of the starship element. It’s a complex type, but it’s different from that of starfleet. The xsd:all group means that there can only be up to one element each of all those listed, in any order. This would normally mean that each starship could be empty or contain a class, a captain, or both as children. However, we want to make ship class and captain mandatory. To achieve this result, we specified the attribute minOccurs="1" for both elements.
Lines 26–27 define the two attributes of starship. The use attribute lets you specify that they are mandatory.
If you now look again at enterprises.xml, you’ll notice that the class element has an attribute (name). Because of this attribute, you must define its type as complex, although class has no body. This is done in lines 29–31. As you can see, you specify an empty body by creating a complex type without sub-elements.
Occurrence Constraints
In starfleet.xsd, we used three attributes to limit the number of occurrences: minOccurs and maxOccurs when declaring elements, and use when declaring attributes. While the constraints for elements accept non-negative integers as values (with 1 as the default), use can only have one of the following values: required, optional (the default), and prohibited. You can use two additional attributes when declaring either elements or attributes: default and fixed.
When applied to an attribute, default supplies the value of an optional attribute in case it is omitted when you define its element in the XML document (it is an error to provide a default for attributes that are required). Note that when you define elements in an XML document, they’re always created with all their attributes, whether you explicitly define them in the XML document or not, because their existence is determined by their presence in the schema. When applied to an element, default refers to the element content, but it never results in the creation of elements. It only provides content for empty elements. For example: <xsd:attribute name="country" type="xsd:string" default="USA"/>.
The fixed constraint forces an attribute value or an element content to have a particular value. You can still define a value in the XML document, but it must match the fixed value assigned in the schema.
Primitive and Derived Types
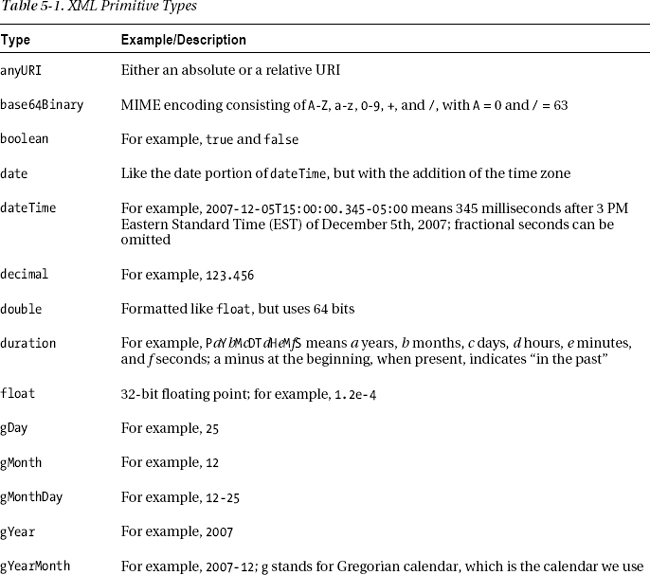
With xsd:string, you’ve already seen an example of primitive types. Table 5-1 summarizes the full list of primitive types.
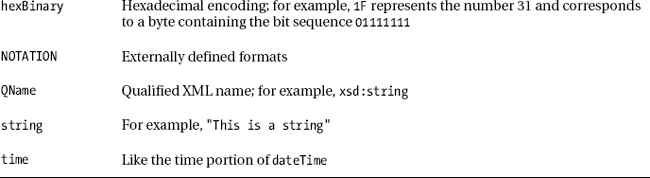
The XML Schema standard also defines additional types called derived, among which are those listed in Table 5-2.

Simple Types
If you need to modify an already defined type without adding attributes or other elements, you can define a so-called simple type instead of recurring to a complex one. For example, the following code defines a string that can only contain up to 32 characters:
<xsd:simpleType name="myString">

  <xsd:restriction base="xsd:string">

    <xsd:maxLength value="32"/>

    </xsd:restriction>

  </xsdLsimpleType>
Besides maxLength, you can also apply the length and minLength attributes to listlike types. Additionally, you can use the whiteSpace and pattern attributes.
The possible values for whiteSpace are preserve (the default), replace, and collapse. With replace, all carriage return, line feed, and tab characters are replaced with simple spaces. With collapse, leading and trailing spaces are removed, and sequences of multiple spaces are collapsed into single spaces.
With pattern, you define a regular expression that must be matched. For example, the following code specifies that only strings consisting of at least one letter of the alphabet are valid:
<xsd:pattern value="[A-Za-z]+"
For non-list types, you can also use the attributes minExclusive, minInclusive, maxExclusive, maxInclusive, totalDigits, fractionDigits, and enumeration. For example, this code defines a number with three decimal figures >= 10 and < 20:
<xsd:simpleType name="xxyyyType">

  <xsd:restriction base="xsd:decimal">

    <xsd:totalDigits value="6"/>

    <xsd:fractionDigits value="3"/>

    <xsd:minInclusive value="10.000"/>

    <xsd:maxExclusive value="20.000"/>

    </xsd:restriction>

  </xsd:simpleType>
And here’s an example of enumeration:
<xsd:simpleType name="directionType">

  <xsd:restriction base="xsd:string">

    <xsd:enumeration value="left"/>

    <xsd:enumeration value="right"/>
    <xsd:enumeration value="straight"/>

    </xsd:restriction>

  </xsd:simpleType>
REGULAR EXPRESSIONS
Instead of defining a new simple type by imposing a restriction, you can also specify that it consists of a list of items of an existing simple type. For example, the following code defines a type consisting of a series of directions:
<xsd:simpleType name="pathType">

  <xsd:list itemType="directionType"/>

  </xsd:simpleType>
Finally, besides xsd:restriction and xsd:list, you can define a new simple type by means of xsd:union, which lets you combine two different preexisting types. For example, the following code defines a type that can be either a number between 1 and 10 or one of the strings "< 1" and "> 10":
<xsd:simpleType name="myNumber">

  <xsd:union>

    <xsd:simpleType>

      <xsd:restriction base="xsd:positiveInteger">

        <xsd:maxInclusive value="10"/>

        </xsd:restriction>

      </xsd:simpleType>

    <xsd:simpleType>

      <xsd:restriction base="xsd:string">

        <xsd:enumeration value="< 1"/>

        <xsd:enumeration value="> 10"/>

        </xsd:restriction>

      </xsd:simpleType>

    </xsd:union>

  </xsd:simpleType>
Complex Types
You’ve already seen some examples of complex types in starfleet.xsd. There are three models that you can use to group the elements contained in a complex type: sequence (in which the elements must appear in the specified sequence), all (in which there can only be up to one element each of all those listed, but they can appear in any order), and choice (in which the contained elements are mutually exclusive). Note that while all can only contain individual elements, sequence and choice can contain other groups. For example, the fragment:
<xsd:sequence>

  <xsd:choice>

    <xsd:element name="no" ... />

    <xsd:all>

      <xsd:element name="yes1" ... />

      <xsd:element name="yes2" ... />

      </xsd:all>

    </xsd:choice>

  <xsd:element name="whatever" ... />
</xsd:sequence>
defines an element that contains one of the following combinations of elements:
whateverno,whateveryes1,whateveryes2,whateveryes1,yes2,whateveryes2,yes1,whatever
Complex type definitions provide many additional options, but are not always easy to handle. One might even argue that they’ve been overengineered. Therefore, to describe them in detail would exceed the scope of this manual. Nevertheless, the information I have provided on primitive and simple types, together with the description of the three model groups, is already enough to cover most cases.
Validation
An XML document is said to be valid if it passes the checks done by a validating parser against the document’s DTD or XML schema. For the parser to be able to operate, the XML document must be well formed, which means that all tags are closed, the attributes are quoted, the nesting is done correctly, and so on. A validating parser, besides checking for well formedness, also checks for validity.
You actually have to validate two documents: the XML file and the DTD or XML Schema. In the example, those are enterprises.xml and starfleet.dtd/starfleet.xsd, respectively. The simplest way to do the validation is to use a development environment like Eclipse, which validates the documents as you type.
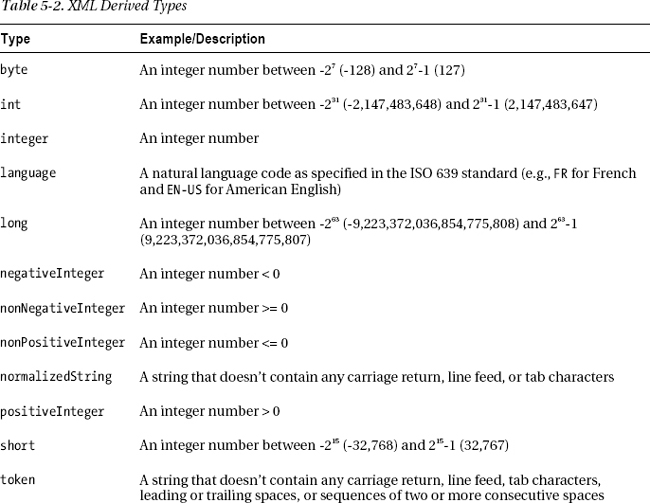
An alternative is to use online services. For example, the tool available at http://xmlvalidation.com can check XML files, DTD files, and XML schemas. To validate your schema, you can also use the online tool by W3C, which provides an authoritative check. Go to http://www.w3.org/2001/03/webdata/xsv and look at the second section, which should look as shown in Figure 5-1.
![]() Caution The fact that your XML schema is valid doesn’t mean at all that you will not get any error when validating an XML file, because inconsistencies can easily creep in.
Caution The fact that your XML schema is valid doesn’t mean at all that you will not get any error when validating an XML file, because inconsistencies can easily creep in.
Figure 5-1. Validating the schema with W3C
Click on the Browse... button, select starfleet.xsd (or the schema you want to get checked), and then click on Upload and Get Results. You should see a page like that shown in Figure 5-2.
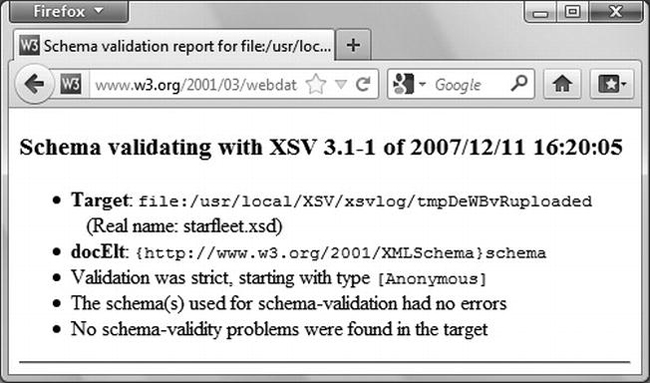
Figure 5-2. Validation results
In general, you need to go through three steps to validate an XML document:
- Associate the document to the DTD/schema against which it is to be validated.
- Define an exception handler to specify what happens when a validation error is detected.
- Parse the document with a validating parser, which validates your XML document against the DTD/schema.
Using JSP to Validate XML against a DTD
To validate an XML file against a DTD, you must first associate the XML document with the DTD by adding a DOCTYPE declaration to the XML file. The declaration, which you should insert immediately after the <?xml...?> line, is as follows:
<!DOCTYPE starfleet SYSTEM "http://localhost:8080/xml-validate/dtd/starfleet.dtd">
Notice that the file starfleet.dtd doesn’t need to be in the WEB-INFdtds folder. We had to place the DTDs there because Tomcat expected them there, but if you do the validation yourself, Tomcat is out of the loop. You can therefore place your DTDs wherever you like.
The next step is the definition of an exception handler. This is a Java object of a class that extends org.xml.sax.helpers.DefaultHandler and replaces three of its methods: warning, error, and fatalError. Once the handler is registered with the parser, the parser executes the appropriate method upon encountering a validation problem. The default behavior of DefaultHandler is to do nothing. Therefore, you need to overwrite the methods in order to report the errors. Listing 5-4 shows you the code of a possible handler. It’s really up to you to decide what level of reporting you’d like to have, but I have decided to report all validation problems and interrupt the parsing.
Listing 5-4. ParsingExceptionHandler.java
package myPkg;

import org.xml.sax.helpers.DefaultHandler;

import org.xml.sax.SAXParseException;

public class ParsingExceptionHandler extends DefaultHandler {

  public SAXParseException parsingException = null;

  public String errorLevel = null;

  public void warning(SAXParseException e) {

    errorLevel = "Warning";

    parsingException = e;

    }

  public void error(SAXParseException e) {

    errorLevel = "Error";

    parsingException = e;

    }

  public void fatalError(SAXParseException e) {

    errorLevel = "Fatal error";

    parsingException = e;

    }

  }
As you can see, it’s pretty simple. You define two public attributes: one to save the exception generated by the parser, and one to save the error level. You then update the two attributes in each one of the three methods. After each parsing, you can check one of the attributes for null in order to determine whether the parsing succeeded or not. Compile this module from the DOS command line with javac ParsingExceptionHandler.java and copy the resulting .class file into the WEB-INFclassesmyPkg folder of your application directory.
You are now ready to perform the validation. Listing 5-5 shows you a JSP page that implements a SAX parser.
Listing 5-5. starfleet_validate_sax.jsp (first cut)
<%@page language="java" contentType="text/html"%>

<%@page import="javax.xml.parsers.SAXParserFactory"%>

<%@page import="javax.xml.parsers.SAXParser"%>

<%@page import="org.xml.sax.InputSource"%>

<%@page import="myPkg.ParsingExceptionHandler"%>

<html><head><title>Starfleet validation (SAX - DTD)</title></head><body>

<%

  SAXParserFactory factory = SAXParserFactory.newInstance();

  factory.setValidating(true);

  SAXParser parser = factory.newSAXParser();

  InputSource inputSource = new InputSource("webapps/xml-validate/xml/enterprises.xml");

  ParsingExceptionHandler handler = new ParsingExceptionHandler();

  parser.parse(inputSource, handler);

  %>

</body></html>
After instantiating the parser factory and setting its validating property to true, you direct the factory to create a SAX parser. Then you instantiate the InputSource class to access the XML document and the exception handler. After that, all you need to do is execute the parser.
This implementation is not very nice, though, because it causes the dumping of a stack trace whenever the validation fails. It is better to wrap the parsing inside a try/catch as shown in Listing 5-6, so that you can display validation errors without stack trace.
Note that before you can execute the improved version of starfleet_validate_sax.jsp, you need to download the StringEscapeUtils from Apache Commons. Their purpose is to convert special characters to their corresponding HTML entities, so that they display correctly in your web page. Go to http://commons.apache.org/lang/download_lang.cgi and click on the link commons-lang3-3.1-bin.zip.
To install it in Tomcat, unzip the file, copy commons-lang3-3.1.jar to %CATALINA_HOME%lib, and restart Tomcat.
![]() Tip In alternative to copying libraries to Tomcat’s
Tip In alternative to copying libraries to Tomcat’s lib folder, you can make them available to a particular application by placing them in the WEB-INFlib folder of the application (create it if it’s not yet there). In that way, the library will not be generally available, but you will not run the risk of later needing a different version of the same library for another application and introducing a conflict when both versions are in Tomcat’s lib folder.
Listing 5-6. starfleet_validate_sax.jsp
<%@page language="java" contentType="text/html"%>

<%@page import="javax.xml.parsers.SAXParserFactory"%>

<%@page import="javax.xml.parsers.SAXParser"%>

<%@page import="org.xml.sax.InputSource"%>

<%@page import="org.apache.commons.lang3.StringEscapeUtils"%>

<%@page import="myPkg.ParsingExceptionHandler"%>

<html><head><title>Starfleet validation (SAX - DTD)</title></head><body>

<%

  SAXParserFactory factory = SAXParserFactory.newInstance();

  factory.setValidating(true);

  SAXParser parser = factory.newSAXParser();

  InputSource inputSource = new InputSource("webapps/xml-validate/xml/enterprises.xml");

  ParsingExceptionHandler handler = new ParsingExceptionHandler();

  try { parser.parse(inputSource, handler); }

  catch (Exception e) { }

  if (handler.errorLevel == null) {

    out.println("The document is valid.");

    }

  else {

    out.println(

        "*** Validation " + handler.errorLevel + ": "

      + StringEscapeUtils.escapeHtml4(handler.parsingException.toString())

      );

    }

  %>

</body></html>
Now, if you type http://localhost:8080/xml-validate/with-dtd/starfleet_validate_sax.jsp in a browser, you should get a one-liner confirming that enterprises.xml is correct.
When you introduce an error in the XML document, for example by mistyping the closing tag as in <captain>James Tiberius Kirk</catain>, you get the following message:
*** Validation Fatal error: org.xml.sax.SAXParseException; systemId:

file:///C:/Program%20Files/Apache%20Software%20Foundation/Tomcat/webapps/xml-

validate/xml/enterprises.xml; lineNumber: 7; columnNumber: 35; The element type

"captain" must be terminated by the matching end-tag "</captain>".
Good, isn’t it? Notice that it is a fatal error. Incidentally, the angle brackets around /captain is why you need to escape the message with StringEscapeUtils. If you remove the line altogether, you get this message:
*** Validation Error: org.xml.sax.SAXParseException; systemId:

file:///C:/Program%20Files/Apache%20Software%20Foundation/Tomcat/webapps/xml-

validate/xml/enterprises.xml; lineNumber: 7; columnNumber: 16; The content of

element type "starship" is incomplete, it must match "(class,captain)".
Notice that it is an error, rather than a fatal error. I confess that I tried to get a warning message but didn’t succeed. If you do, please let me know.
To use a DOM parser instead of SAX, make a copy of starfleet_validate_sax.jsp, name it starfleet_validate_dom.jsp, and replace six lines with seven new lines, as shown in Listing 5-7.
Listing 5-7. starfleet_validate_dom.jsp
<%@page language="java" contentType="text/html"%>

<%@page import="javax.xml.parsers.DocumentBuilderFactory"%>

<%@page import="javax.xml.parsers.DocumentBuilder"%>

<%@page import="org.xml.sax.InputSource"%>

<%@page import="org.apache.commons.lang3.StringEscapeUtils"%>

<%@page import="myPkg.ParsingExceptionHandler"%>

<html><head><title>Starfleet validation (DOM - DTD)</title></head><body>

<%

  DocumentBuilderFactory factory = DocumentBuilderFactory.newInstance();

  factory.setValidating(true);

  DocumentBuilder parser = factory.newDocumentBuilder();

  InputSource inputSource = new InputSource("webapps/xml-validate/xml/enterprises.xml");

  ParsingExceptionHandler handler = new ParsingExceptionHandler();

  parser.setErrorHandler(handler);

  try { parser.parse(inputSource); }

  catch (Exception e) { }

  if (handler.errorLevel == null) {

    out.println("The document is valid.");

    }

  else {

    out.println(

        "*** Validation " + handler.errorLevel + ": "

      + StringEscapeUtils.escapeHtml4(handler.parsingException.toString())

      );

    }

  %>
</body></html>
Using JSP to Validate XML against a Schema
The procedure used to validate an XML file against a schema is almost identical to the procedure explained in the previous section for validating against a DTD.
To avoid confusion, I made copies of enterprises.xml and starfleet_validate_sax.jsp and renamed them respectively enterprises_schema.xml and starfleet_validate_sax_schema.jsp.
In enterprises_schema.xml, to change from DTD to schema, you only need to remove the DOCTYPE declaration and add to the starfleet tag some attributes:
<starfleet

    xmlns="http://localhost:8080/xml-validate/xsd"

    xmlns:xsi="http://www.w3.org/2001/XMLSchema-instance"

    xsi:schemaLocation="http://localhost:8080/xml-validate/xsd

http://localhost:8080/xml-validate/xsd/starfleet.xsd"

    >
Listing 5-8 shows starfleet_validate_sax_schema.jsp with the differences from starfleet_validate_sax.jsp highlighted in bold.
Listing 5-8. starfleet_validate_sax_schema.jsp
<%@page language="java" contentType="text/html"%>

<%@page import="javax.xml.parsers.SAXParserFactory"%>

<%@page import="javax.xml.parsers.SAXParser"%>

<%@page import="org.xml.sax.InputSource"%>

<%@page import="org.apache.commons.lang3.StringEscapeUtils"%>

<%@page import="myPkg.ParsingExceptionHandler"%>

<html><head><title>Starfleet validation (SAX - schema)</title></head><body>

<%

  SAXParserFactory factory = SAXParserFactory.newInstance();

  factory.setValidating(true);

  factory.setNamespaceAware(true);

  factory.setFeature("http://apache.org/xml/features/validation/schema", true);

  SAXParser parser = factory.newSAXParser();

  InputSource inputSource =

    new InputSource("webapps/xml-validate/xml/enterprises_schema.xml");

  ParsingExceptionHandler handler = new ParsingExceptionHandler();

  try { parser.parse(inputSource, handler); }

  catch (Exception e) { }

  if (handler.errorLevel == null) {

    out.println("The document is valid.");

    }

  else {

    out.println(

        "*** Validation " + handler.errorLevel + ": "

      + StringEscapeUtils.escapeHtml4(handler.parsingException.toString())

      );

    }

  %>
</body></html>
As you can see, apart from updating the page title and the name of the XML file, you only need to switch on two features of the parser that tell it to use a schema instead of a DTD.
What I said about changing SAX to DOM in starfleet_validate_sax.jsp also applies to starfleet_validate_sax_schema.jsp. You will find starfleet_validate_dom_schema.jsp in the software package for this chapter.
JSTL-XML and XSL
The XML actions specified in JSTL are meant to address the basic XML needs that a JSP programmer is likely to encounter.
To make XML file contents easier to access, the W3C specified the XML Path Language (XPath). The name XPath was chosen to indicate that it identifies paths within XML documents (see http://www.w3.org/TR/xpath). The JSTL-XML actions rely on that language to identify XML components.
To avoid confusion between EL expressions and XPath expressions, the actions that require an XPath expression always use the select attribute. In this way, you can be sure that all expressions outside select are EL expressions. Several XML actions are the XPath-counterparts of equivalent core actions, with the attribute select replacing the attribute value (when present). They are: x:choose, x:forEach, x:if, x:out, x:otherwise, x:set, and x:when.
The remaining three actions are x:parse and the pair x:transform and x:param. But before you can learn about them, we have to talk about the Extensible Stylesheet Language (XSL).
XSL is a language for expressing style sheets that describe how to display and transform XML documents. The specification documents are available from http://www.w3.org/Style/XSL/.
While CSS only needs to define how to represent the predefined HTML tags, XSL has to cope with the fact that there are no predefined tags in XML! How do you know whether a <table> element in an XML file represents a table of data as you know it from HTML or an object around which you can sit for dinner?
That’s why XSL is more than a style-sheet language. It actually includes three parts:
- XPath: The language to navigate in XML documents I already mentioned.
- XSLT: A language to transform XML documents that can completely change their structure.
- XSL Formatting Objects (XSL-FO): A language for formatting XML documents.
I will only explain XPath and XSLT, because XSL-FO is concerned with page formatting (page size, margins, headers, footers, citations, footnotes, and so on), which is very different from the screen formatting and hyperlinking you need for web pages.
Just to give you an idea, XSL-FO divides the output into pages, the pages into regions (body, header, footer, and left and right sidebars), the regions into block areas, the block areas into line areas, and the line areas into inline areas. You can define several attributes of these fields and then “flow” your content into them. XSL-FO also provides constructs for lists and tables similar to those you know from HTML.
XPath
XPath expressions identify a set of XML nodes through patterns. Extensible Stylesheet Language Transformations (XSLT) templates (see later in this chapter for XSLT examples) then use those patterns when they apply transformations. Possible XPath nodes can be any of the following: document/root, comment, element, attribute, text, processing instruction, and namespace.
![]() Note Processing instructions in an XML document provide information for the application that uses the document.
Note Processing instructions in an XML document provide information for the application that uses the document.
For example, take a look at the following XML document:
<?xml version="1.0" encoding="UTF-8"?>

<whatever xmlns:zzz="http://myWeb.com/whatever">

  <!-- bla bla -->  <?myAppl "xyz"?>

  <item name="anything">

    <subitem>The quick brown fox</subitem>

    </item>

  </whatever>
The document (or root) node is <whatever>, <!-- bla bla --> is a comment node, <subitem>...</subitem> is an element node, name="anything" is an attribute node, the string The quick brown fox is a text node, <?myAppl "xyz"?> is a processing-instruction node, and xmlns:zzz="http://myWeb.com/whatever" is a namespace node.
As with URLs, XPath uses a slash as a separator. Absolute paths start with a slash, while all other paths are relative. Similar to file directories, a period indicates the current node, while a double period indicates the parent node.
Several nodes with the same name are distinguished by indexing them, as Java does with array elements. For example, let’s say you have the following XML code:
<a> <b>whatever</b> <b>never</b> </a>

<c> <non_b>no</non_b> <b>verywell</b> </c>

<a> <b attr="zz">nice</b> <b attr="xxx">ok</b> </a>
The pattern /a/b selects the four <b> elements, which contain whatever, never, nice, and ok. The <b> element with verywell isn’t selected, because it’s inside <c> instead of <a>. The pattern /a[1]/b[0] selects the <b> element with nice. Attribute names are prefixed by an @. For example, /a[1]/b[1]/@attr refers to the attribute that has the value xxx in the example.
A clever thing in XPath: you can use conditions as indices. For example, /a/b[@attr="zz"] selects the same <b> element selected by /a[1]/b[0], while /a[b] selects all <a> elements that have <b> as a child (in the example, both), and /a[b="never"] selects the first <a> element. A final example: /a/b[@attr][0] selects the first <b> element that is contained in an <a> and has the attribute attr (i.e., it selects once again the element /a[1]/b[0]).
XPath defines several operators and functions related to node sets, positions, or namespaces, and it defines string, numeric, boolean, and conversion operations.
A node set is a group of nodes considered collectively. A node set resulting from the execution of an XPath expression doesn’t necessarily contain several nodes. It can consist of a single node or even none. Keep in mind that the nodes belonging to a node set can be organized in a tree, but not necessarily. For example, the expression $myDoc//C identifies all C elements in a document that was parsed into the variable myDoc. It is unlikely that they form a tree.
Within XPath, you have access to the implicit JSP objects you’re familiar with. Table 5-3 lists the mappings.

Before we look at an XPath example, I would like to give you a more rigorous reference of its syntax and explain some terms that you are likely to encounter “out there.”
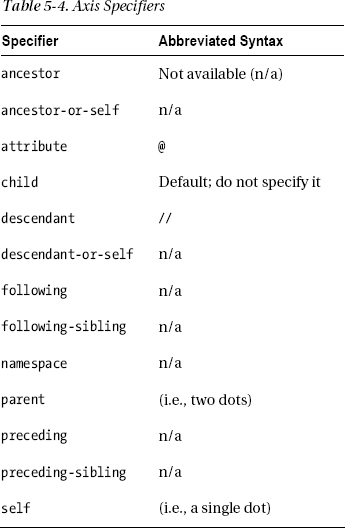
To identify a node or a set of nodes, you need to navigate through the tree structure of an XML document from your current position within the tree (the context node) to the target. The path description consists of a series of steps separated by slashes, whereby each step includes the navigation direction (the axis specifier), an expression identifying the node[s] (the node test), and a condition to be satisfied (the predicate) enclosed between square brackets.
A slash at the beginning indicates that the path begins at the root node, while paths relative to the context node begin without a slash. Two consecutive colons separate the axis specifier and the node test. For example, this code identifies the second attribute of all B elements immediately below the root element A:
/child::A/child::B/attribute::*[position()=2]
You can express the same path with an abbreviated syntax, as follows:
/A/B/@*[2]
where child, ::, and position()= are simply omitted, and attribute is represented by @.
Table 5-4 shows the possible axis specifiers and their abbreviated syntax.
As node tests, you can use node names with or without a namespace prefix, or you can use an asterisk to indicate all names. With abbreviated syntax, an asterisk on its own indicates all element nodes, and @* indicates all attributes.
You can also use node() as a node test to indicate all possible nodes of any type. Similarly, comment() indicates all comment nodes, text() indicates all text nodes, and processing-instruction() indicates all processing instruction nodes.
For example, the following code selects all elements B descendant of A that have the attribute xx set to 'z':
A//B[@xx='z']
while to select all elements C anywhere in the tree that have the attribute yy you can do this:
//C[@yy]
To form expressions, besides the operators you have already seen (i.e., slash, double slash, and square brackets), you have available all standard arithmetic and comparison operators (i.e., +, -, *, div, mod, =, !=, <, <=, >, and >=). Additionally, you have and and or for boolean operations, and the union operator | (i.e., the vertical bar) to merge two node sets.
References to variables are indicated by sticking a dollar sign before them, as shown in the following example:
<x:parse doc="${sf}" varDom="dom"/>

<x:forEach var="tag" select="$dom//starship">
where I parse an XML document into the variable dom and then use $dom when I refer to it in an XPath expression.
An XPath Example
So far, everything has been pretty dry and abstract. To spice things up a bit, we are going to write a JSP page that parses an XML file, selects its elements and attributes, and displays them in a HTML table. Listing 5-9 shows the XML file we’ll play with, starfleet.xml. It is an expanded version of the file enterprises.xml (Listing 5-1) you have already encountered in the validation section of this chapter.
Listing 5-9. starfleet.xml
<?xml version="1.0" encoding="UTF-8"?>

<starfleet>

  <starship name="Enterprise" sn="NX-01">

    <class commissioned="2151">NX</class>

    <captain>Jonathan Archer</captain>

    </starship>

  <starship name="USS Enterprise" sn="NCC-1701">

    <class commissioned="2245">Constitution</class>

    <captain>James Tiberius Kirk</captain>

    </starship>

  <starship name="USS Enterprise" sn="NCC-1701-A">

    <class commissioned="2286">Constitution</class>

    <captain>James T. Kirk</captain>

    </starship>

  <starship name="USS Enterprise" sn="NCC-1701-B">

    <class commissioned="2293">Excelsior</class>

    <captain>John Harriman</captain>

    </starship>

  <starship name="USS Enterprise" sn="NCC-1701-C">

    <class commissioned="2332">Ambassador</class>

    <captain>Rachel Garrett</captain>

    </starship>

  <starship name="USS Enterprise" sn="NCC-1701-D">

    <class commissioned="2363">Galaxy</class>

    <captain>Jean-Luc Picard</captain>

    </starship>

  <starship name="USS Enterprise" sn="NCC-1701-E">

    <class commissioned="2372">Sovereign</class>

    <captain>Jean-Luc Picard</captain>

    </starship>

  </starfleet>
Notice that it doesn’t include the DOCTYPE element necessary for DTD validation or the namespace declarations necessary for schema validation. This is because in this example we are not going to do any validation. Listing 5-10 shows the JSP page that does the conversion to HTML, and Figure 5-3 shows its output as it appears in a web browser.
Listing 5-10. starfleet.jsp
01: <%@page language="java" contentType="text/html"%>

02: <%@taglib uri="http://java.sun.com/jsp/jstl/core" prefix="c"%>

03: <%@taglib uri="http://java.sun.com/jsp/jstl/xml" prefix="x"%>

04: <c:import url="starfleet.xml" var="sf"/>

05: <x:parse doc="${sf}" varDom="dom"/>

06: <html><head>

07:   <title>Parsing starfleet.xml</title>

08:   <style>th {text-align:left}</style>

09:   </head>

10: <body>

11: <table border="1">

12:   <tr><th>Name</th><th>S/N</th><th>Class</th><th>Year</th><th>Captain</th></tr>

13:   <x:forEach var="tag" select="$dom//starship">

14:     <tr>

15:       <td><x:out select="$tag/@name"/></td>

16:       <td><x:out select="$tag/@sn"/></td>

17:       <td><x:out select="$tag/class"/></td>

18:       <td><x:out select="$tag/class/@commissioned"/></td>

19:       <td><x:out select="$tag/captain"/></td>

20:       </tr>

21:     </x:forEach>

22:   </table>

23: </body>

24: </html>
In line 4, you load the XML file in memory, and in line 5, you parse it into an object of type org.apache.xerces.dom.DeferredDocumentImpl, which implements the standard interface org.w3c.dom.Document of a Document Object Model (DOM). In lines 13–21, you loop through all the starship tags of the DOM, regardless of how “deep” they are in the structure. You can achieve this with the double slash. Inside the x:forEach loop, the variable tag refers in turn to each starship, and you can display the information contained in attributes and sub-elements. Notice that the select paths inside the loop always start with the slash. This is because the root element in each loop iteration is a starship tag, not starfleet, which is the root element of the document.
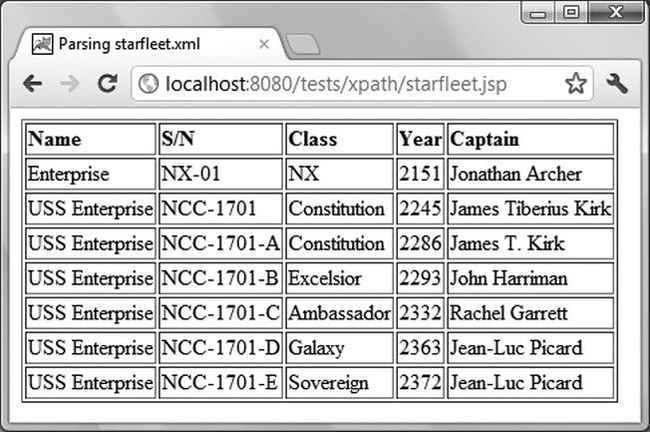
Figure 5-3. Starfleet information
x:parse
With starfleet.jsp, you have just seen an example of how to use x:parse and XPath to convert XML into HTML. Table 5-5 summarizes all attributes that x:parse supports. You will find a good reference for x:parse at http://www.ibm.com/developerworks/java/library/j-jstl0520/.
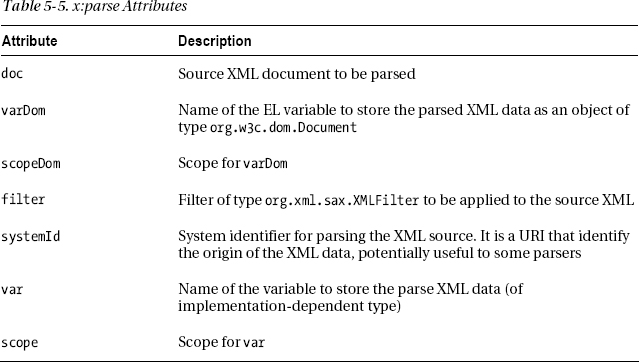
Instead of storing the XML source code in the attribute doc, you can also make x:parse a bodied action and store the source XML in its body.
XSLT: Transformation from One XML Format to Another
At the beginning of this chapter, I showed you the file enterprises.xml (Listing 5.1) and, later on, to explain XPath, I expanded it to starfleet.xml (Listing 5-9).
But the information contained in enterprises.xml is not just a sub-set of the larger starfleet.xml, because also the encoding is different. In particular, the differences from starfleet.xml are:
- The presence of a
titleelement- The removal in the
classelement of thecommissionedattribute- The replacement of the
classbody with an attribute namedname
Listing 5-11 shows you an XSL style sheet that lets you extract enterprises.xml from starfleet.xml.
Listing 5-11. enterprises.xsl
01: <?xml version="1.0" encoding="UTF-8"?>

02: <xsl:stylesheet version="1.0" xmlns:xsl="http://www.w3.org/1999/XSL/Transform">

03: <xsl:output method="xml" version="1.0" encoding="UTF-8" indent="yes"/>

04: <xsl:template match="/">

05:   <starfleet>

06:     <title>The two most famous starships in the fleet</title>

07:     <xsl:for-each select="starfleet/starship">

08:       <xsl:if test="@sn='NCC-1701' or @sn='NCC-1701-D'">

09:         <xsl:element name="starship">

10:           <xsl:attribute name="name">

11:             <xsl:value-of select="@name"/>

12:             </xsl:attribute>

13:           <xsl:attribute name="sn">

14:             <xsl:value-of select="@sn"/>

15:             </xsl:attribute>

16:           <xsl:element name="class">

17:             <xsl:attribute name="name">

18:               <xsl:value-of select="class"/>

19:               </xsl:attribute>

20:             </xsl:element>

21:           <xsl:copy-of select="captain"/>

22:           </xsl:element>

23:       </xsl:if>

24:     </xsl:for-each>

25:     </starfleet>

26:   </xsl:template>

27: </xsl:stylesheet>
Lines 1 and 2 state that the file is in XML format and specify its namespace. In line 2, you could replace xsl:stylesheet with xsl:transform, because the two keywords are considered synonyms.
Line 3 specifies that the output is also an XML document. XML is the default output format, but by writing it explicitly, you can also request that the output be indented. Otherwise, by default, the generated code would be written on a single very long line. The element also lets you specify an encoding other than ISO-8859-1.
The xsl:template element associates a template to an element, and in line 4, you write match="/" to specify the whole source document. In lines 5–6 and 25, you write the enterprise and title elements to the output.
The loop between lines 7 and 24 is where you scan all the starship elements. Immediately inside the loop, you select the two starships you’re interested in with an xsl:if. In XSL, you could have also used the choose/when/otherwise construct that you encountered in Chapter 4 when I described JSTL-core, but in this case, it would not be appropriate, because you do not need an else.
The actual work is done in lines 9–22. The xsl:element and xsl:attribute elements create a new element and a new attribute, respectively, while xsl:value-of copies data from the source XML file to the output. Notice that the XPath expressions in the select attributes are relative to the current element selected by xsl:for-each. Also, notice that the only difference between the source and the output is handled in lines 17–19, where you assign to the name attribute of the class element what was originally in the element’s body. The class attribute commissioned is simply ignored, so that it doesn’t appear in the output.
The xsl:copy-of element copies the whole element to the output, including attributes and children elements. If you only want to copy the element tag, you can use xsl:copy.
XSL includes more than 30 elements, but the dozen or so that I have just described cover the vast majority of what you are likely to need. You will find the official documentation about XSLT at http://www.w3.org/TR/xslt.
XSLT: Transformation from XML to HTML
As you have seen, you can use XPath in a JSP page to navigate through an XML document and display it in HTML format. In this section, I’m going to show you how you can use XSLT to transform the same starfleet.xml directly into HTML. The two strategies are subtly different: with JSP, you pick up the nodes one by one and display them in HTML; with XSLT, you specify how the nodes of the XML files are to be mapped into HTML elements.
Let’s cut to the chase and go directly to the XSLT file, shown in Listing 5-12.
Listing 5-12. starfleet.xsl
<?xml version="1.0" encoding="UTF-8"?>

<xsl:stylesheet version="1.0" xmlns:xsl="http://www.w3.org/1999/XSL/Transform">

<xsl:output method="html" version="4.0" encoding="UTF-8" indent="yes"/>

<xsl:template match="/">

<html><head>

  <title>Styling starfleet.xml</title>

  <style>th {text-align:left}</style>

  </head>

<body>

<h2>The Most Famous Starships in the Fleet</h2>

<table border="1">

  <tr><th>Name</th><th>S/N</th><th>Class</th><th>Commissioned</th><th>Captain</th></tr>

  <xsl:for-each select="starfleet/starship">

    <xsl:sort select="class/@commissioned"/>

    <tr>

      <td><xsl:value-of select="@name"/></td>

      <td><xsl:value-of select="@sn"/></td>

      <td><xsl:value-of select="class"/></td>
      <td><xsl:value-of select="class/@commissioned"/></td>

      <td><xsl:value-of select="captain"/></td>

      </tr>

    </xsl:for-each>

  </table>

</body>

</html>

</xsl:template>

</xsl:stylesheet>
After the first example (Listing 5-11), it should be clear how this works. There is just one point I would like to clarify: if you wanted to, you could omit the third line because, although the default output format is XML, XSL automatically recognizes that you’re generating HTML if the first tag it encounters is <html>. Nevertheless, I recommend that you define the output format explicitly so that you can set HTML version, encoding, and indentation.
XSL Transformation: Browser Side vs. Server Side
I still haven’t told you how to apply an XSL style sheet to an XML file to perform the transformation. This is because I first have to clarify the distinction between browser-side vs. server-side transformation.
Browser-Side XSL Transformation
All browsers can process XML and XSL. For example, let’s say you copy enterprises_schema.xml from the xml-validatexml subfolder of the software package for this chapter to the webappsROOT ests folder of the Tomcat directory. By typing http://localhost:8080/tests/enterprises_schema.xml in most browsers, you see the file with little markers on the left of each element, as shown in Figure 5-4, where I used Chrome. By clicking on the markers, you can collapse or expand the elements as if they were folders. Firefox and IE use -/+ as markers. Opera is the only widely used browser that doesn’t support this feature.
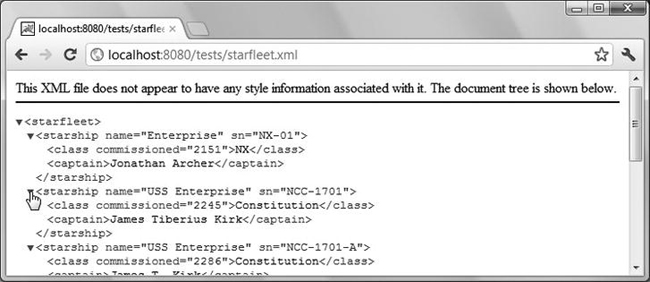
Figure 5-4. Browsing an XML file without XSL
The browsers can provide this feature because they “know” how to display XML. The message at the top of the page indicates that the browser displays the file as a node tree in a generic way because enterprises_schema.xml doesn’t refer to any XSL style sheet. (Just so you know, Firefox displays the same message, IE doesn’t display any message, and Opera simply states "This document had no style information".) But all browsers color code the different components.
Making the association is simple: copy starfleet.xsl from the sub-folder xml-stylexsl of the software package for this chapter to the usual tests folder and insert the following processing instruction immediately below the first line of enterprises_schema.xml (i.e., the line with <?xml...?>):
<?xml-stylesheet type="text/xsl" href="starfleet.xsl"?>
Now, if you ask the browser to display http://localhost:8080/test/enterprises_schema.xml, it will know what style sheet to use. The href attribute expects a URL. Therefore, in general, you can also set it to URLs such as "http://localhost:8080/tests/starfleet.xsl" or "/tests/starfleet.xsl". I chose to write the relative URL, because I am keeping both files in the same test folder, and it makes our lives easier. In any case, Figure 5-5 shows the result.
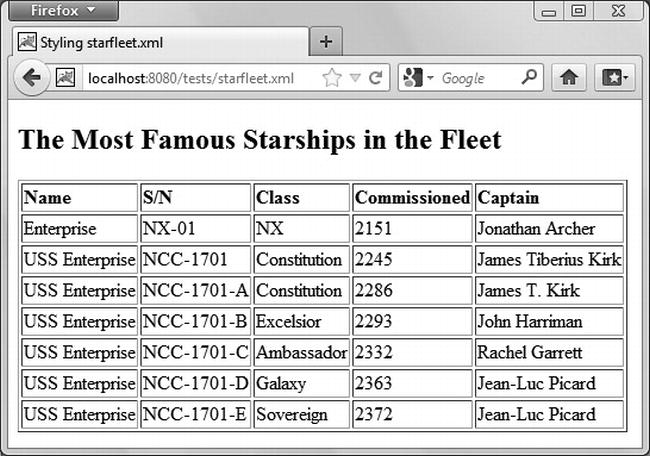
Figure 5-5. Browsing an XML file with XSL
Actually, there is one small advantage in keeping XML and XSL files in the same folder: you can view the XML file in a browser by just drag-and-dropping it onto the browser window. This doesn’t work if you use an absolute URL in the href.
But I need to expand on this concerning Google Chrome. For the drag-and-drop trick to work, the browser must allow a file to access another file. Chrome, for security reasons, doesn’t. You can force it to do this operation by starting it with the switch --allow-file-access-from-files. To do so, right-click Chrome’s icon in the quick-start bar or on the desktop, display its properties, and append the switch to the application’s path you see in the target field. It’s easy, but I advise you not to weaken the security of the browser.
With any browser, if you view the page source, you’ll see the XML file, because it is the browser that does the transformation from XML to HTML. Therefore, the source file is in fact the XML document.
One thing to keep in mind is that the user can also easily obtain your XSL file, because its URL is shown in the XML source. For example, if you copy starfleet.xml from the xml-stylexsl sub-folder of the software package for this chapter to the tests folder and view it in a browser with the URL http://localhost:8080/tests/starfleet.xml, you can display its source and discover the relative URL of the style sheet. Then, you only need to type http://localhost:8080/tests/starfleet.xsl to see the XSL file.
Server-Side XSL Transformation
You can do the transformation on the server and make its output available, rather than making the XML and XSL files visible to the user. In that way, you can keep XML and XSL in private folders. Listing 5-13 shows you how to do the XSL server-side transformation with a JSP page.
Listing 5-13. enterprises_transform.jsp
01: <%@page language="java" contentType="text/html"%>

02: <%@page import="java.io.File"%>

03: <%@page import="java.io.FileOutputStream"%>

04: <%@page import="javax.xml.transform.TransformerFactory"%>

05: <%@page import="javax.xml.transform.Transformer"%>

06: <%@page import="javax.xml.transform.Source"%>

07: <%@page import="javax.xml.transform.SourceLocator"%>

08: <%@page import="javax.xml.transform.TransformerException"%>

09: <%@page import="javax.xml.transform.Result"%>

10: <%@page import="javax.xml.transform.stream.StreamSource"%>

11: <%@page import="javax.xml.transform.stream.StreamResult"%>

12: <%@page import="myPkg.TransformerExceptionHandler"%>

13: <%

14:   File inFile = new File("webapps/xml-style/xsl/starfleet.xml");

15:   File xslFile = new File("webapps/xml-style/xsl/enterprises.xsl");

16:   String outFilename = "webapps/xml-style/out/enterprises_out.xml";

17:   TransformerExceptionHandler handler = new TransformerExceptionHandler();

18:   try {

19:     TransformerFactory factory = TransformerFactory.newInstance();

20:     Transformer transformer = factory.newTransformer(new StreamSource(xslFile));

21:     transformer.setErrorListener(handler);

22:     Source source = new StreamSource(inFile);

23:     Result result = new StreamResult(new FileOutputStream(outFilename));

24:     transformer.transform(source, result);

25:     }

26:   catch (TransformerException e) {

27:     }

28:   if (handler.errorLevel == null) {

29:     out.println("Transformation completed.");

30:     }

31:   else {

32:     out.println(

33:         "*** Transformation " + handler.errorLevel + ": "

34:       + handler.transformationException

35:       );

36:     }

37:   %>
It looks more complicated than it actually is. Moreover, I have hard-coded the file names for simplicity, but you can add to the JSP page a simple input form to set inFile and xslFile, and you’ll have a small utility you can use to transform all XML files. Following the MVC architecture, you should place the application logic in a servlet (i.e., the Controller), not in a JSP page. But I just wanted to show you in the simplest possible way how this is done in JSP/Java.
enterprises_transform.jsp performs the XML transformation on the server side as follows:
- It instantiates a generic
TransformerFactoryand uses it to create aTransformerthat implements the XSL (lines 19 and 20).- In line 21, it registers with the transformer the exception handler that was instantiated in line 17. This is similar to what you did to handle validation exceptions.
- It opens an input stream to read the XML file and an output stream to write the document that will result from the transformation (lines 22 and 23).
- It finally does the transformation (line 24).
The exception reporting is almost a carbon copy of the method I described when talking about validation (Listings 5-5 to 5-7), and the exception handler for transformations (Listing 5-14) is compiled and used exactly like the handler for validations shown in Listing 5-4.
Listing 5-14. TransformerExceptionHandler.java
package myPkg;

import javax.xml.transform.TransformerException;

public class TransformerExceptionHandler

    implements javax.xml.transform.ErrorListener {

  public TransformerException transformationException = null;

  public String errorLevel = null;

  public void warning(TransformerException e) {

    errorLevel = "Warning";

    transformationException = e;

    }

  public void error(TransformerException e) {

    errorLevel = "Error";

    transformationException = e;

    }

  public void fatalError(TransformerException e) {

    errorLevel = "Fatal error";

    transformationException = e;

    }

  }
The JSP page enterprises_transform.jsp applies the style sheet enterprises.xsl to starfleet.xml to produce enterprises_out.xml. If you change the file names in lines 15–16 to starfleet.xsl, and starfleet_out.html, the same page will generate a file that, when viewed in a browser, will appear identical to what you see in Figure 5-5.
My apologies if you find all these variations of XML files somewhat confusing. My purpose is to show you most of the possibilities you have for validating and converting XML files. In real life, you will pick the solution that suits your needs best and stick to it. In any case, I’m not done yet, because there is still one way of implementing server-side transformations that I want to show you.
x:transform and x:param
x:transform applies an XSL style sheet to an XML document. Table 5-6 summarizes its attributes.
Listing 5-15 shows the JSP page starfleet_tag_transform.jsp, which performs on the server the same transformation done by the browser when displaying what is shown in Figure 5-5.
Listing 5-15. starfleet_tag_transform.jsp
<%@page language="java" contentType="text/html"%>

<%@taglib prefix="c" uri="http://java.sun.com/jsp/jstl/core"%>

<%@taglib prefix="x" uri="http://java.sun.com/jsp/jstl/xml"%>

<c:import url="/xsl/starfleet.xml" var="xml"/>

<c:import url="/xsl/starfleet.xsl" var="xsl"/>

<x:transform doc="${xml}" xslt="${xsl}"/>
Type http://localhost:8080/xml-style/starfleet_tag_transform.jsp in your browser. You will see the familiar table shown in Figure 5-5.
At this point you might ask: why on earth did we go through the complex implementation of enterprise_transform.jsp and TransformerExceptionHandler.java (Listings 5-13 and 5-14) when we can achieve an equivalent result with six lines of code?
There are two reasons: the first one is that you might in the future encounter a situation in which you need to do it the “hard way”; the second reason is that I like to “peek under the hood” every now and then, and I thought you might like to do the same.
JSP in XML Syntax
JSP pages with scripting elements aren’t XML files. This implies that you cannot use XML tools when developing JSP pages. However, it is possible to write JSP in a way to make it correct XML. The trick is to use standard JSP actions, JSTL with EL, and possibly non-JSTL custom actions. Actually, there are some “special standard” (pun intended!) JSP actions defined to support the XML syntax (jsp:root, jsp:output, and jsp:directive). In any case, such XML modules are called JSP documents, as opposed to the JSP pages written in the traditional non-XML-compliant way.
As a first example, let’s convert the hello.jsp page shown in Listing 1-4 to a hello.jspx document. Listing 5-16 shows a partial hello.jspx that only writes "Hello World!". We’ll convert the scriptlet that displays the dynamic information later.
Listing 5-16. Partial hello.jspx
01: <?xml version="1.0" encoding="UTF-8"?>

02: <jsp:root

03:   xmlns:jsp="http://java.sun.com/JSP/Page"

04:   xmlns:c="http://java.sun.com/jsp/jstl/core"

05:   xmlns:fn="http://java.sun.com/jsp/jstl/functions"

06:   version="2.1"

07:   >

08: <jsp:directive.page

09:   language="java"

10:   contentType="application/xhtml+xml;charset=UTF-8"

11:   />

12: <html>

13: <head><title>Hello World in XHTML</title></head>

14: <body>

15:   <jsp:text>Hello World!</jsp:text>

15: </body>

16: </html>

17: </jsp:root>
Line 1 states that the file is XML-compliant. The root element in lines 2–7 has several purposes. For example, it lets you use the jsp extension instead of the recommended jspx. It’s also a convenient place where you can group namespace declarations (xmlns). The namespace declaration for the JSTL core tag library is the XML equivalent of the taglib directive in JSP pages. You don’t need to specify the JSP namespace in JSP pages, but you cannot omit it in a JSP document; otherwise, the jsp: tags won’t be recognized.
Lines 8–11 are the XML equivalent of the page directive of JSP pages. Also the include directive has its XML-equivalent with the element <jsp:directive.include file="relativeURL"/>.
Notice that the string “Hello World!” in Line 15 is enclosed within the jsp:text element. This is necessary, because in XML you cannot have “untagged” text.
To be consistent and make possible the full validation of the generated HTML, you should also include the proper DOCTYPE. The best way to do this is to use the attributes of the jsp:output action, which was specifically designed for this purpose. You only need to replace the <html> tag in line 12 with the following three elements:
<jsp:output omit-xml-declaration="false"/>

<jsp:output

  doctype-root-element="html"
  doctype-public="-//W3C//DTD XHTML 1.0 Strict//EN"

  doctype-system="http://www.w3.org/TR/xhtml1/DTD/xhtml1-strict.dtd"

  />

<html xmlns="http://www.w3.org/1999/xhtml">
Yes, it’s quite a bit of work just to write “Hello World!”, but this overhead is going to stay the same for JSP documents of any size. The first line causes the <?xml ... ?> elements to be written at the beginning of the generated HTML page, while the second element generates the DOCTYPE.
If you look at the HTML page generated by this preliminary version of hello.jspx, you’ll see that all the HTML code is in a single line. If you want to have newlines between HTML tags in the output, you have to write them. You can actually do this with the jsp:text action. For example, all the jsp:text elements in the following code fragment contain a newline (which you can see) followed by two spaces (which you cannot see in the listing but are there):
<html xmlns="http://www.w3.org/1999/xhtml"><jsp:text>

  </jsp:text><head><title>Hello World in XHTML</title></head><jsp:text>

  </jsp:text><body>Hello World!</body><jsp:text>

  </jsp:text></html>
As the jsp:text content is sent to the output as it is, the HTML generated will be written over several lines and indented:
<html xmlns="http://www.w3.org/1999/xhtml">

  <head><title>Hello World in XHTML</title></head>

  <body>Hello World!</body>

  </html>
The other possibility is to use a CDATA section to enclose the whole HTML:
<![CDATA[<html xmlns="http://www.w3.org/1999/xhtml">

  <head><title>Hello World in XHTML</title></head>

  <body>Hello World!</body>

  </html>]]>
This way, the whole block will be sent to the client as it is, uninterpreted. However, it seems an admission of defeat to send off code that could have been validated for XML compliance at the source. Don’t you think?
IE AND XHTML
Now you’re finally ready to tackle the conversion of the scriptlet in hello.jsp to XML syntax. Listing 5-17 shows the complete hello.jspx.
Listing 5-17. hello.jspx
<?xml version="1.0" encoding="UTF-8"?>

<jsp:root

  xmlns:jsp="http://java.sun.com/JSP/Page"

  xmlns:c="http://java.sun.com/jsp/jstl/core"

  xmlns:fn="http://java.sun.com/jsp/jstl/functions"

  version="2.1"

  >

<jsp:directive.page

  language="java"

  contentType="application/xhtml+xml;charset=UTF-8"

  />

<jsp:output omit-xml-declaration="false"/>

<jsp:output

  doctype-root-element="html"

  doctype-public="-//W3C//DTD XHTML 1.0 Strict//EN"

  doctype-system="http://www.w3.org/TR/xhtml1/DTD/xhtml1-strict.dtd"

  />

<html xmlns="http://www.w3.org/1999/xhtml">

<head><title>Hello World in XHTML</title></head>

<body>

  <jsp:text>Hello World!</jsp:text>

  <br/>

  <jsp:text>Your IP address is ${pageContext.request.remoteAddr}</jsp:text>

  <br/>

  <jsp:text>and your browser is </jsp:text>

  <c:set var="usAg" value="${header['user-agent']}"/>

  <c:choose>

    <c:when test="${fn:contains(usAg, 'MSIE')}">

      <jsp:text>MS InternetExplorer</jsp:text>

      </c:when>

    <c:when test="${fn:contains(usAg, 'Firefox')}">

      <jsp:text>Mozilla Firefox</jsp:text>

      </c:when>

    <c:when test="${fn:contains(usAg, 'Opera')}">

      <jsp:text>Opera</jsp:text>

      </c:when>

    <c:when test="${fn:contains(usAg, 'Chrome')}">

      <jsp:text>Google Chrome</jsp:text>

      </c:when>

    <c:when test="${fn:contains(usAg, 'Safari')}">

      <jsp:text>Apple Safari</jsp:text>
      </c:when>

    <c:otherwise><jsp:text>unknown</jsp:text></c:otherwise>

    </c:choose>

</body>

</html>

</jsp:root>
![]() Note In JSP documents, you cannot use expressions such as ${whatever > 0}, because the greater-than signs are illegal within XML. Instead, use the gt form, such as ${whatever gt 0}.
Note In JSP documents, you cannot use expressions such as ${whatever > 0}, because the greater-than signs are illegal within XML. Instead, use the gt form, such as ${whatever gt 0}.
As a second example, of converting a JSP page to a JSP document, you can compare starfleet.jspx (Listing 5-18) with the original starfleet.jsp (Listing 5-10).
Listing 5-18. starfleet.jspx
<?xml version="1.0" encoding="UTF-8"?>

<jsp:root

  xmlns:jsp="http://java.sun.com/JSP/Page"

  xmlns:c="http://java.sun.com/jsp/jstl/core"

  xmlns:x="http://java.sun.com/jsp/jstl/xml"

  version="2.1"

  >

<jsp:directive.page

  language="java"

  contentType="application/xhtml+xml;charset=UTF-8"

  />

<jsp:output omit-xml-declaration="false"/>

<jsp:output

  doctype-root-element="html"

  doctype-public="-//W3C//DTD XHTML 1.0 Strict//EN"

  doctype-system="http://www.w3.org/TR/xhtml1/DTD/xhtml1-strict.dtd"

  />

<c:import url="starfleet.xml" var="sf"/>

<x:parse doc="${sf}" varDom="dom"/>

<html xmlns="http://www.w3.org/1999/xhtml">

<head>

  <title>Parsing starfleet.xml</title>

  <style>th {text-align:left}</style>

  </head>

<body>

<table border="1">

  <tr><th>Name</th><th>S/N</th><th>Class</th><th>Year</th><th>Captain</th></tr>

  <x:forEach var="tag" select="$dom//starship">

    <tr>

      <td><x:out select="$tag/@name"/></td>

      <td><x:out select="$tag/@sn"/></td>

      <td><x:out select="$tag/class"/></td>
      <td><x:out select="$tag/class/@commissioned"/></td>

      <td><x:out select="$tag/captain"/></td>

      </tr>

    </x:forEach>

  </table>

</body>

</html>

</jsp:root>
The first 17 lines are identical to the corresponding lines of hello.jspx, while the rest of the document is identical to the corresponding lines of starfleet.jsp, with the only addition of the closing tag for jsp:root. This is because starfleet.jsp didn’t include any scripting element or untagged text.
Summary
In this chapter, you learned about the structure and the syntax of XML documents, DTDs, and XML schemas.
You then saw several ways of how to validate XML documents against DTDs and schemas.
Next, I introduced you to XSL and explained examples of XPath use and of transformation from XML to XML and from XML to HTML.
To conclude, I showed how you can convert JSP pages with directives and scripting elements into JSP documents that are fully XML-compliant.
In the next chapter, we’ll talk about databases.