
C H A P T E R 9
![]()
Tomcat
I’ve been using Tomcat in all the previous chapters to show you examples of servlets, JSP pages, and documents. Now it’s time to talk about Tomcat itself.
Tomcat, an open-source Servlet/JSP server/container from Apache foundation, is essentially three things:
- A web server
- An application that executes Java servlets
- An application that converts JSP pages and documents into Java servlets
In this chapter, I’ll describe the basics of Tomcat’s architecture and its directory structure. I’ll then show you examples of how to do a couple of useful things.
At the moment of writing this chapter, the latest release of Tomcat is 7.0.28, which runs on Java SE 6 (or later), implements the Servlet 3.0 and JSP 2.2 specifications, and supports EL 2.2.
Tomcat is a project of the Apache Software Foundation. Therefore, the authoritative source for obtaining further information on Tomcat is http://tomcat.apache.org/, which provides extensive documentation (http://tomcat.apache.org/tomcat-7.0-doc/).
Tomcat’s Architecture and server.xml
Tomcat’s architecture consists of a series of functional components that can be combined according to well-defined rules. The structure of each server installation is defined in the file server.xml, which is located in the conf subdirectory of Tomcat’s installation folder.
In the rest of this section, I’ll go through the components. Listing 9-1 shows the default server.xml (after removing the comments). I’ll refer to it when describing the various components.
Listing 9-1. Default server.xml
01: <?xml version='1.0' encoding='utf-8'?>

02: <Server port="8005" shutdown="SHUTDOWN">

03:   <Listener className="org.apache.catalina.core.AprLifecycleListener" SSLEngine="on" />

04:   <Listener className="org.apache.catalina.core.JasperListener" />

05:   <Listener className="org.apache.catalina.core.JreMemoryLeakPreventionListener" />

06:   <Listener className="org.apache.catalina.mbeans.GlobalResourcesLifecycleListener" />

07:   <Listener className="org.apache.catalina.core.ThreadLocalLeakPreventionListener" />

08:   <GlobalNamingResources>

09:     <Resource name="UserDatabase" auth="Container"
10: type="org.apache.catalina.UserDatabase"
11: description="User database that can be updated and saved"
12: factory="org.apache.catalina.users.MemoryUserDatabaseFactory"
13: pathname="conf/tomcat-users.xml" />
14: </GlobalNamingResources>
15: <Service name="Catalina">
16: <Connector port="8080" protocol="HTTP/1.1"
17: connectionTimeout="20000"
18: redirectPort="8443" />
19: <Connector port="8009" protocol="AJP/1.3" redirectPort="8443" />
20: <Engine name="Catalina" defaultHost="localhost">
21: <Realm className="org.apache.catalina.realm.LockOutRealm">
22: <Realm className="org.apache.catalina.realm.UserDatabaseRealm"
23: resourceName="UserDatabase"/>
24: </Realm>
25: <Host name="localhost" appBase="webapps"
26: unpackWARs="true" autoDeploy="true">
27: <Valve className="org.apache.catalina.valves.AccessLogValve" directory="logs"
28: prefix="localhost_access_log." suffix=".txt"
29: pattern="%h %l %u %t "%r" %s %b" />
30: </Host>
31: </Engine>
32: </Service>
33: </Server>
Figure 9-1 shows how the major Tomcat components are organized in hierarchical fashion.
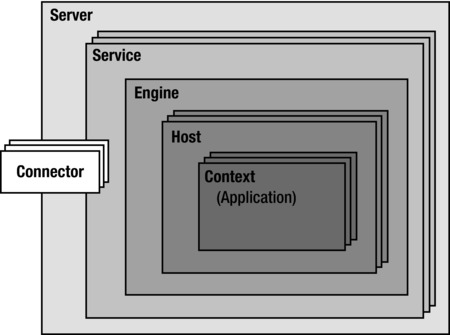
Figure 9-1. Tomcat’s architecture
Context
A Context is the innermost element of a group of Tomcat components called containers, and it represents a single web application.
Tomcat automatically instantiates and configures a standard context upon loading your application. As part of the configuration, Tomcat also processes the properties defined in the WEB-INFweb.xml file of your application folder and makes them available to the application. For example, the web.xml file for eshopf defines, among other properties, a context parameter and a resource reference (see Listing 8-8).
Connector
A Connector is a component associated with a TCP port that handles the communication between applications and clients (e.g., remote browsers). The default configuration of Tomcat includes a connector to handle HTTP communication. By default, this connector waits for requests coming through port 8080. This is why the URLs of our examples always start with http://localhost:8080/.
Later in this chapter, I’ll show you how to change the port number from 8080 to 80, which is the default port for HTTP. Then, you’ll be able to access the examples via http://localhost/.
The presence of an HTTP connector is what makes Tomcat a web server. Note that the requests for all applications go through a single instance of this connector. Each new request causes the instantiation of a new thread that remains alive within the connector for the duration of the request.
Articles about Tomcat often refer to this connector as “Coyote”. Lines 16–18 of Listing 9-1 show how the HTTP connector is defined in server.xml. The connectionTimeout attribute set to 20,000 means that a session is terminated after 5 hours, 33 minutes, and 20 seconds of inactivity, while redirectPort="8443" means that incoming requests that require Secure Socket Layer (SSL) transport are redirected to port 8443. I’ll show you later how you can enable SSL on Tomcat so that it can handle the HTTPS protocol.
By default, Tomcat defines another connector—Apache JServ Protocol (AJP)—which is used to communicate with a web server, such as the Apache HTTP server (see line 19 of Listing 9-1). This connector lets Tomcat only handle dynamic web pages and lets a pure HTML server (e.g., the Apache Web Server) handle the requests for static pages. This maximizes the efficiency with which the requests are handled. Nevertheless, you’ll probably be better off keeping it simple and relying on Tomcat to handle all requests, especially if most of your pages are dynamic. Also, the efficiency of Tomcat has been improving with each release. If you don’t plan on using a web server together with Tomcat, you can comment out this connector.
Host
A Host container represents a virtual host, which is the association of a name such as www.myDomain.com with the server. A host can contain any number of contexts (i.e., applications).
You can define several hosts on the same server. For example, if you have registered the domain myDomain.com, you can define host names such as w1.myDomain.com and w2.myDomain.com. Later in this chapter, I’ll show you how to define a virtual host, but keep in mind that it will only be accessible from the Internet if a domain name server maps its name to the IP address of your computer. For this purpose, you should be able to use the DNS of the company you registered your domain with (i.e., your registrar), but only if you’ve obtained a fixed IP address from your ISP.
The default configuration of Tomcat includes the host named localhost (see lines 25–30 of Listing 9-1), which you’ve encountered in many examples. I just said that a host is reachable by name if it is mapped by a DNS to the IP address of your computer. It is obviously not possible to use such a mechanism that relies on external systems to map localhost, which is local by definition. The association between localhost and your computer is done instead by writing an entry in the file C:WindowsSystem32driversetchosts. I’ll come back to this file when I will explain how to define a virtual host.
The Host attribute appBase defines the application directory within the Tomcat installation folder. Each application is then identified by its path within that directory. The only exception is the path ROOT, which is mapped to the empty string. The application base directory for localhost is webapps. This means that the application in the following directory:
C:Program FilesApache Software FoundationTomcat 6.0webappsROOT
is identified by the empty string. Therefore, its URL is http://localhost:8080/.
For other applications, which reside in directories other than ROOT, as in
C:Program FilesApache Software FoundationTomcat 6.0webappsappl-dir
the URL is like http://localhost:8080/appl-dir/.
You can also assign an absolute directory to appBase.
The attribute unpackWARs="true" means that if you drop a WAR file in the appBase directory, Tomcat will automatically expand it into a normal folder. If you set this attribute to false, the application will run directly from the WAR file. This obviously means a slower execution of the application, because Tomcat needs to unzip the WAR file at execution time.
The attribute autoDeploy="true" means that if you drop an application in the appBase directory while Tomcat is running, it will be deployed automatically. Actually, this definition is redundant because the default for autoDeploy is true.
Engine
The Engine is the highest level of container. It can contain several hosts, but it cannot be contained by any other container component.
An engine must contain one or more hosts, one of which is designated as the default host. The default Tomcat configuration includes the engine Catalina (see line 20 of Listing 9-1), which contains the host localhost (obviously designated to be the default host because it is the only one).
The Catalina engine handles all incoming requests received via the HTTP connector and sends back the corresponding responses. It forwards each request to the correct host and context on the basis of the information contained in the request header.
This Catalina engine is the servlet engine that I mentioned in Chapter 1 (see Figure 1-8).
Service
The purpose of the Service component is to associate one or more connectors to a particular engine.
Tomcat’s default configuration includes the service Catalina (see line 15 of Listing 9-1, and yes, it is named like the engine), which associates the HTTP and AJP connectors to the Catalina engine. Accordingly, Connector and Engine are subelements of the Service element.
Server
The Server is the top component, which represents an instance of Tomcat. It can contain one or more services, each with its own engine and connectors.
You might find this hierarchy of components more complicated than necessary, but it provides a flexible structure. In any case, it is unlikely that you’ll need more than one instance of Tomcat and more than the default Catalina service and engine.
Listener
A Listener is a Java object that, by implementing the org.apache.catalina.LifecycleListener interface, is able to respond to specific events. The default server.xml, as you can see in lines 3-7 of Listing 9-1, defines five listeners inside the Server component.
The first listener enables the Apache Portable Runtime (APR) library. This library provides functionality that integrates what is made available by the operating system (in our case, Microsoft Windows). Its purpose is to increase portability across OSs. One of the functions of the package is to support OpenSSL if the SSLEngine attribute is on (which is the default).
The second listener enables Jasper, which is the JSP engine. This listener is what makes it possible to recompile JSP documents that have been updated.
The third and fifth listeners deal with different known situations that can cause memory leaks.
The fourth listener is responsible for instantiating the managed beans associated with global Java Naming and Directory Interface (JNDI).
The bottom line is that these listeners improve or provide some of Tomcat’s functionality and should remain untouched.
Global Naming Resources
The GlobalNamingResources element can only be defined inside the Server component. It defines JNDI resources that are accessible throughout the server.
The only resource defined in the default server.xml is a user and password memory-based database defined via the file conf/tomcat-users.xml (see lines 9–13 of Listing 9-1). In Chapter 2, you saw an example of user authentication that relies on this element.
Realm
The Realm component can appear inside any container component (Engine, Host, and Context). It represents a database of users, passwords, and user roles. Its purpose is to support container-based authentication. In other words, you can specify an authentication database for each application, host, or engine.
The only realm defined in the default server.xml is in the Catalina engine (see lines 21–24 of Listing 9-1). It refers to the user database defined as a JNDI global resource.
Beside UserDatabaseRealm, the following realm classes are available: JDBCRealm (to connect to a relational database via its JDBC driver), DataSourceRealm (to connect to a JDBC data source named via JNDI), JNDIRealm (to connect to a Lightweight Directory Access Protocol directory), and MemoryRealm (to load an XML file in memory).
Cluster
Tomcat supports server clustering by providing the following three functions:
- Replication of sessions across the clustered servers: This ensures that a session opened on one server is valid on all other servers.
- Replication of context attributes: This makes it possible for you to access the attributes on all servers.
- Cluster-wide deployment via WAR files: This ensures that the same application executes on all servers of a cluster.
You can place a Cluster element inside an Engine or a Host container.
Valve
A Valve is an element that, when inserted in a Container (Context, Host, or Engine), intercepts all the incoming HTTP requests before they reach the application. This gives you the ability to preprocess the requests directed to a particular application, to the applications running in a virtual host, or to all the applications running within an engine.
The valve you see in lines 27–29 of Listing 9-1 logs all requests received by localhost. I will talk about it in one of the following sections.
One of the valves you might like to use is the access log valve, which lets you customize request log entries in a file of your choice. Later in this chapter, I’ll show you an example of how to do it.
The remote address filter valve lets you selectively block requests on the basis of their source IP address. It supports two attributes—allow and deny—which accept regular expressions as values (for a brief description of regular expressions, see the “Regular Expressions” sidebar in Chapter 5). For example, the following valve allows all requests originated from any of the IP addresses 192.168.*.* and rejects all the others:
<Valve className="org.apache.catalina.valves.RemoteAddrValve" allow="192.168.*"/>
On the other hand, by replacing the allow attribute with deny="84.74.97.75", you would have allowed all requests with the exception of those coming from the IP address 84.74.97.75.
The remote host filter valve operates like remote address filter but on client host names instead of client IP addresses. For example, the following valve only allows requests from hosts belonging to the domain myweb.com:
<Valve className="org.apache.catalina.valves.RemoteHostValve" allow=".*myweb.com"/>
The request dumper valve logs details of the incoming requests and therefore is useful for debugging purposes. Here’s how you define it:
<Valve className="org.apache.catalina.valves.RequestDumperValve"/>
The single sign on valve, when included in a Host container, has the effect of requiring only one authentication for all the applications of that host. Without this valve, the user would have to enter his ID and password before using each separate application. Here's how you use it:
<Valve className="org.apache.catalina.valves.SingleSignOn"/>
Loader and Manager
By defining a Loader element inside a Context element, you can replace the standard class-loading mechanism in an application with your own. I see no reason for you to do so, as the default Loader works just fine.
You define a Manager if you want to replace the default session management. As I said concerning the Loader element, it isn’t likely that you’ll ever need to do so.
Directory Structure
If you’ve installed Tomcat as I explained in Chapter 1, Tomcat will be in the following directory:
C:Program FilesApache Software FoundationTomcat
The Tomcat folder contains the following subdirectories: bin, conf, lib, logs, temp, webapps, and work, as shown in Figure 9-2. Two of them are pretty obvious: bin is where the Tomcat executable resides, and temp is a working directory for temporary files.
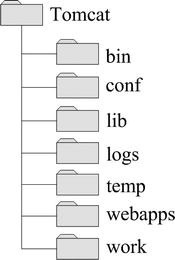
Figure 9-2. Tomcat’s top directories
conf
The conf directory contains the configuration files that apply to all applications. The server.xml file, which I described earlier in this chapter, is one of them. Besides two property files and one policy file used internally by Tomcat, you’ll also see context.xml, tomcat-users.xml, and web.xml, which define defaults for all the applications of the server, and two property-definition files.
In Chapter 8, I showed you how to use a context.xml file containing a Context element to make the information concerning a MySQL database accessible to eshopf (see Listing 8-9). On that occasion, context.xml was in the META-INF application subfolder. The same file placed in the conf folder would make the same database data accessible to all applications. In Chapter 2, you saw an example of how to use tomcat-users.xml to implement user authentication.
This conf folder also includes a subfolder for each engine. By default, only a folder named Catalina exists. Inside the engine folder is a folder for each host, containing host-specific context information. By default, only a folder named localhost exists. We’ll come back to this later in this chapter, when I will tell you how to create virtual hosts.
lib
All the JAR files are kept in the lib directory. If you look into it after doing all the installations I described in the previous chapters, you should see the following libraries or some newer versions of them: annotations-api.jar, catalina.jar, catalina-ant.jar, catalina-ha.jar, catalina-tribes.jar, commons-lang3-3.1.jar, ecj-3.7.1.jar, el-api.jar, jasper.jar, jasper-el.jar, javax.faces-2.1.7.jar, javax.servlet.jsp.jstl-1.2.1.jar, javax.servlet.jsp.jstl-api-1.2.1.jar, jsp-api.jar, mysql-connector-java-5.1.18-bin.jar, servlet-api.jar, tomcat-api.jar, tomcat-coyote.jar, tomcat-dbcp.jar, tomcat-i18n-es.jar, tomcat-i18n-fr.jar, tomcat-i18n-ja.jar, tomcat-jdbc.jar, tomcat-util.jar, xercesImpl.jar, and xml-apis.jar.
Your Tomcat release might have slightly different JARs. And you might see internationalization JARs named like tomcat-i18n-fr.jar but with different language codes.
logs
Tomcat keeps its log files in the logs directory. On any given day of operation, you’ll see the following files: catalina.yyyy-mm-dd.log, commons-daemon.yyyy-mm-dd.log, host-manager.yyyy-mm-dd.log, localhost.yyyy-mm-dd.log, localhost_access_log.yyyy-mm-dd.txt, manager.yyyy-mm-dd.log, tomcat7-stderr.yyyy-mm-dd, and tomcat7-stdout.yyyy-mm-dd.log.
If you have tested eshopf, you will also see eshopf-access.yyyy-mm-dd.log.
If you want to write something to the stdout log from JSP, you can simply write to System.out. For example, the following code writes a line containing “bla bla bla” in the file stdout_yyyy-mm-dd.log:
<% System.out.println("bla bla bla"); %>
The output of System.err also goes to stdout. Therefore, you won’t be able to write to stderr.
Later in this chapter, I’ll show you how you can log the requests received by your applications.
webapps
The webapps directory is the application base directory of localhost. The content of any subdirectory of webapps is accessible by browsers. For example, if you create the folder aaa inside webapps and copy into it the file bbb.jsp, you’ll be able to execute it by typing this in your browser:
http://localhost:8080/aaa/bbb.jsp
You can also drop into webapps a WAR file at any time and Tomcat will automatically expand it.
work
Tomcat keeps the translation of JSP into Java in the work directory. For example, if you create inside webappsROOT folder the the file lineout.jsp containing the following two lines:
<%@page language="java" contentType="text/html"%>

<html><body><% out.println("jsp out"); %></body></html>
and execute it by typing this in a browser:
http://localhost:8080/lineout.jsp
Tomcat will translate it into lineout_jsp.java and compile it into lineout_jsp.class. The two files will be in workCatalinalocalhost\_orgapachejsp, where Catalina is the engine name, localhost is the host name, and the underscore indicates that it is the default application of the host.
The Java listing is 77 lines long. Therefore, I won’t show it here. However, you should look at least once at how Tomcat converts a JSP page into a servlet. The actual JSP code becomes:
out.write("
");

out.write("<html><body>ok");

out.println("jsp out");

out.write("</body></html>
");
The characters "
" after the closing HTML tag are there because I hit the Enter key after typing the second line of lineout.jsp. The initial empty line is due to the fact that the start HTML tag is not immediately after the JSP page directive.
Logging the Requests
To log the incoming requests directed to all applications present on a particular host, you need to include an access log valve in the corresponding Host element of server.xml. By default, Tomcat logs all the requests sent to localhost in a file named localhost-access.yyyy-mm-dd.txt. This is achived with the following valve (see lines 27–28 of Listing 9-1).
<Valve className="org.apache.catalina.valves.AccessLogValve" directory="logs"
prefix="localhost_access_log." suffix=".txt"
pattern="%h %l %u %t "%r" %s %b" />
<Valve className="org.apache.catalina.valves.AccessLogValve"
directory="logs" prefix="localhost-access." suffix=".log"
pattern="common" resolveHosts="false"/>
Listing 9-2 shows some examples of log entries.
Listing 9-2. localhost-access.2012-07-05.log
01: 127.0.0.1 - - [05/Jul/2012:17:50:51 +1000] "GET / HTTP/1.1" 200 11535

02: 127.0.0.1 - - [05/Jul/2012:17:50:51 +1000] "GET /tomcat.css HTTP/1.1" 200 5926

03: 127.0.0.1 - - [05/Jul/2012:17:50:51 +1000] "GET /tomcat.png HTTP/1.1" 200 5103

04: 127.0.0.1 - - [05/Jul/2012:17:50:52 +1000] "GET /bg-upper.png HTTP/1.1" 200 3103

05: 127.0.0.1 - - [05/Jul/2012:17:50:52 +1000] "GET /bg-nav.png HTTP/1.1" 200 1401

06: 127.0.0.1 - - [05/Jul/2012:17:50:52 +1000] "GET /bg-button.png HTTP/1.1" 200 713

07: 127.0.0.1 - - [05/Jul/2012:17:50:52 +1000] "GET /asf-logo.png HTTP/1.1" 200 17811

08: 127.0.0.1 - - [05/Jul/2012:17:50:52 +1000] "GET /bg-middle.png HTTP/1.1" 200 1918

09: 127.0.0.1 - - [05/Jul/2012:17:56:00 +1000] "GET /tomcat-docs HTTP/1.1" 404 988

10: 127.0.0.1 - - [05/Jul/2012:17:56:08 +1000] "GET /docs HTTP/1.1" 302 -

11: 127.0.0.1 - - [05/Jul/2012:17:56:08 +1000] "GET /docs/ HTTP/1.1" 200 14939

12: 127.0.0.1 - - [05/Jul/2012:17:56:08 +1000] "GET /docs/images/tomcat.gif HTTP/1.1" 200 2066

13: 127.0.0.1 - - [05/Jul/2012:17:56:08 +1000] "GET /docs/images/asf-logo.gif HTTP/1.1" 200 7279
Tomcat logged lines 1–8 when I requested the page http://localhost:8080/, line 9 when I requested http://localhost/tomcat-docs (which doesn’t exist), and lines 10–13 when I requested http://localhost/docs/ (which does exist).
Each log entry begins with the IP address of localhost (127.0.0.1), followed by the date and time of the request. The next field is a quoted string (e.g., "GET /docs/ HTTP/1.1"), which contains the type of request (GET), the relative URL of the page (/docs/), and the protocol used (HTTP/1.1). The last two fields are the HTTP status code and the request size in bytes.
The status codes are defined in the standard RFC 2616 (see http://www.w3.org/Protocols/rfc2616/rfc2616-sec10.html). For example, 200 means OK, while 404 means Not Found. There are no codes below 100, and the codes between 100 and 299 indicate that everything is OK. The user doesn’t see them. The codes between 300 and 399 indicate that the client (i.e., the browser) needs to take additional actions (e.g., the server reports a redirection). Usually, the user is not aware of them. What the user always see are the codes between 400 and 499, which indicate client errors (e.g., 404 when the requested URL doesn’t exist), and the codes between 500 and 599, which indicate server errors (e.g., 500, which often indicates that your JSP page contains an error). There are no codes above 599.
Note how the request for the images contained in the page follows the request of the page itself. Also, after requesting the nonexistent page (but before requesting the existing documentation page), I redisplayed Tomcat’s home page. Nevertheless, Tomcat made no entry in the log. This is because the browser had cached the page when I requested it the first time and didn’t actually send any request to the server. You have to keep this issue of caching in mind if you want to make sense of the access logs, especially since caching can occur not only in the client’s browser but also in proxy servers between the client and the server.
When I reloaded the page, according to the log, the browser sent a new request to the server. But it was interesting to note that Tomcat didn’t reply with the OK code 200, but with code 304, which means that the page had not changed since the previous request. This allowed the browser to respond more quickly, because the server had only sent a short response instead of a response containing the page.
If you want to log only the requests directed to a particular application, you can include the valve in a Context element, as in the following example:
<Context debug="5" reloadable="true" crossContext="true">

  <Valve className="org.apache.catalina.valves.AccessLogValve"

    directory="logs" prefix="eshop-access." suffix=".log" pattern="common"

    resolveHosts="false"/>

  </Context>
and place it in the META-INFcontext.xml file of the application folder.
The directory attribute specifies where Tomcat creates the log file. In this case, I decided to use the relative path logs, which is where Tomcat keeps all the other logs. The prefix and suffix attributes define the strings to be placed around the log date to form the daily file names. The resolveHosts attribute specifies whether Tomcat should try to resolve the originating IP address into a host name. I strongly recommend that you leave out the attribute or set it to false, because the name resolution would significantly slow down the logging process.
The pattern attribute defines the format of the log entries. You can form your own pattern by concatenating some of the identifiers listed in Table 9-1 (adapted from the Tomcat documentation).

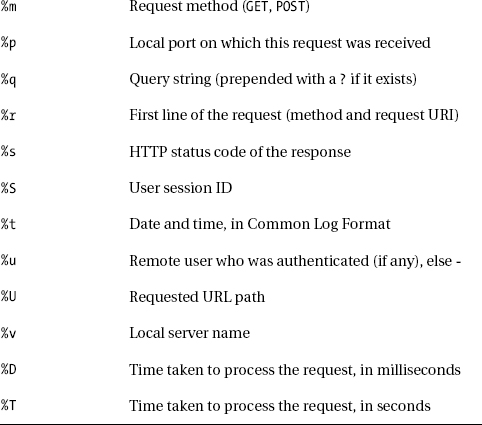
pattern="common" tells Tomcat to use the standard log entry format and is equivalent to the pattern %h %l %u %t "%r" %s %b. You can also use the predefined pattern combined, which is like common with the addition of the referer (i.e., the page that made the request) and the user-agent (e.g., Firefox).
Tomcat on Port 80
The standard HTTP port is 80, while Tomcat by default waits for incoming requests on port 8080. You might like to change the port number to the standard 80, so that no port needs to be specified in the URLs.
All you need to do is update the HTTP connector defined in server.xml. Change the value assigned to the port attribute from 8080 to 80, restart Tomcat, and you’re done.
But, as I remarked in Chapter 1 concerning the default ports when I explained how to install Tomcat, you should check beforehand that port 80 is not being used by other applications.
Creating a Virtual Host
Suppose that you register the domain name jsp-jsf.com (not registered at the time of writing) and would like to point it to your server. Normally, you should have a fixed IP address to be able to do it. Unfortunately, unless you ask your ISP to have a fixed address and pay for it, you just get a dynamic IP address from the ISP. In that case, you can still point a domain name to your computer by using the dynamic DNS service offered online by several providers.
In any case, once requests sent to jsp-jsf.com reach your computer, Tomcat must be able to recognize them and send them to the right applications. For that to happen, you have to create a Host element in server.xml and a couple of directories.
Place the following element inside the Catalina Engine element of server.xml, for example, immediately before the engine end tag:
<Host name="www.jsp-jsf.com"  appBase="webapps/www.jsp-jsf.com"

    unpackWARs="true" autoDeploy="true"

    xmlValidation="false" xmlNamespaceAware="false">

  <Alias>jsp-jsf.com</Alias>

  <Valve className="org.apache.catalina.valves.AccessLogValve"

    directory="logs" prefix="www.jsp-jsf.com_access." suffix=".log"

    pattern="common" resolveHosts="false"/>

  </Host>
Notice that I’ve defined an Alias, so that the “naked” domain name jsp-jsf.com becomes an alternate name for the host name, which is www.jsp-jsf.com. There is no need to have a www host, but it is what almost everybody expects. Obviously, you could choose any other name. Also, notice that the application base directory has the same name as the host. Any other name would have been perfectly acceptable, but if the base directory has the same name as the host, then you’ll never get the directories mixed up, regardless of the number of virtual hosts you create.
Now create a folder named www.jsp-jsf.com inside confCatalina, a second folder also named www.jsp-jsf.com inside webapps, and a third folder named ROOT inside the newly created webappswww.jsp-jsf.com (all paths relative to the Tomcat folder).
Restart Tomcat, and you’re ready to access your host—but only, as I said, if you have a DNS mapping the name jsp-jsf.com to your IP address.
To test your new website without any DNS entry, open the file C:WindowsSystem32driversetchosts and add the following lines to the end:
127.0.0.1    www.jsp-jsf.com

127.0.0.1    jsp-jsf.com
This maps your domain and host names to the local system. As the communication software checks the file host before asking external DNSs to look up a host name, you’ll be able to test your virtual hosts without DNSs, and test an application on any computer before deploying it to its final destination.
Finally, place the following index.html file inside ROOT:
<html><head></head><body>Welcome to www.jsp-jsf.com!</body></html>
and type http://www.jsp-jsf.com or http://jsp-jsf.com in a browser.
You will see your welcome page. Stop Tomcat to force it to save the logs to their corresponding files and open logswww.jsp-jsf.com_access.2012-07-05.log. You will see the following entries:
127.0.0.1 - - [05/Jul/2012:18:42:07 +1000] "GET / HTTP/1.1" 200 49

127.0.0.1 - - [05/Jul/2012:18:42:07 +1000] "GET /favicon.ico HTTP/1.1" 404 988

127.0.0.1 - - [05/Jul/2012:18:42:07 +1000] "GET /favicon.ico HTTP/1.1" 404 988
The first entry is clear: it’s your home page in the ROOT directory of your new website. But what is the favicon.ico file that Tomcat looks for and cannot find?
favicon.ico is the file containing the little icon that appears in the address field of the browsers when they access websites. If you do an Internet search, you will find several free tools that let you convert an image into a favicon.ico file.
All browsers look for the little file in the ROOT directory of your website. There are other mechanisms to supply the icon, but they are not completely standardized.
HTTPS
In this section, I’ll explain how to create a secure web site for the virtual host www.jsp-jsf.com I created in the previous section.
With the HTTPS protocol, the traffic between browser and server is encrypted. This is achieved by sticking the HTTP protocol on top of the protocol layers that actually manage the encryption, Secure Socket Layer (SSL) and Transport Layer Security (TLS).
When you request a page via HTTPS, before sending the response, the server communicates the identity of its service by sending to the browser an encrypted certificate. This means that you need to install a certificate in Tomcat before you can access www.jsp-jsf.com via HTTPS.
Note that you can create a certificate for services (e.g., catalina), but not for virtual hosts (e.g., localhost and www.jsp-jsf.com), because you need a connector for each protocol (e.g., HTTP and HTTPS), and you can only associate connectors with services. The reason is simple: SSL must be tied to a unique combination of IP address and port, but all virtual servers share the same combination.
Obviously, if you create your own certificates, their existence doesn’t prove at all that your websites are where they claim to be. For that, a Certification Authority (CA) of proven respectability must sign your certificates to confirm their validity.
That said, in the remainder of this section, I am precisely going to tell you how to create and sign your own certificates. Once you know how things work, you can always contact a CA and get a “real” certificate from them. They don’t necessarily come cheap, though. Alternatively, you can obtain a certificate via CAcert (http://cacert.org), an “open source” organization that is gaining acceptance worldwide.
The first step is to install the program that lets you create your own certificates. OpenSSL (http://openssl.org) is the logical choice, but they only distribute the sources. To download an installer for Windows, go to http://gnuwin32.sourceforge.net/packages/openssl.htm and click on the Setup link beside “Complete package, except sources”.
Launch the installer (openssl-0.9.8h-1-setup.exe) and keep clicking on the Next button until you reach the Select Components dialog. Untick the boxes beside Documentation and Developer files before clicking Next. I recommend that you don’t install documentation and developer files (i.e., things like C header files) because they cause error messages during installation. I know, it is a bit unsettling, but you can download the documentation directly from the OpenSSL website.
To create the certificate, start by creating a working folder (I created a folder named SSL on the desktop) and copy to it the file shown in Listing 9.3, which you will find in the software package for this chapter.
Listing 9-3. openssl.cfg
dir = .


[ req ]

default_bits = 2048

default_keyfile = tomcatkey.pem

distinguished_name = req_distinguished_name


[ req_distinguished_name ]

0.organizationName = Giulio Zambon

countryName= AU
countryName_min= 2

countryName_max = 2

stateOrProvinceName= Australia

localityName = Canberra

organizationalUnitName = n.a.

commonName = www.jsp-jsf.com

commonName_max = 64

emailAddress = [email protected]

emailAddress_max = 40


0.organizationName_default = Giulio Zambon

localityName_default = Canberra

stateOrProvinceName_default = Australia

countryName_default = AU

commonNameDefault = www.jsp-jsf.com


[ v3_ca ]

basicConstraints = CA:TRUE

subjectKeyIdentifier = hash
As you can see, it consists of a series of assignments with some square-bracketed headers. To explain everything would take too long. You can read a description of the configuration file in http://www.openssl.org/docs/apps/config.html. If you go to http://www.openssl.org/docs/apps/, you will also find the raw list of many documents that don’t appear to be reachable from links in the OpenSSL website.
In any case, it should be clear that most of the fields refer to the identity of the organization that requests the certificate. Notice that I set the commonName field to www.jsp-jsf.com. It will become clear in a moment. Obviously, you should update the fields to reflect your identity and not mine.
To create the certificate for Tomcat, open a command-line window by navigating to Accessories ![]()
Command Prompt, change the directory to the working folder, and launch the OpenSSL application with the command (including the quotes):
"C:Program FilesGnuWin32inopenssl"
At the prompt, type the OpenSSL command:
req -new -x509 -out tomcatcert.pem -days 365 -config openssl.cfg
X.509 is the ITU-T standard for public-key cryptography that defines the type of certificate you need, and the parameter days lets you set the validity of the certificate. Listing 9-4 shows what you are going to see when you hit Enter.
Listing 9-4. Capture of Creating a Certificate
OpenSSL> req -new -x509 -out tomcatcert.pem -days 365 -config openssl.cfg

Loading 'screen' into random state - done

Generating a 2048 bit RSA private key

.....................................................................+++

................................................................................

.............................+++

writing new private key to 'tomcatkey.pem'

Enter PEM pass phrase:

Verifying - Enter PEM pass phrase:
-----

You are about to be asked to enter information that will be incorporated

into your certificate request.

What you are about to enter is what is called a Distinguished Name or a DN.

There are quite a few fields but you can leave some blank

For some fields there will be a default value,

If you enter '.', the field will be left blank.

-----

Giulio Zambon [Giulio Zambon]:

AU [AU]:

Australia [Australia]:

Canberra [Canberra]:

n.a. []:

www.jsp-jsf.com [www.jsp-jsf.com]:

[email protected] []:

OpenSSL>
I have highlighted the lines where you need to provide an input. PEM stands for Privacy Enhanced Mail, the format used for encoding certificates. The program asks for a pass phrase, which can consist of several words, used to protect the generated certificate. As a pass phrase for this example, I used the word whatever. In real life you should use something less predictable.
The lower block of questions gives you the possibility of modifying the configuration stored in openssl.cfg. As you can see from Listing 9-4, I didn’t type anything before hitting Enter after each question, which means that I didn’t change anything.
You will find that your working directory now contains two additional files: tomcatkey.pem and tomcatcert.pem. You should move or copy them to a place where Tomcat can find them. I moved mine to the Tomcat folder.
Now that you have in place a certificate, to be able to use HTTPS, you need to “open” the corresponding connector in the Catalina service defined in server.xml. A connector definition for this purpose is already there, but you cannot use it as it is. To explain why, I need to take a small digression.
Tomcat supports two different implementations of SSL: JSSE and APR. JSSE stands for Java Secure Socket Extension and is provided as part of the Java Runtime. APR means Apache Portable Runtime and is the provided as part of Tomcat itself.
Do you remember that in Chapter 1 I recommended to install Tomcat with native libraries for better performance? One of the effects of that choice is that Tomcat uses the APR implementation of SSL, while the connector already defined (but commented out) in server.xml is for JSSE. That’s why you cannot simply uncomment the HTTPS connector in server.xml.
No big deal. It took more to explain the whole story than to modify the existing connector as needed. Here it is:
<Connector port="443" protocol="HTTP/1.1" SSLEnabled="true"

    maxThreads="150" scheme="https" secure="true"

    SSLCertificateFile="/Program Files/Apache Software Foundation/Tomcat/tomcatcert.pem"

    SSLCertificateKeyFile="/Program Files/Apache Software Foundation/Tomcat/tomcatkey.pem"

    SSLPassword="whatever"

    clientAuth="false" sslProtocol="TLS"

    />
The only difference is that I inserted the three attributes that start with SSL. As I had changed the HTTP port from 8080 to 80, I also changed the HTTPS port from 8443 to 443, which is the standard one for that protocol. Finally, to make server.xml self-consistent, I removed the redirectPort="8443" attribute from the HTTP connector.
After restarting Tomcat, open a browser window and type https://www.jsp-jsf.com/. The browser will open a dialog like that shown in Figure 9-3 (screenshot taken with IE).
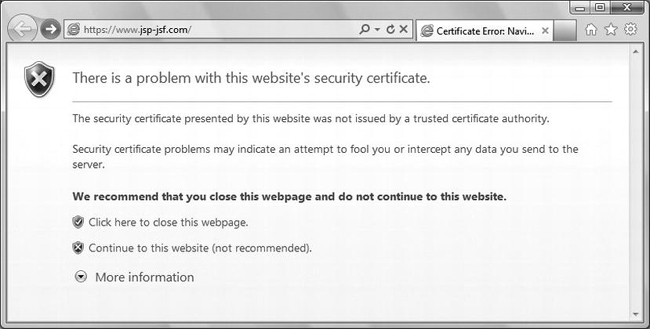
Figure 9-3. Unknown authority (Internet Explorer)
You see this dialog because the certificate was issued by you insteayd of by a recognized CA. If you click on Continue to this website and then on the little red shield that will appear in the address bar, you will see the dialog shown in Figure 8-4.
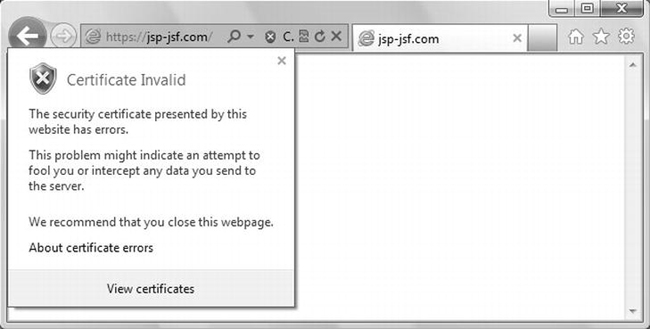
Figure 9-4. Security report (Internet Explorer)
If you click on View certificates, you will see the certificate shown in Figure 9-5.
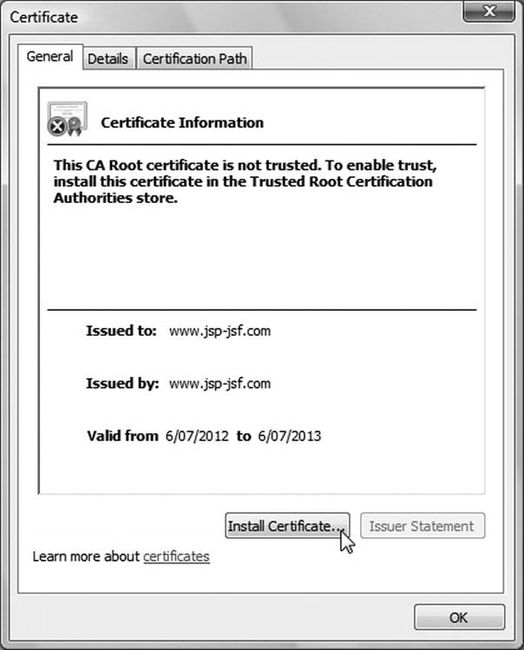
Figure 9-5. Security certificate (Internet Explorer)
What causes the warning is the fact that Issued by doesn’t name a trusted CA. The browser will keep asking for confirmation before displaying every page of the web site https://www.jsp-jsf.com unless you install the web site certificate in the browser. Note that every browser displays equivalent warnings, although in different formats.
If the Issued To name on the certificate doesn’t match the host name, instead of getting the dialog displayed in Figure 9-3, you get the one shown in Figure 9-6.
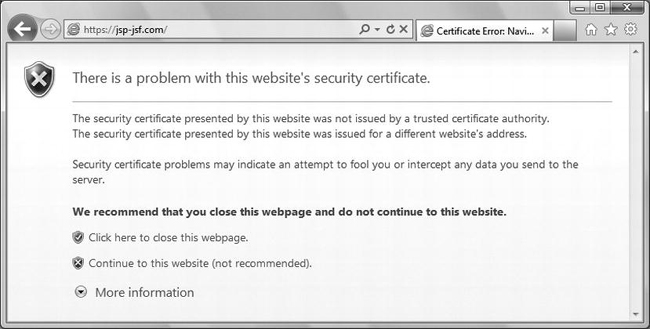
Figure 9-6. Domain name mismatch (Internet Explorer)
At first sight, the two dialogs seem identical, but there is a difference: in the dialog of Figure 9-6, there are two lines of warnings instead of one. The certificate’s common name is www.jsp-jsf.com, but to cause the dialog in Figure 9-6 to appear I displayed https://jsp-jsf.com, without www. Something to keep in mind when you publish a secure website.
Application Deployment
The simplest way to deploy an application with Tomcat is to create an application folder and place it inside the application base directory of the host (webapps by default).
For example, if you go to the Source Code/Download area of the Apress web site (http://www.apress.com) and download the software package containing the examples I developed for this manual, you’ll find that the folder with the examples for Chapter 3 contains a folder named eshop folder that contains a folder named eshop. Copy the folder eshop to the directory
C:Program FilesApache Software FoundationTomcat 6.0webappswww.jsp-jsf.com
and you’ll be able to launch the application with the following URL:
http://www.jsp-jsf.com/eshop/shop
If you copy the folder eshop to webapps rather than to webappswww.jsp-jsf.com, the URL will be:
Another way of deploying an application is to create a WAR file (as I described in Chapter 3), and place it in the application base directory of the host. Tomcat will then expand it into the application folder. For example, copy the eshop.war file you find in the eshop folder I mentioned above to the directory
C:Program FilesApache Software FoundationTomcat 6.0webappswww.jsp-jsf.com
and wait a few seconds while Tomcat expands it.
You can deploy an application without having to restart Tomcat, because the definitions of localhost and www.jsp-jsf.com contained in server.xml include the attributes unpackWARs="true" and autoDeploy="true".
You might decide to define hosts that don’t support automatic deployment. This would improve security, but it would also force you to restart Tomcat in order to deploy or redeploy applications. To resolve this issue, Tomcat’s developers have created a manager application that lets you deploy your applications without having to restart Tomcat.
To be able to use the manager application, edit the server.xml file and insert the following element into the element that defines the host you want to manage:
<Context path="/manager" privileged="true" docBase="manager">

  <Valve className="org.apache.catalina.valves.RemoteAddrValve" allow="127.0.0.1"/>

  </Context>
The Valve element prevents you from using it remotely. Remove the Valve element if you want to be able to use it from a system other than the one you have installed Tomcat on. As an added measure of security, the manager application requires you to log in with a user ID that has manager capabilities. You defined such a user ID when you installed Tomcat. If you’ve forgotten the ID or its associated password, look inside the tomcat-users.xml file, which is located in the same conf directory as server.xml. There, you’ll find the following element:
<user username="userID" password="pass" roles="admin-gui,manager-gui" />
Now, if you type the URL http://localhost/manager/html in a browser, you will be requested to enter user ID and password of an admin/manager user, as shown in Figure 9-7.
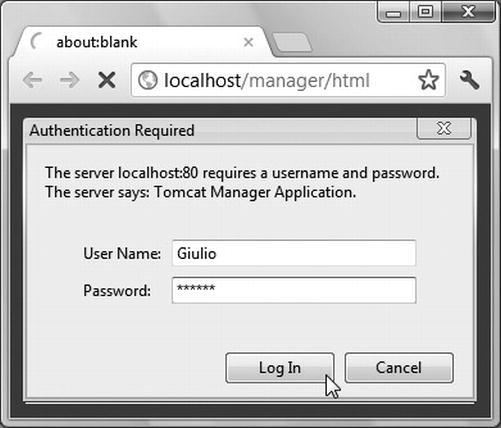
Figure 9-7. Logging in to manage the server
After logging in, you’ll see a page with the list of the deployed applications and additional information. Figure 9-8 shows the top of the page, including the first application, which is the ROOT application of localhost.
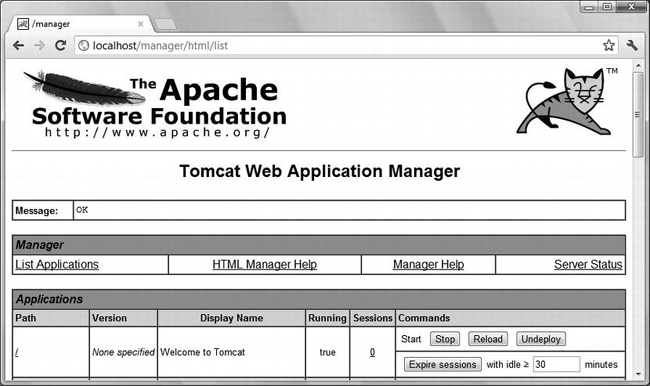
Figure 9-8. Top of Tomcat’s Web Application Manager page
Notice that you can undeploy (i.e., remove) the application, reload it, and stop it. You can also change the session idle timeout, which is currently set to the default value of 30 minutes.
If you scroll down, you will find a part of the page that lets you deploy new applications. Figure 9-9 shows the bottom of the page beginning from the entry of the last deployed application. There is no point in showing you the entries of all my applications.
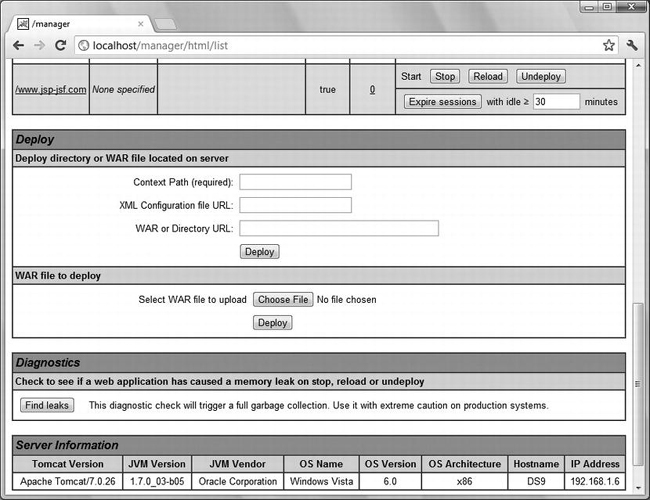
Figure 9-9. Bottom of Tomcat’s Web Application Manager page
Cool!
Notice the versions of Tomcat and of the Java Virtual Machine. If you want to know more about your server, you only need to click on the Server Status tab you see in Figure 9-8. If you do so, you will see that the tab changes to Complete Server Status. Click on it again and you will get detailed information on all the applications.
Summary
In this chapter, I provided a very brief introduction to a complex package. Nevertheless, Tomcat’s default configuration already covers all the functionality that most people are ever going to need.
I started by describing the components that make up Tomcat. Then, I continued my introduction to Tomcat by explaining how its directories are organized. Finally, I showed some examples of how to modify Tomcat’s default configuration. In particular, I explained how to log incoming requests, how to use the standard HTTP ports, and how to create a virtual host, including the handling of encrypted pages.
In the next chapter I’ll complete the description of the eshop, eshopx, and eshopf applications I have used in several chapters as a source of examples.