
Instead, this chapter covers the patterns you will most often encounter, and we will also work through some example snippets.
The Model
where beanName corresponds to the setBean() method parameter from the pseudo-code, and name corresponds to a field name.
CDI in Java MVC
Java MVC is a modern framework and its model capabilities supersede the idea of simply referring to beans. It does so by incorporating the CDI (Context and Dependency Injection) technology for Jakarta EE 8 in version CDI 2.0. CDI is not a small technology—its specification PDF has more than 200 pages! Needless to say, we cannot introduce every concept of CDI, but we discuss the most important ideas and center our survey on the way Java MVC uses CDI.
You can find the CDI specification at https://jakarta.ee/specifications/cdi/2.0/.
The basic idea is the same: we want to instantiate bean classes (data classes that contain mainly fields and their getters and setters) and provision those instances to both the controllers and the views. The main difference between the pre-CDI and the CDI way is that we don’t instantiate such model classes ourselves and instead let CDI do it.
We also use the @RequestScoped annotation to bind the lifecycle of the object instance to a single HTTP request/response cycle. We talk more about scopes in the next section.
CDI in Java MVC
You can then use the altered name in a view page: ${user.name}. Since, in @Inject, the reference happens by class name and not by an annotation parameter, for injection into a Java class, you still use @Inject private UserName userName;, even with the altered name.
Model Object Scopes
Request scope : An instance of an injected bean is created during an HTTP request and prevails only for the lifespan of the HTTP request and the response sent to the client (the browser). A typical usage scenario of request scope variables is when communicating POST form data or GET query parameters to the view layer page defined in the response. So you inject @Named request scope beans into controllers, set their fields there, and use the beans in the view layer. Because the lifespan of request scoped beans is short, they help keep the memory footprint of a web application low and avoid memory leaks.
Session scope: A session is bound to a browser window and spans several HTTP request/response cycles. A session is started whenever the user enters a web application and terminates upon some timeout or an explicit session cancellation. Session scoped data objects prevail until some timeout is fired or the session is explicitly closed. You use session scoped objects when you need to maintain state with a lifecycle exceeding a single HTTP request/response cycle. Session data simplifies state handling, but significantly increases the danger of having a memory consuming web application or of establishing destabilizing memory leaks.
- Redirect scope : In order to support the POST-redirect-GET design pattern, Java MVC defines a redirect scope for CDI beans. You use this pattern if you want to avoid reposts when a browser user clicks the reload button prior to a POST action being terminated. The lifecycle of beans with a redirect scope span the POST and a subsequent GET (because the browser was made to receive a redirect code 303). In the Java MVC controller, you start POST-redirect-GET by either returning a Response.seeOther( URI.create("response/path" )).build() or a string "redirect:response/path" from inside the method that handles the POST. The process is as follows:
- 1.
The user enters data in a form and submits it. The Java MVC controller is invoked.
- 2.
The controller works through the form parameters, and the method in the end returns Response.seeOther( URI.create("response/path" )).build() or "redirect:response/path".
- 3.
The browser automatically sends a redirect to the given path.
- 4.
The response/path path (adapt it accordingly) points to another controller method with the GET verb. It advances to a view page showing the appropriate response to the user’s request.
- 1.
Application scope : Any application-wide user-independent data can use this scope. Data prevails until the web application is undeployed or the server is stopped.
Dependent scope : This is a pseudo-scope. It means the CDI bean gets the same scope as the bean it was activated from. The dependent scope is the default if no scope is explicitly set.
They are all from the javax.enterprise.context package, except for RedirectScoped, which is a Java MVC extension and belongs to the javax.mvc.annotation package .
The Simplified Model Data Container
Use the Models interface only when you need to handle a small amount of data. Otherwise, you risk unstructured, incomprehensive code.
Models data has a request scope.
The View: JSPs
The view part of Java MVC is responsible for presenting the frontend to the client (the browser), for both input and output. Those Java MVC view files, which are connected to controller methods, are in the WEB-INF/views folder, or, because we are using Gradle as a build framework, in the src/main/webapp/WEB-INF/views folder.
Java MVC, out-of-the-box, supports two view engines—JSPs (JavaServer Pages) and Facelets (the view declaration language for JSF, JavaServer Faces). By design, other view engines can be included by an extension mechanism based on CDI. In this section, we talk about the JSP variant of Java MVC views.
For the JSP specification, see https://download.oracle.com/otndocs/jcp/jsp-2_3-mrel2-spec/.
JSP Basics
JSPs allow developers to interleave static content, for example HTML, and dynamic content, represented by JSP elements. A JSP page is internally compiled into one big Java class inheriting from Servlet. A file containing JSP code has the ending .jsp.
For GlassFish, you can see the generated servlets in the GLASSFISH_INST/glassfish/domains/domain1/generated/jsp/-[PROJECT-NAME] folder.
Directives
JSP Directives
Name | Description |
|---|---|
<% page ... %> | Page-dependent attributes. Possible parameters are shown in Table 6-2 (space-separated list). |
<% include file="relative url" %> | Include another file in this place. For example: <% include file = "header1a.jsp" %> |
<% taglib uri="uri" prefix="prefix" %> | Include a tag library. The precise syntax is shown in the tag library documentation. |
JSP Page Directives
Name | Description |
|---|---|
buffer="..." | Use this to set the output buffer’s size. Possible values: none (no buffer), or Nkb, where N is a number and kb stands for kilobytes (for example: 8kb). |
autoFlush="true"|"false" | Auto-flushes the output buffer once it’s filled. Otherwise, an exception will be thrown. Default is true. |
contentType="..." | Sets the output’s content type. Examples: text/html, text/xml. To also specify the character encoding, add ;charset=..., as in contentType = "text/html;charset=UTF-8" |
errorPage="..." | Specify an error page to be shown if an exception is thrown. This is a relative URL. Example: errorPage = "error.jsp" |
isErrorPage="true"|"false" | If true, qualifies this JSP as an error page. |
extends="some.pckg.SomeClass" | Makes the generated servlet extend the given class. This way you can provide your own servlet implementation. |
import="..." | Works exactly like a Java import statement. |
info="..." | Add any text here that describes the JSP. |
isThreadSafe="true"|"false" | If false, only one thread at a time will be working the JSP. Default is true. |
language="..." | Indicates the programming language used. Write java here. |
session="true"|"false" | If true, sessions will be enabled. Default is true. |
isELIgnored="true"|"false”" | If true, expression language constructs ${ ... } are not evaluated. Default is false. |
isScriptingEnabled="true"|"false" | If true, dynamic JSP scripting is enabled. Default is true, and setting this to false normally makes no sense except for truly static pages . |
This implies that the text editors use UTF-8 (I presume this is the case). The two taglibs refer to the JSTL (JavaServer Pages Standard tag Library) tag library. The core and fmt parts of this taglib refer to useful tags common to many web applications.
JSTL has more parts, which we don’t use for Java MVC. If you want to learn more about JSTL, go to https://jcp.org/aboutJava/communityprocess/final/jsr052/index.html.
Static Content
This code will be output as is, with three exceptions. The directives on top, the <%-- ... --%>, which embraces a comment, and the ${ ... }, which stands for an expression to be handled by a processing step inside the JSP engine.
Java Scriptlets and Java Expressions
The second construct, <%= ... %>, adds the expression result to the servlet’s output stream.
Do not overuse these constructs. After all, Java is an object oriented language, not a frontend templating language.
Implicit Objects
out: The servlet’s output stream of type JspWriter (extends java.io.Writer).
request: The request, type HttpServletRequest.
response: The response, type HttpServletResponse.
session: The session, type HttpSession.
application: The application, type ServletContext.
config: The servlet configuration, type ServletConfig.
page: The servlet itself, type Object (runtime type javax.servlet.http.HttpServlet).
pageContext: The page context, type PageContext.
You can use these objects to achieve fancy results, but bear in mind that you somehow leave official development patterns if you use them. This might make your code hard for others to read, and by putting functionality into the view pages, the natural demarcation between the model, the view, and the controller is broken.
JavaBeans Components
In both cases, you use an expression language construct ${ ... } inside the JSP. We talk about the expression languages in the next section.
Because of the implicit objects, you can refer to POST or query parameters directly from inside the JSPs. This is not MVC-like, however, because it introduces a second model layer out of reach to the controllers, and it moves controller responsibilities to the view. So don’t do that and always use injected CDI beans instead.
Expression Languages
name: Directly refers to a CDI managed bean or an implicit object. While rendering the view, the expression leads to using the toString() method for generating output. Example: ${user}.
value.property: Refers to a property field of a value object (there must be a getter), or a map entry keyed by property if value is a map. Examples: ${user.firstName} (there must be a getFirstName() in the user CDI bean) and ${receipt.amount} (receipt is a map, and amount a key therein).
value[property]: Refers to a field value-of-property of a value object (there must be a getter), or a map entry keyed by value-of-property if value is a map, or an item of a list or array if property evaluates to an int (for the index) and if value is a list or array. The property can also be a literal, like 42 or 1.3 or 'someString' or "someString". Examples: ${user['firstName']} (same as ${user.firstName}) and ${list[2]} (third element in a list or array).
unaryOperator value: Applies unaryOperator to value. Unary operators are − (negate), not or !, and empty (value is null or empty).
- value1 binaryOperator value2: Applies binaryOperator to value1 and value2. Binary operators are:
Arithmetical: +, -, *, /, and div, %, and mod (modulo)
Logical: and and &&, or and ||
Relational: == and eq, != and ne, < and lt, > and gt <=, and le, >=, and ge
value1 ternaryOperatorA value2 ternaryOperatorB value3: Applies ternaryOperator to value1, value2, and value3. There is just one: a ? b : c evaluates to b if a is true; otherwise, it evaluates to c.
EL Implicit Objects
Name | Description |
|---|---|
pageScope | A map with scoped variables from page scope. |
requestScope | A map with scoped variables from request scope. |
sessionScope | A map with scoped variables from session scope. |
applicationScope | A map with scoped variables from application scope. |
paramValues | A map with request parameters as collections of strings. In a Java MVC application, you normally don’t access such data via expressions, so don’t use it. |
param | A map with request parameters as strings (the first of each request parameter). In a Java MVC application, you normally don’t access such data via expressions, so don’t use it. |
headerValues | A map with HTTP request headers as collections of strings. |
header | A map with HTTP request headers as strings (the first of each header). To access a certain header, you’d for example write ${header["user-agent"]}. |
initParam | A map with context initialization parameters. |
cookie | Maps cookie names to instances of javax.servlet.http.Cookie. |
pageContext | An object of type javax.servlet.jsp.PageContext. Allows you to access various objects, like the request, the response, and the session. |
Output
They are not exactly the same, though. Without an additional escapeXml = "false", the tag will for example replace > with > and < with <. If ${userData.name} happens to be <John>, you won’t see anything in the browser window for Hello ${userData.name}. The browser sees a <John>, which it interprets as an (invalid) tag. The tag variant instead outputs a <John> which shows up as a <John>.
escapeXml: Whether to escape special XML characters. Not required; the default is true.
value: The value to print. Required. Typically you write an expression like ${someBean.someProperty} here.
default: The default to write if something goes wrong with the value. Not required.
Variables
value: The value to be used for the new variable (or property). Typically, you write an expression like ${someBean.someProperty} here.
var: The name of a new variable that stores the value. Not required, but if not given, target and property must be used.
scope: The scope of the variable given in var="...". The default is page (only the currently rendered page).
target: An object or map that stores the value. Not required.
property: The name of a property (field) or key (for maps) if target is specified. Not required.
Loops
The expression inside items="..." can be any array or a list of strings, primitives, or other objects.
items: The items to iterate through. Not required, but if missing, the loop will iterate over an integer. This is where you probably write an expression like ${someBean.someListOrArray}.
var: The name of a page scope variable that will be generated and then will hold each item of the loop. Not required.
begin: Element to start with. Not required; the default is 0 (the first item).
end: Element to end with. Not required; the default is the last element.
step: The step. Not required; the default is 1.
varStatus: The name of a loop status variable (the page scope). Not required. The variable will hold an object of type javax.servlet.jsp.jstl.core.LoopTagStatus.
Conditional Branching
Cookies
where theCookieName is replaced with the cookie name. The ${cookie.theCookieName} then refers to an object of type javax.servlet.http.Cookie. However, only the name and the value are available.
In the response page (or some later page), you can then write the JSP code shown to investigate the cookie.
For a local test server, you must set localhost as the cookie domain. Also, you must set the appropriate path value, maybe / for simplicity (it matches all paths).
The View: Facelets
The other view technology that Java MVC supports, apart from JSP, are Facelets. Facelets is the templating framework especially created for JSF, and JSF (JavaServer Faces) is the dedicated main frontend technology for Jakarta EE. JSF is component-based, in contrast to Java MVC, which is action-based. This is where a problem shows up: Java MVC is somewhat of a competitor to JSF, so Java MVC and Facelets at first sight don’t seem to match. The good news is that, because JSF and Facelets are highly decoupled, we don’t have to use JSF components, and Facelets as a mere templating engine can be used for Java MVC as well. This is nice, because Facelets is more apt to a modern programming style compared to JSP, which is sometimes considered old-school, although venerable.
We didn’t put Facelets at second place as a templating engine for Java MVC without intention, though. JSPs have proven to be valuable for decades now, and they are a little bit closer to basic programming paradigms often used by frontend developers. Besides, if you have some experience programming in JSF, using Facelets obviates the danger of trying to use JSF features for Java MVC, which easily messes up your application design. Facelets, in contrast, applies a higher degree of abstraction, and, if it’s used by a skilled developer, allows for a leaner and cleaner application design.
Having said that, it is totally up to you which frontend technology you use. This section shows you how to use Facelets for Java MVC.
Facelets Files
Facelets files for Java MVC go in the same folder as JSP files: the WEB-INF/views folder, or, because we are using Gradle as a build framework, in the src/main/webapp/WEB-INF/views folder.
Facelets files are XML files, which is maybe the most noticeable difference between JSPs and Facelets. You don’t have directives like ci{<\% ... \%>} in Facelets, and you can’t use legacy HTML constructs which are not valid XML, but nevertheless allowed for JSPs.
Facelets Configuration
This class is empty by intention; the context path element is added by the annotation alone.
Templating via Facelets
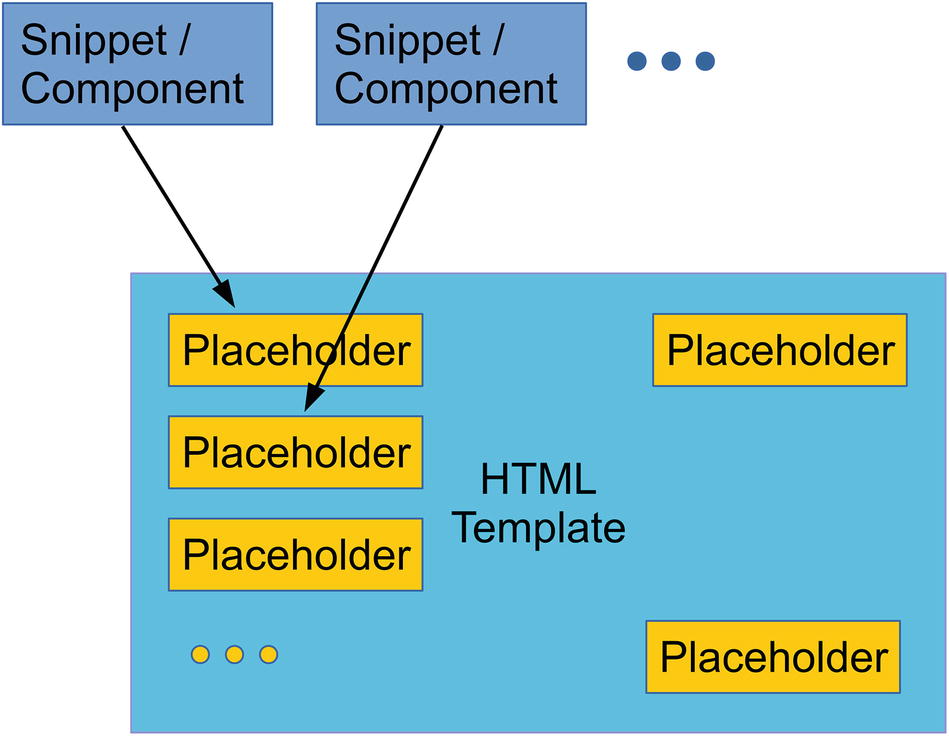
Facelets allow us to introduce parameterized template HTML pages, HTML snippets (components) to be included in pages, placeholders for such snippets, and decorators and repetitions for things like elaborated list views. In the following pages, we first enlist the Facelets tags, and after that develop a sample application to get you started.
In the following sections, we explain the Facelets tags you can include in a XHTML file to apply or mix templates, include XHTML snippets, or pass parameters.
The <ui:include> Tag
If the included file contains a <ui:composition> or a <ui:component>, only the inner contents of the <ui:composition> or <ui:component> tag will be included. This allows designers to style the included files independent of their later plumbing together by the server.
The <ui:composition> Tag, First Variant
it defines a subtree (collection) of HTML elements. The idea behind that is, if you use <ui:include> and the included file contains a <ui:composition> ... </ui:composition>, only the inner contents of the <ui:composition> ... </ui:composition> will be included. The tag itself and anything around it will be ignored. So you can let page designers create a completely valid XHTML file, put a <ui:composition> ... </ui:composition> around the interesting parts, and write <ui:include> in any other JSF page to extract exactly such parts.
The <ui:composition> Tag, Second Variant
it defines a collection of XHTML snippets to be passed into placeholders inside the template file (corresponding to the template = "..." attribute).
to define contents to be used for the <ui:insert> tags. Anything around the <ui:composition> tag will be ignored again, so you can let designers create the snippets using non-JSF aware HTML editors and only later extract interesting parts with <ui:define name = "someName"> ... </ui:define> to be used for materializing the template file.
The <ui:insert> Tag
Use this to define placeholders inside template files. A <ui:insert name="name1"/> tag inside a template file thus means that any file referring to this template may define contents for the placeholders. This definition has to happen inside <ui:composition>, <ui:component>, <ui:decorate>, or <ui:fragment>.
it will be taken as a default if the placeholder is not defined otherwise.
The <ui:define> Tag
Since insertion points can only exist in template files, the <ui:define> tag can only show up in files referring to template files via <ui:composition template = "...">
The <ui:param> Tag
The <ui:component> Tag
id: The element’s ID in the component tree. Not required; JSF generates an automatic ID if you don’t specify it. May be an EL (expression language) string value.
binding: For binding the component to a Java class (must inherit from javax.faces.component.UIComponent). Not required. May be an EL string value (class name).
rendered: Whether or not the component is to be rendered. Not required. May be an EL boolean value.
The <ui:decorate> Tag
In contrast to <ui:composition>, the file with the <ui:decorate> will contain the completely valid XHTML code, including html, head, and body, and the template file will be inserted where the <ui:decorate> appears. Therefore, it must not contain html, head, or body. This is more or less an extended include, where passed-over data is not given by the attributes but listed in the tag body instead.
You usually apply the <ui:decorate> tag to further elaborate code snippets. You can wrap them into more <div>s to apply more styles, add a label or a heading, and more.
The <ui:fragment> Tag
id: For the element’s ID in the component tree. Not required; JSF generates an automatic ID if you don’t specify it. May be an EL (expression language) string value.
binding: For binding the component to a Java class (must inherit from javax.faces.component.UIComponent). Not required. May be an EL string value (class name).
rendered: Whether or not the component is rendered. Not required. May be an EL boolean value.
We have introduced XHTML (the caption) and a new component (the table).
The <ui:repeat> Tag
begin: Not required. If it’s specified, the iteration begins in the list or array. May be an int valued value expression.
end: Not required. If specified, the iteration ends (inclusive) in the list or array. May be an int valued value expression.
step: Not required. If specified, steps inside the list or array. May be an int valued value expression.
offset: Not required. If specified, an offset is added to the iterated-over values. May be an int valued value expression.
size: Not required. If specified, it’s the maximum number of elements to read from the collection or array. Must not be greater than the array size.
value: The list or array to iterate over. An Object valued expression. Required.
var: The name of an expression language variable to hold the current item of the iteration. May be a String value expression.
varStatus: Not required. The name of a variable to hold the iteration status. A POJO with read-only values: begin (int), end (int), index (int), step (int), even (boolean), odd (boolean), first (boolean), or last (boolean).
rendered: Whether the component is to be rendered. Not required. May be an EL boolean value.
The JSTL (Java Standard Tag Library) collection provides a <c:forEach> tag for looping. JSF and JSTL do not work together very well because of conceptual differences. In tutorials and blogs, you will find lots of examples for loops with JSTL. It is, however, better to use <ui:repeat> instead to avoid problems.
The <ui:debug> Tag
Add this to your page during the development phase of your project. Using a hotkey, the tag will then lead to the JSF component tree and the other information to be shown on the page. Use the hotkey="x" attribute to change the hotkey. Shift+Ctrl+x will then display the component (note that the default d does not work with the Firefox browser!). The second optional attribute is rendered="true|false" (you can also use an EL boolean expression) to switch on or off this component.
This tag only works in the development project stage. Inside WEB-INF/web.xml, you can add this tag:
to specify the project stage (any of Development (default), UnitTest, SystemTest, or Production).
An Example Facelets Project
Templating with Facelets
Apart from dependency handling, this build file introduces two custom tasks for deploying and undeploying the MusicBox web application on a local server. The Guava library is just a collection of useful tools for streamlining basic development needs.
You should enter your own GlassFish server installation path. An empty admin password is An empty password is Glassfish’ default setting. If you changed this, you must enter the password in this file.
The Musicbox Facelets application
The response() method is not implemented in this example. It is shown here to get you started if you want to include forms.
You can see that we use the <ui:composition> tag to apply the page template.
The pages deliberately do not use any JSF tags. If you look for Facelets tutorials, in most cases they will include JSF tags. I consider it a dangerous practice to use Facelets and JSF tags in Java MVC projects. The different design paradigms for Java MVC (action based) and JSF (component based) will very likely lead to problems that are hard to fix. It is however possible to use Facelets and JSTL together; see the following section.
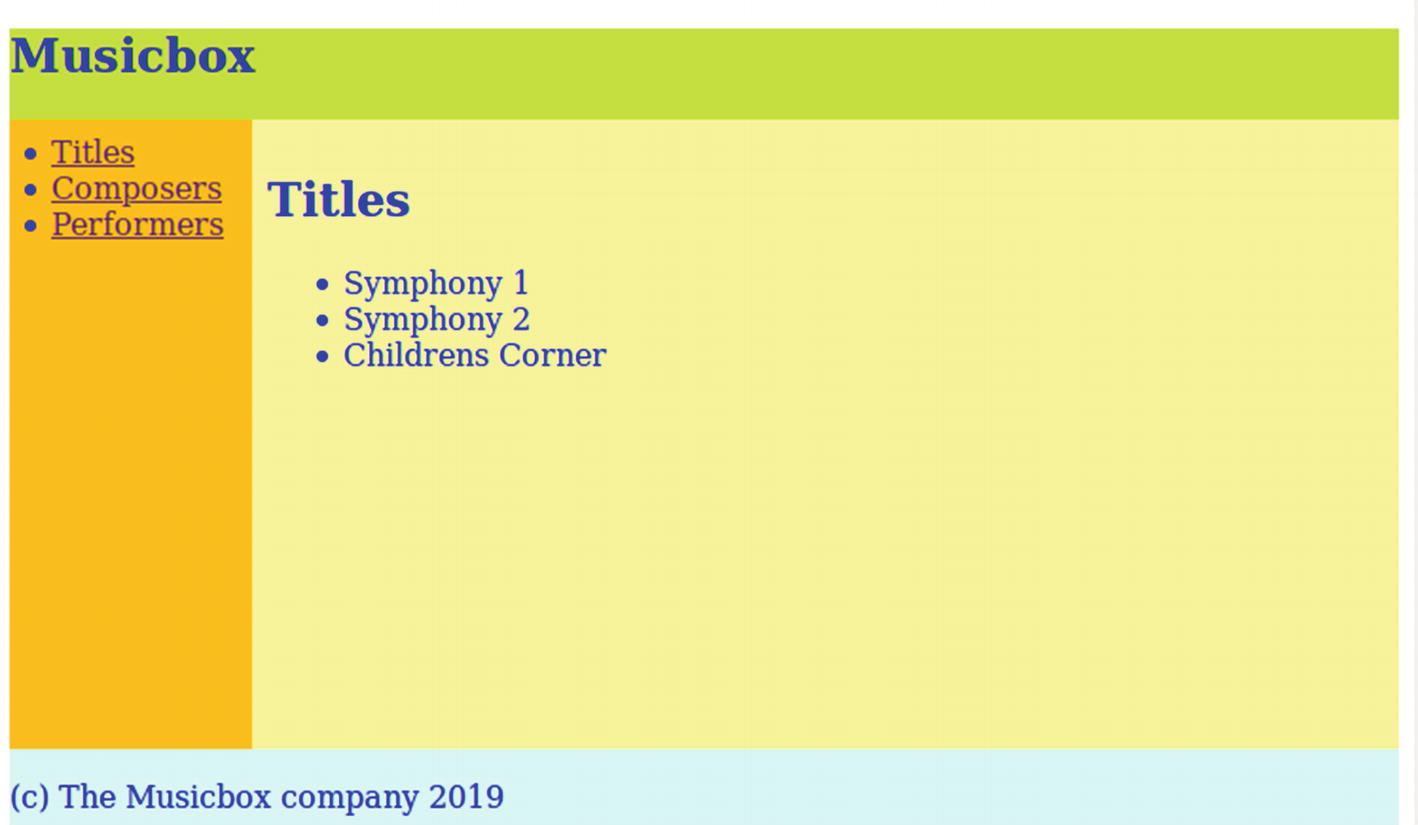
Build and deploy the application by running the Gradle task localDeploy. Then point your browser to http://localhost:8080/MusicBox to see the application running. See Figure 6-3.
Mixing Facelets and JSTL
We already pointed out that, with Java MVC , we don’t want to mix-in JSF components and Facelets pages for stability reasons. This however leads to a severe lack of functionalities, including a missing if-else construct. In the JSF world, you switch on and off components (or component subtrees) via the rendered attribute. So what can we do if we want to use Facelets for Java MVC and need conditional branching on a view page? The answer is astonishingly simple. Because we don’t use JSF components, we can simply add the JSTL tag libraries without any danger of breaking proper page rendering. Then we can use the <c:if> and <c:choose> tags.
Because JSPs and JSTL have been taken care of in our build.gradle file, we just have to add the JSTL namespace in order to be able to use JSTL.
Unified Expressions
For JSF, the expression language handling has been extended to use deferred expressions , denoted by #{ ... } instead of ${ ... }. Such deferred expressions aren’t evaluated prior to the JSF component reacting to the requests initiated by forms. This way, it was possible to use expressions as lvalues, meaning you can assign user input to them. A #{ someBean.someProperty } thus can serve both output and input.
The combination of immediate expressions and deferred expressions, more precisely the enhanced expression language, is also called unified expressions.
For Java MVC, form input is exclusively handled by controller methods. There is by design no such thing as autowiring form input to CDI beans. For this reason, we don’t need deferred expressions, and to make things clear as a rule of thumb consider:
Don’t use deferred expressions #{ ... } in Java MVC Facelets views.
The Controller
Controller classes describe the action part of a Java MVC application. They are responsible for preparing the model, taking user requests, updating the model, and deciding which view pages to show after a request.
Controller Basics
You don’t have to use controllerPath for the @Path parameter; this is just an example.
Getting Pages
In this snippet, you can see the two possible return types—you return a string pointing to a JSP (or Facelets page) and then use suffix .xhtml, or you return a Response object. While returning a string is easier, with the Response instance, you have more options. For example, you can precisely specify the HTTP status code, and actually specify status codes (like OK, Server Error, Accepted, Created, No Content, Not Modified, See Other, Temporary Redirect, or Not Acceptable). You can also set the encoding, the cache control, HTTP headers, the language, the media type, expired and last modification times, and add cookies. For details, see the API documentation of the javax.ws.rs.core.Response class.

Controller URLs
Preparing the Model
The updated or initialized model can then be used from inside the called view page. We described that in the previous view-related text sections.
Posting Data into Controllers
For the parameter type, you can choose String, int, long, float, double, BigDecimal, BigInteger, and boolean (true or false). Java MVC makes sure that user input is appropriately converted if you choose any type other than String.
Generally, it is recommended to use method parameters, because class instance fields somehow suggest that parameter passing is the controller classeqresponsibility, without respecting which method is used, while it actually depends on the method as to which parameters make sense.
This is possible for @GET and @POST annotated methods.
Exercises
Exercise 1: In the HelloWorld application from two chapters ago, remove the Models field in the controller and instead add a new request scoped model class called UserData with one field, name. Update the controller and the views accordingly.
Exercise 2: Which one is true? JSPs are handled by one Servlet. Or, each JSP is transformed into one new Servlet.
Exercise 3: Which view technology is newer—Facelets or JSPs?
Exercise 4: True or false? In order to use Facelets in Java MVC, you must also use JSF.
Summary
For the model part of Java MVC, the original idea of a MVC framework is rather unchanged. Model classes were just Java bean classes (classes with fields, getters, and setters), and developers would add them to the view programmatically. In a response view, you then would access the model beans using some expression similar to Hello ${beanName.name}. Java MVC however is a modern framework and its model capabilities supersede the idea of simply referring to beans. It does so by incorporating the CDI (Context and Dependency Injection) technology for Jakarta EE 8 in version CDI 2.0. The basic idea is still the same: we want to instantiate bean classes (data classes that contain mainly fields and their getters and setters) and provision those instances to the controllers and the views. The main difference between the pre-CDI and CDI way is that we don’t instantiate model classes ourselves and let instead CDI do it.
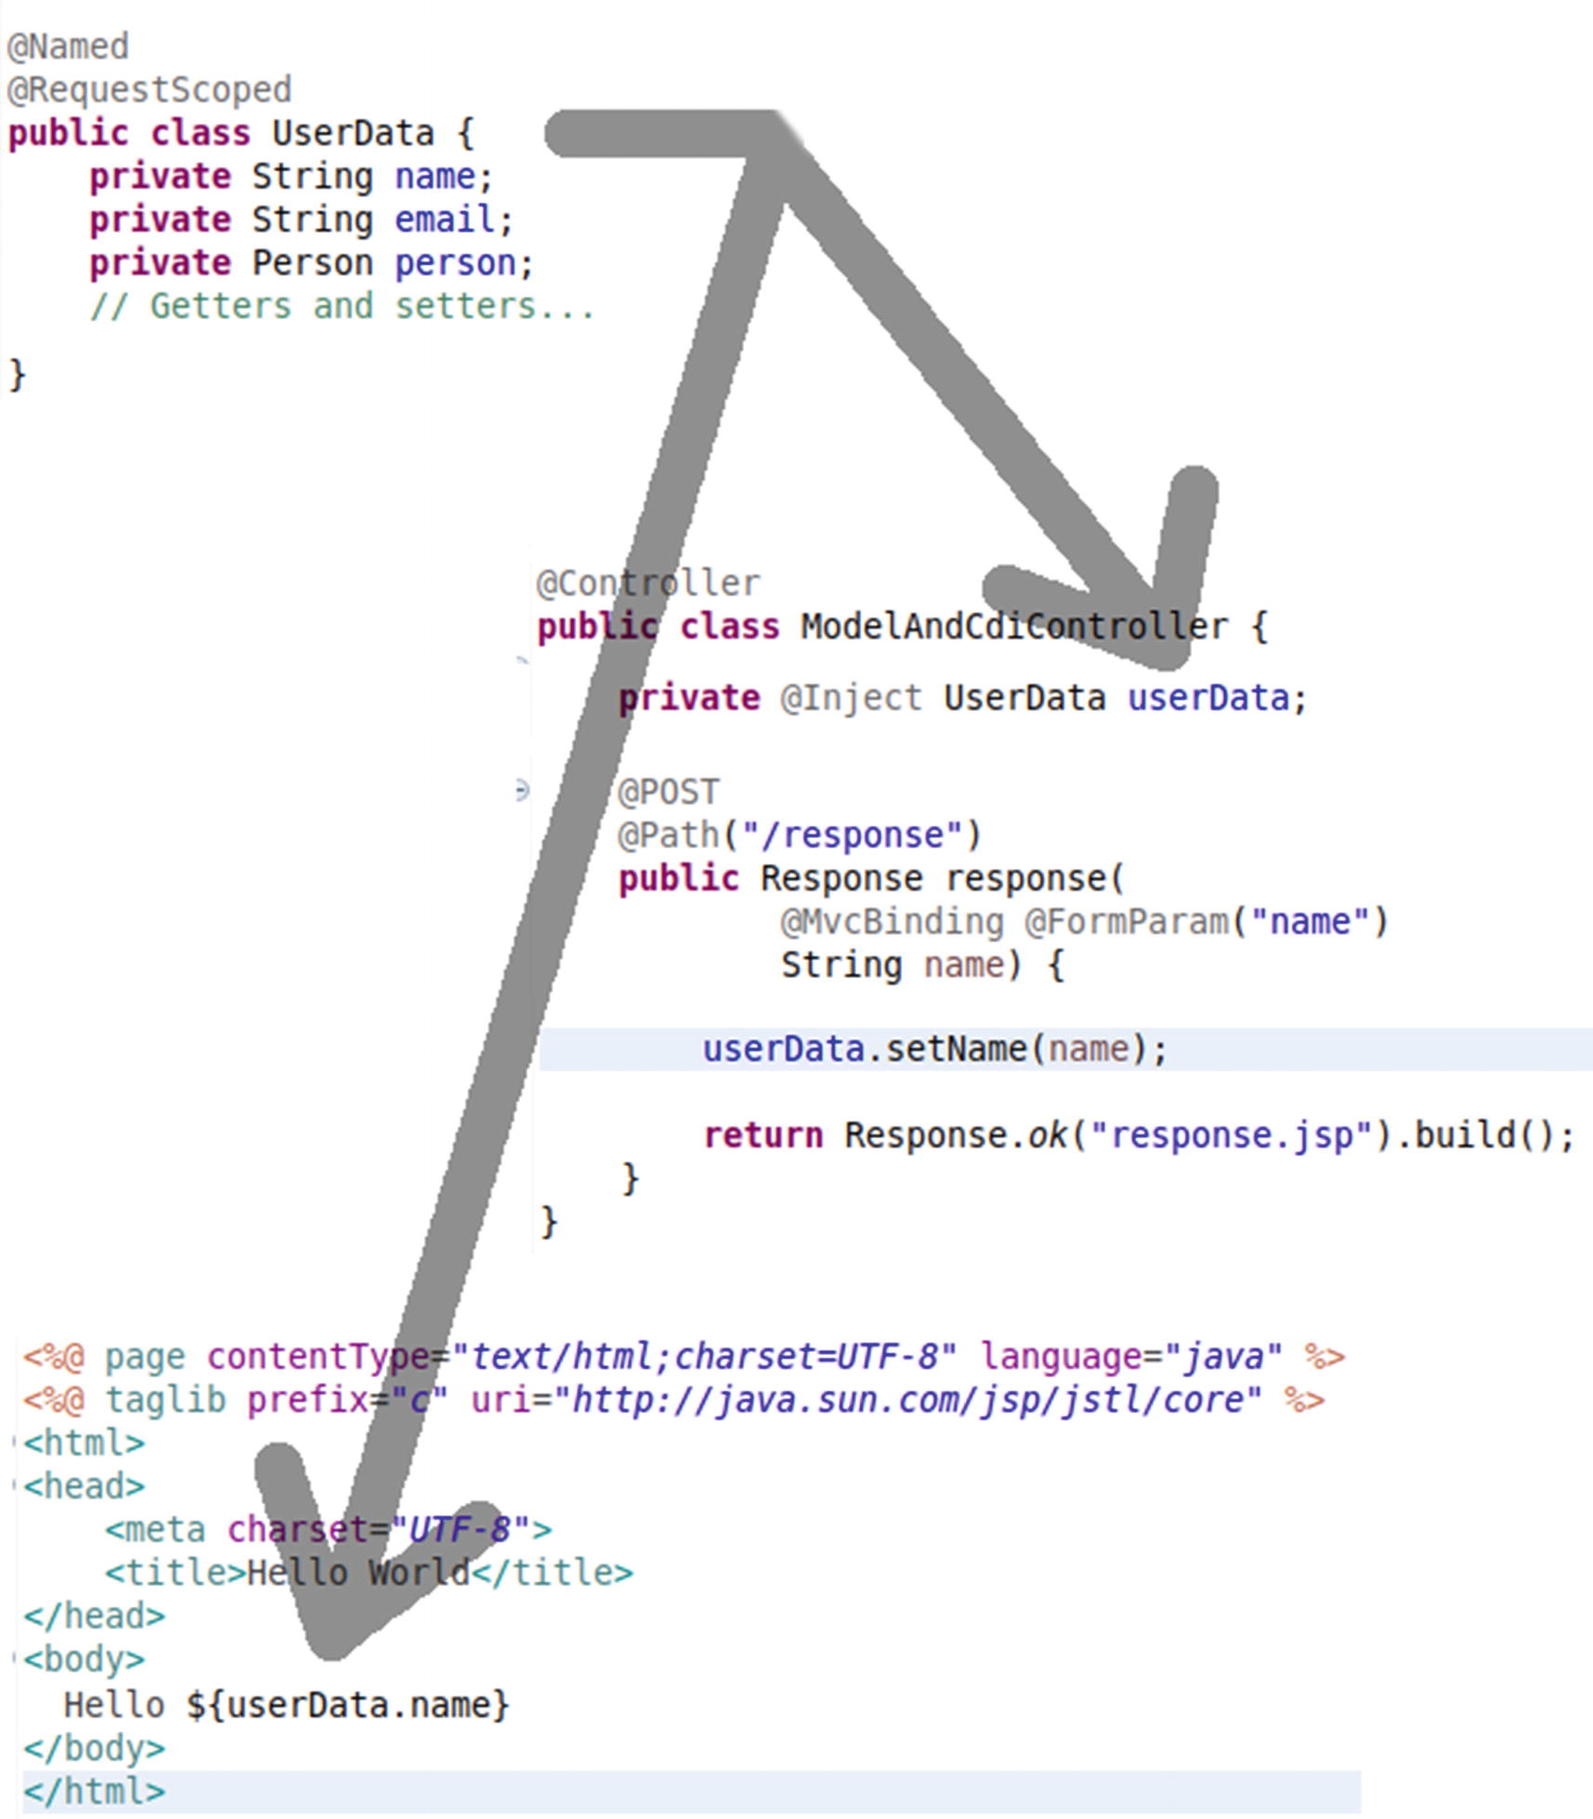
To tell Java MVC that we want a model class to be controlled by CDI and available to the view pages, we use the @Named annotation from the javax.inject package. We can also add the @RequestScoped annotation to bind the lifecycle of the object instance to a single HTTP request/response cycle.
Once we announce a bean via @Named to the CDI framework, two things happen in Java MVC. First, we can use @Inject (in the javax.inject package) to refer to the bean instance from inside any Java MVC controller and from inside any other CDI controlled class. Second, we can use the instance from view pages by using the class name with the first letter lowercase: ${userData.name} and ${userData.email}.
If you’re using CDI to manage model data, model class instances subordinate to a lifecycle control governed by CDI. This means CDI decides when to construct beans and when to abandon them. In injected beans, the way CDI controls the lifecycle of instances is by a characteristic called scope. In Java MVC, the following scopes exist: request scope, session scope, redirect scope, and application scope.
Instead of using CDI beans marked with the @Named annotation, you can also use an injected instance of Models (in the javax.mvc package). The model values are then available from inside view pages without a prefix: Hello ${name}.
The view part of Java MVC is responsible for presenting the frontend to the client (the browser), for both input and output. Those view files for Java MVC, which are connected to controller methods, go in the WEB-INF/-views folder, or, because we are using Gradle as a build framework, in the src/main/webapp/WEB-INF/views folder.
Java MVC, out-of-the-box, supports two view engines—JSPs (JavaServer Pages) and Facelets (view declaration language for JSF, JavaServer Faces). By design, other view engines can be included with an extension mechanism based on CDI.
out: The servlet’s output stream of type JspWriter (extends java.io.Writer).
request: The request, type HttpServletRequest.
response: The response, type HttpServletResponse.
session: The session, type HttpSession.
application: The application, type ServletContext.
config: The servlet configuration, type ServletConfig.
page: The servlet itself, type Object (runtime type javax.servlet.http.HttpServlet).
pageContext: The page context, type PageContext.
You can use these objects to achieve fancy things, but bear in mind that you somehow leave official development patterns if you use them. This might make your code hard for others to read, and by putting functionality into the view pages, the natural demarcation between the model, the view, and the controller is broken.
CDI beans with the @Named annotation are directly provisioned to the JSPs: Hello ${userName.name}. If you add model data to an injected javax.mvc.Models CDI bean, you can directly access it without a prefix, as in Hello ${name}.
Constructs in JSP pages like ${ ... } are treated as expressions and are processed by an expression language handler. There are several implicit objects you can use in expressions: pageScope, requestScope, sessionScope, applicationScope, paramValues, param, headerValues, header, initParam, cookie, and pageContext.
If you prefer to use a tag for dynamic output, you can use the <c:out> tag as follows: Hello <c:out value="${userData.name}" />.
By using the <c:set> tag, you can introduce variables for further use in the page.
For loops over lists or arrays, you can use the <c:forEach> tag (the c signifies the jstl/core taglib). If you want to use the <c:forEach> tag for an integer-valued range loop, you use the begin and end attributes, such as <c:forEach begin="1" end="10" var="i">.
For conditional branching inside a JSP, you can use one of the <c:if> and <c:choose> tags.
Cookies can be read directly from inside JSPs by using the implicit cookie object.
The other view technology that Java MVC supports apart from JSP is called Facelets. Facelets is the templating framework especially created for JSF. Facelets files for Java MVC go in the same folder as JSP files, the WEB-INF/views folder, or, because we are using Gradle as a build framework, in the src/main/webapp/WEB-INF/views folder. Facelets files are XML files, which is maybe the most noticeable difference between JSPs and Facelets.
Facelets allow you to introduce parameterized template HTML pages, HTML snippets (components) to be included in pages, placeholders for such snippets, and decorators and repetitions for things like elaborated list views.
For Java MVC, we don’t want to mix JSF components into Facelets pages for stability reasons. This, however, leads to a severe lack of functionalities, including a missing if-else construct. In the JSF world, you switch on and off components (or component subtrees) via the rendered attribute. So what can we do if we want to use Facelets for Java MVC and need a conditional branching on some view page? The answer is astonishingly simple. Because we don’t use JSF components, we can simply add the JSTL tag libraries without danger of breaking proper page rendering. Then we can use the <c:if> and <choose> tags.
For JSF, expression language handling has been extended to use deferred expressions, denoted by #{ ... } instead of ${ ... }. These deferred expressions aren’t evaluated prior to the JSF component reacting to the requests initiated by forms. This way, it was possible to use expressions as lvalues, meaning you can assign user input to them. A #{ someBean.someProperty } thus can serve for both output and input. The combination of immediate expressions and deferred expressions, more precisely the enhanced expression language, is also called unified expressions. For Java MVC, form input is exclusively handled by controller methods. There is by design no such thing as autowiring form input to CDI beans. For this reason, we don’t need deferred expressions.
Don’t use deferred expressions #{ ... } in Java MVC Facelets views.
Controller classes describe the action part of a Java MVC application. They are responsible for preparing the model, taking user requests, updating the model, and deciding which view pages to show after a request. To mark a class as a Java MVC controller, add the @Controller annotation (in the javax.mvc package) and the @Path annotation (in the javax.ws.rs package) to the class.
For pages that are not the result of some form post, you use the GET verb and mark the corresponding methods with the @GET annotation.
In controller methods marked with @GET or @POST, you either return a string pointing to a JSP (or Facelets page) and then use suffix .xhtml, or you can return a Response object. While returning a string is easier, with the Response instance you have more options. For example, you can precisely specify the HTTP status code and actually specify status codes (like OK, Server Error, Accepted, Created, No Content, Not Modified, See Other, Temporary Redirect, or Not Acceptable). You can also set the encoding, the cache control, HTTP headers, the language, the media type, expired and last modification times, and add cookies.
The triggering path is calculated by concatenating the class’ @Path annotation and the method’s @Path annotation, and then prepending the applications’ URL path.
If you need to prepare model values for the called page to use, you can inject CDI beans in the controller and just adjust their values from inside the controller methods. The updated or initialized model can then be used from inside the called view page.
In order to transport user input from a form to a controller method, you mark the method with a @POST annotation and add the form fields as parameters of the method. For the parameter type, you can choose String, int, long, float, double, BigDecimal, BigInteger, and boolean (true or false). Java MVC makes sure that user input is appropriately converted if you choose any type other than String.
The @MvcBinding allows Java MVC to pass over validation and conversion errors in an injected BindingResult object. You can then handle the errors programmatically inside the POST method.
If you need to make query parameters (a and b in http://xyz.com/app?a=3&b=4) available to controller methods, you basically do the same thing as with posted parameters. What is different though is that you must use the QueryParam annotation for query parameters. This is possible for @GET and @POST annotated methods.
In the next chapter, we cover more advanced topics of Java MVC.