Hour 16. HTML5 and CSS3
Hypertext Markup Language (HTML) is the code behind web pages. Using HTML, you place text, graphics, JavaScript, Java and other active content, and hyperlinks throughout web pages to give those pages the look you desire. You’ve been using some HTML to this point, as it serves as a wrapper around the JavaScript code you’ve been writing to learn basic programming. You needed some rudimentary HTML code to make the JavaScript run.
Unlike traditional programming languages (but like the JavaScript you’ve studied so far), HTML is interpreted as your web page loads. Your web page, formatted with HTML code, goes across the Internet to any user who requests it. That user’s browser then interprets your HTML elements to format the page properly.
This hour introduces you to the world of HTML coding. You will learn how HTML formats text, graphics, and other web page elements. HTML is a fairly simple language because, instead of issuing commands to process data as you do with procedural languages such as C++, most HTML includes simple formatting instructions to adjust the appearance of the web page.
The highlights of this hour include
![]() Understanding how HTML formats web pages
Understanding how HTML formats web pages
![]() Recognizing HTML tags
Recognizing HTML tags
![]() Working with HTML text
Working with HTML text
![]() Placing graphics on a web page
Placing graphics on a web page
![]() Introducing CSS
Introducing CSS
![]() Generating web page hyperlinks
Generating web page hyperlinks
HTML Programming
A web page might contain text, graphics, icons and text containing links (also known as hyperlinks or hot spots), Java applets, JavaScript code, and multimedia content. One of the goals of web page designers is to make web pages appear uniform no matter what kind of computer the user uses (or, more accurately, which platform the user uses, which might be a PC, a tablet, or a phone, with one of a number of operating systems). Although the same web page still looks different on different computers and different browser versions, a steady progression is being made to a truly universal browser standard that will show all web pages uniformly (see the sidebar entitled, “W3C Attempts to Standardize HTML.”) The HTML is a machine-independent language that web developers use to design web pages. A page’s HTML listing is actually a set of text elements that, when viewed with a web browser, produces a web page that conforms to the look the author intended.
Tip
No matter what programming language you decide to master next, whether it is advanced Java, C++, or another, you should learn the fundamentals of HTML. HTML and JavaScript in concert can be used to accomplish some fairly impressive tasks. The Internet plays a huge role in computers today, and you’ll almost certainly be connecting your programming efforts to the web eventually in some way. HTML is the primary web page language. All the other web page languages use HTML in some way. Fortunately, HTML is primarily a formatting and hyperlinking language that is rather simple to master, especially now that you understand the way JavaScript works.
Not only can simple HTML markup produce visually appealing web pages, many times beginners don’t use HTML to produce a web page today; instead they rely on website-creation tools that allow them to choose basic templates and then make simple changes to the look and feel. These sites then translate the page you laid out into HTML elements. Microsoft Word and other word processors can often save documents (with formatted text as well as embedded tables, graphics, and multimedia) as HTML pages that Word translates to HTML code.
Tip
Using website-creation tools and Word can generate code for you, but you’ll never learn without doing, and frankly the code that is automatically generated is often sloppy and poorly executed. You are far better off in the long run learning to write your own HTML from scratch.
W3C Attempts to Standardize HTML
The World Wide Web Consortium, known as W3C, is a standards committee supported and staffed by the computer industry. The goal of W3C is to define standards for HTML and HTML-based languages and web browsers.
Although web browsers and HTML language systems don’t have to follow the W3C’s suggestions for HTML coding, those that do will help to ensure that their website will have more of a chance of being seen properly in all web browsers. The committee makes many coding suggestions, and also defines new HTML elements that browser makers can adopt to make HTML coding easier and to make web pages richer with content. The most recent update is HTML5.
You can visit their website at www.w3.org and learn more about the consortium.
Following an HTML Example
Figure 16.1 shows a web page. The page looks rather simple and is free of clutter.

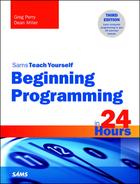
Figure 16.2 contains some of the HTML markup that produced Figure 16.1’s web page.
Take a moment to compare Figure 16.2’s HTML markup to Figure 16.1’s web page. The full HTML code required to display Figure 16.1 is even longer than what you see in Figure 16.2. The HTML code that you do see is rather advanced so the excerpt of this HTML listing looks a little forbidding. Nevertheless, as you keep comparing the HTML code to the web page, you’ll begin to see some ways that the HTML language formatted and placed text on parts of the web page.
Be warned that Figure 16.2 contains virtually no whitespace and alignment that would make the page easier to maintain. Often, web pages generated with website creation programs are rather compact, as opposed to web pages that an HTML programmer designs from scratch. Before this hour is over, you will see simpler HTML code written by a programmer that demonstrates more readability. You’ll inevitably find both kinds of HTML-based pages because many of the web pages you use today are generated by web page design programs instead of coded by hand in HTML. Actually, many web page programmers use a web page designing program to produce the initial HTML code, and then they modify the generated HTML code, often cleaning up the code’s spacing to make the code more maintainable.
You will notice that the HTML code snippet from the website used in Figure 16.1 uses lowercase for the tags (the HTML elements between angled brackets, < and >) and attributes (the words that specify how some of the tags look and behave, such as color). At one time, the W3C recommended all uppercase in tags and attributes. Most web pages use lowercase, or a mixture of both lowercase and uppercase HTML tags and attributes. Although the browser ignores case and doesn’t care which you use, for all new web development, it’s now strongly recommended to take the all-lowercase approach.
Displaying a Web Page
When you navigate to view a web page, the remote server sends to your browser only the HTML text, and the browser responds to the markup by formatting text appropriately and placing links and graphics images where the HTML code dictates they should appear. Your browser first receives the full HTML page and then receives whatever graphics images and multimedia content are needed to complete the page.
Browsers provide a Stop button that you can click, or you can press Esc, to keep from receiving graphics and multimedia images for those times when you don’t want to wait on them but want to read the text that has already been sent to your browser. In place of the images and multimedia content, most browsers display an icon in place of the image showing where the image would appear if you had let the image load to your computer.
Command Tags
The terms within angled brackets, (< and >) are called tag references (or tag commands). Tag commands are central to the HTML program. Many commands contain a beginning and ending tag (a forward slash, /, always precedes an ending tag). A nonbracketed text item is a literal (a value that does not change), such as a title that is to appear on the web page. The tags primarily determine the placement of figures, the content of text, and links to other websites. For example, as you saw in many of your JavaScript programs, <title> marks the beginning of a title and </title> marks the end. In versions prior to HTML5, the presentation of content was also accomplished with HTML tags, however many of those tags have been deprecated (no longer supported in code compliant with HTML5), and those functions have been moved to cascading style sheets (CSS), which are touched upon later in the hour.
Many of the tags in Figure 16.2 are formatting tag codes that specify font style and size instructions for the web browser.
Tags don’t contain formatted text; they offer formatting instructions that your web browser is to follow. Therefore, when your web browser sees the <center> tag, your web browser knows to center the text that runs up to the subsequent </center> ending tag as the following HTML code would do:
<center>Fran's Place</center>
The HTML code completely determines how text appears. Therefore, except for keeping your HTML code readable, no advantage exists for adding spacing. HTML ignores extra spaces that come before your web page’s text. The following code produces the same, centered title that the previous code did even though the text itself has some extra spaces at the beginning:
<center>
Fran's Place
</center>
You can document HTML code with the following comment tag:
<!-- This is an HTML comment -->
Everything between <!-- and --> is treated as an HTML comment, even if the comment spans multiple lines. Like you have seen in other sections of this book, comments are for the benefit of the people reading the code and are ignored when the HTML is interpreted by the browser—the information between those character sets do not display on the page.
A Simpler Example
Many websites are a good deal simpler than the one previously shown. Don’t get bogged down in advanced HTML commands when you first begin studying HTML because even simple HTML commands can produce quite attractive and complete web pages. For example, consider how simple Listing 16.1’s HTML code appears. You should have little trouble following the HTML commands even if HTML is new to you. If you do find yourself unsure, don’t worry. This is actually a code listing from later in the hour, and its particulars will be covered in more detail.
LISTING 16.1 Simple HTML commands can produce attractive web pages.
<!DOCTYPE html>
<html>
<head>
<title>Using styles</title>
<style>
body
{
background-color:pink;
}
h1
{
color:orange;
text-align:center;
}
img.imgBlue { border: 12px solid; color: blue; padding:5px;}
p.ex1 {color:red; font-family:Georgia; font-size:20px;}
p.ex2 {color:blue;font-family:Courier; font-size: 24px;}
p.ex3 {color:green;font-size:8px;}
</style>
</head>
<body>
<h1>Let's try CSS with our HTML</h1>
<p class="ex1">Text using the ex1 attributes.</p>
<p class="ex2">Text using the ex2 attributes<br>
This is a second line still using ex2 as it isn't turned off yet.</p>
<p class="ex3">Hard to read, but this is the third style, ex3.</p>
<img src="img1.gif" class=imgBlue>
</body>
</html>
This example code combines HTML and CSS and will be analyzed and run later in the hour. However, with your JavaScript experience, nothing about this quick example should seem too intimidating.
Tip
The next time that you are using your web browser, locate the menu option that lets you view the HTML source code. If you use Internet Explorer, the source display command is View, Source, and if you use Google Chrome, just right click your mouse on the page and select View Page Source from the menu.
Transferring a packet of HTML code, such as that in Listing 16.1, is much less time-consuming than transferring a graphics image of the web page. Your web browser reads the HTML commands and then formats the text or graphics images according to their instructions.
As stated earlier, several powerful web-design tools and sites exist to create web pages using modern graphical cut-and-paste methods; but you also can create a fancy web page simply by using a text editor and knowing the HTML language. Often, programmers use graphical tools to lay out the overall web page and then use a text editor to hone the HTML source code to finalize the page.
A Quick HTML Primer
All web pages require a fundamental set of HTML codes. Listing 16.2 shows the minimal HTML code needed to display a web page.
LISTING 16.2 The general format for all HTML web pages
<!DOCTYPE html>
<html>
<!-- This is a comment -->
<head>
<title>The window's title bar text goes here</title>
</head>
<body>
<!-- The bulk of the web page text, graphics, and HTML
code goes here -->
</body>
</html>
All listings start with the <!DOCTYPE html> tag (which you probably remember from your numerous JavaScript programs). This tag serves as a declaration to tell your browser what version of HTML is being used to author the web page. The angled bracket commands are the HTML command tags that format the page’s data and instruct the browser on how to display the page. Many HTML tags appear in pairs, such as <body> and </body>. The closing tag, indicated with a slash (/), tells the browser where the tag command ends. However, some tags are singular—you do not need a closing tag.
Notice that the first tag in all web pages should be <html>, indicating the beginning of the HTML code. The end tag is </html>, indicating that the web page is through.
The heading section, enclosed with <head> and </head>, contains title bar information using the <title> and </title> tags and other preliminary web page data such as metatags, advanced HTML code that programmers can place inside web pages to get noticed by search engines. If you remember, you often defined JavaScript functions in the heading section of your HTML pages. If you don’t use JavaScript, the title bar is the only text that appears in the heading section.
The body section, enclosed with <body> and </body>, includes the bulk of the web page content. The user is most interested in the data between these two tags.
HTML Text Formatting
To make text appear on the browser’s screen, simply type the text inside the HTML code. Your web page body could include lines of text like this:
<body>
This text will appear
on whatever web browser screen
opens this HTML code.
</body>
Web browsers do not automatically format text. These three lines of text all appear on one line inside the browser, like this:
This text will appear on whatever web browser screen opens this HTML code.
As covered in the beginning of the book, if you want to add line breaks, you must include the <br/> tag (no ending <br> tag is needed). <br/> tells the web browser to break the line at that point and move to the next line. The following <body> section displays three lines of text:
<body>
This text will appear<br/>
on whatever Web browser screen<br/>
opens this HTML code.
</body>
Again, the text breaks onto three lines only because of the <br> tags and not because the lines happen to end there.
You can add italics, boldfacing, and underlining to your text. The following HTML code contains such formatting:
This line contains <u>two underlined</u> words.
This line contains <i>two italicized</i> words.
This line contains <b>two boldfaced</b> words.
Caution
Generally, web page designers refrain from using underlining on web pages because most hyperlinks appear as underlined text. Therefore, if you include underlined text that does not serve as a link to another web page, users may waste time trying to click on those underlined words to see what happens.
Try it Yourself
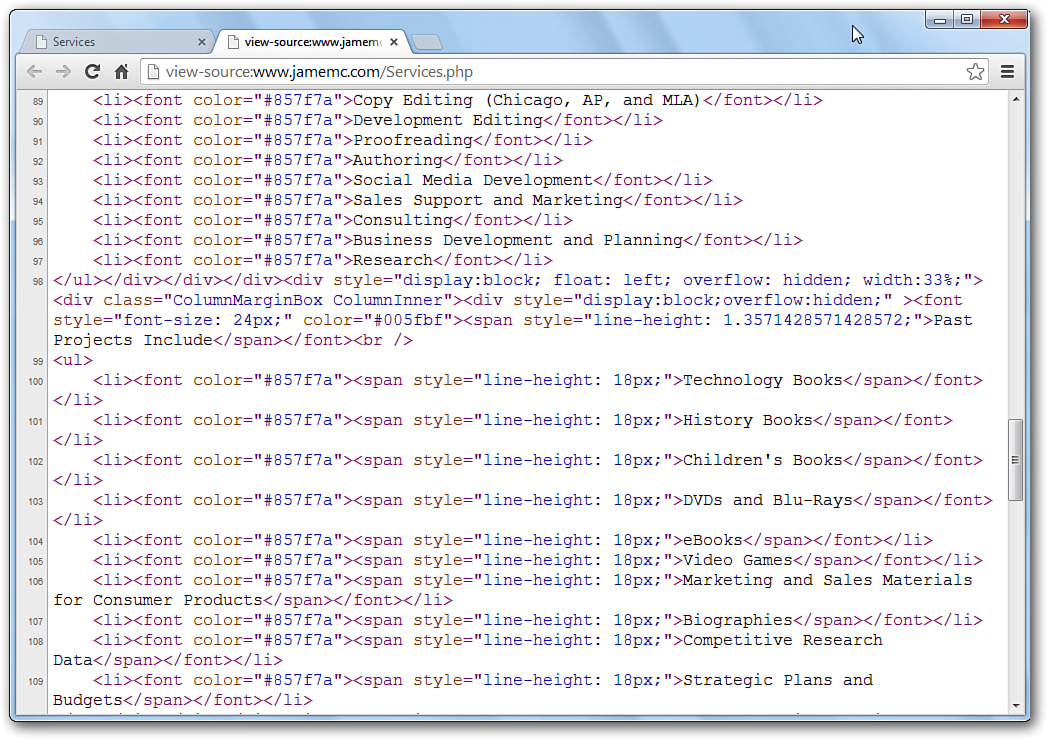
LISTING 16.3 Examples of the <h> tag show how to change headline text size.
<!DOCTYPE html>
<html>
<head>
<title>Headline sizes</title>
</head>
<body>
<!-- An automatic line break
occurs after each headline -->
<h1>Number 1 headline </h1>
<h2>Number 2 headline </h2>
<h3>Number 3 headline </h3>
<h4>Number 4 headline </h4>
<h5>Number 5 headline </h5>
<h6>Number 6 headline </h6>
</body>
</html>
Using CSS to Control How Your Text Looks
Versions of HTML before 5 used to use a <font> tag as an additional method to control the size of your text. HTML5 has eliminated this and you now need to use CSS to accomplish the same goal. CSS3 is the latest version of CSS, and these sheets can be used to control the appearance of your text on HTML web pages. This information can be included directly on your HTML page, or you can create a separate file with the information. Like you did with your JavaScript user-created functions, this is an excellent method to then re-use your favorite type styles, in terms of color, font size, font type, and more. The use of CSS3 with HTML5 enables web developers to use HTML to focus on the content of the document versus the presentation of that content, which can now be better controlled across a variety of formats with CSS.
There is so much to CSS in terms of what you can do with your web page. This lesson can only touch on some very basic points, as the goal of the book is to get you back into programming, but you should know of the presence and goals of CSS3, particularly with the release of HTML, which has deprecated (phased out) some of the previous font, table, color, and size tags and attributes of previous versions with the goal that these functions will be better executed with CSS. Obviously, the browser support of those tags from previous versions cannot simply end—there’s literally millions of web pages out there written in earlier versions of HTML and they still need to be viewable. But you should design web pages with an eye to the future and not the past, so if you’d like to learn more about HTML5 and CSS3, please pick up Sams Teach Yourself HTML and CSS in 24 Hours, 9th Edition.
Try it Yourself
LISTING 16.4 Examples of setting your own styles using CSS to control font color, size, and typeface
<!DOCTYPE html>
<html>
<head>
<title>Using styles</title>
<style>
body
{
background-color:pink;
}
h1
{
color:orange;
text-align:center;
}
p.ex1 {color:red; font-family:Georgia; font-size:20px;}
p.ex2 {color:blue;font-family:Courier; font-size: 24px;}
p.ex3 {color:green;font-size:8px;}
</style>
</head>
<body>
<h1>Let's try CSS with our HTML</h1>
<p class="ex1">Text using the ex1 attributes.</p>
<p class="ex2">Text using the ex2 attributes<br>
This is a second line still using ex2 as it isn't turned off yet.</p>
<p class="ex3">Hard to read, but this is the third style, ex3.</p>
</body>
</html>
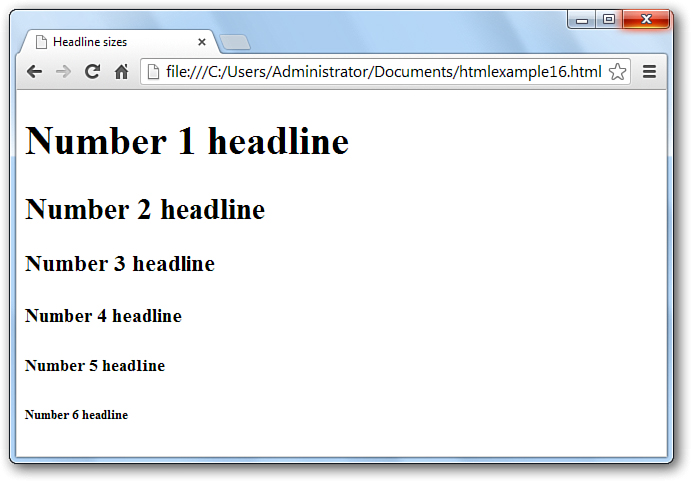
FIGURE 16.4 You have the ability to change a number of text attributes. Text size grows as you increase the font size.
While you can specify colors in CSS using their names as shown in this simple example, you have far more flexibility when you use RGB notation. This involves passing three integers between 0 and 255, for example rgb(255,0,255). The first value is red, the second green, and the third blue. Black would be achieved by setting all to 0 and white results from setting all to 255. In between, these three values can result in more than 16 million color combinations, far more than just using color names.
Including Graphics in Your Website with HTML
The <img> tag places images on your web pages when you use the arc= attribute with the tag. After you designate an image’s location and filename, the image appears. Graphics are simple to display and the <img> tag is all you’ll need for many of your web page graphics.
Here is a simple web page command that displays an image on the screen:
<img src="images/myphoto.jpg">
The image appears wherever this <img/> tag appears inside the HTML code. It’s up to you to ensure that the image is formatted in a type of file that browsers can display. The common image formats are GIF, JPEG, and PNG, and most graphics programs produce images in these three formats.
Older versions of HTML allowed you to place a border around a graphic, in effect adding a framed image to your web page. However, HTML5 has phased out the <border> attribute, but CSS3 can help you out again. For example, adding the following line to the style section of the head:
img.imgBlue { border: 12px solid; color: blue; padding:5px;}
will put a solid blue border around the image if you add the class info to your image placement like this.
<img src="img1.gif" class=imgBlue>
Again, experimentation is the best way to learn about what is possible with CSS, but if you plan to make compelling sites, CSS can be just as powerful a tool for you as the programs you can write with JavaScript.
Using Hyperlinks
An anchor tag, indicated by <a> and </a>, creates a hyperlink to another page location. The browser that displays your web page creates an underlined link at the point of your HTML’s <a> tag.
The following lines send the user to the Pearson Education website when the user clicks the hyperlink:
<a href="http://www.pearsoned.com">
Click for great learning
</a>
Everything between the <a> tag and the closing </a> tag comprises the anchor, and the href attribute forces the hyperlink. The four words, Click for great learning, will be underlined on the screen, and the user can click anywhere in that text to access the corresponding website.
You can even specify graphics and multiline text as hyperlinks. When the user clicks the hyperlink, the browser accesses the linked web page. The user can click the browser’s Back button to access the current page.
The HTML statement that follows shows you how to use an image as a hyperlink. Remember that everything you place between the initial <a href> tag and attribute, along with the </a> ending tag is a hyperlink, whether you place graphics, text, or both there.
<a href="http://www.jamemc.com">
<img src="images/Flag.gif">
</a>
When the web page appears that includes this statement, the user’s mouse pointer will change to a hand when the user points to the image on the screen that is named Flag.gif. If the user then clicks the image, the browser opens the page located at www.jamemc.com.
Summary
By now, you have a preliminary understanding of how to use HTML and CSS to code and format web pages. Once you understand the general nature of HTML code, creating and formatting web pages becomes a simple matter. When you are ready to add tables, frames, and other advanced elements to your page, you’ll need to master more advanced command tags, but you should have little trouble doing so as long as you build gradually on the knowledge you have already acquired. Using only the tags discussed in this hour, you can create nice-looking, although simple, web pages that contain text, graphics, and links to other sites.
Q&A
Q. Why do some HTML tags require both opening and ending tags while others do not use ending tags?
A. A command tag requires a beginning and ending tag when you are about to format a specific element on the web page. For example, when italicizing text, you must begin the italics with the <i> tag and the italicized text follows. Without the ending tag, </i>, all text on the rest of the web page would be italicized. Command tags such as line breaks, <br/>, do not format specific text or graphics and can stand alone because they cause a single action, a line break.
Q. Do I need web page designer software to practice learning HTML and CSS?
A. Just like you did with JavaScript, start Notepad and enter your HTML and CSS commands. Save your text with any of the following filename extensions: .htm, .html, .HTM, or .HTML, the case doesn’t matter. If you don’t specify the extension, Notepad will save your file as a text file with the .TXT extension. Web pages should always use one of the extensions just listed. You then can start your web browser, such as Google Chrome or Internet Explorer, and select File, Open and locate the file you just created. When you click OK, your HTML-based web page will appear. If you did not code something properly, you will not get an error, but the page will not look right.
Workshop
The quiz questions are provided for your further understanding.
Quiz
1. Why is a working knowledge of HTML so important for all programmers today?
2. For what does CSS stand?
3. What is a command tag?
4. How do you code an HTML comment?
5. What do the <title> and </title> command tags control?
6. How do you increase the size of headline text?
7. How do you increase the size of regular web page text?
8. Why would you specify alternate text for web page graphics?
9. True or false: You can turn both graphics and text into hyperlinks on a web page.
10. Why is it generally a bad practice to underline text on a web page?
Answers
1. HTML is used by Java programmers, as well as programmers of other languages, and the web is integrated into many programming environments today.
2. CSS stands for cascading style sheets.
3. A command tag is an HTML command.
4. An HTML command begins with <!-- and ends with -->.
5. These tags define the title that appears inside the web page window’s title bar.
6. Use the <hn> tag to increase headline text, replacing n with a number between 1 and 6. The <h1> tag is for the largest head, and each number makes a smaller sized head.
7. Use CSS to define the type, size, and weight of your text font.
8. So the alternative text appears if the user has turned off the web browser or if a visually impaired user is using a voice-enabled web browser.
9. True.
10. Unless the underlined text is a link to another element, underlines imply that a link exists where there is none.