
Chapter 16
Sending an E-Mail
In This Chapter
![]() Defining the series of events for sending an e-mail
Defining the series of events for sending an e-mail
![]() Developing an e-mail application
Developing an e-mail application
![]() Testing the e-mail application
Testing the e-mail application
This chapter helps you understand the process of sending an e-mail using Python. More important, this chapter is generally about helping you understand what happens when you communicate outside the local PC. Even though this chapter is specifically about e-mail, it also contains principles you can use when performing other tasks. For example, when working with an external service, you often need to create the same sort of packaging as you do for an e-mail. So, the information you see in this chapter can help you understand all sorts of communication needs.
To make working with e-mail as easy as possible, this chapter uses standard mail as a real-world equivalent of e-mail. The comparison is apt. E-mail was actually modeled on real-world mail. Originally, the term e-mail was used for any sort of electronic document transmission, and some forms of it required the sender and recipient to be online at the same time. As a result, you may find some confusing references online about the origins and development of e-mail. This chapter views e-mail as it exists today — as a storing and forwarding mechanism for exchanging documents of various types.
The examples in this chapter rely on the availability of a Simple Mail Transfer Protocol (SMTP) server. If that sounds like Greek to you, read the sidebar entitled “Considering the SMTP server” that appears later in the chapter.
Understanding What Happens When You Send E-mail
E-mail has become so reliable and so mundane that most people don’t understand what a miracle it is that it works at all. Actually, the same can be said of the real mail service. When you think about it, the likelihood of one particular letter leaving one location and ending up precisely where it should at the other end seems impossible — mind-boggling, even. However, both e-mail and its real-world equivalent have several aspects in common that improve the likelihood that they’ll actually work as intended. The following sections examine what happens when you write an e-mail, click Send, and the recipient receives it on the other end. You might be surprised at what you discover.
Viewing e-mail as you do a letter
The best way to view e-mail is the same as how you view a letter. When you write a letter, you provide two pieces of paper as a minimum. The first contains the content of the letter, the second is an envelope. Assuming that the postal service is honest, the content is never examined by anyone other than the recipient. The same can be said of e-mail. An e-mail actually consists of these components:
- Message: The content of the e-mail, which is actually composed of two subparts:
- Header: The part of the e-mail content that includes the subject, the list of recipients, and other features, such as the urgency of the e-mail.
- Body: The part of the e-mail content that contains the actual message. The message can be in plain text, formatted as HTML, and consisting of one or more documents, or it can be a combination of all these elements.
- Envelope: A container for the message. The envelope provides sender and recipient information, just as the envelope for a physical piece of mail provides. However, an e-mail doesn’t include a stamp.
When working with e-mail, you create a message using an e-mail application. As part of the e-mail application setup, you also define account information. When you click send:
- The e-mail application wraps up your message, with the header first, in an envelope that includes both your sender and the recipient’s information.
- The e-mail application uses the account information to contact the SMTP server and send the message for you.
- The SMTP server reads only the information found in the message envelope and redirects your e-mail to the recipient.
- The recipient e-mail application logs on to the local server, picks up the e-mail, and then displays only the message part for the user.
The process is a little more complex than this explanation, but this is essentially what happens. In fact, it’s much the same as the process used when working with physical letters in that the essential steps are the same. With physical mail, the e-mail application is replaced by you on one end and the recipient at the other. The SMTP server is replaced by the post office and the employees who work there (including the postal carriers). However, someone generates a message, the message is transferred to a recipient, and the recipient receives the message in both cases.
Defining the parts of the envelope
There is a difference in how the envelope for an e-mail is configured and how it’s actually handled. When you view the envelope for an e-mail, it looks just like a letter in that it contains the address of the sender and the address of the recipient. It may not look physically like an envelope, but the same components are there. When you visualize a physical envelope, you see certain specifics, such as the sender’s name, street address, city, state, and zip code. The same is true for the recipient. These elements define, in physical terms, where the postal carrier should deliver the letter or return the letter when it can’t be delivered.
However, when the SMTP server processes the envelope for an e-mail, it must look at the specifics of the address, which is where the analogy of a physical envelope used for mail starts to break down a little. An e-mail address contains different information from a physical address. In summary, here is what the e-mail address contains:
- Host: The host is akin to the city and state used by a physical mail envelope. A host address is the address used by the card that is physically connected to the Internet, and it handles all the traffic that the Internet consumes or provides for this particular machine. A PC can use Internet resources in a lot of ways, but the host address for all these uses is the same.
- Port: The port is akin to the street address used by a physical mail envelope. It specifies which specific part of the system should receive the message. For example, an SMTP server used for outgoing messages normally relies on port 25. However, the Point-of-Presence (POP3) server used for incoming e-mail messages usually relies on port 110. Your browser typically uses port 80 to communicate with websites. However, secure websites (those that use https as a protocol, rather than http) rely on port 443 instead. You can see a list of typical ports at http://en.wikipedia.org/wiki/List_of_TCP_and_UDP_port_numbers.
- Local hostname: The local hostname is the human-readable form of the combination of the host and port. For example, the website www.myplace.com might resolve to an address of 55.225.163.40:80 (where the first four numbers are the host address and the number after the colon is the port). Python takes care of these details behind the scenes for you, so normally you don’t need to worry about them. However, it’s nice to know that this information is available.
Now that you have a better idea of how the address is put together, it’s time to look at it more carefully. The following sections describe the envelope of an e-mail in more precise terms.
Host
A host address is the identifier for a connection to a server. Just as an address on an envelope isn’t the actual location, neither is the host address the actual server. It merely specifies the location of the server.
 The connection used to access a combination of a host address and a port is called a socket. Just who came up with this odd name and why isn’t important. What is important is that you can use the socket to find out all kinds of information that’s useful in understanding how e-mail works. The following steps help you see hostnames and host addresses at work. More important, you begin to understand the whole idea of an e-mail envelope and the addresses it contains.
- Open a Python Shell window.
You see the familiar Python prompt.
- Type import socket and press Enter.
Before you can work with sockets, you must import the socket library. This library contains all sorts of confusing attributes, so use it with caution. However, this library also contains some interesting functions that help you see how the Internet addresses work.
- Type socket.gethostbyname(“localhost”) and press Enter.
You see a host address as output. In this case, you should see 127.0.0.1 as output because localhost is a standard hostname. The address, 127.0.0.1, is associated with the host name, localhost.
- Type socket.gethostbyaddr(“127.0.0.1”) and press Enter.
Be prepared for a surprise. You get a tuple as output, as shown in Figure 16-1. However, instead of getting localhost as the name of the host, you get the name of your machine. You use localhost as a common name for the local machine, but when you specify the address, you get the machine name instead. In this case, Main is the name of my personal machine. The name you see on your screen will correspond to your machine.

Figure 16-1: The localhost address actually corresponds to your machine.
- Type socket.gethostbyname(“www.johnmuellerbooks.com”) and press Enter.
You see the output shown in Figure 16-2. This is the address for my website. The point is that these addresses work wherever you are and whatever you’re doing — just like those you place on a physical envelope. The physical mail uses addresses that are unique across the world, just as the Internet does.

Figure 16-2: The addresses that you use to send e-mail are unique across the Internet.
- Close the Python shell.
Port
A port is a specific entryway for a server location. The host address specifies the location, but the port defines where to get in. Even if you don’t specify a port every time you use a host address, the port is implied. Access is always granted using a combination of the host address and the port. The following steps help illustrate how ports work with the host address to provide server access:
- Open a Python Shell window.
You see the familiar Python prompt.
- Type import socket and press Enter.
Remember that a socket provides both host address and port information. You use the socket to create a connection that includes both items.
- Type socket.getaddrinfo(“localhost”, 110) and press Enter.
The first value is the name of a host you want to obtain information about. The second value is the port on that host. In this case, you obtain the information about localhost port 110.
You see the output shown in Figure 16-3. The output consists of two tuples: one for the Internet Protocol version 6 (IPv6) output and one for the Internet Protocol version 4 (IPv4) address. Each of these tuples contains five entries, four of which you really don’t need to worry about because you’ll likely never need them. However, the last entry, ('127.0.0.1', 110), shows the address and port for localhost port 110.
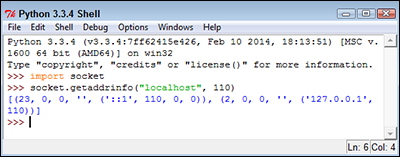
Figure 16-3: The localhost host provides both an IPv6 and an IPv4 address.
- Type socket.getaddrinfo(“johnmuellerbooks.com”, 80) and press Enter.
Figure 16-4 shows the output from this command. Notice that this Internet location provides only an IPv4 address, not an IPv6, address, for port 80. The socket.getaddrinfo() method provides a useful method for determining how you can access a particular location. Using IPv6 provides significant benefits over IPv4 (see http://www.networkcomputing.com/networking/six-benefits-of-ipv6/d/d-id/1232791 for details), but most Internet locations provide only IPv4 support now.

Figure 16-4: Most Internet locations provide only an IPv4 address.
- Type socket.getservbyport(25) and press Enter.
You see the output shown in Figure 16-5. The socket.getservbyport() method provides the means to determine how a particular port is used. Port 25 is always dedicated to SMTP support on any server. So, when you access 127.0.0.1:25, you’re asking for the SMTP server on localhost. In short, a port provides a specific kind of access in many situations.

Figure 16-5: Standardized ports provide specific services on every server.
- Close the Python shell.
Some people assume that the port information is always provided. However, this isn’t always the case. Python will provide a default port when you don’t supply one, but relying on the default port is a bad idea because you can’t be certain which service will be accessed. In addition, some systems use nonstandard port assignments as a security feature. Always get into the habit of using the port number and ensuring that you have the right one for the task at hand.
Local hostname
A hostname is simply the human-readable form of the host address. Humans don’t really understand 127.0.0.1 very well (and the IPv6 addresses make even less sense). However, humans do understand localhost just fine. There is a special server and setup to translate human-readable hostnames to host addresses, but you really don’t need to worry about it for this book (or programming in general). When your application suddenly breaks for no apparent reason, it helps to know that one does exist, though.
The “Host” section, earlier in this chapter, introduces you to the hostname to a certain extent through the use of the socket.gethostbyaddr() method, whereby an address is translated into a hostname. You saw the process in reverse using the socket.gethostbyname() method. The following steps help you understand some nuances about working with the hostname:
- Open a Python Shell window.
You see the familiar Python prompt.
- Type import socket and press Enter.
- Type socket.gethostname( ) and press Enter.
You see the name of the local system, as shown in Figure 16-6. The name of your system will likely vary from mine, so your output will be different than that shown in Figure 16-6, but the idea is the same no matter which system you use.

Figure 16-6: Sometimes you need to know the name of the local system.
- Type socket.gethostbyname(socket.gethostname( ) and press Enter.
You see the IP address of the local system, as shown in Figure 16-7. Again, your setup is likely different from mine, so the output you see will differ. This is a method you can use in your applications to determine the address of the sender when needed. Because it doesn’t rely on any hard-coded value, the method works on any system.
- Close the Python shell.

Figure 16-7: Avoid using hard-coded values for the local system whenever possible.
Defining the parts of the letter
The “envelope” for an e-mail address is what the SMTP server uses to route the e-mail. However, the envelope doesn’t include any content — that’s the purpose of the letter. A lot of developers get the two elements confused because the letter contains sender and receiver information as well. This information appears in the letter just like the address information that appears in a business letter — it’s for the benefit of the viewer. When you send a business letter, the postal delivery person doesn’t open the envelope to see the address information inside. Only the information on the envelope matters.
 It’s because the information in the e-mail letter is separate from its information in the envelope that nefarious individuals can spoof e-mail addresses. The envelope potentially contains legitimate sender information, but the letter may not. (When you see the e-mail in your e-mail application, all that is present is the letter, not the envelope — the envelope has been stripped away by the e-mail application.) For that matter, neither the sender nor the recipient information may be correct in the letter that you see onscreen in your e-mail reader.
The letter part of an e-mail is actually made of separate components, just as the envelope is. Here is a summary of the three components:
- Sender: The sender information tells you who sent the message. It contains just the e-mail address of the sender.
- Receiver: The receiver information tells you who will receive the message. This is actually a list of recipient e-mail addresses. Even if you want to send the message to only one person, you must supply the single e-mail address in a list.
- Message: Contains the information that you want the recipient to see. This information can include the following:
- From: The human-readable form of the sender.
- To: The human-readable form of the recipients.
- CC: Visible recipients who also received the message, even though they aren’t the primary targets of the message.
- Subject: The purpose of the message.
- Documents: One or more documents, including the text message that appears with the e-mail.
E-mails can actually become quite complex and lengthy. Depending on the kind of e-mail that is sent, a message could include all sorts of additional information. However, most e-mails contain these simple components, and this is all the information you need to send an e-mail from your application. The following sections describe the process used to generate a letter and its components in more detail.
Defining the message
Sending an empty envelope to someone will work, but it isn’t very exciting. In order to make your e-mail message worthwhile, you need to define a message. Python supports a number of methods of creating messages. However, the easiest and most reliable way to create a message is to use the Multipurpose Internet Mail Extensions (MIME) functionality that Python provides (and no, a MIME is not a silent person with white gloves who acts out in public).
As with many e-mail features, MIME is standardized, so it works the same no matter which platform you use. There are also numerous forms of MIME that are all part of the email.mime module described at https://docs.python.org/3/library/email.mime.html. Here are the forms that you need to consider most often when working with e-mail:
- MIMEApplication: Provides a method for sending and receiving application input and output
- MIMEAudio: Contains an audio file
- MIMEImage: Contains an image file
- MIMEMultipart: Allows a single message to contain multiple subparts, such as including both text and graphics in a single message
- MIMEText: Contains text data that can be in ASCII, HTML, or another standardized format
Although you can create any sort of an e-mail message with Python, the easiest type to create is one that contains plain text. The lack of formatting in the content lets you focus on the technique used to create the message, rather than on the message content. The following steps help you understand how the message-creating process works, but you won’t actually send the message anywhere.
- Open a Python Shell window.
You see the familiar Python prompt.
- Type the following code (pressing Enter after each line):
from email.mime.text import MIMEText
msg = MIMEText("Hello There")
msg['Subject'] = "A Test Message"
msg['From']='John Mueller <[email protected]>'
msg['To'] = 'John Mueller <[email protected]>' This is a basic plain-text message. Before you can do anything, you must import the required class, which is MIMEText. If you were creating some other sort of message, you’d need to import other classes or import the email.mime module as a whole.The MIMEText() constructor requires message text as input. This is the body of your message, so it might be quite long. In this case, the message is relatively short — just a greeting.
At this point, you assign values to standard attributes. The example shows the three common attributes that you always define: Subject, From, and To. The two address fields, From and To, contain both a human-readable name and the e-mail address. All you have to include is the e-mail address.
- Type msg.as_string( ) and press Enter.
You see the output shown in Figure 16-8. This is how the message actually looks. If you have ever looked under the covers at the messages produced by your e-mail application, the text probably looks familiar.
The Content-Type reflects the kind of message you created, which is a plain-text message. The charset tells what kind of characters are used in the message so that the recipient knows how to handle them. The MIME-Version specifies the version of MIME used to create the message so that the recipient knows whether it can handle the content. Finally, the Context-Transfer-Encoding determines how the message is converted into a bit stream before it is sent to the recipient.

Figure 16-8: Python adds some additional information required to make your message work.
Specifying the transmission
An earlier section (“Defining the parts of the envelope”) describes how the envelope is used to transfer the message from one location to another. The process of sending the message entails defining a transmission method. Python actually creates the envelope for you and performs the transmission, but you must still define the particulars of the transmission. The following steps help you understand the simplest approach to transmitting a message using Python. These steps won’t result in a successful transmission unless you modify them to match your setup. Read the “Considering the SMTP server” sidebar for additional information.
- Use the Python Shell window that you opened if you followed the steps in the “Defining the message” section.
You should see the message that you created earlier.
- Type the following code (pressing Enter after each line and pressing Enter twice after the last line):
import smtplib
s = smtplib.SMTP('localhost')The smtplib module contains everything needed to create the message envelope and send it. The first step in this process is to create a connection to the SMTP server, which you name as a string in the constructor. If the SMTP server that you provide doesn’t exist, the application will fail at this point, saying that the host actively refused the connection.
- Type s.sendmail(‘SenderAddress', [‘RecipientAddress'], msg.as_string( )) and press Enter.
In order for this step to work, you must replace SenderAddress and RecipientAddress with real addresses. Don’t include the human-readable form this time — the server requires only an address.
This is the step that actually creates the envelope, packages the e-mail message, and sends it off to the recipient. Notice that you specify the sender and recipient information separately from the message, which the SMTP server doesn’t read.
- Close the Python shell.
Considering the message subtypes
The “Defining the message” section, earlier in this chapter, describes the major e-mail message types, such as application and text. However, if e-mail had to rely on just those types, transmitting coherent messages to anyone would be difficult. The problem is that the type of information isn’t explicit enough. If you send someone a text message, you need to know what sort of text it is before you can process it, and guessing just isn’t a good idea. A text message could be formatted as plain text, or it might actually be an HTML page. You wouldn’t know from just seeing the type, so messages require a subtype. The type is text and the subtype is html when you send an HTML page to someone. The type and subtype are separated by a forward slash, so you’d see text/html if you looked at the message.
Theoretically, the number of subtypes is unlimited as long as the platform has a handler defined for that subtype. However, the reality is that everyone needs to agree on the subtypes or there won’t be a handler (unless you’re talking about a custom application for which the two parties have agreed to a custom subtype in advance). With this in mind, you can find a listing of standard types and subtypes at http://www.freeformatter.com/mime-types-list.html. The nice thing about the table on this site is that it provides you with a common file extension associated with the subtype and a reference to obtain additional information about it.
Creating the E-mail Message
So far, you’ve seen how both the envelope and the message work. Now it’s time to put them together and see how they actually work. The following sections show how to create two messages. The first message is a plain-text message and the second message uses HTML formatting. Both messages should work fine with most e-mail readers — nothing fancy is involved.
Working with a text message
Text messages represent the most efficient and least resource-intensive method of sending communication. However, text messages also convey the least amount of information. Yes, you can use emoticons to help get the point across, but the lack of formatting can become a problem in some situations. The following steps describe how to create a simple text message using Python. This example also appears with the downloadable source code as TextMessage.py.
- Open a Python File window.
You see an editor in which you can type the example code.
- Type the following code into the window — pressing Enter after each line:
from email.mime.text import MIMEText
import smtplib
msg = MIMEText("Hello There!")
msg['Subject'] = 'A Test Message'
msg['From']='SenderAddress'
msg['To'] = 'RecipientAddress'
s = smtplib.SMTP('localhost')
s.sendmail('SenderAddress',
['RecipientAddress'],
msg.as_string())
print("Message Sent!")This example is a combination of everything you’ve seen so far in the chapter. However, this is the first time you’ve seen everything put together. Notice that you create the message first, and then the envelope (just as you would in real life).
- Choose Run⇒Run Module.
The application tells you that it has sent the message to the recipient.
Working with an HTML message
An HTML message is basically a text message with special formatting. The following steps help you create an HTML e-mail to send off. This example also appears with the downloadable source code as HTMLMessage.py.
- Open a Python File window.
You see an editor in which you can type the example code.
- Type the following code into the window — pressing Enter after each line:
from email.mime.text import MIMEText
import smtplib
msg = MIMEText(
"<h1>A Heading</h1><p>Hello There!</p>","html")
msg['Subject'] = 'A Test HTML Message'
msg['From']='SenderAddress'
msg['To'] = 'RecipientAddress'
s = smtplib.SMTP('localhost')
s.sendmail('SenderAddress',
['RecipientAddress'],
msg.as_string())
print("Message Sent!")The example follows the same flow as the text message example in the previous section. However, notice that the message now contains HTML tags. You create an HTML body, not an entire page. This message will have an H1 header and a paragraph.
The most important part of this example is the text that comes after the message. The "html" argument changes the subtype from text/plain to text/html, so the recipient knows to treat the message as HTML content. If you don’t make this change, the recipient won’t see the HTML output. - Choose Run⇒Run Module.
The application tells you that it has sent the message to the recipient.
Seeing the E-mail Output
At this point, you have between one and three application-generated messages (depending on how you’ve gone through the chapter) waiting in your Inbox. To see the messages you created in earlier sections, your e-mail application must receive the messages from the server — just as it would with any e-mail. Figure 16-9 shows an example of the HTML version of the message when viewed in Output. (Your message will likely look different depending on your platform and e-mail application.)
If your e-mail application offers the capability to look at the message source, you find that the message actually does contain the information you saw earlier in the chapter. Nothing is changed or different about it because after it leaves the application, the message isn’t changed in any way during its trip.

Figure 16-9: The HTML output contains a header and a paragraph as expected.
The point of creating your own application to send and receive e-mail isn’t convenience — using an off-the-shelf application serves that purpose much better. The point is flexibility. As you can see from this short chapter on the subject, you control every aspect of the message when you create your own application. Python hides much of the detail from view, so what you really need to worry about are the essentials of creating and transmitting the message using the correct arguments.