© Joshua M. Willman 2020
J. M. WillmanBeginning PyQthttps://doi.org/10.1007/978-1-4842-5857-6_10

10. Introduction to Handling Databases

Joshua M. Willman1 
(1)
Hampton, VA, USA
 

Data is fundamental to the ways that modern business, communications, science, and even our personal lives are changing. The information we create from our online shopping, social media posts, search-engine queries, and location data is collected, managed, and analyzed and can be used for a number of reasons, including to track consumer patterns, to train artificial intelligence algorithms, or even to study the geographic distribution of particular events such as diseases.

Data analysis is an important process, and this chapter will have a look at working with structured data for GUI development. Data can be stored in many different formats, including textual, visual, and multimedia.

In order to analyze data, we need to organize it into structures that we can store and then access electronically through a computer system. Sometimes you may only be working with a small dataset consisting of one or two files. Other times, you may need to access certain portions of an entire database filled with private information. A database is an organized collection of multiple datasets.

We generally view the data from files and databases in tables. The rows and columns of a table typically work best for handling the style of data in data files. If we had a dataset of employees in a company, each row might represent an individual employee in the company, while each column depicts the different types of attributes for each employee, such as their age, salary, and employee ID number.

This chapter will focus only on using PyQt’s table classes for displaying and manipulating data. We will see how to use tables for creating the foundation for a spreadsheet editor, for working with CSV files, and for working with the SQL database management language. Of course, there are also other formats for viewing data, namely, lists and trees, should they better fit your application’s requirements.

In Chapter 10, we are going to take a look at creating GUIs that will
  • Take a look at PyQt’s convenience class for making tables, QTableWidget

  • Find out how to add context menus to GUI applications

  • Learn about Qt’s model/view architecture for working with data using the QTableView class

  • See an example of how to work with CSV files in PyQt

  • Introduce the QtSql module for working with SQL and databases

The QTableWidget Class

The QTableWidget class provides a means to display and organize data in tabular form, presenting the information in rows and columns. Using tables breaks down data into a more quickly readable layout. An example of PyQt’s tables can be seen in Figure 10-1.

QTableWidget provides you with the standard tools that you will need to create tables, including the ability to edit cells, set the number of rows and columns, and add vertical or horizontal header labels.

To create a QTableWidget object, you could pass the number of rows and columns as parameters to the QTableWidget, like in the following code:
table_widget = QTableWidget(10, 10, self)
Or you could construct a table using the setRowCount() and setColumnCount() methods .
table_widget = QTableWidget()
# Set initial row and column values
table_widget.setRowCount(10)
table_widget.setColumnCount(10)
You can also add items to the table programmatically using the setItem() method . This allows you to set the row and column values, and an item for the cell using QTableWidgetItem. In the following code, the item Kalani is inserted in row 0 and column 0:
self.table_widget.setItem(0,0, QTableWidgetItem("Name"))
self.table_widget.setItem(1,0, QTableWidgetItem("Kalani"))

Setting either horizontal or vertical header labels is done with setHorizontalHeaderItem() or setHorizontalHeaderLabels(). Change Horizontal to Vertical for the vertical header.

For the first example in this chapter, Listing 10-1, we will be taking a look at how to use QTableWidget to create the foundation for an application to edit spreadsheets and how to use a context menu to manipulate the contents of the table widget.
# spreadsheet.py
# Import necessary modules
import sys
from PyQt5.QtWidgets import (QApplication, QMainWindow,
    QTableWidget, QTableWidgetItem, QMenu, QAction,
    QInputDialog)
class SpreadsheetFramework(QMainWindow):
    def __init__(self):
        super().__init__()
        self.initUI()
    def initUI(self):
        self.setMinimumSize(1000, 500)
        self.setWindowTitle("Spreadsheet - Table Example")
        # Used for copy and paste actions
        self.item_text = None
        self.createMenu()
        self.createTable()
        self.show()
    def createTable(self):
        """
        Set up table widget.
        """
        self.table_widget = QTableWidget()
        # Set initial row and column values
        self.table_widget.setRowCount(10)
        self.table_widget.setColumnCount(10)
        # Set focus on cell in the table
        self.table_widget.setCurrentCell(0, 0)
        # When the horizontal headers are double-clicked, emit a signal
        self.table_widget.horizontalHeader().sectionDoubleClicked.connect(self.changeHeader)
        self.setCentralWidget(self.table_widget)
    def createMenu(self):
        """
        Set up the menu bar.
        """
        # Create file menu actions
        quit_act = QAction("Quit", self)
        quit_act.setShortcut('Ctrl+Q')
        quit_act.triggered.connect(self.close)
        # Create table menu actions
        self.add_row_above_act = QAction("Add Row Above", self)
        self.add_row_above_act.triggered.connect(self.addRowAbove)
        self.add_row_below_act = QAction("Add Row Below", self)
        self.add_row_below_act.triggered.connect(self.addRowBelow)
        self.add_col_before_act = QAction("Add Column Before", self)
        self.add_col_before_act.triggered.connect(self.addColumnBefore)
        self.add_col_after_act = QAction("Add Column After", self)
        self.add_col_after_act.triggered.connect(self.addColumnAfter)
        self.delete_row_act = QAction("Delete Row", self)
        self.delete_row_act.triggered.connect(self.deleteRow)
        self.delete_col_act = QAction("Delete Column", self)
        self.delete_col_act.triggered.connect(self.deleteColumn)
        self.clear_table_act = QAction("Clear All", self)
        self.clear_table_act.triggered.connect(self.clearTable)
        # Create the menu bar
        menu_bar = self.menuBar()
        menu_bar.setNativeMenuBar(False)
        # Create file menu and add actions
        file_menu = menu_bar.addMenu('File')
        file_menu.addAction(quit_act)
        # Create table menu and add actions
        table_menu = menu_bar.addMenu('Table')
        table_menu.addAction(self.add_row_above_act)
        table_menu.addAction(self.add_row_below_act)
        table_menu.addSeparator()
        table_menu.addAction(self.add_col_before_act)
        table_menu.addAction(self.add_col_after_act)
        table_menu.addSeparator()
        table_menu.addAction(self.delete_row_act)
        table_menu.addAction(self.delete_col_act)
        table_menu.addSeparator()
        table_menu.addAction(self.clear_table_act)
    def contextMenuEvent(self, event):
        """
        Create context menu and actions .
        """
        context_menu = QMenu(self)
        context_menu.addAction(self.add_row_above_act)
        context_menu.addAction(self.add_row_below_act)
        context_menu.addSeparator()
        context_menu.addAction(self.add_col_before_act)
        context_menu.addAction(self.add_col_after_act)
        context_menu.addSeparator()
        context_menu.addAction(self.delete_row_act)
        context_menu.addAction(self.delete_col_act)
        context_menu.addSeparator()
        copy_act = context_menu.addAction("Copy")
        paste_act = context_menu.addAction("Paste")
        context_menu.addSeparator()
        context_menu.addAction(self.clear_table_act)
        # Execute the context_menu and return the action selected. mapToGlobal() translates the position of the window coordinates to the global screen coordinates. This way we can detect if a right-click occurred inside of the GUI and display the context menu.
        action = context_menu.exec_(self.mapToGlobal(event.pos()))
        # To check for actions selected in the context menu that were not created in the menu bar.
        if action == copy_act:
            self.copyItem()
        if action == paste_act:
            self.pasteItem()
    def changeHeader(self):
        """
        Change horizontal headers by returning the text from input dialog.
        """
        col = self.table_widget.currentColumn()
        text, ok = QInputDialog.getText(self, "Enter Header", "Header text:")
        if ok and text != "":
            self.table_widget.setHorizontalHeaderItem(col, QTableWidgetItem(text))
        else:
            pass    
    def copyItem(self):
        """
        If the current cell selected is not empty, store the text.
        """
        if self.table_widget.currentItem() != None:
            self.item_text = self.table_widget.currentItem().text()
    def pasteItem(self):
        """
        Set item for selected cell.
        """
        if self.item_text != None:
            row = self.table_widget.currentRow()
            column = self.table_widget.currentColumn()
            self.table_widget.setItem(row, column, QTableWidgetItem(self.item_text))
    def addRowAbove(self):
        current_row = self.table_widget.currentRow()
        self.table_widget.insertRow(current_row)
    def addRowBelow(self):
        current_row = self.table_widget.currentRow()
        self.table_widget.insertRow(current_row + 1)
    def addColumnBefore(self):
        current_col = self.table_widget.currentColumn()
        self.table_widget.insertColumn(current_col)
    def addColumnAfter(self):
        current_col = self.table_widget.currentColumn()
        self.table_widget.insertColumn(current_col + 1)
    def deleteRow(self):
        current_row = self.table_widget.currentRow()
        self.table_widget.removeRow(current_row)
    def deleteColumn(self):
        current_col = self.table_widget.currentColumn()
        self.table_widget.removeColumn(current_col)
    def clearTable(self):
        self.table_widget.clear()
if __name__ == "__main__":
    app = QApplication(sys.argv)
    window = SpreadsheetFramework()
    sys.exit(app.exec_())
Listing 10-1

Example code that uses the QTableWidget class and some of its functions
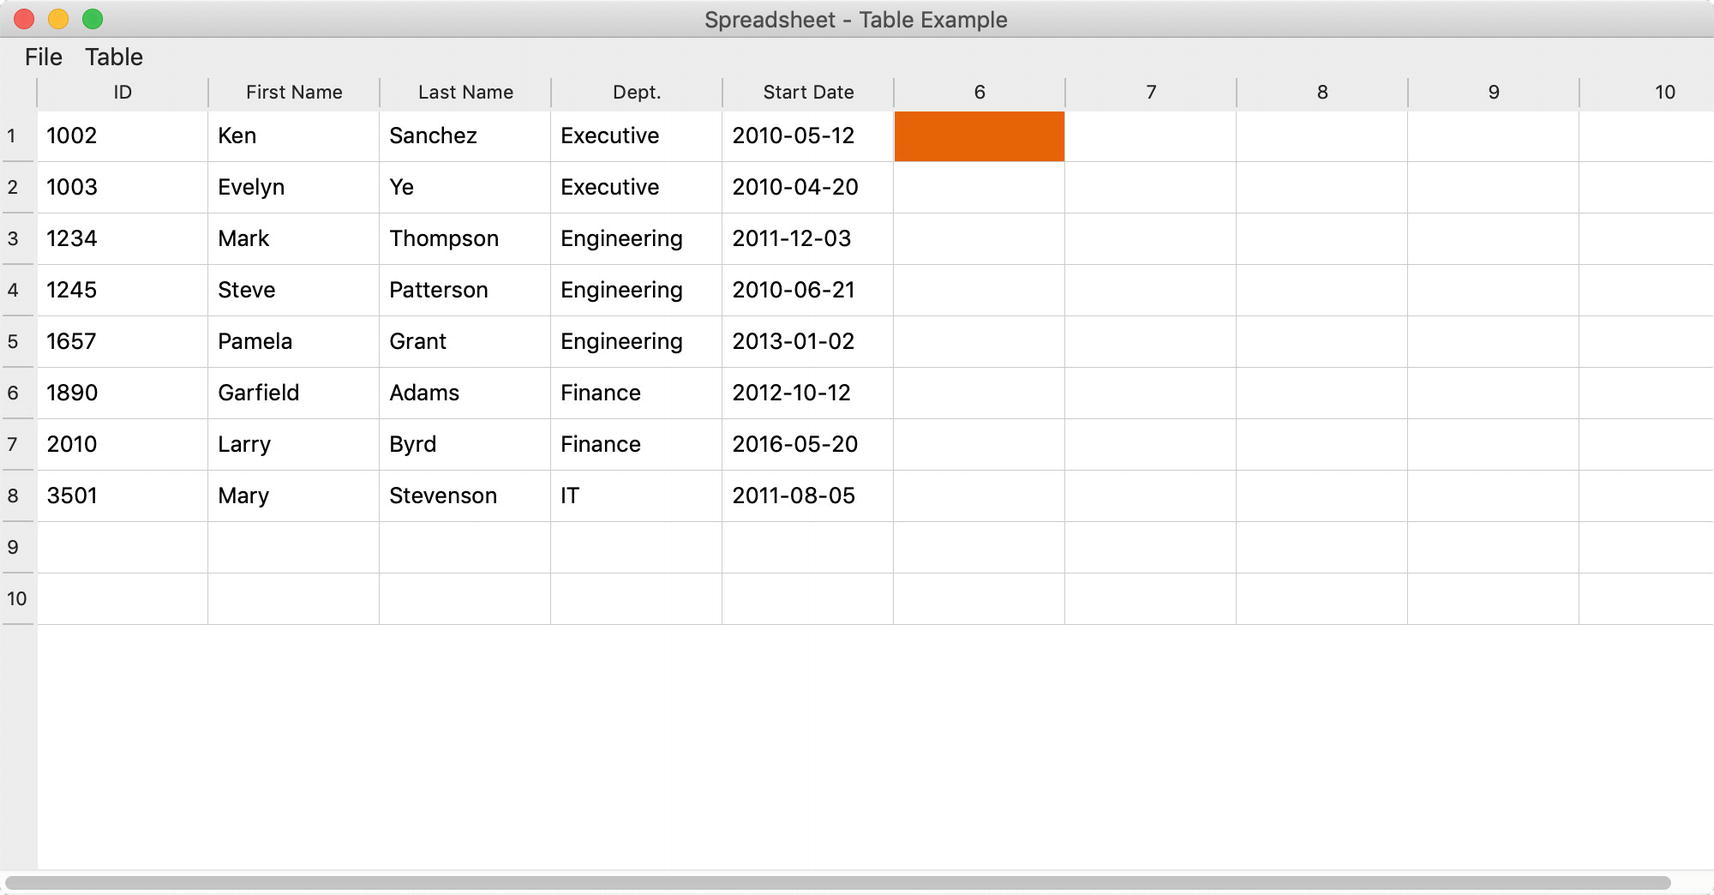
Figure 10-1 displays the GUI for this application, including the QTableWidget with examples of data already entered into some of the rows and columns, and horizontal headers.
../images/490796_1_En_10_Chapter/490796_1_En_10_Fig1_HTML.jpg
Figure 10-1

Example of a table from the QTableWidget class

Explanation

When we import classes in the beginning of the program, we need to make sure to include QTableWidget and QTableWidgetItem, which is used to create items for the table widget. A table is composed of a group of cells, and the items are the bits of textual information in each one. QTableWidget has a number of signals for checking to see if cells or items have been clicked, double-clicked, or even altered.

Next, create the menubar with File and Table menus. QTableWidget includes a few methods for manipulating table objects. The Table menu creates actions that put those methods to use. These actions include
  • Adding rows above or below the currently selected row using insertRow()

  • Adding columns before or after the currently selected column using insertColumn()

  • Deleting the current row or column using removeRow() or removeColumn()

  • Clearing the entire table, including items and headers with clear()

Since we are working with a table, if we are going to manipulate the rows or columns, we first need to know which row or column is currently selected. For example, when add_row_above_act is clicked, it triggers a signal that calls addRowAbove(). We first find out the row that is selected using currentRow().
current_row = self.table_widget.currentRow()
self.table_widget.insertRow(current_row)

A new row is then inserted in the current row’s location, causing all other rows to move down. For methods that manipulate columns, use the currentColumn() method .

Changing header labels in QTableWidget can either be done directly in code or by using a slightly indirect approach. Headers for tables are created using QHeaderView in the QTableView class (which we will cover later in this chapter’s project). Since QTableWidget inherits from the QTableView class, we also have access to its functions. In the following line of code, we are able to obtain the QHeaderView object using table_widget.horizontalHeader(). From there, we can connect to the QHeaderView signal sectionDoubleClicked(), checking to see if the user double-clicked a header section. If they did, a signal triggers the changeHeader() method .
self.table_widget.horizontalHeader().sectionDoubleClicked.connect(self.changeHeader)

From there, we get the column for the current header and show a QInputDialog to get the header label from the user. Finally, the item for the horizontal header is set using setHorizontalHeaderItem().

Creating Context Menus

This application also introduces how to create a context menu, sometimes called a pop-up menu, that appears in the window due to a user’s interaction, such as when the right mouse button is clicked. A context menu displays a list of commands, such as Back Page or Reload Page, that make interacting with the GUI even more convenient. Context menus can also be set for managing specific widgets.

Since context menus are caused by events, we can reimplement the contextMenuEvent().
def contextMenuEvent(self, event):
    context_menu = QMenu(self)
    context_menu.addAction(self.add_row_above_act)

A context menu is typically created using QMenu(). You can either use existing actions that are created in the menubar or the toolbar, or you can create new ones. In the preceding example, two actions are created specifically for the context menu, copy_act and paste_act. If a cell in the table is not empty, we “copy” the text to item_text. In the pasteItem() slot, the current row and column of the selected cell is checked. We then “paste” the item using setItem(). The copy and paste actions could also be implemented using the QClipboard.
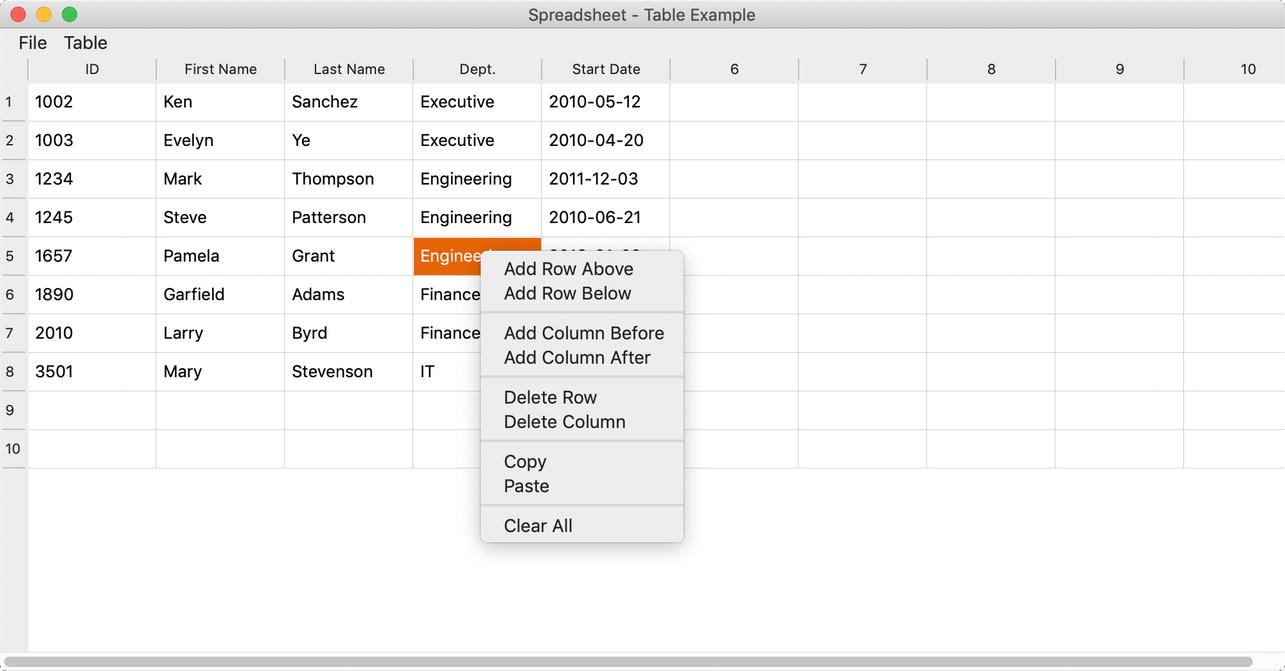
The context menu is displayed using exec_(). We pass self.mapToGlobal() as an argument to get the coordinates of the mouse relative to the screen. An example of the context menu can be seen in Figure 10-2.
../images/490796_1_En_10_Chapter/490796_1_En_10_Fig2_HTML.jpg
Figure 10-2

Example of a context menu that displays actions for editing the table widget

The QTableWidget is actually a convenience class, providing simplified access to other classes, namely, QTableView and QAbstractModel. Before learning about accessing databases with PyQt, you should take a moment to get familiar with the model/view architecture used by Qt.

Introduction to Model/View Programming

Qt, and therefore PyQt, needs a system to access, display, and manage data that can be presented to the user. An older technique used for managing the relationship between data and its visual representation for user interfaces is the model-view-controller (MVC) software design pattern. MVC divides a program’s logic into three interlinked components – a model, a view, and a controller.

PyQt utilizes a similar design pattern that is based on MVC – the model/view architecture.

The Components of the Model/View Architecture

Model/view programming also separates the logic between three components, but combines the view and the controller objects, and introduces a new element – a delegate. A diagram of the architecture can be seen in Figure 10-3.
  • Model – The class that communicates with the data source, accessing the data, and provides a point of connection between the data and the view and delegate.

  • View – The class that is responsible for displaying the data to the user, either in list, table, or tree formats, and for retrieving items of data from the model using model indexes. The view also has similar functionality to the controller in the MVC pattern, which handles the input from a user’s interaction with items displayed in the view.

  • Delegate – The class that is in charge of painting items and providing editors in the view. The delegate also communicates back to the model if an item has been edited.

Using the model/view structure has quite a few benefits, specifically being ideal for developing large-scale applications, giving more flexibility and control over the appearance and editing of data items, simplifying the framework for displaying data, and offering the ability to display multiple views of a model at the same time.
../images/490796_1_En_10_Chapter/490796_1_En_10_Fig3_HTML.jpg
Figure 10-3

The model accesses data from the data source and provides data to the view. The view presents items stored in a model and reflects changes to the data in the model. The delegate is responsible for drawing items in the view and for handling the editing of the data in the model. (Adapted from https://doc.qt.io/ web site)

PyQt’s Model/View Classes

QTableWidget is one of a few convenience classes that PyQt provides for working with data. QTableWidget creates a table of items, QListWidget displays a list of items, and QTreeWidget provides a hierarchal treelike structure. An example of QListWidget can be seen in Chapter 8. These widgets provide all the tools necessary to work with data, and the view, model, and delegate classes all grouped into one class. However, these classes are more focused on item-based interfaces and are less flexible than working with the model/view structure. Each of these widgets inherits behavior from an abstract class, QAbstractItemView, creating the behavior for selecting items and managing headers.

An abstract class provides the points of connection, referred to as an interface, between other components, providing functionality and default implementation of features. Abstract classes can also be used to create custom models, views, or delegates.
  • Models – All models are based on the QAbstractItemModel class, defining the interface used by both views and delegates to access data, and can be used to handle lists, tables, or trees. Data can take on a number of forms, including Python data structures, separate classes, files, or databases. Some other model classes are QStandardItemModel, QFileSystemModel, and SQL-related models.

  • Views – All views are based on QAbstractItemView and are used to display data items from a data source, including QListView, QTableView, and QTreeView.

  • Delegates – The base class is QAbstractItemDelegate, responsible for drawing items from the model and providing an editor widget for modifying items. For example, while editing a cell in a table, the editor widget, such as QLineEdit, is placed directly on top of the item.

The following example in Listing 10-2 demonstrates how to use the model/view classes for displaying data using tables. Chapter 12 contains an extra example that shows how to use QFileSystemModel and QTreeView to display the contents of directories on your computer.

Communication between the models, views, and delegates is handled by signals and slots. The model uses signals to notify the view about changes to the data. The view generates signals that provide information about how a user interacts with items. Signals from the delegate are emitted while editing an item to inform the model and view about the state of the editor.

The following program illustrates how to use model/view programming to display the contents of a small CSV file in a table view.
# model_view_ex.py
# Import necessary modules
import sys, csv
from PyQt5.QtWidgets import (QApplication, QWidget, QTableView, QVBoxLayout)
from PyQt5.QtGui import QStandardItemModel, QStandardItem
class DisplayParts(QWidget):
    def __init__(self):
        super().__init__()
        self.initializeUI()
    def initializeUI(self):
        """
        Initialize the window and display its contents to the screen.
        """
        self.setGeometry(100, 100, 450, 300)
        self.setWindowTitle('Model and View Example')
        self.setupModelView()
        self.show()
    def setupModelView(self):
        """
        Set up standard item model and table view.
        """
        self.model = QStandardItemModel()
        table_view = QTableView()
        # From QAbstractItemView.ExtendedSelection = 3
        table_view.SelectionMode(3)
        table_view.setModel(self.model)
        # Set initial row and column values
        self.model.setRowCount(3)
        self.model.setColumnCount(4)
        self.loadCSVFile()
        v_box = QVBoxLayout()
        v_box.addWidget(table_view)
        self.setLayout(v_box)
    def loadCSVFile(self):
        """
        Load header and rows from CSV file.
        Items are constructed before adding them to the table.
        """
        file_name = "files/parts.csv"
        with open(file_name, "r") as csv_f:
            reader = csv.reader(csv_f)
            header_labels = next(reader)
            self.model.setHorizontalHeaderLabels(header_labels)
            for i, row in enumerate(csv.reader(csv_f)):
                items = [QStandardItem(item) for item in row]
                self.model.insertRow(i, items)
if __name__ == '__main__':
    app = QApplication(sys.argv)
    window = DisplayParts()
    sys.exit(app.exec_())
Listing 10-2

Code demonstrating how to design a GUI using model/view architecture

The simple GUI created using model/view programming can be seen in Figure 10-4.
../images/490796_1_En_10_Chapter/490796_1_En_10_Fig4_HTML.jpg
Figure 10-4

Table created using the model/view architecture

Explanation

The preceding example displays the contents of a CSV file in a table view and demonstrates how simple it is to use the model/view paradigm. Tables can be used to organize and display various types of data, such as employee or inventory information.

We begin by importing classes, including QTableView from the QtWidgets module, and the QStandardItemModel and QStandardItem classes from QtGui. QStandardItemModel will supply the item-based model we need to work with the data; QStandardItem provides the items that are used in the model.

Instances of both the model using QStandardItemModel as well as the QTableView class are created. There are different ways that users can select items in the table view. SelectionMode() handles how the view responds to users’ selections. ExtendedSelection allows a user to select multiple items by pressing the Ctrl key (Cmd on MacOS) while clicking an item in the view or to select several items using the Shift key. To set up the view to display items in the model, you simply need to call the setModel() method .
table_view.setModel(self.model)
In the previous example where we looked at QTableWidget, the setRowCount() and setColumnCount() methods were called on the table widget. When using QTableView, these methods are not built-in and instead are called on the model.
self.model.setRowCount(3)

Next, we call loadCSVFile() to read the contents of the data file and add the items to the model to be displayed in the view. The table_view widget is added to the QVBoxLayout.

In the loadCSVLayout() method , we can see how to read headers and data from a CSV file. Comma-separated values (CSV) is a very common format used for storing the data of spreadsheets and datasets. We open the file, set up the reader to read the sequences in the file, get the headers, and skip to the next line. For this example, we assume that the CSV file will have header labels. The horizontal labels of the model are set using the list of items from the first row.
self.model.setHorizontalHeaderLabels(header_labels)
For the remaining rows, we use a list comprehension to read the items for each row into a list and use insertRow() to insert the list of items into the ith row. Figure 10-5 shows the contents of the parts.csv file.
../images/490796_1_En_10_Chapter/490796_1_En_10_Fig5_HTML.jpg
Figure 10-5

Example of the data stored in a CSV file

Working with SQL Databases in PyQt

Now that we have looked at PyQt’s model/view architecture and the QTableView class, let’s move on and begin taking a look at how to use SQL for handling structured data.

What Is SQL?

The Structured Query Language (SQL) is a programming language designed for communication with databases. The data stored in databases is organized into a set of tables. The rows of the tables are referred to as records, and the columns are referred to as fields. Each column can only store a specific kind of information, such as names, dates, or numbers.

With SQL, we can query the data stored in relational databases – a collection of data items that have predefined relationships across multiple tables, marked by a unique identifier known as a foreign key. In a relational database, multiple tables comprise a schema, more than one schema makes up a database, and those databases are stored on a server. Relational databases allow for multiple users to handle the data at the same time. For this reason, accessing a database often requires a user to log in with a username and password in order to connect to the database.

This section will focus solely on using SQL along with classes from PyQt’s QtSql module for creating a very basic database management system interface.

Working with Database Management Systems

The QtSql module provides drivers for a number of relational database management systems (RDBMS) , including MySQL, Oracle, Microsoft SQL Server, PostgreSQL, and SQLite versions 2 and 3. An RDBMS is the software that allows users to interact with relational databases using SQL.

For the following examples, we will be using SQLite 3 since the library already comes shipped with Python and is included with Qt. SQLite is not a client-server database engine, so we do not need a database server. SQLite operates on a single file and is mainly used for small desktop applications.

Getting Familiar with SQL Commands

SQL already has its own commands for generating queries from databases. Using these commands, a user can perform a number of different actions for interacting with database tables. For example, the SQL SELECT statement can be used to retrieve records from a table. If you had a database for a dog identification registry that contained a table called dog_registry, you could select all of the records in the table with the following statement:
SELECT * FROM dog_registry
When you are creating a query, you should consider where you are getting your data from, including which database or table. You should keep in mind what fields you will use. And be mindful of any conditions in the selection. For example, do you need to display all the pets in the database, or only a specific breed of dog?
SELECT name FROM dog_registry WHERE breed = 'shiba inu'
Using different drivers will more than likely entail using different SQL syntax, but PyQt can handle the differences. The following table lists a few common SQLite 3 commands that will be used in this chapter’s examples.
Table 10-1

A list of common SQLite keywords and functions that can be found in this chapter1

SQLite Keywords

Description

AUTOINCREMENT

Generates a unique number automatically when a new record is inserted into the table.

CREATE TABLE

Creates a new table in the database.

DELETE

Deletes a row from the table.

DROP TABLE

Deletes a table that already exists in the database.

FOREIGN KEY

Constraint that links two tables together.

FROM

Specifies the table to interact with when selecting or deleting data.

INTEGER

Signed integer data type.

INSERT INTO

Inserts new rows into the table.

MAX()

Function that finds the maximum value of a specified column.

NOT NULL

Constraint that ensures a column will not accept NULL values.

PRIMARY KEY

Constraint that uniquely identifies a record in the table.

REFERENCES

Used with FOREIGN KEY to specify another table which has relation with the first table.

SELECT

Selects data from a database.

SET

Identifies which columns and values should be updated.

UNIQUE

Constraint that ensures all values in a column are unique.

UPDATE

Updates existing values in a row.

VALUES

Defines the values of an INSERT INTO statement.

VARCHAR

Variable character data type for strings.

WHERE

Filters the results of a query to include only records that satisfy specific conditions.

In the following sections, we will see how to create a user interface that can be used to view a database’s information in a table view.

Project 10.1 – Account Management GUI

For this project, we are going to take a different approach to designing the account management GUI. This section builds up to the final project by working through a number of smaller example programs. There is a good deal of information to unpack, and if this is your first time working with SQL, especially to build an interface in PyQt, then the process for working with databases can become a little unclear.

Imagine you have a business and you want to create a database to keep track of your employees’ information. You want to include information such as their first and last names, employee IDs, e-mail addresses, departments, and the countries where they work. (This could be extended to include more information such as salaries, phone numbers, and dates of hire.) In the beginning, a small database is okay. However, as your workforce builds, so will the information. Some employees may have the same first or last name, or work in the same country. You need a way to manage all of those employees so that fields in the database are populated with the correct information and data types.

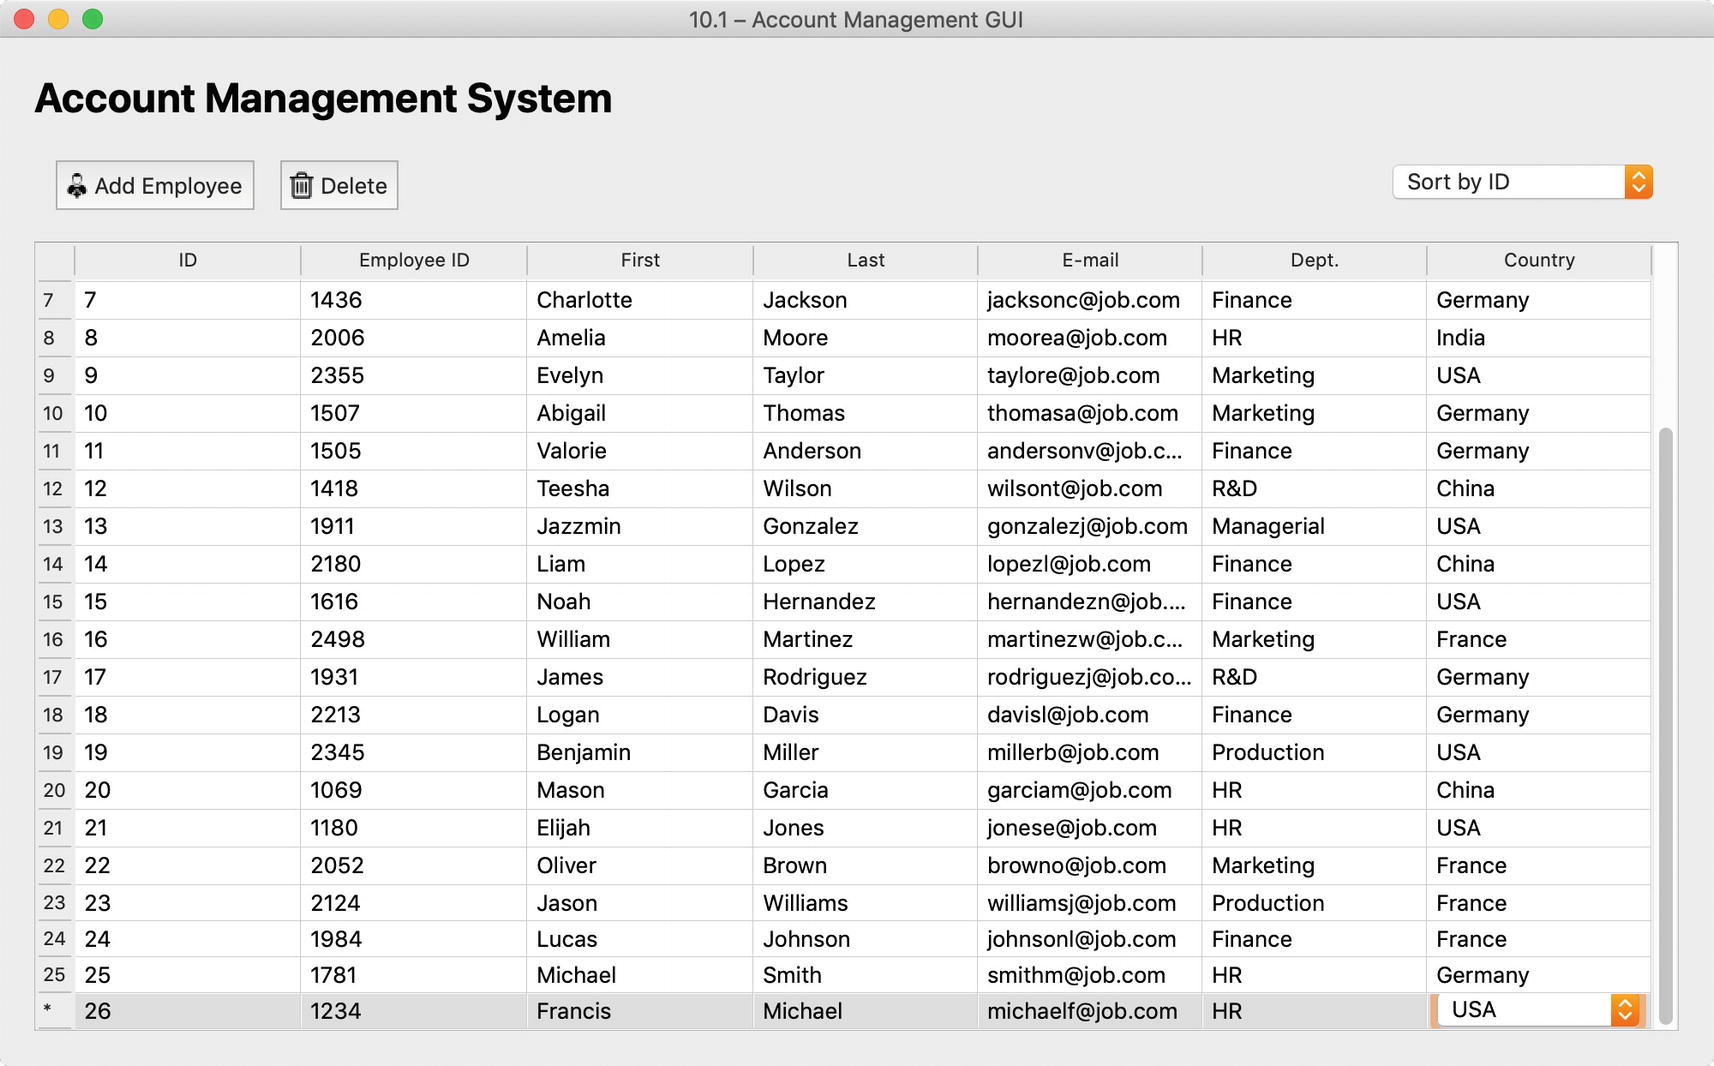
Using a relational database, we can avoid issues with the data’s integrity. We could set up multiple tables, one for the different employees’ accounts and one for the countries. For this example, we only use repeating country names to demonstrate how to use PyQt’s classes for working with relational databases. Figure 10-6 displays the account management GUI.

The project is broken down into the following parts:
  1. 1.

    Introduce how to use QSqlDatabase to connect to databases and QSqlQuery for creating queries

     
  2. 2.

    A few examples of how to use QSqlQuery for working with databases

     
  3. 3.

    Introduce QSqlTableModel for working with databases with no foreign keys

     
  4. 4.

    Show how use to QSqlRelationalTableModel to create tables with foreign key support

     
  5. 5.

    Create the account management GUI

     
../images/490796_1_En_10_Chapter/490796_1_En_10_Fig6_HTML.jpg
Figure 10-6

The account management GUI. The last row of the table displays a new record being added to the database

Working with QtSql

In this first example, we are going to see how to use QSqlQuery to create a small database that we will be able to view in the account management GUI. The database has two tables, accounts and countries. The two tables are linked together through the country_id field in accounts and the id field in countries.
# create_database.py
# Import necessary modules
import sys, random
from PyQt5.QtSql import QSqlDatabase, QSqlQuery
class CreateEmployeeData:
    """
    Create sample database for project.
    Class demonstrates how to connect to a database, create queries, and create tables and records in those tables.
    """
    # Create connection to database. If db file does not exist,
    # a new db file will be created.
    database = QSqlDatabase.addDatabase("QSQLITE") # SQLite version 3
    database.setDatabaseName("files/accounts.db")
    if not database.open():
        print("Unable to open data source file.")
        sys.exit(1) # Error code 1 - signifies error
    query = QSqlQuery()
    # Erase database contents so that we don't have duplicates
    query.exec_("DROP TABLE accounts")
    query.exec_("DROP TABLE countries")
    # Create accounts table
    query.exec_("""CREATE TABLE accounts (
                id INTEGER PRIMARY KEY AUTOINCREMENT UNIQUE NOT NULL,
                employee_id INTEGER NOT NULL,
                first_name VARCHAR(30) NOT NULL,
                last_name VARCHAR(30) NOT NULL,
                email VARCHAR(40) NOT NULL,
                department VARCHAR(20) NOT NULL,
                country_id VARCHAR(20) REFERENCES countries(id))""")
    # Positional binding to insert records into the database
    query.prepare("""INSERT INTO accounts (
                  employee_id, first_name, last_name,
                  email, department, country_id)
                  VALUES (?, ?, ?, ?, ?, ?)""")
    first_names = ["Emma", "Olivia", "Ava", "Isabella", "Sophia", "Mia", "Charlotte", "Amelia", "Evelyn", "Abigail", "Valorie", "Teesha", "Jazzmin", "Liam", "Noah", "William", "James", "Logan", "Benjamin", "Mason", "Elijah", "Oliver", "Jason", "Lucas", "Michael"]
    last_names = ["Smith", "Johnson", "Williams", "Brown", "Jones", "Garcia", "Miller", "Davis", "Rodriguez", "Martinez", "Hernandez", "Lopez", "Gonzalez", "Wilson", "Anderson", "Thomas", "Taylor", "Moore", "Jackson", "Martin", "Lee", "Perez", "Thompson", "White", "Harris"]
    employee_ids = random.sample(range(1000, 2500), len(first_names))
    countries = {"USA": 1, "India": 2, "China": 3, "France": 4, "Germany": 5}
    country_names = list(countries.keys())
    country_codes = list(countries.values())
    departments = ["Production", "R&D", "Marketing", "HR",
                   "Finance", "Engineering", "Managerial"]
    # Add the values to the query to be inserted in accounts
    for f_name in first_names:
        l_name = last_names.pop()
        email = (l_name + f_name[0]).lower() + "@job.com"
        country_id = random.choice(country_codes)
        dept = random.choice(departments)
        employee_id = employee_ids.pop()
        query.addBindValue(employee_id)
        query.addBindValue(f_name)
        query.addBindValue(l_name)
        query.addBindValue(email)
        query.addBindValue(dept)
        query.addBindValue(country_id)
        query.exec_()
    # Create the second table, countries
    country_query = QSqlQuery()
    country_query.exec_("""CREATE TABLE countries (
                id INTEGER PRIMARY KEY AUTOINCREMENT UNIQUE NOT NULL,
                country VARCHAR(20) NOT NULL)""")
    country_query.prepare("INSERT INTO countries (country) VALUES (?)")
    # Add the values to the query to be inserted in countries
    for name in country_names:
        country_query.addBindValue(name)
        country_query.exec_()
    print("[INFO] Database successfully created.")
    sys.exit(0)
if __name__ == "__main__":
    CreateEmployeeData()
Listing 10-3

Code showing examples of how to create queries with QSqlQuery

To see an example of what the data this program created looks like in a table view, refer back to Figure 10-6 .

Explanation

This program does not create a GUI, so we only need to import the QSqlDatabase and QSqlQuery classes from QtSql. We will use QSqlDatabase to create the connection that allows access to a database; QSqlQuery can be used to perform SQL statements in PyQt.

We begin by creating a connection to the database in the CreateEmployeeData class. The addDatabase() function allows you to specify the SQL driver that you want to use. The examples in this chapter use SQLite 3 so we pass QSQLITE as the argument. Once the database object is created, we can set the other connection parameters, including which database we are going to use, the username, password, host name, and the connection port. For SQLite 3 we only need to specify the name of the database with setDatabaseName(). You can also create multiple connections to a database.
database = QSqlDatabase.addDatabase("QSQLITE")
database.setDatabaseName("files/accounts.db")
Note

A connection is referenced by its name, not by the name of the database. If you want to give your database a name, pass it as an argument after the driver in the addDatabase() method. If no name is specified, then that connection becomes the default connection.

If the accounts.db file does not already exist, then it will be created. Once the parameters are set, you must call open() to activate the connection to the database. A connection cannot be used until it is opened.
Now that the connections are established, we can begin querying our database. You typically might start with databases that already have data in them, but in this example, we are going to see how we can create a database using SQL commands. To query a database using PyQt, we first need to create an instance of QSqlQuery. Then, we call the exec_() method to execute the SQL statement in query. In the following lines, we want to delete the table accounts :
query = QSqlQuery()
query.exec_("DROP TABLE accounts")
Next, let’s create a new accounts table using exec_() and CREATE TABLE accounts. Each table entry will have its own unique id by using AUTOINCREMENT. The accounts table will include information for an employee’s ID, first name, last name, e-mail, department, and the country where they are located. We also create a countries table which holds the names of the employee’s countries and is linked to the accounts table using the following line:
country_id VARCHAR(20) REFERENCES countries(id))
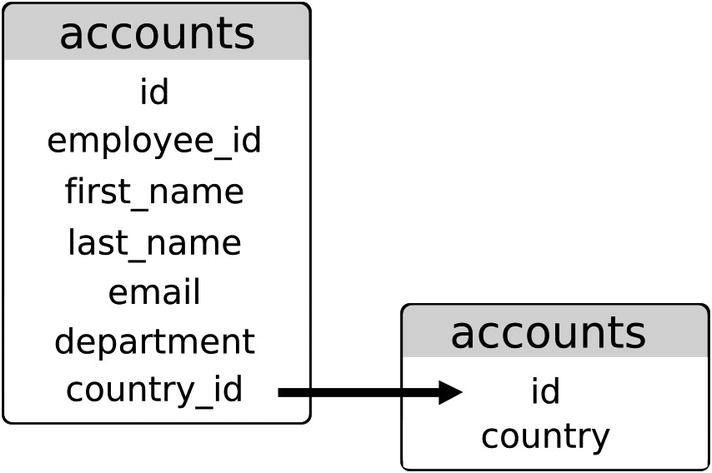
The country_id references the countries table’s id. Figure 10-7 illustrates the connection between the two tables.
../images/490796_1_En_10_Chapter/490796_1_En_10_Fig7_HTML.jpg
Figure 10-7

Illustration of the relations between the accounts and countries tables

The next thing to do is to insert records into our tables. We could continue to use exec_() to execute queries, but this would become tedious if we have a large database. To insert multiple records at the same time, we separate the query from the actual values being inserted using placeholders and the prepare() method. The placeholder will act as a temporary variable, allowing users to supply different data using the same SQL query. In the following code, the positional placeholders are the ?. PyQt supports two placeholder syntaxes ODBC style which uses ? and the Oracle style which uses :field_name.
query.prepare("""INSERT INTO accounts (
              employee_id, first_name, last_name,
              email, department, country_id)
              VALUES (?, ?, ?, ?, ?, ?)""")

Each field, such as employee_id or first_name, is associated with one of the placeholders. Since we used AUTOINCREMENT for id, we do not have to include the field or a placeholder in the query.

The prepare() method gets the query ready for execution. If the query is prepared successfully, then values can be binded to the fields using the addBindValue() method .

Next, we create the values for the first_name, last_name, and other fields using Python lists and dictionaries. A for loop is then used where we bind the values to the placeholders. exec_() is called at the end of each iteration to insert the values into the accounts table. The countries table is prepared in a similar manner.

Once the tables are populated, we call sys.exit(0) to exit the program.

Example Queries Using QSqlQuery

The following code in Listing 10-4 is not necessary for the accounting manager GUI, but it does give a few more examples for understanding how to input, update, and delete records with SQL in a PyQt application.
# query_examples.py
# Import necessary modules
import sys
from PyQt5.QtSql import QSqlDatabase, QSqlQuery
class QueryExamples:
    def __init__(self):
        super().__init__()
        self.createConnection()
        self.exampleQueries()
    def createConnection(self):
        """
        Create connection to the database.
        """
        database = QSqlDatabase.addDatabase("QSQLITE")
        database.setDatabaseName("files/accounts.db")
        if not database.open():
            print("Unable to open data source file.")
            sys.exit(1) # Error code 1 - signifies error
    def exampleQueries(self):
        """
        Examples of working with the database.
        """
        # Executing a simple query
        query = QSqlQuery()
        query.exec_("SELECT first_name, last_name FROM accounts WHERE employee_id > 2000")
        # Navigating the result set
        while (query.next()):
            f_name = str(query.value(0))
            l_name = str(query.value(1))
            print(f_name, l_name)
        # Inserting a single new record into the database
        query.exec_("""INSERT INTO accounts (
                  employee_id, first_name, last_name,
                  email, department, country_id)
                  VALUES (2134, 'Robert', 'Downey', '[email protected]', 'Managerial', 1)""")
        # Update a record in the database
        query.exec_("UPDATE accounts SET department = 'R&D' WHERE employee_id = 2134")
        # Delete a record from the database
        query.exec_("DELETE FROM accounts WHERE employee_id <= 1500")
        sys.exit(0)
if __name__ == "__main__":
    QueryExamples()
Listing 10-4

Demonstrating how to insert, update, and delete records using SQL and PyQt

This code will modify the database created in Listing 10-3. To view the changes, run this code and then run the code in one of the following examples to see how the tables have been manipulated.

Explanation

This example also has no GUI window. If you run this program after running the program in Listing 10-3, you will notice how the queries here modify the database.

We start by creating a connection to the SQLite 3 driver and add the database created in the previous program, accounts.db. Next, we complete the connection using open().

In exampleQueries(), let’s take a look at how to use the QSqlQuery class and SQL commands to query the database. We create a new QSqlQuery instance to search for the first and last names of the employees whose employee IDs are greater than 2000.
query.exec_("SELECT first_name, last_name FROM accounts WHERE employee_id > 2000”)

With that query, we could use the values from first_name and last_name to update or delete records. To cycle through the results of the query, we use next(). Other methods that could be used to navigate the results include next(), previous(), first(), and last().

To insert a single record, we can use the INSERT SQL command. You could also add multiple records into the database. Refer back to Listing 10-3 to see how. In this query, we insert specific values for each field. To update records, use UPDATE. We update the department value for the employee that was just inserted. Finally, to delete a record, use DELETE.

Working with QSqlTableModel

We are finally going to create a GUI for visualizing the database’s contents. In this table, we are only going to visualize the accounts table to demonstrate the QSqlTableModel class , an interface that is useful for reading and writing database records when you only need to use a single table with no links to other tables. The following program will demonstrate how to use model/view programming to view the contents of a SQL database.

We could use QSqlQuery to do all of the database work, but combining the class with PyQt’s model/view paradigm allows for us to design GUIs that make the data management process simpler.
# table_model.py
# Import necessary modules
import os, sys
from PyQt5.QtWidgets import (QApplication, QWidget, QTableView, QVBoxLayout, QMessageBox, QHeaderView)
from PyQt5.QtSql import QSqlDatabase, QSqlTableModel
class TableDisplay(QWidget):
    def __init__(self):
        super().__init__()
        self.initializeUI()
    def initializeUI(self):
        """
        Initialize the window and display its contents to the screen.
        """
        self.setMinimumSize(1000, 500)
        self.setWindowTitle('SQL Table Model')
        self.createConnection()
        self.createTable()
        self.show()
    def createConnection(self):
        """
        Set up the connection to the database.
        Check for the tables needed.
        """
        database = QSqlDatabase.addDatabase("QSQLITE")
        database.setDatabaseName("files/accounts.db")
        if not database.open():
            print("Unable to open data source file.")
            sys.exit(1) # Error code 1 - signifies error
        # Check if the tables we need exist in the database
        tables_needed = {'accounts'}
        tables_not_found = tables_needed - set(database.tables())
        if tables_not_found:
            QMessageBox.critical(None, 'Error',
                f'The following tables are missing from the database: {tables_not_found}')
            sys.exit(1) # Error code 1 – signifies error
    def createTable(self):
        """
        Create the table using model/view architecture.
        """
        # Create the model
        model = QSqlTableModel()
        model.setTable('accounts')
        table_view = QTableView()
        table_view.setModel(model)
        table_view.horizontalHeader().setSectionResizeMode(QHeaderView.Stretch)
        # Populate the model with data
        model.select()
        # Main layout
        main_v_box = QVBoxLayout()
        main_v_box.addWidget(table_view)
        self.setLayout(main_v_box)
if __name__ == "__main__":
    app = QApplication(sys.argv)
    window = TableDisplay()
    sys.exit(app.exec_())
Listing 10-5

Code to view SQL database using QSqlTableModel
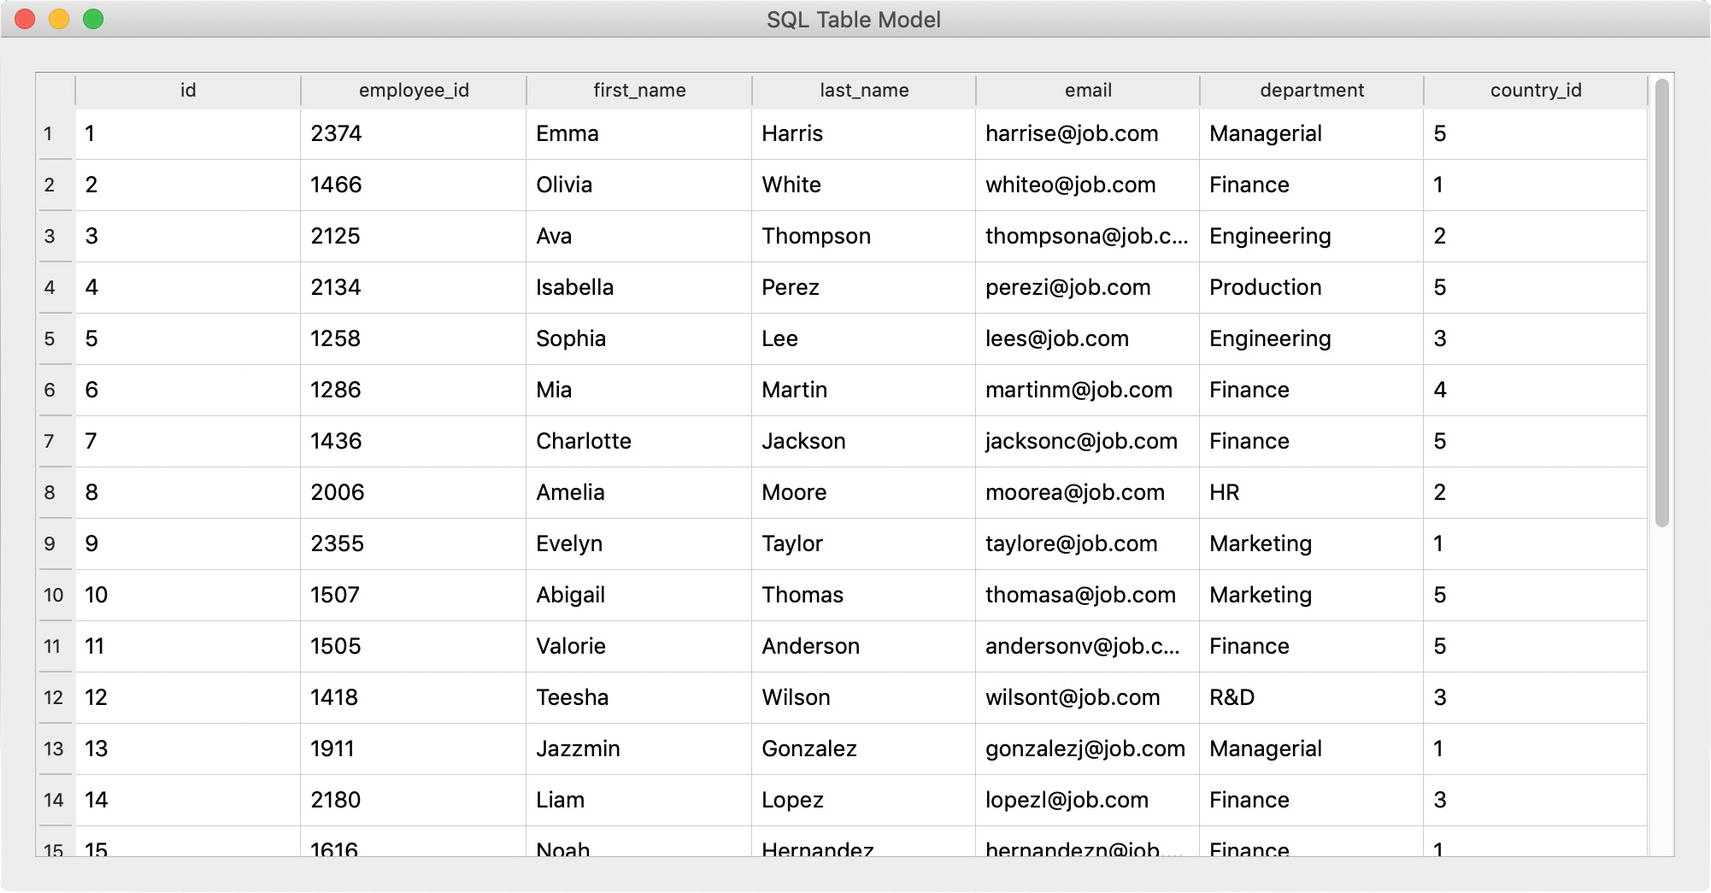
Figure 10-8 displays the contents of the database in a table view. Notice how the header labels display the field names used when the database was created. We will see how to set header labels later. Also, the country_id column currently only displays numbers associated with the different names in the countries table. If you only want to display specific columns, the following code lets you select which ones you want to display:
model.setQuery(QSqlQuery("SELECT id, employee_id, first_name, last_name FROM accounts"))
../images/490796_1_En_10_Chapter/490796_1_En_10_Fig8_HTML.jpg
Figure 10-8

The table created using QSqlTableModel

Explanation

Get started by importing the PyQt classes, including QSqlTableModel. Next, create the TableDisplay class for displaying the contents of the database.

In the createConnection() method , we connect to the database and activate the connection with open(). This time, let’s check to make sure that the tables we want to use are in the database. If they cannot be found, then a dialog box will be displayed to inform the user and the program will close.

The instances of the QSqlTableModel and the QTableView are created in the createTable() method . For the model, we need to set the database table we want to use with setTable().
    model.setTable('accounts')
Next, set the model for table_view using setModel(). To make the table stretch to fit into the view horizontally, we use the following line:
table_view.horizontalHeader().setSectionResizeMode(QHeaderView.Stretch)

This line also handles stretching the table when the window resizes.

Finally, populate the model with data using select(). If you have made changes to the table but have not submitted them, then select() will cause the edited items to return back to their previous states .

Working with QSqlRelationalTableModel

Next we are going to see how to use PyQt’s QSqlRelationalTableModel for working with relational databases. The QSqlRelationalTableModel class provides a model for viewing and editing data in a SQL table, with support for using foreign keys. A foreign key is a SQL constraint used to link tables together. The application in Listing 10-6 builds upon the previous example in Listing 10-5.
# relational_model.py
# Import necessary modules
import os, sys
from PyQt5.QtWidgets import (QApplication, QWidget, QTableView, QVBoxLayout, QMessageBox, QHeaderView)
from PyQt5.QtSql import (QSqlDatabase, QSqlRelationalTableModel, QSqlRelation)
class TableDisplay(QWidget):
    def __init__(self):
        super().__init__()
        self.initializeUI()
    def initializeUI(self):
        """
        Initialize the window and display its contents to the screen.
        """
        self.setMinimumSize(1000, 500)
        self.setWindowTitle('Relational Table Model')
        self.createConnection()
        self.createTable()
        self.show()
    def createConnection(self):
        """
        Set up the connection to the database.
        Check for the tables needed.
        """
        database = QSqlDatabase.addDatabase("QSQLITE")
        database.setDatabaseName("files/accounts.db")
        if not database.open():
            print("Unable to open data source file.")
            sys.exit(1) # Error code 1 - signifies error
        # Check if the tables we need exist in the database
        tables_needed = {'accounts', 'countries'}
        tables_not_found = tables_needed - set(database.tables())
        if tables_not_found:
            QMessageBox.critical(None, 'Error',
                f'The following tables are missing from the database: {tables_not_found}')
            sys.exit(1) # Error code 1 – signifies error
    def createTable(self):
        """
        Create the table using model/view architecture.
        """
        # Create the model
        model = QSqlRelationalTableModel()
        model.setTable('accounts')
        # Set up relationship for foreign keys
        model.setRelation(model.fieldIndex('country_id'), QSqlRelation('countries', 'id', 'country'))
        table_view = QTableView()
        table_view.setModel(model)
        table_view.horizontalHeader().setSectionResizeMode(QHeaderView.Stretch)
        # Populate the model with data
        model.select()
        # Main layout
        main_v_box = QVBoxLayout()
        main_v_box.addWidget(table_view)
        self.setLayout(main_v_box)
if __name__ == "__main__":
    app = QApplication(sys.argv)
    window = TableDisplay()
    sys.exit(app.exec_())
Listing 10-6

Code to view SQL database using QSqlRelationalTableModel
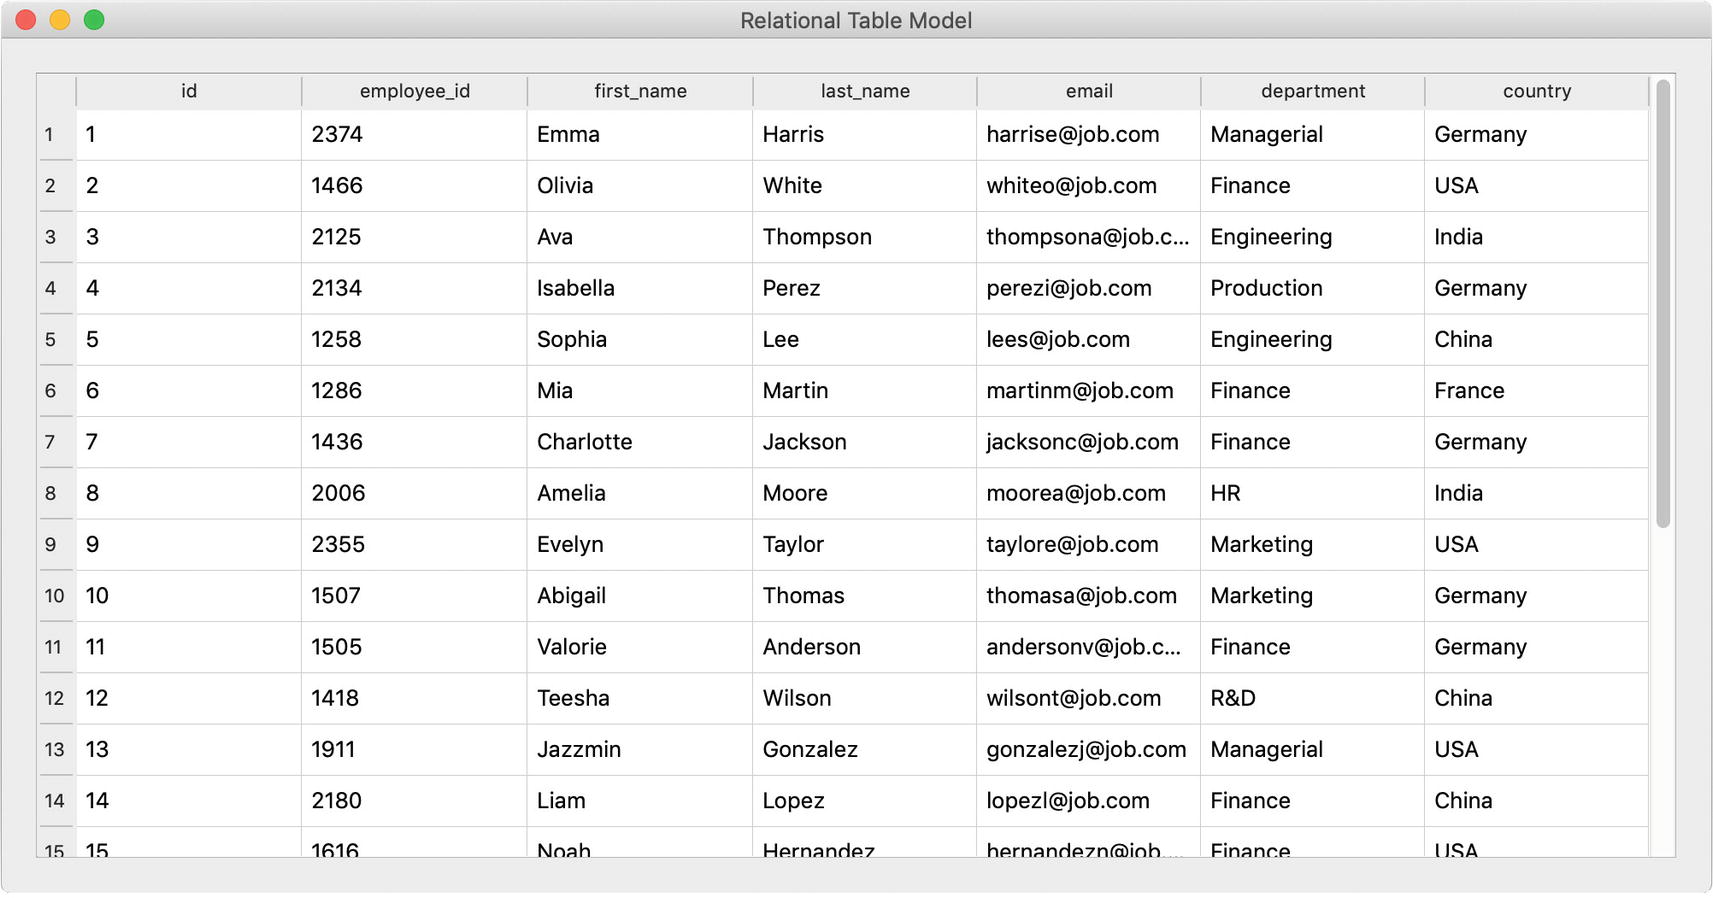
If you compare Figure 10-9 to Figure 10-8, you will notice that data in the last column has been updated to display the names of the countries and that the header has been changed to country.
../images/490796_1_En_10_Chapter/490796_1_En_10_Fig9_HTML.jpg
Figure 10-9

The table created using QSqlRelationalTableModel

Explanation

This time we need to import QSqlRelationalModel since we are working with relational databases and foreign keys. Also, QSqlRelation stores the information about SQL foreign keys.

We connect to the database like before, except this time we are checking for both tables, accounts and countries. Next we create instances of the QSqlRelationalModel and QTableView classes. The setTable() method is used to cause the model to fetch the accounts table’s information.

The country_id field in accounts is mapped to countries’ field ID. Using setRelation(), we can cause table_view to present the countriescountry field to the user. The following code shows how to do this, and the results can be seen in Figure 10-9:
model.setRelation(model.fieldIndex('country_id'), QSqlRelation('countries', 'id', 'country'))

The rest of the program is the same as Listing 10-5 .

Account Management GUI Solution

The account management GUI uses the QSqlRelationalModel for managing the accounts and countries tables. We use the concepts we learned in the previous sections and design a GUI with features for managing the database directly rather than programmatically.

The account management GUI lets a user add, delete, and sort the contents of the table. Rows added or deleted will also update the database. This example also briefly shows how to create a delegate for editing data. The code for the account management GUI can be found in Listing 10-7.
# account_manager.py
# Import necessary modules
import sys, os
from PyQt5.QtWidgets import (QApplication, QWidget, QLabel,
    QPushButton, QComboBox, QTableView, QHeaderView,
    QHBoxLayout, QVBoxLayout, QSizePolicy, QMessageBox)
from PyQt5.QtSql import (QSqlDatabase, QSqlQuery,
    QSqlRelationalTableModel, QSqlRelation,
    QSqlRelationalDelegate)
from PyQt5.QtCore import Qt
from PyQt5.QtGui import QIcon
class AccountManager(QWidget):
    def __init__(self):
        super().__init__()
        self.initializeUI()
    def initializeUI(self):
        """
        Initialize the window and display its contents to the screen.
        """
        self.setMinimumSize(1000, 600)
        self.setWindowTitle('10.1 – Account Management GUI')
        self.createConnection()
        self.createTable()
        self.setupWidgets()
        self.show()
    def createConnection(self):
        database = QSqlDatabase.addDatabase("QSQLITE") # SQLite version 3
        database.setDatabaseName("files/accounts.db")
        if not database.open():
            print("Unable to open data source file.")
            sys.exit(1) # Error code 1 - signifies error
        # Check if the tables we need exist in the database
        tables_needed = {'accounts', 'countries'}
        tables_not_found = tables_needed - set(database.tables())
        if tables_not_found :
            QMessageBox.critical(None, 'Error',
                f'The following tables are missing from the database: {tables_not_found}')
            sys.exit(1) # Error code 1 - signifies error
    def createTable(self):
        """
        Set up the model, headers and populate the model.
        """
        self.model = QSqlRelationalTableModel()
        self.model.setTable('accounts')
        self.model.setRelation(self.model.fieldIndex('country_id'), QSqlRelation('countries', 'id', 'country'))
        self.model.setHeaderData(self.model.fieldIndex('id'), Qt.Horizontal, "ID")
        self.model.setHeaderData(self.model.fieldIndex('employee_id'), Qt.Horizontal, "Employee ID")
        self.model.setHeaderData(self.model.fieldIndex('first_name'), Qt.Horizontal, "First")
        self.model.setHeaderData(self.model.fieldIndex('last_name'), Qt.Horizontal, "Last")
        self.model.setHeaderData(self.model.fieldIndex('email'), Qt.Horizontal, "E-mail")
        self.model.setHeaderData(self.model.fieldIndex('department'), Qt.Horizontal, "Dept.")
        self.model.setHeaderData(self.model.fieldIndex('country_id'), Qt.Horizontal, "Country")
        # Populate the model with data
        self.model.select()
    def setupWidgets(self):
        """
        Create instances of widgets, the table view and set layouts.
        """
        icons_path = "icons"
        title = QLabel("Account Management System")
        title.setSizePolicy(QSizePolicy.Fixed, QSizePolicy.Fixed)
        title.setStyleSheet("font: bold 24px")
        add_record_button = QPushButton("Add Employee")
        add_record_button.setIcon(QIcon(os.path.join(icons_path, "add_user.png")))
        add_record_button.setStyleSheet("padding: 10px")
        add_record_button.clicked.connect(self.addRecord)
        del_record_button = QPushButton("Delete")
        del_record_button.setIcon(QIcon(os.path.join(icons_path, "trash_can.png")))
        del_record_button.setStyleSheet("padding: 10px")
        del_record_button.clicked.connect(self.deleteRecord)
        # Set up sorting combo box
        sorting_options = ["Sort by ID", "Sort by Employee ID", "Sort by First Name",
"Sort by Last Name", "Sort by Department", "Sort by Country"]
        sort_name_cb = QComboBox()
        sort_name_cb.addItems(sorting_options)
        sort_name_cb.currentTextChanged.connect(self.setSortingOrder)
        buttons_h_box = QHBoxLayout()
        buttons_h_box.addWidget(add_record_button)
        buttons_h_box.addWidget(del_record_button)
        buttons_h_box.addStretch()
        buttons_h_box.addWidget(sort_name_cb)
        # Widget to contain editing buttons
        edit_buttons = QWidget()
        edit_buttons.setLayout(buttons_h_box)
        # Create table view and set model
        self.table_view = QTableView()
        self.table_view.setModel(self.model)
        self.table_view.horizontalHeader().setSectionResizeMode(QHeaderView.Stretch)
        self.table_view.verticalHeader().setSectionResizeMode(QHeaderView.Stretch)
        self.table_view.setSelectionMode(QTableView.SingleSelection)
        self.table_view.setSelectionBehavior(QTableView.SelectRows)
        # Instantiate the delegate
        delegate = QSqlRelationalDelegate(self.table_view)
        self.table_view.setItemDelegate(delegate)
        # Main layout
        main_v_box = QVBoxLayout()
        main_v_box.addWidget(title, Qt.AlignLeft)
        main_v_box.addWidget(edit_buttons)
        main_v_box.addWidget(self.table_view)
        self.setLayout(main_v_box)
    def addRecord(self):
        """
        Add a new record to the last row of the table.
        """
        last_row = self.model.rowCount()
        self.model.insertRow(last_row)
        id = 0
        query = QSqlQuery()
        query.exec_("SELECT MAX (id) FROM accounts")
        if query.next():
            id = int(query.value(0))
    def deleteRecord(self):
        """
        Delete an entire row from the table.
        """
        current_item = self.table_view.selectedIndexes()
        for index in current_item:
            self.model.removeRow(index.row())
        self.model.select()
    def setSortingOrder(self, text):
        """
        Sort the rows in table.
        """
        if text == "Sort by ID":
            self.model.setSort(self.model.fieldIndex('id'), Qt.AscendingOrder)
        elif text == "Sort by Employee ID":
            self.model.setSort(self.model.fieldIndex('employee_id'), Qt.AscendingOrder)
        elif text == "Sort by First Name":
            self.model.setSort(self.model.fieldIndex('first_name'), Qt.AscendingOrder)
        elif text == "Sort by Last Name":
            self.model.setSort(self.model.fieldIndex('last_name'), Qt.AscendingOrder)
        elif text == "Sort by Department":
            self.model.setSort(self.model.fieldIndex('department'), Qt.AscendingOrder)
        elif text == "Sort by Country":
            self.model.setSort(self.model.fieldIndex('country'), Qt.AscendingOrder)
        self.model.select()
if __name__ == '__main__':
    app = QApplication(sys.argv)
    window = AccountManager()
    sys.exit(app.exec_())
Listing 10-7

Code for the account management GUI

Your GUI should look similar to the one displayed in Figure 10-6 .

Explanation

After importing all of the PyQt classes we need and setting up the AccountManager class, next we need to connect to the accounts database just like we have previously done. The createTable() method instantiates and sets up the model, creating the foreign key between the two tables. The setHeaderData() method applies labels to each of the columns by using fieldIndex() to locate the index of the given field name. An example is given as follows:
self.model.setHeaderData(self.model.fieldIndex('id'), Qt.Horizontal, "ID")

The QTableView object, table_view, is created in the setupWidgets() method , along with the GUI’s labels, push buttons, and combo box. For table_view, we set the model and a few parameters. The table’s vertical and horizontal headers will stretch to fit the window. QAbstractItemView.SingleSelection only allows the user to select one item at a time. QAbstractItemView.SelectRows only allows rows to be selected in the table.

The two push buttons, add_record_button and del_record_button, emit signals that add and delete rows in the table. For addRecord(), we check how many rows are in the table with rowCount() and use insertRow() to insert an empty row at the end of table view. We query the database to find out the largest id value. If a user does not enter a value for id into the row, then the new record’s id is equal to the highest id value plus one. For deleteRecord(), we get the currently selected row’s index and delete the row with removeRow(). Then we update the model using select().

For the QComboBox, when the selection has changed, the widget emits a currentTextChanged() signal. We use the text to determine how to set the view’s order for displaying records.

In the model/view architecture, the delegate provides the default tools for painting item data in the view and for providing editor widgets for item models. The appearance and editor widgets of the item delegate can be customized. For the account management GUI, the delegate used is the QSqlRelationalDelegate. This class provides a combo box for editing data in fields that are foreign keys for other tables.
delegate = QSqlRelationalDelegate(self.table_view)
self.table_view.setItemDelegate(delegate)

An example of the combo box used by the delegate can be seen in the bottom-right corner of Figure 10-6. The widget appears whenever the user needs to select a country from the countries table that will be displayed in the view.

Summary

PyQt provides convenience classes for lists, tables, and trees. QListWidget, QTableWidget, and QTreeWidget are useful when you need to view data for general situations. While they are practical for creating quick interfaces for editing data, if you need to have more than one widget for displaying a dataset in an application, you must also create a process for keeping the datasets and the widgets in agreement. A better option is to use PyQt’s model/view architecture.

With the model/view paradigm, you are able to have multiple views in a single application that work in unison to view and update the database. You also have more control over the look of the editing widgets and the items in the view with the delegate.

There are different formats available for storing and managing data. One example is the CSV format which is convenient for reading, parsing, and storing smaller datasets. However, for large databases that contain multiple tables with relational characteristics, a relational database management system that uses SQL is a more preferable option for managing the data. SQL allows users to select desired information that might be shared between tables, as well as insert, update, and delete existing records easily.

The model/view architecture is very useful for working with SQL databases, providing the tools necessary for connecting to a database and viewing its content. PyQt provides three models for working with SQL databases. For an editable data model without foreign key support, use QSqlTableModel. If you have tables with relational properties, use QSqlRelationalTableModel. Finally, the QSqlQueryModel is beneficial when you only need to read the results of a query without editing them.

Over the course of this book, we took a look at a few applications that could have benefited greatly by being able to connect to databases using SQL. The login GUI in Chapter 3 could connect to a database to retrieve usernames and passwords. The to-do list GUI in Chapter 4 could be completely redesigned to include a QCalendarWidget (covered in Chapter 12) that keeps track of events by using a database. There is also the pizza ordering GUI from Chapter 6. You could implement a database for storing customers’ information, using a relational database for adding new customers, updating existing ones, and preventing data from being duplicated.

In Chapter 11, we will take a brief look at multithreading in PyQt.

..................Content has been hidden....................

You can't read the all page of ebook, please click here login for view all page.
Reset
3.135.198.49