Chapter 8 introduced the concept of backing up your database. Making a copy of the database and storing it separately from the original database is a wonderful safety mechanism. But it's an incomplete model. After you back up the database, you need to be able to bring it back and put all the structures and data from the backup onto your server for use again. This is known as a restore. Restoring a database is every bit as important as backing up the database. Without the backup, you have nothing to restore, but unless you can restore, you might as well have skipped the backup.
Restores are much more complicated than backups. The simplest restore of an uncomplicated database requires more definition and code than the backup of that same database did. When you then bring incremental backups and log backups into the picture, restores get complicated fast. But without the restore process, you can't create a plan to recover your system in the event of something catastrophic occurring. This plan is called a disaster recovery plan.
Because this is a more complicated subject, a greater degree of detail will be required. The restore operation simply requires more from you than the backup did. We will cover the following in this chapter:
How to restore a database with the Management Studio GUI
How to restore a database with T-SQL
How to restore differential backups
How to restore log backups
How to restore file backups
How to test backups
How to develop a full disaster recovery plan
To the user, a database consists of tables with rows and columns of data. But to the Windows operating system on which the SQL Server instance runs, a database consists of some number of files. The number of files that represent a given database could be quite large as the structures and data maintained by that database grow. But the simplest default database consists of two files: a data file and a log file. These are defined on the model database, which is a database maintained by SQL Server explicitly for creating other databases.
To show the database restore in action, we'll create a basic database. You can follow along by opening Management Studio and connecting to a SQL Server instance that you can run tests against. Once connected, right-click the Databases folder in the Object Explorer window, and select New Database from the menu. The New Database window will open. Type a name for the database; we used RestoreTest. Make no other changes, and click the OK button. This will create a very simple database. Using one of the full backup methods outlined in Chapter 8, create a backup of the newly created database. Here's the script we used:
BACKUP DATABASE RestoreTest
TO DISK = 'c:dataRestoreTest.bak';
To be sure that the restore operation works, modify the database by adding a simple table with this script:
USE RestoreTest ;
CREATE TABLE dbo.Table1
(Id INT, Val NVARCHAR(50)) ;
Once this script is run, you should be able to expand the Databases folder in the Object Explorer window, followed by the RestoreTest database and then the Tables folder. There you will see the table dbo.Table1. You cannot restore a database when other users are connected to it. You will need to log off the users and roll back or commit any outstanding transactions prior to performing the restore operation.
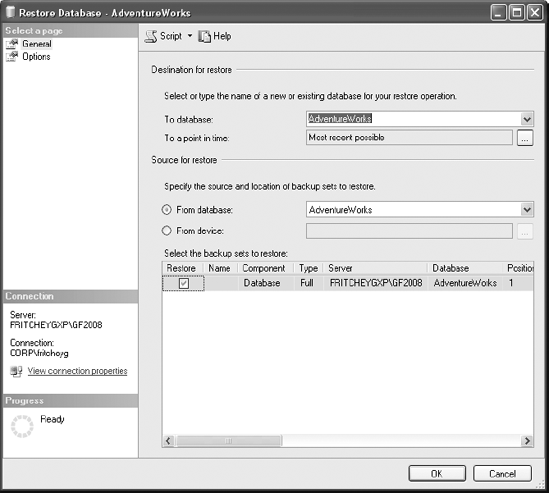
Just like backups, you can use the Management Studio user interface or T-SQL scripts to restore a database. For this simple restore, we'll use Management Studio. Right-click the RestoreTest database in the Object Explorer window. This will open the context menu. Open the Tasks menu folder and then the Restore menu folder. From the final list, select Database. This will open the Restore Database window, as shown in Figure 9-1.

As you can see in Figure 9-1, the Restore Database window has two pages, General and Options, which are listed on the left side of the window.
The General page opens by default. Because it was opened from a particular database, that database is already selected in the To Database drop-down list. If you wanted to restore to a different database, you can select other databases from there. It's also possible to simply type into the box. We'll explain more about that later.
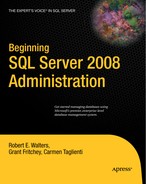
The "To a point in time" option is for the restore of database logs to recover to a specific point in time (covered in detail in the section "Restoring Log Backups"). The lower half of the page allows you to select the "Source for restore" option. The first option selected by radio button is "From database." This allows you to restore from one database to another. That's not a standard operation, but it is available. The second choice is "From device." Since the plan is to restore from a backup file created earlier, it's necessary to select the "From device" radio button and then click the ellipsis button next to it. This opens the Specify Backup window visible in Figure 9-2.
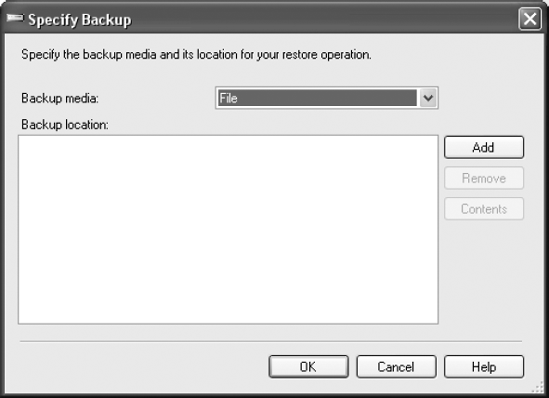
The Backup Media drop-down box allows you to choose the source of the backup that will be used in the restore operation. The basic media choices are File or Backup Device. For this example, select File. To add a file to the Backup location list, click the Add button. This will open the Locate Backup File window, as shown in Figure 9-3.
The Locate Backup File window is basically a file explorer window that lets you navigate through drives and shares to locate the file you want to access. In this case, you want to access the RestoreTest.bak file located in the path C:data. Once the right file is selected, click the OK button. This will close the window and move the file into the Specify Backup window like it is in Figure 9-4.

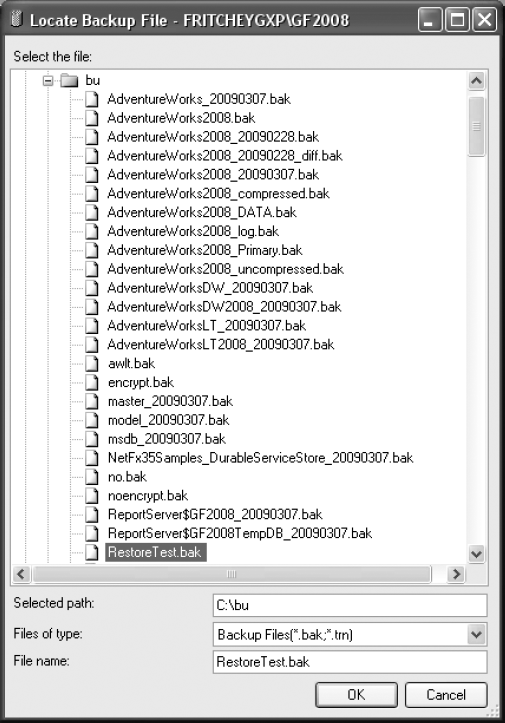
Since it is possible to split backups across multiple files, you get the option of adding more files to the backup location list. You can also remove a file from that list by selecting the file and clicking the Remove button. You can put multiple backups into a single backup media set. If you do that, then clicking the Contents button opens the Device Contents window, visible in Figure 9-5.
The Device Contents window will show the information about a backup media set. This information isn't easily displayed in the window when the window is made narrow enough to fit onto the printed page. However, the information consists of the following:
Name: The name, if any given to the backup
Type: What was backed up—database or log
Component: The kind of backup performed—full, incremental, and so on
Server: The server from which the backup was taken
Database: The database from which the backup was taken
Position: The order of the file within the media set
Date: The date on which the backup was taken
Size: The size of the backup
User: Which user performed the backup
Expiration: The date on which the backup will expire if one was specified
The data in the Device Contents window is purely informational. When finished reviewing the information, click the Close button. Back in the Specify Backup window, click the OK button. This will then move the specified backup file to the Restore Database window, as shown in Figure 9-6.
If the database is in simple recovery mode (explained in Chapter 8), then you can simply click the OK button, and the database will restore. Once completed, a window stating that the restore completed successfully will appear. Once you click that new window, it will close, as will the Restore Database window. You will then have completed a successful restore of the database.
If, on the other hand, the recovery mode for the database is set to full or bulk-logged, when you click the OK button, you'll get an error with the message "Restore failed for Server 'YourServer.'" The window with the error message will have additional information explaining that the tail of the log for the database has not yet been backed up. The tail is any transactions that completed since the last full, incremental, or log backup was done. Figure 9-7 shows an example of this error message.
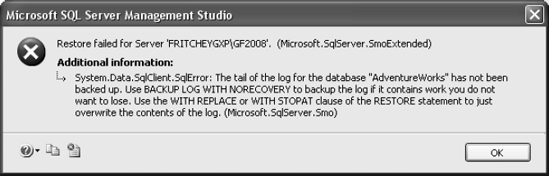
To complete the restore of a database in full recovery, you'll need to either deal with the log information (which is detailed in the section called "Restoring Log Backups") or, as the message suggests, use the RESTORE statement's WITH REPLACE clause.
To get to the additional settings, options, and actions of the RESTORE statement in the Management Studio GUI, select the Options page on the left side of the Restore Database window. The new page will look like Figure 9-8.
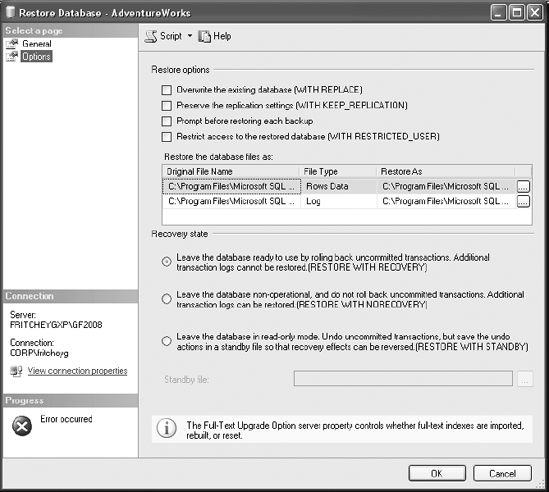
The Options page allows you to take very direct control over the restore operation. The page is split into two major sections, "Restore options" and "Recovery state." The "Restore options" section allows you to define behaviors of the restore, and the "Recovery state" section allows you to define the state in which the database is left when your restore is finished. For now, don't worry about the recovery state. Leave the default option in place. We'll be covering the various recovery states in the sections "Restoring Differential Backups" and "Restoring Log Backups."
The first restore option is the check box "Overwrite the existing database (WITH REPLACE)." The label both describes what the option does and tells which T-SQL command to use. You need to select this check box in order to restore a backup taken from a database in full recovery mode. This will replace the existing database with the database from the backup. The next option is "Preserve the replication settings (WITH KEEP_REPLICATION)." Until you're setting up replication on the server, you don't need to worry about this option for your databases; it is beyond the scope of this chapter. The next check box is "Prompt before restoring each backup." If you are performing multiple restores from multiple backups, this will pause between each file in order for you to verify that it should continue with the next step. This will slow down restores but give you more control over exactly what gets restored and when, because you can stop if there's a reason to not use the next file. The next check box, "Restrict access to the restored database (WITH RESTRICTED_USER)," allows you to restore a database and bring it online but to bring it online so that only database owners—specifically, users belonging to the db_owner role—can access the database. This is a good way to restore a database but keep end users from it until you can verify that the restore worked properly. Finally, the database files that define the database being restored are shown in the "Restore the database files as" area. You'll learn how to work with the database files in more detail in the section "Restoring a Database Using T-SQL." Since the plan in this case is to overwrite the existing database, there's nothing you need to change here. At the top of the screen is a Script button. By clicking this button, you can generate a T-SQL script that includes all the settings you've just selected in the GUI.
Once you select the "Overwrite the existing database" check box, the restore is ready to run. Click the OK button, and the database should restore without error this time. Although you can do basic restores using the GUI, the full functionality of restores is exposed through the T-SQL statements.
If you now check the "Restore the database files as" area for the database, the table created just after the backup was done is no longer in the database.
Not all restore options are exposed through the GUI. You can't automate the GUI either. To get at the full set of options available to the restore operation and to begin to program and automate restore operations, you need to use Transact-SQL commands.
In the previous section, you created a small blank database called RestoreTest and took a backup of that database. (When we say "take" a backup, that phrase is basically the same as saying "create a backup" of the database in question.) To perform the same restore that was defined with the GUI, including replacing the existing database, you simply need to run the following code (simplerestore.sql in the download):
RESTORE DATABASE RestoreTest
FROM DISK = 'c:data
estoretest.bak'
WITH REPLACE;
Just as in the earlier GUI procedure, this command will restore the database and overwrite the existing database.
You can do much more than simply restore your original database in its original location. What if you wanted to create a copy of the database? You could modify the procedure as follows and run it (attemptrestore.sql in the download):
RESTORE DATABASE WholeNewRestoreFROM DISK = 'c:data estoretest.bak';
All you did here was change the name. SQL Server will attempt to create a new database from the backup. Unfortunately, if you run this command, it will generate this error output:
Msg 1834, Level 16, State 1, Line 1
The file 'C:Program FilesMicrosoft SQL Server
MSSQL10.MSSQLServerMSSQLDATARestoreTest.mdf'
cannot be overwritten.  It is being used by database 'RestoreTest'.
Msg 3156, Level 16, State 4, Line 1
File 'RestoreTest' cannot be restored to 'C:Program FilesMicrosoft SQL
ServerMSSQL10.MSSQLServerMSSQLDATARestoreTest.mdf'. Use
WITH MOVE to identify a valid location for the file.
Msg 1834, Level 16, State 1, Line 1
The file 'C:Program FilesMicrosoft SQL ServerMSSQL10.MSSQLServer
MSSQLDATARestoreTest_log.ldf'
cannot be overwritten.  It is being used by database 'RestoreTest'.
Msg 3156, Level 16, State 4, Line 1
File 'RestoreTest_log' cannot be restored to 'C:Program FilesMicrosoft SQL
ServerMSSQL10.MSSQLServerMSSQLDATARestoreTest_log.ldf'.
Use WITH MOVE to identify a valid location for the file.
Msg 3119, Level 16, State 1, Line 1
Problems were identified while planning for the RESTORE statement.
Previous messages provide details.
Msg 3013, Level 16, State 1, Line 1
RESTORE DATABASE is terminating abnormally.
That's a lot of information to take in all at once. You can boil it down to the following rule: you can't create a database with the same file names and locations as an existing database. This is illustrated in the results with the statements that say a particular file and path "cannot be overwritten."
Fortunately, the error message provides the answer to the problem in the form of the suggestion "Use WITH MOVE to identify a valid location for the file." The MOVE keyword allows you to change the location or names of files when restoring a database. So, to create a new copy of the database, the following is the script that needs to be run (newdbrestore.sql in the download):
RESTORE DATABASE WholeNewRestore
FROM DISK = 'c:data
estoretest.bak'
WITH MOVE 'RestoreTest' TO 'C:Program FilesMicrosoft SQL
ServerMSSQL10.MSSQLServerMSSQLDATAWholeNewRestore.mdf'
,MOVE 'RestoreTest_Log' TO 'C:Program FilesMicrosoft SQL
ServerMSSQL10.MSSQLServerMSSQLDATAWholeNewRestore_Log.ldf';
Notice that the MOVE operation doesn't move the file from one file location to a new file location. Instead, it uses the names RestoreTest and RestoreTest_Log. These are the logical file names used by SQL Server to define where the physical files are located. They're used in the restore operation to define a new location for the files. Running this script will create a new database with this output:
Processed 168 pages for database 'WholeNewRestore', file 'RestoreTest' on file 1.
Processed 5 pages for database 'WholeNewRestore', file 'RestoreTest_log' on file 1.
RESTORE DATABASE successfully processed 173 pages in 0.064 seconds (21.041 MB/sec).
The pages processed are the pages that data is stored on in the database. Each file is processed individually, and then the database is available for use.
You can get the logical names of the database files by looking at the Properties window through the Management Studio GUI. But you may not have an existing copy of the database available to gather this information from. Luckily, there's a method to retrieve the list of files that define the database from the backup file itself (filelistrestore.bak in the download):
RESTORE FILELISTONLY
FROM DISK = 'c:data
estoretest.bak'
The output from this is a very extensive description of the files that define the database. Figure 9-9 shows some of the information available.

The information in Figure 9-9 is the most basic information that you would need for managing a database restore. The first column, LogicalName, is the logical file name that you would use if you needed to perform the MOVE operation. The next column, PhysicalName, is the actual file location of the database that was backed up. It's useful to verify whether the same drives and directories exist on the server where you're performing the restore or even whether there are already files in that location. The last column displayed here, Type, defines the file type, in this case one data file and one log file. Other types may be displayed, and since different types require different handling and definitions during the restore, it's good to know what kind you're dealing with. Table 9-1 explains the other information from the FILELISTONLY command.
Table 9.1. The Remaining Output from FILELISTONLY
Column Name | Description | Use |
|---|---|---|
| The filegroup to which the file belongs | Largely informational for backup purposes |
| Size of the file in bytes | Extremely useful information so you know if there's enough room on the drive |
| Max size of the file in bytes | Same as with the |
| An identifier created by SQL Server unique within a database | Informational |
| Log sequence number for the creation of the file | Used internally by the |
| Log sequence number for a dropped file | Used internally by the |
| Log sequence number that defines the read-only nature of the database | Used internally by the |
| Log sequence number defining the read-write options of the database | Used internally by the |
| Size of the backup file | Another useful bit of information for copying files |
| Size of the blocks of the physical file | Used internally by the |
| Exactly what it says, the ID of the filegroup | Informational |
| This value is not defined by Microsoft | Doesn't communicate anything useful |
| Defined in differential backups; marks the difference between the differential and log backups. | Very useful for restores |
Defined in differential backups; marks the difference between the differential and the full backup | Very useful for restores | |
| Marks whether the file is read-only | Informational |
| Marks whether the file is actually in the backup | Useful if you're backing up different files and filegroups for the database |
You can also display general information about the backup, in what's known as the header. The syntax is similar to that used in the other restore operations, as shown here (headerrestore.sql in the download):
RESTORE HEADERONLY
FROM DISK = 'c:data
estoretest.bak';
Figure 9-10 shows part of the output from the header.
Like the FILEILISTONLY output, a lot more columns are available for the backup header. Most of them are more focused on describing the database or log being backed up and are not immediately applicable to the restore process, so we'll go over only the columns displayed here. Table 9-2 describes those columns.
Table 9.2. Partial Output from RESTORE HEADERONLY
Column Name | Description | Use |
|---|---|---|
| The name given by the backup process, if any | Used to identify individual backups in addition to the backup file name |
| If supplied by the backup process, a short description of the backup | Another opportunity to supply more information about the backup |
A numeric value that describes what kind of backup was done | Clearly useful for identifying the type of backup if the backup file name doesn't supply enough information | |
| The date on which the backup will be expired | Needed to know if a backup will be expired or not |
| A true/false field that determines whether a backup is compressed | Informational |
| The number determining its location within the set, if the backup is part of a set | Necessary for restores from a backup set |
| A number that determi whether it's a virtual or physical device | Not used in restores |
| The user who performed the backup | Informational in restore operations |
| The server from which the backup was taken | Informational in restore operations but might be useful to know if this will be a replace operation or not |
Through the RESTORE FILELISTONLY and RESTORE HEADERONLY commands, it's possible to gather enough information to restore a full backup. You can overwrite an existing database, or you c create a new one by moving the files as you restore them.
In Chapter 8, we introduced the concept of differential backups. These are backups that contain only the changes within the database since the last full backup. Restoring one of these backups is a two-step process. To illustrate it, run the following script (setupdifferential.sql in the download):
CREATE DATABASE DiffTest ;
GO
USE DiffTest ;
CREATE TABLE dbo.DataChanges
    (DataChangesId INT IDENTITY(1, 1)
                       NOT NULL
    ,DataValue NVARCHAR(50) NOT NULL
    ,UpdateDate DATETIME NOT NULL
    ,CONSTRAINT PK_DataChanges PRIMARY KEY CLUSTERED (DataChangesId)) ;

INSERT  INTO dbo.DataChanges (DataValue, UpdateDate)
VALUES  (N'First Row', GETDATE()),
        (N'Second Row',GETDATE()),
        (N'Third Row', GETDATE()) ;

BACKUP DATABASE DiffTest TO DISK = 'c:datadifftest.bak' ;

INSERT  INTO dbo.DataChanges (DataValue, UpdateDate)
VALUES  (N'Fourth Row' ,GETDATE()),
        (N'Fifth Row', GETDATE());

BACKUP DATABASE DiffTest
TO DISK = 'c:datadifftest_diff.bak'
WITH DIFFERENTIAL ;

DELETE dbo.DataChanges
WHERE DataChangesId = 3;
This script creates a database, DiffTest. It then creates and loads data into a new table, DataChanges. After this work, the script performs a full backup of the database to disk. Then more data is inserted, and a differential backup is taken. Finally, data is "accidentally" deleted, setting up the need to restore the database to the last good backup, the differential backup.
From here it is possible to restore the database differential. The first step, since the differential is based on data changes since the last full backup, is to restore the previous backup. But, instead of simply restoring it, it's necessary to leave it in a state that allows for the next backup to be applied. This means preventing the recovery of the database. Recovery is the process right at the end of restore in which uncommitted transactions, if any were captured by the backup, are rolled forward, and then the database is brought online for access by the users. To restore the database but prevent the recovery, you must run the restore from the full backup in this manner (norecoverydiffrestore.sql in the download):
RESTORE DATABASE DiffTest
FROM DISK = 'c:datadifftest.bak'
WITH REPLACE, NORECOVERY;
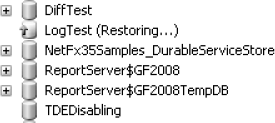
This will restore the full database, replacing the existing copy as you did in the original full backup restores; however, by using the NORECOVERY option, you prevent the database from recovering. This is even visible in the GUI. Once you run this script, click the Databases list in the Object Explorer window, and press the F5 key to refresh the list. You'll see something similar to Figure 9-11.

The next step is to restore the differential backup. The syntax is identical to that of a full restore operation; only the source file is different (diffrestore.sql in the download):
RESTORE DATABASE DiffTest
FROM DISK = 'c:datadifftest_diff.bak'
This command will restore the differential data and recover the database. If you refresh the database list again, you'll see that this database is online. If you select the data from the DataChanges table, you'll see that all the rows are back in place. To clean up before continuing, drop the DiffTest database (cleanupdifftest.sql in the download):
USE master;
DROP DATABASE DiffTest;
In the gaps between differential backups are the log backups. Restoring them is a similar process.
When a database is in full recovery mode, it's necessary to back up the logs independently from the database backups. When it's time to recover these logs, you can recover full log files, or you can actually recover to a specific point in time. For example, in the morning, say 3 a.m., you run your full backups. Following that, once every half hour, you back up the log. Then at 11:40 a.m., someone accidentally deletes important data. You act quickly and run a log backup. Now you need to restore all the completed transactions up to 11:39. It's possible to do that with log backups.
Let's look at an example of restoring log backups. Begin by running the following script, which will set up the database and a set of backups. Be warned—the script will take more than two minutes to run (setuplogs.sql in the download):
CREATE DATABASE LogTest ;
GO
ALTER DATABASE LogTest SET RECOVERY FULL ;
GO

USE LogTest ;

CREATE TABLE BusinessData
    (BusinessDataId INT NOT NULL
                        IDENTITY(1, 1)
    ,BusinessValue NVARCHAR(50)
    ,UpdateDate DATETIME
    ,CONSTRAINT pk_BusinessData PRIMARY KEY CLUSTERED (BusinessDataID)) ;

INSERT  INTO BusinessData
        (BusinessValue
        ,UpdateDate)
VALUES  ('Row 1', GETDATE()),
        ('Row 2', GETDATE()) ;

--Full backup
BACKUP DATABASE LogTest
TO DISK = 'c:datalogtest.bak'

--create more business data
INSERT  INTO BusinessData
        (BusinessValue
        ,UpdateDate)
VALUES  ('Row 3', GETDATE()),
        ('Row 4', GETDATE()) ;

--First Log Backup
BACKUP LOG LogTest
TO DISK = 'c:datalogtest_log1.bak';

INSERT  INTO BusinessData
        (BusinessValue
        ,UpdateDate)
VALUES  ('Row 5', GETDATE()),
        ('Row 6', GETDATE()) ;

--Second Log Backup
BACKUP LOG LogTest
TO DISK = 'c:datalogtest_log2.bak';
PRINT CAST(GETDATE() AS VARCHAR(50));
INSERT INTO BusinessData
(BusinessValue
,UpdateDate)
VALUES ('Row 7', GETDATE()),
('Row 8', GETDATE()) ;
--pause for two minutes
WAITFOR DELAY '00:02'
DELETE BusinessData;
--Final Log Backup, after the "accident"
BACKUP LOG LogTest
TO DISK = 'c:datalogtest_log3.bak'This script is very busy. First it creates a database and sets the recovery model to FULL. Then it creates a table, BusinessData, and inserts some data. This is then backed up using a full database backup, just like you would do in a production environment. More data is inserted, and then a log backup is taken. This is modeling behavior that would occur during the normal production day. More data is added, and another log backup is taken. A print statement shows the date and time (since there's no way to know when all this is taking place). Then more data is inserted, and a delay of two minutes is added. Finally, the "error" deletes all the data in the BusinessData table. Then an "emergency" log backup is taken. This final log backup will include the delete, but it will also include the last good data in the database. If you are following along with the code, leave this Query Editor window open after running the query. You'll understand why a little bit later.
To begin restoring this database, first you'll need to restore the full backup. The restore operation will need to leave the database in an unrecovered state, just like what was done with the differential backup. The script would look like this (norecoverylogrestore.sql in the download):
RESTORE DATABASE LogTest
FROM DISK = 'c:datalogtest.bak'
WITH REPLACE, NORECOVERY;
Just like in the differential backup, the database will be in a state labeled "Restoring..." in the GUI, as shown in Figure 9-12.
You now have the database back to the state as of the last full backup. But more data changes were made prior to the delete, so each of the log files will need to be recovered in the order in which they were taken. You also want to know the time when the final good query completed or when the problem query started. In the example case, the last good query, the INSERT statement, was finished just after April 7, 2009, at 21:53:30. You know this because you are able to get the date and time from the output of the PRINT statement. With this information, you can put together a set of restore operations that look something like the following (pointintimelogrestore.sql in the download):
RESTORE LOG LogTest
FROM DISK = 'c:datalogtest_log1.bak'
WITH NORECOVERY;

RESTORE LOG LogTest
FROM DISK = 'c:datalogtest_log2.bak'
WITH NORECOVERY;

RESTORE LOG LogTest
FROM DISK = 'c:datalogtest_log3.bak'
WITH STOPAT = 'Apr  7 2009  21:53:30';
Each of the individual log restores, except the last one, completes its restore but does not allow the database to recover. The final log restore includes the information needed to stop before the time at which the delete occurred. Obviously, the more precise you can determine the moment in time you want to restore to, the less data that will be lost. To verify that all the data was recovered, select BusinessTest from the table using a script similar to this one:
SELECT * FROM dbo.BusinessData AS bd
You will see all eight rows of data returned, as shown in Figure 9-13.
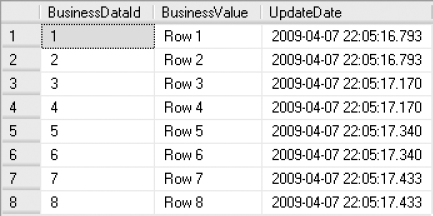
You could have stopped the recovery at any point with one of the other log files, but they did not cover the full time frame in which the error occurred. The full recovery that took place was because of the extra log backup taken after the error that caused the data loss. That tail backup was what enabled the ability to recover to a point in time. Recovering individual file backups has slightly different requirements and implications than the previous restore types.
Before continuing, you may want to do some cleanup. Run the following script to remove the database used to test log recovery (cleanuplogtest.sql in the download):
USE MASTER;
DROP DATABASE LogTest;
When you're dealing with very large databases or databases that have to be split between different disks for performance reasons, it can make more sense to back up individual files or filegroups rather than the entire database, as detailed in Chapter 8. It's then possible to restore the individual files or filegroups to the database. To see a filegroup restore in action, run the following script to prepare a database and backups (setupfile.sql in the download):
CREATE DATABASE FileTest;

ALTER DATABASE FileTest
ADD FILEGROUP FileTestFG;

ALTER DATABASE FileTest
ADD FILE (
    NAME = FileTest2,
    FILENAME = 'c:datafiletest2.ndf',
    SIZE = 5MB,
    MAXSIZE = 100MB,
FILEGROWTH = 5MB
) TO FILEGROUP FileTestFG;
GO
USE FileTest;
CREATE TABLE dbo.ft1
(ID INT IDENTITY(1,1) NOT NULL
,Val NVARCHAR(50) NOT NULL)
ON FileTestFG;
INSERT INTO dbo.ft1 (
Val
) VALUES ( N'Test' ) ;
BACKUP DATABASE FileTest
FILEGROUP = 'FileTestFG'
TO DISK = 'c:dataFileTest_FileTestFG.bak'
WITH INIT;
BACKUP LOG FileTest
TO DISK = 'c:dataFileTest_Log.bak'
WITH INIT;This script creates a new database, FileTest. The script then adds a filegroup, FileTestFG, and adds a file to that group, FileTest2. From there the script creates a table, ft1, and adds one row to the table. A backup of the filegroup is taken. Then a backup of the end of the log, also known as the tail, is taken. When a file or group is not read-only, the tail of the log must be backed up in order to restore and recover the file or filegroup.
The restore operation itself is very simple. First you restore the filegroups or files that you need to restore. But the database should not be recovered because the log still needs to be restored. As shown earlier with log restores, until the final log is restored, the database should not be recovered. The following is what the final script will look like (filerestore.sql in the download):
RESTORE DATABASE FileTest
FILEGROUP = 'FileTestFG'
FROM DISK = 'c:dataFileTest_FileTestFG.bak'
WITH NORECOVERY;

RESTORE LOG FileTest
FROM DISK = 'c:dataFileTest_Log.bak'
WITH RECOVERY;
To verify that the file is back online, you can select a row from the table dbo.ft1. It seems easy, but the large databases that you'll be performing this type of operation on, if needed, will be much more complicated than this simple example. To remove the test database, run the following script (cleanupfiletest.sql in the download):
USE MASTER;
DROP DATABASE FileTest;
In Chapter 8, we pointed out that in the Back Up Database window in SQL Server Management Studio there was an option called "Verify backup when finished" on the Options page. This option is visible about halfway down the page, as shown in Figure 9-14.
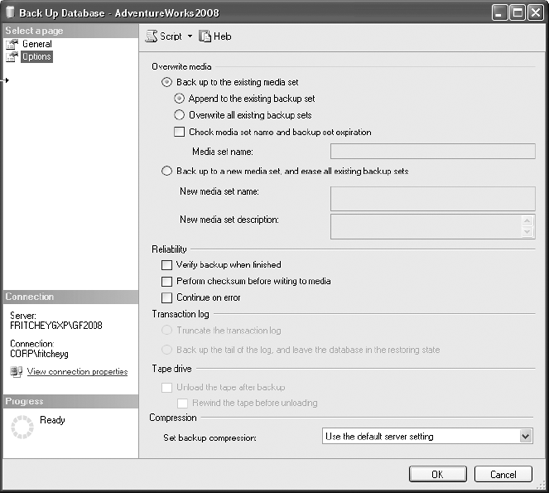
We didn't address this option in Chapter 8 because it's actually a function of the RESTORE command. The syntax looks like this:
RESTORE VERIFYONLY FROM DISK = 'somepath'
This command—and it's the same if you run it from the Back Up Database window in Management Studio—reads the backup file. It checks that the whole file is readable and complete. It does not in any way actually restore the database. That makes VERIFYONLY a vital part of your backup and recovery strategy because it will help ensure that the backups you're creating are ready when you need them. You can also run RESTORE VERIFYONLY before attempting a backup in order to save time. When VERIFYONLY finds no issues with the backup, it returns a success message. If there is a problem with the backup, an error is returned.
Between Chapter 8 on backups and this chapter on restores, you have the basics to begin thinking about laying out a disaster recovery plan for your databases. A disaster recovery plan has to take many factors into account. Most of these are not technical issues. Rather, the factors that drive most of the decision making and planning around disaster recovery are related directly to the needs of the business. To arrive at a disaster recovery plan, you first need to ask a series of questions of both the business team and the information technology team. We won't hit every possible question here, but we'll give you enough information so that you can plan for the worst kinds of disaster.
After you gather all the information about the technology and the business, you need to plan a backup and restore strategy that will answer all, or most, of the business needs that came up. You'll have to take into account the technology that you have available and its capabilities. You may need to purchase additional capacity in terms of tape backups or off-site storage. You also may have to make compromises because the technology can't do what you want or because you may not be able to afford it. All of this will help you define a plan for your disaster recovery.
Once you have the plan put together and implemented, you need to document it. You need to share that document with the business and with the various technology teams in your organization. Everyone should know what's expected of them, what they can expect of you, and what you can all expect in the event of an emergency. You then need to take that plan and practice it. Run through all the processes, either literally or as a desktop exercise. Make sure you've practiced performing the tasks necessary to support the plan.
You may have a very thorough understanding of what your business does or what kind of information your business captures, stores, and presents in its databases. You may not. You need to develop a full understanding of which data is vital, which is important, and which is ancillary to the business. Here is a first set of questions to ask:
"What kind of data am I storing?"
"How important to the business is this data?"
"How much data is there? (In other words, how big are the databases?)
Once you ask these questions of the business, you'll understand whether you're storing transactional data from the sales force, test runs from the chemical plant, or demographic data from an outside source. You'll know whether the data stored is absolutely vital to the continuing operation of the company or whether it's easily replaceable by downloading the content from the vendor. You'll also know how much data you have to deal with.
With this information in hand, you need to ask more questions:
"How much information can be lost in a worst-case scenario?"
"How much downtime (time without the database being online) can the business sustain?"
"How many locations must we protect?"
The initial answer to the first of these questions is almost always "none." But then, if you push back, you'll find that the previous day can be lost, for example, or it may be only up to five minutes. Or you may in fact be working with a business that can lose no data.
The second question involves finding out just how long the servers and their data can be offline before it starts to hurt the business. And the third question is about how many different physical locations you have to cover in the event of a real emergency.
Then you need to focus on the information services information. This where you ask questions such as the following:
"How much storage capacity is available?"
"Is off-site storage of backups available?"
"How fast is the network?"
"How much budget do I have to work with?"
These technical questions and the information provided go hand in hand with business information to help you make decisions about the disaster plan.
Now that you know your basic requirements and capacities, you can start making plans. As a method for showing how a plan might work, we'll describe two scenarios for a business and technology and then suggest a possible disaster plan for each.
In scenario 1, you're supporting a large commercial insurance company. The type of information the company stores is quite diverse, but it primarily consists of information about the clients and the property that you insure. The amount of data is somewhat large, but it consists of multiple moderate-sized databases varying from 20GB to 300GB, for a total of about 1TB. The data itself is not terribly volatile since the client base doesn't change very fast and since the number of transactions against the system, the amount of data being changed, is small on a daily basis.
The data is the company, though. Without full knowledge of what is insured, the company would be in serious trouble in the event of a claim. The company has a large storage area network from a major vendor, a fast network, quite a lot of spare capacity, and secondary backup systems (such as tape or mirroring) already installed. If the system lost no more than an hour of work in any given day, there would be minimal impact on the business. Since the business could be run entirely on paper if necessary, you can count on a day or two of recovery time if you really needed it.
With all this information, the backup plan might look something like this:
Full database backups taken once a week. One backup kept on disk for recovery.
Incremental backups taken twice a day. Each one overwrites the previous.
Log backups taken once every half hour. These are accumulated between incremental backups but kept only for 24 hours.
Copies taken of the full backups each week and stored outside the company.
Copies taken of the incremental and log backups each day.
This backup plan will allow you to capture the data for the company described in the scenario and meet the basic business requirements. The full and incremental backups provide basic recovery. The log backups taken once each half hour help ensure less than one hour of data would be lost in the event of a failure where the tail of the log could not be backed up. The off-site storage means that in the event of a catastrophic disaster, no more than a week of data is lost to the company.
In scenario 2, you're a DBA in a small to midsized online retail business. Everything the company does is dependent on sales, and all the sales come into the database by way of the Web. There are two different sets of data. There's the ongoing transactional data from the sales. There are a lot of transactions, and the data is changing constantly during the day, but the database itself isn't that big—only 75GB. There are also the historical sales records, which are aggregated once a week into a large and growing data mart for reporting. The company leases storage and doesn't have much in the way of spare capacity. If the system goes down, so does the company. If data is lost in the transactional system, the company loses sales. If data is lost in the data mart, it hurts the company a bit, but it wouldn't be the end of everything. If the transactional database were to go down, you'd need to recover everything in as timely a fashion as humanly possible.
With this information, the backup plan might resemble this:
Full database backups taken once a week for the data mart, immediately following the aggregation load. No other backups needed. One copy kept online.
For the transactional system, one full backup taken each day, keeping only one online.
During the day, an incremental backup taken once every four hours, keeping only one online.
Log backups taken every five minutes but kept for only four hours.
This backup plan reflects the lack of space and the inability to store backups off-site. If the leased storage were to go offline, this business might have to close. A secondary backup system should be negotiated into the contract, or some other method of backup is necessary in the event of a catastrophic failure. The full backup taken daily and the incremental backups taken every four hours should help shorten the recovery time since less changed data would have to be applied after the full backup was restored. The logs taken every five minutes helps ensure a minimum of loss in the event of a complete failure of the database.
Having a disaster plan is not enough. The plan must be tested. First, you should be running backup verifications on the backups themselves. You need to know that your backups are structurally sound. This is especially important if your backups are getting shipped to off-site storage in the event of an emergency. You need some assurance that those backups are functional.
You need to practice restoring your databases. You should do this regularly. Restore the full backups on a regular basis to a test machine somewhere (not on your production system). When an emergency occurs, all the managers descend to your desk to see how things are going, and if that's the first time you've run a full restore, you might be in trouble. Performing restores regularly also tests the integrity of your backups. Run an incremental restore on a regular basis too. All the same rules apply. You'll want to use the logs to recover to a point in time even more often than using the incremental backups. This is the most common emergency process that you'll run into, and you need to prepare for it.
You should take one of the backups out of the off-site archive on a semiregular basis and see whether you can restore the database. This tests both the off-site storage mechanisms and the integrity of your backups. If possible, you should go to an off-site facility, either within your company or at one of the emergency backup companies, and see whether you can get a system installed, configured, and operational at the off-site facility. Be sure you can do the same for SQL Server and your backups.
All of this may sound a bit paranoid and over the top, but when the emergency occurs and you've already run the restore of the most vital systems three or four times that year, you'll be smooth and confident. You'll have the system, and the company, back online in a minimal amount of time.
Backups are one of the most important things you can do for your data, your server, and your company. But without the ability to restore the data, the backups are useless. Some of the more important points from the chapter bear repeating. Restoring a full database requires that you manage the files associated with that database, but you can get the information needed directly from the backup itself. Incremental and log restores require you to leave the database in a recovering state.
If you take nothing else away from this chapter, be sure that you're verifying your backups through the use of RESTORE VERIFYONLY. Taking the backup is simply not enough. You need to know that it will work. You must also restore your databases so that you know how to perform the operation and so you know that your backups are functional. With all this, you can protect the value that the data represents to your business.