
10.2. The SharePoint Way
The solutions described in the previous section can be provided with the WSS 3.0 (that is right, the free version of SharePoint). To make the solution complete, you need MS Office 2007, but even with earlier Office versions, you can go a long way. The recommendation is that users who actively update documents have MS Office 2007, or at least MS Office 2003, but users who read and act on these documents can do so with MS Office 2002 or even MS Office 2000.
The features described in this section are available for both MOSS and WSS, meaning that this can be done in any type of site, including intranet portal sites and team sites. But you may remember from previous chapters that collaborating should be done in team sites, so even if you have MOSS installed, you will most likely end up implementing these solutions in a team site.
The basic structure for file and document management is SharePoint's Document Libraries. It provides you with the following built-in features:
Storing any type of file: Note that there is a global setting in SharePoint that controls what file types that SharePoint does not allow; see the following section on how to change that setting.
Built-in version history: This is disabled by default, but when enabled it automatically keeps track of all updates of each file in the document library. You can choose between a simple version history, just keeping track of the time and date for each version, or a version history, keeping track of both major (1.0, 2.0) and minor (1.1, 1.2) versions.
Add custom file properties: You can add any number of columns to a document library to describe properties or any type of information you want about each file.
Add custom views: You can create definitions on how to sort and present the files in this document library; these views may be personal or publicly available.
Built-in file locking: Using the standard type of checkout/checkin capabilities found in all DMSs, the user can lock a file for any period of time, regardless of whether the file is open or not.
Create Document Workspace: This automatically makes a copy of a file and builds a subsite around it. This site, or workspace, can then have one or more users who are allowed to work with this file. When they are done, the new version of the document will be published back to its original location.
Send notifications when updated: There are two ways to do this: Use the Alert feature to send an e-mail when a specific document or folder is modified, or make the document library an RSS Feed to MS Outlook 2007, thus sending an RSS posting whenever there is a new document added to the library.
Undelete: If a document or folder in the document library is deleted, it can be restored by the user directly, using the built-in undelete feature.
Workflow: Create an workflow that triggers when a new document is created or a property is changed. For example, anytime a quote is created, the sales manager will be informed.
Approval: You can enforce the rule that all new files and documents must be approved before going public.
Policies: Define policies and rules for documents. For examples, all documents older than six months should be converted to a PDF file and moved to another location. Or you can audit every action taken on a document, such as read, edit, or delete but also if the file is moved or copied. (Requires MOSS 2007 Enterprise Edition.)
Content types: This is a very advanced feature that allows you to create any number of document templates for a document library, including special workflow settings, property columns, and document policies.
Item-level security: Each file and document will inherit the permission setting of its parent, that is, the document library itself, or a folder in the document library. But you can also set the permission for a specific document, if necessary. You can also set permissions to a specific folder in the document library; its setting will be inherited by the documents stored in that folder.
Fully integrated with Office 2007: All of these features can be used with the web client interface or an MS Office 2007 application, such as MS Word, MS Excel, or MS PowerPoint.
So there you have it — everything you need to build a solution for more effective document management. And remember that all of this is available not only for MS Office documents but for any file type (for example, PDF files, ASCII text files, and CAD files).
10.2.1. Allowed File Types
There is a global setting that will affect what file types users are allowed to store in any document library. Note that there is no way to control an individual document library in SharePoint 2007. How to view and manage these file types is demonstrated in the Try It Out below.
Try It Out: Manage Disabled File Types
|

The 81 file types that are blocked by default are shown in the following table.
| File type | File type | File type | File type |
|---|---|---|---|
| ade | adp | app | asa |
| ashx | asmx | asp | bas |
| bat | cdx | cer | chm |
| class | cmd | com | Config |
| cpl | crt | csh | dll |
| exe | fxp | hlp | hta |
| htr | htw | ida | idc |
| idq | ins | isp | its |
| jse | ksh | lnk | mad |
| maf | mag | mam | maq |
| mar | mas | mat | mau |
| mav | maw | mda | mdb |
| mde | mdt | mdw | mdz |
| msc | msi | msp | mst |
| ops | pcd | pif | prf |
| prg | printer | pst | reg |
| rem | scf | scr | sct |
| shb | shs | shtm | shtml |
| soap | stm | url | vb |
| vbe | vbs | wsc | wsf |
| Wsh |
The reason that these file types are blocked is security. They can each be used to activate some sort of malicious action, such as a virus, Trojan horse, or worm. If you want to replace the shared file system with SharePoint's document libraries, you may need to unblock some or all of these file types.
NOTE
Before you unblock these file types, it is strongly recommended you implement a SharePoint-enabled antivirus solution, just as you would do in an ordinary file system.
10.2.2. Creating Document Libraries
To start with, you need a document library. Contrary to previous SharePoint versions, you can use all of these document management features on any document library, regardless of whether it is a MOSS site, or a WSS team site. However, since a team site is most commonly used for file and document management, this is what you will use in the examples below. Several site templates, such as Team Sites, already contain one document library named "Shared Documents." Either you start with this or you create a new one, using the steps in the following Try It Out.
Try It Out: Create a New Document Library
|
Figure 10-2. Figure 10-2

By default, a document library can only contain one single document template. However, using SharePoint's feature Content Types you can add multiple document templates, as described later in this chapter. The available default templates are listed here and allow the creator of this library to choose between the old file format, used in MS Office 97-2003, and the new format introduced in MS Office 2007. Note that the selected template file will be stored in the subfolder Forms in the document library. To create a new document based on this template, the user clicks New in the document library.
None: Use this option if you want no template at all, for this document library.
Microsoft Office Word 97-2003 document: Create a MS Word file based on the file format used by Word 97-2003, and the content of the file Template.doc. You can edit Template.doc if you want all new files to start with a specific content.
Microsoft Office Excel 97-2003 spreadsheet: Create a spreadsheet file based on the file format used by MS Excel 97-2003, and the content of the file Template.xls. Edit Template.xls if you want all new files to start with a specific content.
Microsoft Office PowerPoint 97-2003 presentation: Create a PPT file based on the file format used by PowerPoint 97-2003, and the content of the file Template.pot. Edit Template.pot if you want all new files to start with a specific content.
Microsoft Office Word: Create a MS Word file based on the file format used by Word 2007, and the content of the file Template.docx. You can edit Template.docx if you want all new files to start with a specific content.
Microsoft Office Excel spreadsheet: Create a spreadsheet file based on the file format used by MS Excel 2007, and the content of the file Template.xlsx. Edit Template.xlsx if you want all new files to start with a specific content.
Microsoft Office PowerPoint presentation: Create a PPT file based on the file format used by PowerPoint 2007, and the content of the file Template.potx. Edit Template.potx if you want all new files to start with a specific content.
Microsoft Office OneNote section: Create a MS OneNote file based on the content of Template.one. Edit Template.one if you want all new files to start with a specific content.
Microsoft Office SharePoint Designer Web page: Starts the SharePoint Designer tool, and opens the file Template.htm. Edit Template.htm if you want all new files to start with a specific content.
Basic page: Create a new basic web page in this site. Note that all extra web pages for a SharePoint site will be stored as files in a document library. This page will have the Content Editor Web Part added to allow you to enter information on this page in rich-text format, including tables and pictures.
Web Part Page: Click New Documents to create a new Web Part page with a specific layout in this site. Just like basic pages, these Web Part pages must be stored in a document library.
The last two options, Basic page and Web Part Page, may need some extra clarification. All team sites consist of one single Web Part page named Home. You can create additional pages for the team site, both standard HTML pages and Web Part pages; these extra pages are stored as files in a document library in this team site. To actually display a page on the site, the user must open its page file. In order to make it easier for the user to see what extra pages exist and open them, you can use either of these methods, on the Home page for the team site:
Change the navigation settings for this site to show pages (if possible, depending on the site template), or add a link to each page to the Quick Launch bar.
Display these page files on the start page for this site by using the Web Part for that document library. Make sure to give these page files descriptive names so that the user understands what they are used for.
Use the Links Web Part, and create links to these page files. Use descriptive link titles so that the user understands what the pages are used for.
NOTE
Note that the extra pages will not be displayed in a tab view. You can use page layers and tab buttons to create this view, as described in Chapter 13.
A relevant question now is "How many document libraries do I need?" And the answer is: Start with one single library and use it for everything until one of the following scenarios happens:
You need to activate version history for some, but not all, files: Since this feature is set per library, not per file, you must create a separate document library for each set of files, unless you don't mind having version history active even for those files that don't really use it. The price will be that more disk space is required on the SQL Server.
You need content approval for some, but not all, files: This feature is also set per library. If only some of the files need this feature, create a separate document library for them.
The number of files is more than 2,500 per folder: To ensure optimum performance, no folder in a document library should contain more than 2,500 files, and the total number of files should be less than 3,000,000.
Note that one document library can host more than three million files, as long as they are divided into a number of folders. When you exceed this number, you must divide them into several libraries to ensure the optimum performance when listing and updating the files. After all, SharePoint is a web application.
10.2.3. Understanding Columns and Views
The most common mistake when moving from a file system to SharePoint is to create one document library for each main file share structure; for example, in the file system depicted earlier in this chapter, you would end up with one library named "Projects" and another named "Customers." That might sound like a good idea, since it will resemble the old environment. But you should first test if you can store all files in one library and then use columns and views to sort them into Projects and Customers, to mimic the old file structure. To do this, you need to create custom columns for the document library, and then build views that use these columns to sort and filter the list of files. The biggest advantage of using views, instead of a folder structure, is that views are dynamic and easy to create and modify. You can have more than one view for presenting and sorting files, to meet different needs, depending on what the user wants to see.
10.2.3.1. Document Library Columns
This feature makes it possible to describe the file's content without using the filename. Actually, when you start using these columns, you may even start to wonder why you need filenames at all. When you add columns to a document library, you have a number of types to choose from. It is important to use the correct column type, since it will affect what you can to with the column, especially when creating views. The following table displays all the default column types and how to use them:
| Column Type | Description | Examples |
|---|---|---|
| Single line of text | Allows the author to enter one text line with up to 255 characters. | Can be used for short descriptions or comments. |
| Multiple lines of text | Allows the author to enter up to 1,000 lines of text of 80 characters each. | Can be used for longer descriptions. |
| Choice | Allows the author to select from more than 100 predefined choices. | Create a list of Document Types, such as "Info, Quote, Contract," or Customers, such as "Ericson, H&M, Ford." |
| Number | Allows the author to enter a number with or without decimals or in percent. | Enter the number of products in stock, the weight of a patient, a zip code, and so on. |
| Currency | Allows the author to enter a number that will be treated as currency. You can define what format is to be used. | Use for prices, income, net results, and so on. |
| Date and Time | Allows the author to enter a date and optional a time value. | Use for contract dates, defining time periods, birth dates, and so on. |
| Lookup | The value displayed in this field will come from another list or library on this site. | Use for displaying a list of all members for the site, a customer name retrieved from a Customer Contact list, or a Product list on the site. |
| Yes/No | The author can select Yes or No. | Use it for binary options, such as "This document is public," or "Quote is active." |
| Person or Group | Allows the author to choose a user or a group, from Active Directory or a given SharePoint group. | Use this to pick out a user that responsible for a document. |
| Hyperlink | The author can enter an HTML URL address; this address can be displayed as a link or formatted as a picture. | Use this to add links to external information, or to display pictures of products or people. |
| Calculated | This field is automatically filled with a calculated value. The author will not enter anything in this field. You can use mathematical formulas and logical operators. | Calculate the total sum based on two other "Number" columns, or the date 30 days from now. |
| Business data | This field will be populated with data retrieved from an external data source. | Get the customer list from an external customer database, or list the products available in a specific segment. |
The column type Calculated is similar to a calculated cell value in MS Excel. For example, say that you have two columns named "Price" and "Pieces" and you want a third column that calculates the total sum based on Price × Pieces. A reference to another column is defined by entering the name within [ ]; for example, [Price] and [Pieces]. The formula would then be:
[Price]*[Pieces]
Another example would be to display text based on a given limit. For example, if the value in the column Sales is higher than Expenses, you want a third column to display "Nice business"; if not, it should display "You are losing money!" The formula for this will look like:
IF([Sales]>[Expenses],"Nice business","You are losing money!")
The result would then look like Figure 10-3.
Figure 10-3. Figure 10-3

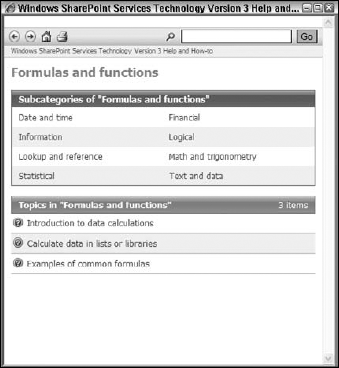
You can find a lot more information about calculated columns using the Help window and opening the link Formulas and functions (see Figure 10-4).
Figure 10-4. Figure 10-4
As usual, examples are the best way of demonstrating how to work with columns in document libraries. Say that you have a list of files and you need describe the document type (Quote, Order, and Contract) and security class (Public, Internal only, and Secret) for each of these files. Instead of creating files with names such as Quote_Internal_Ford.doc, you want to do it the SharePoint way. The following examples and descriptions assume that you are working with a WSS site based on the Team Site template.
Try It Out: Create Columns for Document Libraries
|

The method in step 7 above is fine if you just want to change the properties for a single document; the second method in step 8 is very handy when you want to modify several documents' properties at the same time. Use whatever method you find convenient.
This is fun, don't you agree? It is so easy to add a new column if there is a need to keep track of a new property. Now try some more: Say that you want to list the person who is responsible for each document. You also want to display the company name that each file is connected with. Now, (and this is very nice), if you already have a contact list that contains all the company names, you can use that list in this document library.
To make this exercise more fun, before you continue, add some company names to the Contact list for this site: In the Quick Launch bar, click Contacts to view this list. To add a contact, click the New button. On the following web form, enter at least the Last Name and the Company name, then click OK. Now add some more contacts with other company names. When you're ready, continue with these steps:
Click the Shared Documents link to open a new page with the library.
Let's start by adding a column with the person responsible for a given document: Click Settings
 Create Column. On the web form enter these settings (accept the other default settings):
Column Name: Responsible.
The type of information in this column is: Person or Group. Instead of adding a choice list of possible document managers that you need to update regularly, you can do a lookup on the Active Directory.
Description: "Enter the user responsible for this document."
Allow selection of: People Only.
Choose from: All Users.
Show field: Name (with picture).
Click OK to save and close this page. Your column is done.
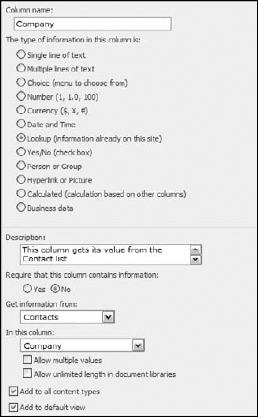
The next and final column will retrieve its content from the Contact list. What you need is just the company name for each customer. Click Settings
 Create Column. On the web form enter these settings (as shown in Figure 10-6):
Column Name: Company.
The type of information in this column is: Lookup.
Description: "This column gets its value from the Contact list."
Get information from: Contacts (the name for this list).
In this column: Company.
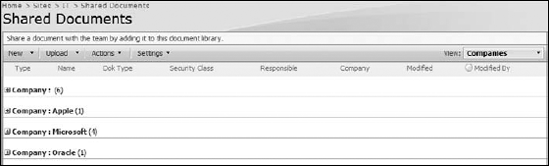
You have the two new columns now. Let's see how they work: Switch to the Datasheet view (Actions
 Edit in Datasheet View), the edit the following columns for the document in the library:
In the Responsible column, use its dropdown menu (note that it lists all users in this Active Directory environment), and select any name.
Then use the Company dropdown menu, and note that it will contain the names in the Contacts folder; select any company name in this list.
Repeat steps a and b until at least five documents have a value for these columns, to prepare for the next exercise. Then go back to the standard view: Actions
 Show in Standard View. Note that in standard view, a picture of the Responsible user will be displayed, since you selected the option to show the field Name (with picture) in step 2f above.
As you have seen, adding new columns is very easy and makes it much easier to understand what a specific file is used for. To sort the list of documents, click on the column names. For example, if you want to sort the files based on document types, click the Doc Type name; click one more time if you want to reverse the sort order. Even though the column feature is very nice, it will be hard to find what you are looking for when the list contains hundreds or even thousands of files. What you need is a way of grouping and filtering the filenames.
10.2.3.2. Working with Views
A document library with custom columns is so much easier to use than a standard file system. But you can also use these columns to do something more; they can be the base for sorting, grouping, and filtering the files presented in the document library. SharePoint calls this a view. You can create a view that only displays documents where the Security Class is equal to Secret or a view that groups all documents and files based on company, or a view that only displays the files of which you are the Responsible person.
A document library can have any number of views. Each view can be either public or personal. Note that views are not security definitions; if someone knows the URL address for another user's personal view, he can use it by typing in the URL address manually.
The real beauty with columns will show up when you start creating views. Note that end users are supposed to create their own views, after some training, without any assistance from the administrator or a web developer. Views are an important feature and a key to achieving effective document management.
Now it's time for some exercises again. Use the steps to create the views mentioned above. Remember that they are dependent on the columns made in the previous examples, so if you have created other columns, you will have to replace the names below with your column names.
Try It Out: Create Views in Document Libraries
|
It should be clear to you now that views are easy to create, yet very powerful. The variations are almost endless. You can also combine multiple columns (for example, if you need a view that lists all public files that you are responsible for). It is also possible to display more advanced calculations. For example, say that you have one column that displays the date when a contract ends. You want a view that lists all documents with fewer than 30 days to the end of the contract. This is not possible to define with just a view, but you can use a little trick: Create an extra column that contains the date 30 days before the end of the contract and then use both of these columns when creating the filter criteria for this view.
Try It Out: List Documents with Less Than 30 Days to a Date
|
10.2.4. Working with Alerts
One of the really cool features in SharePoint is alerts. An alert is your own private servant that checks all documents and other information types. If something you are interested in changes, you will get an e-mail from SharePoint. This is known as an alert, and it works with both MOSS and WSS. Here are the most common types of alerts:
A single file: Sends you an e-mail if a specific file is changed.
A complete folder: Checks a folder; if it is modified or if a file is added, modified, or removed, you are notified.
A list item: Checks a specific list item in any type of list; if the item is modified, you are notified.
A complete list: Checks a specific list; if the list is updated, for example if a list item is added or modified, you get an e-mail.
A news item: Lets SharePoint's alerts govern the News list on an intranet; when something happens to this list, you get an e-mail.
Search query: Gives you the option when creating a search query (under the Action section) to define a persistent SQL query, meaning that your search query can be saved and used again later.
NOTE
SharePoint 2007 also allows you to send updates as RSS Feeds, as a complement to or replacement for alerts; see Chapter 7 for more information about RSS.
A common question when discussing SharePoint alerts is how to add an alert for somebody else or for a group. This was not possible in SharePoint 2003, unless you added special Web Parts. But in SharePoint 2007 this feature is built in.
In the following example you add an alert for a single file and for a complete document library.
Try It Out: Add Alerts to Files and Document Libraries
|
The alert feature is available almost everywhere in SharePoint, both in MOSS sites and in every WSS site. Learn how to use them. They can save you a lot of time and ensure that you know about important changes.
10.2.5. Checking Out and Checking In
So far you have learned how to work with custom columns and views, as well as alerts. Now you will look more closely at how the actual document is updated. When you open a MS Office document stored in a file share, it automatically opens in edit mode, even if your intention is only to read it. If someone else tries to open the same document while you have it open in edit mode, it will not work, since you have locked it. The other user can use a copy of that document or wait for you to close the document (also closing edit mode). It would have been better if documents were automatically opened in read-only mode instead of edit mode. SharePoint does this, and you actually must use the document's quick menu to select Edit in Microsoft Office Word or whatever file type you are opening.
Assume that the user Anna needs to update a specific document that is stored on a public file share; she knows that it will take more time than she has available today, so what do she do? One solution is to copy the file to her local computer and update this file locally. The problem with this very common solution is that someone else, let's say Thomas, may start modifying the original file, unaware that Anna is updating a copy of this file. When Anna is done with her editing, she copies the file back to the original storage. What will happen if the original file has been updated by Thomas during this time, without Anna knowing this? Well, Anna's file will overwrite Thomas's version, without any warning.
A much better approach is to lock the file so that only one person can edit the document. This is a standard feature of all SharePoint's sites, including the free WSS team sites. It is called checking out when a user locks the editing process on a file; from that point on only that user is able to update that document. When that user is done, he or she performs a check in, which saves the current version and removes the editing lock. The file is now available for others to edit.
So what happens when a user checks out a file? It actually splits in two separate versions: one that the content author sees and works with and another that other users see, which is the same as the most recent public version. When the author later checks in the file, that version replaces the previous public version and becomes the new public version. What happens with the previous version depends on the setting for version history. If version history is activated, the file is saved but hidden; if version history is not activated, the file is overwritten.
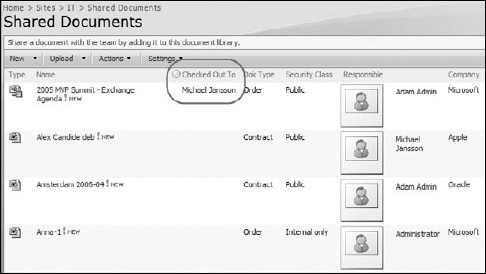
When a user checks out a file, her name will be listed in the default column Checked Out To that all document libraries have. If another user tries to open that file in edit mode, she will be warned that this file has been checked out by the first user, but SharePoint will offer the user the option to open the file in read-only mode. There is no way that a checked-out file can be edited by more than a single user.
When a user opens any MS Office files, such as Word and Excel files in the normal way, without any previous checkout process, this also works as if the file were checked out. In other words, SharePoint does a silent and implicit checkout when opening any Office document; when the document is later saved and closed, a silent checkin occurs. No listing is created in the Checked Out To column, but the process works the same way as before, except that it only works as long as the user has the document open in her MS Office application. This feature will work with MS Office 2000 or later.
Try It Out: Check Out and Check In Documents
|


A commonly asked question is whether the administrator can break or undo a checkout lock made by somebody else. The answer is Yes! The administrator simply goes to the same document library, uses the Quick Launch bar, and selects either Check in to keep whatever the author has saved so far or Discard Check Out to revert the document to its last public version. If the administrator chooses to check in the document, SharePoint will display the following warning depicted in Figure 10-12.
Figure 10-12. Figure 10-12

10.2.6. Document Version History
By default SharePoint will not store previous versions of any document. It is possible to activate the version history feature for most types of lists and document libraries, XML libraries, and picture libraries. This is a big improvement over the previous SharePoint 2003 version, where only libraries had version history.
The reason that version history is disabled by default is that it requires disk and CPU resources. However, the load is much less with SharePoint 2007 than with SharePoint 2003. Now SharePoint only stores the delta, that is, the information updated, not complete documents as in previous SharePoint version. If you have version history active and later revert back to no version management, it will in effect delete all prior versions of all documents except the latest version.
There are two types of version history in SharePoint 2007: one that only stores public, also known as major, versions (i.e., 1, 2 and 3), and another type that keeps track of both draft (1.1, 1.2) and major versions (1.0, 2.0). Choose the one that suits your needs best; you will probably need a mix of all three types for all your document libraries.
Try It Out: Enable Version History
Regardless of the type of version history you selected, it is now active, but only for the current library! If you have more document libraries and want a version history of them all, you must enable this for all of these libraries. Test it now:
|
10.2.7. Content Types and Document Templates
One of the most requested features in the previous version of SharePoint was to be able to add more than one document template for any given document library. By default, a document library would only offer one type of document template; for example, an empty MS Word document.
Microsoft's solution was to create functionality beyond simple document templates. Why? Because many users will eventually need it, even though this need might not seem obvious at first glance. For example, say that you want to have two document templates in a document library, one Sales Quote and one Contract. The content of these templates looks different, of course. Each template most likely needs different properties, or metadata. For example, the Sales Quote needs to keep track of the due date for this quote, while the Contract stores the period that it is valid (the start and end dates). The Sales Quote also has an attached workflow, so every time a new quote is created, the sales manager will get an e-mail, while the Contract has a workflow that will inform the user responsible for this contract when there is one month left in the period. There may even be more differences between these types of documents, and if you have more than two templates, the differences will be even greater. This is why Microsoft did not just call their solution a "document template," but instead a "content type."
10.2.7.1. Content Types Overview
The solution Microsoft created for SharePoint 2007 works for both WSS and MOSS and allows an administrator to create any number of content types, each with different settings, such as:
Document Template: The precreated content of the document; for example, with document headers, footers, contact information, and so on.
Columns: You can define any number of specific columns for storing metadata about the type of documents. Whenever an author creates a document based on a content type, these columns will be visible.
Workflows: A content type can have one or more workflows associated with it. You can also create a workflow that starts automatically every time an author creates or modifies a new document, based on the content type.
Property Pane: You can customize the property page displayed in MS Office 2007 when working with documents based on a content type. You can also define if the property pane should be visible or not in MS Office 2007.
Policies: You can define a number of document policies that will affect a document based on a specific content type. These policies will follow the document through its lifetime.
In other words, content types make it very easy to use documents in a process-oriented manner, not just as individual files. This is also the reason SharePoint 2007 can be used to comply with many governmental regulations, like the Sarbanes-Oxley Act (SOX) or the Health Insurance Portability and Accountability Act (HIPAA), which define how an organization should manage any type of information.
A content type can inherit its setting from a parent content type. For example, say that you have three types of sales quotes; each of them has a specific document template, but all of them have the same columns and workflows. If so, you could create a content type for the master sales quote, and the three other content types that inherit the settings from the master quote, except the document template. If you later decide to change the workflow on the master quote, the change will be inherited by all three sales quotes automatically. Working in this way, you will have a much better control over these quotes, and it will be easy to change and update them later on.
All content types you create must inherit from one of the base content types, for example a Document content type. These base content types come with SharePoint, and you can see all of them if you follow the steps in the Try It Out below.
Try It Out: List the Default Content Types
|

Each site content type is grouped into sections, such as Business Intelligence, Document Content Types, and so on, to make it easier for you to find the right one. When you create new content sources, you can store them in existing groups or create new groups. For each content type this list will display its parent content type, and the Source column shows what SharePoint site the content source belongs to. Note that a content source can have one site as the source, while still be used in subsites of that site.
10.2.7.2. Creating Content Types
You can create a new content type, whenever you need it, but very often you have a document template already that you want to use for the new content type. For example, you may have a Sales Quote in a MS Word template that you have been using for a while, and now you want to use it in a site content type. The following Try It Out shows how to do this.
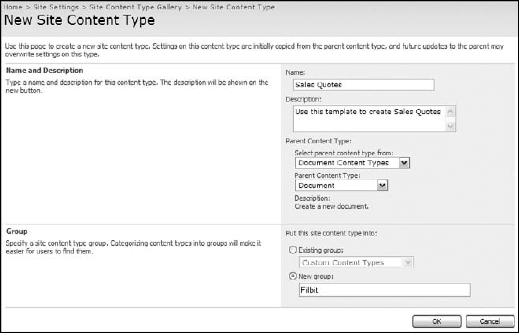
Try It Out: Create a Content Type
|
The content type is now configured and ready to be used. Since it is created in the top site for this site collection, it can be used in any of its sites. Let's test it and add it to the document library in the IT site created before.
Try It Out: Apply a Content Type to a Document Library
|

What if you need to change the settings for this site content type; for example, to modify its document template or add more columns? This is really where content types shine. Just open the content type where it was created (usually at the top site), as previously described, then change any setting, including uploading a new document template. Make sure to set the option Update all content types inheriting from this type to Yes, and all document libraries associated with that content type will be updated.
NOTE
Note that existing documents in the library will not be affected by the modified document template. But other settings, such as new columns or policies, will affect existing documents as well.
10.2.8. Document Management with MS Office
So far you have worked exclusively with a web browser, typically MS Internet Explorer. A user of MS Office 2007 will also find a lot of SharePoint-related features integrated into products like MS Word, MS Excel, and MS PowerPoint. The integration will make it possible for a user who works a lot with MS Office products to view and set SharePoint information without having to switch to a web browser. Using any edition of Office 2007, you can do the following SharePoint-related tasks:
Check Out/Check In: Lock and unlock editing for a file.
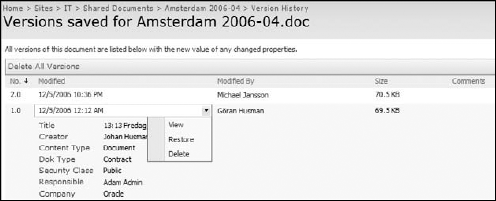
View version history: Display a list of all previous versions, including all comments. You can also view, restore, and delete previous versions.
View Workflow Tasks: View or start workflows defined for the document library where the document is stored. This requires MS Office Professional Plus or higher editions.
Manage Alerts: Set an alert for the current document.
Manage other files in the library: Set alerts and delete and open other files. You can also add new documents and create folders in the current library.
Manage Document Workspace: Create or delete a workspace for the current document; see more about workspaces later in this chapter.
View membership: See what members have access to a team site, and if they are online, add new members, edit their Site Group membership, and remove members.
Manage Tasks: View, modify, delete, and add new tasks, and create alerts for a task. This information will be stored in a task list on the site where the document library is stored. For more information about working with Tasks lists, see Chapter 7.
Manage Links: View, modify, delete, and add new URL links; and create alerts for a link. This information will be stored in a link list on the site where the document library is stored.
Manage Document Properties: All properties (including column settings) for the document are available here and may be changed and used in the Office document (for example, in a document header or footer). If you change a column value in Office, this will be replicated back to the document library when you store the changes.
Manage the team site: From within Office, you can open this site, change its title, and open its site settings.
A subset of these features will be available for users of MS Office 2003, but none of these features is available for earlier versions! It is therefore important that at least the users who produce documents have MS Office 2007 in order to have an optimal working environment.
To see how all these features work, some examples follow. Use the steps in the following Try It Out to get familiar with this MS Office integration.
Try It Out: MS Office 2007 Integration
|


One very handy feature is the propagation of document properties from columns in SharePoint's document library to MS Office document properties. This makes it possible to view and display those properties inside the content of a document. For example, say that you have a column in the document library that defines the customer name for a document. You can use that information to display the customer name in the document header, or anywhere in the document, by following the steps in the Try It Out below.
Try It Out: Display Properties inside Office Documents
|
This last feature for displaying column settings inside an MS Office document is very handy when using document headers or other structured documents. Instead of adding values such as document type, customer name, or project number manually in the document, you can create columns for the document library and then expose them in the document, which will make it much easier for the user to both view and set the values.
10.2.9. More about Datasheet Views
Earlier in this chapter you saw how any list or library could be displayed using a Datasheet view, based on MS Access 2007. This Datasheet view actually has more features besides those previously explained. For example, you can print a list using MS Exchange or create a report using MS Access. This is particularly important, since the print capabilities in any web application, including SharePoint, are not too impressive.
There is a cleverly hidden button at the far-right side of the Datasheet view. It looks like a part of the right frame. Click on it, and a task pane will be displayed (see Figure 10-19). Another way of displaying this pane is to click the menu Actions ![]() Tasks. Note that Datasheet view must be displayed to find the Tasks option on the Actions menu.
Tasks. Note that Datasheet view must be displayed to find the Tasks option on the Actions menu.
Figure 10-19. Figure 10-19
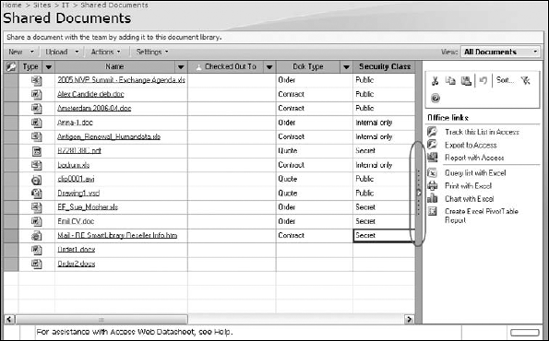
Using this task pane, a user can activate these features:
Track this List in Access: You can link this list to an Access database and use it to create reports or work with its data with all the features of MS Access. If the content in the list is modified, then the Access database will automatically be updated. If you modify a value in the Access database, then the content of the list in SharePoint is updated. This is also a way to take the list offline, since all of the actual content of the list is copied to the Access database, not only the columns displayed in the current view. You can use one Access database for several lists, or you can create a separate database for each list, whatever suits your needs.
Export to Access: This is simply a way to copy all the content of the current list to an Access database table. It will not have the two-way synchronization feature that the previous option had. Use this option when you simply want to take a snapshot of the current values in this list, possibly for calculating or reporting purposes.
Report with Access: The content of this SharePoint list is copied to Access, and a default report is created. You can then modify this report; for example, removing columns, changing the order of columns, changing the logotype, and using Access AutoFormat feature to create a better-looking report (see Figure 10-20).
Query list with Excel: Use this option to copy the list content to an Excel spreadsheet. By default, Excel will warn you about opening this data connection. To continue, you must select Enable. The result is a formatted table in Excel. You can now use this content with all the features of Excel, such as calculating, sorting, building a diagram, and printing. Note that this option will not replicate any local modifications in the spreadsheet back to the SharePoint list, as in SharePoint 2003. To modify list content outside SharePoint, you should use the option Track this List in Access instead.
Print with Excel: Since SharePoint is a web application is has poor printing functionality. Use MS Excel if you want better control of the print process for the list content, such as the formatting, fonts, and colors. By default, Excel will warn you about opening this data connection; you must click Enable to continue.
Chart with Excel: If you have columns with numerical or date format you can use these values in MS Excel to create charts, such as histograms and pie charts. Also here Excel, by default, warns you about opening a data connection. Select Enable to continue, then select the columns to be used for the diagram and the type of diagram; you will see the resulting diagram.
Create Excel Pivot Table Report: Use the column properties to create a dynamic summary of these cell values; this is typically used for pivot tables. Also here Excel warns about the data connection; click Enable to continue.
At the top of this task pane, you will also find buttons for actions like sorting, cutting, copying and pasting documents or columns.
Figure 10-20. Figure 10-20
