Siva Prasad Reddy Katamreddy1 and Sai Subramanyam Upadhyayula2
(1)
Hyderabad, India
(2)
Rotterdam, The Netherlands
Security
is an essential aspect of software application design. It protects software from unauthorized access and misuse. Numerous threats are lurking around the Internet to steal users’ information. Hence, you as a software engineer must understand how to develop secure applications.
There are two essential terms to understand when talking about security. Authentication refers to verifying the user’s credentials by asking for the user’s credentials. Authorization refers to verifying the user’s ability to do a certain activity.
Spring Security is a powerful and flexible framework for securing Java-based web applications
. Even though Spring Security is commonly used with Spring-based applications, you can also use it to secure non-Spring-based web applications.
This chapter explains how to use the Spring Boot Security Starter to secure your Spring Blog application and how to secure service layer components using method-level security. The chapter also explores implementing the OAuth2 protocol using Spring Security to secure the REST API.
Spring Security in Spring Boot Web Application
Spring Security
is a framework for securing Java-based applications
at various layers with great flexibility and customization. Spring Security provides authentication and authorization support
against database authentication, LDAP, form authentication, JA-SIG central authentication service
, Java Authentication and Authorization Service (JAAS)
, and many more. With minimal configuration, Spring Security has built-in support to block common attacks like CSRF
, XSS, and session fixation.
You can use Spring Security to secure the application at various layers, such as web URLs, service layer methods, and more. Spring Security from version 3.2 onward provides Java configuration support for security. Using Spring Security in a Spring Boot application became easier with its autoconfiguration features.
Adding the Spring Security Starter
(spring-boot-starter-security) to a Spring Boot application will
Enable HTTP basic security
Enable a single user with the name “user” stored in an in-memory database
Ignore paths for commonly used static resource locations (such as /css/**, /js/**, /images/**, etc.)
Enable common low-level features such as XSS and CSRF protection, caching, and more
To get started, add the following dependency to your Spring blog application
:
That’s all you need to do to add basic security to your Spring blog application. Note the word “basic.” When you start the application, you can see the following entry in the logs:
Using generated security password: b5dd65a5-b0e7-49d0-8f2b-eaa55abf0487
This generated password is for development use only. You must update your security configuration before running your application in production.
By default, Spring Boot provides a default username and password for you to use during the development phase. If you open your application at http://localhost:8080, the browser will navigate to a default login page
, as shown in Figure 12-1.
A window depicts the web browser with a spring security default login page.
Figure 12-1
Spring Security default login page
Let’s enter the credentials to access the application. The default user is user, and the password is autogenerated, one you can find in the logs, as mentioned.
You can change the default user credentials in application.properties as follows:
security.user.name=admin
security.user.password=secret
security.user.role=USER,ADMIN
That’s nice for a quick demo. You may want to implement a more complex and mature security system like a registration feature where users can register before accessing the application and access resources where the user has necessary permissions. You may also want to introduce roles like ADMIN, USER, and such. Let’s go ahead and implement them in your Spring blog application.
Implementing In-Memory Authentication
Let’s start by implementing basic in-memory authentication
where the users are stored in memory. If you have very few users for your application, and there is no need to change the user details, then in-memory authentication is a simple solution. All you have to do is to define a bean, as follows:
@Bean
public InMemoryUserDetailsManager userDetailsService() {
UserDetails user = User.withUsername("user")
.password("{noop}password")
.roles("USER")
.build();
return new InMemoryUserDetailsManager(user);
}
This bean will allow you to log in using the credentials of user/password. The text {noop} before the password denotes that you are not encoding the password before storing it, but in real world applications you must encode passwords to avoid storing them in clear text. We will discuss this topic in the coming sections.
But this kind of authentication is not so flexible because it won’t support registering new users, changing the user details, and such. You can create an implementation to store users in the database and authenticate those users with the help of the UserDetailsService interface from Spring Security. Let’s see how to do that.
Implementing Custom User Authentication
As part of the
custom user authentication
, you will implement the UserDetailsService interface to read the users from the database instead of the memory.
The UserDetailsServiceinterface
exposes a single method called loadUserByUsername(). You just have to implement your class with your custom logic inside this method.
For that, you must to create the domain class User to store the user details like username, password, and roles, as shown in Listing 12-1.
You will use Spring Data JPA to persist the user information. You can also JDBC to store the details if you like, as shown in Listing 12-1.
public Collection<? extends GrantedAuthority> getAuthorities() {
return List.of(new SimpleGrantedAuthority(role));
}
@Override
public String getUsername() {
return userName;
}
@Override
public boolean isAccountNonExpired() {
return true;
}
@Override
public boolean isAccountNonLocked() {
return true;
}
@Override
public boolean isCredentialsNonExpired() {
return true;
}
@Override
public boolean isEnabled() {
return true;
}
}
Listing 12-1
User JPA Entity
The User class contains the necessary attributes like username, password, and role information. In addition, this class implements the UserDetails interface from Spring Security, which represents an Authenticated User object.
There are multiple methods like isEnabled(), isCredentialsNonExpired(), isAccountNonLocked(), and isAccountNonExpired() that are used at the time of authentication.
If any methods return false, the login will not be successful.
You also have the getAuthorities() method that returns the permissions of a given user.
Next, create the Spring Data JPA repository for the user entity, as shown in Listing 12-2.
public interface UserRepository extends JpaRepository<User, Integer>
{
Optional<User> findByUserName(String userName);
}
Listing 12-2
Spring Data JPA Repository Interface UserRepository.java
The UserRepository interface defines a method named findByEmail() to look up the user by email.
Now let’s implement the UserDetailsService called CustomUserDetailsService to read UserDetails from the database, as shown in Listing 12-3.
@Service
@Transactional
@RequiredArgsConstructor
public class CustomUserDetailsService implements UserDetailsService {
private final UserRepository userRepository;
@Override
public UserDetails loadUserByUsername(String userName)
throws UsernameNotFoundException {
com.apress.demo.springblog.domain.User user = userRepository.findByUserName(userName)
.orElseThrow(() -> new UsernameNotFoundException("Email " + userName + " not found"));
return new org.springframework.security.core.userdetails.User(
user.getEmail(),
user.getPassword(),
user.getAuthorities()
);
}
}
Listing 12-3
UserDetailsService Implementation
Inside the loadUserByUsername(), you query the database using the UserRepostiory to find the user by the username, and you encapsulate the user object with the User object from Spring Security, which is an implementation of the UserDetails interface.
The org.springframework.security.core.userdetails.User represents the authentication object, used internally by Spring Security.
Custom Spring Security Configuration
Until now you have worked with the default Spring Security settings that come with the Spring Boot Security Starter. To switch the default security configuration and provide your customized security configuration
, you can create a configuration class with the @EnableWebSecurity annotation and create a bean of the type SecurityFilter Chain, as shown in Listing 12-4.
@Configuration
@EnableWebSecurity
@RequiredArgsConstructor
public class WebSecurityConfig {
@Bean
public SecurityFilterChain defaultSecurityFilterChain(HttpSecurity http) throws Exception {
http
.authorizeRequests()
.anyRequest().authenticated()
.and()
.formLogin();
return http.build();
}
}
Listing 12-4
Customized Spring Security Configuration
This class defines two beans. One is of type SecurityFilterChain, which contains all the security configurations of your application. First, you make sure that all the requests to your Spring blog application are authenticated using the authorizeRequests().anyRequest().authenticated() method calls. Then you inform Spring Security to use a form-based authentication using the formLogin() method.
If you want to use a custom login page, you can extend the formLogin() method call with the following method calls:
.formLogin()
.loginPage("/login")
.defaultSuccessUrl("/posts")
.failureUrl("/login?error")
.permitAll();
Spring Security will fetch the HTML from the path /login and display it instead of the default login form.
When the login is successful, it will redirect to the default success URL /posts, and when the login fails, it will redirect to /login with an error request attribute.
The login page should be accessible for everyone, so for this reason, you add the method permitAll() to the method calls. If you do not add this method call, you will receive a 401 error when you try to access the login page.
You can see the code of the login.html file in Listing 12-5.
Next, you need to add the following configuration inside the WebConfig.java class to tell Spring Security to use the login.html page as the custom login page instead of the default login page:
@Override
public void addViewControllers(ViewControllerRegistry registry) {
Spring Security also implements the logout functionality
by default. All you have to do is define the following configuration inside the defaultSecurityFilterChain method.
This code triggers the logout functionality when it receives a request at the URL /logout. After the successful logout, the page will redirect to /login?logout.
Alright, now let’s test whether your login and logout flow is working. But before that, you need some users in your database. Until you create the registration functionality, let’s add initial test data to work with the login by implementing the CommandLineRunner interface to your Spring blog application main class and overriding the run method, as shown in Listing 12-6.
@SpringBootApplication
public class SpringblogApplication implements CommandLineRunner {
private final UserRepository userRepository;
public SpringblogApplication(UserRepository userRepository) {
Initial Test Data in the SpringblogApplication.java Class
At the time of application startup, the run method will add the admin user to the database if no other users exist.
Now let’s run the application and open the URL http://localhost:8080. You should see a basic HTML form, as shown in Figure 12-2.
A window depicts the basic H T M L form for the whole page of login.
Figure 12-2
Basic login page
You may think this page looks far worse than the default Spring Security login page. I agree, but let’s concentrate on the Spring Security functionality instead of styling the login page. I added the necessary styles to the login page and the blog application in general to the completed source code, which you can find in the GitHub repository.
Back to your application, if you type in the credentials you stored in your database, you will be greeted with the following error:
fixed java.lang.IllegalArgumentException: There is no PasswordEncoder mapped for the id "null" error
Spring Security, by default, will expect your passwords to be stored in an encoded format. It will not allow you to store the passwords in clear text. In the previous section, when you stored the user details in-memory, you used a string {noop} to use the NoOpPasswordEncoder from Spring Security. So, to fix this issue, you must define a NoOpPasswordEncoder to temporarily allow the clear-text passwords. Please do not use this in your production applications! You will use the correct password encoding in the coming sections of this chapter.
@Bean
public static PasswordEncoder passwordEncoder() {
return NoOpPasswordEncoder.getInstance();
}
After adding the above bean definition to the WebSecurityConfig.java class, make sure to clear the users table if you are using a MySQL or any other database, as you have changed the password encoding format. If you are using h2, you don’t need do anything. Open the application again, type in the credentials one more time, and this time the browser will redirect to the /posts page. If you now go to URL http://localhost:8080/logout, the browser will redirect back to the login page. If you try to access the URL http://localhost:8080 one more time, you will still be redirected to the login page.
Implementing User Registration
Now, let’s implement the user registration functionality
in your Spring blog application. Create a new class called UserRegistrationController.java inside the controller package with the code shown in Listing 12-7.
@Controller
@RequestMapping("/user/register")
@RequiredArgsConstructor
public class UserRegistrationController {
private final UserService userService;
@GetMapping
public String register() {
return "register";
}
@PostMapping
public String doRegister(@Valid UserForm userForm) {
userService.registerUser(userForm);
return "redirect:/login";
}
}
Listing 12-7
User Registration Controller
This class is a standard Spring MVC Controller with the @Controller and @RequestMapping annotations.
The register()method
handles the GET request and returns the register.html file as the response. When the user fills the necessary details and submits the form, the doRegister()method
is invoked, which calls the registerUser()method
inside the UserService, which performs the actual logic of storing the user inside the database. You can view the code of UserService class in Listing 12-8.
@Service
@RequiredArgsConstructor
@Transactional
public class UserService {
private final UserRepository userRepository;
public void registerUser(UserForm userForm) {
User user = userForm.toUser(userForm);
userRepository.save(user);
}
}
Listing 12-8
UserService Class
The registerUser()method
inside the UserService will first convert the UserForm object, which is a form representation of the User object, and save it to the database using the UserRepository.save() method.
This class has the @Transactionalannotation
, which creates a database transaction in the background when persisting the user entity to the database and then commits the transaction after successfully persisting the user entity. If there is any error during the save, the transaction will roll back, and the user information won’t be saved to the database.
You can read the code for the UserForm.javaclass
in Listing 12-9.
@Data
@NoArgsConstructor
@AllArgsConstructor
@Builder
public class UserForm {
@Email
private String email;
@NotBlank
private String username;
@NotBlank
private String password;
public User toUser(UserForm userForm) {
User user = new User();
user.setEmail(userForm.getEmail());
user.setUserName(userForm.getUsername());
user.setPassword(userForm.getPassword());
user.setRole("USER");
return user;
}
}
Listing 12-9
UserForm.java Class
The UserForm class contains all the fields coming from the web application. It also contains the bean validation annotations like @Email and @NotBlank to validate the incoming data.
Finally, let’s create the register.html file under the templates directory and copy the code shown in Listing 12-10.
Lastly, you must be able to access the register.html page without authentication. For this reason, you have to enhance your defaultSecurityFilterChain()method
inside the WebSecurityConfig class with the following code:
http
.authorizeRequests()
.antMatchers("/user/register")
.permitAll()
.anyRequest()
.authenticated()
The antMatchers()method
allows you to define a matcher path like /user/register, and the permitAll() method allows you to access the path defined inside the antMatchers() method without authentication.
Start the application and open the URL http://localhost:8080/user/register. You should see the HTML page, and if you register, the user will be successfully saved into the database, and the page will be redirected to the /login path.
If you try to log in with your newly registered credentials, you should be able to login successfully.
As mentioned, Spring Security, by default, expects the password to be encoded using any of the standard password encoding mechanisms. Let’s see how to do that in the next section.
Hashing Passwords Using PasswordEncoder
When storing passwords of users
in a database, you must be very careful not to store them in plain text format. If, unfortunately, a hacker gets access to the database, they can find all the user’s passwords in clear text, which is not so good.
Spring Security allows you to hash the passwords using industry-standard hashing algorithms
before persisting to the database. It supports hashing algorithms like BCrypt and key-derivation functions like Scrypt, Pbkdf2, and Argon.
BCrypt
is a widely used hashing algorithm to hash passwords, and Spring Security provides a class named BCryptPasswordEncoder, an implementation of the PasswordEncoder interface.
To be able to use this password encoder, you have to create a bean of the type BCryptPasswordEncoder in your WebSecurityConfig class, as follows:
@Bean
public PasswordEncoder passwordEncoder() {
return new BCryptPasswordEncoder();
}
After defining this bean, inject the PasswordEncoder bean into the SpringBlogApplication.java class and replace the code with setting the password, as follows:
.password(passwordEncoder.encode("password"))
Refactor the registerUser()method
in the UserService.java class to encode the password before saving the user to the database. You can view the code in Listing 12-11.
Spring Security will now automatically decode the password at the time of authentication and check if it matches the password saved in the database.
If the password matches, then the authentication will be successful.
Implementing the Remember-Me Feature
Spring Security
provides the Remember-Me feature
so that applications can remember the identity of a user between sessions. To use the Remember-Me functionality
, you just need to send the HTTP parameter remember-me.
<form th:action="@{/login}" method="post">
<input type="email" name="username"/>
<input type="password" name="password" />
<input type="checkbox" name="remember-me"> Remember Me
<button type="submit">LogIn</button>
</form>
Spring Security provides the following two implementations of the Remember-Me feature
out of the box:
Simple hash-based token as a cookie: This approach
creates a token by hashing the user identity information and setting it as a cookie on the client browser.
Persistent token: This approach uses a persistent store like a relational database to store the tokens.
Simple Hash-Based Token as a Cookie
You can enable the Remember-Me feature
in the Security configuration, which uses a hash-based token approach
, as shown in Listing 12-12.
@Bean
public SecurityFilterChain defaultSecurityFilterChain(HttpSecurity http) throws Exception {
Spring Security Configuration Enabling Remember-Me
You add a single line of code to the existing configuration: rememberMe().
With this configuration, when you log in by selecting the Remember Me checkbox, a cookie will be set with remember-me and will contain the hash-based token
as a value. If you close and reopen the browser and go to the application, you will be automatically authenticated. Note that the remember-mecookie
is deleted when the user logs out.
This hash-based token
as a cookie approach is implemented by Spring Security using org.springframework.security.web.authentication.rememberme.TokenBasedRememberMeServices.
The remember-me cookie token value is generated as follows:
The default expirationTime is two weeks (1209600 seconds) and key is a random generated string (UUID.randomUUID().toString()).
You can customize the cookie name, expiration time, and key as follows:
.rememberMe()
.key("my-secure-key")
.rememberMeCookieName("my-remember-me-cookie")
.tokenValiditySeconds(24 * 60 * 60)
.and()
With this customization, after successful authentication, it will create the remember-mecookie
with the name my-remember-me-cookie
. It will be valid for one day (24 * 60 * 60 seconds).
Caution
In this approach, the generated token contains the MD5 hashed password and is a potential security vulnerability if the cookie is captured.
Persistent Tokens
Spring Security provides another implementation of the Remember-Me feature
that can be used to store the generated tokens in persistent storage such as a database. The persistent tokens approach
is implemented using org.springframework.security.web.authentication.rememberme.PersistentTokenBasedRememberMeServices, which internally uses the PersistentTokenRepository interface to store the tokens
.
Spring provides the following two implementations of PersistentTokenRepository out of the box:
InMemoryTokenRepositoryImpl can be used to store tokens in-memory (not recommended for production use).
JdbcTokenRepositoryImpl can be used to store tokens in a database.
The JdbcTokenRepositoryImpl stores the tokens in the persistent_logins table. See Listing 12-13.
create table persistent_logins
(
username varchar(64) not null,
series varchar(64) primary key,
token varchar(64) not null,
last_used timestamp not null
);
Listing 12-13
persistent_logins Table
Now you’ll see how to configure Remember-Me functionality
to use a relational database to store the tokens. See Listing 12-14.
@Configuration
@EnableWebSecurity
@RequiredArgsConstructor
public class WebSecurityConfig {
private final DataSource dataSource;
@Bean
public SecurityFilterChain defaultSecurityFilterChain(HttpSecurity http) throws Exception {
JdbcTokenRepositoryImpl tokenRepositoryImpl = new JdbcTokenRepositoryImpl();
tokenRepositoryImpl.setDataSource(dataSource);
return tokenRepositoryImpl;
}
}
Listing 12-14
Configuring Remember-Me Using Persistent Tokens
When successfully logging in with the Remember-Me checkbox selected, Spring Security will store the generated token in the persistent_loginstable
.
This approach generates a unique series value for the user and random token data to create a token and set it as a cookie. Every time the user logs in with the cookie, Spring Security will generate new random token data, but the series value will be intact for that user.
Cross-Site Request Forgery Protection
Cross-Site Request Forgery (CSRF)
is an attack that lets users execute unwanted actions on an authenticated web application. Suppose you go to the genuinesite.com website and authenticate yourself. This website may set cookies on your browser, including an authentication token. Now, if you open the malicioussite.com website on the same browser but in a different tab, you can send a request from malicioussite.com to genuinesite.com with unwanted data. This data will send the request along with the cookies set by genuinesite.com.
Spring Security provides CSRF protection
by default using the CsrfFilter class. The CsrfFilter will intercept all the requests, ignore the GET, HEAD, TRACE, and OPTIONS requests, and check whether a valid CSRF token is present for all the other requests (such as POST, PUT, DELETE, etc.). If the CSRF token
is missing or contains an invalid token, it will throw AccessDeniedException.
You should send the state-changing requests (such as POST, PUT, DELETE, etc.) with the CSRF token
as a hidden parameter in the request. You can manually insert the token as follows:
<form method="post" action="/users">
...
...
<input
type="hidden"
th:name="${_csrf.parameterName}"
th:value="${_csrf.token}" />
</form>
If you are using Spring Security and Thymeleaf, the CSRF token
will be automatically included if the <form> has the th:action attribute and method is anything other than GET, HEAD, TRACE, or OPTIONS.
For your Spring blog application, the csrf field is automatically added. You can inspect the code for the addPost.html page, and you will see the hidden field for csrf token, as shown in Figure 12-3.
An 11-line code indicates the concealed code field for the C S R F token, which is highlighted.
Figure 12-3
Hidden CSRF token
added in the HTML page
Note
If you use the action attribute instead of setting the th:action or method value to any of GET, HEAD, TRACE, or OPTIONS, the CSRF token won’t be inserted automatically.
If you submit the form without a CSRF token
or an invalid CSRF token, then AccessDeniedException will be thrown with the 403 HTTP status code.
Method-Level Security
You have learned how to secure web applications by protecting access to web URLs. But the service-layer methods
that are supposed to be invoked only by authenticated users are still accessible without restriction if users have the Spring bean. You can use Spring not only for developing web applications but also for batch-processing applications, integration servers, and such, which doesn’t provide a web interface. So, you may need to secure the methods access based on roles and permissions.
Spring Security provides method-level security
using the @Secured annotation. It also supports the JSR-250 security annotation @RolesAllowed. From version 3.0, Spring Security has provided an expression-based security configuration using the @PreAuthorize and @PostAuthorize annotations, which provides more fine-grained control.
You can enable method-level security using the @EnableGlobalMethodSecurityannotation
on any configuration class, as follows:
secureEnabled: Defines whether @Secured is enabled
prePostEnabled: Defines whether the pre/post annotations @PreAuthorize and @PostAuthorize are enabled
jsr250Enabled: Defines whether the JSR-250 annotation @RolesAllowed is enabled
Once you enable method-level security, you can annotate the SpringMVC controller request-handling methods, service-layer methods, or any Spring components with @Secured, @PreAuthorize, or @RolesAllowed in order to define your security restrictions. See Listing 12-15.
@PostMapping
@PreAuthorize("hasRole('ADMIN')")
public String addPost(@ModelAttribute("post") @Valid Post post, Errors errors) {
if (errors.hasErrors()) {
return "addPost";
}
postService.addPost(post);
return "redirect:/posts";
}
Listing 12-15
SpringMVC REST Controller Using Method-Level Security Annotations
Similarly, you can secure service-layer methods
using the @Secured, @PreAuthorize, or @RolesAllowed annotations.
@Service
@Transactional
public class PostService
{
@PreAuthorize("hasRole('ADMIN')")
public void addPost(Post post)
{
....
}
}
You can also use the @Secured, @PreAuthorize, or @RolesAllowed annotations at the class level to apply security configuration to all methods in that class.
You can use the Spring Expression Language (SpEL)
to define the security expressions as follows:
hasRole(role): Returns true if the current user has the specified role
hasAnyRole(role1,role2): Returns true if the current user has any of the supplied roles
isAnonymous(): Returns true if the current user is an anonymous user
isAuthenticated(): Returns true if the user is not anonymous
isFullyAuthenticated(): Returns true if the user is not an anonymous or Remember-Me user
You can combine these expressions using the logical operators AND, OR, and NOT(!).
@PreAuthorize("hasRole('ADMIN') OR hasRole('USER')")
@PreAuthorize("isFullyAuthenticated() AND hasRole('ADMIN')")
@PreAuthorize("!isAnonymous()")
Although defining security restrictions using @Secured and @PreAuthorize looks similar, there are some minor differences to be noted.
The @Secured("ROLE_ADMIN")annotation
is the same as @PreAuthorize("hasRole('ROLE_ADMIN')"). The @Secured({"ROLE_USER", "ROLE_ADMIN") is considered as ROLE_USER OR ROLE_ADMIN, so you cannot express the AND condition using @Secured. You can define the same with @PreAuthorize("hasRole('ADMIN') OR hasRole('USER')"), which is easier to understand. You can express AND, OR, or NOT(!) as well.
@PreAuthorize("!isAnonymous() AND hasRole('ADMIN')")
Note
The @PreAuthorize annotation is more powerful compared to @Secured/@RolesAllowed, so it’s better to use @PreAuthorize.
Securing Spring Boot REST APIs using OAuth2
Until now, you have learned how to secure Spring Boot web applications developed with Spring MVC using Spring Security by manually implementing the authentication and authorization logic. How can you secure a REST API?
If you are using a REST API
, you cannot provide a UI to authenticate the users to access your application. You can use HTTP basic authentication, but this is not a secure way of authenticating. The password is usually encoded using Base-64 format; if any hacker somehow manages to access the password, it’s straightforward to decode. Not only that, but once you give out the credentials to the clients, you cannot revoke access to that user unless you change the password.
There is a need for a more secure way to authorize your REST APIs, so to handle this, OAuth Framework was introduced.
What Is OAuth2.0?
The term OAuth stands for Open Authorization
, and it’s an industry-standard protocol that was developed for authorization between services or applications. This protocol is right now in version 2.0, which is why it’s usually known as Oauth2
.
For example, imagine you are developing an image editing application, and you are developing a feature to let users import pictures from their Google Photos, iCloud, or One Drive account into your application. For this, your application needs to access the user’s photos. In this case, the user cannot just hand over their Google/iCloud/One Drive credentials to your application because it is not secure. So how can a third-party client like your application access the user’s pictures?
OAuth2.0 protocol
was developed to address this problem. It’s a standard way of providing authorization, which means permission for service A (in your case, the image editing application) to access Service B (a user’s Google/iCloud account).
Now let’s learn some OAuth2 terminologies
:
Resource: The first one is called a resource or a protected resource. In your image editing application, the resource is the image or picture stored inside the user’s Google Photos account. So, anything that needs to be accessed by an external service and which needs authorization to access it is called a resource.
Resource owner: As the name suggests, this means the owner of the resource
. In this case, it would be the person who owns the Google Photos account.
Resource server: The server
that stores or hosts the resource. In your case, it’s the Google Photos server that stores users’ photos.
Client: This is the application
or service that wants to access the resource. In your case, it’s the image editing application
.
You can have a couple of types of clients. A publicclient
such as web applications and desktop or mobile applications is one that can be accessed publicly.
You can also have confidential clients that are not exposed to the public. They can be a service or a CRON job running on a remote server.
For each client
, there are different ways of authorizing itself. After the authorization, each client will receive an access token, which can be used to access the resource from the Resource Server. The process of fetching this access token is called authorization flow or grant type.
Authorization Server: Responsible for generating and providing access tokens to the client and verifying whether an access token is valid. You will use Spring’s implementation of the Authorization Server
(https://spring.io/projects/spring-authorization-server) in your Spring blog application to secure the REST API.
An access token is nothing but a unique identifier that is used for an application to authenticate incoming requests. Instead of sending the username and password for the authentication, you can send out the access tokens generated by the Authorization Server
to your application (a Resource Server). In this way, you can make your REST APIs stateless.
OAuth Grant Types
A client can authorize itself and request an access token in different ways. You can use various grant types to fetch the access token based on multiple use cases. The most common OAuth grant types
are listed below:
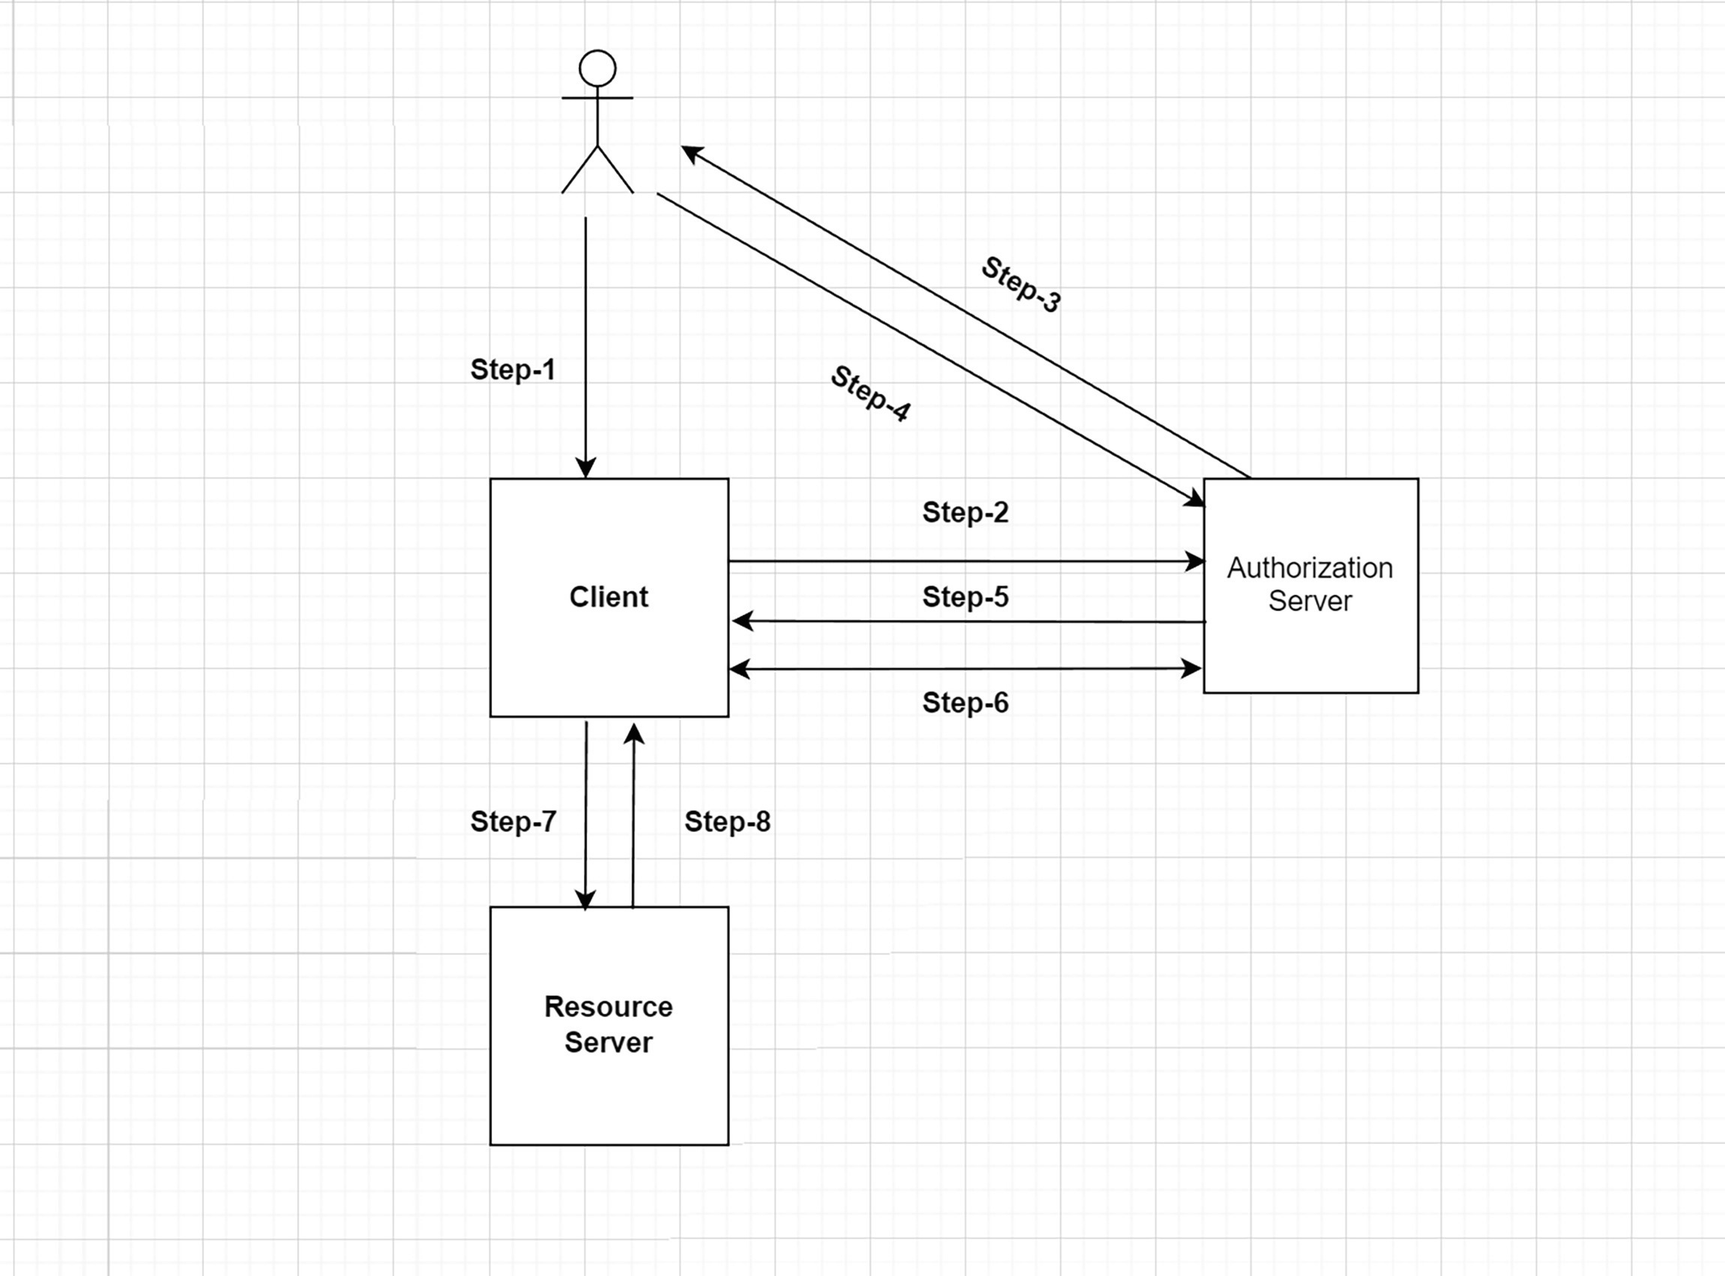
Let’s see how your fictional image editing application, discussed in the previous section, can access the user’s pictures using the Authorization Code grant type
.
1.
The user tries to access their Google/iCloud account from the image editing application.
2.
The client (the image editing application) redirects to a login page from the Authorization Server (Google/iCloud), along with a redirect URL.
3.
The user enters the credentials, and upon successful login, the Authorization Server asks the user for consent to allow the client to access the images.
4.
The user verifies the consent form and allows the client (the image editing application) to access the resource (the photos).
5.
The Authorization Server redirects the page to the client’s redirect URL from Step 2, along with an authorization code.
6.
The client exchanges the authorization code for an access token from the Authorization Server.
7.
The client requests the Resource Server for the images by sending an access token as part of the authorization header.
8.
The Resource Server (Google/iCloud image servers) verifies whether the access token is valid or not and returns the required response to the client.
An authorization code flow diagram indicates the authorization code for the access token. After the user returns to the client via the U R L, the application gets the authorization code.
Figure 12-4
Authorization code flow
The authorization code flow
is used when dealing with some kind of user interface where it’s possible to authenticate using a web browser. But in the case of REST APIs, this is not feasible because the client wants to authenticate silently without filling out any login form. For this reason, you can use the Client Credentials grant type.
Client Credentials
In this grant type, the client
will be first registered in the Authorization Server and get a client id and a client secret. Whenever the user wants to access the resource server
, this is what the process looks like:
1.
The user asks to fetch images from the Google/iCloud account.
2.
The client requests the Authorization Server with the provided client ID and client secret.
3.
The Authorization Server verifies the credentials, generates an access token, and sends it back to the client as a response.
4.
The client can now access the Resource Server by sending the access token as part of the authorization header.
5.
Lastly, the Resource Server verifies the token and returns the response to the client.
You can refer to Figure 12-5 to better understand the client credentials flow
.
A client credentials flow diagram indicates the client to the authorization server to the resource server back to the client.
Figure 12-5
Client credentials flow
As you can see, fewer steps are involved while using the Client Credentials grant flow
, as no manual user interaction is required.
Introduction to OIDC
OIDC
stands for OpenID Connect, a protocol developed on top of the OAuth2 protocol. It allows the client to verify the identity of the user. You can learn more about it at https://openid.net/connect/.
An access token
is used to verify if the particular user is authorized to access a given resource or not, but how do you know who is the user and the user details? For this reason, the Authorization Server will also issue an ID token using the OIDC protocol.
Introduction to Spring Authorization Server
Spring Team released a community-driven project called Spring Authorization Server
(https://spring.io/projects/spring-authorization-server). Instead of relying on third-party vendors or software, you can maintain your Authorization Server by using this project. Let’s see how to set this up in your Spring blog application.
Setting Up Spring Authorization Server
Create a new Spring Boot project from the website https://start.spring.io. You can name this project as auth-server and select the following dependencies:
Spring Web
Spring Security
Download the project to your machine and open it in your IDE.
After that, open the pom.xml file and add the following dependency to enable the Spring Authorization Server capabilities
:
Also, please note that at the time of writing this book, the Spring Authorization Server does not yet support Spring Boot version 3.0. Hence, you will use the Spring Boot Starter parent version 2.7.2 in your examples. The examples in the GitHub repository
will be updated when Spring Authorization Server supports Spring Boot 3.
Let’s also add the Spring Data JPA and h2 dependencies to manage the users in the Authorization Server.
Go ahead and define the default Security Configuration settings
for the Authorization Server to secure all the requests to your Spring Authorization Server.
This class defines a bean called defaultSecurityFilterChain(), which secures all the requests to your Spring Authorization Server by default. When the user wants to log in using the Authorization Server, it also provides a default form login page, as you saw at the beginning of this chapter.
To store the required user information in your Authorization Server, you need to define some domain classes to store the user data and the Spring Data JPA repositories to persist the data in the database, as shown in Listing 12-16.
The Userclass
is a simple Java class that extends the UserDetails interface and contains fields like userName, email, password, and role to store the user information. Let’s also create the UserRepsitory interface that extends the JpaRepository interface from Spring Data JPA.
@Repository
public interface UserRepository extends JpaRepository<User, Long> {
}
Now it’s time to add some sample user data to your database. Add the necessary code inside the main SpringBootApplication class:
@SpringBootApplication
public class AuthServerApplication implements CommandLineRunner {
private final UserRepository userRepository;
private final PasswordEncoder passwordEncoder;
public AuthServerApplication(UserRepository userRepository, PasswordEncoder passwordEncoder) {
By implementing the CommandLineRunner interface and overriding the run() method, you can seed your database with the sample data at the application startup.
Next, you need to update your Security Configuration class to look up the user information from the database whenever there is a login request with the user details. For this reason, you can create a bean called UserDetailsService inside the Security Configuration class to look up the user from the database by username.
.orElseThrow(() -> new IllegalArgumentException("Cannot find user with username - " + username));
}
Now it’s time to configure your Authorization Server. Create a new class called AuthServerConfiguration.java in a package called config, as shown in Listing 12-17.
As the name suggests, this class defines the complete configuration for your Authorization Server.
First, you create a bean of the type SecurityFilterChain that defines some default security configurations like securing all the requests to the Authorization Server and enabling different protocol endpoints.
The @Order annotation with HIGHEST_PRECEDENCE ensures that if any other beans of the type SecurityFilterChain are defined inside your application, this bean will be picked up by Spring Boot due to the highest precedence.
Next, you create a bean named RegisteredClientRepository that registers your Spring blog application client with clientId - springblog and clientSecret - secret.
The client authentication method is set as CLIENT_SECRET_POST because you will send the clientSecret as part of the POST method body.
This client can acquire an access token using an authorization code or a client credentials grant flow. If the token is expired, you can request a new token using the refresh token grant type instead of re-logging in. You can read more about the Refresh Token grant type at https://oauth.net/2/grant-types/refresh-token/
Next, you define the redirect URLs the authorization server can redirect to after the successful authorization. The redirect URLs are applicable while using the Authorization Code grant type.
You also define the scopes createBlogPost, updateBlogPost, and deleteBlogPost to define the actions your client can perform on the Post Resource.
You also enable the user consent screen for your Spring blog application client.
Since your authorization server generates JWT tokens
, you must define a JSON web key (JWK)
as a signing key. The jwkSource bean takes care of creating the necessary private and public key pairs and produces a JWK out of the key pair. The Authorization Server uses the private key to sign the token and the Resource Server uses the public key to verify the token.
And you define the Token Time To Live as 15 minutes using the tokenSettings bean. This means your token will be active for 15 minutes after the Authorization Server generates it.
Lastly, you define some properties in the application.propertiesfile
to change the default port of the authorization server to 9000 so that it won’t clash with your Spring blog application running at 8080.
server.port=9000
Now go ahead and run the AuthServerApplication class, open the browser, and go to URL http://localhost:9000.
You should see a simple login screen. Fill in the username and password you added into your database (admin/password) and you should see a 404 error page.
That’s fine because your Authorization Server is not exposing any endpoints or web pages by default.
Testing the Authorization Server Using Client Credentials
Go ahead and use the
Client Credentials grant flow
to request an access token
.
To understand which URL to call to request an access token, you can refer to the Discovery Document provided by the Spring Authorization Server. You can access this by opening the URL http://localhost:9000/.well-known/oauth-authorization-server. This URL is a standard URL implemented by all Authorization Servers compliant with the OAuth 2.0 Framework. You should see the following response when you open this URL:
Here you can see all the different endpoints exposed by your Authorization Server. Now let’s call the token_endpointhttp://localhost:9000/oauth2/token to receive an access token.
curl --location --request POST 'http://localhost:9000/oauth2/token'
You received an access token in the JWT format
(JSON web token), along with the scope you defined inside the AuthServerConfiguration class.
The token type is set as Bearer because usually the access token will be sent as part of the authorization HTTP header with the Bearer scheme.
Lastly, you have the expiration time as 300 seconds.
Now, if you open the website https://jwt.io and paste the JWT in the Encoded section (please note that you are doing this only for educational purposes; do not paste your access tokens anywhere for security reasons), you will see details about the client, like the clientId - springblog, the scope of the client, the issuer of the token, and the token’s expiration time, as shown in Figure 12-6.
A window depicts the encoded and decoded regulations for the functionality of the J W T information.
Figure 12-6
JWT information
Configuring the Resource Server
Alright, you configured the Authorization Server successfully. Now let’s go ahead and set up the Resource Server
: the Spring Blog REST API you developed in Chapter 11.
First, add the following dependency in the pom.xml file to enable the Resource Server capabilities in your REST API:
As you learned, the Resource Server contacts the Authorization Server to verify whether the access token is valid. For this reason, you need to define the URL of the Authorization Server inside the Resource Server. You can do that using the property spring.security.oauth2.resourceserver.jwt.jwk-set-uri.
Inside the application.properties file, define the following property:
This is the JWKS
(JSON web key set) URL of the Authorization Server, which contains the information about the keypair used to sign the access token.
Spring Security will read this information during the application startup to set up the required JWKS to verify the incoming access token.
The JWK Set URL is exposed as part of the discovery document http://localhost:9000/.well-known/oauth-authorization-server.
{
.....
jwks_uri": "http://localhost:9000/oauth2/jwks",
....
}
Lastly, you need to configure your Spring Blog REST API as a Resource Server. For that, let’s create a class called SecurityConfig inside a package called config.
You enable the Resource Server capabilities for your Spring blog application by calling the oauth2ResourceServer() method, which will read the incoming JWT, decode it, and verify it with the Authorization Server.
Now start the Spring blog application and test your implementation.
First, try to access the listAllPosts() endpoint at http://localhost:8080/api/posts.
curl --location --request GET 'http://localhost:8080/api/posts'
You will get a 401 UnAuthorized Error, which means your Spring blog application is secured, which is good.
Now try to access the same endpoint using an access token. First, try to acquire a new access token from your Authorization Server.
curl --location --request POST 'http://localhost:9000/oauth2/token'
You should get the access token as a response from the Auth Server, copy the token, and make a call to the listAllPosts() endpoint again using the following command:
curl --location --request GET 'http://localhost:8080/api/posts'
Replace the text <your-auth-token> with the actual access token. Now you should see the response from the server for the listAllPosts() endpoint.
Testing the Authorization Server Using the Authorization Code Flow
In the previous sections, you learned how to request an access token from the Auth Server using the client credentials flow. Now, let’s understand how to use the Authorization Code Flow grant type
to request an access token. Let’s configure your Spring blog application developed using Spring MVC and Thymeleaf as the client to request an access token from the Auth Server.
Add the following dependency in the pom.xml to enable Spring OAuth2 Client capabilities in your Spring MVC blog web application:
This configuration ensures that all requests to your application are secured. You enable the OAuth2 client capabilities in your application using the oauth2Client()method
.
The auth2Login.loginPage("/oauth2/authorization/springblog") method will redirect to the login page of the Auth Server whenever an unauthenticated user tries to access your application.
And, lastly, you define the client properties inside the application.properties file like so:
These properties registers an OAuth2 Client called springblog with details like client-id, client-secret, authorization-grant-type, redirect-uri, and scope.
These are the same values you defined inside the Authorization Server.
Since you want to test the authorization code flow
using this client, you defined the authorization-grant-type field as authorization_code. That’s all you need to do to enable the OAuth2 Client capabilities. If you start the application and go to http://localhost:8080, you should see the login page shown in Figure 12-7, which is coming from the Authorization Server.
A window depicts the local host for the page for signing in provided by the authorization server.
Figure 12-7
Login page from the Authorization Server
Once you log in using the sample user created in the Auth Server (admin/password), the page will be redirected to Consent screen, shown in Figure 12-6, where the server will ask you to review the permissions for the client and submit your approval.
You can select the permissions you want to grant the client and click the Submit Consent button, and after that you should be able to see the list of blog posts in your Spring blog application, as shown in Figure 12-8.
A window depicts the selection of the permissions to grant to the client, followed by clicking the button labeled submit consent.
Figure 12-8
Consent page from the Authorization Server
Summary
This chapter explored how to secure traditional web applications built with SpringMVC and Thymeleaf using the Spring Security starter. Then you learned more about how to secure your Spring Boot application using OAuth2. You learned how to secure the REST APIs using the Client Credentials grant flow and the web applications using the Authorization Code grant flow.
In the next chapter, you will learn about Spring Boot Actuator.