So far, you have worked exclusively with tables by using Data Manipulation Language (DML) statements. You have learned to manipulate data by inserting new rows and updating or deleting existing rows. You can use many other objects in a SQL Server database to make your database applications more efficient and secure. You have also used control flow language. This chapter teaches you how to add restrictions to tables and to create other objects that help to enforce key business rules. In this chapter, you will learn about Data Definition Language (DDL) statements and constraints on tables, views, stored procedures, user-defined functions, and user-defined types. Because SQL Server provides so many choices for creating these objects, this chapter doesn’t attempt to explore every possible option. The chapter does, however, provide enough detail to teach you most of what you will encounter on your journey to becoming an expert T-SQL developer.
Tables
SQL Server and other database systems store data in tables. You have learned how to retrieve data from tables as well as how to insert, update, and delete data. Specifically, you learned how to create temporary tables in Chapter 12 and how to create tables using the SELECT INTO and CREATE TABLE syntax in Chapter 10. You have already started to define business rules when you chose a data type and nullability. You can enforce even more business rules based on the constraints you can add to the table definition.
As a beginner T-SQL developer, you will most likely write T-SQL code against a database already in place, possibly from a software vendor or one created by a design team using data modeling software to create the tables. Although your job description may not include writing scripts to create tables, you do need to understand how the table definition controls the data you can insert into a table and how you can update the data. This section covers many options available when creating or altering tables such as computed columns, primary keys, foreign keys, and other constraints. The point of this section is not to encourage you to memorize how to add keys and constraints but rather to give you an understanding of the implications of having them in place.
Tip
You can script the commands to create existing tables and other objects in the database. This is a great way to learn the syntax. To script the definition, right-click the object and select “Script as create.”
Adding Check Constraints to a Table
As you already know, each column in a table must have a specific data type and usually a maximum size that controls what data can be inserted or updated and whether a column may contain NULLs. For example, you can’t add a nonnumeric string to an INT column. It is also possible to further control what data you can add by defining check constraints. For example, you may want to restrict the values of a column to a particular range of values.
Note
The NULL and NOT NULL options are also commonly referred to as constraints.
Here is the syntax to add a check constraint to a table when creating the table and later with an ALTER TABLE command:
ALTER TABLE <table name> ADD CONSTRAINT <constraint name> CHECK (<condition>)
The condition looks much like the criteria in a WHERE clause. If you try to insert or update data that would return false, the change will not succeed. Although the constraint name is optional, the name will appear in any error messages when the constraint is violated, therefore helping you troubleshoot. Type in and execute the code in Listing 13-1 to learn how to add a constraint.
CHECK (col2 IN ('January','February','March','April','May',
'June','July','August','September','October',
'November','December')
)
);
--3
ALTER TABLE table1 ADD CONSTRAINT ch_table1_col1
CHECK (col1 BETWEEN 1 and 12);
PRINT 'Jan';
--4
INSERT INTO table1 (col1,col2)
VALUES (1,'Jan');
PRINT 'February';
--5
INSERT INTO table1 (col1,col2)
VALUES (2,'February');
PRINT 13;
--6
INSERT INTO table1 (col1,col2)
VALUES (13,'March');
PRINT 'Change 2 to 20';
--7
UPDATE table1 SET col1 = 20;
Listing 13-1
Adding a Check Constraint
Figure 13-1 shows the results of running this code. Statement 1 drops the table in case it already exists. Statement 2 creates table1 along with a constraint specifying that the exact months of the year may be entered into col2. Statement 3 adds another constraint to the table, specifying values for col1. Statements 4 to 6 insert new rows into table1. Only Statement 5 succeeds because the values in Statements 4 and 6 each violate one of the constraints. If the constraints had not been added to the table, these inserts would have worked. Statement 7 attempts to update the one successful row with an invalid col1. You can see all the error messages in Figure 13-1.
Figure 13-1
The results of attempting to violate check constraints
Adding UNIQUE Constraints
You can specify that a column or columns in a table contain unique values. Unlike primary keys, which you will learn more about in the next section, unique columns may contain one NULL. In the case of multiple columns, you must decide whether to have a constraint on each column or a constraint that covers several columns. In the first case, each column value must be unique; in the second case, the combination of the column values must be unique. You can add UNIQUE constraints to tables when you create them or later with an ALTER TABLE statement. Here is the syntax:
--Adding a unique constraints to individual columns
ALTER TABLE ADD CONSTRAINT <constraint name> UNIQUE (<col1>,<col2>)
The first syntax example creates a separate constraint on each column within the CREATE TABLE statement, but SQL Server will come up with the constraint names. The second example shows the same thing except that constraints are named. The other two examples each create one constraint on a combination of the columns. If you don’t specify a constraint name, SQL Server will come up with a name for you. Listing 13-2 contains example code showing how to create UNIQUE constraints. Type in and execute the code to learn more.
USE tempdb;
GO
--1
DROP TABLE IF EXISTS table1;
--2
CREATE TABLE table1 (col1 INT NULL UNIQUE,
col2 VARCHAR(20) NULL, col3 DATE NULL);
GO
--3
ALTER TABLE table1 ADD CONSTRAINT
unq_table1_col2_col3 UNIQUE (col2,col3);
--4
PRINT 'Statement 4'
INSERT INTO table1(col1,col2,col3)
VALUES (1,2,'2020/01/01'),(2,2,'2020/01/02');
--5
PRINT 'Statement 5'
INSERT INTO table1(col1,col2,col3)
VALUES (3,2,'2020/01/01');
--6
PRINT 'Statement 6'
INSERT INTO table1(col1,col2,col3)
VALUES (1,2,'2020/01/01');
--7
PRINT 'Statement 7'
UPDATE table1 SET col3 = '2020/01/01'
WHERE col1 = 1;
Listing 13-2
Creating Tables with UNIQUE Constraints
Figure 13-2 shows the results. Code section 1 drops the table in case it already exists. Statement 2 creates table1 with three columns. It creates a UNIQUE constraint on col1. Statement 3 adds another UNIQUE constraint on the combination of columns col2 and col3. Statement 4 adds two rows to the table successfully. Statement 5 violates the constraint on col2 and col3. Statement 6 violates the constraint on col1. Statement 7 violates the constraint on col2 and col3 with an UPDATE to the table. Notice in the figure that the name of the constraint violated by Statement 7 is not as helpful in figuring out what went wrong.
Figure 13-2
The results of adding UNIQUE constraints
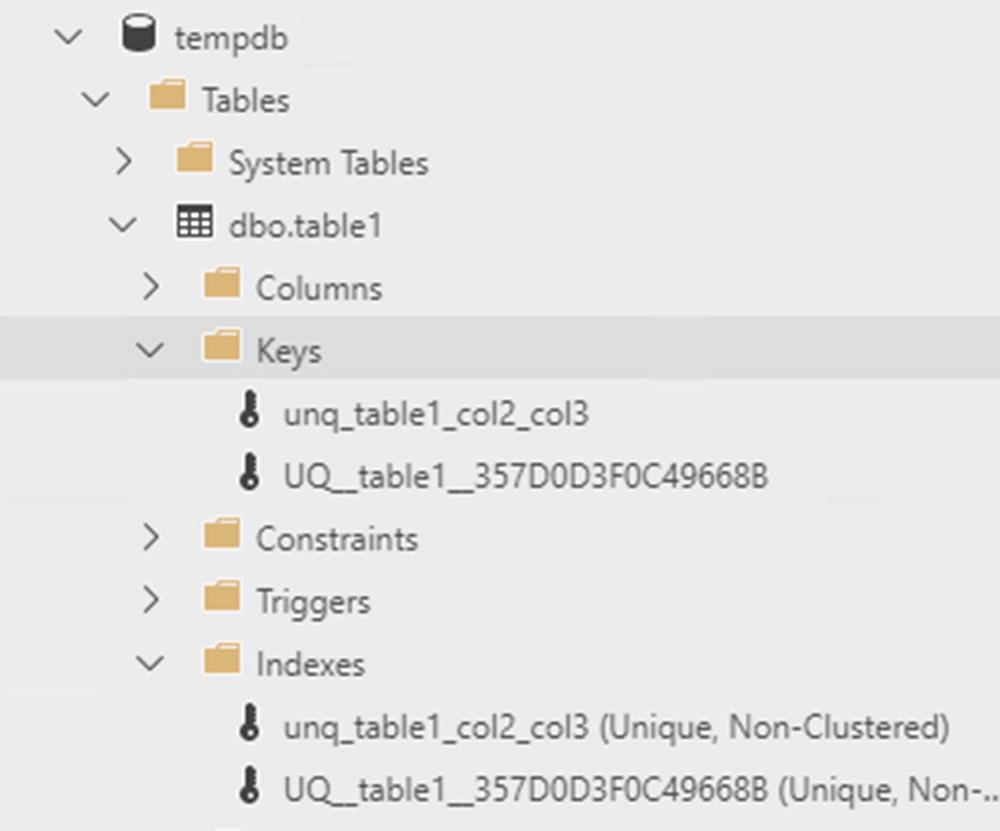
Another interesting thing about UNIQUE constraints is that you will not see them in the Constraints section in Azure Data Studio. Instead, you will find them in the Indexes and Keys sections. When creating a unique constraint, you are actually creating a unique index. Figure 13-3 shows the constraints, as indexes and keys, added to table1.
Figure 13-3
The unique constraints defined on table1 are indexes and keys
Adding a Primary Key to a Table
Throughout this book, you have read about primary keys. You can use a primary key to uniquely define a row in a table. A primary key must have the following characteristics:
A primary key may be made of one column or multiple columns, called a composite key.
A table can have only one primary key.
The values of a primary key must be unique.
If the primary key is a composite key, the combination of the values must be unique.
None of the columns making up a primary key can contain NULLs.
I once received a call from a developer asking me to remove the primary key from a table because it was preventing him from inserting rows into a table in one of our enterprise systems. He insisted that the table definition must be wrong. I spent ten minutes explaining that the primary key was preventing him from making a mistake and helped him figure out the correct statements. After this developer moved on to another company, I received almost the identical phone call from his replacement. Primary keys and other constraints are there to ensure data consistency, not to make your job harder.
You can add a primary key to a table when you create the table using the CREATE TABLE statement or later by using the ALTER TABLE statement. Like other constraints, explicitly naming the constraint will help you read error messages. Here is the syntax:
CREATE TABLE <table name>(<column1> <data type> NOT NULL,
<column2> <data type>)
ALTER TABLE <table name> ADD CONSTRAINT <primary key name>
PRIMARY KEY [CLUSTERED|NONCLUSTERED] (<column1>)
By default, when creating a primary key, the index created will be clustered unless another clustered index exists on the table. See Chapter 2 to learn more about indexes.
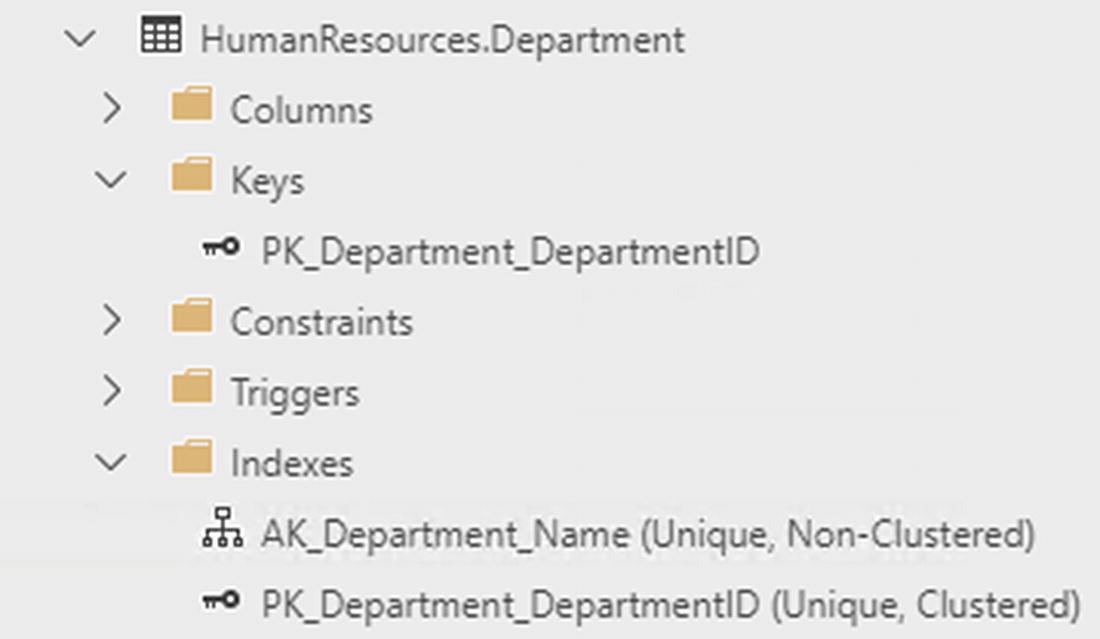
Take a look at the keys and indexes of the HumanResources.Department table in the AdventureWorks2019 database (see Figure 13-4). When you create a primary key, the database engine automatically creates an index composed of that key. One of the indexes, PK_Department_DepartmentID, is also the primary key composed of the DepartmentID column. There is also a unique index on the department name column. Whether you create a unique index or create a unique constraint, the end result is a unique index.
Figure 13-4
The indexes of the HumanResources.Department table
Listing 13-3 contains some examples that create tables with primary keys, either during the CREATE command or later with the ALTER command. Type in and execute the code to learn more.
USE tempdb;
GO
--1
DROP TABLE IF EXISTS table1;
DROP TABLE IF EXISTS table3;
--2
CREATE TABLE table1 (col1 INT NOT NULL,
col2 VARCHAR(10)
CONSTRAINT PK_table1_Col1 PRIMARY KEY (col1));
--3
CREATE TABLE table2 (col1 INT NOT NULL,
col2 VARCHAR(10) NOT NULL, col3 INT NULL,
CONSTRAINT PK_table2_col1col2 PRIMARY KEY
(col1, col2)
);
--4
CREATE TABLE table3 (col1 INT NOT NULL,
col2 VARCHAR(10) NOT NULL, col3 INT NULL);
--5
ALTER TABLE table3 ADD CONSTRAINT PK_table3_col1col2
PRIMARY KEY NONCLUSTERED (col1,col2);
Listing 13-3
Creating Primary Keys
Figure 13-5 shows the resulting tables. Code section 1 drops the tables if they already exist in the database. Statement 2 creates table1 with a primary key made of col1. The code doesn’t contain the optional keyword CLUSTERED. The keyword CLUSTERED specifies that the primary key is also a clustered index. (See Chapter 2 for more information about clustered and nonclustered indexes.) By default, if no clustered index already exists on the table, as in this case, the primary key will become a clustered index.
Figure 13-5
The tables created with primary keys
Statement 3 creates table2 with a composite primary key composed of col1 and col2. You actually don’t have to specify NOT NULL when defining the primary key, because SQL Server will change the primary key columns to NOT NULL for you. I prefer to specify the NOT NULL constraint in the CREATE TABLE statement for clarity, especially if I am saving the script. Again, because there is no other clustered index, the primary key will also be a clustered index on table2.
Statement 4 creates table3 without specifying a primary key. Statement 5, an ALTER TABLE statement, adds the primary key, in this case a nonclustered index. The primary key is frequently a clustered index, but that is not a requirement. You will often see the clustered index composed of a smaller column, such as an INT column, if the primary key contains several large columns. The reason is that the clustered index is automatically part of every other index, so having a “narrow” clustered index saves space in the database. Keep in mind the wider the index, the more reads SQL Server will need to perform to retrieve the data, and this can have a negative impact on performance.
Creating Foreign Keys
You have seen how to join tables on the primary key of one table to the foreign key of another table beginning with Chapter 5. Having foreign keys defined on tables is not a requirement to join tables but, in addition to performance implications, explicitly defined foreign keys can help enforce what is called referential integrity. Referential integrity means that data consistency between tables is maintained. For example, no orders may exist without a valid customer for that order.
Just like primary keys, you can define a foreign key within the CREATE TABLE command or later in an ALTER TABLE statement. Here is the syntax for creating simple foreign keys:
The foreign key refers to or points to the table specified after the keyword REFERENCES. For example, if you were defining the foreign key on the orders table, table2 would be the customers table. The column or columns specified after the referenced table generally will be the primary key of that table. If the column or columns referred to are not the primary key, they must have a unique index defined on the column. Type in and execute Listing 13-4, which shows a simple example.
Figure 13-6 shows the results of adding the foreign key and then violating it. Code section 1 drops table1 and table2 if they exist. Notice that the code drops table2 first. If the drop statements are reversed and you run the code multiple times, it will fail. Note that table1 may not be dropped while the foreign key pointing to it exists. To eliminate this problem, drop table2 first. You can also drop foreign keys by using the ALTER TABLE statement, but if you are dropping tables, be sure to drop the referencing table first.
Figure 13-6
The results of adding a foreign key
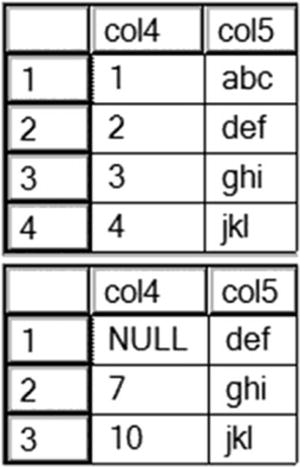
Statement 2 creates table1. Statement 3 creates table2 with the foreign key. Statement 4 adds three rows to table1. Statement 5 inserts two valid rows to table2. Any value for col4 must already exist in col1 of table1. Statement 6 attempts to insert a row with the value 7. Because the value 7 doesn’t exist in col1 of table1, the statement fails. Statement 7 attempts to update an existing row with an invalid value. The statement fails because the value, 6, doesn’t exist in col1 of table1.
Creating Foreign Keys with Delete and Update Rules
You saw in the previous section that foreign keys ensure that only valid values from the referenced table are used. For example, if you have an order table, only valid CustomerID values from the customer table may be used. You can also define what should happen if a customer with orders is deleted from the database. Will all orders also be deleted at the same time? Should SQL Server prevent the customer from being deleted? What about changing the CustomerID in the customer table? Will that change also change the CustomerID in the order table or prevent the change? You can define all that behavior within the foreign key definition. A rule may be set up for deletions and for updates. Here are the possible values:
NO ACTION: Prevents the deletion or update and rolls back the transaction.
CASCADE: Applies the same action to the foreign key table.
SET NULL: Sets the value of the foreign key columns to NULL.
SET DEFAULT: Sets the value of the foreign key columns to the default values or NULL if no default is defined.
Here is the syntax for creating foreign keys with update and delete rules:
By default, the NO ACTION option applies if no rule is defined. In this case, if you attempt to delete a customer who has placed one or more orders, SQL Server will return an error message and roll back the transaction. To use SET NULL, the columns making up the foreign key must allow NULL values. The other requirement is that the default value must be a valid value that satisfies the foreign key. The example in Listing 13-5 is fairly long. You may want to download the code from the book’s website at www.apress.com instead of typing it. Execute the code in Listing 13-5 to learn how these rules work.
USE tempdb;
GO
SET NOCOUNT ON;
GO
--1
DROP TABLE IF EXISTS Child;
DROP TABLE IF EXISTS Parent;
--2
CREATE TABLE Parent (col1 INT NOT NULL PRIMARY KEY,
ALTER TABLE Child DROP CONSTRAINT fk_Child_Parent;
--9
PRINT 'Add CASCADE';
ALTER TABLE Child ADD CONSTRAINT fk_Child_Parent
FOREIGN KEY (col4) REFERENCES Parent(col1)
ON DELETE CASCADE
ON UPDATE CASCADE;
--10
PRINT 'Delete from Parent';
DELETE FROM Parent WHERE col1 = 1;
--11
PRINT 'Update Parent';
UPDATE Parent SET col1 = 10 WHERE col1 = 4;
--12
ALTER TABLE Child DROP CONSTRAINT fk_Child_Parent;
--13
PRINT 'Add SET NULL';
ALTER TABLE Child ADD CONSTRAINT fk_Child_Parent
FOREIGN KEY (col4) REFERENCES Parent(col1)
ON DELETE SET NULL
ON UPDATE SET NULL;
--14
DELETE FROM Parent WHERE col1 = 2;
--15
ALTER TABLE Child DROP CONSTRAINT fk_Child_Parent;
--16
PRINT 'Add SET DEFAULT';
ALTER TABLE Child ADD CONSTRAINT fk_Child_Parent
FOREIGN KEY (col4) REFERENCES Parent(col1)
ON DELETE SET DEFAULT
ON UPDATE SET DEFAULT;
--17
PRINT 'Delete from Parent';
DELETE FROM Parent WHERE col1 = 3;
--18
SELECT col4, col5 FROM Child;
Listing 13-5
Using Update and Delete Rules
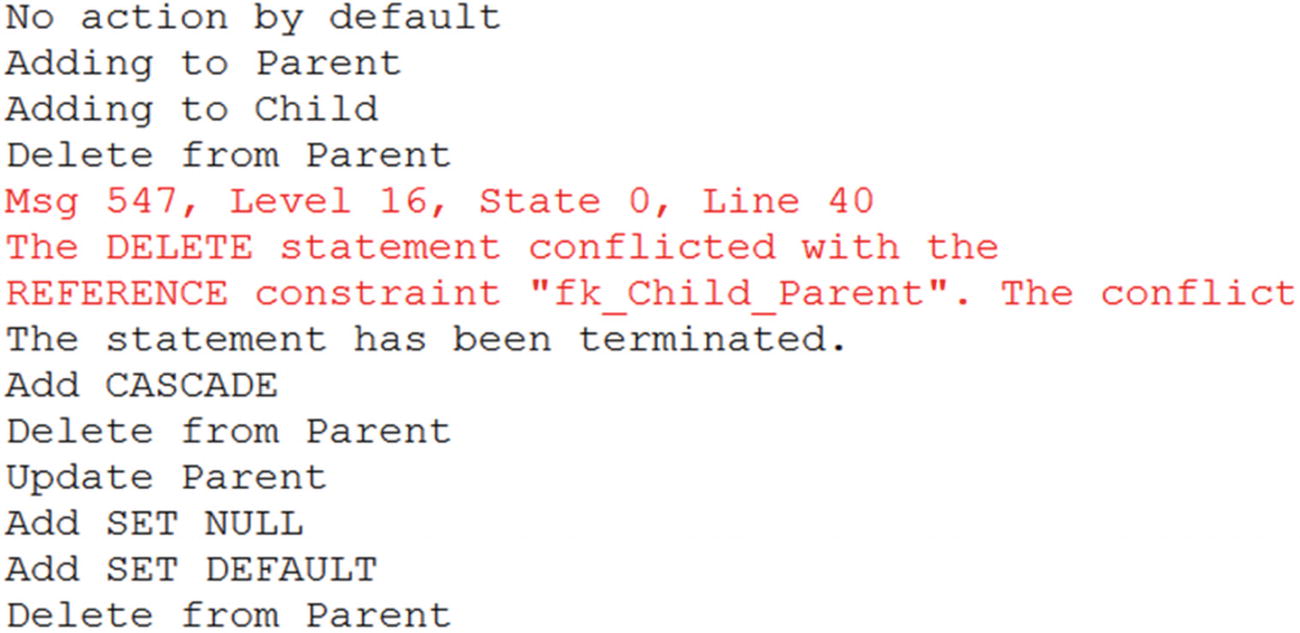
Figure 13-7 shows the information and error messages that result from running the script. Code section 1 drops the Parent and Child tables if they exist. Statement 2 creates Parent. Statement 3 creates Child with a foreign key referencing Parent with the default NO ACTION rules. In my experience, most of the time, the default NO ACTION is in effect, which prevents updates and deletions from the referenced table, as in Statement 3. Statements 4 and 5 add a few rows to the tables. Statement 7 deletes a row from Parent. Because that deletion violates the foreign key rules, the statement rolls back and produces an error.
Figure 13-7
The results of applying foreign key rules
Statement 8 drops the foreign key constraint so that Statement 9 can re-create the foreign key with the CASCADE options. Statement 10, which deletes the row from Parent with col1 equal to 1, succeeds. The CASCADE rule also automatically deletes the matching row from Child. (Figure 13-8 shows how Child looks after population and at the end of the script.) Statement 11 changes the value of col1 in Parent to 10 where the value is equal to 4. The CASCADE rule automatically updates the matching row in Child.
Figure 13-8
The results of changes based on foreign key options
Statement 12 drops the foreign key constraint so that Statement 13 can re-create the foreign key with the SET NULL option. Statement 14 deletes a row from Parent. The SET NULL rule automatically changes the matching value in Child to NULL.
Statement 15 drops the foreign key constraint so that Statement 16 can re-create the foreign key with the SET DEFAULT option. Statement 17 deletes a row from Parent. The SET DEFAULT rule automatically changes the matching value in Child to the default value 7. Finally, Statement 18 displays the rows after all the automatic changes. Review the script again. Except for the INSERT statement, the script contains no other explicit changes to the data in the Child table. The rule in effect at the time of each data change to Parent automatically made changes to the data in Child.
Defining Automatically Populated Columns
You have seen automatically populated columns used in the “Inserting Rows into Tables with Automatically Populating Columns” section in Chapter 10. This section will show you how to define IDENTITY columns, ROWVERSION columns, COMPUTED columns, and columns with DEFAULT values. Here are the syntax examples:
--IDENTITY
CREATE TABLE <table name> (<col1> INT NOT NULL IDENTITY[(<seed>,<increment>)],
CREATE TABLE <table name> (<col1> <data type> DEFAULT <default value or function>)
Several rules apply to using these column types. Review the following to learn more.
The rules for IDENTITY columns are
A table may contain only one IDENTITY column.
By default, IDENTITY columns begin with the value 1 and increment by 1.
You can specify different values by specifying seed and increment values.
You may not insert values into IDENTITY columns unless the IDENTITY_INSERT setting is turned on for a particular table in the current session.
The rules for ROWVERSION data type are
The ROWVERSION value will be unique within the database.
A table may contain only one ROWVERSION column.
You may not insert values into ROWVERSION columns.
Each time you update the row, the ROWVERSION value changes.
The rules for COMPUTED columns are
A table may contain multiple COMPUTED columns.
Do not specify a data type for COMPUTED columns.
You may not insert values into COMPUTED columns.
By specifying the option PERSISTED, the database engine stores the value in the table.
You can define indexes on deterministic COMPUTED columns.
You can specify other non-COMPUTED columns, literal values, and scalar functions in the COMPUTED column definition.
The rules for DEFAULT columns are
When inserting rows, you do not need to specify a value for a column with a DEFAULT value defined.
You can use expressions with literal values and scalar functions, but not other column names with DEFAULT value columns.
When inserting rows, if a value is specified for a column with a DEFAULT, the specified value applies.
If a column with a DEFAULT value specified allows NULLs, you can still specify NULL for the column.
You can use the new SEQUENCE object and the NEXT VALUE FOR function as a default to insert incrementing values.
Note
Although a sequence does enable you to autopopulate values in a table, it is a database object and is not dependent upon the table. You create SEQUENCE objects apart from tables and reference them in your INSERT statements or use them as a default value.
Listing 13-6 demonstrates creating and populating tables with these automatically populating columns. Type in and execute the code to learn more.
Defining Tables with Automatically Populating Columns
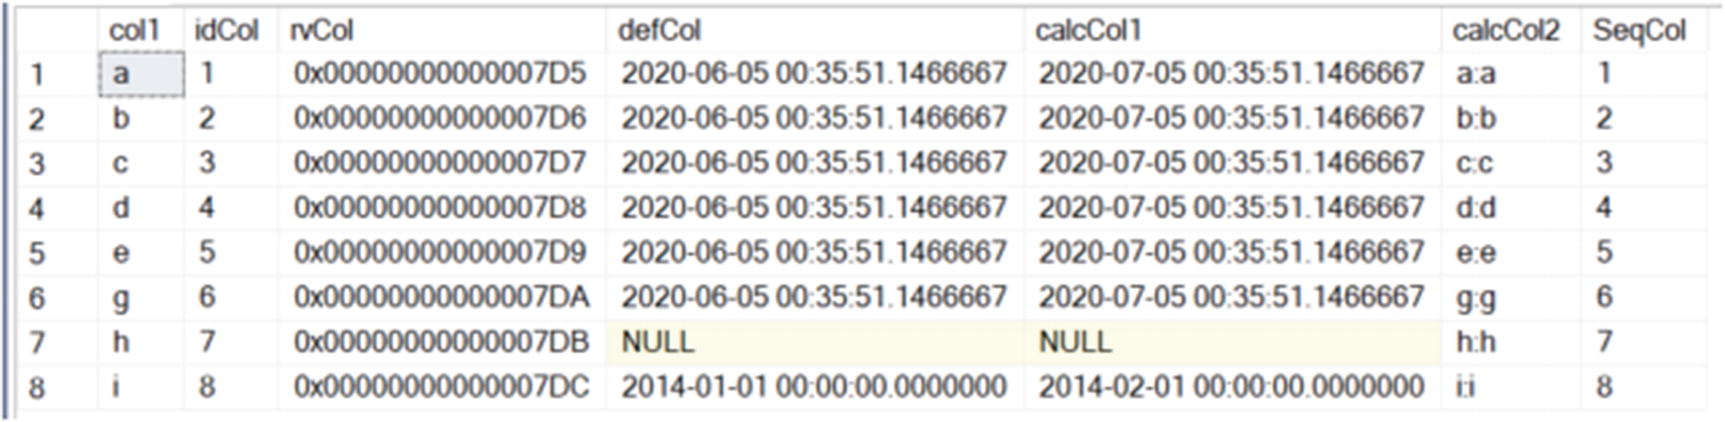
Figure 13-9 shows the results of running this code. Statement 1 drops and creates the sequence object. Statement 2 drops and creates table3 with one regular column, col1, and several other columns that may be automatically populated. Statement 3 inserts several rows into table3, specifying values only for col1. Statement 4 inserts two more rows, specifying values for col1 and the column with a DEFAULT value, defCol. Notice that the first row inserted in Statement 4 specifies NULL for defCol. Statement 5 just returns the results.
Figure 13-9
The results of populating a table with automatically populating columns
If you run the script more than once, you will see that the ROWVERSION column, rvCol, contains different values each time. Notice, also, that in the row where col1 equals h, both devCol and calcCol1 also contain NULL. That is because Statement 4 explicitly inserted a NULL into defCol. Because the value for calcCol1 is based on defCol and any operation on NULL returns NULL, calcCol1 also contains a NULL in that row. Statement 4 inserts a row with another explicit value for defCol, and calcCol1 reflects that as well.
Even though the main purpose of database tables is to store data, you can enforce many business rules by the table definition. Practice what you have learned by completing Exercise 13-1.
EXERCISE 13-1
Use the tempdb database to complete this exercise. You can find the solutions at the end of the chapter.
1.
Create a table called dbo.testCustomer. Include a CustomerID that is an identity column primary key. Include FirstName and LastName columns. Include an Age column with a check constraint specifying that the value must be less than 120. Include an Active column that is one character with a default of Y and allows only Y or N. Add some rows to the table.
2.
Create a table called dbo.testOrder. Include a CustomerID column that is a foreign key pointing to dbo.testCustomer. Include an OrderID column that is an identity column primary key. Include an OrderDate column that defaults to the current date and time. Include a ROWVERSION column. Add some rows to the table.
3.
Create a table called dbo.testOrderDetail. Include an OrderID column that is a foreign key pointing to dbo.testOrder. Include an integer ItemID column, a Price column, and a Qty column. The primary key should be a composite key composed of OrderID and ItemID. Create a computed column called LineItemTotal that multiplies Price times Qty. Add some rows to the table.
4.
It’s possible to create a table with defaults defined for all columns. To insert a row in that table, you can use the keywords DEFAULT VALUES instead of a SELECT statement or row constructor (VALUES list). Create a table called #AllDefaults with three columns, an IDENTITY called ID, a column called ANumber with the default 1, and a column called TheDate with the default of the current date. Insert a row into the table.
Views
SQL Server stores data in tables, but you can create objects, called views, that you query just like tables. Views don’t store data; they are just saved query definitions. Developers can use views to simplify coding. Another reason to use views is security. You can give the end user permission to select from a view without giving permission to the underlying tables.
In the AdventureWorks2019 database, the Person.Person table defines the attributes of a person for several other tables. You could create views to join the Person.Person table to the other tables so that you would always have the name columns available, therefore simplifying queries for reports.
You can also simplify security by using views. You can give a user permission to select data from a view when the user doesn’t have permission to select data from the tables comprising the view. This keeps users from seeing or modifying data they should not access.
Note
An indexed view, also known as a materialized view, actually does contain data. To create an indexed view, add a clustered index to the view. See SQL Server’s documentation for more information about creating and using indexed views.
Creating Views
Creating views is easy. You can create views using most SELECT statements, including those made with common table expressions. For example, you might want to create a view that lists all the customers in the Sales.Customer table from the AdventureWorks2019 database along with their names from the Person.Person table. You could use that view instead of the Sales.Customer table in other queries. Here is the syntax to create, alter, and drop views:
CREATE VIEW <view name> AS SELECT <col1>, <col2> FROM <table>
ALTER VIEW <view name> AS SELECT <col1>, <col2> FROM <table>
DROP VIEW <view name>
Type in and execute the code in Listing 13-7 to learn how to create and use views.
--1
USE AdventureWorks2019;
GO
DROP VIEW IF EXISTS dbo.vw_Customer;
GO
--2
CREATE VIEW dbo.vw_Customer AS
SELECT c.CustomerID, c.AccountNumber, c.StoreID,
c.TerritoryID, p.FirstName, p.MiddleName,
p.LastName
FROM Sales.Customer AS c
INNER JOIN Person.Person AS p ON c.PersonID = p.BusinessEntityID;
GO
--3
SELECT CustomerID,AccountNumber,FirstName,
MiddleName, LastName
FROM dbo.vw_Customer;
GO
--4
ALTER VIEW dbo.vw_Customer AS
SELECT c.CustomerID,c.AccountNumber,c.StoreID,
c.TerritoryID, p.FirstName,p.MiddleName,
p.LastName, p.Title
FROM Sales.Customer AS c
INNER JOIN Person.Person AS p ON c.PersonID = p.BusinessEntityID;
GO
--5
SELECT CustomerID,AccountNumber,FirstName,
MiddleName, LastName, Title
FROM dbo.vw_Customer
ORDER BY CustomerID;
Listing 13-7
Creating and Using a View
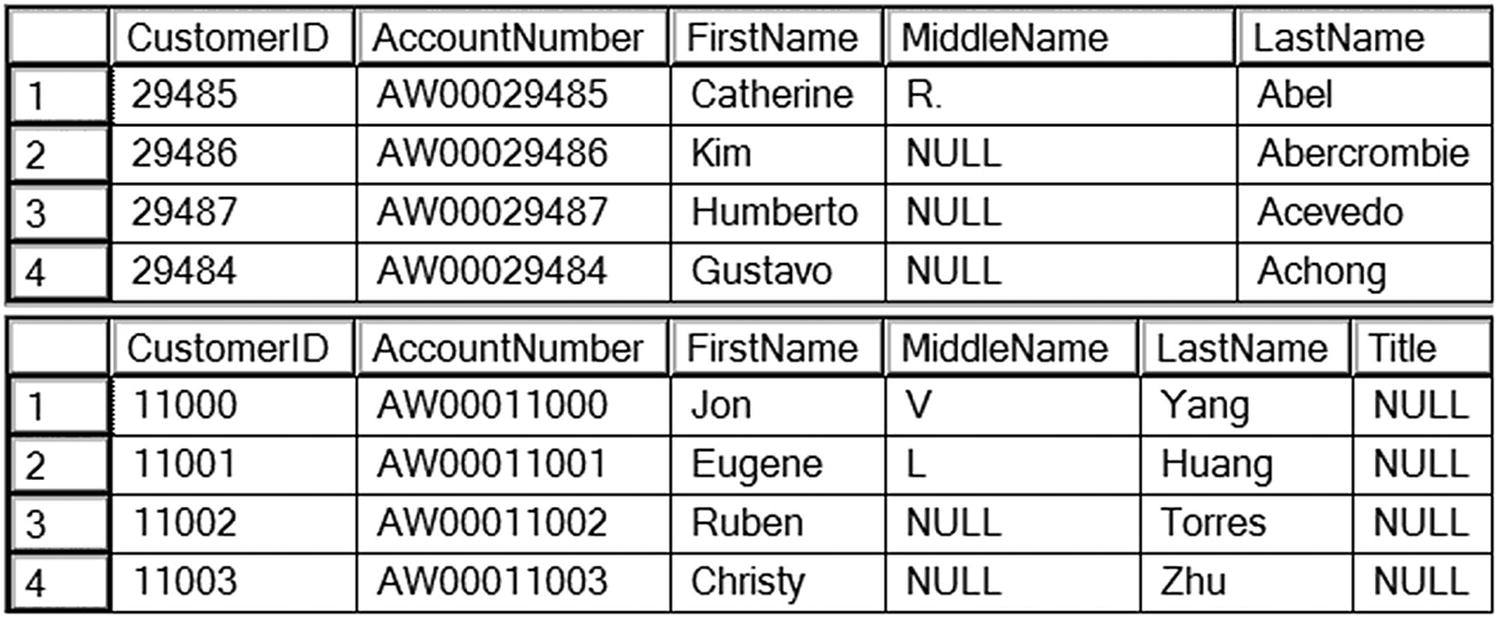
Figure 13-10 shows the results of running this code. Statement 1 drops the view if it already exists. Code section 2 creates the view. Notice that the GO statements surround the CREATE VIEW code so that it has its own batch. Any time you create or alter a view, the code must be contained within a batch that has no other code except for comments. Notice that the view begins with the characters vw_, designating that it is a view, not a table. This is not a requirement, just a suggestion. Often companies will have naming conventions such as this; be sure to find out whether your company requires special naming for views. Statement 3 selects several of the columns from the view. You can treat the view like a table, and the query could include a WHERE clause and an ORDER BY clause, or involve the view in an aggregate query if you wanted. Basically, you can treat the view like a table in a SELECT statement. Statement 4 alters the view by adding a column. Statement 5 is another SELECT statement, which includes the new column and an ORDER BY clause.
Figure 13-10
The results of creating and using a view
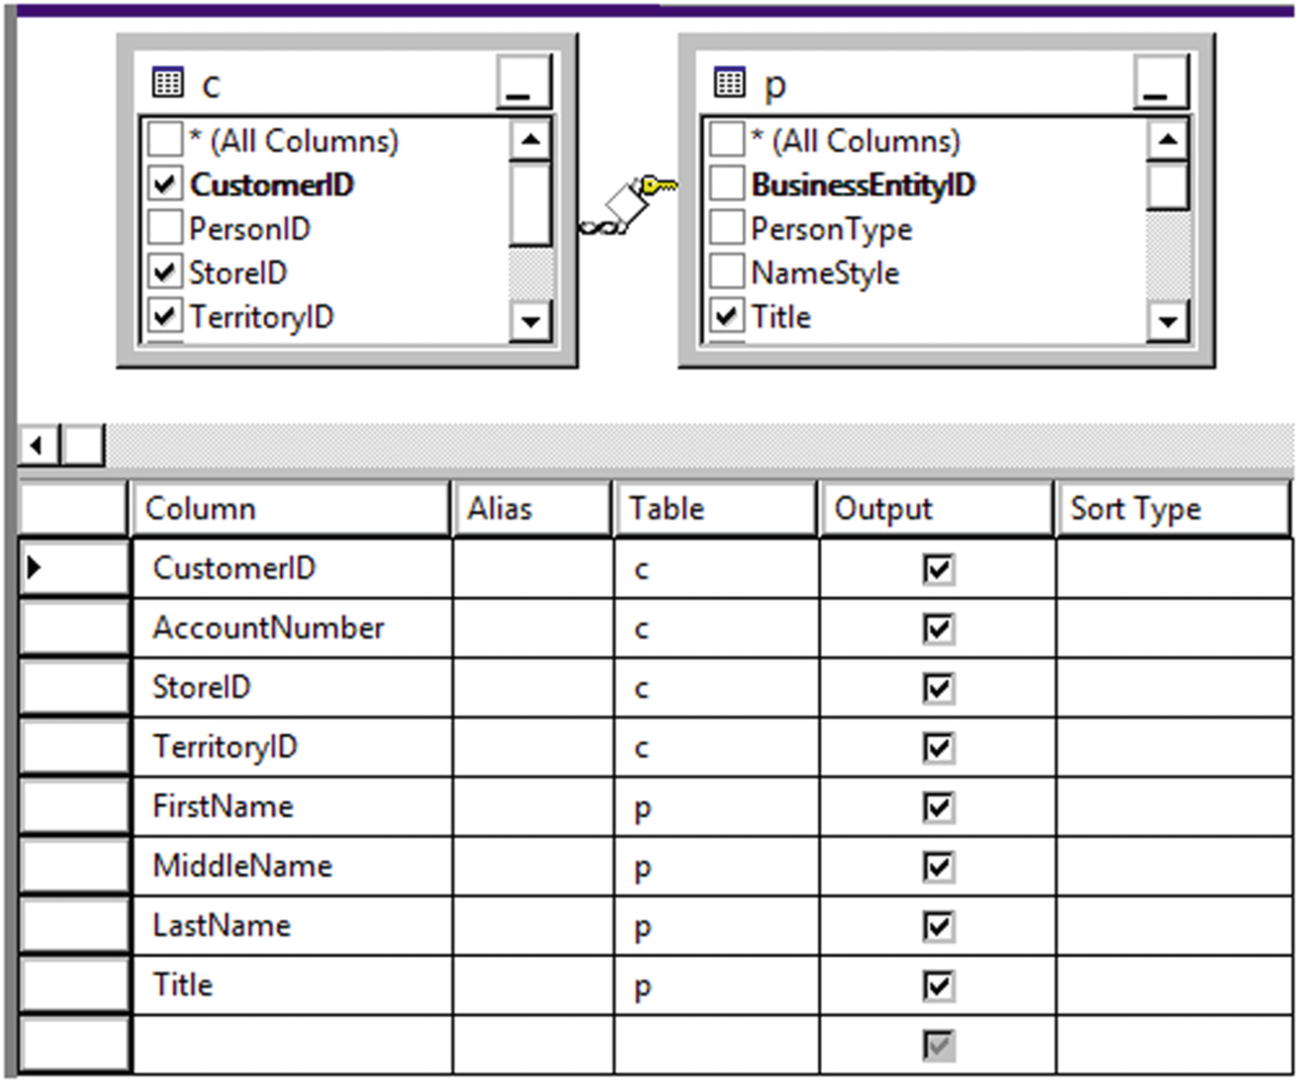
To see the view in Azure Data Studio, navigate to the Views section of the AdventureWorks2019 database. You will see the newly created view along with several views that ship with the database. Notice that each of the preexisting views belongs to one of the schemas in the database. Just like tables, you can script out the definition or bring up a graphical designer if you are using SQL Server Management Studio (Azure Data Studio doesn’t have this functionality as of this writing). Figure 13-11 shows the graphical designer for the view.
Figure 13-11
The graphical designer for views
Avoiding Common Problems with Views
You may decide that you should set up views joining all the tables in the database and just write queries against those views, but there are often problems associated with using views as the main strategy for database development. One problem is the confusion that can result from views created on top of other views on top of other views. Tracking down logic errors becomes difficult when they are buried in layers of views. If the underlying table structure changes, the view may produce strange results, as shown in Listing 13-8. To avoid this problem, you can define a view with the SCHEMABINDING option, which prevents the underlying table from being changed.
Make sure you don’t use views in a way that will negatively impact performance. For example, suppose you created a view containing the customers, customer addresses, sales, and sales details tables. If you just wanted a list of customers, you could query the view, but you would be also accessing tables you didn’t need to view at that time. Multiple layers of views can also make it difficult for SQL Server to come up with a good execution plan.
Developers often want to add an ORDER BY clause to a view definition. This is disallowed except under specific conditions and doesn’t make sense because you can always add the ORDER BY clause to the outer query. (To add an ORDER BY to a view definition, you must add the TOP specifier to the view. Chapter 16 discusses TOP in more detail.) In fact, the database engine doesn’t guarantee that the data will be returned in the order specified in the view definition according to the CREATE VIEW topic in SQL Server’s documentation. Type in and execute the code in Listing 13-8 to learn more about two common problems with views.
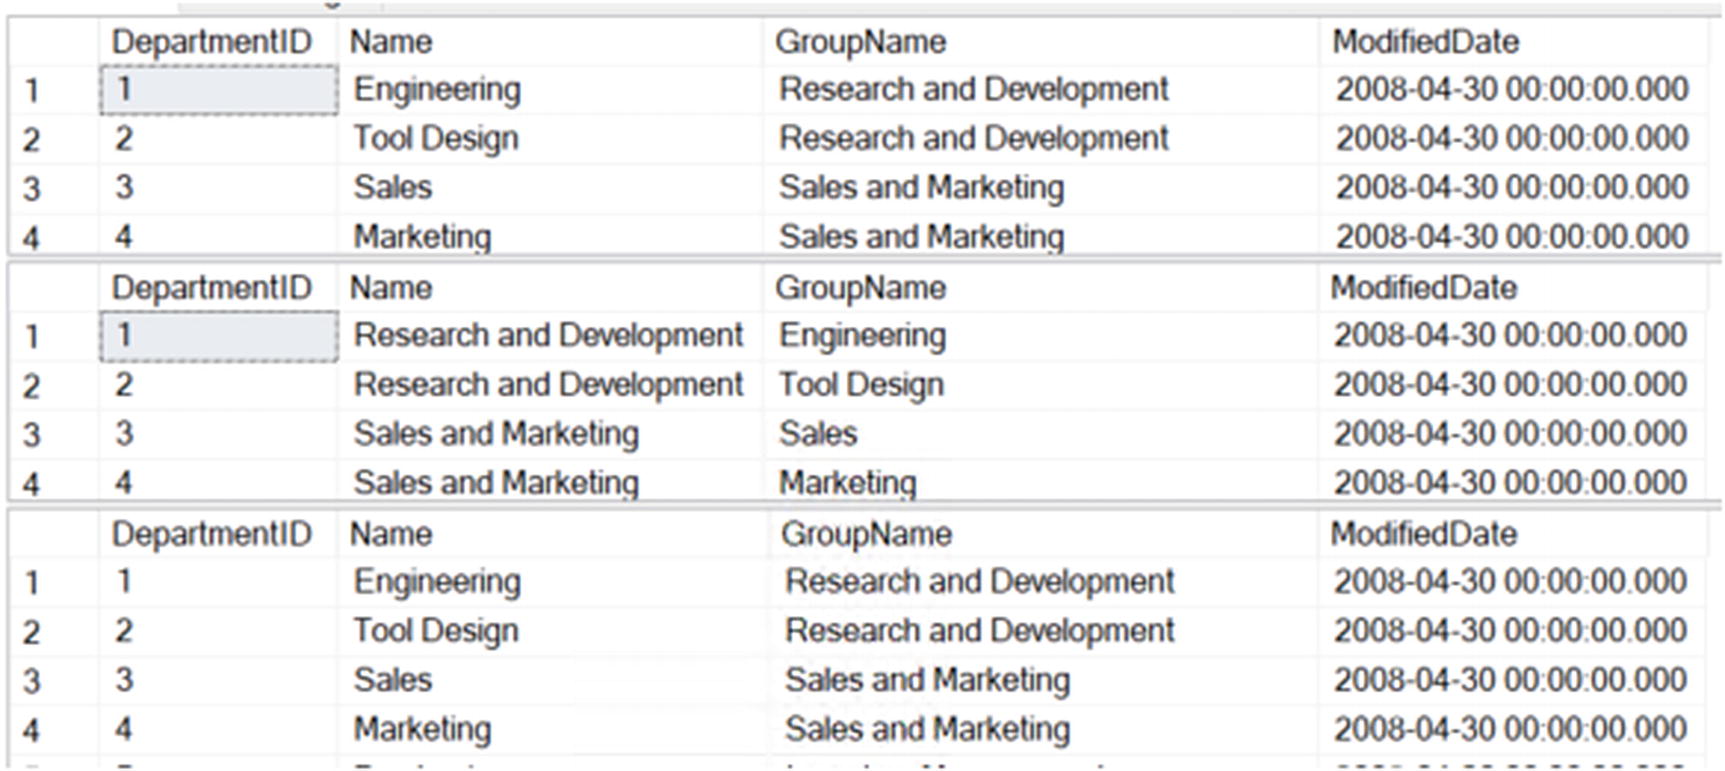
Figure 13-12 shows the partial results of running this code. Code section 1 drops the view and a worktable in case they already exist. Statement 2 creates the table dbo.demoDept from the HumanResources.Department table. Statement 3 creates a view, dbo.vw_Dept, using the asterisk (*) syntax against the dbo.demoDept table. Statement 4 selects all the rows from the view, and the results look as expected in the first result set.
Figure 13-12
The results of demonstrating some common problems with views
Statement 5 drops the dbo.demoDept table, and Statement 6 creates and populates the table again but with the columns in a different order. Statement 7 selects the rows from the view, but this time with surprising results. Because the table was dropped and re-created differently, the columns in the view are now mismatched, as shown in the second result set. The Name and GroupName columns are reversed. To fix this problem, you would have to refresh the view definition with the ALTER VIEW command.
Statement 8 drops the view, and Statement 9 creates it while attempting to enforce a specific order in the view definition. Statement 10 shows within the final set of results that the ORDER BY clause within the view definition didn’t make any difference.
Manipulating Data with Views
So far, you have seen how you can use views to select data. You can also modify the data of a table by updating a view as long as the view meets several requirements:
Modifying the data of a view by inserting or updating may affect only one base table.
You may not delete data from a view that consists of more than one table.
The columns updated must be directly linked to updateable table columns; in other words, you can’t update a view column based on an expression or an otherwise non-updateable column.
Inserts into views are possible only if all columns that require a value are exposed through the view.
As you can see, modifying data through views can be much more complicated than through tables, especially if the view is made up of more than one table. Type in and execute the code in Listing 13-9 to learn how to update data using views.
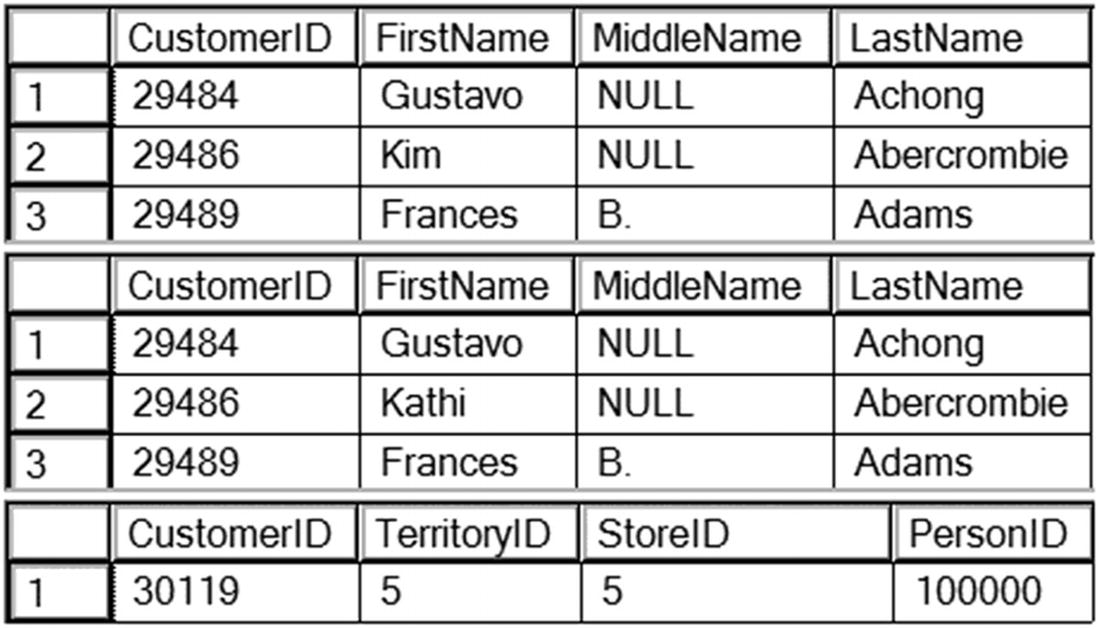
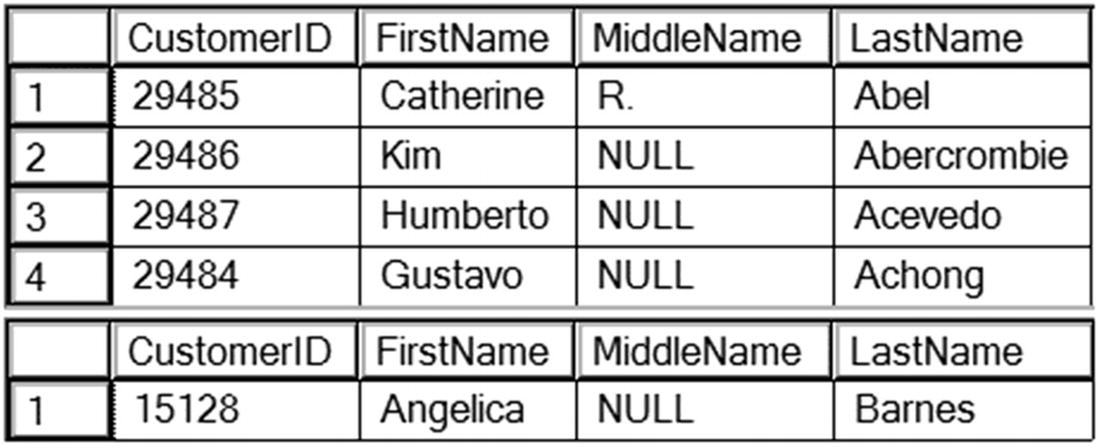
Because this code will produce some errors, view the error messages and then click the Results tab (see Figure 13-13). Code section 1 drops the two tables and the view involved in this script if they exist. Code section 2 creates the two tables, dbo.demoPerson and dbo.demoCustomer, using SELECT INTO statements. Because the two tables must be in place before the view is created, the code to create dbo.vw_Customer is in a separate batch, Section 3. Statement 4 shows how three of the rows look before the data is manipulated and is the first result set in Figure 13-13. Statement 5 changes the first name of one row from Kim to Kathi. This statement succeeds because the update affects only one of the tables.
Figure 13-13
The results of manipulating data through a view
Statement 6 attempts to update two of the columns. Because the FirstName column is from one base table and TerritoryID is from a different base table, the update fails. Statement 7 attempts to delete a row from the view but fails. Deletions will work only if the view consists of one base table.
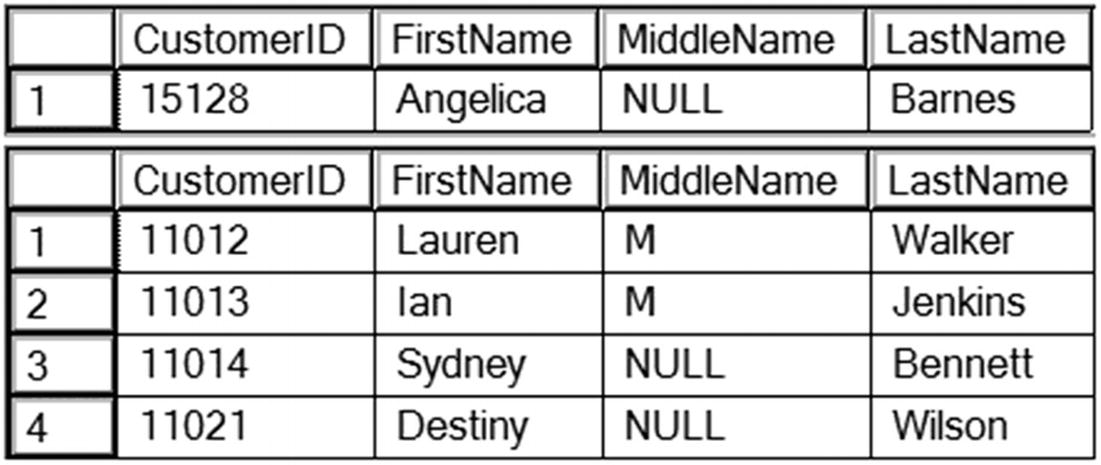
Statement 8 successfully inserts one row into the dbo.demoCustomer table through the view. Statement 9 attempts to insert a row into dbo.demoPerson but fails because the view does not expose the non-NULL column, BusinessEntityID, and there is no way to add a valid value. Statements 10 and 11 show the results of the script. The script updated only one row and added one row to dbo.demoCustomer through the view.
Another problem you may encounter is updating a view with a WHERE clause filter. You can create the view with the WITH CHECK OPTION to prevent any updates that violate the filter. Developers can use views to simplify database programming, but care must be taken to avoid performance and logic problems. Practice what you have learned by completing Exercise 13-2.
EXERCISE 13-2
Use the AdventureWorks2019 database to complete Questions 1 and 2. Switch to the WideWorldImporters database to complete this exercise. You can find the solutions at the end of the chapter.
1.
Create a view called dbo.vw_Products that displays a list of the products from the Production.Product table joined to the Production.ProductCostHistory table. Include columns that describe the product and show the cost history for each product. Test the view by creating a query that retrieves data from the view.
2.
Create a view called dbo.vw_CustomerTotals that displays the total sales from the TotalDue column per year and month for each customer. Test the view by creating a query that retrieves data from the view.
3.
Switch to WideWorldImporters. Create a view in the application schema that points to Application.Cities. The view, called CityView, should have the following columns, in order: CityID, StateProvinceID with an alias of StateID, CityName.
4.
Create a view that displays the percentage of backorders to total orders in the Sales.Orders table. The result should be cast as a decimal(5,3). Name the view vw_BackOrderPct.
User-Defined Functions
You learned about the built-in functions available in SQL Server in Chapter 4. You can also create your own T-SQL user-defined functions (UDFs) that can be used in the same way as the built-in functions. You will learn about two types of UDFs in this section: scalar valued, which return one value, and table-valued, which return sets of data in tabular format. The table-valued functions can be divided even further into two types. One is called an inline table-valued function, and the other is called a multi-statement table-valued function. You’ll learn more later in this section.
By using UDFs, you can reuse code to simplify development and hide complex logic. Use caution when using UDFs. In many cases, they can negatively affect performance due to the overhead of calling the function for each row. Although not as elegant, performance is generally better with a complex expression. There have been some improvements made to how the query optimizer handles UDFs in SQL Server 2017 and later additions. These features, called Intelligent Query Processing, are covered in the “Thinking About Performance” section.
Creating User-Defined Scalar Functions
A scalar function returns one value and may take one or more parameters. You can create your own scalar functions to simplify your code. For example, your application may have a complex calculation that appears in many queries. Instead of including the formula in every query, you can create and include the function in your queries instead. Keep these facts about scalar UDFs in mind:
They can be used almost anywhere in a T-SQL statement.
They can accept one or more parameters.
They return one value.
They can use logic such as IF blocks and WHILE loops.
They can access data, though this is sometimes not a good idea.
They can’t update data.
They can call other functions.
Their definition must include a return value.
They can create table variables but not temp tables or regular tables.
When used in a statement, the function is called once for each row.
You may have noticed that scalar-valued UDFs can access data, but this is not always a good use of UDFs. UDFs should generally not be dependent on the tables in a particular database. They should be reusable as much as possible. Depending on the features used in a UDF, the performance can be very poor, especially when used within a T-SQL query. Most of the time, the queries within the function run for each row in the outer query. Here is the syntax for creating, altering, and deleting user-defined scalar functions:
CREATE OR ALTER FUNCTION <scalar function Name> (<@param1> <data type1>,
<@param2> <data type2>)
RETURNS <data type> AS
BEGIN
<statements>
RETURN <value>
END
DROP FUNCTION <scalar function name>
Listing 13-10 demonstrates how to create and use user-defined functions. Type in and execute the code to learn more.
--1
DROP FUNCTION IF EXISTS dbo.udf_Product;
DROP FUNCTION IF EXISTS dbo.udf_Delim;
GO
--2
CREATE FUNCTION dbo.udf_Product(@num1 INT, @num2 INT) RETURNS INT AS
BEGIN
DECLARE @Product INT;
SET @Product = ISNULL(@num1,0) * ISNULL(@num2,0);
RETURN @Product;
END;
GO
--3
CREATE FUNCTION dbo.udf_Delim(@String VARCHAR(100),@Delimiter CHAR(1))
RETURNS VARCHAR(200) AS
BEGIN
DECLARE @NewString VARCHAR(200) = '';
DECLARE @Count INT = 1;
WHILE @Count <= LEN(@String) BEGIN
SET @NewString += SUBSTRING(@String,@Count,1) + @Delimiter;
SET @Count += 1;
END
RETURN @NewString;
END
GO
--4
SELECT StoreID, TerritoryID,
dbo.udf_Product(StoreID, TerritoryID) AS TheProduct,
dbo.udf_Delim(FirstName,',') AS FirstNameWithCommas
FROM Sales.Customer AS c
INNER JOIN Person.Person AS p ON c.PersonID= p.BusinessEntityID;
Listing 13-10
Creating and Using User-Defined Scalar Functions
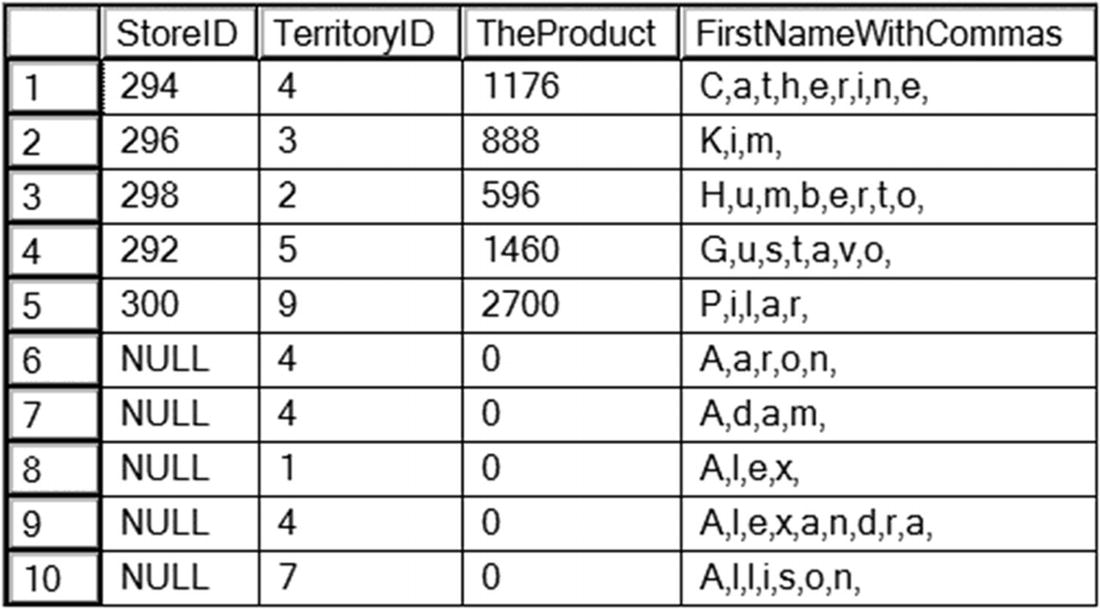
Figure 13-14 shows the results of running this code. Code section 1 drops the UDFs in case they already exist. Code section 2 creates the UDF dbo.udf_Product. The dbo.udf_Product UDF takes two INT parameters. Inside the UDF, the two parameters are multiplied together after correcting for NULLs. The code saves the product in a variable, @Product, which is returned.
Figure 13-14
The partial results of using two user-defined scalar functions
Code section 3 creates the second UDF, dbo.udf_Delim. It takes two parameters: @String, which is a VARCHAR(100), and @Delimiter, which is a one-character string. Inside the definition, a loop builds a new string inserting the delimiter after each character in the original string. The function returns the new string. Query 4 uses the new functions in the SELECT list, multiplying the StoreID by the TerritoryID and adding commas to the FirstName column. Each of these functions is database agnostic; you could add them to any database.
Using Table-Valued User-Defined Functions
The second type of UDF returns a set of rows instead of one value. You can’t use this type of UDF in the SELECT list within a query, but you can use it in place of a table or save the results into a temp table or table variable for use later in your script.
There are two types of table-valued UDFs. One type, sometimes called an inline table-valued UDF, contains only a single SELECT statement. The other contains multiple statements with the possibility of programming logic included as well. The syntax to create these functions is different. Like scalar UDFs, the multi-statement table-valued function is typically called once for each row in the results.
The AdventureWorks2019 database contains one example of a table-valued UDF. This function accepts a @PersonID value and returns information about the contact. Connect to the AdventureWorks2019 database, and drill down to the dbo.ufnGetContactInformation function via Programmability ➤ Functions ➤ Table-valued Functions. Once you reach the function, right-click and choose Script as Create (ADS) or Create to ➤ New Query Editor Window (SSMS). You can see why this is a function instead of a view. Because the Person.Person table contains information about contacts from many different tables, the function uses logic to figure out which query to run to pull the information. You can’t define logic like that in a view, so that is why the AdventureWorks developers chose to create the multi-statement table-valued UDF. This function is fine if an application calls it to get the information about one person. If it is used in a query that returns many rows, the performance would be terrible.
To work with a table-valued UDF, you can select from it like a table or use the CROSS APPLY or OUTER APPLY operator to join the function to another table when it requires parameters from the other table. Here is the syntax:
SELECT <col1>,<col2> FROM <schema>.<udf name>(<@param>)
SELECT <col1>,<col2>
FROM <table1>
CROSS APPLY <udf name>(<table1>.<col3>)
SELECT <col1>,<col2>
FROM <table1>
INNER JOIN <udf name> ()
ON <table1>.<col1> = <udf name>.<col2>
Listing 13-11 demonstrates using the dbo.ufnGetContactInformation function. Type in and execute to learn more.
CROSS APPLY dbo.ufnGetContactInformation(sc.PersonID) AS c;
Listing 13-11
Using a Table-Valued UDF
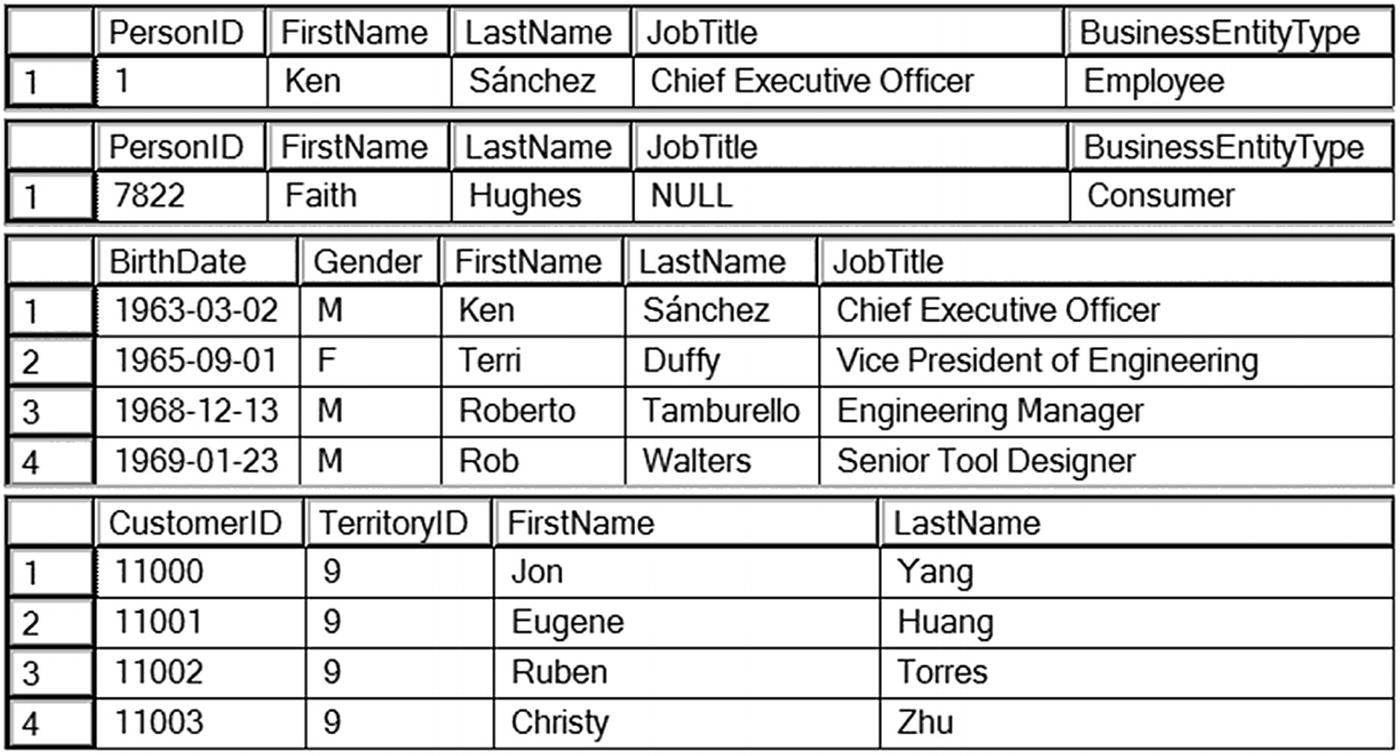
Figure 13-15 shows the partial results of running this code. Query 1 calls the UDF with the parameter 1. The logic inside the UDF determines that BusinessEntityID 1 belongs to an employee and returns that information. Query 2 calls the UDF with parameter 7822. The logic inside the UDF determines that this BusinessEntityID belongs to a customer and returns the appropriate information. Query 3 uses the CROSS APPLY operator to join the HumanResources.Employee table to the UDF. Instead of supplying an individual value to find one name, the query supplies the BusinessEntityID column of the HumanResources.Employee table to the function. Columns from the UDF and the table appear in the SELECT list. Query 4 uses CROSS APPLY to join the UDF on the Sales.Customer table. Another option, OUTER APPLY, returns rows even if a NULL value is passed to the UDF, similar to an OUTER JOIN. The APPLY operator calls the function one time for each row of the table on the left but does switch to a join behind the scenes depending on the query.
Figure 13-15
The partial results of using a table-valued UDF
You will probably find many reasons to write user-defined functions. Always consider the performance implications of using UDFs which you’ll learn more about in the “Thinking About Performance” section. You can also create user-defined functions with a .NET language, but this is beyond the scope of this book. Practice what you have learned about UDFs by completing Exercise 13-3.
EXERCISE 13-3
These examples will work in any database. You can find the solutions at the end of the chapter.
1.
Create a user-defined function called dbo.fn_AddTwoNumbers that accepts two integer parameters. Return the value that is the sum of the two numbers. Test the function.
2.
Create a function dbo.fn_RemoveNumbers that removes any numeric characters from a VARCHAR(250) string. Test the function. Hint: The ISNUMERIC function checks to see whether a string is numeric. Check the online documentation to see how to use it.
3.
Write a function called dbo.fn_FormatPhone that takes a string of ten numbers. The function will format the string into this phone number format: “(###) ###-####.” Test the function.
4.
Write a UDF named temperature. It should accept a DECIMAL(3,1) and a character, either F or C, denoting in which system the answer should be returned. Search the Internet for the conversion formula.
Stored Procedures
Stored procedures (sometimes shortened to procs or sprocs) are the workhorses of T-SQL. Developers and database administrators use them to increase security as well as encapsulate logic. Stored procedures can contain programming logic, update data, create other objects, and more. Essentially, stored procedures are just saved scripts, and they can do anything that the stored procedure owner can do. Like views, the user of the stored procedure doesn’t usually need to have permissions on the tables used within the stored procedure.
Tip
Stored procedures are often used to prevent SQL injection attacks. Hackers employing SQL injection techniques insert SQL commands into web forms that build SQL statements dynamically. Eventually, the hacker takes over databases, servers, and networks. This problem is not unique to SQL Server; other database systems have been attacked as well.
Stored procedures and UDFs have many similarities, but they also have some distinct differences. Table 13-1 shows some of the differences between stored procedures and UDFs as well as views.
Table 13-1
The Differences Between Stored Procedures and User-Defined Functions
Feature
SP
Scalar UDF
Table UDF
View
Return tabular data
Yes
No
Yes
Yes
Return multiple sets of results
Yes
N/A
No
No
Update data
Yes
No
No
No
Create other objects
Yes
No
No
No
Call from a procedure
Yes
Yes
Yes
Yes
Can call a procedure
Yes
No
No
No
Can call a function
Yes
Yes
Yes
Yes
Can call within a SELECT list
No
Yes
No
No
Use to populate multiple columns in a table
Yes
No
Yes
Yes
Return value required
No
Yes
Yes (table)
N/A
Return value optional
Yes
No
No
N/A
Take parameters
Yes
Yes
Yes
No
Output parameters
Yes
No
No
No
You will find that creating stored procedures is easy. Here’s the syntax to create, alter, drop, and execute a stored procedure:
CREATE PROC[EDURE] <proc name> [<@param1> <data type>,<@param2> <data type>] AS
Some shops require that developers use stored procedures for all database calls from their applications. I have also heard of shops that don’t allow stored procedures at all. Chances are you will work with stored procedures at some point in your career. Listing 13-12 shows how to create a stored procedure. Type in and execute the code to learn more.
INNER JOIN Person.Person AS p on c.PersonID = p.BusinessEntityID
WHERE c.CustomerID = @CustomerID;
RETURN 0;
END
ELSE BEGIN
RETURN -1;
END;
GO
--4
EXEC dbo.usp_CustomerName @CustomerID = 15128;
Listing 13-12
Creating and Using a Stored Procedure
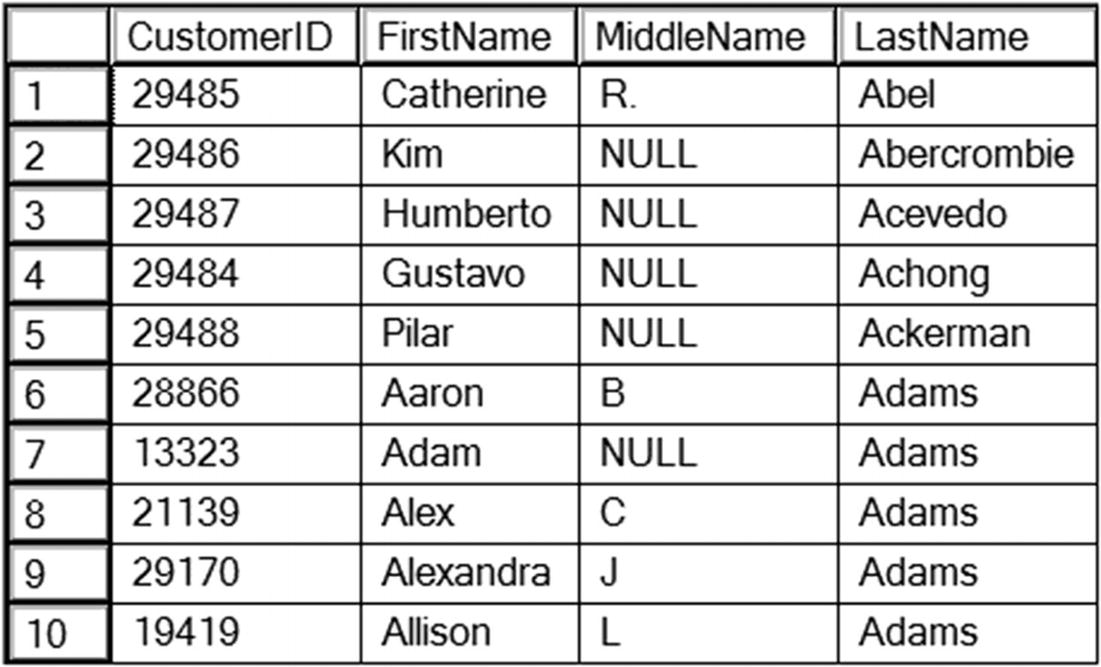
Figure 13-16 shows the results of running this code. Code section 1 creates the stored procedure, dbo.usp_CustomerName. You can have many statements in a stored procedure. This procedure has two statements and a return value. The SET NOCOUNT ON statement keeps the rows affected messages from being returned. The procedure simply joins the Sales.Customer table to the Person.Person table and returns several columns from those tables. Notice that the query includes the ORDER BY clause. Unlike views, the ORDER BY clause will actually return the rows in the order specified. Statement 2 calls the procedure with the EXEC command. Code section 3 changes the stored procedure by adding a parameter and using that parameter in a WHERE clause. By using the CREATE OR ALTER PROC statement instead of dropping and re-creating the procedure, any security settings are retained.
Figure 13-16
The partial results of using a stored procedure
Statement 4 calls the modified procedure, supplying a value for the @CustomerID parameter. You could have left out the name of the parameter when you called the stored procedure in this case. Supplying the name of the parameter makes the code easier to read and understand.
Using Default Values with Parameters
SQL Server requires that you supply a value for each parameter unless you define a default value for the parameter. When a parameter has a default value, you can skip the parameter when you call the stored procedure. In that case, you will have to name the other parameters, not just rely on the position in the list. Once you use a named parameter when calling the stored procedure, you must continue naming parameters. You may want to get in the habit of naming the parameters anyway because it makes your code easier to understand. Here is the syntax for creating a stored procedure with default value parameters:
INNER JOIN Person.Person AS p on c.PersonID = p.BusinessEntityID
WHERE @CustomerID = CASE @CustomerID WHEN -1 THEN -1 ELSE c.CustomerID END;
RETURN 0;
GO
--2
EXEC dbo.usp_CustomerName @CustomerID = 15128;
--3
EXEC dbo.usp_CustomerName ;
Listing 13-13
Using Default Value Parameters
Figure 13-17 shows the partial results of running this code. Code section 1 creates the stored procedure along with the parameter @CustomerID and the default value –1. In this case, if the user calls the stored procedure without a value for @CustomerID, the stored procedure will return all the rows. Statement 2 calls the stored procedure with a value, and the stored procedure returns the one matching row. Statement 3 calls the stored procedure without the parameter value, and the stored procedure returns all the rows.
Figure 13-17
The partial results of using a default value parameter
Using the OUTPUT Parameter
You can use an OUTPUT parameter to get back a value from a stored procedure directly into a variable. This is one of those gray areas where you may decide to use a scalar-valued UDF with a return value instead unless there are other reasons to use a procedure such as data modifications. In my opinion, if the logic is not portable to any database, use a stored procedure. Save scalar-valued UDFs for truly database-agnostic uses. Here is the syntax for creating and using an OUTPUT parameter with a stored procedure:
You can include as many parameters as you need, and your OUTPUT parameter can pass a value to the stored procedure as well as return a value. Type in and execute Listing 13-14 to learn how to use an OUTPUT parameter.
--1
CREATE OR ALTER PROC dbo.usp_OrderDetailCount @OrderID INT,
Code section 1 creates the stored procedure, dbo.usp_OrderDetailCount, along with two parameters, @OrderID and @Count. The first parameter accepts a SalesOrderID value. The second parameter is the OUTPUT parameter, which returns the count of the orders for that SalesOrderID. Statement 2 creates a variable, @OrderCount, to be used as the OUTPUT parameter. Statement 3 calls the stored procedure with the value for @OrderID and the variable for the @Count parameter. In Statement 4, the final value of @Count from inside the stored procedure saved to the variable @OrderCount prints in the Message window. The call to the stored procedure could also have looked like this:
One mistake that developers often make is to forget to use the OUTPUT keyword when calling the stored procedure. To get the modified parameter value back, you must use OUTPUT.
Saving the Results of a Stored Procedure in a Table
One very popular use of a stored procedure is to save the results in a temp or worktable for later processing. When saving the results of a stored procedure in a table, define the table ahead of time. All the columns must be in place and of compatible data types. If the procedure returns multiple sets of results, the first set will populate the table. Here is the syntax for inserting the rows returned from a stored procedure into a table:
Inserting the Rows from a Stored Procedure into a Table
Figure 13-18 shows the results of running this code. Code section 1 drops the table and stored procedure if they exist. Statement 2 creates the table #tempCustomer, matching up columns and data types. They don’t need to have the same names as the stored procedure, but they should have the same number of columns, in the same order, and of compatible data types. Alternatively, you can specify the column names instead. In this case, the list of columns must match the columns returned from the procedure. Code section 3 creates the stored procedure. Statement 4 calls the stored procedure while at the same time storing the results in #tempCustomer. Query 5 returns the results.
Figure 13-18
The partial results of saving the results of a stored procedure into a table
Using a Logic in Stored Procedures
So far, you have seen stored procedures that don’t do much more than run queries, but stored procedures are capable of so much more. You can include conditional code, loops, error trapping, object creation statements, and more within stored procedures. Listing 13-16 shows an example. Type in and execute the code to learn more.
USE tempdb;
GO
--1
CREATE OR ALTER PROC usp_ProgrammingLogic AS
CREATE TABLE #Numbers(number INT NOT NULL);
DECLARE @count INT;
SET @count = ASCII('!');
WHILE @count < 200 BEGIN
INSERT INTO #Numbers(number) VALUES (@count);
SET @count = @count + 1;
END;
ALTER TABLE #Numbers ADD symbol NCHAR(1);
UPDATE #Numbers SET symbol = CHAR(number);
SELECT number, symbol FROM #Numbers;
GO
--2
EXEC usp_ProgrammingLogic;
Listing 13-16
Using Logic in a Stored Procedure
Figure 13-19 shows the partial results of running this code. This stored procedure creates a table of numbers and the ASCII symbol for each number. This is a simple example just to give you an idea of what you can do. Anything you have learned in this book can be encapsulated within a stored procedure.
Figure 13-19
The partial results of using a stored procedure with programming logic
Now that you have seen many of the possibilities of using stored procedures, complete Exercise 13-4 to practice what you have learned.
EXERCISE 13-4
Use the AdventureWorks2019 database to complete Questions 1 to 3. Then switch to the WideWorldImporters database to complete this exercise. You can find the solutions at the end of the chapter.
1.
Create a stored procedure called dbo.usp_CustomerTotals instead of a view from Question 2 in Exercise 13-2. Test the stored procedure.
2.
Modify the stored procedure created in Question 1 to include a parameter @CustomerID. Use the parameter in the WHERE clause of the query in the stored procedure. Test the stored procedure.
3.
Create a stored procedure called dbo.usp_ProductSales that accepts a ProductID for a parameter and has an OUTPUT parameter that returns the total number sold for the product from the Sales.SalesOrderDetail table. Test the stored procedure.
4.
Switch to WideWorldImporters. Create a stored procedure that inserts a new row into the Application.PaymentMethods table and returns the new PaymentMethodID. Note that the PaymentMethodID is automatically populated with a SEQUENCE object, the PaymentMethodName must be unique, and you must supply a LastEditedBy integer. Make sure to use a TRY CATCH block and wrap it in a transaction. Display the error number and message if there is an error.
User-Defined Data Types
Within a database, you can create user-defined data types (UDTs), which are nothing more than native data types that you have given a specific name or alias. This enables you to make sure that a particular type of column is consistently defined throughout the database. These are not used very often, but I have seen them used in a production system, and there are several in the AdventureWorks2019 database. For example, databases often contain ZIP code and phone number columns as UDTs.
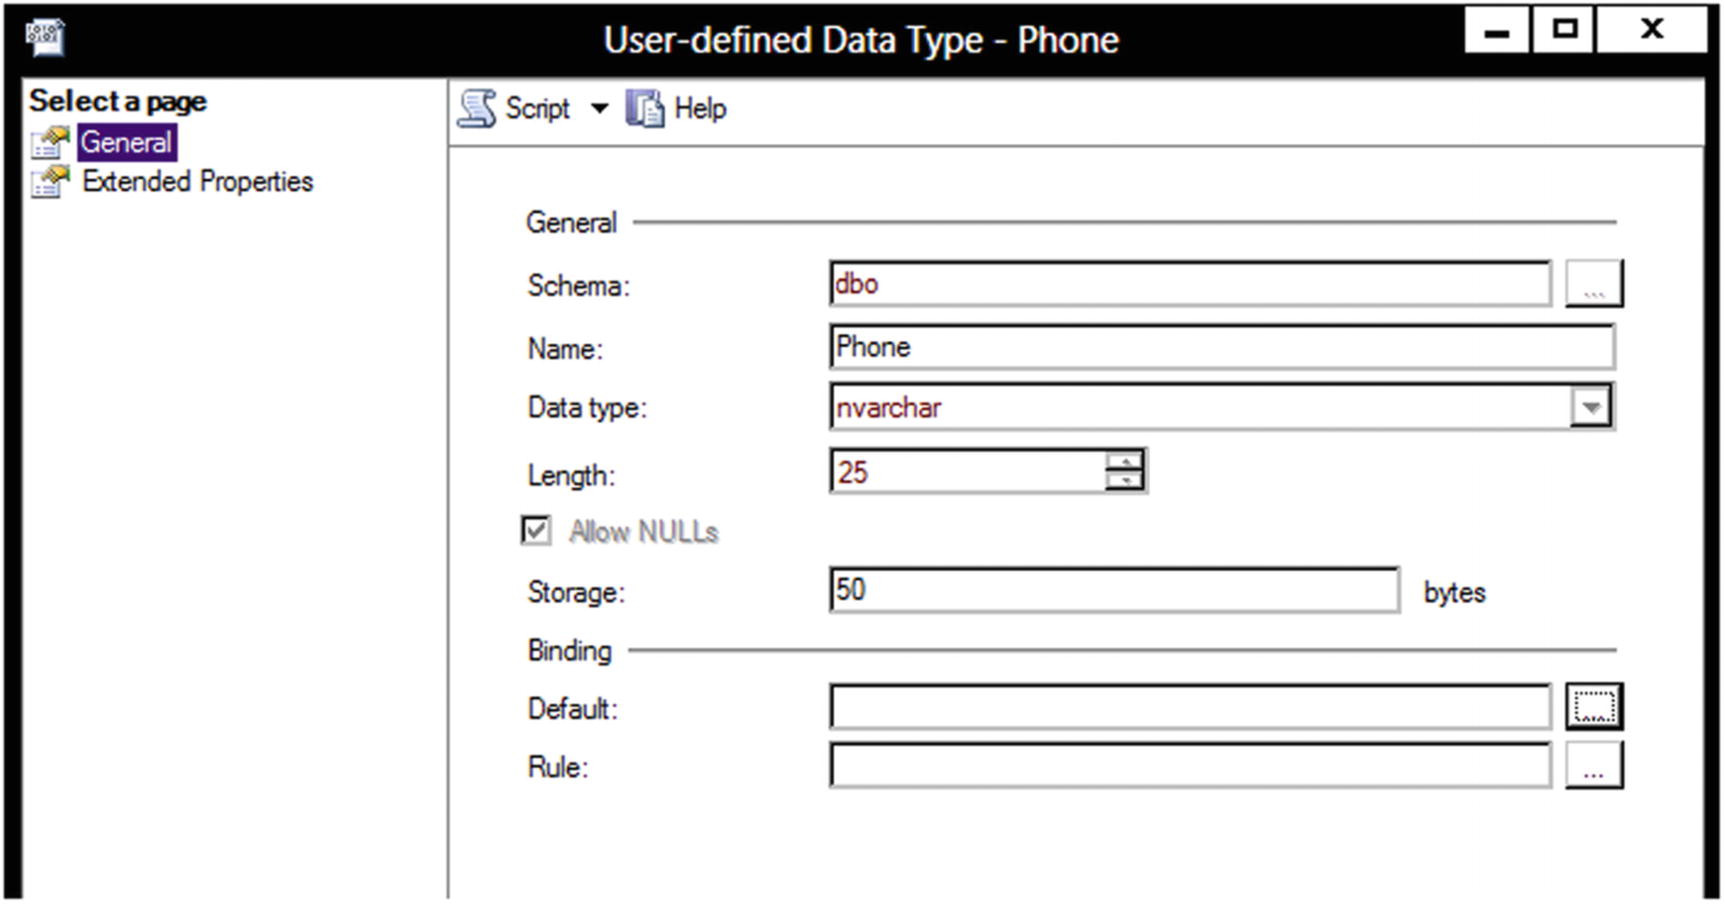
Take a look at the UDTs defined for the AdventureWorks2019 database by navigating to Programmability ➤ Types ➤ User-Defined Data Types in SSMS. If you double-click the Phone data type, you can see the graphical editor for the type as shown in Figure 13-20. (This functionality is not available in ADS at the time of this writing.)
Figure 13-20
The properties of the Phone user-defined data type
The Phone data type is an NVARCHAR(25) that allows NULLs. The Binding section for Default and Rule is blank. In previous versions of SQL Server, you had to create defaults and rules that were then applied to columns or UDTs, but the binding features have been deprecated and should not be used. Once you have the data type defined, you can use it when defining columns in tables as any other data type. Here is the syntax for creating a UDT:
CREATE TYPE <type name> FROM <native type and size> [NULL|NOT NULL]
Listing 13-17 shows how to create a UDT. Type in and execute the code to learn more.
DROP TYPE IF EXISTS dbo.CustomerID;
GO
CREATE TYPE dbo.CustomerID FROM INT NOT NULL;
Listing 13-17
Creating a User-Defined Data Type
Now that the new UDT exists, you can use it when defining new tables. Another type of object is called a user-defined type. This type must be created with a .NET language called a CLR data type. CLR types can contain multiple properties and can contain methods. Beginning with SQL Server 2008, Microsoft has included several complex data types created with the CLR. You will learn about these data types in Chapter 14.
Table Types
A special type of user-defined type object is the table type. A table type allows you to pass tabular data to a stored procedure in the form of a table variable. Before this feature became available, it was difficult, but not impossible, to send multiple rows of data to a stored procedure in one call. One workaround was to send the data in a variable, but then you would have to implement logic in the stored procedure to parse out the columns and rows. This is a big issue when sending data to SQL Server to be processed from a .NET application when multiple rows are involved. Usually, the solution was to create the stored procedure to accept one parameter for each column. Then the application would send the data for one row at a time.
Starting with SQL Server 2008, the table type is available to enable stored procedures to accept multiple rows at one time and treat the variable inside the procedure as a table that can be used to join to other tables, insert rows, or update existing data.
Note
As part of the In-Memory OLTP features available with SQL Server 2014, the table types can also be configured to reside in memory only. Traditional table variables are actually created on disk in tempdb. The In-Memory OLTP features, codenamed Hekaton, are beyond the scope of this book.
A table type is just a definition, similar to a UDT. Here is the syntax for creating a table type:
CREATE TYPE <schema>.<tableName> AS TABLE(
<col1> <dataType1>, <col2> <dataType2> );
Type in and execute the code in Listing 13-18 to create a table type.
--Clean up objects for this section if they exist
DROP PROCEDURE IF EXISTS usp_TestTableVariable;
DROP TYPE IF EXISTS dbo.CustomerInfo;
CREATE TYPE dbo.CustomerInfo AS TABLE
(
CustomerID INT NOT NULL PRIMARY KEY,
FavoriteColor VARCHAR(20) NULL,
FavoriteSeason VARCHAR(10) NULL
);
Listing 13-18
Create a Table Type
Once dbo.CustomerInfo is created, you can see it in the Programmability section of Azure Data Studio, as shown in Figure 13-21.
Figure 13-21
The CustomerInfo type
Although you can view the properties of the CustomerInfo type, you can’t add data to it or query it. A variable must be created based on the type. Listing 13-19 demonstrates how to create and populate the table variable.
DECLARE @myTableVariable [dbo].[CustomerInfo];
INSERT INTO @myTableVariable(CustomerID, FavoriteColor, FavoriteSeason)
Create and Populate Table Variable Based on the Type
The @myTableVariable variable has the same definition as the dbo.CustomerInfo type. It could be used to send multiple rows to a stored procedure for further processing. This is called a table-valued parameter. Listing 13-20 creates a stored procedure and then executes it, passing in a table variable as an argument.
GO
--1
CREATE PROC dbo.usp_TestTableVariable @myTable CustomerInfo READONLY AS
Create a Stored Procedure and Use a Table Variable
Code section 1 creates a stored procedure that accepts a variable of type CustomerInfo. Inside the stored procedure, the table variable is required to be read-only, and that must be specified in the stored procedure definition. Inside the procedure, the table variable is used to join on the Sales.Customer table. Code section 2 declares and populates a table variable. Code section 3 calls the stored procedure with the table-valued parameter. Figure 13-22 shows the results.
Figure 13-22
The results of using a table-valued parameter
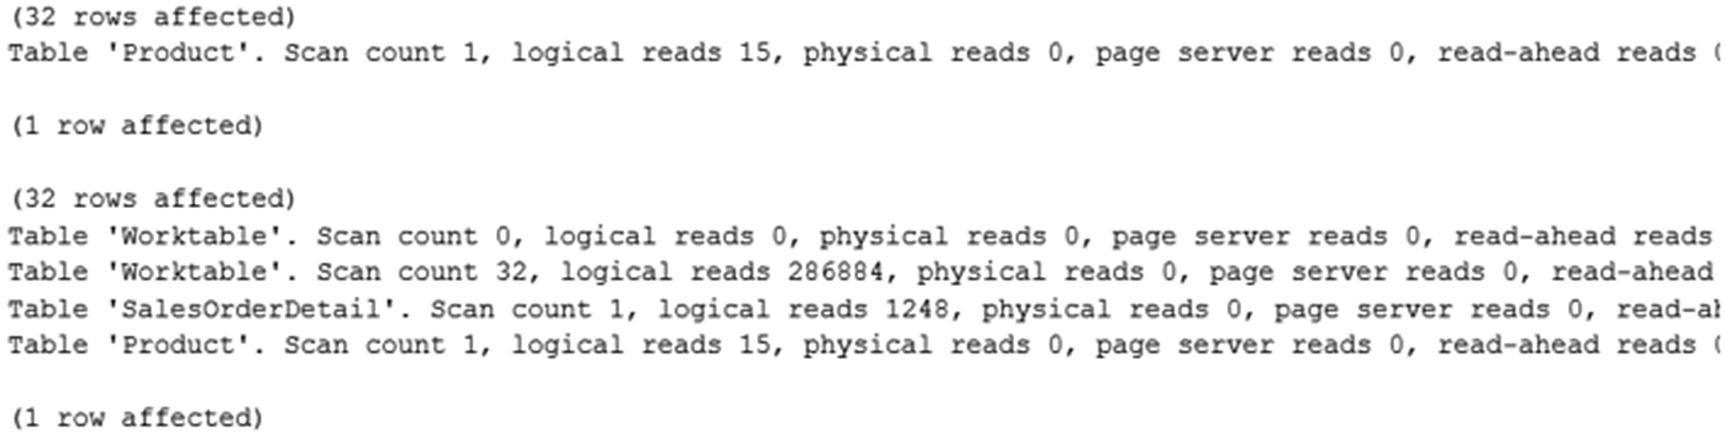
Figure 13-23
The Statistics IO information after running the script
Triggers
Triggers are a very powerful feature of SQL Server. As with most powerful things, they can also cause many problems. Triggers are like a special type of stored procedure that runs whenever data is modified. You can also create triggers at the database level that fire when any object definition is modified or at the server level when a login to the database is attempted, for example. You can define triggers on tables that fire when new rows are inserted or when existing rows are updated or deleted. Triggers can insert data into auditing tables, roll back the current update, or even modify the row that caused the trigger to fire in the first place. Obviously, they can have an impact on performance, and care must be taken so that triggers are not used in a way that causes them to fire repeatedly because of one update.
Any code within a trigger must be very efficient. The transaction that caused the trigger to fire can’t complete until the trigger is successfully completed. One common use of triggers is to enforce referential integrity, or the primary key to foreign key relationships between tables. For example, a trigger that fires when a customer is deleted from the customer table might delete all the orders for that customer. In actuality, this use of triggers is not necessary. Database designers can use foreign key constraints to take care of situations like this.
Listing 13-21 is an example of a simple trigger. Just be aware that triggers often exist in databases and are frequently the cause of performance or logic problems that are difficult to track down.
--1
DROP TABLE IF EXISTS dbo.Customers;
--2
CREATE TABLE dbo.Customers
(ID int IDENTITY
,FirstName varchar(70)
,LastName varchar(80)
,CreateDate datetime DEFAULT GETDATE()
,ModifyDate datetime
,CreateUser varchar(50) DEFAULT SYSTEM_USER
,ModifyUser varchar(50)
);
GO
--3
CREATE TRIGGER trCustomers
ON Customers
AFTER UPDATE
AS
BEGIN
SET NOCOUNT ON
UPDATE Customers
SET ModifyDate=GETDATE()
,ModifyUser=SYSTEM_USER
WHERE ID IN
(SELECT ID FROM Inserted i);
END
GO
--4
INSERT INTO Customers(FirstName,LastName)
VALUES ('Joe','Smith'), ('Mary','Jones');
--5
SELECT * FROM Customers;
--6
UPDATE dbo.Customers SET FirstName="Jack"
WHERE ID=1;
--7
SELECT * FROM Customers;
--8
DROP TABLE IF EXISTS dbo.Customers;
Listing 13-21
A Table with a Trigger
The code in Listing 13-21 creates a table and then adds a trigger. By inserting and updating rows, you can see the automatic population and updates to the ModifyDate and ModifyUser columns.
Thinking About Performance
User-defined functions have always been problematic for performance when used in queries. The inline table-valued functions are an exception because they are changed to joins which you can see by looking at the execution plan. It’s easy for the optimizer to do this because inline table-valued functions contain just a single SELECT statement. Both multiline table-valued functions and scalar UDFs have been considered bad practices by the T-SQL gurus over the years. Starting with SQL Server 2017, some of these problems have been alleviated with a group of enhancements called Intelligent Query Processing (https://docs.microsoft.com/en-us/sql/relational-databases/performance/intelligent-query-processing?view=sql-server-ver15).
The first enhancement to consider is called Scalar UDF Inlining (SQL Server 2019). In some cases, the database engine can “inline” the function as if the code was just added to the query instead of as a function. Run Listing 13-22 to see how this works.
SET STATISTICS IO ON;
GO
USE AdventureWorks2019;
GO
--1 Create a scalar function
CREATE OR ALTER FUNCTION dbo.udf_GetSalesCount(@ProductID INT, @Year INT = 0)
RETURNS INT AS
BEGIN
DECLARE @Count INT;
IF @Year = 0 BEGIN
SELECT @Count = COALESCE(SUM(OrderQty),0)
FROM Sales.SalesOrderDetail
WHERE ProductID = @ProductID;
END ELSE
SELECT @Count = COALESCE(SUM(OrderQty),0)
FROM Sales.SalesOrderDetail AS SOD
JOIN Sales.SalesOrderHeader AS SOH
ON SOD.SalesOrderID = SOH.SalesOrderID
WHERE ProductID = @ProductID
AND YEAR(OrderDate) = @Year;
RETURN @Count;
END
GO
--2 Switch to 2017 compat mode
ALTER DATABASE [AdventureWorks2019] SET COMPATIBILITY_LEVEL = 140
GO
--3 Use the function
SELECT ProductID, Name, ListPrice, dbo.udf_GetSalesCount(ProductID,0) AS QtySold
FROM Production.Product
WHERE ProductSubcategoryID = 1;
--4 Switch to 2019 Compat
ALTER DATABASE [AdventureWorks2019] SET COMPATIBILITY_LEVEL = 150
GO
--5 Use the function
SELECT ProductID, Name, ListPrice, dbo.udf_GetSalesCount(ProductID,0) AS QtySold
FROM Production.Product
WHERE ProductSubcategoryID = 1;
Listing 13-22
Inline Scalar UDF
Notice that you cannot see the logical reads from the Sales.SalesOrderDetail and Sales.SalesOrderHeader tables when the database is in 2017 compatibility mode even though the function definitely accessed them. Once you switch to 2019 mode, then all the tables involved in the query can be seen so that you can do appropriate query tuning. Often, inlining a scalar UDF improves the performance tremendously.
Inlining of scalar UDFs does not happen if the UDF contains loops or table variables. Be sure to see the documentation for more information about the many restrictions.
Inlining is also possible with multi-statement table-valued functions beginning with 2017. This happens only when the function has no parameter arguments from the outer query. In this case, the function returns the same results for every row in the outer query, so the database engine just runs the results of the function once and then joins it to the table. Run Listing 13-23 to see this in action.
--Create a function
CREATE OR ALTER FUNCTION dbo.getColors()
RETURNS @Colors TABLE
(
Color varchar(20)
)
AS
BEGIN
INSERT INTO @Colors(Color)
SELECT DISTINCT Color
FROM Production.Product
INSERT INTO @Colors(Color)
VALUES('Lime'),('Turquoise');
RETURN;
END
GO
Listing 13-23
Inline Multi-statement Table-Valued Function
No matter how many times you run this function in a query, it returns the same data as long as the Production.Product table doesn’t change. Before 2017, if this function was used in a join, the function would run once for every row of the results. With inlining, the database engine runs it once and then treats those results as if it were a table.
The performance issues with user-defined functions are not all resolved, but Microsoft has added enhancements in 2017 and 2019 that can help in some circumstances.
Database Cleanup
You have created quite a few objects during this chapter. You can either run the script in Listing 13-24 (also available on the book’s web page at www.apress.com) to clean up the objects from the examples or reinstall the sample databases according to the instructions in the “Installing Tools for SQL Server” section in Chapter 1 or Appendix A if you installed SQL Server in a container.
USE AdventureWorks2019;
GO
DROP VIEW IF EXISTS vw_Customer;
DROP VIEW IF EXISTS dbo.vw_Dept;
DROP TABLE IF EXISTS dbo.demoDept;
DROP TABLE IF EXISTS dbo.demoCustomer;
DROP TABLE IF EXISTS dbo.demoPerson;
DROP FUNCTION IF EXISTS dbo.udf_Product;
DROP FUNCTION IF EXISTS dbo.udf_Delim;
DROP PROC IF EXISTS dbo.usp_CustomerName;
DROP PROC IF EXISTS dbo.usp_OrderDetailCount;
DROP TABLE IF EXISTS dbo.tempCustomer;
DROP PROC IF EXISTS usp_ProgrammingLogic
DROP FUNCTION IF EXISTS dbo.udf_ProductTotal;
DROP VIEW IF EXISTS dbo.vw_Products;
DROP VIEW IF EXISTS dbo.vw_CustomerTotals;
DROP FUNCTION IF EXISTS dbo.fn_AddTwoNumbers;
DROP FUNCTION IF EXISTS dbo.fn_RemoveNumbers;
DROP FUNCTION IF EXISTS dbo.fn_FormatPhone;
DROP PROCEDURE IF EXISTS dbo.usp_CustomerTotals;
DROP PROCEDURE IF EXISTS dbo.usp_ProductSales;
DROP PROCEDURE IF EXISTS usp_TestTableVariable;
DROP TYPE IF EXISTS dbo.CustomerInfo;
DROP SEQUENCE IF EXISTS MySequence;
DROP FUNCTION IF EXISTS dbo.getColors;
DROP FUNCTION IF EXISTS dbo.udf_GetSalesCount;
USE WideWorldImporters;
GO
DROP VIEW IF EXISTS Application.CityView;
DROP VIEW IF EXISTS dbo.vw_BackorderPct;
DROP PROC IF EXISTS dbo.procAddNewPmtType;
Listing 13-24
Database Cleanup
Summary
SQL Server contains many ways to enforce business rules and ensure data integrity. You can set up primary and foreign keys, constraints, and defaults in table definitions. You can create user-defined functions, stored procedures, views, and user-defined data types to add other ways to enforce business rules. You have many options that you can use to make development simpler and encapsulate logic.
Each new version of SQL Server adds new data types and functions. Chapter 14 covers some of the types added with SQL Server 2008 including spatial data types. Chapter 15 covers the XML and JSON data types.
Answers to the Exercises
This section provides solutions to the exercises found on creating database objects.
Solutions to Exercise 13-1: Tables
Use the tempdb database to complete this exercise.
1.
Create a table called dbo.testCustomer. Include a CustomerID that is an identity column primary key. Include FirstName and LastName columns. Include an Age column with a check constraint specifying that the value must be less than 120. Include an Active column that is one character with a default of Y and allows only Y or N. Add some rows to the table.
Here’s a possible solution:
IF OBJECT_ID ('dbo.testCustomer') IS NOT NULL BEGIN
INSERT INTO dbo.testCustomer(FirstName, LastName,Age)
VALUES ('Kathy','Morgan',35),
('Lady B.','Keller',14),
('Dennis','Wayne',30);
2.
Create a table called dbo.testOrder. Include a CustomerID column that is a foreign key pointing to dbo.testCustomer. Include an OrderID column that is an identity column primary key. Include an OrderDate column that defaults to the current date and time. Include a ROWVERSION column. Add some rows to the table.
IF OBJECT_ID('dbo.testOrder') IS NOT NULL BEGIN
DROP TABLE dbo.testOrder;
END;
GO
CREATE TABLE dbo.testOrder
(CustomerID INT NOT NULL,
OrderID INT NOT NULL IDENTITY,
OrderDate DATETIME DEFAULT GETDATE(),
RW ROWVERSION,
CONSTRAINT fk_testOrders
FOREIGN KEY (CustomerID)
REFERENCES dbo.testCustomer(CustomerID),
CONSTRAINT PK_TestOrder PRIMARY KEY (OrderID)
);
GO
INSERT INTO dbo.testOrder (CustomerID)
VALUES (1),(2),(3);
3.
Create a table called dbo.testOrderDetail. Include an OrderID column that is a foreign key pointing to dbo.testOrder. Include an integer ItemID column, a Price column, and a Qty column. The primary key should be a composite key composed of OrderID and ItemID. Create a computed column called LineItemTotal that multiplies Price times Qty. Add some rows to the table.
IF OBJECT_ID('dbo.testOrderDetail') IS NOT NULL BEGIN
DROP TABLE dbo.testOrderDetail;
END;
GO
CREATE TABLE dbo.testOrderDetail(
OrderID INT NOT NULL, ItemID INT NOT NULL,
Price Money NOT NULL, Qty INT NOT NULL,
LineItemTotal AS (Price * Qty),
CONSTRAINT pk_testOrderDetail
PRIMARY KEY (OrderID, ItemID),
CONSTRAINT fk_testOrderDetail
FOREIGN KEY (OrderID)
REFERENCES dbo.testOrder(OrderID)
);
GO
INSERT INTO dbo.testOrderDetail(OrderID,ItemID,Price,Qty)
VALUES (1,1,10,5),(1,2,5,10);
4.
It’s possible to create a table with defaults defined for all columns. To insert a row in that table, you can use the keywords DEFAULTVALUES instead of a SELECT statement or row constructor (VALUES list). Create a table called #AllDefaults with three columns, an IDENTITY called ID, a column called ANumber with the default 1, and a column called TheDate with the default of the current date. Insert a row into the table.
CREATE TABLE #AllDefaults(ID INT NOT NULL IDENTITY, ANumber INT DEFAULT 1, TheDate DATETIME2 DEFAULT GETDATE());
INSERT INTO #AllDefaults DEFAULT VALUES;
SELECT * FROM #AllDefaults;
Solutions to Exercise 13-2: Views
Use the AdventureWorks2019 database to complete Questions 1 and 2. Then switch to the WideWorldImporters database to complete the exercise.
1.
Create a view called dbo.vw_Products that displays a list of the products from the Production.Product table joined to the Production.ProductCostHistory table. Include columns that describe the product and show the cost history for each product. Test the view by creating a query that retrieves data from the view.
IF OBJECT_ID('dbo.vw_Products') IS NOT NULL BEGIN
DROP VIEW dbo.vw_Products;
END;
GO
CREATE VIEW dbo.vw_Products AS (
SELECT P.ProductID, P.Name, P.Color,
P.Size, P.Style,
H.StandardCost, H.EndDate, H.StartDate
FROM Production.Product AS P
INNER JOIN Production.ProductCostHistory AS H
ON P.ProductID = H.ProductID);
GO
SELECT ProductID, Name, Color, Size, Style,
StandardCost, EndDate, StartDate
FROM dbo.vw_Products;
2.
Create a view called dbo.vw_CustomerTotals that displays the total sales from the TotalDue column per year and month for each customer. Test the view by creating a query that retrieves data from the view.
IF OBJECT_ID('dbo.vw_CustomerTotals') IS NOT NULL BEGIN
DROP VIEW dbo.vw_CustomerTotals;
END;
GO
CREATE VIEW dbo.vw_CustomerTotals AS (
SELECT C.CustomerID,
YEAR(OrderDate) AS OrderYear,
MONTH(OrderDate) AS OrderMonth,
SUM(TotalDue) AS TotalSales
FROM Sales.Customer AS C
INNER JOIN Sales.SalesOrderHeader
AS SOH ON C.CustomerID = SOH.CustomerID GROUP BY C.CustomerID,
YEAR(OrderDate), MONTH(OrderDate));
GO
SELECT CustomerID, OrderYear,
OrderMonth, TotalSales
FROM dbo.vw_CustomerTotals;
3.
Switch to WideWorldImporters. Create a view in the application schema that points to Application.Cities. The view, called CityView, should have the following columns, in order: CityID, StateProvinceID with an alias of StateID, CityName.
CREATE VIEW Application.CityView
AS
SELECT CityID
,StateProvinceID AS StateID
,CityName
FROM Application.Cities;
4.
Create a view that displays the percentage of backorders to total orders in the Sales.Orders table. The result should be cast as a decimal(5,3). Name the view vw_BackOrderPct.
CREATE VIEW vw_BackorderPct
AS
SELECT CAST(COUNT(BackorderOrderID) * 1.0 /
COUNT(OrderID) * 100 AS DECIMAL (5,3)) AS BackPct
FROM Sales.Orders;
Solutions to Exercise 13-3: User-Defined Functions
These examples will work in any database.
1.
Create a user-defined function called dbo.fn_AddTwoNumbers that accepts two integer parameters. Return the value that is the sum of the two numbers. Test the function.
GO
CREATE OR ALTER FUNCTION dbo.fn_AddTwoNumbers
(@NumberOne INT, @NumberTwo INT)
RETURNS INT AS BEGIN
RETURN @NumberOne + @NumberTwo;
END;
GO
SELECT dbo.fn_AddTwoNumbers(1,2);
2.
Create a function dbo.fn_RemoveNumbers that removes any numeric characters from a VARCHAR(250) string. Test the function. Hint: The ISNUMERIC function checks to see whether a string is numeric. Check the online documentation to see how to use it.
Write a function called dbo.fn_FormatPhone that takes a string of ten numbers. The function will format the string into this phone number format: “(###) ###-####.” Test the function.
CREATE OR ALTER FUNCTION dbo.fn_FormatPhone
(@Phone VARCHAR(10))
RETURNS VARCHAR(14) AS BEGIN
DECLARE @NewPhone VARCHAR(14);
SET @NewPhone = '(' + SUBSTRING(@Phone,1,3)
+ ') ';
SET @NewPhone = @NewPhone +
SUBSTRING(@Phone, 4, 3) + '-';
SET @NewPhone = @NewPhone +
SUBSTRING(@Phone, 7, 4);
RETURN @NewPhone;
END;
GO
SELECT dbo.fn_FormatPhone('5555551234');
4.
Write a UDF named temperature. It should accept a DECIMAL(5,3) and a character, either F or C, denoting in which system the answer should be returned. Search the Internet for the conversion formula.
CREATE OR ALTER FUNCTION temperature (@temp DECIMAL(3,1), @ReturnUnitsIn char(1))
RETURNS DECIMAL(3,1)
AS
BEGIN
DECLARE @Result DECIMAL(3,1) = 0
IF @ReturnUnitsIn = 'C'
SET @Result = (@temp - 32) / 1.8;
ELSE IF @ReturnUnitsIn = 'F'
SET @Result = (@temp * 1.8) + 32;
RETURN @result;
END
GO
SELECT dbo.Temperature( 32 , 'C');
Solutions to Exercise 13-4: Stored Procedures
Use the AdventureWorks2019 database to complete Questions 1 to 3. Then switch to the WideWorldImporters database to complete this exercise.
1.
Create a stored procedure called dbo.usp_CustomerTotals instead of a view from Question 2 in Exercise 13-2. Test the stored procedure.
CREATE OR ALTER PROCEDURE dbo.usp_CustomerTotals AS
SELECT C.CustomerID,
YEAR(OrderDate) AS OrderYear,
MONTH(OrderDate) AS OrderMonth,
SUM(TotalDue) AS TotalSales
FROM Sales.Customer AS C
INNER JOIN Sales.SalesOrderHeader
AS SOH ON C.CustomerID = SOH.CustomerID
GROUP BY C.CustomerID, YEAR(OrderDate),
MONTH(OrderDate);
GO
EXEC dbo.usp_CustomerTotals;
2.
Modify the stored procedure created in Question 1 to include a parameter @CustomerID. Use the parameter in the WHERE clause of the query in the stored procedure. Test the stored procedure.
CREATE OR ALTER PROCEDURE dbo.usp_CustomerTotals
@CustomerID INT AS
SELECT C.CustomerID,
YEAR(OrderDate) AS OrderYear,
MONTH(OrderDate) AS OrderMonth,
SUM(TotalDue) AS TotalSales
FROM Sales.Customer AS C
INNER JOIN Sales.SalesOrderHeader
AS SOH ON C.CustomerID = SOH.CustomerID
WHERE C.CustomerID = @CustomerID
GROUP BY C.CustomerID,
YEAR(OrderDate), MONTH(OrderDate);
GO
EXEC dbo.usp_CustomerTotals 17910;
3.
Create a stored procedure called dbo.usp_ProductSales that accepts a ProductID for a parameter and has an OUTPUT parameter that returns the total number sold for the product from the Sales.SalesOrderDetail table. Test the stored procedure.
CREATE OR ALTER PROCEDURE dbo.usp_ProductSales
@ProductID INT,
@TotalSold INT = NULL OUTPUT AS
SELECT @TotalSold = SUM(OrderQty)
FROM Sales.SalesOrderDetail
WHERE ProductID = @ProductID;
GO
DECLARE @TotalSold INT;
EXEC dbo.usp_ProductSales @ProductID = 776,
@TotalSold = @TotalSold OUTPUT;
PRINT @TotalSold;
4.
Switch to WideWorldImporters. Create a stored procedure that inserts a new row into the Application.PaymentMethods table and returns the new PaymentMethodID. Note that the PaymentMethodID is automatically populated with a SEQUENCE object, the PaymentMethodName must be unique, and you must supply a LastEditedBy integer. Make sure to use a TRY CATCH block and wrap it in a transaction. Display the error number and message if there is an error.
--Here is a possible solution
CREATE OR ALTER PROCEDURE [dbo].[procAddNewPmtType] @pmtType varchar(40) , @UserID INT = 1
AS
SET NOCOUNT ON;
BEGIN
BEGIN TRY
DECLARE @MessageExists VARCHAR(100) =
(
SELECT TOP 1
PaymentMethodName
FROM Application.PaymentMethods
WHERE PaymentMethodName = @pmtType
);
IF (@MessageExists) IS NOT NULL
BEGIN
PRINT 'Check for this type if it already exists';
RETURN;
END;
ELSE
BEGIN
SET XACT_ABORT ON;
DECLARE @PMI TABLE
(
pmi INT
);
BEGIN TRAN;
INSERT INTO Application.PaymentMethods
(
PaymentMethodName
, LastEditedBy
)
OUTPUT Inserted.PaymentMethodID
INTO @PMI
VALUES
(@pmtType, @UserID);
COMMIT TRAN;
SELECT pmi AS ID
FROM @PMI;
END;
END TRY
BEGIN CATCH
IF @@TRANCOUNT > 0
ROLLBACK;
UPDATE @PMI
SET pmi = NULL; --TRANSACTION ROLLED BACK; ID canceled';
PRINT ERROR_NUMBER();
PRINT ERROR_MESSAGE();
PRINT ERROR_NUMBER();
THROW 665555, 'ERROR OCCURRED - TRY AGAIN LATER', 1;