![]()
Running SQL Server in the Cloud
I must confess that when I hear the phrase “in the cloud” I immediately picture white fluffy clouds with desktop computers, complete with monitors and keyboards strewn about. I’m not sure where this image originated because I know that Microsoft has datacenters worldwide that are situated firmly on the ground consisting of thousands of commodity servers in racks that look nothing like desktop computers. Microsoft’s cloud services are branded Microsoft Azure.
The enterprise computing landscape is ever evolving, and right now, companies are taking advantage of cloud services, like Microsoft Azure, to save money and be more flexible. Large companies are using cloud services for many purposes. Some are obvious, such as secondary backup locations. Companies are moving their web-based applications entirely to the cloud. In the case of Microsoft Azure SQL Database, it is possible to scale up and down quickly as needs change over time. The beauty of this, over traditional onsite datacenters, is that you just pay for what you use.
Imagine buying and configuring the hardware for an application that is used mainly during the holiday season. You would have to buy hardware good enough to handle the load during the busiest time. During the other 9 or 10 months of the year, that hardware would be sitting mostly idle. If the application and database were built instead in Azure, you could scale out during the busy months and scale back during the slow months. You would pay more during the busy months and save a lot of money during the slow months.
The world moves quickly in the cloud. Microsoft makes frequent announcements about new services, enhanced features, and pricing changes. Microsoft has been releasing a new version of SQL Server approximately every two years since 2008. You will see feature announcements much more frequently with Microsoft Azure SQL Database.
There are two ways to run SQL Server in the cloud. The first is very similar to how you do it today on your own servers, however, you do not purchase and provision the hardware. You can create Azure virtual machines (VMs) and run the desired version and edition of SQL Server on the VM. Once you have SQL Server running in the VM, you can create your databases. The second method is by creating a Microsoft Azure SQL Database. In this case, you create just the database; you do not spin up a VM.
This chapter will discuss the advantages and how to get started with each method.
Procuring a Microsoft Azure Account
I have an MSDN (Microsoft Developer Network) subscription. The level of my subscription gives me $150 worth of Azure services to use each month. This allows me to create VMs and databases for development, learning, experimenting, and teaching only. If I wanted to create a production database or application, I would have to use a paid account.
If you have an MSDN subscription, be sure to activate your free Azure benefits. One nice thing about this benefit is that if you accidently use the entire allowance during a given month, the services will just stop. You won’t be charged unless you configure the account to do so.
If you are not lucky enough to have an MSDN subscription, you can still sign up for a free trial of Azure. At the time of this writing, you can get a one-month trial consisting of $200 worth of services (http://azure.microsoft.com/en-us/pricing/free-trial/).
If you decide that you will need an account for longer than a month or one that is licensed for production workloads, there are several options. You can “pay as you go” with no commitment. You will pay for only the services you enable. There are also two prepay options. You can sign up for $500 or $1000 worth of services per month. By doing so, you get additional discounts and unused services rollover. See http://azure.microsoft.com/en-us/pricing/purchase-options/ for information about paid plans.
The Azure Dashboard
Microsoft provides a web-based dashboard for provisioning and managing your Windows Azure services. Figure 17-1 shows my dashboard with my service names blurred out.
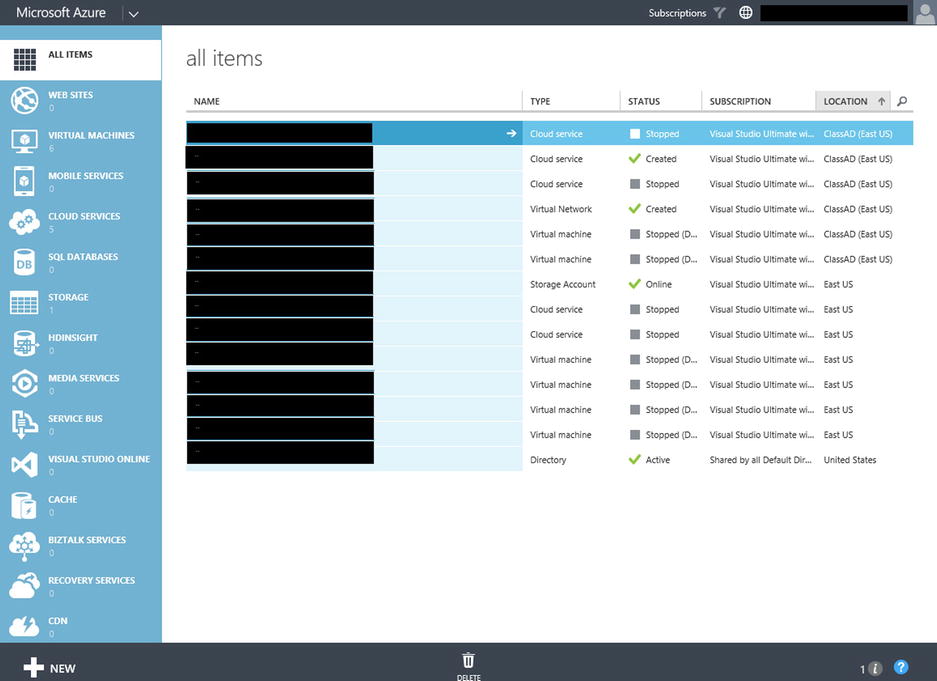
Figure 17-1. My Microsoft Azure dashboard
The possible services are listed along the left side of the screen. In addition to VMs and Microsoft Azure SQL Databases, you can create web sites, mobile services, storage, HDInsight for analyzing big data, and more. This chapter will just focus on VMs and Microsoft Azure SQL Database.
Clicking one of the service types on the left will filter your list of services on the right. You can then manage each service.
Windows Azure Virtual Machines
Virtual Machines is my favorite Azure feature. I love how I can create a new VM in just a few minutes. As long as I keep the VM stopped while I am not using it, the charges are minimal. There are still charges for the storage, but the VM itself doesn’t generate charges when it is not running. Obviously, this isn’t usually possible for production servers, but for learning and experimenting it is a great option.
Many companies take advantage of virtual machines in their own data centers. In fact, your production SQL Servers could be running on VMs today and you wouldn’t even know it. The idea is that powerful servers running special software for virtualization, called a hypervisor, would then host many individual guest servers. The benefits of this arrangement include the ability to flexibly reassign resources as the VMs need them, increased availability because it is possible to quickly move a VM to another host, decreased procurement time, and cost savings.
You have the ability to upload an existing VM, create a blank VM and install everything, or create one using a template. To create your Windows Azure VM, you must first make some decisions. Which operating system will you need? Do you want SQL Server to be preinstalled? Do you want a SharePoint VM? You can even create a Linux VM from a template. In this example, let’s take advantage of the templates by following these steps:
- Click the Virtual Machines link on the left side of the dashboard.
- If you have any existing VMs, you will see them listed. Click the +New icon at the bottom of the screen (Figure 17-2).

Figure 17-2. Click to create a new VM
- Select Compute
 Virtual Machine From Gallery, as shown in Figure 17-3.

Figure 17-3. Create a VM from a template
- The next step is to select the image. Notice that there are many options for non-Microsoft servers as well as for the expected Windows Servers. Because this book is about SQL Server, select SQL Server from the list to filter the list of templates available. If you are familiar with the Windows 8 operating system, select SQL Server 2014 RTM Enterprise, as shown in Figure 17-4. If you are still used to the traditional Windows 7 operating system, you should probably select one of the images using Windows Server 2008 R2 instead. After selecting an image, click the arrow at the bottom right.
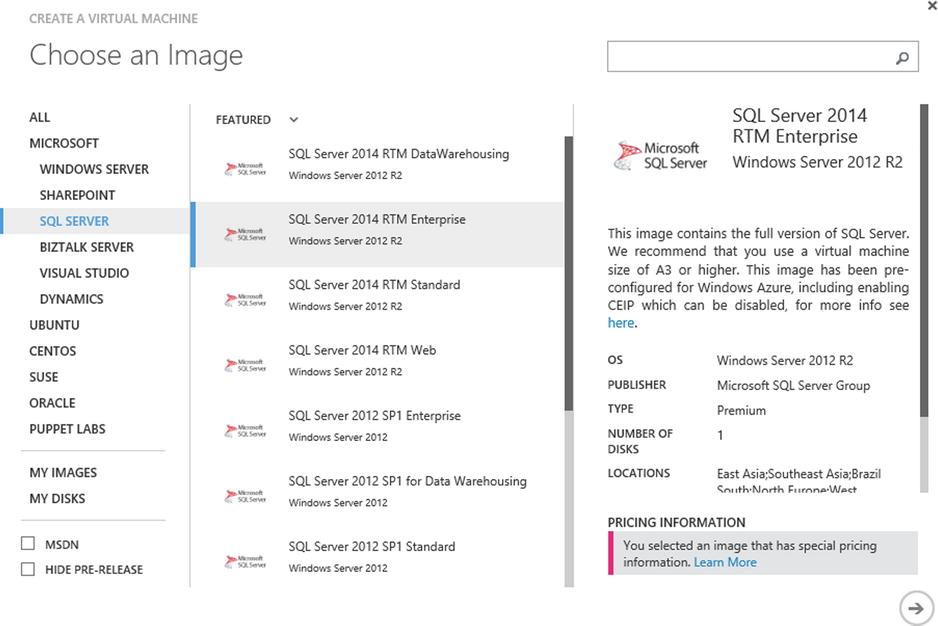
Figure 17-4. Select SQL Server 2014 RTM Enterprise
- On the Virtual machine configuration page, type in a name for your new VM.
- Select the Tier, either Basic or Standard. Basic is fine for a test machine, but you will probably want Standard for production servers to take advantage of several features such as load balancing.
- Select a machine size. This will directly affect both your performance and the price you pay. For this example, select A3.
- Enter a User Name. This name will be the administrator account for the server. Be sure to write down the name.
- Finally, enter a password for the administrator account and write it down. Figure 17-5 shows how my screen looks. Click the right arrow when your page is complete.
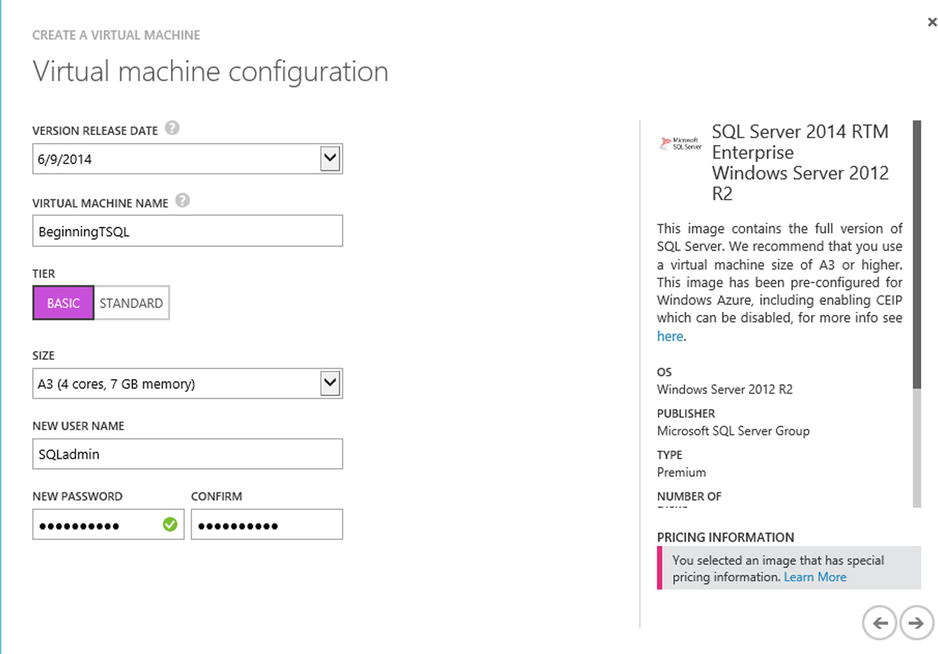
Figure 17-5. The Virtual machine configuration
- The next screen is also called Virtual machine configuration, but it has a different set of questions. If this is your first VM, you will need to create a new cloud service. Otherwise, you could select an existing service from the list.
- Your new cloud service name will be automatically filled in for you.
- In the Region/Affinity Group/Virtual Network box, select a region that is close to you geographically.
- Leave the Storage Account set to automatically generate an account or select an existing one from the list if this is not your first VM.
- For practice VMs, you can leave the Availability Set at (none). Figure 17-6 shows how you may have this set up. Click the right arrow when you are done.
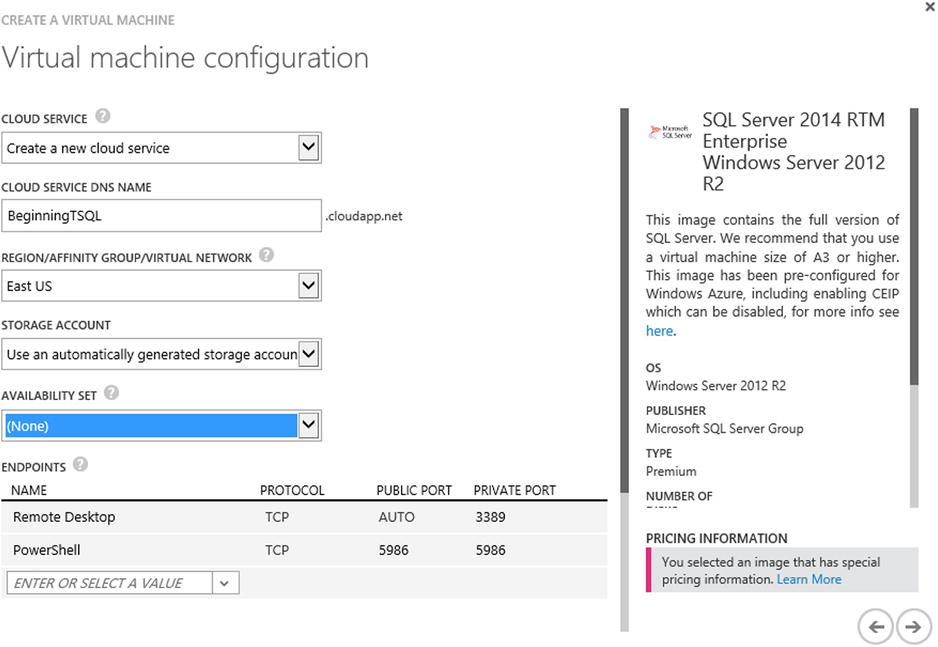
Figure 17-6. Setting up the cloud service
- Another screen provides several options for the VM. These options allow you to manage administration and security of the VMs. Make sure that Install the VM agent is selected and click the checkbox.
After following the steps, you will see the dashboard once again. Your new VM will be listed, but it will take a few minutes before it is available for you to use. Compare that to the amount of time it would take if you had to order hardware, put everything together, and then install the operating system.
Make sure that the VM status says Running as shown in Figure 17-7 before trying to connect to the VM. Click the Status column next to the server name and then click the Connect button at the bottom of the screen.
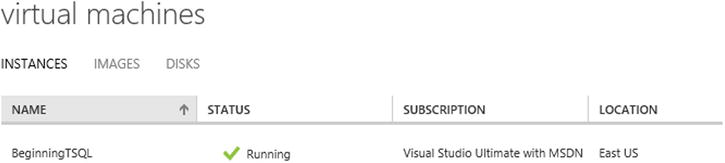
Figure 17-7. The new VM is ready
If you are asked if you want to save or open the file, select Open. You will be using Remote Desktop to connect to your server, as shown in Figure 17-8. Check “Don’t ask me again for connections to this computer” and click Connect.
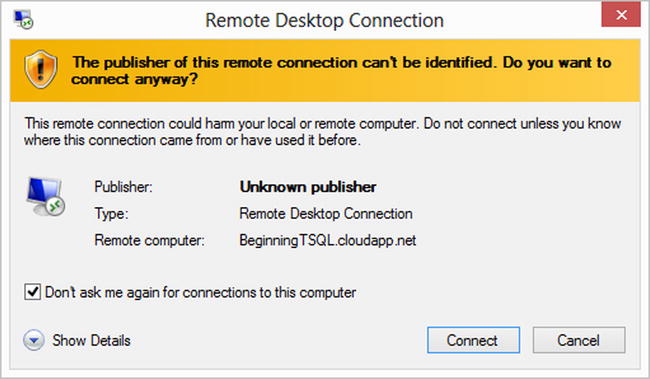
Figure 17-8. The Remote Desktop Connection
When prompted, use the admin account and password you set up earlier in steps 8 and 9 to log into the server, as shown in Figure 17-9.
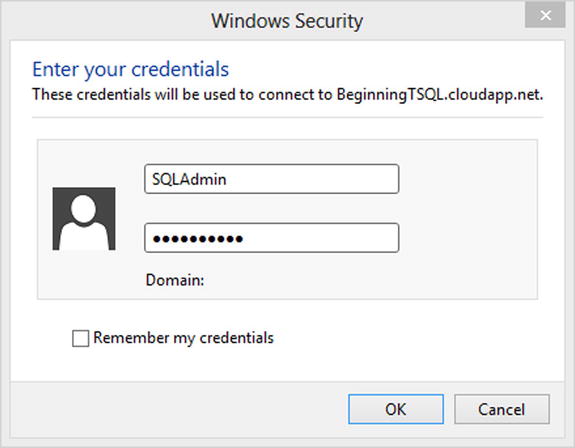
Figure 17-9. Enter the credentials
Congratulations! You are now remote controlling your first Azure VM.
SQL Server is installed on this server just waiting for you to add user databases. You can add the AdventureWorks databases or create a new one if you wish.
When you are done with the VM, be sure to shut it down using the menu on the Azure dashboard. The next time you want to use your VM, just start it up again. This will prevent the meter from running when you don’t need the VM.
The Windows Azure Virtual Machines feature is a great way to set up “playgrounds” for learning and experimenting. I have created several for writing articles and technical editing of other book projects. I have also created Azure VMs for writing this book.
Azure SQL Database
The previous section described how to set up servers in the cloud running SQL Server. This section will explain a strictly cloud-based database called Windows Azure SQL Database, or SQL Database for short. To make the meaning clear, I will use the term Azure SQL Database in this chapter. Notice that the word “server” is missing from the name. That’s because you don’t actually have control of a server, just databases.
Part of the appeal of Azure SQL Database is that you can provision a database in seconds and never have to worry about reboots, upgrades, or backups. Microsoft automatically performs most of the maintenance for you. Another interesting thing about Azure SQL Database is the pricing. The monthly rate is calculated based on the database size and prorated based on the day.
Luckily, the majority of T-SQL DML and DDL commands are exactly the same as those used in traditional SQL Server. Microsoft is adding new features regularly to Azure SQL Database, and it is possible that some features will appear in the cloud before the traditional versions of SQL Server.
Because the features can change rapidly, I won’t attempt to list all the differences. To see up-to-date information, review the current official information found at http://msdn.microsoft.com/en-us/library/ee336250.aspx. You should also visit the Azure SQL Database Transact-SQL Reference found at http://msdn.microsoft.com/en-us/library/ee336281.aspx. As a beginning T-SQL developer, the majority of features you probably care about are supported.
To get started with SQL Database, follow these instructions:
- Log on to your Windows Azure Dashboard.
- Select SQL Databases.
- Click +New found in the bottom menu.
- Select Data Services SQL Database Quick Create, as shown in Figure 17-10.

Figure 17-10. Create a SQL Database
- Fill in a name for the database.
- In the Server selection, if this is your first Azure SQL Database, choose New SQL database server. Otherwise, select a previous server from the drop-down list. You won’t actually have control of a server; this is more of a way to organize your databases.
- Select a region that is close to you.
- Create a login and password. Be sure to write these down.
- Click the check mark next to Create SQL Database at the bottom of the form.
It took less than 10 seconds for my database’s status to change to Online after clicking the check mark. There is still some configuration to do. To increase security, only connections from known IP addresses are allowed. Make sure your database is selected and click Manage. When you do, a message will pop up asking to include your current IP address in the firewall rules. Click Yes to continue and then Yes again when asked if you want to manage the database. Enter the username and password from step 8 above and click Log On.
You should now see the Azure SQL Database dashboard, which allows you to create tables and write queries. This dashboard can also change frequently as Microsoft adds new functionality. At the time of this writing, it looked like Figure 17-11.
Figure 17-11. The Azure SQL Database dashboard
To create a table, click the Design link and then New Table. Fill out the form with column names and data types as shown in Figure 17-12 and then click Save.
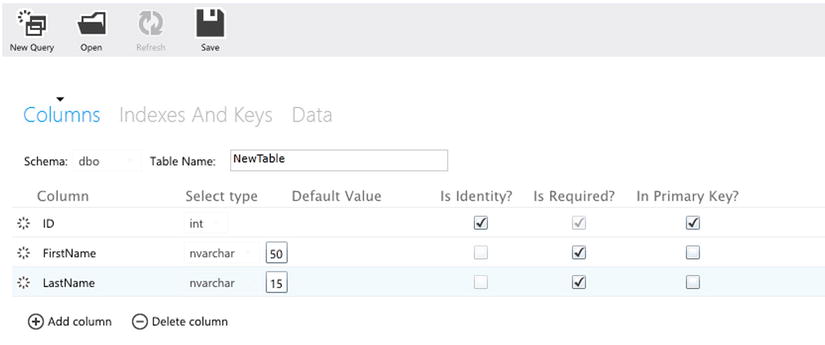
Figure 17-12. Create a new table
Click New Query to open a query window. In this window you can type in and run Listing 17-1 if you created the table shown in Figure 17-12.
Listing 17-1. Create a Table in SQL Database
--1
INSERT INTO dbo.NewTable(FirstName, LastName)
VALUES('Ken','Sanchez'),('Terri','Duffy'),('Roberto','Tamburello'),

--2
SELECT ID, FirstName, LastName
FROM NewTable;
Figure 17-13 shows the results of running this code.
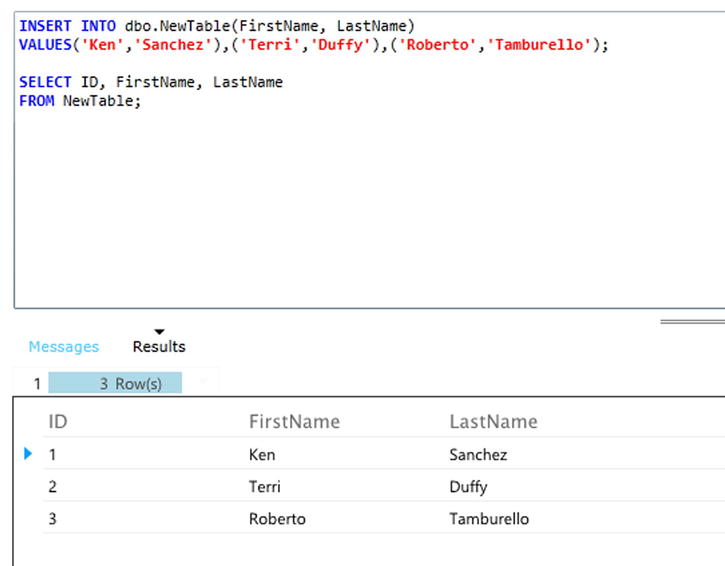
Figure 17-13. The results of populating a table in SQL Database
At the time of this writing, no IntelliSense was available. It is, however, possible to see the execution plan. Select just query 2 and click the Actual Plan icon. After the query runs, click the Query Plan link. Figure 17-14 shows the execution plan.
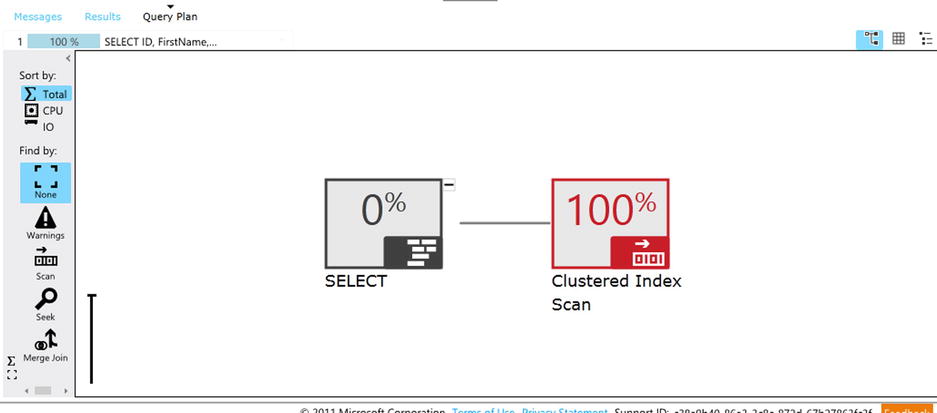
Figure 17-14. The execution plan
Although the interface for working with your SQL Databases is improving over time as Microsoft adds new features, it still might be easier to work with the database through SQL Server Management Studio (SSMS). Follow these steps to connect using SSMS:
- Log on to the Microsoft Azure dashboard.
- Click the name of your database, as shown in Figure 17-15.
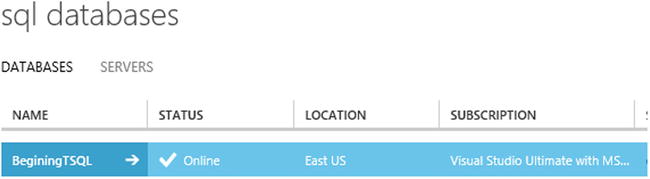
Figure 17-15. Find your SQL Database
- You will now see a page with many tasks you can perform to manage this database. Near the bottom of the page, copy the connection string, as shown in Figure 17-16.

Figure 17-16. Copy the connection string
- Start up SSMS.
- When prompted to connect, paste in the connection string you copied from the Azure page.
- Change the Authentication to SQL Server Authentication.
- Type in the username and password you used to create the database and click Connect.
You should be able to see the table you created and use the Query Window to write queries. This may be a more comfortable environment to work in; however, at the time of this writing, you are still missing features such as IntelliSense.
Even though most T-SQL statements are compatible, there are some things to keep in mind when working with Azure SQL Database. First, some of the database administration-type tasks are taken care of by Microsoft, such as fault tolerance or high-availability and Database Console Commands (DBCC) to check for database consistency.
For fault tolerance, Microsoft automatically creates three replicas of each database. You don’t have access to the replicas, but one of the replicas will become active in case of a problem. This is seamless; there is no change to the connection properties when a replica takes over. To set up something similar in your own data center is expensive and requires the efforts of highly skilled database and network professionals.
Throttling
Another thing to keep in mind is the concept of multitenancy. This means that your database is hosted on a server with databases belonging to other customers. You can only see your databases, and no one else can see your database. Except for the master database, you cannot see any system databases. Even within master, most system tables don’t exists or at least you don’t have permission to run them. Try running Listing 17-2 in both your Azure database and an on-premises SQL Server database.
Listing 17-2. Querying System Tables
--1
SELECT * FROM sys.databases;

--2
SELECT * FROM sys.database_files;
After running the statements in both types of databases, you’ll find that statement 1 will run in both, but statement 2 will work only against the traditional SQL Server.
Because multiple customers will have databases on the same servers, what happens if one customer runs a query that takes the majority of the resources on the server? In a case like that, and I’m sure it happens often, the offending connections are throttled, preventing writing and sometimes reading to the database. It is possible to upgrade your databases to the Premium edition, in preview at the time of this writing, for a higher price so that your databases are immune to throttling.
Database Size Limitations
From the beginning of Azure SQL Database availability, the database size has been limited. Frequently, however, Microsoft will announce new, larger sizes. At the time of this writing, an Azure SQL Database can be up to 150GB, which can be relatively constricting in today’s database world. To get around this limitation, applications can be designed to split the data over several databases.
Another benefit to this is called elasticity. Elasticity is the ability to scale out to multiple databases in times of heavy activity. For example, imagine that you have an application that collects information during elections. You can increase the number of databases on election day and roll the data back into a smaller number of databases once the election is complete. This would also improve performance because the transactions would be spread over many databases.
There are two ways to accomplish this scale out. The first method is called sharding. When you decide to use sharding, you will provision multiple databases, and it is up to you when you create your application to direct the inserts into the appropriate databases. The second method is called federation. Federation works automatically to spread the data over the federated database. Unfortunately, Microsoft is discontinuing this functionality and recommends using the custom sharding method.
Pricing
You pay for Azure SQL Databases based on the size and service tier of the database. At the time of this writing, there are two service tiers available, Basic and Standard. Microsoft has announced that these tiers will be retired in April 2015 and will be replaced with Basic, Standard, and Premium tiers. The Premium version will allow you to avoid throttling and also has advanced business continuity features including point in time restores.
The charge for databases is prorated by the day that the database exists. If you create a database and then delete it a few seconds later, you will pay for one day. This is another reason that scaling out when needed has such great cost benefits. Scale out when your requirements increase, and scale back when your requirements decrease. Be sure to delete any databases that you create just to experiment when you are done using them to minimize charges.
There is one more thing to keep in mind about pricing. You are also charged for data leaving the data center. The results from a query that you run in the Management Portal or from an Azure web application do not leave the data center. The results from a query that you run from SSMS or from a non-Azure hosted web application do leave the data center. For more information about pricing, see http://azure.microsoft.com/en-us/pricing/details/sql-database/.
AZURE SQL DATABASE REAL-WORLD EXPERIENCE

By Kim Tessereau
SQL Azure can be quite a mystery until you actually begin to work with it. And even then, there is so much that is unknown and unpublished that even the experienced database administrator finds it hard to transverse over the new terrain called Azure SQL Database.
When I was first assigned the task of moving one of our flagship applications into Azure, I was excited that I was going to finally get experience working with Azure. So like any good database administrator, I started my research by trying to hunt down a good book so I could get some basic knowledge on using Azure. Well that search ended abruptly when I couldn’t find a book on Azure that was more than a high-level introduction to a rather elusive product. To save time, I found a two-day hands-on class that had you create a small Azure database along with a small application to show how Azure works. Everything went great during the labs and everything seemed so straightforward. Unfortunately, that wasn’t the case in the real world. Once I returned to work, I started to play around with Azure and found some things that were really limiting, such as not being able to run certain types of DBCC. Then I slowly started to realize that I didn’t need to be able to run some of these commands because Microsoft took care of a lot administration overhead. And disaster recovery in Azure was taken care of by the “cloud.”
The main lesson that we learned was you have to pick the right type of application to put into the Azure cloud. There is a rather exhaustive list of features that are not supported in Azure SQL Database including things like SQL Agent Jobs and Replication. The design of your application is very dependent on what is available to you in Azure. There are, however, some definite benefits to the cloud for the right type of application.
Summary
The cloud is the future of enterprise computing. There is no turning back now. This chapter has provided a glimpse of what is possible. One thing to keep in mind is that things move fast in the Azure world. Microsoft frequently makes announcements about feature and pricing changes.
Now that you have a good background in T-SQL and some special topics like XML, special data types, and Azure SQL Database, it’s time to think about other ways to advance your knowledge. Chapter 18 helps you figure out where to go next.