![]()
Organizing and Searching Your Computer
Our computing devices—be they desktop PCs, laptops, tablets, smartphones, or new ultrabooks—are all about content. We either make it or consume it, but we all have ever-growing quantities of it. You may store it on a network share, in the cloud, on an external hard disk, or on the computer’s hard disk or solid-state drive (SSD)—but there will probably be a lot of it wherever it is stored.
Of this content, you’ll likely have an ever-ballooning collection of digital photographs, a big music Library, and possibly a growing video collection. These files take a lot of space to store and can make finding exactly what you’re looking for problematic, especially with photos.
At the other end of the file-size scale are all your Microsoft Word, Excel, PDF, and other file types, which you have for personal, household, work, and school purposes. Although they may not take up large amounts of space, these files can be equally difficult to find and organize.
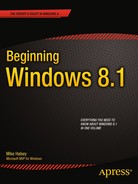
Traditionally, the way to organize files and documents was to use a folder structure. I remember using software such as XTree on the first IBM PCs to perform this task (see Figure 5-1).
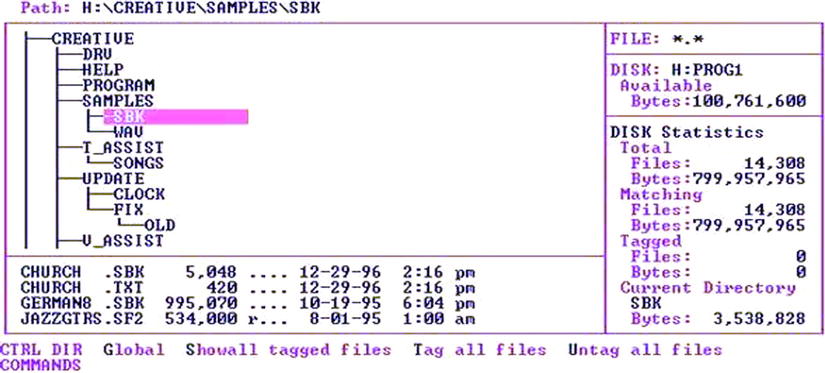
Figure 5-1. XTree on the original IBM PC
Folders aren’t always a suitable way to organize our files and documents because some have crossovers between categories; and as the volume of files, music, pictures, and videos we collect expands, even the most organized folder structure can become unwieldy and difficult to navigate.
For many years now, Windows has tried to help us organize our files through user folders, My Documents, and so forth. They still exist, but there are much more powerful ways to help you organize. In this chapter, I’ll show you how to optimize file organization and access.
Using File Explorer
Before moving into newer features, the place to start a discussion about organizing your files is File Explorer, sometimes referred to in Windows 8.1 as This PC. In Windows 8, it has been significantly overhauled with the inclusion of the Ribbon interface, which was first introduced in Microsoft Office 2007.
![]() Note The Ribbon interface is minimized by default in Windows 8.1, appearing only when you click a tab header. You can show or hide the Ribbon at all times in File Explorer by clicking the small arrow on the right of the Ribbon headers (see Figure 5-2).
Note The Ribbon interface is minimized by default in Windows 8.1, appearing only when you click a tab header. You can show or hide the Ribbon at all times in File Explorer by clicking the small arrow on the right of the Ribbon headers (see Figure 5-2).

Figure 5-2. File Explorer in Windows 8.1
File Explorer in Windows 8.1 is split into several different sections, and some can be used with great effect to aid productivity or save time when searching for and working with files. At the very top left of the File Explorer, there is a File Explorer button that can be clicked to perform various actions on the program, including minimizing it and closing it.
![]() Tip Clicking a program button in the top left of its window first displays a menu of window controls; with a second click, the program closes.
Tip Clicking a program button in the top left of its window first displays a menu of window controls; with a second click, the program closes.
Quick Access Toolbar
The Quick Access Toolbar remains next to the program button at the top of the window (see Figure 5-3). This area allows you to single-click access to commonly used commands. It is customizable too, with the Down arrow to its right bringing up a list of additional buttons that you can add to the toolbar, including Undo, Delete, and Rename.
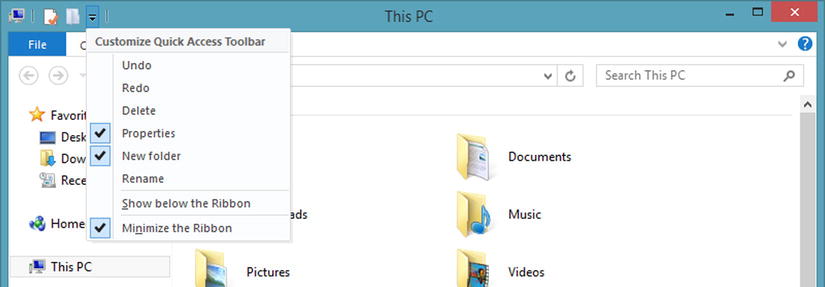
Figure 5-3. The Quick Access Toolbar in File Explorer
You can add and remove items from the Quick Access Toolbar by selecting and deselecting them in the toolbar options menu.
The Address Bar
Just below the Ribbon, which I will talk about in depth shortly, is the address bar, sometimes known as the breadcrumb bar. On the left of it are buttons to move backward and forward in the current view. These buttons remember where you have been and allow you to return to locations, even if they are out of the current folder tree (see Figure 5-4).

Figure 5-4. The address bar in File Explorer
Next to these buttons is an up arrow that takes you one level up in the current folder hierarchy. To the right of the address bar is a search box that allows you to search for any type of file or text within a file. By default, the search prioritizes the contents of the current folder. For example, if you are looking at pictures, those pictures are prioritized in your search results over other types of documents.
The address bar is so called because it offers you ways back in the current folder tree that provide easy access to other parts of that tree (see Figure 5-5). Each of the two folder names has a small black arrow separating them.
Figure 5-5. Using the address bar in File Explorer
![]() Tip The address bar displays a list of recent places on your PC and your network that you have visited when you start using it. You can clear this history from the File tab on the Ribbon by clicking Delete History and then clicking Address bar History. Similiarly, deleting the Recent Places List clears the recent places history for the Recent Places link in the Favorites bar in the Navigation Pane (see Figure 5-5).
Tip The address bar displays a list of recent places on your PC and your network that you have visited when you start using it. You can clear this history from the File tab on the Ribbon by clicking Delete History and then clicking Address bar History. Similiarly, deleting the Recent Places List clears the recent places history for the Recent Places link in the Favorites bar in the Navigation Pane (see Figure 5-5).
If you click one of the arrows between folders, you are given quick links to jump to any other folder in that part of the tree. This can make it extremely quick and easy to navigate to different parts of your hard disk(s) and find what it is you are looking for.
![]() Tip To find out the exact current folder location or to manually type a folder address into the address bar, click the button located on the far left of the address bar. The exact current folder address will appear, highlighted, so you can immediately start typing a new folder address; you can also press Ctrl+C to easily copy it while its highlighted.
Tip To find out the exact current folder location or to manually type a folder address into the address bar, click the button located on the far left of the address bar. The exact current folder address will appear, highlighted, so you can immediately start typing a new folder address; you can also press Ctrl+C to easily copy it while its highlighted.
The Navigation Pane
To the left of the window is the Navigation pane, which is split into different categories. In the first, Favorites, you can drag and drop folders (not files) that you want quick one-click access to, perhaps because you use them often.
![]() Tip You can pin Favorite Links, folders, and files to the Start screen by right-clicking them and selecting Pin to Start.
Tip You can pin Favorite Links, folders, and files to the Start screen by right-clicking them and selecting Pin to Start.
Beneath the Favorite Links in the Navigation Pane are quick, expandable groups for the following:
- SkyDrive displays if you log in to your Windows 8.1 PC using a Microsoft account. It displays all the files and folders you have stored on SkyDrive and gives you quick access to them. If you are syncing your PC’s files with SkyDrive, this duplicates the user folders in This PC.
- HomeGroup, which I discuss in detail in Chapter 4, provides access to documents, pictures, music, and video that is shared on your home network using the HomeGroup feature.
- This PC, formerly known as Computer in File Explorer, displays all the hard disks and attached storage on your computer in addition to your user folders for your Desktop, Documents, Downloads, Music, Pictures, and Videos.
- Network displays all available attached network locations, networked computers, and network storage.
Customizing the Navigation Pane
You can customize the Navigation Pane by clicking the Navigation Pane button on the View tab in the Ribbon, see Figure 5-6. The options available include

Figure 5-6. You can customize the Navigation Pane in File Explorer
- Turning the Navigation Pane off altogether
- Displaying a folder list underneath the clicked item in the Navigation Pane that automatically Expand[s] to [the currently] open folder
- Show[ing] all [the] folders on your PC in a traditional tree view (yes, this is where you can find it!)
- Show [the] Libraries that are hidden by default in Windows 8.1 but still exist. Libraries, which I will show you how to use later in this chapte,r can be extremely useful.
- Show [the] Favorite links section at the top of the Navigation Pane
Status Bar and Folder Options
Running along the bottom of File Explorer is the Status bar. It gives basic information about the current folder of the currently selected items, such as the number of files. Unlike with Windows 7, this Status bar doesn’t contain details about files; they have been moved to a Details pane, which I will talk about shortly.
You can turn the Status bar off in the Folder Options for File Explorer. It can be accessed by clicking the Options button under the View tab on the Ribbon and then clicking Change folder and search options. In the options that appear, you find the Folder Options under the View tab (see Figure 5-7).

Figure 5-7. The Folder Options for File Explorer
In this list, you find a check box for Show status bar. Other controls are also very useful and include being able to uncheck the option to Show Drive letters for your hard disks; showing compressed NTFS drives in color; or unhiding protected operating system files, which can prove useful if you need to troubleshoot and repair a problem with Windows.
Another useful feature in the Folder Options is the Apply to Folders button that you can use to make all the folders on your PC (for general and mixed document types) look the same as the current folder. I will show you how to customize the views in File Explorer later in this chapter.
![]() Tip At the far right of the Status bar are buttons to quickly access two of the most common views in File Explorer: the Details view and the Thumbnail view. Clicking these buttons immediately changes the File Explorer view of the current folder.
Tip At the far right of the Status bar are buttons to quickly access two of the most common views in File Explorer: the Details view and the Thumbnail view. Clicking these buttons immediately changes the File Explorer view of the current folder.
Main Explorer View
In the main File Explorer pane , you see all your files and folders, which can be arranged in a great many ways. You can also select files in the main view in several ways, including the following:
- Right-click: You can right-click a file or folder with your mouse to bring up a context menu of the actions you can perform on it.
- Tap and hold: You can tap and hold a folder or file to bring up the actions context menu.
- Hover the mouse: You can hover your mouse over a file or folder to bring up a check box to select the item. You can use this method to select multiple items if you want.
![]() Tip To select multiple files and/or folders with your mouse and keyboard, you can use one of these options. To select everything between two items, click the first item, hold down the Shift key, and then click the item at the end of the list. To select multiple, randomly placed items, hold the Ctrl key while clicking the items you want to select.
Tip To select multiple files and/or folders with your mouse and keyboard, you can use one of these options. To select everything between two items, click the first item, hold down the Shift key, and then click the item at the end of the list. To select multiple, randomly placed items, hold the Ctrl key while clicking the items you want to select.
Hiding Picture File Names
One very useful feature that has not made it into the Ribbon is the ability to hide the file names of pictures in File Explorer. If you are looking at holiday photos or similar, why do you need to look at reams of DSCxxx file names anyway?
You can hide the file names for pictures by right-clicking in any blank space; then in the View menu, select Hide file names (see Figure 5-8).

Figure 5-8. Hiding file names in picture views
File Explorer Ribbon
I have left the Ribbon until last because I want to spend a little more time on it and talk about each tab.
By default, the Ribbon in File Explorer is hidden, and you display it by clicking one of the tabs at the top of the window: File, Home, Share, and View. Other tabs can appear, however, such as Computer, Library, or Picture. These extra tabs contain functions specific to those file types. When the Ribbon is open, a pin icon appears on the right of the window. You can click this to lock the Ribbon so that it is always displayed.
I won’t discuss every Ribbon function in depth here, but I do want to concentrate on the Ribbon functions that I think are most useful, most interesting, or most likely to give you a valuable productivity boost.
You may find that the Ribbon is hidden in File Explorer and you can see only the tab names. If you click one of these, the Ribbon appears temporarily, but you can show and hide the Ribbon by clicking the small up/down arrow (this changes depending on whether the Ribbon is currently displayed or hidden) that appears next to the Help button on the far right of the tab name on the right of the window.
File Tab
The main file tab, which is blue—a different color from the other tabs—is where you find options such as Open or Open in a New Window. As well as having options for deleting your File Explorer history a list of your frequently accessed folders appear here. You can click the pin icon to the right of them to pin any to this Frequent Places list (see Figure 5-9).
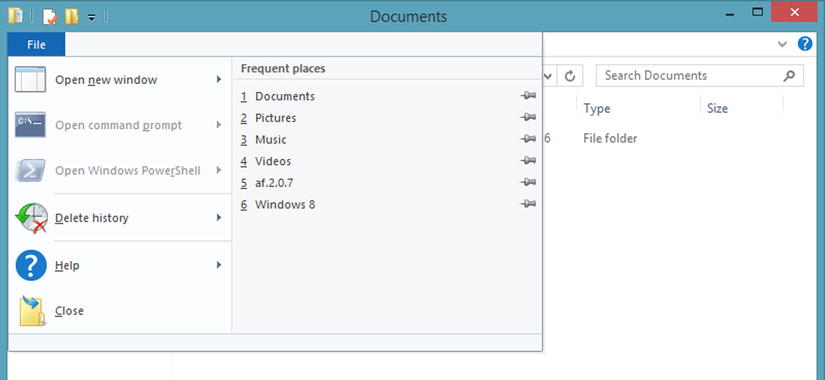
Figure 5-9. You can perform general File Explorer options from the File tab
Computer Tab
The Computer tab is accessible from the This PC or network main drive (see Figure 5-10). The Computer tab provides context-sensitive options to perform actions such as adding a network location to File Explorer. You also get easy access to the Windows 8.1 Control Panel and the Programs and Features panel, in which you can uninstall desktop programs.

Figure 5-10. Computer tab
Home Tab
The Home tab (see Figure 5-11) is where you find all the common options associated with files and folders in Windows. These options include Cut, Copy, Paste, Move, and Delete. You can also create new folders and files in the New section of the Ribbon. Of particular interest are the History button and the Selection buttons.

Figure 5-11. The Home tab in File Explorer
![]() Tip You can perform cut, copy, and paste actions in Windows using the Ctrl+X (Cut), Ctrl+C (Copy), and Ctrl+V (Paste) hot keys.
Tip You can perform cut, copy, and paste actions in Windows using the Ctrl+X (Cut), Ctrl+C (Copy), and Ctrl+V (Paste) hot keys.
Windows 8.1 includes a better file versioning system than what was included in Windows 7. I discuss how to use the feature in depth in Chapter 12, but if you have a single file selected, the History button brings up the versioning for that file, including any previous versions of the file that Windows 8.1 has backed up.
Also, the Open section has a Properties button that you can click to quickly bring up the Properties dialog for any file, folder, or a selection of files and/or folders. In the Properties dialog for files, you can change or update information about a file, including artist and track information for music, as well as tags and ratings.
In the Selection section, very handy buttons for Select all, Select None, and Invert Selection have been included. It can be very helpful when you want to work with some files, perhaps to change their properties, and then need to perform another action on all the other files in the same folder.
Note that if you select a location such as a DVD or non-hard-disk location, the options on the Home tab change to better reflect the actions you can perform with that device.
Share Tab
The Share tab (see Figure 5-12) contains the tools and utilities you need to share and back up your files and folders. These options include syncing and backing up to Microsoft’s SkyDrive service, sending files via e-mail, creating a zipped archive file, burning files to disc (CD/DVD/Blu-ray), and printing or faxing files.

Figure 5-12. The Share tab in File Explorer
If you are sharing files on your computer or across a network, or would like to, you can set who you want to share files with by using this tab.
View Tab and Customizing File Explorer
In the View tab (see Figure 5-13), you can customize File Explorer to look and work the way you like.

Figure 5-13. The View tab in File Explorer
There are different panes that can be switched on and off in File Explorer. The Navigation Pane has a button to switch it off or to customize it. There is no way to turn on the traditional folder view, not that you were necessarily used to it in earlier versions of Windows anyway, but turning on Show All Folders in the Navigation Pane displays the same result in the This PC section.
The Preview and Details panes are slightly different, though they can be confused with one another. Both these panes appear on the right side of the Explorer window and cannot be displayed simultaneously. If you turn on the Preview pane, a live image of the file appears, which you can review (this will work for the most common file types, but won’t work for custom or less common files). This includes being able to scroll through an entire Word, Excel, or Acrobat document.
![]() Tip Grouping, which is a great way to clearly organize your files and folders in File Explorer, can be activated for a folder by clicking the [■ ] button in the Current View section. It seperates the content of a folder by a category that you specify, such as the size or file type. When you group items in File Explorer, each group is separated by a horizontal line. You can click this line to select all the items in the group or right-click the line to display an option to hide the group (or all the groups). This makes folders that contain many files easier to navigate.
Tip Grouping, which is a great way to clearly organize your files and folders in File Explorer, can be activated for a folder by clicking the [■ ] button in the Current View section. It seperates the content of a folder by a category that you specify, such as the size or file type. When you group items in File Explorer, each group is separated by a horizontal line. You can click this line to select all the items in the group or right-click the line to display an option to hide the group (or all the groups). This makes folders that contain many files easier to navigate.
The Details pane in File Explorer gives you detailed information about a file that you select. The information presented in the Details pane is editable, meaning that you don’t have to bring up the separate Properties dialog to edit information such as Author, Track Number, or Rating.
In the Layout section of the Ribbon are some very useful tools for customizing the current view:
- The Small, Medium, Large, and Extra Large buttons change the default thumbnail size in the current view.
- List displays all items in view as a simple list, such as was the case in the very early versions of Windows.
- Details is a very common view. It can also be accessed from a button on the Status bar at the bottom right of the window. This view displays extra information about files and folders that many people find useful, such as the file size and the date/time the file was created and last modified.
- Tiles and Content present files and folders in much friendlier ways than the default view, in my opinion. Tiles is an upgraded thumbnail view. Content presents more details about files in a way similar to the Details view.
In the Current View section are tools to help you sort and group content in different ways. You may want, for example, to sort items by Date Modified or Created By. Grouping files and folders is an excellent way to keep yourself organized so that you know exactly what you have and where. Grouping files and folders by Type, for example, groups all the folders together, all the Word documents together, all the PNG images together, and so on.
![]() Tip At the bottom of the Sort By and Group By drop-down menus is a Choose Columns option. If you select it, many more sort and group options appear, including album artist or rating for music or EXIF data for digital photographs.
Tip At the bottom of the Sort By and Group By drop-down menus is a Choose Columns option. If you select it, many more sort and group options appear, including album artist or rating for music or EXIF data for digital photographs.
In the Show/Hide group are two functions previously hidden to many Windows users: the ability to show and hide file extensions. These are hidden by default for all known file types. The second option is to show and hide hidden files. This option is extremely useful if you need to drill down into the Windows system folder or your User folder to find specific information or a specific hidden file.
![]() Tip In the Ribbon, you can set all folders to display in the same way as the current folder by clicking Options
Tip In the Ribbon, you can set all folders to display in the same way as the current folder by clicking Options ![]() Folder and Search Options
Folder and Search Options ![]() View
View ![]() Apply to Folders.
Apply to Folders.
Copying and Moving Files in File Explorer
The feedback you get when copying and moving files in Windows 8.1 has significantly improved. There is more feedback and more control when duplicate copies of files are found. The copied file dialog is shown in Figure 5-14.
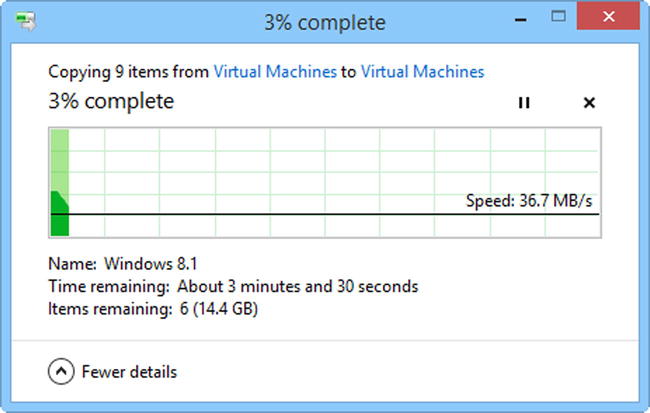
Figure 5-14. The improved copy/move file dialog in Windows 8.1
One of the most significant improvements to copy and move file operations is that all operations now appear in the same window. This means that if you have several copy or move operations running simultaneously, you now only have one window on your screen that contains them all.
The other significant improvement is the addition of a Pause button to the dialog. You can now pause, copy, and move operations if you need to do something else or put your computer to sleep at the end of the day. When you return to Windows, you can continue with the operation by unpausing it.
When you click More Details on a copy or move file dialog, you are shown a graph of the copy or move operation. This graph gives you live feedback on the current speed of the copy, the number of megabits per second being copied, and a filled graph showing how the speed of the copy has changed. This is useful for diagnosing problems with copy or move operations when something else is happening in the background.
The Replace dialogs have also been upgraded in Windows 8.1 (see Figure 5-15), as you will notice when you copy or move files into a folder or onto a drive where another copy already exists.

Figure 5-15. The improved Replace or Skip Files dialog
The Replace or Skip Files dialog is now much simpler with choices to replace or skip all the files, or to choose which ones you want to keep in the destination folder.
If you want to choose which files you want to keep or overwrite, this dialog has improved as well. You still have a check box to select everything to keep or replace, but each individual file is more easily identifiable.
![]() Tip To keep all the source and destination files in a copy or move operation, check the Files From and Files Already In check boxes at the top of both the left and the right columns (see Figure 5-16).
Tip To keep all the source and destination files in a copy or move operation, check the Files From and Files Already In check boxes at the top of both the left and the right columns (see Figure 5-16).
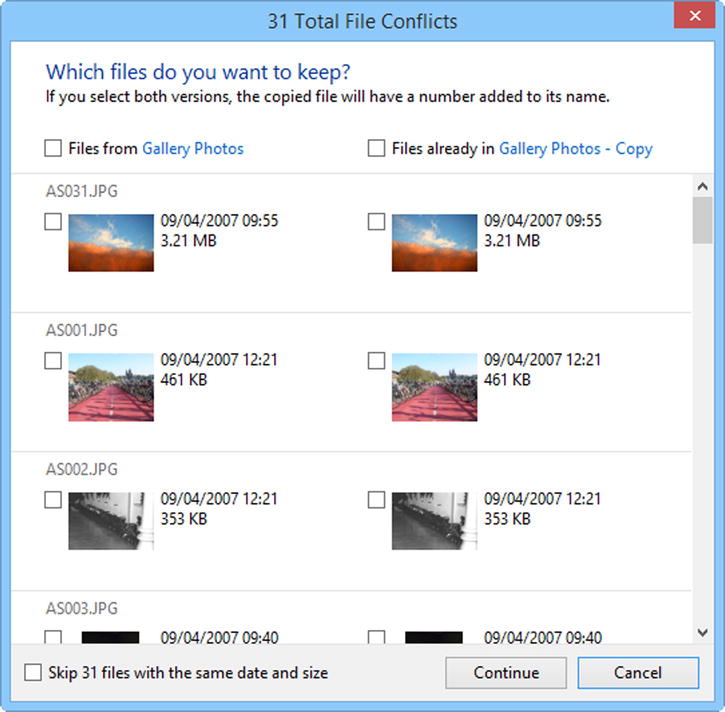
Figure 5-16. You can easily select files to overwrite in Windows 8.1
Pictures have a thumbnail image, but other file types just display the associated program’s icon. This new dialog makes it much easier to decide which files to keep and which to replace than with Windows 7, in which you were given only text information such as the date and time stamps.
Managing Files and Folders from Apps
Managing files and folders in Windows 8.1 apps is a much simpler affair, and you can get easy access to files across your network or stored in SkyDrive (see Figure 5-17). However, the new interface can make it difficult to manage large volumes of files or to perform complex actions because the commands available in the App bar are not as extensive as in the desktop File Explorer.

Figure 5-17. You can easily find files in different locations from within apps
To select any file in an app on which you want to perform an action, tap and hold it. You can also right-click it with a mouse. You can select multiple files, but the options available for working with those files in the App bar may change depending on the app in which you are currently working.
Using Libraries in Windows 8.1
The common view of Windows 7 users is that Libraries are the same as the shell user folders—those folders with “My” in front of their names. Libraries actually are aggregated storage for many locations. They are customizable for specific types of content. They’re actually very powerful with the way that content can be displayed.
By default, Libraries aren’t displayed in Windows 8.1, although you can turn them on by clicking the Navigation Pane button on the View tab in the Ribbon and selecting them there. They then appear in the Navigation Pane as in Windows 7 and 8; additionally opening File Explorer now takes you directly to your Libraries (see Figure 5-18). However, if you still want to see This PC as the default File Explorer view, I will show you how to do this in Chapter 13.

Figure 5-18. Accessing Libraries in File Explorer
By default, there are Libraries of documents, music, pictures, and videos; although if you install other software (such as the Microsoft Zune player), others (such as Podcasts) may be added.
You can create your own Libraries to view and arrange content in specific ways; for instance, you might want one for your work or school documents, and so on.
Creating a Library
You can add new folders to an existing Library (I show you how to do this shortly), but you can also create your own custom Libraries. I have one for Photos, in which where all my pictures are arranged by their tags. You might want a separate Library for your school, work, or household documents. You can have a Library for anything, and it’s a great way to organize files.
![]() Tip You can add SD cards and other removable media to Libraries in Windows 8.1. This is useful if your ultrabook or tablet comes with a memory card shot for additional storage. To add these file locations, right-click them; from the context menu that appears, click Include in Library. From the list that appears, click the Library in which you want to include the folder.
Tip You can add SD cards and other removable media to Libraries in Windows 8.1. This is useful if your ultrabook or tablet comes with a memory card shot for additional storage. To add these file locations, right-click them; from the context menu that appears, click Include in Library. From the list that appears, click the Library in which you want to include the folder.
To create a new Library, perform the following steps:
- Open File Explorer on the desktop.
- Click Libraries in the left pane.
- Right-click (or tap and hold with your finger) any blank space in the main Explorer window (see Figure 5-19).

Figure 5-19. Creating a new Library
- From the context menu, select New and then Library. You are presented with a new empty Library to which you need to give a name.
- Once the Library is created, double-click it to open it.
- Click the Include a Folder button and choose a folder to display in the Library (see Figure 5-20). You can add additional folders later (I will show you how to do this shortly).

Figure 5-20. Including a folder in a Library
Changing the Way a Library Displays Files
You now see your folder listed in the Library, but it just looks like an ordinary explorer Window. It is now that the full flexibility of Libraries can be used because they can display content in ways that the normal Explorer folder view cannot.
- To change the view, right-click (or tap and hold with your finger) in any blank space in the main window (see Figure 5-21).

Figure 5-21. Changing the way a Library is displayed
- From the context menu, click Arrange By and then your preferred choice by which to arrange the contents of the Library (see Figure 5-22). This action can be performed only by a right-click, not from the Ribbon. It is different from the Ribbon’s Sort By and Group By views.

Figure 5-22. Choosing how to arrange files in a Library
You see that the Library is now arranged as you want it. In Figure 5-23, I have arranged a Photo Library by tag. Regardless of what folder the photographs are stored in, I can view all pictures of Brighton Pier (for example) just by opening the tagged group. A nice benefit.

Figure 5-23. Viewing photos by tag in Libraries
These Brighton Pier photos may reside in a dozen or more different folders on my hard disk, but because they all have the same tag, they are all displayed together in the Library when I arrange the files by tag.
![]() Note Within Libraries, you can arrange files by type, which display the files as stacked groups for Word documents, PDFs, and so on. Sadly, you cannot specify just a single file type to be shown in a Library, only complete folders.
Note Within Libraries, you can arrange files by type, which display the files as stacked groups for Word documents, PDFs, and so on. Sadly, you cannot specify just a single file type to be shown in a Library, only complete folders.
Managing Libraries
When you are viewing a Library, a Manage tab appears on the Ribbon (see Figure 5-24). This Library Tools tab contains tools for managing the library, including which folders are included within it, what type of content the Library is optimized for (to aid in displaying that content correctly), and whether the Library is displayed in the Navigation Pane. Here you can also change the icon for the Library to one of the standard Windows icons or to a custom .ico file of your choosing.

Figure 5-24. You can manage a Library from the Ribbon in File Explorer
The folders included by default in the standard Windows 8.1 Libraries are the default folders found in C:User[Username]. In addition to the default folders, you can include other folders and remove folders in a Library. To add or remove folders from a Library, click Manage Library on the Manage tab in the Ribbon.
![]() Tip Although Libraries don’t allow you to add external hard disks and network locations, it can still be done through an easy cheat. See “Adding Network Locations to Libraries,” later in this chapter.
Tip Although Libraries don’t allow you to add external hard disks and network locations, it can still be done through an easy cheat. See “Adding Network Locations to Libraries,” later in this chapter.
Clicking the Manage Library button on the Ribbon brings up the Photos Library Locations dialog with its simple Add and Remove buttons for Library locations. You must have at least one location for a Library, but you can specify as many as you want (see Figure 5-25).

Figure 5-25. Adding and removing folders to Libraries
![]() Tip You can also add local folders on your PC and SD card storage to Libraries by right-clicking them and selecting Include in Library from the menu that appears.
Tip You can also add local folders on your PC and SD card storage to Libraries by right-clicking them and selecting Include in Library from the menu that appears.
Changing the Default Save Location
A question mark can be raised about where the default save locations for Documents, Music, Pictures, and Video will be when you add new folders to a Library. After all, when you save a file, where does it go? Into your Users folder on the C: drive? Into the Library somewhere? Into a specific folder in the Library?
In Chapter 12, I talk about how and why you should move your files away from Windows and onto a separate hard disk or partition to safeguard them, but one way to do it is to change the default save location for a Library. You can do this from the Library Tools tab on the Ribbon in File Explorer when a Library is being viewed.
On the left of the Ribbon, there is a Set Save Location button, which offers a drop-down menu of the folders contained within that Library. To change the default save location, simply click the relevant folder that you want all new files saved to (see Figure 5-26).

Figure 5-26. Setting the default save location for Libraries
Adding Network Locations to Libraries
It’s fairly well known and established that you can’t add network locations to Libraries in Windows 8.1, as was the case with Windows 7 . . . or can you? In fact, it’s always been possible to add network locations to your Music, Pictures, and Videos Libraries. You do it in two ways in Windows 8.1.
The first way is to create a symbolic link between the Library and the folder on your network that contains the files you want to include:
- Create a folder in your C:Users[Username] folder named after the folder you want to include.
- Add this new folder to your Library.
- Delete the folder from C:Users[Username], but do not delete it from the Library.
- Open the Command Prompt window from the Win+X menu.
- Type MKLINK /D C:Users Username FolderName \ NetworkLocation , substituting the correct paths to the folders.
This process adds the network location to the Library, but does not add it to the index, which means that the Library may be slow to refresh when you open it. (I will talk more about the Windows index later in this chapter.) A friendlier way to add a folder to a Library can be done using Windows Media Center. Note that in Windows 8.1, Windows Media Center is no longer a standard feature in the operating system, but is available as a chargeable add-on for Windows 8.1 Pro and brings with it DVD and Blu-ray playback. You can purchase an upgrade by clicking Add Features to Windows in the Control Panel.
Open Windows Media Center to add network locations containing Pictures, Music, and Video (but not Documents). From the main menu, click Settings ![]() Media Libraries.
Media Libraries.
You are presented with a wizard that allows you to add or remove folders to/from the Libraries. When asked where the files are located, select On Another Computer (see Figure 5-27). This displays network drives and allows you to add these locations to the Libraries.
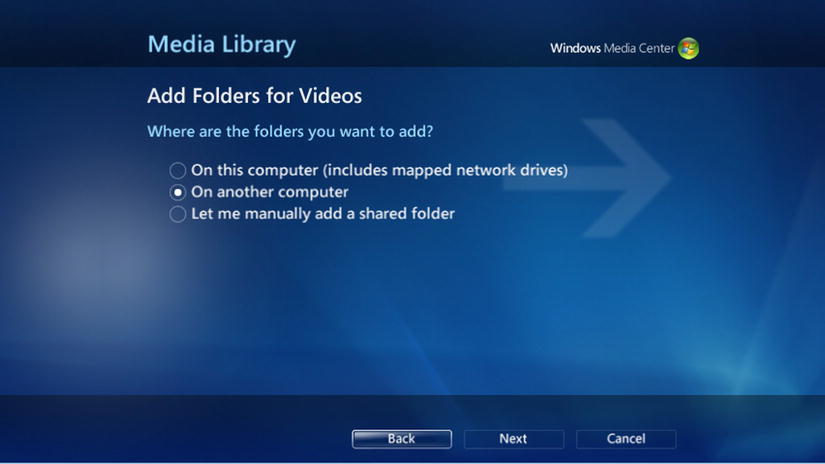
Figure 5-27. Using Media Center to add network locations to Libraries
All available network locations, including other computers on your network (that are switched on), appear in a collapsible list (see Figure 5-28). You can check and uncheck media folders to add to the Library. This is a fantastically simple workaround to what is otherwise a missing functionality in Windows Libraries.
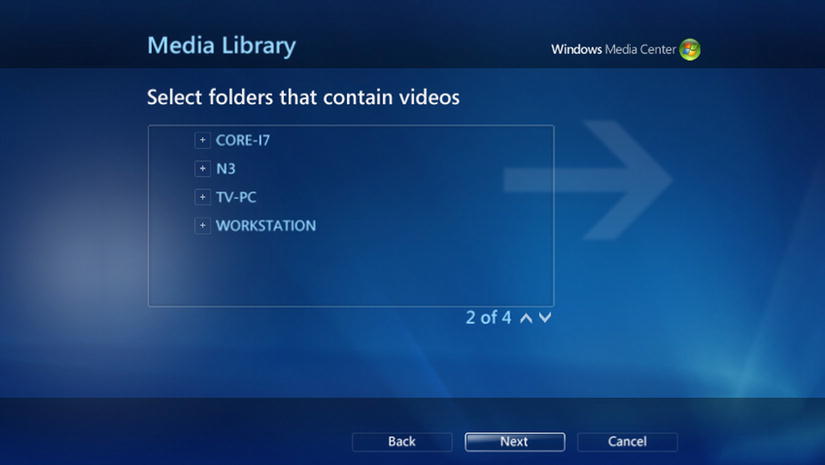
Figure 5-28. Viewing network drives to add to Libraries in Media Center
Using Tags and Ratings to Organize Files
Tags and Ratings are two of the best ways to organize and categorize files. Tags are labels that help you find relevant documents. For example, you might have documents tagged as “work,” “school,” “household,” or “auto.” Thus, tags might help you locate documents related to your car quickly and easily.
If you have a lot of photos, you might label them “vacation,” “children,” or “Germany” to help you find them quickly for display to friends and family (this is, after all, why you took them in the first place).
You might already be familiar with tags called metadata with your music files, where the artist, album name, track number, track name, and more are all tags. They are labels used to help you identify the contents of a file.
You don’t need to be limited to a single tag per file, either. You can stack multiple tags together so your recent vacation photos in Orlando might be tagged “vacation,” “Orlando,” “Disney,” “Janell,” and “Lidia.”
Ratings are slightly different but easier to understand. Ratings in Windows 8.1 use one to five stars that indicate how significant the file is. In your music, you probably already use 4- and 5-star ratings to identify your favorite tracks; you may have been doing this for years. If you use the Like tag for music tracks in the Zune Desktop software, for example, it automatically adds a 5-star rating to each file you like.
You can view the tags and ratings for any file or files in File Explorer by clicking the Details pane button on the Ribbon under the View tab (see Figure 5-29). This opens a pane on the right side of the windows, showing all manner of information, which changes from file type to file type. Tags and Rating are always at the top of the list.
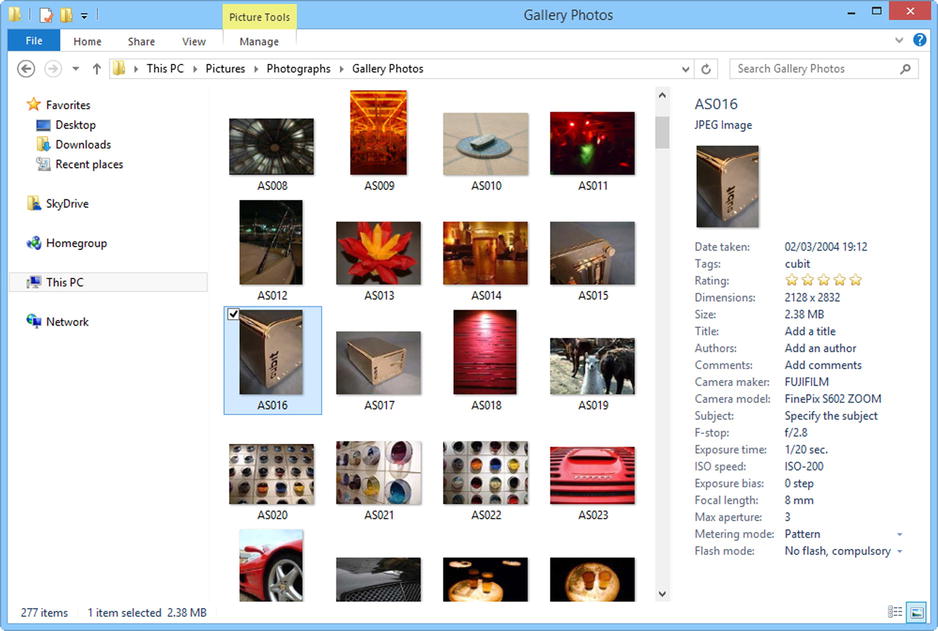
Figure 5-29. The Details pane in File Explorer
To add a tag or multiple tags to a file or a selection of files (remember you can press Ctrl+click to select multiple individual files, and click followed by Shift+click to mark a selected group), click next to Tags in the Details pane and type as many as you like, each one separated by a semicolon (;). When you have finished adding tags, click the Save button to finish.
You can add a rating or change a rating by clicking the appropriate number of stars. Click Save when you are done.
![]() Tip You can remove all the metadata in a file by opening the file’s properties (right-click and select Properties from the menu that appears) and under the Details tab click the Remove Properties and Personal Information link at the bottom of the properties panel.
Tip You can remove all the metadata in a file by opening the file’s properties (right-click and select Properties from the menu that appears) and under the Details tab click the Remove Properties and Personal Information link at the bottom of the properties panel.
Simplify Adding Tags and Ratings with Windows Photo Gallery
It can be a laborious process adding tags and ratings to files, but the important thing to remember is that you need to do this only once. There are tools that can make the process much easier for you as well. Windows Photo Gallery , part of the Windows Essentials suite, can be downloaded for free from download.live.com. In the View tab on the Ribbon, you have the option to view files by tag (see Figure 5-30).
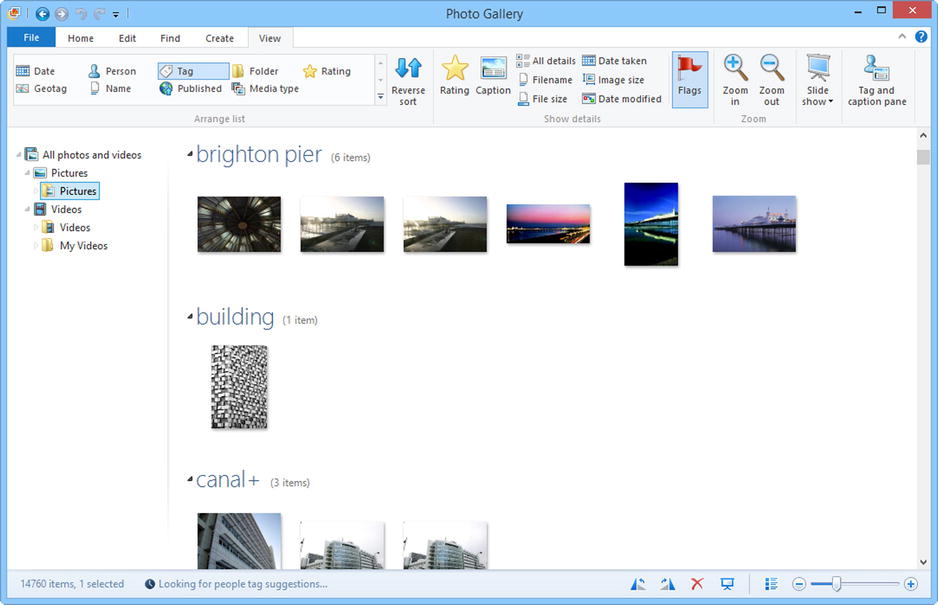
Figure 5-30. Tagging photos in Windows Live Photo Gallery
The View tab features a button to open the Tag and Caption Pane (the button is on the far right of the Ribbon). This pane offers a great way to simplify the addition of tags to photos and pictures because it lists all your photos by tag category, and shows all the photos that are not tagged. You can select these photos for tagging, making it much easier to know which pictures are already tagged.
When you import new photos to Windows 8.1 from your digital camera or memory card, the default import utility, the Photos app, doesn’t permit adding tags. You can add tags automatically when you import photos to your PC however by doing this from within Photo Gallery. This is a good time to do it because all the photos are probably related, and having Windows automate the process of adding tags makes things much simpler.
You can also remove and amend tags and ratings later in Windows Live Photo Gallery using simple controls. The options for this appear in the right pane when a photo or photos are selected.
You can import photos from your camera or digital memory card by clicking the Import button under the Home tab on the Ribbon.
You will first be asked to identify the media you are importing your photos from and you can then click Add Tags and type your tags (see Figure 5-31). This automatically adds the tags you enter to all your imported photos. You may want to use general tags such as “vacation,” “family,” or “Germany.” I talk more about importing photos and videos in Chapter 7.

Figure 5-31. Tagging photos on import from a camera
![]() Tip Most music players help automate adding tags to your music by finding the correct album from an extensive online database.
Tip Most music players help automate adding tags to your music by finding the correct album from an extensive online database.
Managing Folder Options
Folder Options offers a huge amount of control over File Explorer and the way files and folders are viewed.
The first tab in this window, General, gives you the option to open files and folders with a single-click instead of a double click. This is especially useful for people using a Windows 8.1 tablet (see Figure 5-32).

Figure 5-32. Changing the general folder view options
The option to show all folders in File Explorer’s Navigation Pane may be the most popular. If you aren’t a fan of the new Favorite Links pane, either you can switch it off completely in favor of the legacy folder view (see Figure 5-33) or you can combine the two. You can also set File Explorer to automatically expand the folder view of the currently viewed folder.

Figure 5-33. Showing the folder view in File Explorer
The View tab gives you extra control over the way files and folders are viewed and organized (see Figure 5-34). At the top of this window are buttons to Apply [the current folder view] to [all] Folders or to Reset [all] Folders to their default view. This enables you to decide the way you want your folders to look. If you want your folders tiled with items grouped by file type, for example, you can apply this quickly and easily to all the folder views on your computer.
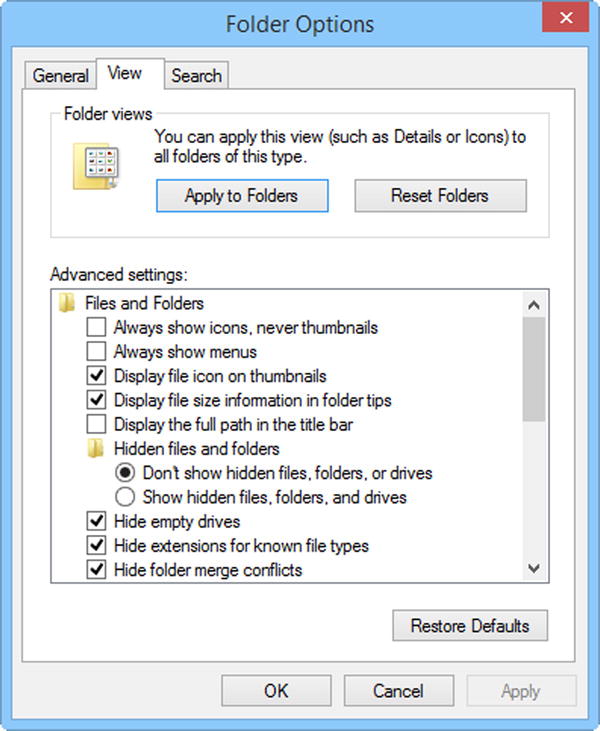
Figure 5-34. Changing advanced folder view options
Brief descriptions of some of the more noteworthy options follow:
- Display the full path in the title bar forces the address bar to display the full drive and folder location at all times.
- Hidden files and folders allows you to show or hide all hidden folders on your computer.
- Hide empty drives in the Computer folder is checked by default. It hides empty USB flash drives or memory card drives that you might want to copy files onto.
- Hide extensions for known file types is checked by default, but some users want to know the file extensions for all their files.
- Hide protected operating system files can be unchecked to display hidden system files that you may need to work with.
- Show drive letters shows the legacy drive assignments (C:, D:, and so on) on File Explorer views. Uncheck to remove the ability to see the drive letters.
- Show encrypted or compressed NTFS files in color highlights files in blue when an encryption service such as EFS is turned on. Many people like to uncheck this option.
The last tab, Search, contains options for searching files and folders. For example, by default, Windows 8.1 doesn’t search the content of compressed ZIP, CAB, or RAR files. You might want to turn on this option if you work with compressed files often (see Figure 5-35).
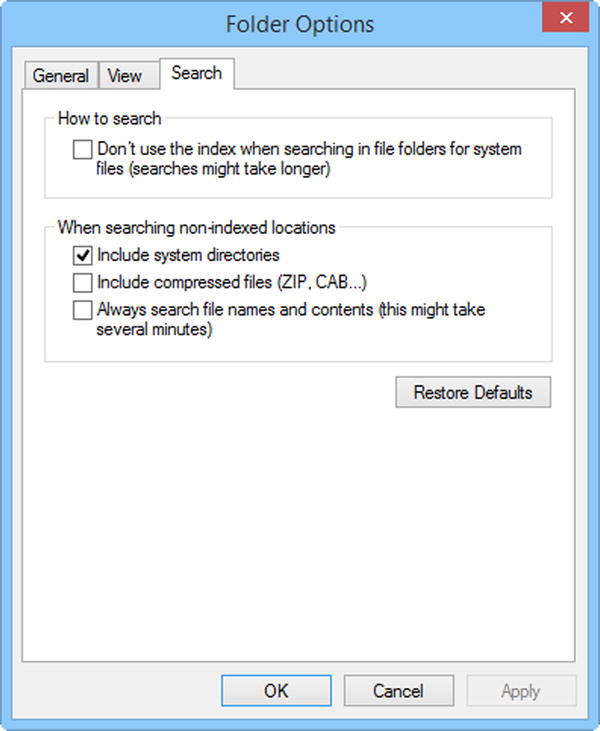
Figure 5-35. Changing folder search options
Using Search in Windows 8.1
It seems that with each new version of Windows, the methods by which we search for programs, settings, and files changes again. Windows 8.1 is no exception. In its simplest terms, basic search has been greatly improved since Windows 7. In Windows 7, you open the Start menu and simply type a search result; whereas in Windows 8, you just start typing at the Start screen.
Windows 7 always contextualizes your searches, so a search in the Start menu always prioritizes programs and settings. Windows 8.1 searches by default for files, settings, and apps; and also searches online at the same time. Searching directly in File Explorer, however, still prioritizes the type of content displayed in that window.
Searching from the Start Screen
You can now search in Windows 8.1 directly from the Start screen by simply typing. Whatever it is you are doing, as long as you are looking at the Start screen (even if you have right-clicked on a tile), you can begin typing, and the search results instantly appear. You can also search directly from the Start screen or the Windows desktop by pressing the Win+S key combination.
When you begin a search in Windows 8.1, the search results display relevant results, be they files, settings or apps, with Internet search results (provided by Bing.com) underneath (see Figure 5-36).

Figure 5-36. Searching from the Start screen in Windows 8.1
If you press the Enter key or the Search button to the right of the search box, then a full screen results page appears, containing many more contextualized results (see Figure 5-37). These results are displayed in columns, and underneath is a See all link that, when clicked, expands that section if more results are available.
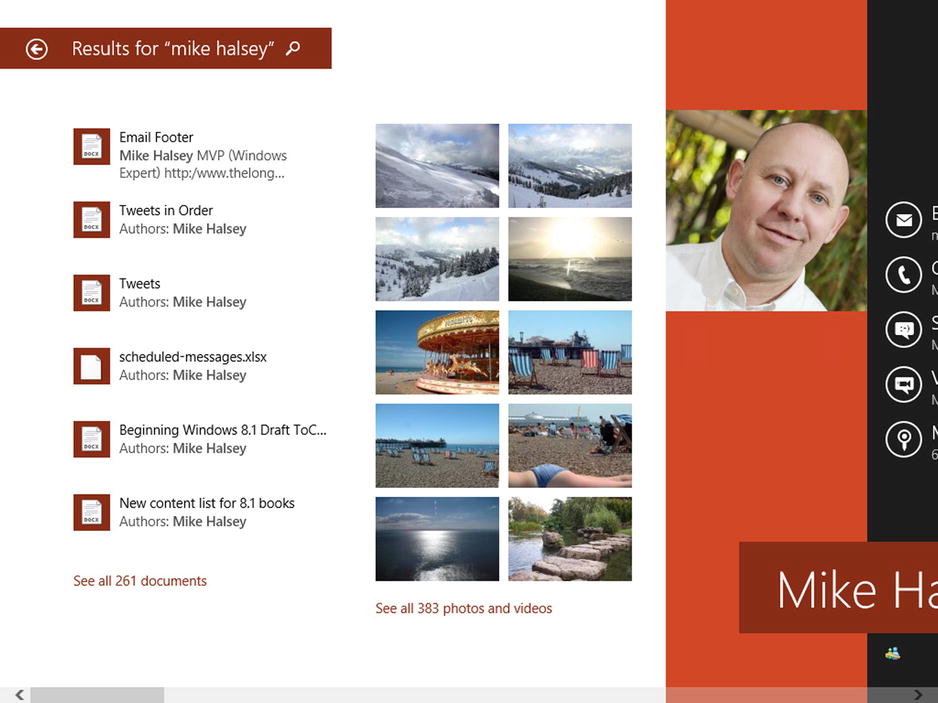
Figure 5-37. You can get very detailed and contextualized search results
![]() Note Sometimes when you search, the first item in the Search pane results list is highlighted because Windows 8.1 believes this to be exactly what you’re looking for. Pressing Enter here opens that selected item, not the full search panel. If you see a highlighted item, click the search button to the right of the search box to open the full results panel instead.
Note Sometimes when you search, the first item in the Search pane results list is highlighted because Windows 8.1 believes this to be exactly what you’re looking for. Pressing Enter here opens that selected item, not the full search panel. If you see a highlighted item, click the search button to the right of the search box to open the full results panel instead.
Search is intelligent, so it does not search for the words literally as you type them. A search for Control, for example, brings up relevant Windows features, including the Device Manager, Remote Assistance, and Accessibility options.
This means that you do not have to know the exact name of the feature in Windows you are looking for. When you are searching for apps and desktop programs (for which the results appear in the Apps results), the results depend more on how the developer has described and programmed it, but generally the search facility in Windows 8.1 is excellent.
Searching in File Explorer
File Explorer contains its own context-sensitive search box. In some ways, using it is a more efficient way to search for files and documents in Windows 8.1 than using the Start screen.
The search box prioritizes the content. It might be prioritized by documents, pictures, music, video, a specific disk drive (internal or external), a network location, or something else (see Figure 5-38). In this way, it is flexible and more dynamic than the Start screen search.
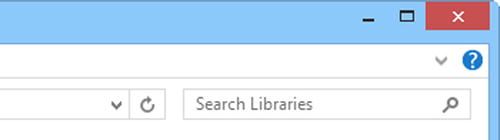
Figure 5-38. File Explorer has its own search box
When searching in File Explorer, a Search tab appears on the Ribbon. It contains tools and buttons to make search even more powerful and useful, especially for people who are less familiar with search syntax.
The Search tab on the Ribbon (see Figure 5-39) allows you to filter your search by
- The current folder and all subfolders
- Libraries, e-mail, notes, or the Internet
- When the file was last modified (opened)
- The type of file
- The file size
- File names
- Specific folders
- File tags

Figure 5-39. The Search tab on the Ribbon
These options cover just about any search you will undertake in Windows 8.1. The Search tab on the Ribbon appears automatically the moment you type anything in the search box in File Explorer.
![]() Note The Search tab on the File Explorer Ribbon allows you quick access to recent searches you have made, so that you can repeat them.
Note The Search tab on the File Explorer Ribbon allows you quick access to recent searches you have made, so that you can repeat them.
When you search from an Explorer window, you can also use Advanced Query Syntax (AQS) to narrow your searches (see Figure 5-40). I detail the full AQS in Appendix C, but some of the most useful search syntax options include Kind, Datemodified, Type, and Name. as shown in Tables 5-1 through 5-4.

Figure 5-40. Using AQS to search in an Explorer window
Table 5-1. Kind (to Search the Properties of a Document Type)
| Option | Example |
|---|---|
| Kind:=email | Jake Webster kind:=email |
| Kind:=task | Meeting kind:=task |
| Kind:=note | project kind:=note |
| Kind:=document | Apress kind:=document |
| Kind:=music | Metallica kind:=music |
| Kind:=song | Equinoxe kind:=song |
| Kind:=folder | Book kind:=folder |
| Kind:=program | paint kind:=program |
Table 5-2. Datemodified (to Search by the Date a File Was Modified)
| Option | Example |
|---|---|
| Datemodified:MM/DD/YYYY | Report datemodified:10/22/2012 |
| Datemodified:MM/DD/YY | Report datemodified:7/4/12 |
| Datemodified:MM/DD/YY..MM/DD/YY | Report datemodified:7/4/12..10/22/12 |
| Datemodified:yesterday | Orders datemodified:yesterday |
| Datemodified:lastweek | Orders datemodified:lastweek |
| Datemodified:pastmonth | Orders datemodified:pastmonth |
Table 5-3. Type (to Search by File Type)
| Option | Example |
|---|---|
| Type: | Type:image |
| Type:image jpeg | |
| Type:.doc | |
| Type:.pdf |
Table 5-4. Name (to Search by File Name or by a Property Name of a File)
| Option | Example |
|---|---|
| Name: | Name:vacation |
| Name:wedding | |
| Name:budget |
Typing type: initially displays a drop-down list of all the file types on your computer (for example, DOC or PDF), as shown in Table 5-3. If, for example, you continue by typing type:image, you can filter your search by various image types or search for all image types. You also can use other file types, such as type:document, type:audio, type:video, type:presentation, and so forth.
As you begin to type a search filter in File Explorer, a drop-down list (with all the supported filter options) is displayed. Clicking the appropriate one for your search helps you find what you are looking for more quickly. If you are searching for dates, a calendar assists you.
Expanding Libraries with Saved Searches in Windows 8.1
One of the criticisms of Libraries is that you can add only folders to them; you cannot specify that a Library should contain only one or two file types, say Word and Excel files. Nor can you specify that Libraries should contain only documents created by “Rory” or tagged as “college”.
This is where the true power of search in Windows 8.1 comes into play. It’s such a cool feature that it will probably save you countless hours of lost productivity all on its own!
After you complete a search, you can save it by clicking the Save Search option on the Search tab on the File Explorer Ribbon. Saving a search adds a quick link, named whatever you want, to the Favorite Links pane in File Explorer (see Figure 5-41).
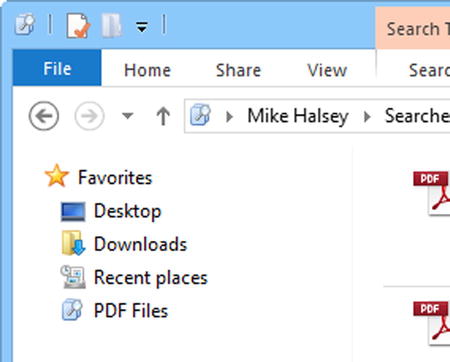
Figure 5-41. Saving searches in Windows 8.1
The upshot of this is that you can create those custom-aggregated folders whenever you want, and each one is automatically and dynamically updated whenever you open it.
Let’s say, for example, that you search for type:.pdf in the search box when looking at your Documents Library. This brings up a list of all your PDF document files in your Documents Library and all subfolders. Saving this search creates something that looks and behaves like a Library consisting entirely of PDF files, which you can use whenever you need. Each time you open this saved search, the search is re-run (it literally takes a fraction of a second if the locations being searched are part of the Windows index), and the contents are updated automatically.
You can further sort, organize, and group the contents of this search however you want, perhaps by the date they were created or the tags associated with them.
I simply cannot overstate how powerful and useful this feature is, especially when used with properly tagged files. As a way of organizing home or work documents, it is a true time-saver!
Harnessing the Full Power of Saved Searches
Let me give you an example of how powerful I believe saved searches really are. In Figure 5-42, I searched for *.ppt? authors:mike halsey, which displays all PowerPoint files created by Mike (and optionally) Halsey.
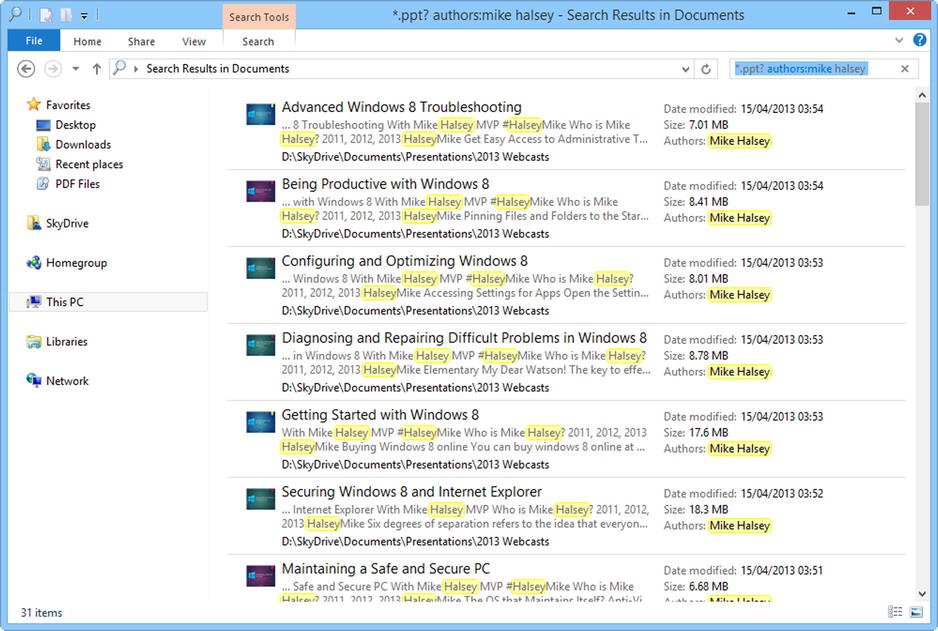
Figure 5-42. Expanding saved searches in Windows 8.1
Saving these search results creates dynamically updated folders in which you can quickly and easily find the information you need. Having a saved search for all documents relating to a project name, for example, enables you to keep track of all the documents related to the project at a single and always up-to-date location.
Saving and Sharing Your Saved Searches
Once you have created a saved search, you can create a copy of it to back it up or perhaps to share with a friend or colleague. You can do this by right-clicking the saved search in the Favorites pane in File Explorer and selecting Open Folder Location from the context menu.
You now see the saved search(es) listed and you can create copies in the same way you would with any other file on your computer. They can be backed up or shared with other computers. Note, however, that if drive assignments are different on the other computers, the search may not function correctly because searches work with drive letters and folders that all have absolute references on your computer.
Tagging Files in Microsoft Office
I’ve talked about adding tags to documents as you create them to help find them later on, but how do you do this? Obviously, the method by which you can add tags to documents as you save them varies considerably from one software package to another, and it can be expected that many software packages won’t support this feature at all.
Microsoft Office has supported tags for some time, however, and if you use Office 2007 or later, it is a simple matter to add tags to documents as you save them.
When you first save a document in Microsoft Office (or select Save As), you have the option to Add a Tag (see Figure 5-43).

Figure 5-43. Adding tags to documents in Microsoft Office
You can add other details here, including authors and title, although the software will probably automatically add some information.
All Microsoft Office programs and many programs from other software vendors support adding tags to your files when you save them. In Microsoft Office, the Save dialogs for Word, Excel, PowerPoint, and so forth, allow you to add tags in the same way. You can also add information such as subjects and project managers to make files easier to find.
With other software, you need to check whether tags can be added when the file is saved. If not, you can always add tags afterward in the Details pane in File Explorer.
Managing the Search and File Index in Windows 8.1
The reason why search works very quickly in Windows 8.1, at least for internal storage on the computer, is that details about the files are all stored in an index database. By default, this database stores information on anything in your user folders and default Libraries. You can move, add, or remove folders (or even entire hard disks) to or from the index.
You can find the Indexing Options in the Search tab on the Ribbon in File Explorer, but you need to perform a search for the tab to appear. A simpler approach is to type Index at the Start screen and run Indexing Options from the Settings search results.
In the main Indexing Options are all the indexed drive and folder locations and their current indexing status (see Figure 5-44).

Figure 5-44. Managing the search index in Windows 8.1
You may find that not many files are indexed, perhaps because you have a relatively new Windows 8.1 installation and a great many files, it can take some time initially for Windows to build its index. In that case, the results you expect won’t appear in the search results. You might see that some critical or important folders don’t appear in the index.
Adding Folders to the Index
You can add (or remove) folders to the index by clicking the Modify button on the Indexing Options screen. It displays a folder list of all the drives on your computer. The current folder locations are checked (see Figure 5-45).
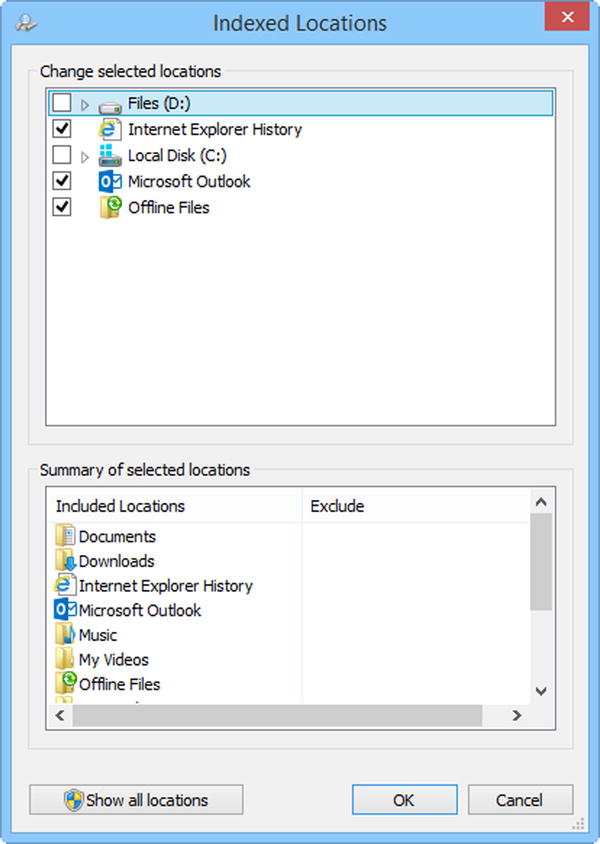
Figure 5-45. Adding folder locations to Indexing Options
To add or remove folders or entire drives to the index, simply check or uncheck their boxes. You can expand and collapse folders by clicking the chevrons next to folder names. When you press the OK button, the index is refreshed to include or exclude the folders you have updated.
![]() Note It can take some time for Windows 8.1 to index the contents of your hard drive, and the process slows when you are using the computer. If you need the index built quickly, leaving the computer switched on overnight can speed up the process significantly.
Note It can take some time for Windows 8.1 to index the contents of your hard drive, and the process slows when you are using the computer. If you need the index built quickly, leaving the computer switched on overnight can speed up the process significantly.
Changing the Advanced Indexing Options
Clicking the Advanced button in the Indexing Options pane brings up several additional options that you may want to consider (see Figure 5-46). Chief among these, especially if you work in a business environment, is the option to index encrypted files. By default, Windows 8.1 doesn’t index files that you have encrypted with either Microsoft’s Encrypting File System (EFS) or third-party software. This is because the key searchable contents of the files contained within the index aren’t encrypted.
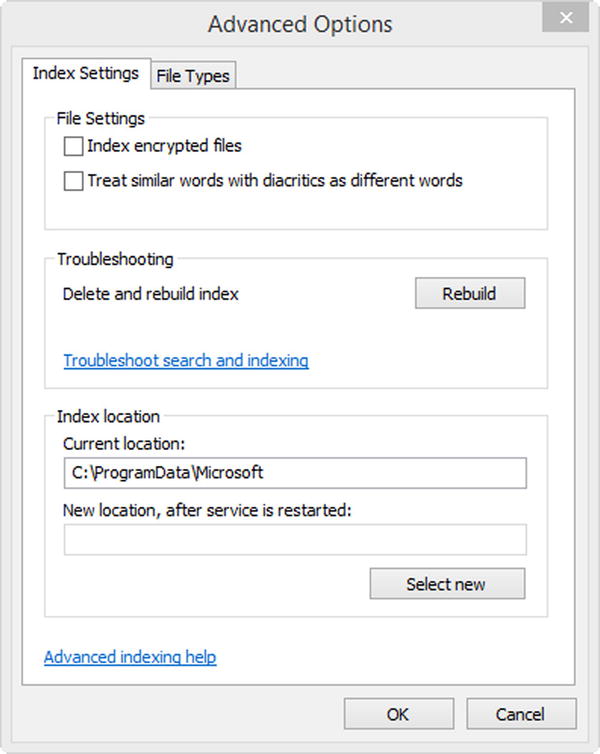
Figure 5-46. Modifying the advanced index options
For most scenarios, it is perfectly acceptable to tick this box. If you work in a governmental, financial, medical, or research and development organization, you should seek advice, although the choice will probably be made for you, and Indexing Options will not be available.
![]() Note The Windows 8.1 automatic indexing of encrypted files does include hard disks in the computer encrypted with BitLocker if you are a user who has access to those drives because this is a full disk encryption system. It is assumed that if you are successfully logged in to a Bitlocker-encrypted PC, you will have permission to access its files.
Note The Windows 8.1 automatic indexing of encrypted files does include hard disks in the computer encrypted with BitLocker if you are a user who has access to those drives because this is a full disk encryption system. It is assumed that if you are successfully logged in to a Bitlocker-encrypted PC, you will have permission to access its files.
The next option in the File Settings section enables you to turn off Windows 8.1’s automatic correction feature to accommodate the different (albeit correct) spellings of words and the oddly spelled word.
In the Index location section is an option to change the default location of the index. I’d like to discuss why you might want to do this and what the benefits are. The most obvious reason to do this is to increase the speed of your hard disk or to improve the resilience of an SSD. If you have a large number of files to index, this is the only circumstance when it’s possibly worthwhile to move the index.
If you have an SSD in your computer (the number of maximum write operations is finite over the life of the disk), you may want to move the index. On modern SSDs, it shouldn’t make a difference because the overall lifespan of the disk should be more than adequate. But you may have an older SSD or perform duties that involve huge amounts of file work and modification every day.
To change the location, type the new location of the index into the empty box with its full drive assignment (e.g., D:Index) and click the Select New button.
![]() Note When you move the index, it is rebuilt from scratch when you restart your computer. Also, you cannot reuse an existing index when you reimage your computer; it rebuilds when you restart your computer.
Note When you move the index, it is rebuilt from scratch when you restart your computer. Also, you cannot reuse an existing index when you reimage your computer; it rebuilds when you restart your computer.
Searching Network Locations in Windows 8.1
When you add extra folders and drives to the Windows 8.1 index, the system does not allow you to add network or other locations to the index. If you are a manager in a small office in which files are shared on a network attached storage (NAS) drive, for example, and you want to create a saved search to monitor the progress of a project, you cannot add this location to the index. While they also won’t be indexed, you can also add network locations to Libraries by creating a symbolic link between the two locations. I described how to do this in the Adding Network Locations to Libraries section on page XREF earlier in this chapter.
However, you can open a network location in File Explorer from Network in the Navigation Pane. When you are at the correct location, you can then perform a search and save that search.
Searches of network locations can take longer than searches of files on your own computer because the search system has to read each file every time instead of referring to its information in the index.
If you are logged in to a domain on a Windows Server system, the index usually allows you to add mapped server locations to the index.
Using Search Syntax in Internet Explorer
In the science fiction book The Hitchhiker’s Guide to the Galaxy (Pan Books, 1985), author Douglas Adams wrote, “Space is big. You just won't believe how vastly, hugely, mind-bogglingly big it is. I mean, you may think it’s a long way down the road to the shops, but that’s just peanuts to space.” As a quote, this is an excellent analogy for the Internet.
The problem is how to find what you are looking for online when there are usually millions and sometimes billions of search results. After all, the major search engines, Bing, Google, and so forth, do a reasonable job of filtering the results for you. How do you know, though, that you’re getting the correct results for what you type? Surely you’re just getting the most popular generalized results.
This is where you can use search syntax options that are commonly supported by all online search engines:
- “Enclose a few words in double quotes” to search for those words as a complete sentence. By default, typing the words without quotes returns search results that include one or more of all the words; it does not treat them as a combined whole.
- Use a plus (+) symbol at the front of a word (e.g., +halsey) to guarantee that this word must appear in the search results. You can also use a plus symbol in front of a string of words (see preceding bullet).
- Use a minus (–) symbol to exclude a particular word or string from the results. You may want to exclude the word -buy or -shopping if you are looking for technical details of a product and want to exclude shopping and price comparison sites from the results.
- Search only a specific web site for a term by typing site:sitename.com. You may want to search for “windows 8.1” site:thelongclimb.com, for example.
- Use * and ? wildcard operators. The asterisk represents a selection of letters, and the question mark represents only a single letter; for example, you want to search for “Mike H*” or Hals?y if you are unsure of a spelling.
- Include Boolean operators OR, AND, and NOT in your search to narrow down the results. Adobe software 2011 OR 2012, for example.
There are other search operators that are specific to individual search engines. The ones I listed here I find to be the most useful and the easiest to remember. I personally only ever use double quotes and the plus and minus signs, for example, and I get search results that I am happy with.
Appendix D features a full list of the AQS options that you can use for Windows 8.1 searches.
![]() Note You can use these operators directly from the Start screen when searching for things online.
Note You can use these operators directly from the Start screen when searching for things online.
Summary
Search in Windows 8.1 is incredibly powerful, but the full features can be hard to remember. I believe that by far the best feature for searching is the saved search, which allows you to search by subject, workflow, author, contributors, file type, location, and more. It also allows you to search for multiple parameters simultaneously. This truly powerful feature can help you get the best out of file management and organization in Windows 8.1.
Elsewhere, however, the ability to search from the Start screen by simply typing is very welcome. We can expect both Microsoft and third-party providers to plug some extremely useful functionality into this feature in the coming years. It’s not quite as powerful and flexible as search in File Explorer, however.
Libraries are also significantly more powerful than you might first believe, with saved search and Windows Media Center able to extend their functionality considerably. I have long argued that Libraries should be more flexible by default, but the ability to create flexibility through simple workarounds greatly increases their usefulness.