![]()
Visual Studio 2012 and Windows Store Application Types
Our environment, the world in which we live and work, is a mirror of our attitudes and expectations.
In application development, the integrated development environment (IDE) can make the difference between feeling like you can work easily and focus on the problem your application is supposed to solve and feeling like you are so distracted trying to figure out how to maneuver within the IDE that you cannot focus on the real task of producing software. With the last several versions of Visual Studio, Microsoft has increasingly built upon a reputation of having one of the best development IDEs available. Even many developers who don’t care to develop for the Microsoft platform will say (if grudgingly) that one is hard-pressed to find a better development environment. In this chapter, you will learn about Visual Studio 2012, which is the latest release in this line-up. While complete coverage of the tools and features would take a book of its own, I will cover in this chapter the topics that I consider to be important to finding your way around the environment well enough to complete the exercises in this book. In addition to learning about Visual Studio in general, you will also learn about the project templates that are used to develop applications designed to run on Windows 8.
Visual Studio Editions
Visual Studio is often used generically to describe the IDE for developing applications built on Microsoft platforms, but rather than a single product, it designates an entire line of products. Including the freely available Express editions, the Visual Studio 2012 line-up includes the following:
- Visual Studio Express 2012 for Windows 8
- Visual Studio Express 2012 for Web
- Visual Studio Express 2012 for Windows Desktop
- Visual Studio Test Professional 2012
- Visual Studio Professional 2012
- Visual Studio Premium 2012
- Visual Studio Ultimate 2012
Visual Studio Express 2012 for Windows Phone 8 has not been released at the time of this writing, but Microsoft has announced that it will be added to the Visual Studio line-up upon the release of Windows Phone 8.
The Visual Studio Express 2012 editions each provide an environment to develop applications for different portions of the Microsoft stack that can be used without having to invest in one of the full Visual Studio 2012 products. Visual Studio Express 2012 for Windows 8 is focused on providing the necessary tools to build and test Windows applications as well as providing support for sharing and selling your applications in the Windows Store. Visual Studio Express 2012 for Windows 8 is sufficient for completing the exercises in this book, and features available in this edition will be the focus of discussion in this chapter. The following are key features of Visual Studio Express for Windows 8:
- Basic analysis of code for errors or practices that could prevent Windows Store certification
- Integrated debugger
- Simulator for running Windows applications
- Profiler to help identify code that requires tuning
- Unit testing support
With the exception of Visual Studio Test Professional 2012, which is designed for people assigned to the testing role in an application development organization, the non-Express editions of Visual Studio 2012 are designed for professional developers. Visual Studio Professional 2012, Visual Studio Premium 2012, and Visual Studio Ultimate 2012 each progressively add features to assist in the following areas of application development:
- Design
- Construction
- Testing
- Analysis
- Troubleshooting
You can find a full comparison of the features that come with each Visual Studio 2012 edition at www.microsoft.com/visualstudio. You can also find Visual Studio Express 2012 for Windows 8 at this site. If you do not already have a Visual Studio 2012 edition installed, I encourage you to install Visual Studio Express 2012 for Windows 8 before reading further.
Getting Started with Visual Studio
When you first open Visual Studio 2012 Express, the default view appears, as shown in Figure 4-1. The most important features in the user interface at this point are the menu bar (labeled A in the figure) and the Start Page (labeled B). The menu bar provides access to many commands, but when first opening Visual Studio, you are most likely going to head for the File menu (shown in Figure 4-2) where you will select either New Project or Open Project. The Start Page offers links to items of interest to developers such as articles on how to be more productive in Visual Studio or perform certain development tasks.
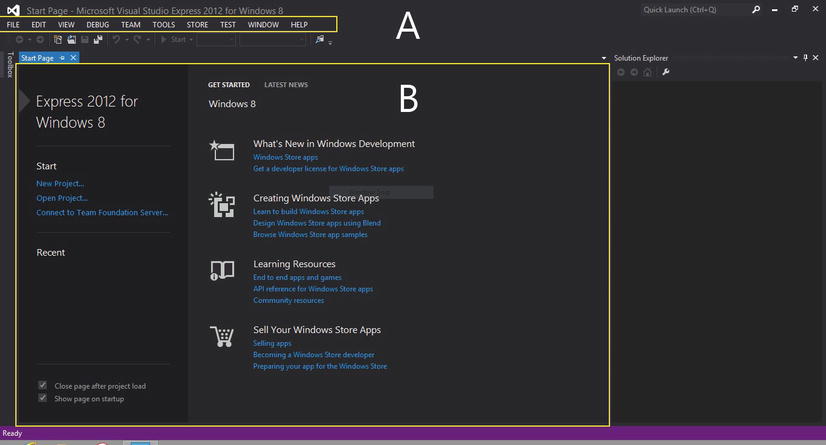
Figure 4-1. Visual Studio initial user interface
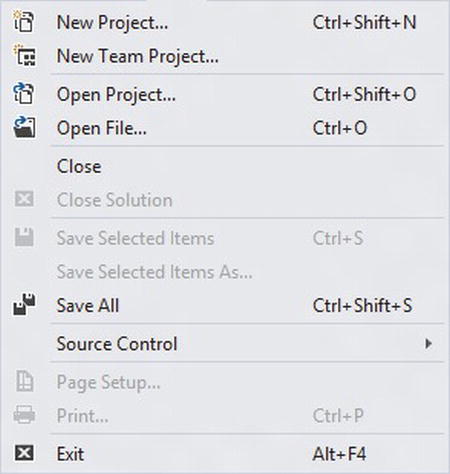
Figure 4-2. File menu
Selecting New Project from the File menu opens the New Project dialog, as shown in Figure 4-3. This dialog presents available project types that are grouped into categories on the left side of the window. Selecting a category shows a listing of the project types within that category in the center section of the window. At the bottom of the windows are fields to assign a name to the project, the location of the project on disk, and the name for a solution to create and add the project to. Solutions are not covered in this book, so at this point I will just describe them as a collection of related projects that are opened and worked with at the same time. The option to create new projects within a solution is enabled by default because many applications will separate the business logic, the data access code, and the code used to present an interface to the user into their own projects to help create a clean division of these duties. Another common use for solutions is to have a separate project within the solution to test the application.
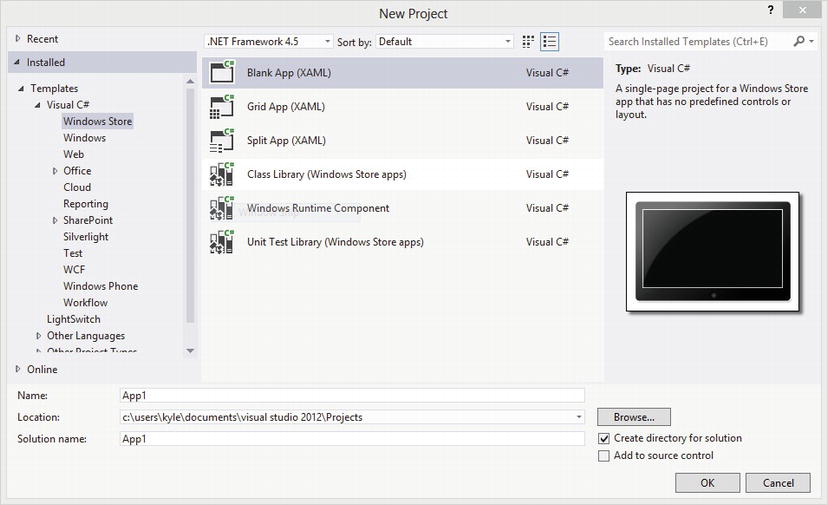
Figure 4-3. New Project dialog
Once a project has been created or opened, additional functionality is revealed. At the right side of the screen, the Solution Explorer window (shown in Figure 4-4) is populated with the file/folder structure of your project, allowing you to navigate to any file within the project and double-click to open either a designer or a code editor depending on the type of file. Figure 4-5 shows app.xaml open in the code editor, and Figure 4-6 shows MainPage.xaml open in a designer.
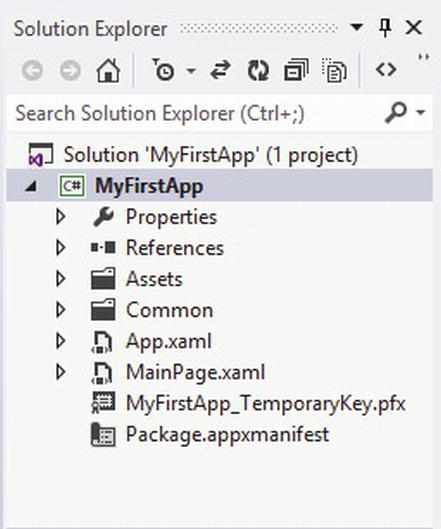
Figure 4-4. Solution Explorer window
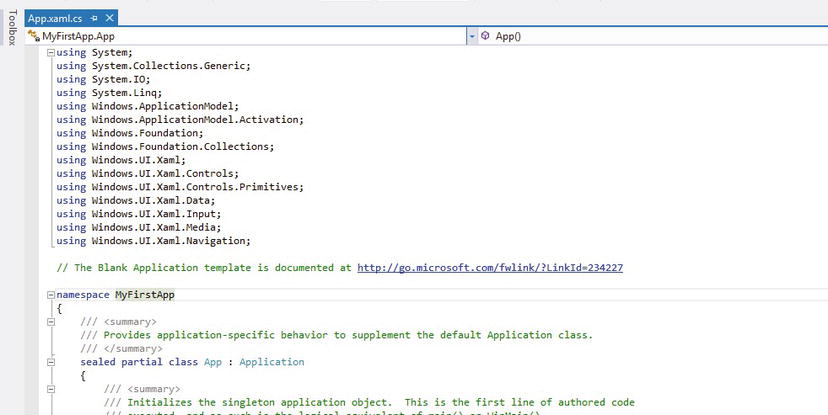
Figure 4-5. Code editor
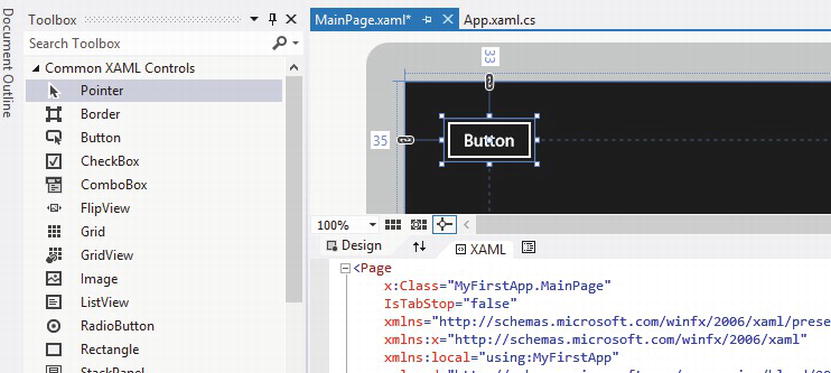
Figure 4-6. XAML designer
In addition to showing the XAML designer, Figure 4-6 also reveals some other useful items for somebody learning their way around Visual Studio. The Toolbox on the left side of the screen, which is hidden by default but can be shown by clicking the word Toolbox, contains controls that can be dragged onto the design surface to build your screens. Additionally, you may find that dragging controls onto the design surface does not give you enough control over the XAML created by the designer, so you instead might desire to create all or part of the XAML by hand. The designer defaults to a “split view,” which enables you to both work directly with the XAML and use the drag-and-drop functionality of the designer. In most real-world applications, you are likely to find yourself using a combination of these two methods.
The Properties window, shown in Figure 4-7, contains different content based on what is actively selected within Visual Studio. If the actively selected item is a control within the XAML designer, the properties and events attached to that control are displayed. If the selected item is a file within the Solution Explorer, the attributes of the selected file are displayed. The Properties window has a convenient feature, a search box, which will filter the displayed items in the list to those whose name contains the criteria entered in the search box. For controls with a significant number of properties, this feature will be a great time-saver over scrolling through the list looking for a particular property name.
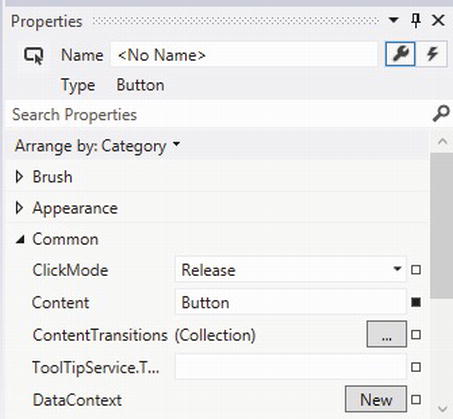
Figure 4-7. Properties window
The final user interface element I will discuss in this chapter is the Debug button on the toolbar, which is shown in Figure 4-8. This button is used to initiate a build and debugging session of your application within either your local machine, the built-in Windows 8 simulator, or a remote machine on your network. By activating the drop-down in this button, you can change the default runtime environment for your application. In general, I prefer to run my applications in the simulator because it gives me easy access to do things such as change orientation and capture screenshots.
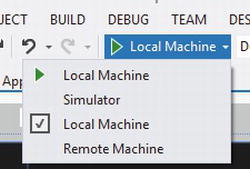
Figure 4-8. Debug button
I have just guided you through a whirlwind tour of the Visual Studio interface, stopping only to show you those features that you will need to successfully work in this book. I strongly encourage you to explore the different windows, menus, and options that are available within Visual Studio and learn how each can help with your development tasks.
Windows Store Application Types
In this section, I will cover the different application types that you can create using the project templates that ship with Visual Studio 2012. You can find these templates in the New Project dialog categorized under Installed ![]() Templates
Templates ![]() Visual C#
Visual C# ![]() Windows Store. I will cover only application types, so the following Windows Store project templates, which are beyond the scope of this book, will not be covered:
Windows Store. I will cover only application types, so the following Windows Store project templates, which are beyond the scope of this book, will not be covered:
- Class Library (Windows Store apps)
- Windows Runtime Component
- Unit Test Library (Windows Store apps)
Blank App is the template that provides you with the most basic starting project of the Windows Store application project template. The project includes a starting set of images to be replaced with your own custom images for the application’s logo and splash screen as well as a standard style sheet (these will be discussed in Chapter 7) and a blank page. This project type works well when you have a single-page app that does not require the layout provided by the other templates.
Grid App (XAML)
The Grid App template gives everything provided by the Blank App template, but it also includes code files establishing a basic Model-View-ViewModel (MVVM) implementation (MVVM is introduced in Chapter 9) and provides the screens and application code for an application that drills down through varying levels of detail to browse hierarchical data. The application consists of three pages: a high-level view that shows all groups with a summarized view of the items within each group (illustrated in Figure 4-9), a group detail page that provides additional information about the group and a listing of the items that it contains (illustrated in Figure 4-10), and an item detail page that gives the finest level of detail on a single item within the group (illustrated in Figure 4-11). As you can see in the figures, this project template provides an application that has been practically prebuilt for you, requiring only that you modify it to fit your data. This project type will be the basis for an application that you will start building in Chapter 7 and continue to build across several chapters as you learn more concepts that can be applied to the application.

Figure 4-9. Default Grid App grouped items view
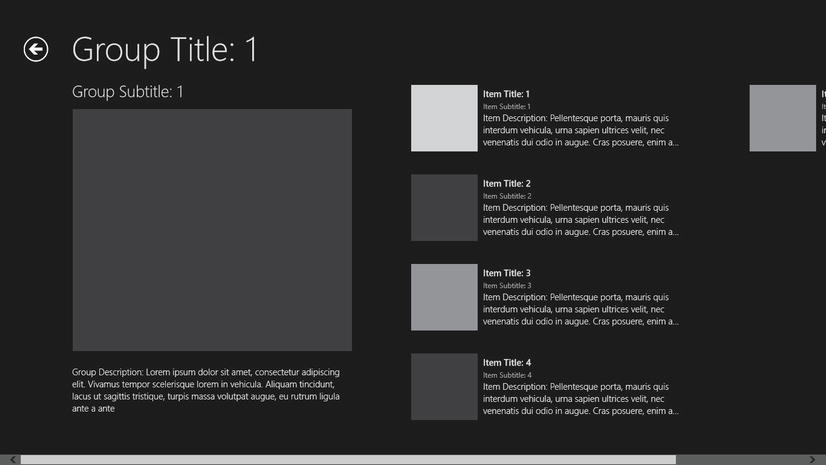
Figure 4-10. Default Grid App group details view
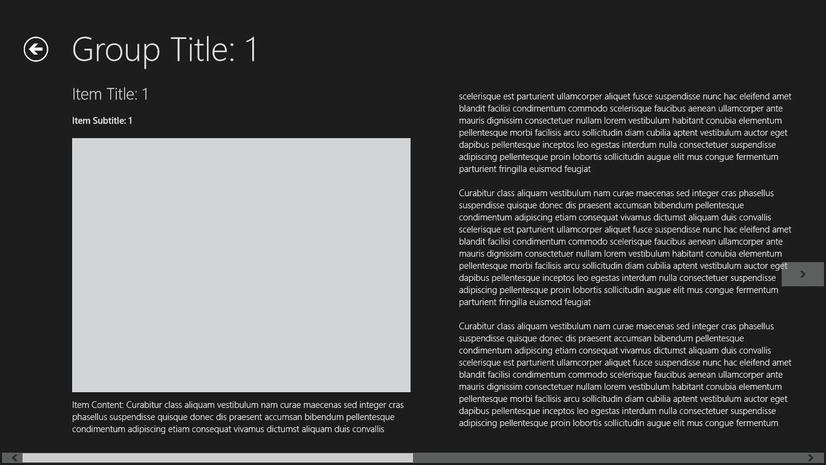
Figure 4-11. Default Grid App item details view
Split App (XAML)
The Split App project template, like Grid App, provides a ready-made application designed to browse hierarchical data. The main difference between Grid App and Split App is that Split App uses only two views to display the information. The first view, which is shown in Figure 4-12, displays a list of the groups into which items are categorized. Unlike Grid App, this view contains information only about the groups and does not display any item information. Selecting any group navigates to that group’s item screen (shown in Figure 4-13), which provides a listing of the items in the group on the left side of the screen and shows the details of the selected item on the right side of the screen.
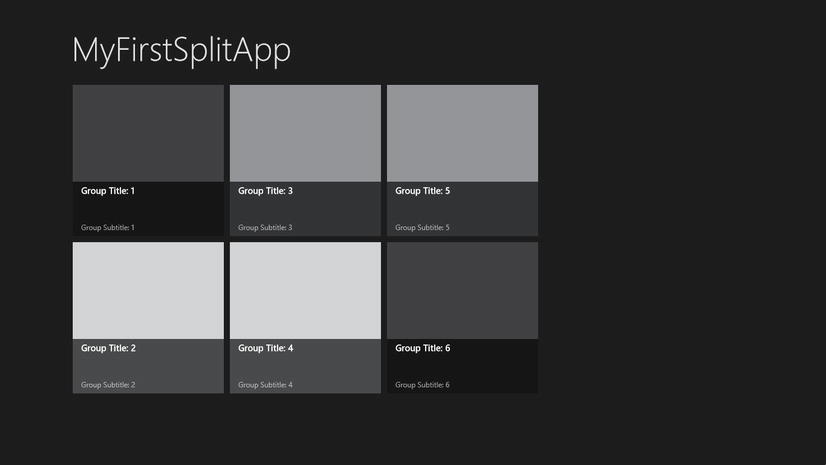
Figure 4-12. Default Split App group view
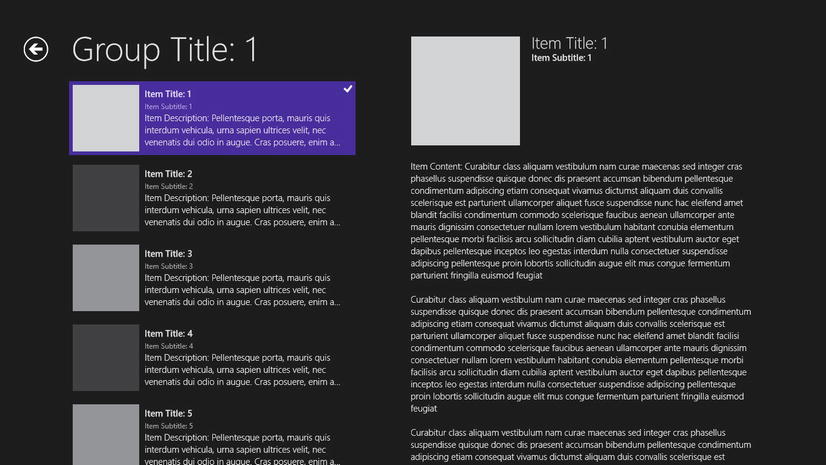
Figure 4-13. Default Split App items view
Conclusion
In this chapter, you were introduced to Visual Studio 2012 and to the Windows Store application types that can be built using the built-in project templates. For further learning, examine some existing Windows 8 applications with the Grid App and Split App templates in mind. You may be surprised at how often you see components of these two approaches. For example, the News and Store apps installed with Windows 8 both take the Grid App approach, while the People app was designed based on the Split App template.
