
In this chapter, you’ll build your very first holographic experience. We’ll begin by setting up Unity for Mixed Reality development using the HoloToolkit. After creating our first hologram, we’ll test our app by deploying directly to our HoloLens using Visual Studio. We’ll also test the app using Unity’s holographic remoting and holographic simulation.
Getting Unity Ready for Mixed Reality Development
Before we begin creating our first hologram, we need to make sure Unity is ready for Mixed Reality development. There are several settings in Unity that need to be changed for our apps to work on the HoloLens and other Mixed Reality devices. For example, in Chapter 2’s Unity tutorial, you may have noticed a grey/brown floor and blue sky in the scene. We usually won’t want this digital floor and sky to appear in all our Mixed Reality experiences, so we need to black out our background so that it doesn’t appear in our device. We also need to adjust our camera settings, so that each eye sees a slightly different perspective of our scene, which will allow users to perceive depth when wearing the headset. These are just a few examples of settings that need to change to prepare Unity for Mixed Reality development. All these settings can be changed manually, but it would be very tedious and time consuming to do this each time you create a new Mixed Reality project.
Fortunately, Microsoft provides a community resource called the HoloToolkit , which helps you automatically set up Unity for making Mixed Reality apps. There’s an entire chapter on the HoloToolkit in this book, so I won’t cover all it has to offer in this chapter. The following steps will walk you through preparing your scene for Mixed Reality development.
Note
The HoloToolkit is updated regularly, and some elements may have changed since these instructions were written. Be sure to check the HoloToolkit documentation for updated instructions if you can’t find the objects I refer to in this tutorial. You can find the HoloToolkit instructions at https://github.com/Microsoft/HoloToolkit-Unity/blob/master/GettingStarted.md .
Step 1: Import HoloToolkit to a New Unity Project
Before proceeding, be sure you’ve already downloaded and saved the HoloToolkit Unity package per the instructions in Chapter 1.
Create a new Unity project (see Chapter 2 if you need a reminder on how to do this) and name it Holo World. Important: Save your scene and give it a name. If you don’t save your scene, you won’t be able to apply HoloLens settings in Step 2.
From the menu bar, go to Assets ➤ Import Package ➤ Custom Package. In the pop-up window that appears, browse to the HoloToolkit that you downloaded in Chapter 1. See Figure 3-1 for an illustration of these menu items.

Figure 3-1. Import the HoloToolkit package you downloaded in Chapter 1
Unity will take a minute to prepare the package you selected and then show you another pop-up window where you can select or deselect package items. Go ahead and leave everything checked (everything should be checked by default) and click the Import button, as shown in Figure 3-2.
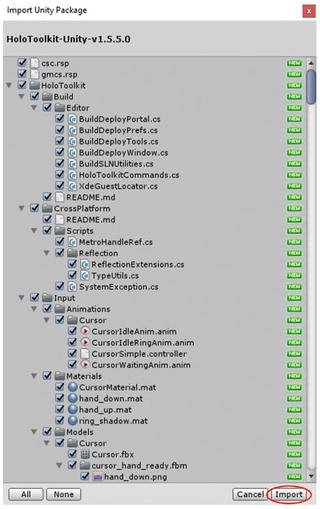
Figure 3-2. Click Import to import the HoloToolkit package
Step 2: Use HoloToolkit to Prepare Your Scene for Mixed Reality Development
After completing Step 1, you should now see a HoloToolkit menu item in your menu bar, as shown in Figure 3-3.
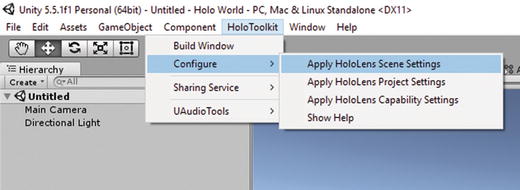
Figure 3-3. You now have a shiny new HoloToolkit menu item. Be sure to apply HoloLens scene settings and project settings
From the menu bar, select HoloToolkit ➤ Configure ➤ Apply HoloLens Scene Settings. This will make the scene background black (when in the Game tab) and modify camera settings. Click the Apply button in the pop-up window that appears. Important: Save your scene.
From the menu bar, select HoloToolkit ➤ Configure ➤ Apply HoloLens Project Settings. This will convert the Unity project to a Windows Direct 3D (D3D) project, optimize quality, and enable Virtual Reality support. Click the Apply button in the pop-up window that appears. Unity will require you to reload your project. If you didn’t save your scene from the previous step, you will lose all changes to the scene and need to apply scene settings again.
Tip After choosing to apply settings from the HoloToolkit menu, a pop-up window appears showing settings to apply. Click each item to learn more about it.
Remove the Main Camera and Directional Light game objects from the Hierarchy by right-clicking each item and choosing Delete from the context menu.
To insert our new camera, go to the Project panel, and browse to HoloToolkit ➤ Input ➤ Prefabs. Drag and drop HoloLensCamera.prefab into the Hierarchy, as shown in Figure 3-4.

Figure 3-4. After deleting the Main Camera and Directional Light objects, insert the HoloLensCamera prefab into the Hierarchy
Save your scene.
Congratulations! Your scene is now ready for holograms. Before starting each new Mixed Reality project in the future, you’ll want to repeat these basic preparation instructions. And although you can keep using the same HoloToolkit package you downloaded, it’s always a good idea to regularly check for updates to the HoloToolkit. New features are added all the time, and bugs are constantly being fixed. You can explore the HoloToolkit at https://github.com/Microsoft/HoloToolkit-Unity . Be sure to look around this page for reports of bugs, recent fixes, updates and more .
Your First Hologram
Your scene should now be completely black when in game view. You will still be able to see a floor grid and horizon when in the scene view. If you were to deploy this “app” to your HoloLens, you would see nothing. In this section, we’ll create a simple cube object, which will serve as our first hologram.
Note
In the context of Windows Mixed Reality, a hologram is any visible game object. To stay consistent with Microsoft’s naming conventions, I generally call any visible game object or 3D model a hologram, but I may use these terms interchangeably throughout this book.
Step 1: Create a Cube
In Chapter 2, you created a plane and a sphere within Unity. Use the same approach to create a cube game object in your scene. In addition to the approach you learned in Chapter 2, you can also create a cube by right-clicking an empty place in the Hierarchy and in the pop-up context menu selecting 3D Object ➤ Cube, as shown in Figure 3-5.

Figure 3-5. Create a cube in the Hierarchy
Step 2: Zoom to Your Cube
If you haven’t already done so, be sure to switch to the scene view so that you can view objects in your scene. You can switch between views by clicking the tabs that are above the visualization window, as shown in Figure 3-6. Zoom to your cube by selecting the Cube game object in your Hierarchy and pressing the F key. Your scene should look similar to Figure 3-6.
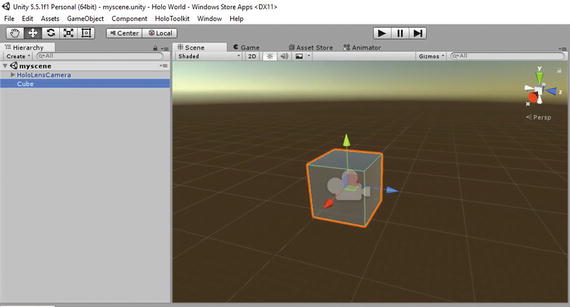
Figure 3-6. Zooming to your Cube
Step 3: Move the Cube Away from the Camera
Next, we’ll want to move the Cube game object away from the camera. In Unity, think of the camera as your eyes. You view your app through the camera. You’ll notice in the scene (refer to Figure 3-6) that both the cube and the camera are in the same place. This means that when you launch this application, you won’t be able to see the cube because your eyes will be inside it! We need to move the cube a short distance in front of our face.
Tip
When positioning objects in Unity, 1 unit represents approximately 1 meter (3.3 feet) in the real world.
Let’s move the cube about 2 units in front of our face, which is about 2 meters in the real world:
Select the Cube in the Hierarchy
In the Inspector, change the Position to 2, as shown in Figure 3-7.
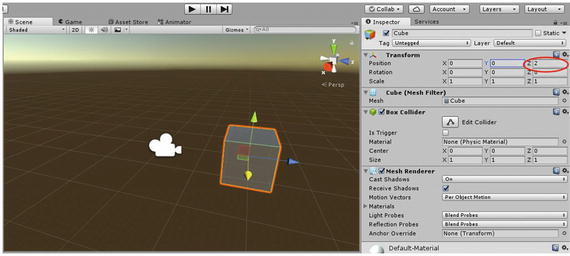
Figure 3-7. Moving the Cube 2 units in front of the camera
As you can see in Figure 3-7, the cube is now 2 units in front of the camera.
Step 4: Resize the Cube
Currently, our cube has a scale of 1 x 1 x 1, meaning it’s approximately 1 meter on each side. Let’s make it so we can view the entire cube within our field of view.
Use the approach in Step 7 of Chapter 2 to scale (resize) your cube down to 0.2 x 0.2 x 0.2, as shown in Figure 3-8.
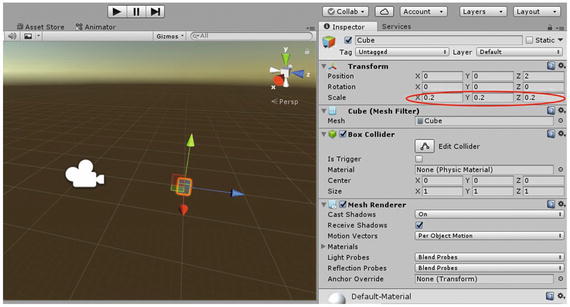
Figure 3-8. Scaling the cube down in size to make it easier to see
Step 5: Test Your App
It’s important to regularly test your app as you develop it to ensure that it’s behaving as you intend. Unity provides a very quick way of testing your app. To begin, simply click the play button located near the top of the Unity Editor, as shown in Figure 3-9. When you click Play, you should see your cube surrounded by a black background.

Figure 3-9. Clicking play to quickly test your app
The HoloLensCamera prefab that you imported into your scene near the beginning of this chapter also includes the ability to “move around” in your scene. Try it by pressing the left/right/up/down arrows on your keyboard while in Game mode (you may need to click the Game window before the keys work). You can also right-click your mouse to drag the camera’s view. Be careful when pressing keys, as the movement can be very fast and you may lose sight of your cube. If that happens, just restart your app test.
Click the play button again to exit Game mode. This was a very quick and easy way to test your app. We didn’t utilize holographic simulation or holographic remoting when we clicked play, so we weren’t able to test all aspects of a full Mixed Reality experience, such as gestures, spatial mapping, object manipulations, and more. You’ll learn about holographic remoting and simulation (collectively called holographic emulation in Unity ) later in this chapter.
Step 6: Install Your App on the HoloLens
Now that we’ve tested our Cube app, let’s install it on our HoloLens to experience our first hologram in person:
Be sure that you’ve exited out of Game mode from the previous step. The play button should be black when you’re not in Game mode; it’s blue when you’re in Game mode.
In your menu bar, go to File ➤ Build Settings
A pop-up window will appear, as shown in Figure 3-10.
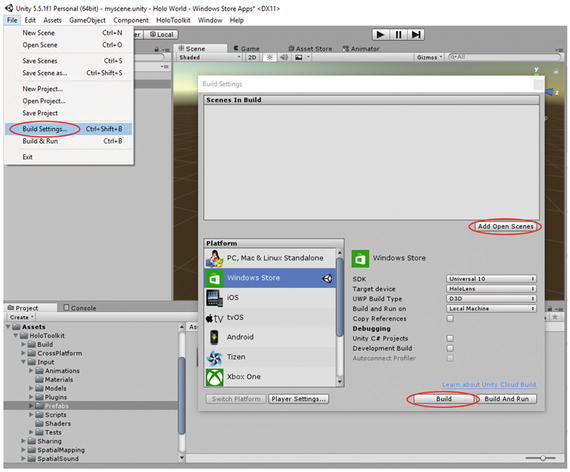
Figure 3-10. Export your first Mixed Reality app using the Build Settings window in Unity
Be sure to click the Add Open Scenes button to add your current scene to the list of scenes to build.
If you applied all the HoloLens projects settings at the beginning of this chapter correctly, then the remaining settings should not need to be modified. Review to make sure the Platform is set to Windows Store, the SDK is set to Windows 10, the Target device is set to HoloLens, the UWP Build Type is set to D3D, and that “Build and Run on” is set to Local Machine. See Figure 3-10 for how these settings should appear.
Click the Build button.
After you click Build , another pop-up window will appear. Create a new folder and name it. I typically name my folder App. Click your newly created folder and click the Select Folder button as shown in Figure 3-11.
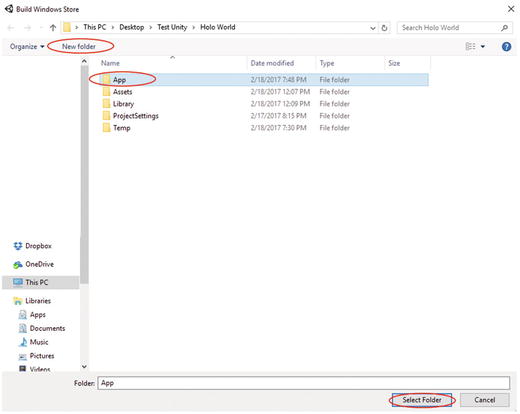
Figure 3-11. Create a new folder to contain your app
Unity will spend a few seconds building your new app and placing project files in the new folder you created. After Unity has completed building your app , a pop-up window will appear, showing the new folder you created. Open this folder.
Double-click Holo World.sln to open your project in Visual Studio. (Your file may be named differently if you didn’t name your project Holo World).
We will use Visual Studio to deploy (install) our app to our HoloLens. But first, we need to enable Developer mode on the HoloLens. Turn on your HoloLens and open the Settings app. Select the Update & Security menu item, as shown in Figure 3-12.
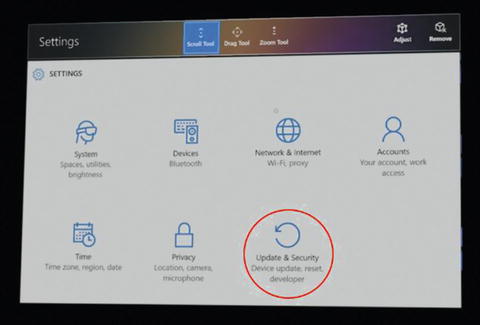
Figure 3-12. In the Settings app, go to the Update & Security menu item
Once in the Update & Security menu, navigate to the “For developers ” section and ensure that Developer mode is turned on, as shown in Figure 3-13.
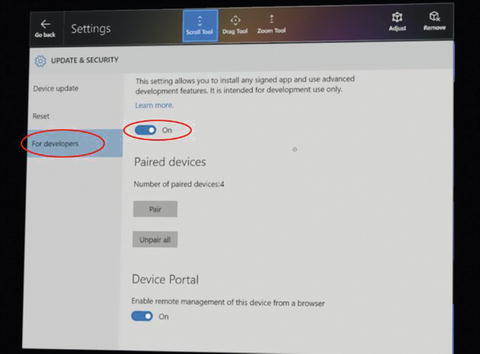
Figure 3-13. Navigate to the “For developers” section and enable Developer mode
Make sure that your HoloLens is connected to the same WiFi network as your development PC.
On your PC , set your configuration to Release and your platform to x86, as shown in Figure 3-14.
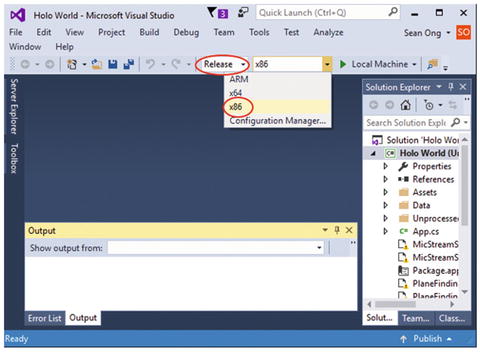
Figure 3-14. Set your configuration to Release and your platform to x86
Set your target device to Remote Machine, as shown in Figure 3-15.

Figure 3-15. Set your target to Remote Machine
A pop-up window will appear, where you can enter the IP address of your HoloLens. If you don’t know your IP address, you can access it on your HoloLens by going to Settings ➤ Network & Internet ➤ Advanced Options. See Figure 3-16 for guidance on where to find the IP address in your HoloLens Settings app .

Figure 3-16. Where to find your HoloLens IP address in the Settings app
Once you know your HoloLens IP address, enter it in the Remote Connections pop-up window in Visual Studio and click the Select button, as shown in Figure 3-17.
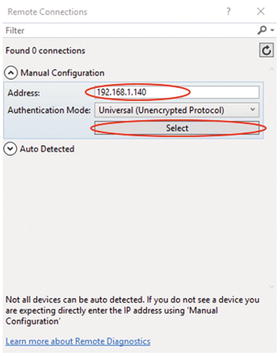
Figure 3-17. Enter your HoloLens IP address into Visual Studio’s Remote Connections window
You are now ready to deploy your app to your HoloLens. In the Debug menu , select Start Without Debugging, as shown in Figure 3-18.
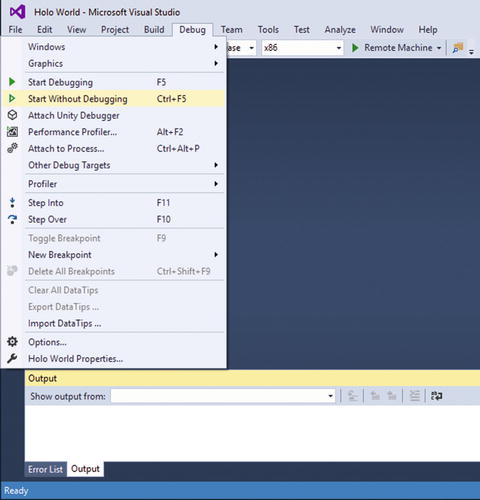
Figure 3-18. Start the app deployment process by going to Debug ➤ Start Without Debugging
If this is your first time deploying to your HoloLens from this PC, you will be prompted to pair your HoloLens with Visual Studio, as shown in Figure 3-19. To pair your HoloLens, go back to the “For developers” section of your HoloLens Settings app and click the Pair button, as can be seen back in Figure 3-13. You will see numbers appear on your HoloLens (see Figure 3-20 for an illustration of this), which you can then type into the pop-up window in Visual Studio.

Figure 3-19. Visual Studio will prompt you for a PIN if this is the first time you’re deploying to your HoloLens from this PC

Figure 3-20. After clicking the Pair button, your HoloLens will display a PIN for you to enter into Visual Studio on your PC. Note: Of course, your PIN will be different than the one shown in this figure.
After entering your HoloLens PIN into Visual Studio on your PC , you may dismiss the PIN pop-up on your HoloLens by clicking the Done button.
Visual Studio will begin deploying your app to the HoloLens. You should see some output text in Visual Studio indicating that your app was successfully deployed to the HoloLens, similar to Figure 3-21. If you receive any error messages and a failed deployment, please check the output to see what the error messages are. Check to make sure you followed all the steps in this tutorial. Even if you followed all the steps correctly, there may be other reasons why a deployment may fail. For example, if you run out of disk space on your drive, or if Visual Studio wasn’t installed correctly. If a mysterious error is preventing a successful deployment, I’ve found that restarting your computer and HoloLens often helps resolve the issue. Other potential solutions include rebuilding your App folder (deleting all contents and rebuilding from Unity) or re-entering your HoloLens IP address into Visual Studio.

Figure 3-21. Example of text displayed by Visual Studio if deployment to the HoloLens is successful
You should now be experiencing your very first Mixed Reality app. Congratulations! Feel free to walk around your hologram (cube) and look at it from various angles. What happens when you try to touch it? Is your hologram behind your computer monitor or wall? If so, restart your app while facing an open area.
Your app is now installed on your HoloLens—which means you’ll see it appear in your apps list as Holo World (if you named it Holo World, as I did in this tutorial).
Test Your App Using Holographic Remoting
This section discusses how to use Unity’s holographic remoting feature to speed up development. In the previous step, we deployed our app to the HoloLens for testing. Although that’s the most robust way to test your app, you may have noticed that it was time consuming and somewhat tedious. It’s an inefficient way to test your app after each change you make to your project. A much faster way to test your app on your HoloLens is to use Unity’s holographic remoting. With holographic remoting, your app is streamed (via WiFi) from Unity to your HoloLens without needing to go through Visual Studio.
Step 1: Install and Run the Holographic Remoting Player to Your HoloLens
If you haven’t done so already, you’ll need to install the Holographic Remoting Player app on your HoloLens.
On your HoloLens, open the Store app.
In the Store’s search bar, start typing in remoting. In the search results, you will see an app called Holographic Remoting Player, as shown in Figure 3-22.
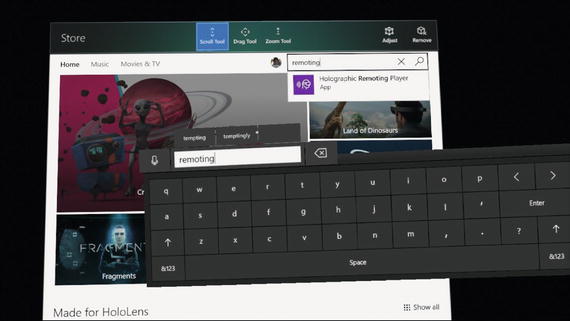
Figure 3-22. Search for the Holographic Remoting Player app and install it on your HoloLens
After installing the Holographic Remoting Player app, launch the app. You will see a welcome screen showing your device’s IP address, as shown in Figure 3-23.

Figure 3-23. You’ll see this screen upon launching the Holographic Remoting Player app on your HoloLens
Step 2: Connect to Your HoloLens with Unity’s Holographic Remoting
In Unity on your PC, go to Window ➤ Holographic Emulation, as shown in Figure 3-24.
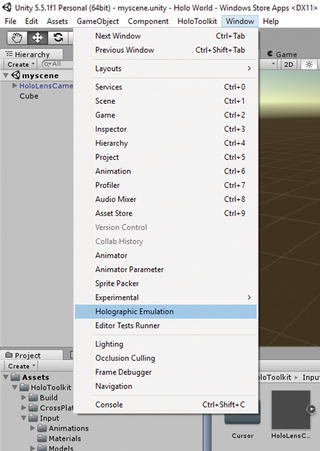
Figure 3-24. In Unity, open the Holographic Emulation window
A pop-up window will appear where you can select your Holographic Emulation settings. For Emulation Mode, select Remote to Device . For the Remote Machine IP Address, enter the IP address that you see displayed on your HoloLens (be sure the Holographic Remoting App player is running). See Figure 3-25 for an example of the Holographic Emulation window in Unity. After entering your IP address, you may need to uncheck and check one of the checkboxes for the changes to take effect, due to a bug. Try that workaround, if you’re unable to connect to your HoloLens.

Figure 3-25. Example of Unity’s Holographic Emulation window
Click the Connect button to connect to your HoloLens. If the connection was successful, the Connection Status in Unity’s Holographic Emulation window should indicate that it’s connected. You should see a blank screen (nothing/transparent) in your HoloLens. If you have music or audio playing on your PC, you may hear it on your HoloLens speakers .
Step 3: Test Your App Using Holographic Remoting
To test your application, click the play button in the Unity editor (refer back to Figure 3-9, from a previous example). Your hologram will instantly appear in your HoloLens, as if it were installed on your HoloLens.
Tip
For the best holographic remoting experiences, be sure to have a strong WiFi connection. A poor connection will cause lagging and/or pixilation issues. Using a PC with a powerful graphics card will also help with performance when streaming complex scenes to your HoloLens.
As you can see, holographic remoting is a very fast and efficient way to test your app on your HoloLens. Later, we’ll see that holographic remoting also supports gesture recognition from your HoloLens, as well as voice commands.
Test Your App Using Holographic Simulation
In this section, we’ll walk through how to use holographic simulation within Unity when testing your apps. So far, you’ve already learned how to deploy apps to your HoloLens via Visual Studio. You also learned a much faster approach for streaming apps to your HoloLens with holographic remoting. Another approach to quickly test your app (when using your HoloLens device is not required) is called holographic simulation. As discussed in Chapter 1, holographic simulation allows you to use a controller,such as the Xbox One controller to walk around and control your app from within Unity.
You may be wondering how this is different from simply clicking the play button in Unity without holographic simulation enabled. Here are some key advantages of using holographic simulation over testing your app without emulation within the Unity editor:
You can select between several rooms/areas in order to simulate spatial mapping.
Holographic simulation supports voice and gesture simulation.
You can easily use a wireless controller to walk around and control your app.
Let’s walk through how to set up holographic simulation to test your app.
Step 1: Enable Holographic Simulation
Open the holographic emulation window by clicking Window ➤ Holographic Emulation.
In the Holographic Emulation pop-up window that appears, select Simulate in Editor for the Emulation Mode, as shown in Figure 3-26. You don’t need to modify the Room or Gesture Hand for the Cube app.
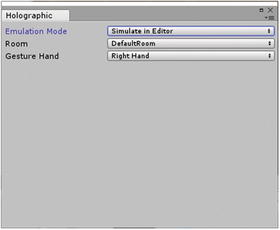
Figure 3-26. To enable holographic simulation, set Emulation Mode to Simulate in Editor within the Holographic Emulation window
Step 2: Connect Your Controller
In order to walk around, look around, and control your app, you’ll need to connect a gamepad or game controller, such as the Xbox One controller. Please see instructions specific to your controller to connect it to your PC. Unity will automatically recognize your controller once connected. No setup is required in Unity for your controller.
Step 3: Test Your App Using Holographic Simulation
Click the play button in the Unity editor to begin testing your app using holographic simulation. If your app isn’t responding to your controller, be sure to check that your game window has focus by clicking it. If you accidentally clicked another part of the Unity editor, or clicked out of Unity, the app won’t respond to your controller.
Holographic emulation loads a virtual model of a room that your app can interact with. Figure 3-27 shows what the spatial mapping mesh looks like when an application has the ability to make the spatial map visible. Note that you won’t be able to see the spatial map in the application we developed in this chapter. I cover spatial mapping extensively in Chapter 6.

Figure 3-27. Holographic simulation loads a virtual room where you are able to test spatial mapping features without leaving Unity
Summary
Congratulations! Having created your very first hologram, you’re well on your way to becoming a Mixed Reality developer. Creating and seeing your first hologram is a very satisfying experience. Let’s recap what was covered in this chapter:
You learned how to prepare Unity for holographic development using the HoloToolkit.
You learned how to place a hologram into a scene.
You learned how to install your app on a HoloLens by deploying it using Visual Studio.
You learned how to stream your app to your HoloLens using Unity’s holographic remoting.
You learned how to test your app using Unity’s holographic simulation.
The tutorials in this chapter serve as the building blocks for all Mixed Reality development workflows.