
WHAT YOU WILL LEARN IN THIS CHAPTER
Create a new iPhone project
Build your first iPhone application using Xcode
Design the user interface (UI) of your iPhone application using Interface Builder
Write some simple code to allow the application to rotate its content based on the orientation of the device.
Add an icon to your iPhone application
Now that you have set up all the tools and SDK, you are ready to start developing for the iPhone and iPod Touch! For programming books, it is customary to start the chapter by showing you how to develop a "Hello World!" application. This approach allows you to use the various tools very quickly without getting bogged down in the details. It also provides you with instant gratification: You see for yourself that things really work, which can be a morale booster that inspires you to learn more.
Power up Xcode and you should see the Welcome screen, as shown in Figure 2-1.
Note
The easiest way to start Xcode is to type Xcode in Spotlight and then press the Enter key to launch it.
To create a new iPhone project, choose File

Although there are quite a few types of iPhone applications you can create, for this chapter, select the View-Based Application template and click the Choose button.
Note
Subsequent chapters show you how to develop some of the other types of iPhone applications, such as Utility Application, Tab Bar Application, and Navigation Application.
Select the View-Based Application template and click Choose. Name the project HelloWorld and click Save. Xcode then proceeds to create the project for the template you have selected. Figure 2-3 shows the various files and folders in your project.

The left panel of Xcode shows the groupings in the project. You can expand on each group to reveal the files contained in each group (and folders). The right panel of Xcode shows the files contained within the group (or folder) you have selected on the left panel. To edit a particular file, select that file, and the editor at the bottom of the right panel opens the file for editing. If you want a separate window for editing, simply double-click a file to edit it in a new window.
In the following Try It Out, you will learn how to customize the Xcode toolbar area to add commonly used items.
TRY IT OUT: Customizing the Xcode Toolbar Area
Codefile [HelloWorld.zip] is available for download from Wrox.comThe top part of Xcode is the toolbar area. This area contains all the toolbar menu items that are commonly used in the development process. You can customize the toolbar area to add such items.
Give this a try by choosing View

To add an item to the toolbar, simply drag and drop the item onto the toolbar. Figure 2-5 shows the Active SDK item added to the toolbar.
The Active SDK item allows you to select whether to deploy your application to a real device or the iPhone Simulator (see Figure 2-6).


How It Works
By adding commonly used items to the Xcode toolbar area, you can improve the efficiency of your development process. In this case, you have added the Active SDK toolbar item to the toolbar area so that you can quickly switch between testing your application on the iPhone Simulator and on a real device simply by selecting the active SDK on the toolbar.
Until now, this project has had no UI. To prove this fact, simply press Command-R (or select Run

Obviously, a blank screen is not very useful. So, it's time to try adding some controls to the UI of your application. If you examine the list of files in your project, you notice two files with the .xib extension — MainWindow.xib and HelloWorldViewController.xib. Files with .xib extensions are basically XML files containing the UI definitions of an application. You can edit .xib files by either modifying their XML content, or more easily (and more sanely), edit them using Interface Builder.
Interface Builder comes as part of the iPhone SDK and allows you to build the UI of an iPhone (and Mac) applications by using drag-and-drop.
Double-click the HelloWorldViewController.xib file to launch Interface Builder. Figure 2-8 shows Interface Builder displaying the content of HelloWorldViewController.xib (which is really empty at this moment). As you can see, the Library window shows all the various controls that you can add to the UI of your iPhone application. The View window shows the graphical layout of your UI. You will see the use of the other windows shortly.

Now, scroll down to the Label control in the Library pane and drag and drop a Label view onto the View window. After the Label view is added, select the Label view and choose the Tools

Next, from the Library window drag and drop a Text Field view to the View window, followed by a Round Rect Button view. Modify the attribute of the Round Rect Button view by entering Click Me! in the Title field (see Figure 2-10).

Note
Rather than specify the Title property of a view to make the text display in the view (for example, the Label and the Round Rect Button views), you can also simply double-click the view itself and type the text directly. After you've done this, you can rearrange the controls and resize them to suit your needs. Note that Interface Builder provides you with alignment guidelines to help you arrange your controls in a visually pleasing layout.
Save the HelloWorldViewController.xib file by pressing Command-S. Then, return to Xcode and run the application again by pressing Command-R. The iPhone Simulator now displays the modified UI (see Figure 2-11).

Tap the Text Field view and watch the keyboard automatically appear (see Figure 2-12).
If you press the Home button on the iPhone Simulator, you will notice that your application has been installed on the simulator (you need to flick to the next page on the right after the Home screen is displayed). To go back to the application, simply tap the HelloWorld icon again (see Figure 2-13).

Note
Only one application can run on the iPhone at any time (except for some built-in applications by Apple). Hence, when you press the Home button on your iPhone, your application exits. Tapping an application icon starts the application all over again.
The iPhone Simulator also supports changes in view orientation. To change the view to Landscape mode, press the Command-→ key combination. Figure 2-14 shows how your application looks in Landscape mode. Press Command-← to change back to Portrait mode.

Notice that your application does not respond to changes in view orientations. To make your application respond appropriately when the view orientation changes, you need to modify your code.
In Xcode, edit the HelloWorldViewController.m file and look for the following code segment (this block of code is commented out by default):
- (BOOL)shouldAutorotateToInterfaceOrientation:(UIInterfaceOrientation)
interfaceOrientation {
    // Return YES for supported orientations
    return (interfaceOrientation == UIInterfaceOrientationPortrait);
}
Note
At this juncture, do not worry about the other files such as HelloWorldAppDelegate.h and HelloWorldAppDelegate.m. You learn more about them in later chapters.
Modify the preceding code to return YES, as shown in the following snippet:
- (BOOL)shouldAutorotateToInterfaceOrientation:(UIInterfaceOrientation)
interfaceOrientation {
    // Return YES for supported orientations
    return YES;
}
Run the application again. This time, notice that your application rotates as the view orientation changes (see Figure 2-15).

In the previous section, you saw that as the orientation changes, the size and positioning of the views remain. In the real world, this scenario is not desirable because it doesn't give the user a good experience while using your application. Ideally, you should reposition your views on the screen so that they change with the view orientation.
To reposition your views, go to the Interface Builder, select the Label view, and choose Tools

Likewise, modify the Autosizing attribute of the Text Field view as shown in Figure 2-17. Note the different pixel sizes.

Finally, modify the Autosizing attribute for the Round Rect Button control as shown in Figure 2-18. This time, you are not resizing the view when the view orientation changes. Instead, you are only anchoring it to the top of the screen.

That's it! Within Interface Builder, you can click the arrow located at the top-right corner (see Figure 2-19) of the screen to rotate the screen so that you can view the effect of the changes you have made immediately.

Go back to Xcode and run the application again. This time, notice that the controls reposition and resize themselves as you rotate the screen (see Figure 2-20).

So far, you have not written any code, because you should be comfortable with Xcode and Interface Builder before embarking on coding. Nevertheless, it's now time to write some code to give you a flavor of programming with iPhone.
Recall that in the section about the Interface Builder, earlier in this chapter, I show a window labeled HelloWorldViewController.xib. Within this window are three components: File's Owner, First Responder, and View.
Select File's Owner and then choose Tools
In the Identity Inspector window, click the + (plus) button shown under Class Actions (see Figure 2-21). Enter btnClicked: in the action name field. (Remember to include the colon because it is part of an action name.) Doing so creates an action (also known as an event handler) named btnClicked:.

Control-click the Round Rect Button view in the View window and drag it to the File's Owner item in the HelloWorldViewController.xib window (see Figure 2-22). A small pop-up containing the btnClicked: action appears. Select the btnClicked: action. Basically, what you are doing here is linking the Round Rect Button view with the action (btnClicked:) so that when the user clicks the button, the action is invoked.

In the HelloWorldViewController.h file, add a header declaration for the btnClicked: action:
//
//  HelloWorldViewController.h
//  HelloWorld
//
//  Created by Wei-Meng Lee on 3/30/09.
//  Copyright __MyCompanyName__ 2009. All rights reserved.
//

#import <UIKit/UIKit.h>

@interface HelloWorldViewController : UIViewController {

}

//---declaration for the btnClicked: action----(IBAction) btnClicked:(id)sender;

@end
In the HelloWorldViewController.m file, add the code that provides the implementation for the btnClicked: action:
- (void)dealloc {
[super dealloc];
}
//---implementation for the btnClicked: action---
-(IBAction) btnClicked:(id)sender {
//---display an alert view---
UIAlertView *alert = [[UIAlertView alloc]initWithTitle:@"Hello World!"message: @"iPhone, here I come!"delegate:selfcancelButtonTitle:@"OK"otherButtonTitles:nil, nil];
[alert show];
[alert release];
}
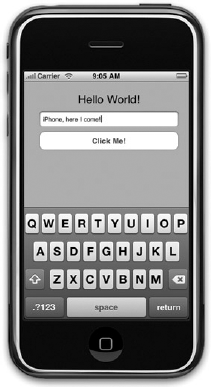
@endThe preceding code displays an alert containing the sentence "iPhone, here I come!"
That's it! Go back to Xcode and run the application again. This time, when you tap the button view, an alert view displays (see Figure 2-23).

As you have observed earlier in Figure 2-13, the application installed on your iPhone Simulator uses a default white image as your application icon. It is possible, however, to customize this icon. When designing icons for your iPhone applications, bear the following in mind:
Design your icon to be 57 × 57 pixels. Larger size is all right because iPhone automatically sizes it for you. In fact, you should design your icons in a larger size in the event Apple releases new devices that are larger than the current size/form factor.
For distribution through the App Store, you need to prepare a 512 × 512 pixel image.
Use square corners for your icon image, because iPhone will automatically round them and add a glossy surface (you can turn off this feature, though).
In the following Try It Out, you will learn how to add an icon to your application so that the iPhone Simulator will use it instead of the default white image.
TRY IT OUT: Adding an Icon to the Application
To make your application more interesting, you should specify your own icon. Before you do so, note that icons for the iPhone come in two sizes: 57 × 57 pixels (for the main screen) and 29 × 29 pixels (as shown in the Settings application). Figure 2-24 shows the two possible sizes for the icon.
To add an icon to your application, drag and drop an image onto the Resources folder of your project (see Figure 2-25). You will be asked if you want to make a copy of the image you are dropping. Check this option so that a copy of the image will now be stored in your project folder.
Select the
Info.plistitem (also located under the Resources folder). Select the Icon file item and set its value to the name of the icon (app-icon.png; see Figure 2-26). This specifies the name of the image to be used as the application icon.


Run the application and test it on the iPhone Simulator. Press the Home button to return to the main screen of the iPhone. You should now see the newly added icon (see Figure 2-27).

This chapter was a whirlwind journey of developing your first iPhone application. Although you may still have many questions, the aim of this chapter was to get you started. The next few chapters dive deeper into the finer details of iPhone programming, and the secret of all those mysterious items working in tandem are gradually revealed.
EXERCISES
You tried to add an icon to your iPhone project in Xcode. What is the size of the image that you should provide?
If your application needs to support a different display orientation, what should you do?
WHAT YOU HAVE LEARNED IN THIS CHAPTER
TOPIC | KEY CONCEPTS |
|---|---|
Xcode | Create your iPhone application project and write code that manipulates your application. |
Interface Builder | Build your iPhone UI using the various views located in the Library. |
Repositioning views | Use the Autosizing feature in Interface Builder to ensure that the views resize even when there is an orientation change. |
Adding application icon | Add an image to the project and then specify the image name in Icon file property of the |
Creating icons for your iPhone applications | Icon size is 57 × 57 pixels (Home screen) and 29 × 29 pixels (Settings). For AppStore hosting, size is 512 × 512 pixels. |