You’ve constructed all your application UIs so far using views and controls that are part of the UIKit framework. You can do a lot with UIKit, and a great many applications are constructed using only its predefined objects. Some visual elements (see Figure 14-1), however, can’t be fully realized without going beyond what the UIKit stock components offer.
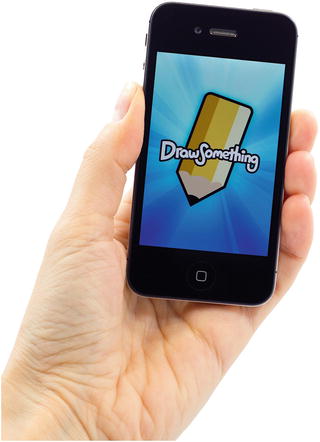
Figure 14-1. Graphics-intense apps can require more drawing control than UIKit offers
For example, sometimes an application needs to be able to do custom drawing. iOS includes the Core Graphics framework, allowing you to perform a wide array of drawing tasks. In this chapter, you’ll explore a small part of this powerful graphics environment. I’ll also show how to build sample applications demonstrating key features of Core Graphics and explain the main concepts.
Quartz 2D
Core Graphics includes a main set of APIs called Quartz 2D, which is a collection of functions, data types, and objects designed to let you draw directly into a view or an image in memory. Quartz 2D provides the view or image that is being drawn into as a virtual canvas. It follows what’s called a painter’s model, which means that the drawing commands are applied in much the same way that paint is applied to a canvas.
If a painter paints an entire canvas red and then paints the bottom half of the canvas blue, the canvas will be half red and half either blue, if the blue paint is opaque, or purple if the blue paint is semitransparent. Quartz 2D’s virtual canvas works the same way. If you paint the whole view red and then paint the bottom half of the view blue, you’ll have a view that’s half red and half either blue or purple, depending on whether the second drawing action was fully opaque or partially transparent. Each drawing action gets applied to the canvas on top of any previous drawing actions.
Quartz 2D provides a variety of line, shape, and image drawing functions. Though easy to use, Quartz 2D is limited to two-dimensional drawing. You’ll start with the basics of how Quartz 2D works and then build a simple drawing application using it.
The Quartz 2D Approach to Drawing
When using Quartz 2D (Quartz for short), you’ll usually add the Swift graphics code to the view doing the drawing. For example, you might create a subclass of UIView and add Quartz function calls to that class’s draw(_ rect:) method. The draw(_ rect:) method is part of the UIView class definition and is called every time a view needs to redraw itself. If you insert your Quartz code in draw(_ rect:), that code will be called, and then the view redraws itself.
Quartz 2D’s Graphics Contexts
In Quartz, as in the rest of Core Graphics , drawing happens in a graphics context, usually referred to simply as a context. Every view includes an associated context. You retrieve the current context, use that context to make various Quartz drawing calls, and let the context handle rendering the drawing onto the view. You can think of this context as a sort of canvas. The system provides you with a default context where the contents will appear on the screen. However, it’s also possible to create a context of your own for doing drawing that you don’t want to appear immediately but that you want to save for later or use for something else. You’ll focus on using the default context, which you get from within draw(_ rect:) by writing let context = UIGraphicsGetCurrentContext().
The graphics context is of type CGContext. This is the Swift mapping for the C-language pointer type CGContextRef, the native Core Graphics representation of a context. The actual inferred type of the context variable in the preceding code is CGContext!. It’s optional because C-language calls can theoretically return NULL (although UIGraphicsGetCurrentContext() doesn’t, provided you only use it where there is guaranteed to be a current context), and it’s unwrapped so that you don’t have to unwrap every reference to the context.
Note
Core Graphics is a C-language API. All the functions with names starting with CG that you see in this chapter are C functions, not Swift functions.
Once you have a graphics context, you can draw into it by passing the context to a variety of Core Graphics drawing functions. For example, the sequence in Listing 14-1 creates a path describing a simple line and then draws that path.
Listing 14-1. Drawing into a Graphics Context
context?.setLineWidth(4.0)context?.setStrokeColor(UIColor.red.cgColor)context?.move (to: CGPoint(x: 10.0, y: 10.0))context?.addLine (to: CGPoint(x: 20.0, y: 20.0))context?.strokePath()
The first call specifies that any subsequent drawing commands that create the current path should be performed with a brush that is 4 points wide. Think of this as selecting the size of the brush you’re about to paint with. Until you call this function again with a different number, all lines will have a width of 4 points when drawn in this context. You then specify that the stroke color should be red. In Core Graphics, two colors are associated with drawing actions.
The stroke color is used in drawing lines and for the outline of shapes.
The fill color is used to fill in shapes.
A context has a sort of invisible pen associated with it that does the line drawing. As drawing commands are executed, the movements of this pen form a path. When you call .moveTo(x: , y:), you lift the virtual pen and move to the location you specify, without actually drawing anything. Whatever operation comes next, it will do its work relative to the point to which you last moved the pen. In the earlier example, for instance, you first moved the pen to (10, 10). The next function call added a line from the current pen location (10, 10) to the specified location (20, 20), which became the new pen location.
When you draw in Core Graphics , you’re not drawing anything you can actually see—at least not immediately. You’re creating a path, which can be a shape, a line, or some other object; however, it contains no color or other features to make it visible. It’s like writing in invisible ink. Until you do something to make it visible, your path can’t be seen. So, the next step is to call the .strokePath() function, which tells Quartz to draw the path you’ve constructed. This function will use the line width and the stroke color you set earlier to actually color (or “paint”) the path and make it visible.
The Coordinate System
In Listing 14-1, you passed a pair of floating-point numbers as parameters to context!.moveTo(x:, y:) and context!.addLineTo(x:, y:). These numbers represent positions in the Core Graphics coordinate system. Locations in this coordinate system are denoted by their x and y coordinates, which you usually represent as (x, y). The upper-left corner of the context is (0, 0). As you move down, the y increases. As you move to the right, the x increases. What this code did was draw a diagonal line from (10, 10) to (20, 20), which would look like the one shown in Figure 14-2.

Figure 14-2. Drawing a line using Quartz 2D’s coordinate system
The Quartz coordinate system can be a little confusing on iOS because its vertical component is flipped from what many graphics libraries use and from the traditional Cartesian coordinate system. In other systems such as OpenGL or the macOS version of Quartz, (0, 0) is in the lower-left corner; and as the y coordinate increases, you move toward the top of the context or view, as shown in Figure 14-3.
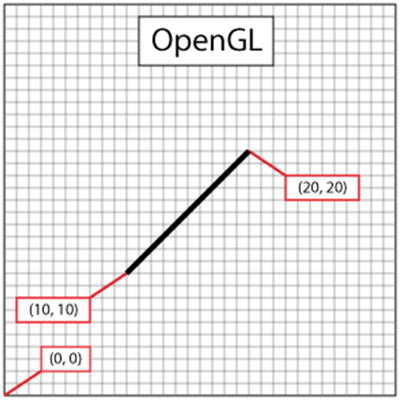
Figure 14-3. In many graphics libraries, including OpenGL, drawing from (10, 10) to (20, 20) would produce a line that looks like this instead of the line in Figure 14-2
To specify a point in the coordinate system, some Quartz functions require two floating-point numbers as parameters. Other Quartz functions ask for the point to be embedded in a CGPoint, which is a struct that holds two floating-point values: x and y. To describe the size of a view or other object, Quartz uses CGSize, which is a struct that also holds two floating-point values: width and height. Quartz also declares a data type called CGRect, which is used to define a rectangle in the coordinate system. A CGRect contains two elements: a CGPoint called origin, with x and y values that identify the top left of the rectangle; and a CGSize called size, which identifies the width and height of the rectangle, as shown in Listing 14-2.
Listing 14-2. Creating a Rectangle
var startingPoint = CGPoint(x: 1.0, y: 1.0)var sizeOfrect = CGSize(width: 10.0, height: 10.0)var rectangle = CGRect(origin: startingPoint, size: sizeOfrect)
Specifying Colors
An important part of drawing is color , so understanding the way colors work on iOS is critical. UIKit provides a class that represents a color: UIColor. You can’t use a UIColor object directly in Core Graphic calls. However, UIColor is just a wrapper around a Core Graphics structure called cgColor (which is what the Core Graphic functions require). You can retrieve a cgColor reference from a UIColor instance by using its cgColor property, as I showed earlier, context!.setStrokeColor(UIColor.red.cgColor).
You got a reference to a predefined UIColor instance using a type method called red and then retrieved its cgColor property and passed that into the function. If you look at the documentation for the UIColor class, you’ll see that there are several convenience methods like redColor() that you can use to get UIColor objects for some commonly used colors .
A Bit of Color Theory for Your iOS Device’s Display
In modern computer graphics , any color displayed on the screen has its data stored in some way based on something called a color model. A color model (sometimes called a color space) is simply a way of representing real-world color as digital values that a computer can use. One common way to represent colors is to use four components: red, green, blue, and alpha. In Quartz, each of these values is represented as CGFloat. These values should always contain a value between 0.0 and 1.0.
Caution
On 32-bit systems, CGFloat is a 32-bit floating-point number and therefore maps directly to the Swift Float type. However, on 64-bit systems, it is a 64-bit value, corresponding to the Swift Double type. Be careful when manipulating CGFloat values in Swift code.
The red, green, and blue components are fairly easy to understand, as they represent the additive primary colors, or the RGB color model, as shown in Figure 14-4. If you add together the light of these three colors in equal proportions, the result appears to the eye as either white or a shade of gray, depending on the intensity of the light mixed. Combining the three additive primaries in different proportions gives you a range of different colors, referred to as a gamut.
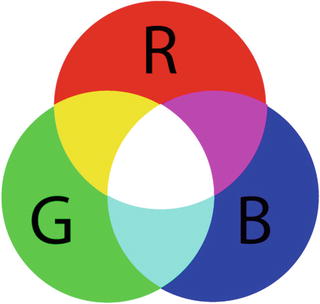
Figure 14-4. A simple representation of the additive primary colors that make up the RGB color model
You’ve probably learned that the primary colors are red, yellow, and blue, which are known as the historical subtractive primaries, or the RYB color model, and have little application in modern color theory and are almost never used in computer graphics. The color gamut of the RYB color model is much more limited than the RGB color model, and it also doesn’t lend itself easily to mathematical definition. For these purposes, the primary colors are red, green, and blue, not red, yellow, and blue.
In addition to red, green, and blue, Quartz uses another color component, called alpha, which represents how transparent a color is. When drawing one color on top of another color, alpha is used to determine the final color that is drawn. With an alpha of 1.0, the drawn color is 100 percent opaque and obscures any colors beneath it. With any value less than 1.0, the colors below will show through and mix with the color above. If the alpha is 0.0, then this color will be completely invisible, and whatever is behind it will show through completely. When an alpha component is used, the color model is sometimes referred to as the RGBA color model, although technically speaking, the alpha isn’t really part of the color; it just defines how the color will interact with other colors when it is drawn.
Other Color Models
Although the RGB model is the most commonly used in computer graphics, it is not the only color model. Several others are in use, including the following:
Hue, saturation, value (HSV)
Hue, saturation, lightness (HSL)
Cyan, magenta, yellow, black (CMYK), which is used in four-color offset printing
Grayscale
There are also different versions of some of these models, including several variants of the RGB color space. Fortunately, for most operations, you don’t need to worry about the color model that is being used. You can just call cgColor on your UIColor objects, and in most cases, Core Graphics will handle any necessary conversions.
Drawing Images in Context
Quartz allows you to draw images directly into a context . This is another example of a UIKit class (UIImage) that you can use as an alternative to working with a Core Graphics data structure (cgImage). The UIImage class contains methods to draw its image into the current context. You’ll need to identify where the image should appear in the context using either of the following techniques:
By specifying a CGPoint to identify the image’s upper-left corner
By specifying a CGRect to frame the image, resized to fit the frame if necessary
You can draw a UIImage into the current context as shown in Listing 14-3.
Listing 14-3. Draw a UIImage into the Current Context
var image:UIImage = UIImage() // assuming this exists and points at a UIImage instancelet drawPoint = CGPoint(x: 100.0, y: 100.0)image.draw(at: drawPoint)
Drawing Shapes: Polygons, Lines, and Curves
Quartz provides a number of functions to make it easier to create complex shapes. To draw a rectangle or a polygon, you don’t need to calculate angles, draw lines, or do any math at all. You can just call a Quartz function to do the work for you. For example, to draw an ellipse, you define the rectangle into which the ellipse needs to fit and let Core Graphics do the work, as shown in Listing 14-4.
Listing 14-4. Drawing a Rectangle in the Current Context
let startingPoint = CGPoint(x: 1.0, y: 1.0)let sizeOfrect = CGSize(width: 10.0, height: 10.0)let theRect = CGRect(origin: startingPoint, size:sizeOfrect)context!.addEllipse(inRect: theRect)context!.addRect(theRect)
You use similar methods for rectangles. Quartz also provides methods that let you create more complex shapes, such as arcs and Bezier paths.
Note
You won’t be working with complex shapes in this chapter’s examples. To learn more about arcs and Bezier paths in Quartz, check out the Quartz 2D Programming Guide in the iOS Dev Center at http://developer.apple.com/documentation/GraphicsImaging/Conceptual/drawingwithquartz2d/ or in Xcode’s online documentation.
Quartz 2D Tool Sampler: Patterns, Gradients, and Dash Patterns
Quartz offers quite an impressive array of tools . For example, Quartz supports filling polygons not only with solid colors but also with gradients. In addition to drawing solid lines, it can also use an assortment of dash patterns. Take a look at the screenshots in Figure 14-5, which are from Apple’s QuartzDemo sample code, to see a sampling of what Quartz can do for you.
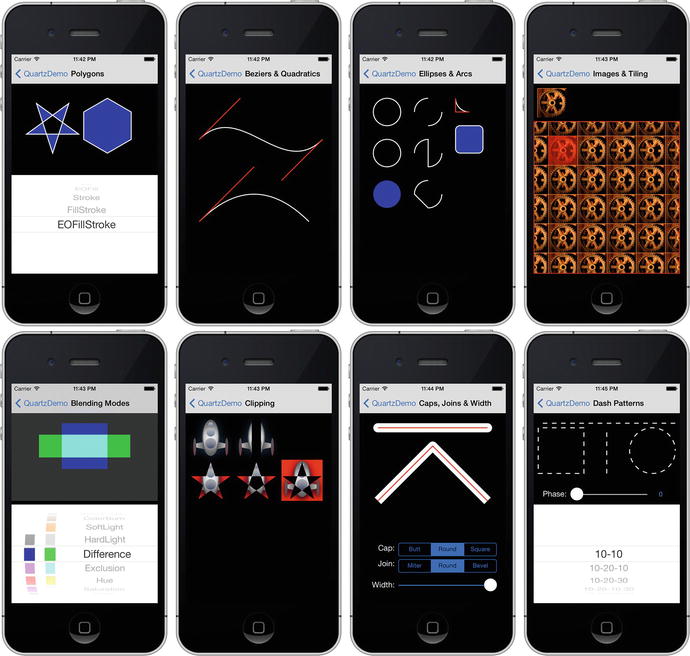
Figure 14-5. Some examples of what Quartz 2D can do from the QuartzDemo sample project provided by Apple
Now that you have a basic understanding of how Quartz works and what it is capable of doing, let’s try it.
The QuartzFun Application
For your next application, you’ll build a simple drawing program (see Figure 14-6) using Quartz to give you a feel for how the concepts I’ve been describing fit together.
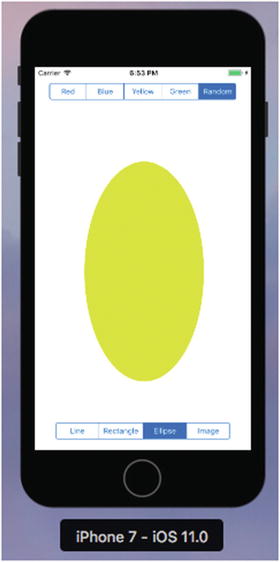
Figure 14-6. The QuartzFun application in action
Creating the QuartzFun Application
In Xcode, create a new project using the Single View App template and call it QuartzFun. The template has already provided you with an application delegate and a view controller. You’re going to be executing your custom drawing in a custom view, so you need to also create a subclass of UIView where you’ll do the drawing by overriding the draw(_ rect:) method. With the QuartzFun folder selected (the folder that currently contains the app delegate and view controller files), press ⌘N to bring up the new file assistant and then select Cocoa Touch Class from the iOS Source section. Name the new class QuartzFunView and make it a subclass of UIView.
You’re going to add a couple of enumerations—one for the types of shapes that can be drawn and another for the available colors. Also, since one of the color selections is Random, you’ll also need a method that returns a random color each time it’s called. Let’s start by creating that method and the two enumerations.
Creating a Random Color
You could define a global function that returns a random color, but it’s better to add this function as an extension to the UIColor class. Open the QuartzFunView.swift file and add the following code near the top:
// Random color extension of UIColorextension UIColor {class func randomColor() -> UIColor {let red = CGFloat(Double(arc4random_uniform(255))/255)let green = CGFloat(Double(arc4random_uniform(255))/255)let blue = CGFloat(Double(arc4random_uniform(255))/255)return UIColor(red: red, green: green, blue: blue, alpha:1.0)}}
This code is fairly straightforward. For each color component, you use the arc4random_uniform() function to generate a random floating-point number in the range 0 to 255. Each component of the color needs to be between 0.0 and 1.0, so you simply divide the result by 255. Why 255? Quartz 2D on iOS supports 256 different intensities for each of the color components , so using the number 255 ensures that you have a chance to randomly select any one of them. Finally, you use those three random components to create a new color. You set the alpha value to 1.0 so that all generated colors will be opaque.
Defining Shape and Color Enumerations
The possible shapes and drawing colors are represented by enumerations. Add the following definitions to the QuartzFunView.swift file:
enum Shape : Int {case line = 0, rect, ellipse, image}// The color tab indicesenum DrawingColor : Int {case red = 0, blue, yellow, green, random}
Both enumerations are derived from UInt because, as you’ll see later, you will need to use the raw enumeration values to map between a shape or a color and the selected segment of a segmented control.
Implementing the QuartzFunView Skeleton
Since you’re going to do your drawing in a subclass of UIView, let’s set up that class with everything it needs, except for the actual code to do the drawing , which you’ll add later. Start out by adding the following six properties to the QuartzFunView class:
// Application-settable propertiesvar shape = Shape.linevar currentColor = UIColor.redvar useRandomColor = false// Internal propertiesprivate let image = UIImage(named:"iphone")private var firstTouchLocation = CGPoint.zeroprivate var lastTouchLocation = CGPoint.zero
The shape property keeps track of the shape the user wants to draw, the currentColor property is the user’s selected drawing color, and the useRandomColor property will be true if the user chooses to draw with a random color. These properties are all meant to be used outside the class (in fact, they will be used by the view controller).
The next three properties are required only by the class implementation and are therefore marked as private. The first two properties will track the user’s finger as it drags across the screen. You’ll store the location where the user first touches the screen in firstTouchLocation. You’ll store the location of the user’s finger while dragging and when the drag ends in lastTouchLocation. Your drawing code will use these two variables to determine where to draw the requested shape. The image property holds the image to be drawn on the screen when the user selects the rightmost toolbar item on the bottom toolbar, as shown in Figure 14-7.
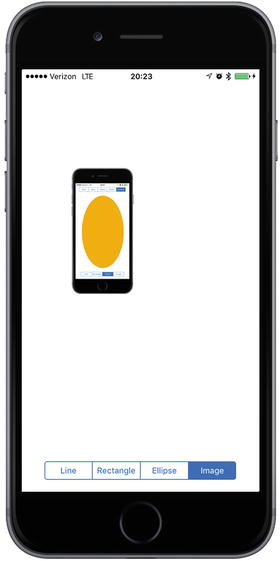
Figure 14-7. Using QuartzFun to draw a UIImage
Now on to the implementation itself. Let’s first add a few methods to respond to the user’s touches. After the property declarations, insert the three methods in Listing 14-5.
Listing 14-5. The Touch Methods for the QuartFunView.swift File
override func touchesBegan(_ touches: Set<UITouch>, with event: UIEvent?) {if let touch = touches.first {if useRandomColor {currentColor = UIColor.randomColor()}firstTouchLocation = touch.location(in: self)lastTouchLocation = firstTouchLocationsetNeedsDisplay()}}override func touchesMoved(_ touches: Set<UITouch>, with event: UIEvent?) {if let touch = touches.first {lastTouchLocation = touch.location(in: self)setNeedsDisplay()}}override func touchesEnded(_ touches: Set<UITouch>, with event: UIEvent?) {if let touch = touches.first {lastTouchLocation = touch.location(in: self)setNeedsDisplay()}}
These three methods are inherited from UIView, which in turn inherits them from its parent, UIResponder. They can be overridden to find out where the user is touching the screen. They work as follows:
touchesBegan(_:withEvent:) is called when the user’s finger first touches the screen. In that method, you change the color if the user has selected a random color using the new randomColor method you added to UIColor earlier. After that, you store the current location so that you know where the user first touched the screen, and you indicate that your view needs to be redrawn by calling setNeedsDisplay() on self.
touchesMoved(_:withEvent:) is continuously called while the user is dragging a finger on the screen. All you do here is store the new location in lastTouchLocation and indicate that the screen needs to be redrawn.
touchesEnded(_:withEvent:) is called when the user lifts the finger off the screen. Just as in the touchesMoved(_:withEvent:) method, all you do is store the final location in the lastTouchLocation variable and indicate that the view needs to be redrawn.
You’ll come back to this class once you have your application skeleton up and running. That draw(_ rect:) method, which is currently commented out, is where you will do this application’s real work, and you haven’t written that yet. Let’s finish setting up the application before you add your drawing code.
Creating and Connecting Outlets and Actions
Before you can start drawing, you need to add the segmented controls to your GUI and then hook up the actions and outlets. Single-click Main.storyboard to set these things up. The first order of business is to change the class of the view. In the Document Outline, expand the items for the scene and for the view controller it contains and then single-click the View item. Press ⌥⌘3 to bring up the Identity Inspector and change the class from UIView to QuartzFunView.
Now use the Object Library to find a segmented control and drag it to the top of the view, just below the status bar. Place it somewhere near the center. You don’t need to be too accurate with this because you’ll shortly add a layout constraint that will center it.
With the segmented control selected, bring up the Attributes Inspector and change the number of segments from 2 to 5. Double-click each segment in turn, changing each label to (from left to right) Red, Blue, Yellow, Green, and Random, in that order. Now let’s apply layout constraints. In the Document Outline, Control-drag from the segmented control item to the Quartz Fun View item, release the mouse, hold down the Shift key, select Vertical Spacing to Top Layout Guide and Center Horizontally in Container, and then press Return. In the Document Outline, select the View Controller icon; then back in the storyboard editor, click the Resolve Auto Layout Issues button (the one to the right of the Pin button) and select Update Frames. If this option is not enabled, make sure you have View Controller selected in the Document Outline. The segmented control should now be properly sized and positioned, as shown in Figure 14-8.
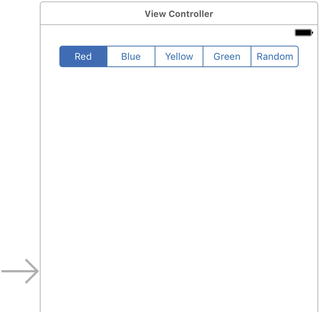
Figure 14-8. Your correctly labelled and positioned color segment control
Bring up the assistant editor , if it’s not already open, and select ViewController.swift from the jump bar. Now Control-drag from the segmented control in the Document Outline to the ViewController.swift file on the right to the line below the class declaration and release the mouse to create a new outlet. Name the new outlet colorControl, and leave all the other options at their default values. Your class should now look like this:
class ViewController: UIViewController {@IBOutlet weak var colorControl: UISegmentedControl!
Next, let’s add an action. Open ViewController.swift in the assistant editor, select Main.storyboard again, and Control-drag from the segmented control over to the bottom of the class definition in the view controller file, directly above the closing brace. In the pop-up, change the connection type to Action and the name to changeColor. The pop-up should default to using the Value Changed event, which is what you want. You should also set the type to UISegmentedControl.
Now let’s add a second segmented control . This one will be used to choose the shape to be drawn. Drag a segmented control from the library and drop it near the bottom of the view. Select the segmented control in the Document Outline, bring up the Attributes Inspector, and change the number of segments from 2 to 4. Now double-click each segment and change the titles of the four segments to Line, Rectangle, Ellipse, and Image, in that order. Now you need to add layout constraints to fix the size and position of the control, just like you did with the color selection control. Here’s the sequence of steps that you need:
In the Document Outline, Control-drag from the new segmented control item to the Quartz Fun View item and release the mouse. Hold down the Shift key and select Vertical Spacing to Bottom Layout Guide and Center Horizontally in Container; then press Return.
In the Document Outline, select the View Controller icon; then back in the editor, click the Resolve Auto Layout Issues button and select Update Frames.
Once you’ve done that, open ViewController.swift in the assistant editor again and then Control-drag from the new segmented control to the bottom of ViewController.swift to create another action. Change the connection type to Action, name the action changeShape, change the type to UISegmentedControl, and click Connect. The storyboard should now look like Figure 14-9. Your next task is to implement the action methods.
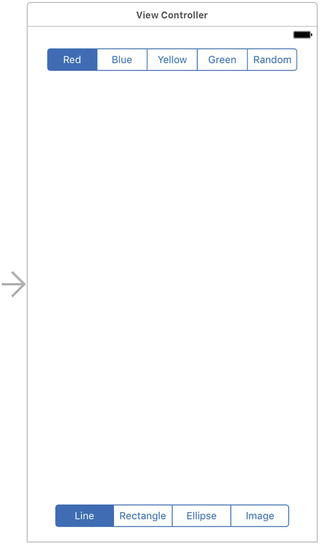
Figure 14-9. Your storyboard with both segmented controls in place
Implementing the Action Methods
Save the storyboard and feel free to close the assistant editor. Now select ViewController.swift, look for the stub implementation of changeColor() that Xcode created for you, and add the code in Listing 14-6.
Listing 14-6. The changeColor Method Goes in the ViewController.swift File
@IBAction func changeColor(_ sender: UISegmentedControl) {let drawingColorSelection =DrawingColor(rawValue: UInt(sender.selectedSegmentIndex))if let drawingColor = drawingColorSelection {let funView = view as! QuartzFunViewswitch drawingColor {case .red:funView.currentColor = UIColor.redfunView.useRandomColor = falsecase .blue:funView.currentColor = UIColor.bluefunView.useRandomColor = falsecase .yellow:funView.currentColor = UIColor.yellowfunView.useRandomColor = falsecase .green:funView.currentColor = UIColor.greenfunView.useRandomColor = falsecase .random:funView.useRandomColor = true}}}
This is pretty straightforward. You simply look at which segment was selected and create a new color based on that selection to serve as your current drawing color . To map from the segmented control’s selected index to the enumeration value for the corresponding color, you use the enumeration’s constructor that takes a raw value.
let drawingColorSelection =DrawingColor(rawValue: UInt(sender.selectedSegmentIndex))
After that, you set the currentColor property so that your class knows which color to use when drawing, unless a random color has been selected. In that case, you set the useRandomColor property to true, and a new color will be chosen each time the user starts a new drawing action (you’ll find in this code in the touchesBegan(_:withEvent:) method, which you added a few pages ago). Since all the drawing code will be in the view itself, you don’t need to do anything else in this method.
Next, look for the existing implementation of changeShape() and add the following code to it:
@IBAction func changeShape(_ sender: UISegmentedControl) {let shapeSelection = Shape(rawValue: UInt(sender.selectedSegmentIndex))if let shape = shapeSelection {let funView = view as! QuartzFunViewfunView.shape = shapecolorControl.isHidden = shape == Shape.image}}
In this method, all you do is set the shape type based on the selected segment of the control. The four elements of the Shape enumeration correspond to the four toolbar segments at the bottom of the application view. You set the shape to be the same as the currently selected segment, and you also hide or show the color selection control based on whether the Image segment was selected.
Make sure that everything is in order by compiling and running your app. You won’t be able to draw shapes on the screen yet, but the segmented controls should work; and when you tap the Image segment in the bottom control, the color controls should disappear.
Now that you have everything working, let’s do some drawing.
Adding Quartz 2D Drawing Code
You’re ready to add the code that does the drawing. You’ll draw a line, some shapes, and an image. You’re going to work incrementally, adding a small amount of code, and then run the app to see what that code does.
Drawing the Line
Let’s do the simplest drawing option first: drawing a single line. Select QuartzFunView.swift and replace the commented-out draw(_ rect: CGRect) method with the one shown in Listing 14-7.
Listing 14-7. The draw(rect: ) Method
override func draw(_ rect: CGRect) {let context = UIGraphicsGetCurrentContext()context!.setLineWidth(2.0)context!.setStrokeColor(currentColor.cgColor)switch shape {case .line:context?.move(to: CGPoint(x: firstTouchLocation.x,y: firstTouchLocation.y))context?.addLine(to: CGPoint(x: lastTouchLocation.x,y: lastTouchLocation.y))context?.strokePath()case .rect:breakcase .ellipse:breakcase .image:break}}
You start things off by retrieving a reference to the current context, which will let you draw onto your QuartzFunView.
let context = UIGraphicsGetCurrentContext()Next, you set the line width to 2.0, which means that any line that you stroke will be 2 points wide.
context!.setLineWidth(2.0)After that, you set the color for stroking lines. Since UIColor has a CGColor property, which is what this function needs, you use that property of your currentColor property to pass the correct color on to this function.
context!.setStrokeColor(currentColor.cgColor)You use a switch to jump to the appropriate code for each shape type. As mentioned earlier, you’ll start off with the code to handle drawing a line, get that working, and add code for each shape in turn as you make your way through this example.
switch shape {case .line:
To draw a line, you tell the graphics context to create a path starting at the first place the user touched. Remember that you stored that value in the touchesBegan(_:withEvent:) method, so it will always reflect the starting point of the most recent touch or drag.
context?.move (to: CGPoint(x: firstTouchLocation.x,y: firstTouchLocation.y))
Next, you draw a line from that spot to the last spot the user touched. If the user’s finger is still in contact with the screen, lastTouchLocation contains the finger’s current location. If the user is no longer touching the screen, lastTouchLocation contains the location of the user’s finger when it was lifted off the screen:
context?.addLine(to: CGPoint(x: lastTouchLocation.x,y: lastTouchLocation.y))
This function doesn’t actually draw the line—it just adds it to the context’s current path. To make the line appear on the screen, you need to stroke the path. This function will stroke the line you just drew, using the color and width you set earlier.
context?.strokePath() That’s it for now. At this point, you should be able to compile and run the app once more. The Rectangle, Ellipse, and Shape options won’t work, but you should be able to draw lines just fine using any of the color choices (see Figure 14-10).
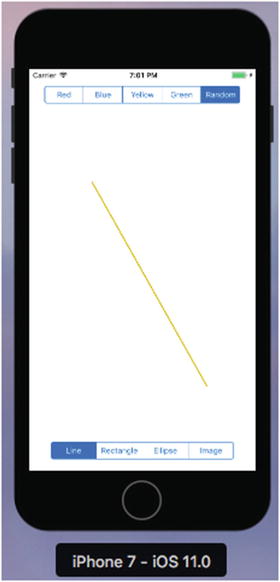
Figure 14-10. The line-drawing part of your application is now complete. Here, you are drawing using a random color.
Drawing the Rectangle and Ellipse
Let’s write the code to draw the rectangle and the ellipse at the same time since Quartz implements both of these objects in basically the same way. Change the existing draw(_ rect: ) method as shown in Listing 14-8.
Listing 14-8. Changes to draw(_ rect: ) to Handle the Rectangle and Ellipse
override func draw(_ rect: CGRect) {let context = UIGraphicsGetCurrentContext()context?.setLineWidth(2.0)context?.setStrokeColor(currentColor.cgColor)context?.setFillColor(currentColor.cgColor)let currentRect = CGRect(x: firstTouchLocation.x,y: firstTouchLocation.y,width: lastTouchLocation.x - firstTouchLocation.x,height: lastTouchLocation.y - firstTouchLocation.y)switch shape {case .line:context?.move(to: CGPoint(x: firstTouchLocation.x,y: firstTouchLocation.y))context?.addLine(to: CGPoint(x: lastTouchLocation.x,y: lastTouchLocation.y))context?.strokePath()case .rect:context?.addRect(currentRect)context?.drawPath(using: .fillStroke)case .ellipse:context?.addEllipse(inRect: currentRect)context?.drawPath(using: .fillStroke)case .image:break}}
Because you want to paint both the outline of the ellipse and the rectangle and to fill their interiors, you add a call to set the fill color using currentColor.
context?.setFillColor(currentColor.cgColor)Next, you declare a CGRect variable. You do this here because both the rectangle and ellipse are drawn based on a rectangle. You’ll use currentRect to hold the rectangle described by the user’s drag. Remember that a CGRect has two members: size and origin. A function called CGRect(x: y: width: height: ) lets you create a CGRect by specifying the values needed to make your rectangle. The code to create the rectangle is pretty straightforward. You use the point stored in firstTouchLocation to create the origin. Next, you figure out the size by getting the difference between the two x values and the two y values. Note that, depending on the direction of the drag, one or both size values may end up with negative numbers, but that’s okay. A CGRect with a negative size will simply be rendered in the opposite direction of its origin point (to the left for a negative width; upward for a negative height).
let currentRect = CGRect(x: firstTouchLocation.x,y: firstTouchLocation.y,width: lastTouchLocation.x - firstTouchLocation.x,height: lastTouchLocation.y - firstTouchLocation.y)
Once you have this rectangle defined, drawing either a rectangle or an ellipse is as easy as calling two functions: one to draw the rectangle or ellipse in the CGRect you defined and the other to stroke and fill it:
case .rect:context?.addRect(currentRect)context?.drawPath(using: .fillStroke)case .ellipse:context?.addEllipse(inRect: currentRect)context?.drawPath(using: .fillStroke)
Build and run your application. Try the Rectangle and Ellipse tools to see how you like them. Don’t forget to change colors, including using a random color .
Drawing the Image
For the last trick, let’s draw an image. The 16 - Image folder contains three images named iphone.png, [email protected], and [email protected] that you can add to your project’s asset catalog. Select Assets.xcassets in the Project Navigator to open it in the editor; then select all three images in the Finder and drag them onto the editor area to create a new image group called iphone in the asset catalog. Now modify the draw(_ rect: ) method as shown in Listing 14-9.
Listing 14-9. Your Modified draw(_ rect: ) Method to Handle Images
override func draw(_ rect: CGRect) {let context = UIGraphicsGetCurrentContext()context?.setLineWidth(2.0)context?.setStrokeColor(currentColor.cgColor)context?.setFillColor(currentColor.cgColor)let currentRect = CGRect(x: firstTouchLocation.x,y: firstTouchLocation.y,width: lastTouchLocation.x - firstTouchLocation.x,height: lastTouchLocation.y - firstTouchLocation.y)switch shape {case .line:context?.move(to: CGPoint(x: firstTouchLocation.x,y: firstTouchLocation.y))context?.addLine(to: CGPoint(x: lastTouchLocation.x,y: lastTouchLocation.y))context?.strokePath()case .rect:context?.addRect(currentRect)context?.drawPath(using: .fillStroke)case .ellipse:context?.addEllipse(inRect: currentRect)context?.drawPath(using: .fillStroke)case .image:let horizontalOffset = image!.size.width / 2let verticalOffset = image!.size.height / 2let drawPoint =CGPoint(x: lastTouchLocation.x - horizontalOffset,y: lastTouchLocation.y - verticalOffset)image!.draw(at: drawPoint)}}
First, you calculate the center of the image since you want the image drawn centered on the point where the user last touched. Without this adjustment, the image would be drawn with the upper-left corner at the user’s finger, also a valid option. Then, you make a new CGPoint by subtracting these offsets from the x and y values in lastTouchLocation:
let horizontalOffset = image!.size.width / 2let verticalOffset = image!.size.height / 2let drawPoint =CGPoint(x: lastTouchLocation.x - horizontalOffset,y: lastTouchLocation.y - verticalOffset)
Now you tell the image to draw itself. This line of code does that:
image!.draw(at: drawPoint)Build and run the application, select Image from the segmented control, and check that you can place an image on the drawing canvas. For a little extra fun, move your finger around the screen and observe that the image follows it.
Optimizing the QuartzFun Application
Your application does what you want, but you should consider a bit of optimization . In your little application, you won’t notice a slowdown; however, in a more complex application that is running on a slower processor, you might see some lag. The problem occurs in QuartzFunView.swift, in the methods touchesMoved(_:withEvent:) and touchesEnded(_:withEvent:). Both methods include this line of code:
setNeedsDisplay()Obviously, this is how you tell your view that something has changed and that it needs to redraw itself. This code works, but it causes the entire view to be erased and redrawn, even if only a tiny bit has changed. You do want to erase the screen when you get ready to drag out a new shape, but you don’t want to clear the screen several times a second as you drag out your shape.
Rather than forcing the entire view to be redrawn many times during your drag, you can use the setNeedsDisplayInRect() method instead. setNeedsDisplayInRect() is a UIView method that marks just one rectangular portion of a view’s region as needing redisplay. By using this method, you can be more efficient by marking only the part of the view that is affected by the current drawing operation as needing to be redrawn.
You need to redraw not just the rectangle between firstTouchLocation and lastTouchLocation but any part of the screen encompassed by the current drag. If the user touched the screen and then scribbled all over but you redrew only the section between firstTouchLocation and lastTouchLocation, then you would leave a lot of stuff drawn on the screen by the previous redraw that you don’t want to remain.
The solution is to keep track of the entire area that has been affected by a particular drag in a CGRect instance variable. In touchesBegan(_:withEvent:), you would reset that instance variable to just the point where the user touched. Then, in touchesMoved(_:withEvent:) and touchesEnded(_:withEvent:), you would use a Core Graphics function to get the union of the current rectangle and the stored rectangle and store the resulting rectangle. You would then use it to specify which part of the view needs to be redrawn. This approach gives you a running total of the area impacted by the current drag.
At the moment, you calculate the current rectangle in the draw(_ rect: ) method for use in drawing the ellipse and rectangle shapes. You’ll move that calculation into a new method so that it can be used in all three places without repeating code. Let’s try it.
Add a new property called redrawRect to the QuartzFunView class.
// Internal propertiesprivate let image = UIImage(named:"iphone")private var firstTouchLocation = CGPoint.zeroprivate var lastTouchLocation = CGPoint.zeroprivate var redrawRect = CGRect.zero
You will use this property to keep track of the area that needs to be redrawn. You also need to move the calculation of the current redraw rectangle to a separate method, which you should add at the end of the QuartzFunView class.
func currentRect() -> CGRect {return CGRect(x: firstTouchLocation.x,y: firstTouchLocation.y,width: lastTouchLocation.x - firstTouchLocation.x,height: lastTouchLocation.y - firstTouchLocation.y)}
Now, in the draw(_ rect: ) method , change all references of currentRect to currentRect() so that the code uses that new method you just created. Next, delete the lines of code where you calculated currentRect, as shown in Listing 14-10.
Listing 14-10. Your Final Modifications to draw(_ rect: )
override func draw(_ rect: CGRect) {let context = UIGraphicsGetCurrentContext()context?.setLineWidth(2.0)context?.setStrokeColor(currentColor.cgColor)context?.setFillColor(currentColor.cgColor)switch shape {case .line:context?.move(to: CGPoint(x: firstTouchLocation.x,y: firstTouchLocation.y))context?.addLine(to(CGPoint(x: lastTouchLocation.x,y: lastTouchLocation.y))context?.strokePath()case .rect:context?.addRect(currentRect())context?.drawPath(using: .fillStroke)case .ellipse:context?.addEllipse(inRect: currentRect())context?.drawPath(using: .fillStroke)case .image:let horizontalOffset = image!.size.width / 2let verticalOffset = image!.size.height / 2let drawPoint =CGPoint(x: lastTouchLocation.x - horizontalOffset,y: lastTouchLocation.y - verticalOffset)image!.draw(at: drawPoint)}}
You also need to make some changes to touchesBegan(_:withEvent:), touchesEnded(_:withEvent:), and touchesMoved(_:withEvent:). You will recalculate the space impacted by the current operation and use that to indicate that only a portion of your view needs to be redrawn. Replace the existing touchesEnded(_:withEvent:) and touchesMoved(_:withEvent:) methods with the new versions shown in Listing 14-11.
Listing 14-11. The Updated Touches Routines
override func touchesBegan(_ touches: Set<UITouch>, with event: UIEvent?) {if let touch = touches.first {if useRandomColor {currentColor = UIColor.randomColor()}firstTouchLocation = touch.location(in: self)lastTouchLocation = firstTouchLocationredrawRect = CGRect.zerosetNeedsDisplay()}}override func touchesMoved(_ touches: Set<UITouch>, with event: UIEvent?) {if let touch = touches.first {lastTouchLocation = touch.location(in: self)if shape == .image {let horizontalOffset = image!.size.width / 2let verticalOffset = image!.size.height / 2redrawRect = redrawRect.union(CGRect(x: lastTouchLocation.x - horizontalOffset,y: lastTouchLocation.y - verticalOffset,width: image!.size.width, height: image!.size.height))} else {redrawRect = redrawRect.union(currentRect())}setNeedsDisplay(redrawRect)}}override func touchesEnded(_ touches: Set<UITouch>, with event: UIEvent?) {if let touch = touches.first {lastTouchLocation = touch.location(in: self)if shape == .image {let horizontalOffset = image!.size.width / 2let verticalOffset = image!.size.height / 2redrawRect = redrawRect.union(CGRect(x: lastTouchLocation.x - horizontalOffset,y: lastTouchLocation.y - verticalOffset,width: image!.size.width, height: image!.size.height))} else {redrawRect = redrawRect.union(currentRect())}setNeedsDisplay(redrawRect)}}
Build and run the application again to see the final result. You probably won’t see any difference, but with only a few additional lines of code, you reduced the amount of work necessary to redraw your view by getting rid of the need to erase and redraw any portion of the view that hasn’t been affected by the current drag. Being kind to your iOS device’s precious processor cycles like this can make a big difference in the performance of your applications, especially as they get more complex.
Note
If you’re interested in a more in-depth exploration of Quartz 2D topics, you might want to take a look at Beginning iPad Development for iPhone Developers: Mastering the iPad SDK by Jack Nutting, Dave Wooldridge, and David Mark (Apress, 2010). This book covers a lot of Quartz 2D drawing. All the drawing code and explanations in that book apply to the iPhone as well as the iPad.
Summary
In this chapter, you’ve really just scratched the surface of the drawing capabilities built into iOS. You should feel pretty comfortable with Quartz 2D now, and with some occasional references to Apple’s documentation, you can probably handle most any drawing requirement that comes your way.