
10 Sample Application: Blockchain and Betting
In this chapter, we’re going to take a look at a practical application of blockchain technologies by creating a sports betting distributed application (dapp) from scratch. We will:
• Set up a full development environment
• Write and explain in detail the Ethereum Solidity code to perform the betting application functionality
Our dapp will be modeled off PeerBet, an open-source peer-to-peer sports betting platform. If you’d like to view a working version of the code we are about to implement, the PeerBet main code repository can be found at https://github.com/k26dr/peerbet and a working implementation can found at peerbet.co. A branch has been set up for the simplified version used in the book and can be found at https://github.com/k26dr/peerbet/tree/for-book.
What Is a Dapp?
Dapp is the name given to a distributed application or smart contract that is deployed on a blockchain like Ethereum. As opposed to a standard web application, a distributed application has no central server for storing data or performing computations. Instead, all computation and data storage are handled by transactions on a blockchain network. The transactions are executed by every node in the blockchain peer-to-peer network, and the data is stored by every node in the network. Because of this, dapps are much harder to censor and take down than a centralized system, making them ideal for use cases where central servers could be compromised either by the law or by attackers.
Not all blockchains are capable of hosting dapps. The Bitcoin blockchain, for example, is not designed to handle the sort of general purpose computation required to host a proper dapp. In fact, the majority of blockchains cannot handle dapps. This is because most blockchains have been designed for a specific use case, such as Bitcoin for financial transactions.
In order to support dapps, a blockchain must be able to encode transactions in a Turing complete programming language. There exists a formal definition of Turing completeness that is mathematically rigorous, but for our purposes it will suffice to define a Turing complete language as one that supports loops and conditionals. JavaScript and Python are both examples of Turing complete languages, while SQL and XML are not. Bitcoin has a custom scripting language it uses for clearing transactions, but it was intentionally designed without loops and conditionals to avoid the complications associated with Turing completeness on a blockchain. The more features the scripting language has, the greater its “attack surface”—that is, it is more vulnerable to security flaws and hacks.
There are currently two major blockchains that feature Turing complete transaction languages: Hyperledger and Ethereum. Hyperledger is a permissioned private blockchain (for more on the difference between public and private blockchains, see Chapter 8, “Private Blockchain Use Cases”).
The largest Turing complete public blockchain by market cap is Ethereum, and that is what we will be using to host our dapp. Ethereum uses a minimalist smart contract programming language named Solidity for developing contracts. The Solidity compiler converts Solidity code to Ethereum Virtual Machine (EVM) bytecode. The EVM bytecode is what actually gets stored and executed on the blockchain, but we will be doing all our development in Solidity. There are other languages supported by the EVM, such as Serpent and LLL (Low-level Lisp-like Language), but Solidity is the most popular.
Introduction to Lotteries, Betting, and Gambling on the Blockchain
Sports betting applications already exist on the Internet in various forms. In Europe and Asia, legal betting houses such as Bet365 and Bovada offer online sports books with house odds. So what’s the advantage of a blockchain for betting?
The majority of blockchain applications are solutions looking for a problem. Today a blockchain is an expensive, inefficient, and slow way of performing computation and storage. This will change as the technology matures. Cloud servers and storage offer magnitudes more computation and storage for a fraction of the cost. In exchange, however, a blockchain offers certain specific advantages and features. An application that does not sufficiently benefit from or is hindered by these advantages should be implemented using traditional server technologies instead.
Before deciding to develop your application on the blockchain, run through the following lists and make sure your application is a good fit for the technology.
Advantages:
• Anonymous, cryptographically secure authentication
• Fast, frictionless, anonymous, low fee payments
• Uncensorable network with 100 percent uptime
• Publically verifiable and guaranteed code transaction execution
• Immutable data storage
Disadvantages:
• Limited, expensive storage
• Limited, expensive computation
• Slow network
• Limited transaction rate
• Contract code deployment cannot exceed the block gas limit (~1000 loc)
Other features that could go either way:
• Transaction fees are paid by users, not contract owners.
• All data is public.
A clear example of a class of applications that would be a poor fit for a blockchain are social media applications. Here’s a list of requirements and features for a typical social media application:
• Scale to millions of users
• Scale to thousands of requests per second
• Large codebases
• Big data storage for generating advertising insights
• Users expect the service to be free
• Users want to control their data
If you go through each of these requirements, each of them contradicts one of the principles of blockchain development listed above.
Let’s take a look now at betting applications. Here are some features required for a betting application:
• Frequent payment processing
• Handle bets from multiple countries with different currencies
• Avoid antigambling laws in certain countries
• Maintain an even balance of money on both sides of a bet
• Option to bet anonymously
• Provide verifiable and consistent bet execution
• Provide competitive odds and fees
These requirements are much better suited to a blockchain solution. One of the biggest pain points for online betting has been moving money around through wires and bank transfers. Users must wait three to five business days to deposit or withdraw money from their bank accounts and must trust the betting site with their banking information. The sites in turn must secure this information, take appropriate security measures to protect their sites from hacking, and stay in compliance with a series of financial regulations in the various countries in which they operate. Additionally, transacting in different countries requires supporting a variety of different currencies and banks, all of which contribute to the complexity of the operation.
Additionally, many bettors like to preserve their anonymity and rely on the sites to safeguard identifying information. Unfortunately, hackers regularly manage to gain access to this data and can use it to extort clients who don’t want their gambling debts to become public.
Using a blockchain solution allows bettors to bet anonymously, transfer money across borders easily for international betting sites, and have a guarantee that their bet will be paid out in a timely fashion.
So let’s begin writing our peer-to-peer blockchain betting dapp!
Setting Up a Development Environment
Before getting started, we will need to download the necessary tools. This section will cover the installation process for Windows, OS X, and Debian-based Linux systems.
In order to set up a proper development environment, we will need the following tools installed on our machines:
• Mist browser
• The Go Ethereum command line client (geth)
• NodeJS + NPM
• Google Chrome browser
• MetaMask Chrome extension
• Solidity compiler
Geth comes bundled with the Mist browser, and both can be installed by downloading the latest release and following the installation instructions at https://github.com/ethereum/mist/releases.
NodeJS and NPM can be installed by following the instructions on the official NodeJS download page, https://nodejs.org/en/download/. If you are running OS X or Linux, you can also use a package manager for the installation.

MetaMask currently only supports Chrome, so you will have to download the Google Chrome browser (https://www.google.com/chrome/).
Once Chrome is installed, open it and navigate to the MetaMask home page, https://metamask.io/, to download the Chrome extension/plugin.
The Solidity compiler is distributed as an NPM package. To install it globally:
npm install -g solc
Syncing an Ethereum Node
Before we can get started with development, we will need a full, synced Ethereum node running on our computer. As opposed to a light client, a full node contains a full copy of the current Ethereum state tree (the blockchain database) so that we can run transactions against it. Run the following command in order to do so:
geth
Geth will automatically connect to the main Ethereum network (mainnet), locate peers, and begin downloading a copy of the blockchain onto our local node. The syncing process can take several hours, and it is usually best to leave it on overnight and check back in the morning by which time it should be complete. Once the node is synced, we can begin development on our dapp.
Creating and Configuring a Private Development Chain
Create a folder for our betting dapp. All of our project code will go in this folder.
To be able to test our code locally, we need to run a private blockchain on our own computer. This will allow us to deploy, interact with, and iterate on our contract without polluting the main Ethereum network or constantly having to pay transaction fees.
The command to properly set up a private testnet is a bit verbose, so we are going to create a file to hold the command for us. Open up a file called geth.sh and insert the following code into it. This line of code is intended for a Linux machine. OS X users should replace all instances of ~/.ethereum with /Library/Ethereum and Windows users should replace it with %APPDATA%/Ethereum.

• --dev This convenience option bootstraps a new private chain, creates a genesis block for the chain, and sets a series of debugging flags.
• --datadir This allows us to specify a custom directory to store chain data. The default directory is being used for the mainnet, so we specify an alternate path to store our private chain.
• --ipcpath By default, geth stores its interprocess communication (IPC) file at the directory specified by --datadir. The Mist browser, however, can only communicate with an IPC file located at ~/.ethereum/geth.ipc, so we must specify this as our IPC path.
• --networkid The network ID flag is used to identify to peers which network (mainnet, Ropsten testnet, Morden testnet, etc.) our chain is synced to. Since we are running a private network, we specify a random unused network ID so that peers do not connect to us.
• --rpc This flag turns on RPC (Remote Procedure Call) mode, which allows light clients and other nodes to access our node via the JSON RPC API. This flag is required so that web3.js and our front ends can access our node.
• --rpcapi By default, RPC mode enables the web3, net, and eth modules. In order to be able to access our node’s accounts and private keys to sign transactions, we will enable the personal module as well.
• --rpccorsdomain Web browsers using the JSON RPC API are restricted by the standard browser same-origin policy. In order to allow browsers to access our API, we will set our CORS domain to the broadest possible setting “*” (allow all access).
• --mine Mine our own network, so that transactions are processed and blocks created. Normally, miners would handle this process, but we will have to do it ourselves for our private chain. The --dev option by default sets a network mining difficulty that can be reasonably mined by a single CPU.
• console This will open the geth console, which allows us to interact directly with our node and private chain using JavaScript commands.
Once the script has been created and saved to geth.sh, we can execute the file directly to run our private chain. Ensure the file is executable, then run it:
![]()
You should now see a series of log output indicating that the private chain is running and being mined.
Creating a Killable Contract
Before we begin developing our full contract, we are going to develop a small test contract to ensure that our development chain is working and can deploy and debug contracts.
All of our contracts will be written in Solidity, a smart contract language that compiles into Ethereum Virtual Machine (EVM) bytecode. We will only have a single .sol file for this project, named bet.sol.
To prevent blockchain bloat and allow removal of old contracts from the blockchain, most contracts include a kill function that allows the contract to be removed from the blockchain by the owner.
The code for a simple killable contract looks as follows:

Let’s review this contract line by line:
contract Bet {
The contract keyword creates a contract that goes by the succeeding name. The contract name will be required in later steps and we will be referring back to it.
address owner;
This creates a variable named owner of type address and allocates space for it in the contract storage.
Every contract has storage and memory space allocated to it. Storage variables are stored on the blockchain and changes to it propagate across the network. Memory variables are temporary variables created during a function execution and destroyed at the end of the function. They do not get stored onto the blockchain. We will see examples of memory variables later in the chapter.
All variables declared in the global scope outside of a function are declared as storage variables.
address is a data type unique to Solidity. It is a 20-byte field that is designed specifically to hold Ethereum wallet and contract addresses.
function Bet() {
In the Bet contract, the Bet function is a special type of function called a constructor function (similarly, in a Bid contract, the name of the constructor function would be Bid). The constructor function is executed immediately upon deployment of the contract onto the blockchain, and usually contains setup logic and variable initializations for the contract.
owner = msg.sender;
Solidity defines a series of built-in convenience functions and values. One of these is msg.sender, which is an address variable containing the value of the wallet or contract address that initiated the current function call. Since the constructor function is executed when the contract is deployed, msg.sender is the deployer of the contract.
function kill() {
This defines a public function (we will discuss private functions later) named kill that can be called with no arguments.
if (msg.sender != owner) throw;
By convention, only the owner of a contract is allowed to destroy it. If anybody else attempts to destroy the contract, this line will throw an error. The throw command consumes all the gas passed to the function to deter abuse.
Sometimes you will want to gracefully exit a function without forcing a user to lose all the gas they provided. This will be covered later.
selfdestruct(owner);
The selfdestruct function is built into Solidity. Calling it from within a contract deletes the contract and any data stored in the contract storage, then sends any ether contained at that contract address to the provided address. In this case, there should be no ether contained at the address, but in case someone accidentally sends ether to the contract address, we can send that money to the owner.
Compiling the Contract
The Ethereum blockchain can only store and execute EVM bytecode, so in order to deploy or execute our Solidity code, we have to first convert it into EVM bytecode by using the Solidity compiler. To compile, run:
solc --bin --abi --optimize -o bin peerbet.sol
The options we invoked do the following:
• --bin: Include a bytecode file in the output. This will be the bytecode we deploy to the blockchain.
• --abi: Output a JSON file that describes the ABI interface for the contract. web3.js uses this to make interacting with our deployed contract easy.
• --optimize: Run optimizations to minimize the data footprint of the contract. This is important because deploying the contract requires gas proportional to the size of the bytecode output. As our contract gets larger, an unoptimized output can exceed the block gas limit and make our contract undeployable.
• -o: Specify an output directory for our bytecode and ABI files (bin/).
• peerbet.sol: The contract file we wish to compile.
Any errors present in our contract file will prevent compilation and be displayed in the output. Correct any errors that you see and recompile. If everything was copied properly from the previous section, your code should compile.
The compiler should output two files into the bin directory:
![]()
Deploying a Contract
Now that we’ve written a simple killable test contract, let’s deploy it to our private chain and try interacting with it. Deploying a contract to an Ethereum chain can be a complex operation, so we will be writing a small script to take care of it for us. The script is going to require the web3.js library, so let’s go ahead and install that before we get started.
![]()
Here’s what our basic deploy script will look like. Our script assumes that we’ve already compiled our bytecode and ABI to the bin/ directory.


There’s a lot going on here, so let’s break it down.

This opening block requires the necessary libraries. The fs and child_process libraries are built into Node.
![]()
The web3.js library needs a provider that exposes the Ethereum JSON RPC API. By this point, we should have a private chain synced and running on our command line. This block connects to that node and will fail if the node is not running.
![]()
All Ethereum transactions, including contract deployments, must originate from a wallet address. This block accesses our account address, then unlocks the account so it can be used for the deployment transaction. Earlier when we created our private chain, we made sure the RPC API option contained the personal module. If we hadn’t done so, we would not have been able to access the accounts on this node from our script.
The second argument to the unlockAccount function is the password. Since you may wish to store this code on GitHub or some other public hosting service, the script is designed to take the password in as a command line argument. DO NOT under any circumstances include your password in a source file. While this password cannot be used maliciously on a private chain, later on we will be using this same code on the mainnet. A node with an exposed personal rpc module exposes all the public keys associated with that node. The only thing stopping a hacker from using your private key to sign a transaction and stealing all your ether is your password, so protect it accordingly!
exec(`solc --bin --abi --optimize -o bin peerbet.sol`);
Usually we want to compile and deploy our script at the same time, so as a convenience we can include the compilation step as a child process. This line is not necessary. You can compile and deploy separately if you prefer.
![]()
web3’s contract object allows for easy deployment and contract interaction. To set up this object, we read in the ABI and pass it to the contract constructor.
var compiled = ’0x’ + fs.readFileSync(“bin/PeerBet.bin”);
Read in the contract hex (remember, hex is just an alternate representation for binary) bytecode. A quirk of web3.js is that it requires all hex strings to be prefixed with ’0x’, so we have done so.

The .new function on a contract object deploys the contract. The first arguments are the transaction (tx) options, and the second argument is a callback.
The wallet address specified in the from field must be an unlocked wallet, and you must have access to the private key for that wallet. Attempting to use a public key whose private key is not stored in the local node will fail.
The data for a contract creation transaction is the bytecode for the contract.
We have set a very high gas limit for now, but the actual gas consumed should be much lower (< 5e5). Any gas not used will be refunded, while transactions without enough gas will throw an OutOfGasError, so it is better to aim too high than too low. Gas limits are typically specified in increments of 100,000 (1e5). The block gas limit is currently set at 47e5 gas/block, so always make sure your gas limit is below this number or your transaction will fail.
The default gas price in Ethereum is 20e9. Gas prices are typically measured in units of gigawei (1e9 wei, 1e-9 ether). On the privatenet, this number is meaningless. On the mainnet, it is real money, so you will have to pay attention to this number. Transactions will clear with gas prices as low as 1 Gwei, but the clearing times will be slow. Miners will prioritize the transactions with the highest gas prices for their blocks.

This is the callback portion of the deployment function. This callback is executed when the miner attempts to mine the transaction. It uses the standard Node (error, data) argument format. If there is an error, we log it. If there is no error, the contract address should be set, and the second if statement should execute. For the user’s benefit, we will log that the contract has been mined, then write the contract address to a file, so we can use it later to load the contract into web3.
If you’ve understood everything above, it is now time to deploy the contract. Save the file as deploy.js, then in your command line run:
node deploy.js [password]
Make sure to replace [password] with the password to your wallet key. The contract may take up to a minute to deploy. Once it is deployed, the log output will indicate that the contract has been mined.
Congratulations! You have deployed the contract to a private dev net. Now let’s put together a script for interacting with the contract.
Contract Debugging and Interaction
Similar to how we set up a deploy script, we are now going to set up a debugging script. In order to have a live debugging environment, we are going to use the NPM package locus. Let’s install locus:
npm install locus --save
Once that is installed, we are ready to write our script. Here’s the full script:


There are only two new blocks in this script, so let’s break those down.

The web3 existing contract constructor requires an ABI and contract address. This block loads those in from the file system, and creates the contract object.
eval(require(’locus’))
This creates an active debugging environment similar to the node console but with all of our loaded variables.
Execute the script to view the debugging environment:
node debug.js [password]
You should see a debugging prompt that looks like this:

Solidity automatically creates getter functions for public storage variables. Type contract .owner() into the debugging prompt and it should return the address of your contract.
We can interact directly with the contract now. Let’s try to use the kill function we defined earlier.
tx = contract.kill({ from: walletAddress, gas: 40e5 })
You may get back an error saying Error: authentication needed: password or unlock. This is because the password on your wallet key has expired. Use the following to unlock your account.
![]()
All transactions follow this same format. List the arguments to the function followed by a tx options object. The kill function takes no arguments, so the only argument here is the tx options object.
When using a web3 contract object, from is the only required tx option. data is created by the library (it would be complex to create on our own), gasPrice defaults to 20e9, and gas defaults to 0.9e5. The default gas value is usually too low to execute a contract transaction, so it is generally specified explicitly.
When a contract transaction is sent, it returns immediately with a transaction id, but the transaction doesn’t execute until it is actually mined. Type tx into the debugger to view the transaction id. To see if the transaction has been mined, use:
web3.eth.getTransactionReceipt(tx)
If the function returns null, that means it has not been mined yet. If it has been mined, you will see a transaction receipt object in the console.
Just because you see a receipt does not mean the function executed properly. Transactions that throw errors or run out of gas will still display receipts. It is up to you to verify that the state changes you requested were made.
In this case, the Solidity selfdestruct function deletes all the contract data by setting their values to 0. Check the value of contract.owner in the debugger. If you get back 0x, the contract has been successfully killed.
Now that we have successfully deployed and killed a simple contract, it is time to build out a full betting contract.
Defining Data Structures
Before we can start coding our contract, we need to define the necessary data structures. Figure 10-1 shows a rough flowchart of what we want our data relations to look like.

FIGURE 10-1 Flow of contract functionality
Solidity uses structs to group related pieces of data. Solidity structs are similar to C structs. They contain a name and a series of member definitions.
Let’s define our data structures using Solidity structs now so that we can use them in our application.

Our Game struct stores some information about the game, a mapping of books (in case we want to add additional books later), and a GameResult. The locktime is equivalent to the game’s start time. Bets placed after the locktime will be rejected.
GameStatus is a Solidity enum, which functions very similarly to a C enum. We will go into more depth on enums later in this section and list the enum definitions for our application.

The GameResult struct stores a score for each team and a timestamp.

The Book struct is modeled after a proper Vegas book, containing over bids, under bids, and bets. The full PeerBet application contains Spread, Money Line, and Over/Under books, but for our sample application we will only be building an Over/Under book.
The overBids and underBids arrays will actually be sorted stacks to allow for efficient bid matching. Unlike C structs, Solidity structs cannot be recursive, so they can’t be used to define recursive data structures like linked lists or stacks. Instead, Solidity allows for dynamic-length arrays, so we must use those instead.
Since bids and bets require us to track multiple pieces of information, we will define structs for them as well.


Since bids are unmatched, they only contain one address field. Matched bets have two parties, one on each side of the bet, so the struct contains an address field for each.
Those are all the structs we will be using in our application. In addition to structs, we would like to define a few enumerations (enum) as well to make our code easier to read. Enumerations in Solidity are similar to enumerations in C in that they are never necessary and can always be replaced with integer values but are convenient for readability.
Enumerables
Here are the enums we will be using in our application:
![]()
Games are Open when bets are being taken, Locked after the locktime has passed, Scored when the game has been scored, and Verified when bets have been paid out.
Bets are Open when the result is undetermined, and Paid when the result has been determined and the participants’ balances have been updated.
Storage Variables
Storage variables must be explicitly defined in the global scope in a Solidity contract. Storage variables use space in the Ethereum state tree, and can be expensive to create, so minimizing the total size of a contract’s storage variables is important.
Here are the storage variables we will be creating:

owner has been covered in the simple killable contract we wrote earlier.
games is a dynamic-length array of Game structs. It will be responsible for the majority of the storage space and is our primary storage variable. Custom structs cannot be made public, so games will remain private. As a reminder, Solidity automatically creates getter ABI functions for public variables but not private ones.
balances is a public mapping that stores user balances. A user is allowed to withdraw the value of their balance from the contract whenever they want. Mappings in Solidity can be tricky because there is no way to determine the keys of a mapping without storing them in a separate array. So given an address, we can determine the address’s balance, but given the amount of ether held in the contract, we cannot determine what the allocation of balances between addresses is.
Events
Solidity events are used to log transaction activity to the blockchain. Event logs are much cheaper to create than new entries in the state tree, so it is a great way to store read-only data. Logs are not accessible from within a contract (only variables are) but can be read by external client libraries such as web3.js.
Ethereum transactions are asynchronous and usually do not mine for 15–30 seconds after they have been broadcast to the network. Because of this, transactions cannot return values. The only way a transaction can create an output is by modifying the state or adding an event log. Client libraries usually parse the logs to determine the output of a transaction.
A Solidity event is a schema for logs. Logs are automatically indexed by contract address and event type for efficient querying. In addition, Solidity events allow you to define three custom indexed fields. Only indexed fields can be queried when parsing logs. Currently, indexed string fields cannot be parsed for a value, so it is best practice to avoid creating string indexes.
Here are the logs we will be using in our contract:

There is an event associated with each of the major state modifications that can occur in our contract. Together, they provide a history of the actions taken by the contract on the blockchain.
Functions
Before we dive into the code, let’s create a list of the functions we will be defining in our application. Functions, like variables, can be either public or private. Public functions can be accessed by other contracts and client libraries (like web3.js) and are listed as part of the ABI. Private functions are only accessible by other functions in the same contract.
In addition, there are constant functions which read from but do not modify the blockchain. Public constant functions return immediately with their result, do not send a transaction to the network, and do not consume any gas when called.
Here are the public non-constant ABI functions we will be defining:

A payable function is one that can accept a non-zero value in the tx options object.
Here are the public constant functions we will be defining:
![]()
Constant functions return a value whose type must be specified with the syntax above.
In addition, we will be defining some private functions for our own internal use:

Note By default, variables in a function definition are presumed to be memory variables. To specify that the variable is a pointer to an existing storage variable in the state tree, it must be explicitly stated as above with Bid[] storage stack and Game storage.
Let’s step through each of the functions and explain the code as we go:
Creating a Game


The function definition specifies that the function returns an int even though we’ve mentioned that non-constant public functions don’t return a value because they don’t execute until the block is mined. The reason we include a return value anyway is for debugging purposes. There are three ways we can invoke a public function.

When we call a non-constant function, it returns with a value just like a constant function. It runs the exact sequence of steps the miner would run in a transaction but doesn’t update the state tree or broadcast the transaction, so it’s great for debugging. A call that throws an error returns with the zero/null value of the return type. So for an int return type, an error will return 0. By convention, we will be returning -1 in all our functions to indicate that the function executed with no errors, and use the positive integers to indicate an error code.
Creating a game requires us to pass in the game parameters (home, away, category, locktime). The locktime is in seconds since the UNIX epoch.
We start by creating an id from the global counter then incrementing the global counter so that our id remains unique. We then extend the games array length by 1 to accommodate our new game, get a reference to the game we just created, and fill in the appropriate properties on the new game object.
Once the game has been created, we emit a GameCreated event to log the state modification we just made and return -1 to indicate that there were no errors.
Bidding


To place a bid, the client must provide the game_id for the game they wish to bid on, which side of the bet they are taking (over or under), and the line limit at which they would like to place the bet. Bids will be matched at or below the limit for over bids and at or above the line for under bids.
The function is payable so clients can send a value with the transaction. For this function, that value will be interpreted as the bid amount. The value sent to a payable Solidity function is available in the built-in msg.value variable.
This function is more complex than the createGame function, so let’s step through and explain it in parts:
![]()
This portion grabs the desired game from storage and creates a temporary Bid in memory. msg.sender contains the address of the wallet/contract that signed and sent the transaction, while msg.value is a uint variable that contains the value of the ether sent to the function in units of wei (1e-18 ether).
Struct variables by default are initialized as storage pointers, but struct constructors always return a pointer to memory. Without specifying Bid memory, the variable assignment will throw a compiler error saying the types of the value and variable do not match.
getGameById is a helper function we will use to get a pointer to a specific game. Here’s the code for the getGameById function:


We have defined the function as both private and constant. It is constant because it does not modify the state. It must be defined as private as well because public functions are not allowed to return custom structs. The return type must be specified as Game storage because function definitions default to memory as the variable location and the game we wish to point to is contained in storage in the state tree.
The function loops through the games array and checks for a matching game id. It maintains a flag that is set to true if a matching game exists in the array. If the game exists, it returns a storage pointer to the game.
If the game does not exist, it throws an error. The throw keyword ends the execution of both the current function and the current transaction. Any changes made during the current transaction are rolled back and all the gas provided to the transaction is consumed and given to the miner.

The game status must be open to accept a bet. Additionally, a game may still have its status set as open when it is past the locktime. In that case, we lock the game and cancel all open bids. Both of these validations return error codes.
now is a built-in variable set to the value of the UNIX timestamp of the current block being mined. This will not be the same as the time the transaction was sent.
cancelOpenBids is a private helper function that cancels and refunds unmatched bids in a book. Here is the code for the function:
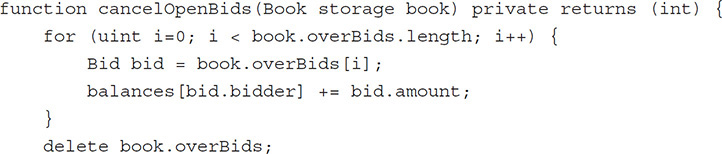
It is important that the parameter to this function be a storage pointer. If it were a memory pointer, we would be deleting items in local memory instead of on the state tree.
We start by looping through the over bids and refunding the bids by adding the amount of the bid to the bidder’s balance. We do not need to worry about initializing the keys.
A key in a Solidity mapping is converted to a 32-byte address that points to a location in the Ethereum state tree, which has a Patricia trie as the underlying data structure. The 32-byte address is generated by computing the keccak256 hash of a series of values, including the contract address, variable address, and mapping key. If the 32-byte address does not exist in the Patricia trie, its value is assumed to be the null value for the type. Since balances is of type mapping(address => uint), all addresses can be assumed to be set initially to the null value for uint, 0.
Once the open bids have been refunded, the overBids array is deleted. The delete keyword sets a variable back to its null value by removing it from the state tree. The null value for a dynamic array is an array of length 0, so overBids is now an array of length 0.
The same actions are then performed on the underBids array.
Bid memory remainingBid = matchExistingBids(bid, game_id);
Once a bid is validated, the first step in processing it is to match it against existing bids.
Here’s the code for the matchExistingBids helper function:


This is a long function that goes through the stack for the opposing side of the bid, matches and deletes as many bids as it can, and logs every bet it places. It then returns a bid with the remaining unmatched amount so it can be added to the proper stack later.
Let’s break this function down as well:
![]()
We start by getting a storage pointer to the game and determining which stack we will be matching against. Over bids will match the under stack, and under bids will match the over stack.

We are going to assume that the array is ordered into a stack already, with the best outstanding bid (highest bid for over stack, lowest bid for under stack) at the bottom of the stack. See Figure 10-2 for the stack arrangements. We start looping from the bottom of the stack by setting the iterator variable, i. We want to keep looping until the iterator is out of bounds, which in this case will be when it’s negative. In order to do this, we have to use an int instead of a uint because uint exhibits undefined behavior when it goes negative and will never express a value less than zero. However, array index accessing requires a uint, so we create a uint version of the iterator, j, once we enter the loop and have verified that the iterator is not negative.

FIGURE 10-2 Bid stack structure

Next, we validate the stack bid by checking if the bid has already been matched. Matched bids will have an amount of 0. In most languages, we would rid ourselves of matched bids by deleting them from the stack. Unfortunately, our stacks are arrays instead of linked lists because Solidity doesn’t allow recursive data structures, so deleting an item requires many rewrites and would be an expensive operation. In order to minimize gas costs, we will be leaving matched bids in the stack and overwriting them whenever possible when inserting new bids.

The break conditions for the stack are as follows:
For an over bid, if the bid line is less than the underline pointed to by the stack iterator, break out of the loop. Because the under stack is sorted so that lines get higher as you move up the stack, once you encounter one under line that is too high to match, all lines above it will be too high to match as well.
For an under bid, it is the opposite. If the bid line is greater than the over line pointed to by the stack iterator, break out of the loop. All lines above it will be too low to match as well.

If it has been determined that the break condition is not satisfied, we have ourselves a valid bet that can be matched. The bet amount is going to be the lower of the stack bet amount and the bid amount. The bet amount is subtracted from both the stack bid and the current bid. If the current bid amount is lower than the stack bid, the bid amount will be 0 after subtraction and the loop condition will fail to satisfy on the next iteration. If the stack bid is lower, the remaining bid will be greater than 0 and the loop will continue.


Once a bet has been placed, it has to be added to the stack and logged with the appropriate event. To make it easier to parse the logs by user, the BetPlaced event is called twice, once for each user.

Decrement the iterator variable, and continue the loop. When the loop is complete, return the remaining bid so it can be added to the appropriate bid stack.
Once bid matching is complete, we return back to the original bid function and add the bids to the stack.

If the remaining bid amount is 0, this code block doesn’t execute. If it isn’t, the bid gets added to the stack. Over and under bids get added differently. The third argument indicates the order in which the stack will be sorted: highest line at the bottom for over and lowest line at the bottom for under. Once the bid has been placed we emit an event, logging the action to the chain.
Let’s look into the addBidToStack helper function to see how that works:

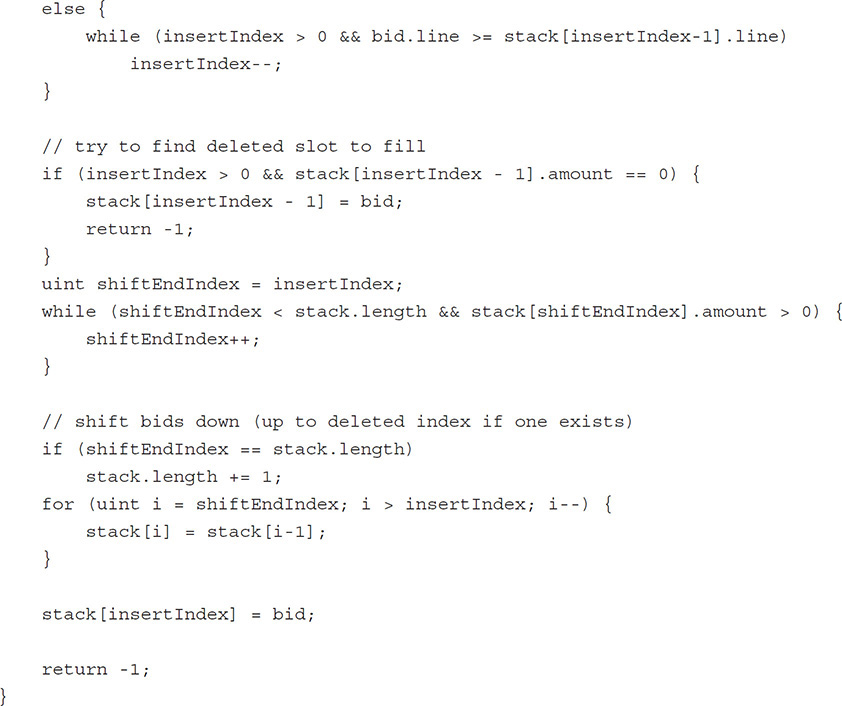
This is probably the most complicated function in the whole contract because it requires us to maintain a stack that can be sorted in both directions, add items to that stack, and replace bids that have been already matched instead of extending the stack length whenever possible.
We mentioned earlier that adding a bid by extending the stack length or deleting an item from the stack is a very expensive operation. Space must be allocated or destroyed for the item in the state tree, then every item in the stack below the insertion/deletion index must be rewritten, so a significant amount of state must be modified with each resize. Normally, using a linked list would make these operations less expensive, but Solidity does not permit recursive data structures so that option is not available to us.
In order to avoid performing an expensive deletion operation, we left bids with 0 amount remaining in the stack during bid matching. Now we will perform the second part of the optimization by rewriting 0 amount bids whenever possible instead of extending the array. Let’s step through how:
![]()
We need to specify the bid to be inserted, the stack into which it should be inserted, and whether the stack is going sorted in normal or reverse order. For our purposes, normal order will be when the lowest bid is at the bottom and reverse order will be when the highest bid is at the bottom.

This is the trivial case. If there are no items in the stack, there’s no need to go through the sorting or rewriting process, just append the item to the stack and return out.
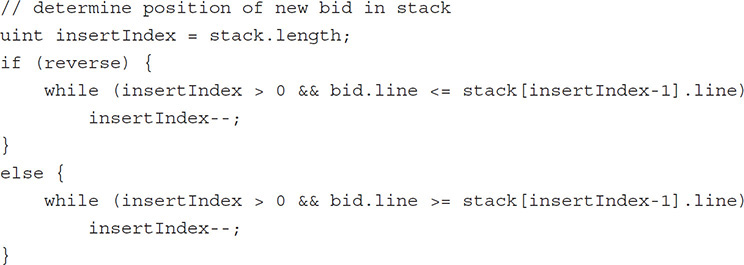
Before inserting the item into the sorted stack, we need to determine the index at which the insertion should occur. For a reverse stack, we start at the bottom and go up the stack while the bid line is less than the stack line. For a normal stack, we start at the bottom and go up the stack while the bid line is greater than the stack line.

Ordinarily, we would shift down all the items below the insert index to make room for the new item in the sorted stack, but because creating additional storage is an expensive operation, we will attempt to find an empty bid (bid.amount == 0) and overwrite that instead.
The first check is to see if the slot above the insert index is an empty bid. If it is, nothing needs to be shifted, we can overwrite that bid with the new bid, and return out of the function. Next, we go down the stack starting at the insert index, and attempt to find the first empty bid. When we do, we exit the loop. If there are no empty bids, we will exit the loop once we hit the end of the stack.


If there were no empty bids in the stack below the insert index, we have to extend the stack length by 1. Starting from right above the shift index and up to the insert index, we will shift all bids down by 1 slot. This will overwrite the bid at the shift index and open up a slot at the insert index, where we then insert the current bid.
Scoring Games and Payouts
Once a game has started and betting has closed, the game result can be set by the creator of the game using the setGameResult function:

This function sets the home and away scores for a specified game. The first part of this function performs a series of validations. The game must be past its locktime and not have been scored yet. Failing either of these validations returns an error code.
All open bids on the book are canceled. The cancelOpenBids helper function was explained in the bidding section. The scores for the home and away teams are updated in storage, the game status is updated, bets are paid out, and an event is logged indicating that the game has been scored.
The payBets helper function looks like this:


This function first uses the game result to calculate the total points scored. It then loops through each of the bets. If the bet has already been paid out, it skips the bet and moves to the next one. This should never be the case, but to prevent a future version of the code from invoking this function twice for the same game, it has been included. If the calculated point total is greater than the bet line, double the bet amount is added to the address of the over bet. If the calculated point total is less than the bet line, double the bet amount is added to the address of the under bet. If the point total and bet line are the same, both sides of the bet are refunded the bet amount. Once the bet has been paid out, the bet status is marked as paid.
Withdrawing
Once a bet has been resolved and the user balances have been updated, the winning users will want to withdraw their money. The withdraw function allows them to do so.

To withdraw, we retrieve the balance of the user from the balances mapping and store it into a temporary variable. Then we zero out the user’s balance and send the ether to their wallet. If the send fails, we refund the amount to their balance and return an error code. If the send succeeds, we log the event.
The order of logic in this function is very important. The infamous DAO hack was caused by an unidentified bug in this exact withdraw implementation. It seems a bit inefficient to zero out the balance of the user, then refund it later if the send fails. The reason for doing this is that the entity calling the withdraw function can be a contract. Contracts can define a fallback function that executes as the default action when no matching ABI function can be found. If the attacker’s contract defines a payable fallback function that runs another withdrawal on our contract and the balance has not been zeroed, it can run withdrawals over and over again until our contract’s balance has been drained. This was how the DAO attacker was able to drain all the funds from the DAO contract.
Reading Games
We need a way for the front end to read active games from the blockchain. Doing so is a two-step process because we can’t directly return a custom struct in a public ABI function. Instead, what we will do is get a list of active game IDs from the contract, then parse the logs for the game details.
Here is the contract ABI function for the first step of the process. The second step will be covered in the front-end section.

The function creates an empty memory array of game IDs initialized to the length of the games array. A memory array is used instead of a storage array because it is a constant function, meaning it can’t modify storage. We loop through the games and add each id to the memory array, then return the array.
Reading Bids
The order book changes with each placed bid, so we need a way of getting a current snapshot of the order book. Unfortunately, the logs aren’t going to be of much use to us here because placed bids can be matched and deleted, so a logged bid may not exist anymore. To get a current view of the book, we have to return bids directly from the contract. Unfortunately, as mentioned earlier, we can’t return custom structs directly in the ABI. So instead we’re going to run a hack job and return a byte array containing the information, then parse the byte array back into a bid array on the front end.
Here’s the contract function to encode the bids into a byte array.


Let’s break this code down since it gets complicated in places.

The function is constant to indicate that it does not modify storage. First, we grab a storage pointer to the game. Then we count the total number of bids in the book and use that to allocate a byte array in memory. bytes is the data type for a dynamically sized byte array. An iterator variable, k, is initialized as well. This iterator variable will point to the current index in the byte array that is being written. Every time a byte is written to the byte array, we will increment the iterator.

Loop through all the bids, and determine whether the current bid is in the over or under stack.


Convert each bid property into its byte representation. The bytesxx data types are defined for all values up to 32 (bytes2, bytes3, etc.) and for a single byte. Next, loop through each byte representation and add them to the main byte array, byte by byte.
Once all the bids have been encoded and concatenated, we return the byte array. We will cover how to parse the byte array into a JavaScript object on the front end later. For now it will suffice to define a data dictionary for the bid byte structure by byte index (see Table 10-1).
TABLE 10-1 Bid Byte Structure

Summary
In this chapter, we have introduced the development life cycle of a full-function betting application built on Ethereum. The focus was primarily on coding with Solidity. In the next chapter, we will deploy the contract and develop a simple front end to run the application.