
11 Deploying the Sample Application: Blockchain and Betting
Deploying Full Contract
In Chapter 10, we introduced the development steps for writing a smart contract. Now that the contract is fully written, let’s deploy it to our test chain, and interact with it.
node deploy.js ethereum && node debug.js ethereum
Fix any errors that pop up during compilation, then run the deployment again if necessary. If everything worked properly, you should see the interactive prompt pop up. Let’s run a couple of test functions to make sure our contract is working.

The first line creates a UNIX timestamp 1 hour (3600s) in the future. The JavaScript Date type uses milliseconds after the UNIX epoch instead of seconds after the UNIX epoch like most other languages, so a conversion is required. The third parameter is the category, with 1 referring to NBA for our purposes. Executing the createGame function will return a transaction id that can be used to check whether the transaction has been mined.
At any point, you can run:
web3.eth.getTransactionReceipt(tx);
to see if the transaction has been mined. If it hasn’t, it will return null. If it has, it will return a receipt object.
Once the transaction has cleared, you should be able to read the newly created game from the contract.
You should be able to view a single game in the output of both those statements.
Deploying to the Mainnet
Deploying to the mainnet is very similar to deploying to our private chain. Repeat all the exact steps above with two exceptions.
First, exit the geth process running our private chain by navigating to that tab and typing CTRL-C. Then run the Ethereum mainnet with the command:
| geth --rpc --rpcapi web3,eth,net,personal
If you haven’t synced a full geth node in the past, this process will take up to a day. If you have, it should only take a few minutes to sync up fully. In order to deploy to the mainnet, you will have to create a wallet address and obtain ether from an exchange. This process is covered in earlier chapters.
Once the node is synced and caught up to the main chain, run the deploy command from the previous section. You should see confirmation of your deployment in the output. You can now run the test scripts from the previous section to confirm that the contract deployed.
Seeding Data
Manually seeding our contract with data every time we deploy is a tedious and slow process, so we’re going to write a script to seed data for us.
Here’s what our seeds.js file is going to look like:


Let’s break this down by section:

These are the standard includes and provider setup logic we’ve seen before.

We load the ABI and contract address from their appropriate files and use it to create a contract object. We then access our default wallet and unlock it with our wallet password, which will be passed into the script as the first command line argument.

To mix it up, we define four different locktimes to use in our games logic.

We create six games here by defining an array of game property arrays, looping through the array, then using the JavaScript spread operator, ..., to pass the parameters into the createGame contract function. This should create six National Basketball Association (NBA) games (category = 1) with different locktimes and teams.

Run a loop 100 times and seed 100 bids into the contract. Each bid will go to a random game, with a random amount, at a random line, to a random side of the bet.
Save this file to seeds.js, then run our full deploy-seed-debug dev flow with:
node deploy.js [password] && node debug.js [password] node seeds.js [password]
As always, replace [password] with your wallet password. Wait about 1 minute for all the transactions to clear. You can monitor the status of the transactions in the terminal tab running the private chain.
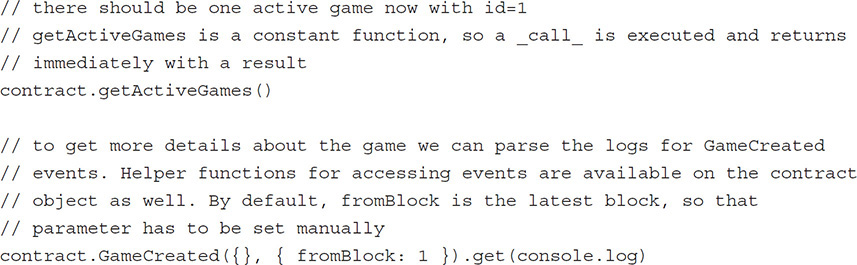
In the debug console, examine the order book for a game:
contract.getOpenBids(2)
Since getOpenBids is a constant function, it should return immediately with a hex string that looks like this:

This is the unparsed byte array created for us by the contract function. To view the book, we have to parse the byte array back into a bid array. Exit the debugger, then include these functions in debug.js:

The parseBid function takes a 114-character hex string and converts it into a bid object using the data dictionary we defined earlier in the chapter. The parseBids function strips away the leading 0x, splits the long hex into 114-character hex strings, and turns the parsed bids into an array. Why 114 (57 * 2) characters instead of 57, which is the length of the bid representation in bytes? Because it takes two hex characters to encode a byte, so twice the number of characters are required.
Enter back into the debugger:

Now your parsed result should look something like this:


The over bids show up first, with the highest line at the bottom, then the under bids are at the bottom half, with the lowest line at the bottom. The amounts for some of the bids will be 0, indicating that they have been matched but have not yet been overwritten by a new bid.
There should be placed bets as well. We can check for those by searching the logs for BetPlaced events in the debug console.
contract.BetPlaced({}, { fromBlock: 1 }).get(console.log)
Front-End User Interface
All public contract functions expose an ABI that can be accessed through the web3.js library. If you wish to run a betting server without a user interface, your work is complete, and the contract is ready to use. However, most sites will require a front-end interface, so we will build out a simple one for our betting contract.
Since the focus of this book is on blockchains and not web interfaces, we will not be building a full-fledged web UI. It is assumed that the reader has a basic understanding of HTML, JavaScript, and jQuery, but no CSS or styling will be used. The purpose of our front end will be to demonstrate how to use the web3.js library with an Ethereum contract, and we will not build out further functionality beyond that. With that, let’s get started!
Pages in the User Interface
Our front end is going to have three pages with the following functionality:
• View list of games (index.html)
• View book for a single game (bet.html)
• Withdraw winnings (withdraw.html)
Displaying Games
Our home page, index.html, is going to display a table with all of our active games. In addition there is a link to the withdraw page we will be building later. Here’s the HTML for the page:


As you can see, there’s a link to the withdraw page above the header, followed by the header and games table. The games table contains a series of descriptive columns about each game. The column with no title is where the links to the game’s betting page will go.
There are two JavaScript files included on the page: the jQuery CDN and our main.js file. The jQuery CDN and the MetaMask Chrome extension (which injects the web3.js library) are the only dependencies for the front end.
Let’s take a look at the custom JavaScript required in the main.js file piece by piece. We will be using the main.js file for all three of our HTML pages, so there will be some overlapping code that will be explained as we go.
This first batch of code loads up some file dependencies and prepares the page for execution. It is common to all three of our pages.


The first two lines use jQuery’s AJAX functionality to load up the two pieces of data we will need to create our web3 Contract object, the ABI and contract address, and defining promises for both AJAX calls.
For those unfamiliar with the concept, promises are a construct that allows for asynchronous code execution. Similar to threads, promises begin execution of a function, then return without waiting for the block of code to finish executing. Instead, the promise resolves when the code is finished executing, and bindings are provided that allow code to execute after a promise resolves instead of immediately when the function returns. Promises are outside the scope of this book but are an integral part of writing good front-end JavaScript code, so please familiarize yourself with the concept before attempting to build a front end for your contract.
As we mentioned earlier, the MetaMask Chrome extension and Chrome browser are requirements for the application. The MetaMask extension injects the web3.js library into our application, so we don’t have to require it ourselves. However, the injection occurs asynchronously, so any code that uses the library (in our case, the entire application) must wait until the injection completes in order to execute. The second block of code handles the asynchronous behavior, by defining a promise that resolves when web3 has been injected. It does so by checking for the existence of the library every 50ms until the library is found.

Once web3 is available and the required files have loaded, we can create the Contract object. $.when is similar to the built-in Promise.all function, and allows us to wait for a series of promises to return before executing a block of code. Once we have a Contract object, our code branches into three different tracks using a switch statement, one for each of the three pages. The default track is the games page, which is the track we will be exploring in this section.

The games page gets a list of games and adds them to the games table. Both of those functionalities are handled in helper functions.
Let’s take a look at the getGames helper:


The first block runs a call to the getActiveGames function, which returns an array of game ids. Those game ids are then resolved through a promise, so they can be available asynchronously to the remainder of the function. Those game ids are then used to access two separate event logs, the GameCreated event and the GameScored event. This occurs in the second and third logs. The results of both those log accesses are resolved through individual promises, then the two are combined in the final block. The game scores are merged with the game information object and the combined object is resolved through the returned promise.
If the scores are not defined because the game has not yet been scored, the home and away scores will be represented by a single ’-’. This way, when we display the scores later with a ’-’ separating the home and away scores, an unscored game will show ’---’.
Once we have the games, we add them to our table through another helper function, addGameToTable:

This function is very simple. It takes the game object, turns it into an HTML table row, then inserts it into the table.
That’s all the code for the games page. The simplest way to run the server is in the command line for the folder:
python2 -m SimpleHTTPServer
Python 2 is preinstalled on OS X and Linux, but on Windows you may have to download the package from https://www.python.org/downloads/.
Make sure your geth private net is running in a terminal tab. Then set your MetaMask extension to connect to the private net by clicking the fox icon in the upper-left corner. Select the item in the drop-down labeled Localhost 8545 (see Figure 11-1).
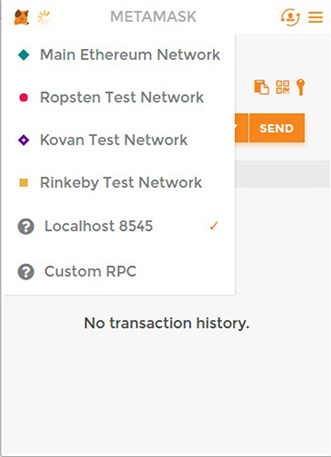
FIGURE 11-1 MetaMask
If everything has been set up properly, you should see a page that looks like Figure 11-2.

FIGURE 11-2 Betting application page 1
Congratulations, you’ve got yourself an ugly but functional games page!
Bet Page Markup
We’re going to be creating a separate page to display the order book and place bets. We saw earlier that our main thread split into three different tracks, one for each page.

We will now be pursuing the betting track and explaining the markup and code associated with the page. To start, here’s the basic HTML outline we will be following. There will be other functionalities available on this page as well, and we will add them to this HTML base as we go.

This is the same frame as for the games page. From here, we will add bet page–specific functionality. First, we want to display some basic game information:

There are display locations for the home team, away team, game time, and score. These will be filled in by our JavaScript on page load. As before, we will not be styling the page.
Next, we need sections for placing our over and under bets.

This displays two identical sections, one for placing an over bet and one for placing an under bet. Each section has two inputs, one for the line and one for the bet amount, and a button for placing the bet.
In addition to bet placement, this page will display the order book and a section for setting the game score. Let’s first look at the HTML for displaying open bids.
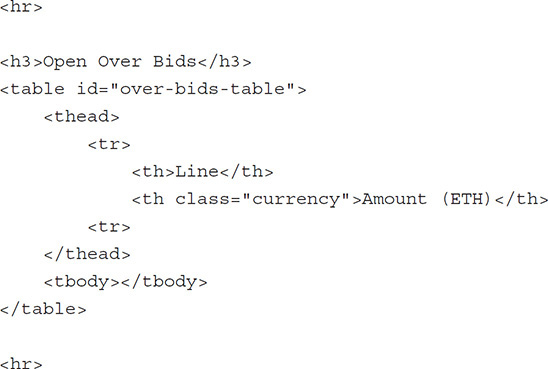

This sets up two tables, one for over bids and one for under bids. Both tables contain columns for the bet line and the bet amount. The table body and table header are given separate sections because later on we will be inserting rows directly into the body without touching the header. The <hr> tag separates the section with a horizontal divider.
We will also be displaying bets that have already been matched and placed into the book.

This table is very similar to the bids table and contains the same columns. The only difference will be in the data we add to the table.
Finally, we want a small form that we can use to score the game when betting has closed and the game is complete.

The form has inputs for the home and away scores, and a button that can be used to submit the score.
That will be all for the HTML. The actual displayed data will come from web3, and we will use JavaScript to print the data onto the page.
Displaying Game Information
To display information about a single game, we will be reusing the getGames function we defined earlier, and defining a new helper function to grab the game we want:

This function gets the list of the games then finds the desired game. Returning an item within a .then callback will cause that promise to resolve with the returned value. So this function returns a promise that resolves with the desired game.
Using this function, we can display the game information on our page:

The home and away team names are displayed from the game object. Then the locktime is converted from a UNIX timestamp to a JavaScript Date and displayed. The scores will not be defined if the game has not been scored yet. In this case, the score will display ’---’ because the home and away scores will both be set to a single ’-’ by the getGames helper.
Displaying Open Bids
Earlier, we defined parseBids and parseBid helper functions in our debug.js file to parse the byte array returned by the contract’s getOpenBids ABI function. We will be reusing those functions here. The code is reproduced below without explanation. Please refer to the “Seeding Data” section earlier in the chapter for the code explanation.

In addition, we will define a getOpenBids helper function to make the web3 call to the contract, parse the returned byte array, and resolve it all through a promise.
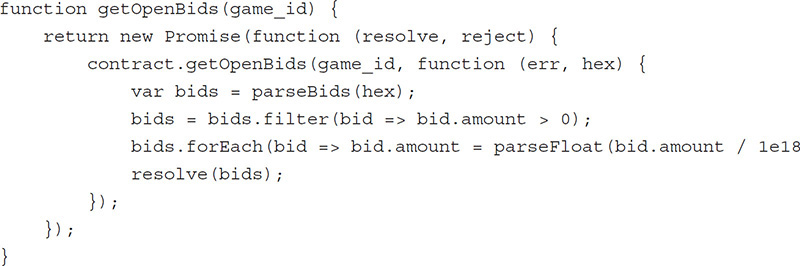
The getOpenBids contract ABI function is a constant function, so web3 executes a call that returns immediately. As always, the first argument in the callback is the error (null if no error) and the returned byte array is the second argument in the form of a hex string (“0xf43...”). The hex string is parsed into a byte array, empty bids with an amount of 0 are removed, and the bid amount is converted from wei to ether. The resulting array is then resolved through the returned promise.
Finally, we will define a helper function that adds the bids to the table:

This function takes a table selector (e.g., “#over-bids-table”) and adds a row to the body of the table with the given bid’s information.
Putting these helper functions together, we can retrieve bids and display them on our page:

The bids are filtered twice, once to get the over bids and display them on the over bids table, and then again to get the under bids and display them on the under bids table.
Displaying Bets
We would like to display existing matched bets in addition to the open bids. In order to do so, we will define a couple more helper functions to get the bets and add them to the bets table.
First, let’s define the helper to retrieve bets from the blockchain logs.

The bets are stored in the logs with an index on the game_id field. We can take advantage of that and parse the logs only for bets with our game id. The first object passed to a web3 contract event getter is an object of index-value pairs for the search. The second object is a config object. As stated earlier, the only config we need to specify is the fromBlock field. The other default values will suffice. Once we get the logs, we extract just the event data from them through the args property and resolve the data through the returned promise.
We will also require a simple helper to add our bet information to the bets table.

This function takes the bet information, creates a table row with it, then adds the row to the bets table body.
Using these helpers, we can now retrieve bets and display them on our page.

For every two-sided bet that occurs in the contract, two separate logs are produced, one for the over side and one for the under side. If we displayed all of the bet logs, each bet would be displayed twice, so we filter out just the over bets and display those. The side chosen is irrelevant; we could just as well filter out the under bets and display those. The result would be the same.
Placing Bids/Bets
When placing a bet, the user will fill in the line and amount for their chosen side and click the corresponding Place Bet button. Our JavaScript code will be responsible for translating that click into a real bid placement on our deployed contract.
We will have to define a helper function that gets the current user’s wallet address in order to do this.
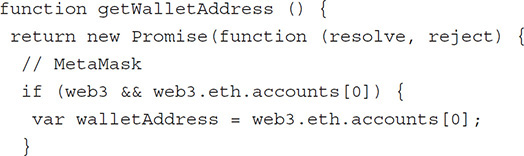

Getting the user’s wallet address is different based on whether we are using MetaMask or the Mist browser. While we haven’t been testing our dapp with the Mist browser up to this point, this function is the only one that has different implementations for the different browsers, so we will include it in the interest of interoperability.
MetaMask exposes the wallet addresses as an array at web3.eth.accounts. The first address will be the one that user has currently selected for use.
The Mist browser requires you to request account permission before unlocking the address. A pop-up, shown in Figure 11-3, will be presented to the user asking them to authorize the application before the address can be used.

FIGURE 11-3 Mist browser request for account permission
This function abstracts away the browser-level differences and returns a promise that resolves with the wallet address regardless of which browser is being used.

Within the betPage function, we will register an event listener that listens for both the over and under bet placement simultaneously. The listener first retrieves the wallet address asynchronously. It then uses the id of the event target (the clicked button) to determine whether the over or under button was clicked and grabs the corresponding line and amount from the inputs. The user enters their bet amount in ether, but the contract expects the bet amount to be in wei, so we multiply by 1e18 to convert the ether amount to wei.
Once all the bid parameters are parsed and determined, we call the contract’s bid ABI function with the parameters. The callback is left empty, but any postprocessing code (such as UI adjustments) could go there.
Let’s test this functionality by attempting to place a bet with Chrome and MetaMask. You should at this point be looking at a page that looks like Figure 11-4. You may have to wait a few seconds after the page loads for the game information to populate.

FIGURE 11-4 Placing a bet
Enter a line of 200 and a bet amount of 0.1 into the over inputs and place your bet. MetaMask should display a confirmation pop-up asking you to verify the transaction; see Figure 11-5.

FIGURE 11-5 MetaMask confirmation pop-up
If the gas field is empty, enter in a value of 20 Gwei. This is the default gas price on Ethereum. Click Accept, then open up your geth tab. You should see a log output similar to this indicating the transaction was sent:

Wait a minute or so to ensure that the transaction gets mined. Now reload the page. You should see your bet in the bets section if it was matched, or in the open bids section if it wasn’t.
Scoring Games
When a game is complete, we want to be able to score it and pay out bets to the winners. To do so, we have already created a form for score inputs. The JavaScript to handle the score submission looks like this:

We get the home and away scores from the inputs, use the id from the parent function, get the wallet address, and send a transaction to the contract’s setGameResult ABI function. The callback is again left blank, but can be filled in with code in the future.
To test game scoring, go back to the games page, then navigate over to a game that has passed its locktime. Remember, scoring a game before it has locked will throw an error and no state changes will occur. The Cleveland-Indiana game will be a good one since it was set to lock 30 seconds after the contract was deployed.
Enter home and away scores into the inputs (e.g., 100 and 98), then submit the score. A MetaMask pop-up should appear again. Set the gas price if necessary, then click Accept. Wait again for a minute, then reload the page. At the top, the final score should now be updated to the score you entered.
Withdrawing Money
The winning side of the bet needs some way of accessing the money that belongs to them in the contract. The withdrawal ABI function allows a user to withdraw the balance of their account.
We will be building a withdraw page to allow users to withdraw their ether. Here is the basic HTML:
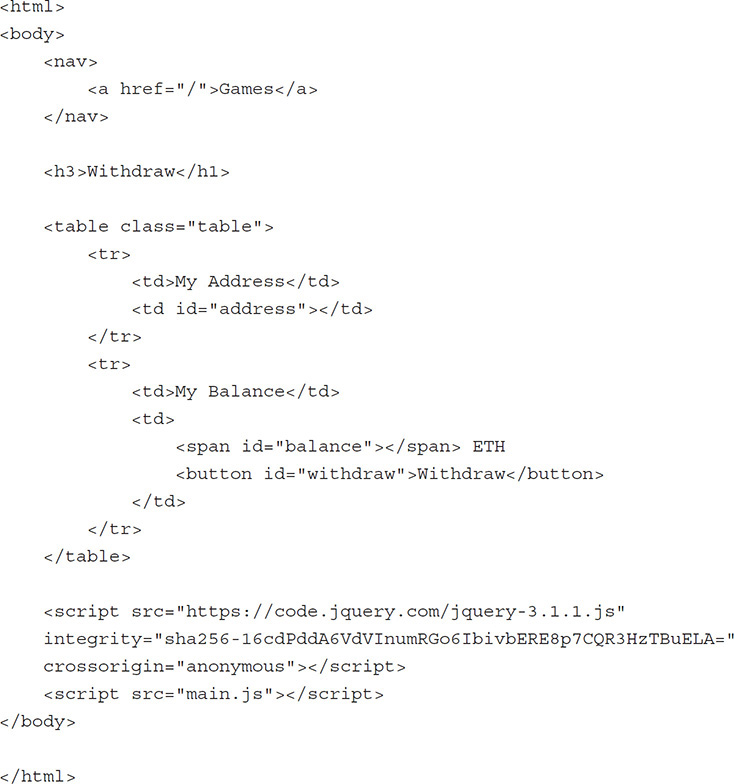
Outside of the standard html, body, and script tags, there is a link to the games page, a table with rows for a user’s address and balance, and a button to allow a user to withdraw their money. The address and balance will be injected via JavaScript.
This time we will be following the withdraw track in our switch statement:

Our withdrawPage function starts by querying for the user’s balance.

We get the wallet address, display it on the page, then use it to call the balances ABI function. The balances function isn’t explicitly stated in the contract, but Solidity automatically creates getters for public state variables so it’s available. Because it’s a mapping, the default getter requires the key to be passed in. We pass in the wallet address as the key, get the balance of the user back, and display it on the page.
If the user has a non-zero balance, they can withdraw it by clicking the Withdraw button. Here’s the event listener code:

When the user clicks the Withdraw button, we get their wallet address, then use the withdraw ABI function to withdraw the user’s balance.
You can test this out by redeploying the contract, placing multiple bets on one of the games that expires in three minutes, then scoring the game once it locks. Once you score the game you should see a non-zero balance on the withdraw page. Withdraw your money (accept the MetaMask pop-up when it appears), and check your balance on MetaMask. If everything works, it should go up!
Deploying to AWS
In order for your application to be available publicly on the Internet, you will have to deploy the application to a server. For our purposes, we will be using Amazon S3 static website hosting to host our front end.
For the full application to work, you must first deploy your smart contract to the Ethereum Main Net using the steps outlined in “Deploying to the Mainnet” earlier in the chapter. If you deployed the contract earlier, then replace the contents of the contract_address file with the address of the mainnet contract. Otherwise, the front end will attempt to access the address of the latest test contract deployed instead of the mainnet contract that you want to access.
First, if you don’t have an account with AWS, you will have to create one at https://aws.amazon.com. Once you have created an account, navigate over to the S3 console. S3 is a cheap storage service for static files. We will be using its static web server functionality.
Create a new bucket in the console, and give it a name. In the setup dialog, in the Set Permissions > Manage Public Permissions section, select the “Grant public read access to this bucket” option. This will allow the outside world to access our files.
Once you’ve created the bucket, click on the bucket in the main S3 console and upload the following files to the bucket:
• bin/peerbet.sol:PeerBet.abi
• contract_address
• index.html
• withdraw.html
• bet.html
• main.js
These are the files that are required to run just the front end of our site. The back-end smart contract should already be deployed to the Ethereum Main Net, so the back-end and test files will not be required on the static host.
Next, go to the Properties section and click on Static Website Hosting and enable it by selecting “Use this bucket to host a website.” Use index.html for the Index Page, then save the settings. Your static website is now enabled.
To view the site, click back on the Static Website Hosting section and go to the URL provided in the settings. For the site to work, MetaMask must be connected to the main network, so go to the MetaMask network settings and select the Ethereum Main Net. Once you have done so, the website should be visible and connected.
Summary
If you have read, understood, and tried some of the code in this chapter you can now write new scripts to deploy and test your own contracts. You can create a contract, and you can create a front end to interact with the contract.