
Brian Kernighan, a computer scientist, wrote the first “Hello, World!” program in 1972 for the language B to be used internally at Bell Labs. Brian wrote a manual titled A Tutorial Introduction to the Language B to demonstrate how to use B’s language. From there, this popular text spread quickly. It was used in a Bell Laboratories memo in 1974, as well as The C Programming Language in 1978. “Hello, World!” remains popular to this day. It became a standard for new programmers for their first program. This particular piece of code proves your code syntax, compiles, and executes to consistently produce the desired output. “Hello, World!” offers the code in more than 60 programming languages.
In the previous chapter, we have theoretically explained the Ethereum network, including Ethereum key components, EVM, architecture, etc. The best way to better understand what we learned so far is to start practicing and writing a smart contract and Dapps for the Ethereum blockchain.
By using the online Remix tool, you’ll learn how to write HelloWorld code in Solidity with all needed syntax. You’ll start from the very beginning, line by line. You will also learn how to compile and deploy your smart contract locally as well as on a globally distributed testnet. Then, we will install and connect our Metamask wallet to testnet. After setting up all that is required in your local Dapp development environment, you will start developing your own Dapp with minimal effort to connect the contract in testnet. By taking control of your Ethereum wallet at the end of this chapter, you should be able to run end-to-end HelloWorld Dapp.
Introducing Remix
Writing your first smart contract
Taking control of your first Ethereum wallet
Decentralized Applications (Dapps)
Tokens standard
In the last section, we talk about token standards with the two most important tokens—ERC-20 and ERC-721. ERC-721 is the NFT token standard that we will go over in the next chapter.
This will help make you more familiar with smart contracts and Dapps.
Introducing Remix
Gavin Wood proposed Solidity programming language in August 2014. Alex Beregszaszi, Christian Reitwiessner, and other Ethereum core contributors created Solidity. It is a high-level object-oriented programming language that is inspired by JavaScript, C++, and Python. The purpose of solidity is to execute smart contracts on EVM-based blockchain networks.
Many tools are available for creating and developing Solidity smart contracts. Remix, HardHat, Truffle, and others are popular tools used by Solidity developers. Remix is a powerful online integrated development environment (IDE) for coding, compiling, testing, and debugging smart contracts in Solidity. We don’t need to install any other special software, apart from your web browser.
You can type the Remix IDE in your browser URL box using the following URL:

A screenshot of an interface labeled file explorers with toolbars. Homepage is displayed on the right with a caption labeled as remix I D E and below it shows a scan alert message.
Remix home page
You will notice that there is a left toolbar menu on the Remix screen. When you click each menu icon, you will see different modules provided.
File Explorers

A screenshot of a interface labeled default workspace illustrates 3 markings for 3 icons. The markings are create new contact, create new folder and load local file to current workspace.
Remix File explorer page
Solidity Compiler

A screenshot of an interface labeled solidity compiler illustrating advanced configurations with file selection and run options.
Remix Solidity compiler page
Deploy and Run Transactions

A screenshot labeled deploy and run transactions page with environment, account, gas limit, value and contract details filling form. Lower part illustrates adress adding, transactions recorded, and deployed contacts section.
Remix Deploy and Run Transaction module
This module provides multiple EVM Environments:

A screenshot of the a section from an interface labeled environment. Environment has a box for selection of java scripts, web providers and connect list.
Remix EVM environments
Injected Provider – Remix will connect to a web3 provider injected in the browser (commonly known as a browser extension for your wallet). Metamask is currently the most popular Injected Provider. You can also use other popular wallets like Coinbase wallet, Trust Wallet, and Ledger. You can connect to Ethereum’s main network or various testnets through the provider. This allows the Remix to interact with a real network.
Web3 Provider – Remix will connect to a remote node. You will need to provide the URL for the selected provider. Infura, Alchemy, and QuikNode are some popular Web3 providers.
Other Modules
We have introduced the important remix modules, which we typically use often. Other modes like plugin module allow you to install the needed plugin like debug plugin, Solidity static analysis module, Solidity Unit test module, and Settings module. If interested, you can refer to the remix document for detail (https://remix-ide.readthedocs.io).
At this stage, we should have the basic knowledge of Remix.
Let’s start to learn Solidity by writing “Hello, World!” smart contract.
Writing Your First Smart Contract

A screenshot of smart contract creation bar chart, with quarter 2 of year 2021 having the highest contract creation.
Number of Smart contract creation from Q1 2021 to Q2 2022
Write a Contract
On Remix File Explorer module, under contracts folder, click the create new contract icon (page icon) or use context menu by right-clicking to add our first contract. We will name our first smart contract HelloWorld.sol. Solidity Smart contracts will always have an extension of .sol as file type.
Software License
Here Comments (//) is a line of text that appears in a Solidity program but is not executed by the program.
Pragmas
The pragma keyword is similar to the C language, which provides the current Solidity compiler. Here 0.8.15 is the Solidity compiler version. The ^ symbol means this file will only support compiler version starting from 0.8.7 till future break changes, which will cause this file to not compile. For example, pragma solidity >=0.4.0 <0.6.0 such as the contract won’t compile in 0.6.0 because of a major solidity change. In that case, you need to modify the related syntax in the file to use the newer version.
Define Contract

A screenshot of the solidity compiler configuration and compiling the hello world.
HelloWorld Empty contract
Declare Contract Variable
In the next line, we enter string public message.
Here the string keyword is a state variable type. State variables are values permanently stored in contract storage and are used to maintain the contract’s state.
The visibility of a state variable can be defined as public, private, or internal. In our case, because we set the visibility to public, the message field can be publicly accessed outside of the smart contract.
Define Contract Constructor

A screenshot of hello world contract with messages.
HelloWorld contract constructor
The constructor is a function that can be compared to a factory machine. Once given an input, they can run a specific task to return a result.
To declare a constructor, we use the constructor keyword. Once we create our constructor, we can create many different contracts using the same constructor. Whenever a new contract is created, the system automatically calls on the constructor; they only need to use the constructor once to create the contract. If a constructor is not defined explicitly, the Solidity compiler will create a default constructor, which does not require any input.
Most often, you may need a constructor that passes one or more parameters. Inside the {}, we add the initialization logic. In our example, we pass “string memory initMessage” input. The memory keyword we use here indicates that we want initMessage parameter to be mutable, or changeable, and the initMessage value is assigned to message variable and initialized during contract creation time.
Define Functions
- 1.
Update contract message function
Update function will be like as follows:function update(string memory newMessage) public {message = newMessage;} - 2.Get contract message functionfunction getMessage() public view returns (string memory) {return message;}
The name of the function. Here “update” is the function name.
A list of parameters to the function is enclosed in parentheses and separated by commas (parameter1, parameter2, ...). It could be empty (). (string memory newMessage) are parameters in the HelloWorld function.
Function visibility – public, private, internal, and external.
Functions behavior – pure, view, and payable.
Followed by optional returns keyword and return value type (type1, type2, ...) when the function has return values. In our update function, we don’t have a return value. But in getMessage, we return (string memory)
A statement block that defines the function, surrounded by curly brackets, {...}.
Syntax
Function Visibility
Public – It can be called internally or externally.
Internal – Internal functions can only be accessed from inside the current contract and related deriving contracts.
External – It can be called from other external contracts, but cannot be called internally (inside the current contract).
Private – Like internal visibility, but the function cannot be accessed from related deriving contracts.
Functions Behavior
The pure, constant, view, and payable keywords dictate a Solidity functions behavior.
If the function behavior is not specified, it will read and modify the state of the blockchain.
Pure Functions: It ensures that the caller can’t read or modify the state.
View Functions: View functions are read-only functions that ensure that state variables will not be modified after calling them.
Payable: A payable fallback function is also executed for plain Ether transfers.

A screenshot of the hello world completed code.
HelloWorld completed contract
Compile a Contract
As we learned in the EVM section, the smart contract needs to be compiled to Bytecode, before it can be deployed to the blockchain. In this step, we will compile our HelloWorld smart contract.

Snapshot of the hello world contract with sections marked as bytecode, a b i, storage layout, web 3 deploy, meradata hash, function hashes, gasestimates, devdoc, userdoc, runtime bytecode, and assembly.
Compiled HelloWorld contract
Deploy and Run a Contract
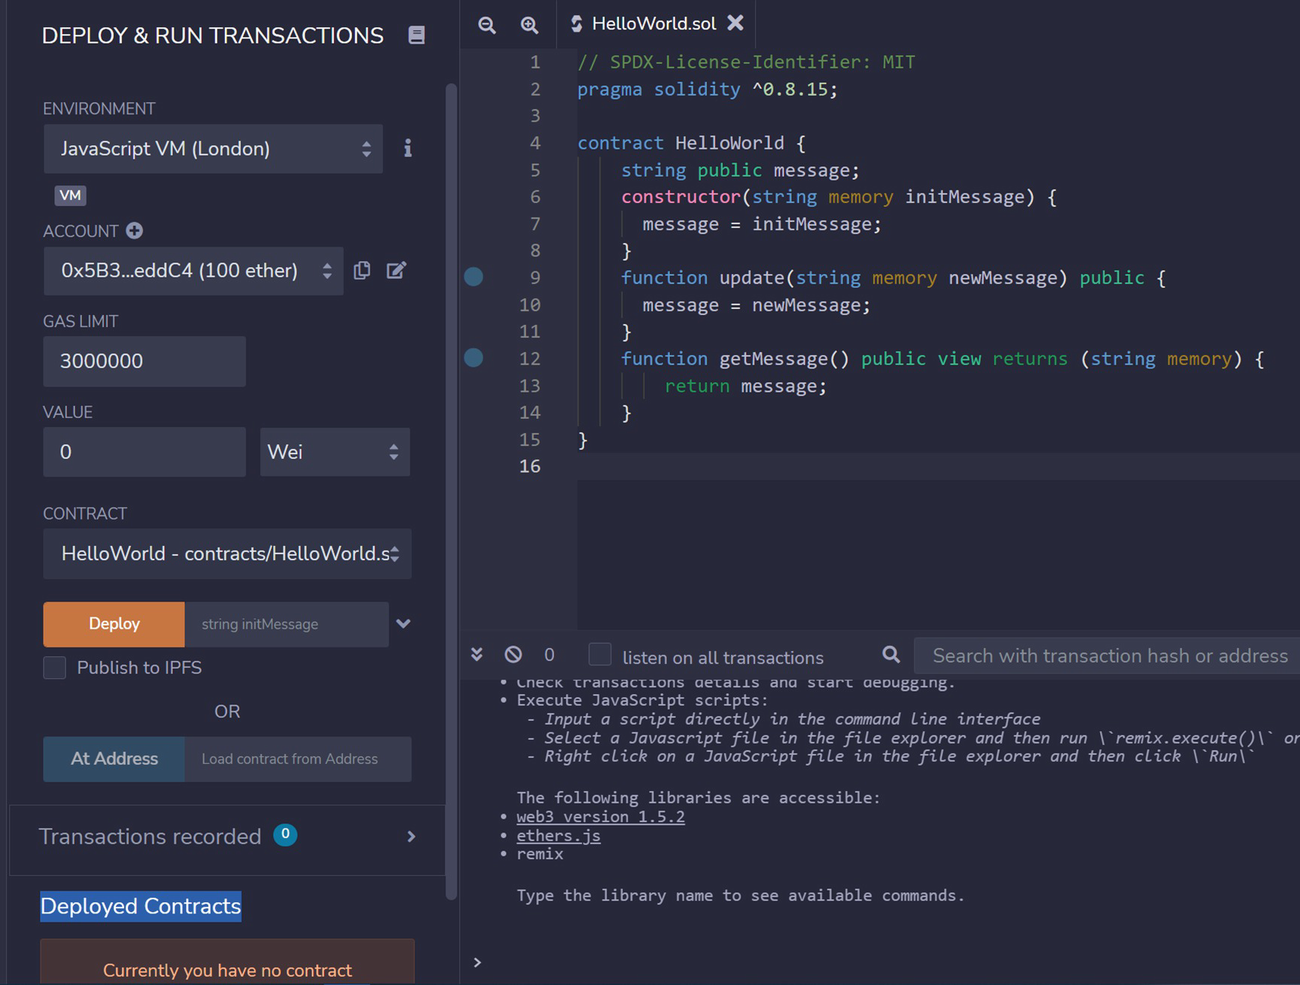
A screenshot of deploy and run transactions interface displaying hello world code on the right. The left side illustrates options for selecting environment, account, gas limit, value, and contract.
HelloWorld contract deployment
So far the contract hasn’t been deployed yet. So, to deploy HelloWorld, we need to provide the string initMessage just beside the Deploy button.

A screenshot of an interface labeled deploy and run transactions illustrating hello world contract entry and deployed contracts on the left and the code on the right.
Deployed HelloWorld contract
The built-in terminal console shows deployment information. The default account amount was reduced by a small amount of gas fee, or a transaction fee, from 100.00000 ETH to 99.99999 ETH.
Under deployed contracts panel, you will see deployed HelloWorld contract with the contract address.
If you expand the deployed HelloWorld contract entry, it will show all contract items—state variables or functions—defined as public in your smart contract.
We can see the update, getMessage function, and message variables in our case.

A screenshot labeled as deployed contacts illustrates a section as hello world message deployed to contracts.
Call HelloWorld contract message
To change the message, enter “Hello Ethereum” for the update function and then click the button to set the new value.

A screenshot of the hello world message updated. The new message is hello ethereum.
Update HelloWorld contract message
Congratulations! You have successfully written your very first Hello World smart contract in Solidity and deployed it to the blockchain. To learn more about Solidity, you can visit the Solidity Official Documentation (https://docs.soliditylang.org/en/v0.8.15/contracts.html).
Taking Control of Your First Ethereum Wallet
In Remix, when we use Injected Provider, Metamask is one of the most widely used wallet providers. MetaMask was founded in 2016 by Aaron Davis and Daniel Finlay and is currently owned by ConsenSys. As of March 2022, Metamask has over 30 million monthly active users. As a free browser extension for Chrome, Firefox, Brave, and Edge, MetaMask allows your regular browser to behave as a web3 browser for storing and exchanging cryptocurrencies, as well as interacting with Ethereum Dapps without running an Ethereum node. Simply put, MetaMask is a mobile crypto wallet you can access in your browser. To manage Metamask access, the user needs only a password and a 12-word recovery phrase, also known as a seed phrase. The seed phrase can be made up of any real words, such as dog, cat, or chicken.
If you forget or lose wallet recovery phrase, there is no way to recover your crypto wallet password. It is very important that you back up these seed phrase in a safe and secure place, maybe a hard disk, USB drive, or paper. Don’t store it where it’ll be vulnerable, like an email, online storage, etc.
MetaMask may not be the best place to store large amounts of crypto or valuable crypto assets, such as NFTs. When connecting to the mainnet for trading, use MetaMask as the only tab in that browser and avoid connecting to social media accounts in the same browser—some social media sites have plugins that can steal your data.

A screenshot of the meta mask interface with a settings page. The option advanced settings is selected and the options are labeled as storage logs, sync with mobile, reset account, advanced gas controls, show hex data and networks.
Update Metamask setting for testnet

A screenshot of the goerli test networks adding new network.
Connect Metamask with Goerli test network
You will see there is default account in account 1 without any ether.
Official Goerli Testnet Faucet: https://goerli-faucet.slock.it/
Starknet Faucet : https://faucet.goerli.starknet.io/
Goerlifaucet: https://goerlifaucet.com/
Most testnets will be discontinued after several months (as of July 2022). Currently, Goerli is confirmed to continue in the future, so test ether in this network is usually in high demand. You may need to try several times to obtain some ether.

A screenshot of Account 1 in the goerli test network with 0.05 goerli E T H.
Get ether from Goerli test network faucet
With these Ethers, you have done all the hard work of bringing your smart contract to life. Now it’s time to share your first smart contract with the world! Let’s deploy our HelloWorld smart contract to the Goerli test network from Remix.
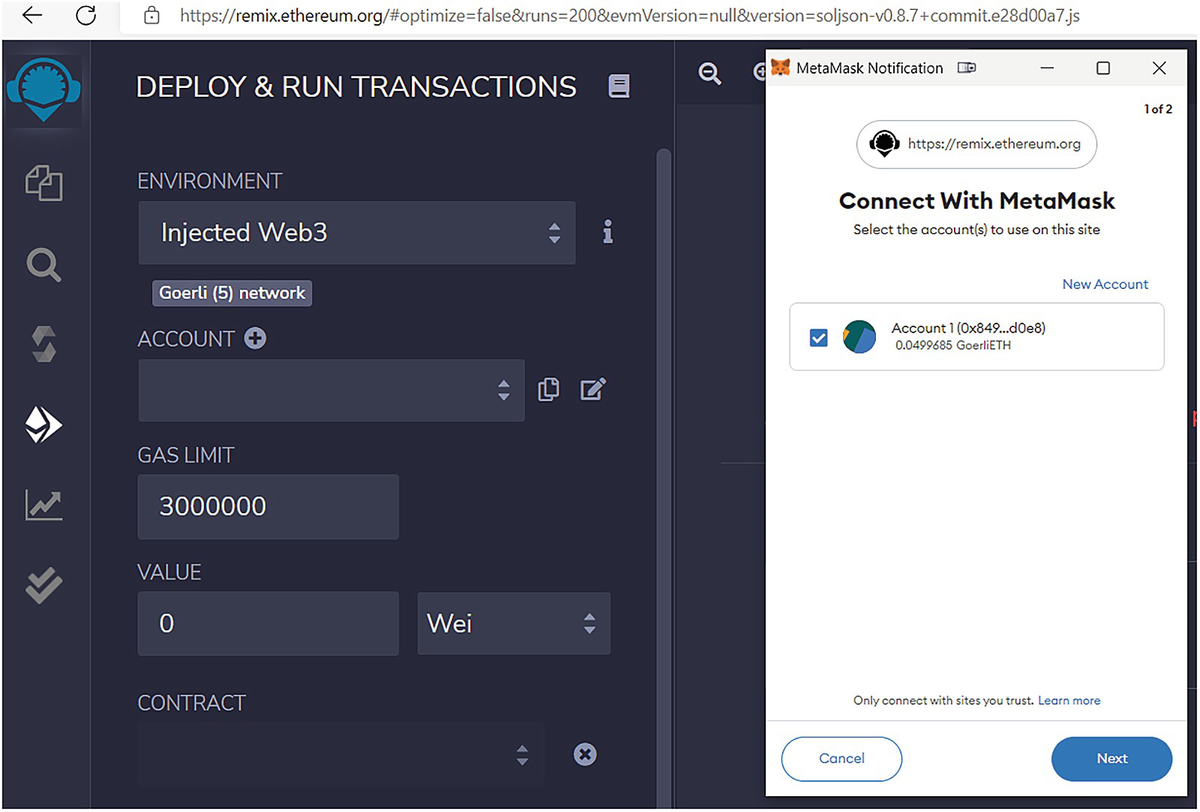
A screenshot labeled deploy and run transactions with an interface at the right labeled connect with metamask and an account is selected. The lower part displays cancel and next options.
Connect Remix to Goerli test network

A screenshot of an account connected in the test network labeled 0.05 goerli E T H.
Connected Metamask Goerli test network

A screenshot of an interface labeled deploy and run transactions the meta mask notification page is displayed at the right.
Deploy contract to Goerli test network

A screenshot of an transaction receipt for hello world contact.
Deployed contract with transaction receipt

A screenshot of an interface labeled goerli test network with account 1 selected. At the centre 0.0487 goerli E T H displays buy, send, and swap option.
Deployed contract with gas fee

A screenshot of the contract deployment status and transactions details labeled confirmed.
Contract deployment detail
You can click the “View on the block explorer.” The link will lead to the etherscan.io page and show this contract deployment detail. You can see that contract was deployed to address 0xe02cfad8b29d0aad478862facb2e6a9b1fed7bc9 (Note: it will display a different address number when you deploy it). This address is publicly accessible for everyone.

A screenshot of an interface for ether scan contract page illustrating transaction details marked success.
Deployed contract in etherscan
Great! You have published the HelloWorld contract in the Goerli test network, which is open to the public and accessible from anywhere. Next, let’s build a simple Dapp to interact with our smart contract.
Decentralized Applications (Dapps)
A front-end layer – A web browser with web servers to host a web page.
Web3 Provider layer – The middle layer between the frontend and the smart contracts, that is, Metamask wallet.
A backend (smart contract) – Contracts run in the blockchain network.

An illustration of the dapp layer architecture flow diagram, with web client, web provider, smart contract and ethereum block chain.
Dapp layer architecture
In the Ethereum client section, we use web3 API to query some blockchain information from the geth console. In this section, we will explore another Ethereum JavaScript Open source library—Ether.js, which also enables web clients to communicate and interact with the Ethereum network.
Getting Started
Before proceeding with this section, you need to install the following:
Installing node.js
Follow the node office installation guide, download and install node.js:
Installing Git
Follow the git office installation guide to install Git:
https://git-scm.com/book/en/v2/Getting-Started-Installing-Git
Git clone HelloWorld Dapp Project
Install HelloWorld Dapp Project
Open terminal, navigate to helloworld project location. Run npm install

A screenshot of the hello world project location.
This will install node library needed to run Helloworld Dapp

A screenshot of the project structure folders illustrating options after selecting client dot js.
Dapp project structure
You can use this address for testing or you modify this address to your own deployed contract address.
Open client.js, update line 3 of your own address. If you modified the contract and have different contract abi, replace line 4 with your own contract abi.

A screenshot of the address testing for own contract address.
Run HelloWorld Dapp Project

A screenshot of the dapp node server address.
Start Dapp node server
Open HelloWorld Dapp from Browser

A screenshot of E 2 E hello world dapp page. A box captioned message update is located at the centre.
Dapp initial page
Connect to Metamask
Once connected, we can get user wallet, network, and account information from the provider. provider.getSigner() will get Ethereum Accounts from Metamask wallet. provider.getNetwork() returns current Ethereum Network that wallet connected.
Here is a snippet of the code:

A screenshot of the snippet code.

Screenshot of an interface labeled E 2 E hello world dapp and a metamask page asking for login information.
Dapp connect to Metamask

A screenshot of an interface labeled E 2 E hello world dapp and a success icon on the right displaying a box for message update.
Dapp connected to Metamask with blockchain data
Get Contract and Call Get Message
In Remix smart contract compile and deployment, we have gotten abi and contract address information. Ether.js is provided below api to get contract information and you can use new ethers.Contract(contactAddress, abi, provider) API to get deployed contract instances.

A screenshot of the read only contract message code.
With ether contract object, you can start “call getMessag” function:

A screenshot of the call get message function code.

A screenshot of the hello solidity message update box in the E 2 E hello world dapp interface.
Dapp get First message
Get Contract and Call Update Message
When you need to call state-changing methods, such as an update message, you must connect to the signer and pay a gas fee to send the state-changing transaction:

A screenshot of the signer contract object input message to update contract.
With the signer contract object, you can now pass input message to update contract:

A screenshot of the a sync function update message.

A screenshot of the reject and confirm transactions page in the E 2 E hello world dapp with the message hello ethereum.
Dapp update message

A screenshot of the update message and the details of transactions with a message confirmed and from and to information.
Dapp update message transaction detail

A screenshot of the etherscan transaction details with a message success highlighted.
Dapp update message transaction in etherscan

A screenshot of a transaction receipt with a message success at the right and a box communicating a localhost message with an option marked ok.
Dapp with response transaction receipt
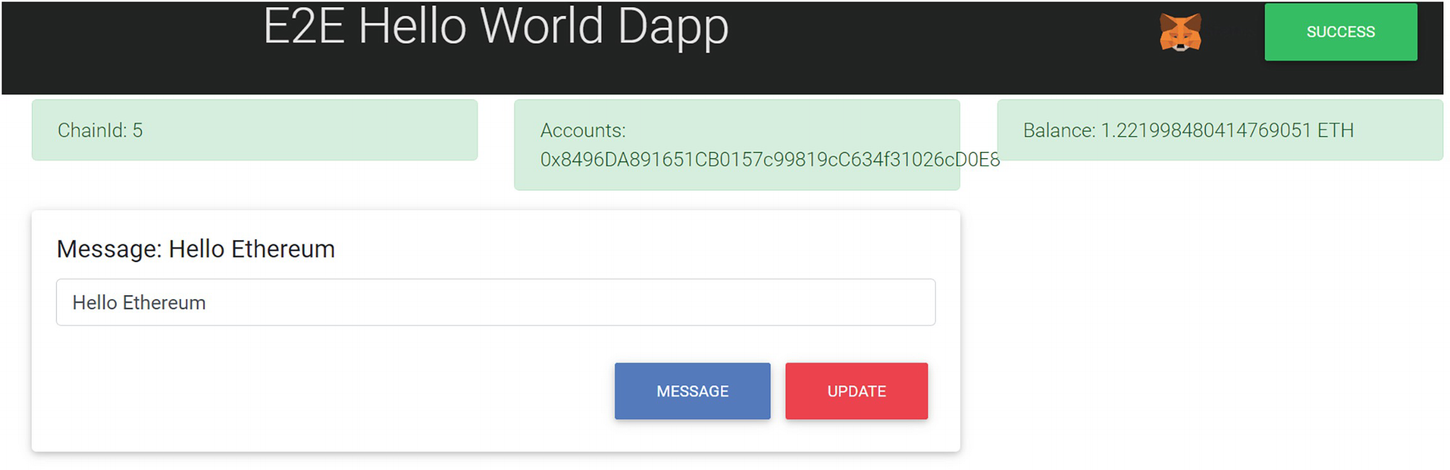
A screenshot of the update message saying hello Ethereum in the E 2 E hello world dapp interface.
Dapp verify updated message
Congratulations, you have successfully published your first smart contract to the public testnet and built a Dapp to call and update the message content! You have now completed an end-to-end Dapp development cycle, which is a huge accomplishment. Pat yourself on the back, because that was a lot of work.
Despite the fact that we have spent enough time exploring Ethereum Dapp and Solidity principles to get you to build a Dapp, this book only provides a basic introduction. There are a lot of good online documentation covering all aspects of Javascript, JQuery, express.js, and ether.js.
ether.js: the document can be found at https://docs.ethers.io/v5/
JQuery: the document can be found at https://jquery.com/
express.js: the document can be found at https://expressjs.com/en/starter/hello-world.html
Node.js: he document can be found at https://nodejs.org/en/docs/guides/getting-started-guide/
Tokens Standard
In Chapter 1, we learned Mohammad Bin Tughlaq invented token money—Tanka, which used copper currency to represent the same value as a silver coin. In a blockchain, the coin represents the native currency. For instance, ether is the coin in Ethereum. And a token is created by a smart contract, which defines basic token properties, then builds and operates.
A crypto token is a virtual currency token representing programmable assets or shared ownership with access rights to an entity with a specific value. The token is managed by a smart contract, which allows for the efficient and secure purchase or sale of an item such as an art collection, the exchange of token ownership, the transfer of token balance, the storage of token value, and the verification of transactions on the blockchain.
To assist developers in standardizing token creation, the Ethereum community has developed many token standards through the Ethereum Improvement Proposal (EIP) process.
EIPs contain standard technical specifications for potential new Ethereum features or processes, including core protocol specifications, improvements, client APIs, and contract standards. It acts as the “source of truth” for the community. Anyone can create an EIP by following standards guidelines in the EIP-1, published in 2015 (https://eips.ethereum.org/EIPS/eip-1). As stated in EIP-1, Ethereum Request for Comment (ERC) is the application-level standards and conventions. If the specific ERC is approved in the Ethereum community, it becomes a new token standard rule which will be outlined in the document through a related smart contract.
Standards of token (ERC-20, ERC-721, ERC-1155, ERC-777)
Name registries (ERC-26, ERC-137)
URI schemes (ERC-67)
Library/packet formats (EIP-82)
Wallet formats (EIP-75, EIP-85)
There are many other tokens still in draft and review status. You can check all token ERC through this link: https://eips.ethereum.org/erc
Let’s take a look at the two most popular ERC standards, ERC-20 and ERC-721.
ERC-20
ERC-20 is the most popular Ethereum token standard and was proposed on November 19, 2015 by Fabian Vogelsteller. Most ICOs (Initial Coin Offering) that have issued their tokens on the Ethereum platform or EVM-based blockchain (like Binance) are ERC-20 tokens. The ICO is cryptocurrency version of the IPO (initial public offering), which is used in the stock market to raise capital or participate in investment opportunities. There are around 508k ERC-20 tokens in the Ethereum mainnet on March 2022. The total market cap of all ERC-20 tokens is around $18.7 billion, and there are more than 160K ERC-20 in Binance.
20 is a unique identification number to distinguish the ERC-20 standard from others.
totalSupply(): Gets the total number of token supply.
balanceOf(): Gets the account balance for the specified address.
allowance(): Returns the amount of tokens which the spender is allowed to withdraw from the owner.
transfer(): Transfer the balance from the owner’s account to another specified address and must fire the transfer event.
transferFrom (): Send the amount of tokens from address `from` to address `to`. The transferFrom method is used for a withdraw workflow, allowing contracts to transfer tokens on your behalf.
approve(): Allows spender to withdraw the specified amount of tokens from your account multiple times.

A screenshot of an interface labeled token kucoin token highlighting an overview, profile summary and transfer information with 34, 718 transactions found marked as transfer and transfer from.
ERC-20 example
The screenshot shows the amount of ERC-20 tokens being transferred from one address to another address by the transfer or transferFrom method.
In ERC-20 token, tokens are fungible, meaning that each token has exactly the same type and value as another token. If you swap one ERC-20 for another, there will be no difference in authenticity or value; they are interchangeable and represent a single entity.
For example, Tether (USDT) is an ERC-20 Token. It is a stablecoin—a crypto asset value pegged to the US dollar at a 1 to 1 ratio and 100% backed by Tether’s equivalent reserves. These reserves are a mix of assets, including cash. USDT is similar to the ETH, meaning that 1 Token is and will always be equal to all the other USDT Tokens. They are the same type, represent the US dollar, and are mutually interchangeable. USDT is also divisible, which can be broken down into smaller units like cents.
So fungible tokens have the following properties: interchangeable, uniform, and divisible.
Next let’s talk about tokens that are not mutually interchangeable or, in other words, nonfungible.
ERC-721
All ERC-20 tokens (like USDT) are identical and provide the same value. So what matters is how many tokens you own in the wallet, not their individual identities. Nonfungible tokens (NFTs) can be uniquely identified; they are assets whose data is stored on blockchain networks. NFTs are not interchangeable with other NFTs because they are unique. Think of a unique work of art created by an artist, luxury brands item from fashion companies, and different videos.
ERC-721 is a standard interface for nonfungible tokens, also known as deeds, and is available at https://eips.ethereum.org/EIPS/eip-721. The proposal for the creation of this new standard was created in Jan 2018, proposed by William Entriken, Dieter Shirley, Jacob Evans, and Nastassia Sachs. According to a Bloomberg report, NFT Market surpassed $40 Billion in 2021 and over $37 billion in NFT marketplaces in 2022 on May 1.
balanceOf: Gets the account balance for the specified address.
ownerOf: The function returns the unique address of the owner of a token based on the provided tokenId.
safeTransferFrom: Transfers the ownership of an NFT from one address to another address. It is required that msg.sender is the current owner, an authorized operator, or the approved address for this NFT.
transferFrom (): Send the amount of tokens from address `from` to address `to`. The transferFrom method is used for a withdraw workflow, allowing contracts to transfer tokens on your behalf.
approve(): Allows spender to withdraw the specified amount of tokens from your account multiple times.
setApprovalForAll: Assign or revoke approval rights for the given operator to manage all of `msg.sender`’s assets.
getApproved: Get the approved address for a single NFT
isApprovedForAll: Check if the given operator address has access right to operate for the given owner’s tokens.

A screenshot of an animated cat and a label marked as kitty hash 1111 with information like owner, born, generation, block number, block hash, official profile, and attributes. On the lower side information is displayed under the label genes.
ERC-721 CryptoKitties example

A screenshot of the ether scan crypto kitties inventory.
ERC-721 CryptoKitties in Etherscan
NFT collectibles market continues to grow as fan engagement increases, which will likely increase mainstream adoption. NFTs can have only one owner at a time. True ownership is one of the key characteristics of any NFT, and it has the potential to play a critical role in bringing the digital and physical worlds closer together than they have ever been.
Summary
You have written your first smart contract through Remix IDE, and deployed HelloWorld Solidity file to the Goerli test network. We demonstrated the basics of Dapp and web3.js and how Dapp interacts with smart contract by connecting with Metamask wallet.
But our journey doesn’t end here—in the next chapter, we will cover more exciting details on the NFT.