Chapter 7
Recording Expenses and Supplier Payments
IN THIS CHAPTER
![]() Creating systems so you can find everything easily
Creating systems so you can find everything easily
![]() Choosing a method to suit your madness
Choosing a method to suit your madness
![]() Finding a home for every transaction
Finding a home for every transaction
![]() Dealing with cash and out-of-pocket expenses
Dealing with cash and out-of-pocket expenses
Your role as a bookkeeper varies enormously depending on whether you’re doing the books for a business that’s just getting started, or whether you’re working for a larger business with many employees and lots of suppliers.
Part of being a good bookkeeper is being able to judge what system works best in each situation. I’m not talking about software choices here — rather, I’m referring to the way you organise information and record transactions. Do you want to keep things simple and just record transactions when they appear in the bank account? Or do you need to record purchase orders, keep track of how much is owed to suppliers, and much more besides?
In this chapter, I show how the process of recording expenses and supplier payments varies depending on the size of the business. I also talk about bank feeds, and explain how bank feeds combined with bank rules can transform bookkeeping for smaller businesses. I show how the efficiencies that bank feeds bring are less significant for larger businesses than for smaller businesses, and how for businesses with several employees and lots of suppliers, a bookkeeper still has a vital role to play.
Creating Order Out of Chaos
A good bookkeeper is both smart and organised (not to mention good-looking and blindingly intelligent). A smart bookkeeper looks for ways to improve systems and make clever use of technology. An organised bookkeeper transforms a chaos of information into a set of logical files where anyone can find anything.
Getting your hands on the right info
For every bookkeeper, the starting point is always the source documents of a business. When accountants talk about source documents, they mean bank statements, credit card statements, receipts and supplier bills. Your first task as a bookkeeper is to locate and organise this information so that you can do your job.
Bank and credit card statements
When I talk about bank statements, I simply mean a statement showing every transaction in your bank account for a given period (usually a week or a month), along with an opening balance, a closing balance, and a running balance for each day.
As a bookkeeper, you’ll find it easiest to work with full bank statements (whether printed or electronic) as opposed to simply printing transaction reports from your internet banking. I often find that vital information such as opening and closing balances, not to mention running statement balances, is missing from transaction reports.
Store the bank statements logically so you can find them easily. You can store printed bank statements in a ring binder or create a folder on your computer and store PDF versions of bank statements in that location.
I treat credit card statements in the same way as any other bank statement, either filing them in date order in a ring binder or storing them electronically as PDFs.
 If you receive bank and credit card transactions via a bank feed, you may be tempted not to worry about bank statements at all. However, reviewing and storing bank statements (either in printed form or electronically) is vital for two reasons:
- Bank feeds are a great innovation but all accounting software companies acknowledge that you get some degree of error. This error rate can be as high as one in every 500 transactions! For this reason, given the number of transactions most businesses make during a year, a vital part of your job as a bookkeeper is to check that the closing balance in the software matches against each month’s closing balance on the bank statement.
- Bank statements can be a very handy reference, particularly if someone deletes a transaction after it has been reconciled, or if you’re troubleshooting reports. Keep in mind that you can’t always rely on internet banking to look up this kind of information, because some banks only allow you to view the last six months’ worth of transactions.
Receipts
When faced with a pile of receipts, separate these receipts into two piles:
- Create one pile for everything that was paid for by cash or from a personal bank account. You either need to record these expenses as petty cash or reimburse the business owner. See ‘Nitpicking over Petty Cash and Out-of-Pocket Expenses’, later in this chapter, for more details.
- Create another pile for everything that was paid from a business bank account by electronic transfer, EFTPOS or credit card. These receipts simply need filing away. See the next section for details.
Supplier invoices
If a supplier bill hasn’t been paid yet, pop this bill into a folder marked ‘Bills to be Paid’. (If you have lots of supplier bills, you’re best to organise this folder according to supplier name, with each supplier in date order.) Alternatively, if you have received this bill as an eInvoice, all you need to do is open your accounting software and approve it.
If a supplier invoice has already been paid, you simply need to file this invoice. See the next section for details.
Filing stuff so you can find it again
If you want to avoid spending life going around in circles, storing things so you can find them again is best. I talk about record-keeping systems in Chapter 4, but a quick recap in this context helps:
- Organise printed supplier invoices according to supplier name, date and financial year. Ring-binder folders or suspension folders work fine. Alternatively, you may prefer to scan supplier invoices, and organise electronic versions of supplier invoices in separate folders (one for each supplier).
- For invoices you receive by email, you may find it easiest to print these invoices and file the printed copy with all your other supplier invoices. Alternatively, you may prefer to store these emails in a special folder within your email program, save the attachments in a specific folder on your computer, or attach an electronic copy of the transaction to the corresponding expense or bill in your accounting software. (All four strategies work fine so long as you’re consistent.)
- With miscellaneous receipts for things such as parking or petty cash expenses, store these in a folder called Petty Cash, and organise these receipts in rough date order, according to the month in which the expense happened.
Most cloud-based accounting applications allow you to scan (or take a photo using your smartphone) supplier invoices and attach these invoices to the payment transaction. While this feature is undoubtedly very nifty, you may find that attaching copies of every single supplier invoice to the relevant transaction is pretty time-consuming. However, I do find this feature really useful for any transactions that I know the accountant is likely to query. For example, if your software has this feature, I recommend you attach copies of supplier invoices for any new capital acquisitions, such as the purchase of new equipment or motor vehicles. (Accountants often want to view this information to check how to allocate the transaction correctly for tax purposes.)
You can also consider subscribing to an add-on application such as Receipt Bank, which automatically scans miscellaneous receipts for key data such as supplier name, date and amount, and then converts this data into a spreadsheet or sends this info to your accounting software.
Working with a Micro Business
Figure 7-1 shows three possible ways of bookkeeping for a micro business. (By micro business, I mean an owner-operated business, usually run from home with no employees, and either just getting started or run as a part-time venture.)
The thing to notice about a micro business is that typically this kind of business has few (if any) supplier credit accounts, and instead pays for most business expenses at the time of purchase, using either EFTPOS or a credit card. Because of this way of working, the combination of cloud accounting software and bank feeds is ideal for a micro business. (Skip ahead to the following section to find out why.)
You may come across a business that purchased accounting software some years ago, and which has never upgraded because the owner can’t afford the monthly subscription fee for cloud accounting. In this instance, an alternative is to type each transaction into the accounting software, working from bank and credit card statements as a reference. (See ‘Entering transactions one by one’ for more information.)

FIGURE 7-1: Possible bookkeeping processes for a micro business.
Lastly, a really small business that can’t afford to purchase or subscribe to any kind of accounting software may choose to list transactions on a spreadsheet. See ‘Listing expenses on a spreadsheet’ later in this chapter for more about this way of working.
Automating data entry with bank feeds
For micro businesses, the quickest way to record business expenses is to use cloud accounting software and to work with bank feeds and bank rules. These two features combined can serve to automate a fair amount of data entry:
- With bank feeds, your transactions appear automatically in your accounts, without you having to enter anything.
- With ‘rules’, these transactions are also coded automatically to the correct accounts.
Figures 7-2 and 7-3 provide examples of how these features work. Figure 7-2 shows a bank statement for a couple of days’ worth of transactions.
Figure 7-3 shows how this information would appear if this business were using bank feeds combined with bank rules. (In this example I’m using Xero, but the principles are similar whatever software you use.) On the left side of Figure 7-3, the bookkeeper views all the transactions from the bank statement the moment he or she logs on. On the right side, you can see how Xero has ‘guessed’ as to how these transactions should be allocated. Xero does this by applying rules that the bookkeeper sets up as they go along. Behind the scenes of Figure 7-3, for example, the bookkeeper has created a rule stating that all payments made to MCO Cleaning should be allocated to Cleaning Expense.
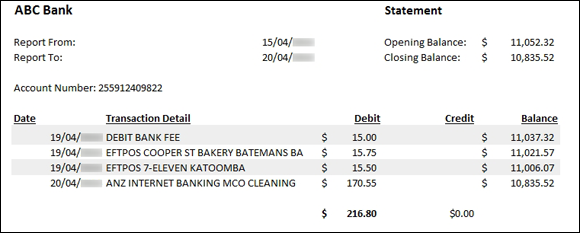
FIGURE 7-2: An example bank statement.
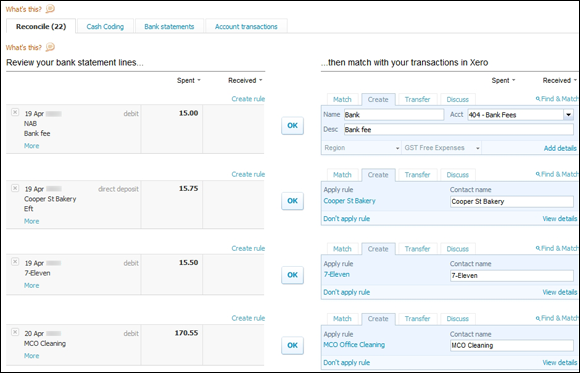
FIGURE 7-3: This screen shows how the transactions from Figure 7-2 would appear in Xero.
All the bookkeeper has to do in this scenario is review the transactions and either click OK if Xero has guessed how to allocate the transaction correctly, or edit the transaction allocation if need be. (The bookkeeper also needs to manually double-check the bank balance to check that all transactions came through correctly — for more on this topic, skip to Chapter 10.)
 Can you see just how efficient this process is? Bank feeds and bank rules are a particularly winning combination for micro businesses because together, these features combine to eliminate an enormous amount of data entry. Chapter 21 provides lots of tips about how to create bank rules with a minimum of fuss.
Entering transactions one by one
If you’re working with an older version of accounting software, you may not have the option to connect to bank feeds or set up bank rules. In this scenario, you have to record each transaction yourself.
The mechanics of how to record expenses depends, of course, on what software you’re using but, regardless, for each transaction you always need the following information:
- The date you made the payment
- The name of the person or company you were paying
- The full amount
- The amount of GST, if applicable
- The correct expense account
Figure 7-4 shows a Bank Register window in Xero with the same transactions as Figures 7-2 and 7-3. (Xero does have bank feed features but, for the purposes of this example, I’m assuming that the bookkeeper has chosen to type transactions into Spend Money instead.) You can see that the format of this bank register isn’t wildly different from Figure 7-3 — the same information is included, but in a slightly different layout.
I can’t be too specific about the mechanics of creating a payments journal using accounting software, because the method varies depending on what software you use. However, for some general tips about recording payments using accounting software, read on:
-
Enter transactions using a method that fits the way you think.
I’m sounding pretty vague here, I confess, because the terminology depends on what software you’re using. Generally, you can choose between recording transactions straight into bank registers or recording transactions using individual Spend Money or Record Expense entries.
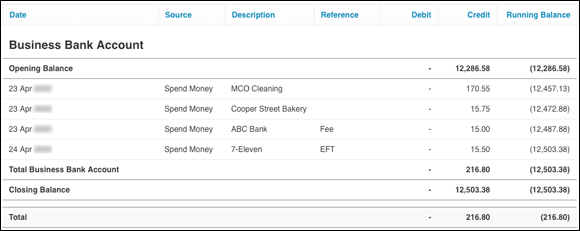
FIGURE 7-4: Entering transactions one by one into the Bank Register window of MYOB.
If you like to be able to see a running list of transactions, so you don’t lose track of where you’re up to, working with the registers works best. If you prefer to add a whole lot of extra detail about each transaction — splitting transactions across multiple lines or adding detailed memos — then recording individual entries works best.
-
Start by selecting the correct bank account.
If you have more than one bank account, make sure you select the correct bank account for each transaction.
-
Be careful with dates, but don’t worry about entering stuff in date order.
Accounting software sorts everything in date order automatically, regardless of what sequence you use to record transactions.
-
Think hard about what tax code you select.
 Tax codes are the secret to success when working with accounting software. Instead of entering the dollar amount of GST, you enter a tax code and the software calculates GST automatically. You can also usually toggle whether you enter amounts including GST, or excluding GST.
 -
If you pay someone regularly, set up a ‘record’ for them.
In this context, a record is a new supplier listing. If you record a name against a transaction and set up this name in the supplier list (or whatever this list is called in your accounting software), you can generate transaction reports based on this supplier name.
-
Think about what other information could be useful from a business management perspective.
A neat thing about accounting software is that you can record a lot of extra information about each transaction, coding transactions according to individual projects, locations, salespeople and much more. Can you record additional info about each transaction that may help your business, or the business that you’re working for, succeed?
Listing expenses on a spreadsheet
When writing about spreadsheets as a bookkeeping tool, I can’t be that specific about what method to use. Because spreadsheets are such a do-it-yourself method, people seem to have different approaches. Some people use spreadsheets that simply list each transaction in date order. Other nerdy folk develop all-singing, all-dancing spreadsheets that generate invoices, calculate total expenses and produce colourful Profit & Loss reports to boot, but which require a master’s degree in programming.
However, in Figure 7-5, I provide a simple example of a spreadsheet, again using the transactions listed in Figure 7-2. My spreadsheet lists transactions in date order, showing the amount including GST in the Amount column, followed by the tax in the GST column, and the net value of the payment in the relevant expense column.
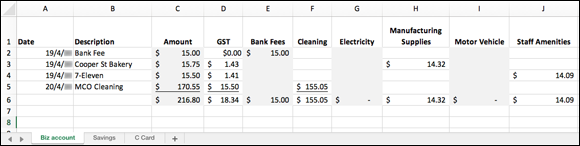
FIGURE 7-5: Entering transactions in a spreadsheet.
You can probably rely on your native cunning to create a spreadsheet like the one in Figure 7-5. (I’m assuming here that you have used a spreadsheet before. If you’ve never used a spreadsheet, I don’t recommend you try doing bookkeeping this way, but instead you cut to the chase and subscribe to accounting software of some kind.) However, here are a few comments to help you along the way:
-
Create a new spreadsheet, name it something sensible and store it in a folder where you can find it.
This is all obvious stuff, but you’re about to invest hours and hours working with this little number, so store the spreadsheet file somewhere you can find it, give it a sensible name and, if anybody else can access your computer, add a password to protect the file.
-
If you need to, create a separate sheet for each bank account.
Take a look at the three tabs along the bottom of Figure 7-5. One is for the business trading account, one’s for the savings account and one’s for the credit card account.
Creating a separate worksheet for each bank account makes reconciling your account (a topic I cover in Chapter 10) much quicker. -
Set up columns similar to Figure 7-5, with separate columns for the total amount, for GST, and for each expense and income category.
I doubt you want to read this For Dummies book with a magnifying glass, so I don’t include many columns in my example. However, you can feel free to add as many expense columns as you like. If you do end up with too many columns, create a column at the end called ‘Other Expenses’. Use this column for miscellaneous expenses that don’t crop up very often.
-
Referring directly to your bank statement, list transactions in date order, starting at the beginning of the month and working forwards.
I enter the supplier name or a comment as the Description, and the full value of the payment as the Amount.
-
Set up formulas to calculate GST.
I explain in Chapter 6 that to calculate GST, you divide the total by 11. Therefore, the formula in the GST column for the Cooper Street Bakery transaction is =C3/11.
If a payment includes no GST, I simply enter $0.00 as the amount in the GST Paid column. Note that in Figure 7-5, no GST is paid on the bank fee.
-
Enter the amount of the payment, excluding GST, in the relevant expense column.
For example, the second transaction on my statement is $15.75 including GST, which equals $14.32 excluding GST. I can either type $14.32 in the Manufacturing Supplies column, or I can use a formula to do the sum automatically. If I use a formula, I enter =C3–D3, which equals the figure in the Amount column less the figure in the GST column.
-
At the end of each month, insert totals at the bottom of each column.
My example only shows a week’s worth of transactions, but in practice you usually insert totals at the end of each month. Click in the cell where you want the total to appear, then go to the Formulas menu and click the AutoSum button. Press the Enter key (Return on a Mac) and the total appears automatically.
-
In the ideal world, check that the total of all expenses plus GST equals the total of the Amount column.
In Figure 7-5, this would mean that I double-check that the total in the Amount column (that’s $216.80) equals the totals for columns D through to J. The two totals match, so I know everything balances.
What if they don’t? Then pause, have a break and then return to your work, double-checking every total. The mistake is there somewhere, just waiting for you to find.
-
Back up or die.
Need I say more? I suggest you subscribe to a service such as Dropbox and save your worksheet both on your local computer and in the cloud.
Note that the example in Figure 7-5 is very simple and lists expenses only. However, in Chapter 8, I explain how you can take things a step further, listing both income and expenses on the same worksheet. This way, I can set up a formula to calculate the running balance of each bank account, which acts as the perfect test that I’ve recorded everything correctly.
Recording Expenses for a Small Business
As a business grows, it tends to purchase more goods and services using supplier credit. A business may receive several invoices from a single supplier through the month, paying these invoices as a combined amount at the end of that period.
When this occurs, the bookkeeping process for a small business differs from that of a micro business in two important ways:
- Instead of the supplier debiting a credit card or the business paying by EFTPOS, the business usually pays the supplier using internet banking.
- The bookkeeper will need some system to keep track of how much is owed to suppliers.
In Chapter 3, I explain how you can do accounts on a cash basis or an accrual basis. When a business starts recording the amounts they owe to suppliers in their accounting system, this is accrual accounting. The idea is that you recognise expenses at the time you receive a bill from a supplier, regardless of when you pay this bill. Later, when you pay this bill, you record the payment as a second transaction.
In Figure 7-6, you get an idea of how the process works. Compare Figure 7-6 against Figure 7-1, and you can see the extra step that’s involved in recording supplier invoices in your accounting system.

FIGURE 7-6: Bookkeeping processes for small business.
Deciding whether to use accrual accounting
Before plunging headlong into the explanation of how to do bookkeeping on an accrual basis, I want to pause for a moment. Do you actually need to record supplier bills as soon as you receive them? Or is it going to work fine simply to record supplier bills when they get paid?
I can’t make this decision for you, but I can explain the upsides and downsides of recording supplier invoices in your accounting system as soon as you receive these invoices (as opposed to only recording these invoices once they have been paid).
Some benefits of recording supplier invoices in your accounting system as soon as you receive them include
-
You can claim GST on bills that you’ve received, but haven’t paid for yet (this only applies if you report for GST on an accrual basis).
- At the click of a button, you can see exactly how much you owe suppliers.
- If you’re purchasing inventory from suppliers, you can use the inventory features within your software to keep track of the quantity and cost price for each item you have in stock.
- You can easily see whether accounts are overdue (and by how much) before things get out of hand.
- You can see what bills you have to pay when and plan your cashflow better.
-
Your monthly Profit & Loss reports are more accurate, because expenses show up in the month to which they belong, rather than showing up in the month that you pay them.
- When you’re ready to pay suppliers, processing payments is quick, easy and efficient.
The downsides of working in this way include
- Every supplier invoice involves two entries instead of one. That’s because you first record the supplier bill as a purchase, and then later you record the supplier payment, instead of recording the bill and payment as one transaction in your cash payments journal.
- Accrual accounting can be tricky to get your head around, especially if you’re new to bookkeeping.
If you use your accounting software to keep tabs on inventory costs and inventory levels, you need to enter supplier bills as soon as you receive stock. You may even want to enter supplier bills before you receive stock, in the form of purchase orders that you can then fax or email to the supplier.
In this situation, using accrual accounting is a no-brainer, because you need to enter supplier bills as soon as you receive them so that your stock levels and costs are accurate and up to date. (For more about working with inventory, skip ahead to Chapter 12.)
Refining the process
How does all this accrual versus cash rave (refer to preceding section) translate into reality? I can’t cover every software solution in this book, but here are a few examples that may clarify what I’m talking about:
- If you use MYOB, cash accounting means you record all payments in Spend Money only, but accrual accounting means you record all supplier bills first in Enter Purchases, and then later you record the payments using Pay Bills.
- If you use QuickBooks Online, cash accounting means you record all payments as an Expense or from the Banking dashboard, but accrual accounting means you record all supplier bills first in Bills, and then later you record the payments using Pay Bills.
- If you use Xero, cash accounting means you record all payments via Spend Money or the Reconcile window. Accrual accounting means you record all supplier bills first as a Bill, and then later you record the payments using the Make a Payment window in Purchases. (If one of your suppliers also uses Xero, you can configure things so that the moment your supplier sends you an invoice, this invoice appears as a draft bill in Xero.)
Keeping tabs on who you owe
If you’re using your accounting software to record supplier invoices and payments, you can generate a report at any time that shows this information. Figure 7-7 shows a typical Aged Payables report from Xero.
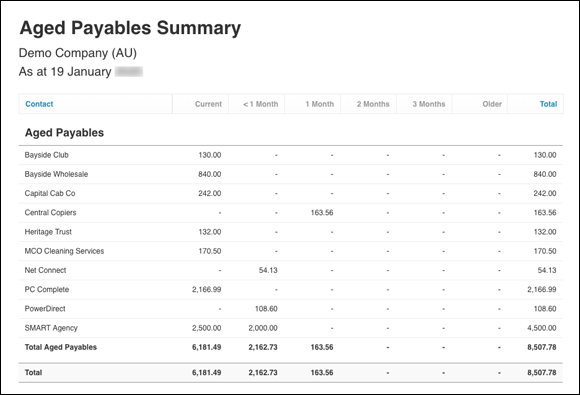
FIGURE 7-7: Seeing how much you owe.
As a conscientious bookkeeper, you want to put this Aged Payables report through its paces and make sure it provides accurate and timely information:
-
Compare your Aged Payables report against supplier statements every time you receive a supplier statement. This double-checking (and fixing, when things go awry!) is what sets a good bookkeeper apart from a not-so-good bookkeeper.
- If you receive a lot of bills from suppliers with weekly or fortnightly payment terms, see whether you can modify the report to specify either 7 or 14 days as the ageing period.
- Be clear about whether your accounting software displays bills according to when they’re due, or by their transaction date. For example, if you receive a bill from a supplier on 1 October and this supplier offers 60-day terms, does this bill show up in the current column until 1 December, or does it move to 30 days as soon as 1 November rolls around?
If your Aged Payables report says you owe a certain supplier some money and you’re positive that you’ve paid the account, you almost certainly recorded this payment as an expense rather than a bill payment in your suppliers’ ledger.
You can fix this situation by either deleting or reversing the outstanding supplier bill. My only proviso against deleting bills is when a bill belongs to a previous financial year, or if the bill belongs to a previous GST period and you report for GST on an accrual basis. In either of these situations, the best approach is not to delete the bill, but to record a credit instead, matching this credit against the offending bill.
Dealing with EFTPOS and credit card transactions
With a small business, you’ll probably find that the business still pays for lots of expenses by EFTPOS or using a credit card. In this instance, you’re best to simply work from the bank feeds to record these transactions.
Bookkeeping for a Larger Business
Bookkeeping becomes more complex as a business grows. Not only do larger businesses tend to purchase most goods and services using supplier credit, but they also tend to issue purchase orders for these transactions. In addition, larger businesses always have employees.
In short, the bookkeeping process of a larger business differs from that of micro or small businesses in several ways:
- The business usually uses the accounting software not just to record bills owing, but also to generate purchase orders.
- The bookkeeper pays most suppliers and employees using a batch file generated by the accounting software and imported into internet banking.
- The bookkeeper relies on the accounting software to record employee timesheets and generate pay transactions.
In Figure 7-8, you get an idea of how the process works. Compare Figure 7-8 against Figure 7-6, and you can see how much more complex the bookkeeping process becomes.
Managing supplier orders and invoices
As I just mentioned, managing supplier orders and invoices becomes one of the more complex and time-consuming parts of a bookkeeper’s role when working for a larger business, and one that bank feeds, bank rules or document exchange between cloud-accounting solutions can’t do much to automate. (Standardised e-invoicing using encrypted digital files does make the exchange of invoices between businesses much more efficient, and is on the horizon to become the new norm for Australian business. However, it will be some time until invoicing in this way is compulsory.)

FIGURE 7-8: The bookkeeping process becomes more complex as a business grows.
Typically, a larger business uses accounting software to generate supplier purchase orders and email these to suppliers. Usually, creating these orders isn’t the bookkeeper’s job, but the job of whoever is placing the order. Later, when the goods arrive, the person responsible for receiving goods approves the order and records the receipt. Lastly, when the supplier invoice arrives, either a manager or the bookkeeper reviews the invoice, notes any price variations, and converts the order into a bill. Only at this point is the bill ready for the bookkeeper to process for payment.
Making supplier payments
For larger businesses, the most efficient way for a bookkeeper to process supplier payments is this:
- Ensure supplier invoices match against purchase orders and get management authorisation/signatures for all invoices. Ideally, you will receive this bill as an eInvoice, automatically appearing in your accounting software without you needing to key any data in.
- Using accounting software, review how much is owed to suppliers, matching these totals against supplier invoices and payments.
- Record payments for suppliers in the accounting software, and use the software to email remittance advices.
- Use accounting software to generate a batch file summarising all the payments for each day (for both suppliers and employees).
- Import the batch file into internet banking.
- Provide documentation for all payments to business owner/finance manager so that they can log onto internet banking and authorise the payment batch.
- File documentation appropriately.
Take the time to set up payment terms for each supplier. That way, your accounting software can prompt you when bills fall due. Also, consider setting up payments to utility companies, such telecommunications and electricity providers, so that the bank account is debited automatically when the bill falls due (let them do the work, rather than you.)
Dealing with EFTPOS and credit card transactions
With a larger business, you’ll probably find that relatively few transactions are made using EFTPOS or credit card. For this reason, bank feeds don’t help with the task of data entry because most purchases are entered in the accounting software before they are paid. (However, bank feeds can potentially make reconciling bank accounts a tad quicker.)
You’ll find that working directly from bank feeds is the easiest way to record any expenses paid for by EFTPOS or credit card. However, as a bookkeeper, you still need to be careful that you have the appropriate invoices for all transactions made on corporate credit cards, and that management have authorised these expenses.
Allocating Transactions
In the following sections, I provide a few tips on how to correctly allocate expenses, and to ensure you get things right, every time.
Selecting allocation accounts
Whatever method you use to do your books, the real skill of bookkeeping (aside from accuracy) is knowing what account to select when you allocate expenses.
In Chapter 2, I talk about setting up your chart of accounts and customising this chart to suit your business. I can’t provide you hard-and-fast rules about what expense accounts to use when allocating transactions because every business is unique, but in Table 7-1 I point out the hairy bits that trap many a novice bookkeeper.
Note: In Table 7-1, you can assume that the suggested account is an expense account unless I specify otherwise.
TABLE 7-1 Matchmaking Payments and Accounts
Type of Expense or Payment |
Comments |
Use This Account |
Bank charges |
Regular bank charges go to Bank Fees, and bank charges for merchant facilities (credit cards) go to Merchant Fees. Interest goes to Interest Expense. |
Bank Fees Merchant Fees Interest Expense |
Coffee, biscuits, tea, toilet rolls |
The essentials for happy employees go into an account called Staff Amenities. |
Staff Amenities |
Government charges |
Company tax return lodgements go to Filing Fees, licence renewals go to Licence Fees and stamp duty on insurance goes to Insurance Expense. |
Filing Fees Licence Fees Insurance Expense |
Hire purchase/leases |
A hire purchase is a different beastie from a lease. Ask your accountant if you’re not sure what you have. |
Hire Purchase (liability) Lease Expense |
Miscellaneous expenses |
Avoid accounts such as Sundry Expense or Miscellaneous Expense. Instead, create a new account or use an existing account that is a close match. |
Office Supplies Repairs & Maintenance Staff Amenities |
Motor vehicle expenses |
If you have more than one vehicle and these vehicles are used for both personal and business, create either separate accounts or job codes for each motor vehicle. |
Motor Vehicle Fuel Motor Vehicle Insurance Motor Vehicle Repairs |
New equipment |
If new equipment goes over a certain dollar value (see Chapter 12 for details), allocate this purchase to an asset account, not an expense. |
Furniture & Fittings (asset) Plant & Equipment (asset) Asset Pool (asset) |
Office repairs |
If a repair is minor, allocate it to Repairs & Maintenance. If a repair counts as an improvement (a new veranda or skylight, for example) it is probably an asset. Ask your accountant if you’re not sure. |
Repairs & Maintenance Leasehold Improvements (asset) Building Improvements (asset) |
Personal spending (sole trader or partnership) |
Always be careful to separate personal spending from business spending. |
Personal Drawings (equity account) |
Personal spending (director or shareholder of a company) |
A company director or shareholder can only use company funds for personal purposes if they take these funds in the form of wages or directors’ fees, or as a debit against a Directors’ or Shareholders’ Loan account. |
Directors’/Shareholders’ Loan (liability account) Directors’ Fees Wages Expense |
Stock purchases |
If you track inventory costs and stock levels, allocate new purchases to an account called Inventory. Otherwise, allocate stock purchases to a Purchases account. |
Inventory Purchases (cost of sales account) |
Subcontractors |
Never muddle subbies and employees. Keep subbie payments entirely separate from wages. |
Subcontractor Expense |
Superannuation |
If you use payroll software, allocate super payments to Superannuation Payable. Otherwise allocate to Superannuation Expense. |
Superannuation Payable (liability) Superannuation Expense |
Taxes |
Every bookkeeper’s nightmare! Be careful where you allocate tax payments and remember that the only tax payments that ever get coded as an expense are Fringe Benefits Tax and, in some situations, Land Tax. |
Company Tax (liability) Fringe Benefits Tax (expense) GST Collected/Paid (liability) PAYG Payable (liability) Personal Drawings Tax (equity) |
Tools |
If new tools are over a certain dollar value (see Chapter 12 for details), allocate this purchase to an asset account, not an expense. |
Plant & Equipment (asset) Replacement Tools (expense) |
Travel |
Keep local travel separate from overseas travel (and remember that overseas travel doesn’t have any GST on it). |
Travel Expense Domestic Travel Expense Overseas |
Wages |
Remember that your wages account should report on gross wages, not net wages. (See Chapter 9 for details.) |
Wages Expense |
Getting things right: five top tips
Here are my five tried-and-true tips for allocating transactions correctly, every time:
- Set up rules. Setting up rules will help you to allocate transactions automatically (so long as your software has this feature, of course). For example, set up a rule so that payments to Telstra automatically get allocated to ‘Telephone Expense’.
- Record default expense accounts for suppliers. If your accounting software doesn’t let you set up rules, record default expense accounts for each supplier instead (if you can, that is!).
- Work out where to allocate tricky transactions. If you’re not sure what account to allocate a transaction to, allocate the transaction to an expense account called ‘Suspense’ (create an account by this name if you don’t have one already). At the end of each month or quarter, ask your accountant for advice on how to allocate these transactions. This method is much better than random guesswork, and every time you follow this process you’re more likely to know what to do next time.
- Separate personal transactions from business transactions with a new bank account. If you’re doing the books for someone who has a jumble of personal and business transactions, suggest to the owner that they open a new bank account so that they can separate personal transactions from business transactions. You’ll find allocating transactions correctly much easier if you’re not wasting time differentiating legitimate business expenses from takeaways, gifts to random lovers, groceries and dog food.
- Use numbers, not just names. If your software allows you to do so, include numbers for each account, not just names, and use account numbers to differentiate between assets, liabilities, income and expenses. This way you’re much less likely to inadvertently allocate a transaction to the wrong kind of account.
Nitpicking over Petty Cash and Out-of-Pocket Expenses
You can find as many different ways to deal with petty cash as there are to make bolognaise sauce. But a few things never change:
- Chocolate bars, roses for the beautiful girl at the train station and vet bills are not legitimate petty cash receipts.
-
When someone takes petty cash from the tin and promises to come back with a receipt, they probably won’t.
- When someone sticks an IOU in the petty cash tin, it means that they’d love to pay you back, but they’re just not sure whether it will be this century or the next.
- No matter how finicky you are, petty cash will never, ever balance.
In the next couple of sections, I talk about two ways to deal with petty cash. The first method is best for businesses with a few employees and a petty cash tin. The second method is best for owner-operators paying expenses out of their own pocket, such as payments made using cash or a personal EFTPOS card. Take a look and see which suits you best.
Storing cash under lock and key
If a business has employees who sometimes pay for business expenses by cash, you need to set up a decent petty cash system. Here’s the whole deal, from start to finish:
-
Buy a petty cash box.
It’s time to liberate your cash from the biscuit tin. Instead, buy a real petty cash box with a lock and key.
-
Appoint a gatekeeper.
Put someone in charge of petty cash and make sure no-one else knows where the key is kept. If you’re the owner of the business, this may feel a bit weird but, hey, you’re not allowed to raid the petty cash tin for Indian takeaways and meat pies any more. Those days are gone.
-
Start a float between $100 and $200.
Make a cash withdrawal from the business bank account for a round amount (about $100) and put this cash in the tin. When you record this withdrawal, allocate it to an asset account called Petty Cash. If you don’t already have an asset account by this name in your chart of accounts, create one now.
-
Every time anyone takes money out of the tin, get a receipt.
This is the part that requires a huge leap in psychology. Every time someone takes money from petty cash, they have to come back with a receipt. This is pretty radical. It works well if the gatekeeper hassles everyone mercilessly: No receipt, no cash next time!
 By the way, if someone doesn’t have a receipt, you can’t cover things up by just writing out a petty cash voucher for the missing amount. A petty cash voucher, even if you describe what the item was for, isn’t a valid receipt in the eyes of an auditor who’s baying for blood.
 -
When petty cash is low, sort out the receipts.
When petty cash funds dwindle, tip all the receipts out and sort them into piles. Write a breakdown of the receipts on the back of an envelope (for example, $35 for petrol, $25.50 for postage, $11 for coffee, $6 for toilet rolls, $17 for stationery and so on), and stuff the receipts into the envelope. Of course, if you want to list these entries using a simple spreadsheet, that’s fine too.
-
Make a cash withdrawal to top petty cash up to the original value of the float.
Here’s the brain-drain: If you’re left with $4.50 in the tin and the original float was $100, make a cash withdrawal for $95.50. Or, if you’re left with $4.50 and the original float was $200, make a cash withdrawal for $195.50.Alternatively, if you don’t want to venture into a bank branch and muck around with over-the-counter transactions, round up your cash withdrawal to the nearest $20 and withdraw this amount from an ATM.
-
Record the cash withdrawal in your payments journal, splitting it across a number of different allocation accounts.
In Figure 7-9, I select my business account as the bank account, and select individual expense accounts as the allocation accounts. In my example, I only have expenses for $195.50 but I’ve withdrawn $200, so I allocate the extra amount ($4.50) to my Petty Cash account.
An alternative method is to select your Petty Cash account as the bank account and individual expense accounts as the allocation accounts, and then record a second transaction that has your business account as the bank account and the Petty Cash account as the allocation account. Either method works fine.
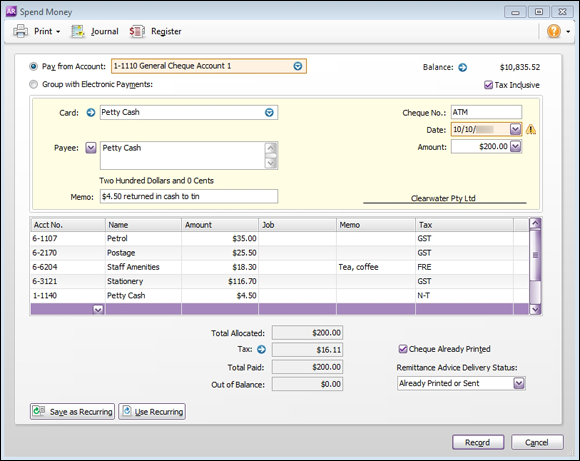
FIGURE 7-9: Recording expenditure from the petty cash tin.
Robbing Peter to pay Paul
Many small businesses are too small to do the whole deal with petty cash tins. Instead, owner-operators tend to pay for small business expenses using cash from their own pocket, or possibly using a personal bank account rather than their business account, ending up with a wallet stuffed full of dog-eared receipts. Here’s my sure-fire method for recording these expenses:
-
Every month or so, go on a mad Mintie hunt for receipts.
If you’re the business owner reading this book, dig through your pockets, tip out your wallet, look under the seats of your car. If you’re a bookkeeper, hassle your employer/client to find every receipt they can lay their hands on.
-
Clear a patch on your desk and sort the receipts into categories.
One pile for stationery, one pile for computer supplies, one pile for postage and so on.
At this point you only want receipts for things paid for by cash or from the owner’s personal bank account (assuming that the owner has a separate account for business and for personal). Put receipts for things paid for by EFTPOS, cheque or credit card to one side. These receipts aren’t part of petty cash, so ignore these for the time being.
-
Use a calculator to add up the total value of each pile, writing these totals down on the front of an empty envelope.
You end up with an envelope that reads something like:
- Total stationery receipts = $15.00
- Total fuel receipts = $25.00
- Total postage receipts = $45.50
Of course, if you want to type these entries into a simple spreadsheet, that’s fine too.
-
Add up the total value of all petty cash receipts and write this total on the front of the envelope.
Alternatively, print your spreadsheet summary and staple it to the front of the envelope.
- Stuff the receipts into the envelope and close it up.
-
Record a journal entry that debits each expense and credits Owner’s Drawings.
I talk more about general journal entries in Chapter 13, but you can see a typical general journal in Figure 7-10. In this journal, I debit three expense accounts (Petrol, Postage and Stationery) and credit the Owner’s Drawings account.
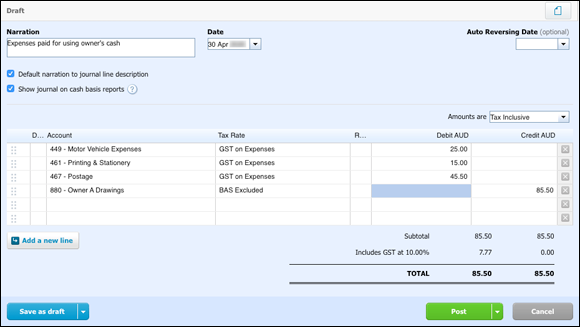
FIGURE 7-10: Recording a journal entry for petty cash expenses paid using owner’s cash.
The method I explain here, recording a journal entry that debits expenses and credits drawings, is only appropriate for sole traders or partnerships. If you’re doing the books for a company, you deal with personal spending made by directors slightly differently. In this scenario, you can either transfer funds into the director’s personal account to reimburse them for out-of-pocket expenses, or you can do a journal entry that debits the relevant expenses and credits a Directors’ Loan liability account.
Keeping tabs of expenses on the run
Many small business operators tend to lose track of receipts and end up missing out on valuable tax deductions. I know that I do this myself. Although I rarely pay for things with cash anymore, I’ll sometimes end up buying a couple of business items while I’m doing something like grocery shopping, and pay for the whole lot using my personal account.
One benefit of cloud accounting is that you can log expenses while you’re out and about. My husband used to be a terror at keeping track of cash receipts, but he’s turned over a new leaf since signing up to Xero a couple of years ago. He loaded the Xero app on his iPhone, which enables him to log expense claims from wherever he is. Later, when he logs onto Xero from his office computer, his expense claims are already entered. John finds it much easier this way, and now rarely misses out on these little tax deductions.