
Chapter 4: Layout and File Handling
In the previous chapter, we learned how the main drawing aspects of the Fyne toolkit are organized and how an application can work directly with CanvasObject items on a window canvas. This was sufficient information to set up a small game, but once applications add the presentation of lots of information or require user input and workflows, they typically require more complex user interface designs. In this chapter, we look at how an application user interface is structured, covering the following:
- Arranging a Container item using built-in layout algorithms
- Creating custom layout algorithms
- Handling files in a way that works across all platforms, desktop, and mobile
With this knowledge, we will build an application for browsing photographs. Let's get started!
Technical requirements
This chapter has the same requirements as Chapter 3, Windows, Canvas, and Drawing, which is to have the Fyne toolkit installed. For more information, please refer to the previous chapter.
The full source code for this chapter can be found at https://github.com/PacktPublishing/Building-Cross-Platform-GUI-Applications-with-Fyne/tree/master/Chapter04.
Laying out containers
As we saw in the previous chapter, a Fyne canvas is made up of CanvasObject, Container, and Widget items (although Container and Widget items are both CanvasObject items as well!). To be able to display multiple elements, we must use the Container type, which groups a number of CanvasObject items (which can also be Widget items or additional Container items). To manage the size and position of each item inside a container, we use an implementation of Layout, which is passed to the container at creation using the container.New(layout, items) constructor function.
There are many ways that an application may want to lay out its components and in this section we will explore the different ways that can be achieved. Layouts are not always required, however, and so first we will look at when you might not need to use a layout and how to handle size and placement manually instead.
Manual layout
Before we explore layout algorithms, it is possible to manage a container without the use of a layout—this is called manual layout and is done using container.NewWithoutLayout(items).
When using a container without a layout, the developer must position and size all elements within the container manually, using the Move() and Resize() methods. In this mode, the developer is responsible for adapting the positions and sizes to the current size of the container.
Let's take a look at the following code:
square := canvas.NewRectangle(color.Black)
circle := canvas.NewCircle(color.Transparent)
circle.StrokeColor = &color.Gray{128}
circle.StrokeWidth = 5
box := container.NewWithoutLayout()(square, circle)
square.Move(fyne.NewPos(10, 10))
square.Resize(fyne.NewSize(90, 90))
circle.Move(fyne.NewPos(70, 70))
circle.Resize(fyne.NewSize(120, 120))
box.Resize(fyne.NewSize(200, 200))
The code we just saw sets up a Rectangle item and a Circle item inside a container, resizes them to be around half their size, and then positions them to have a small amount of overlap. You can see from the following figure that the elements are drawn in the order that they are passed to the container:
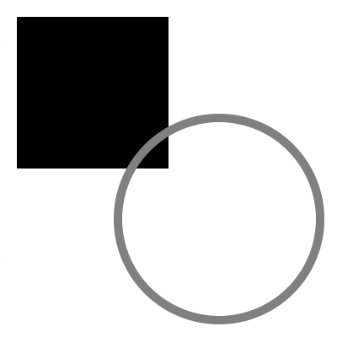
Figure 4.1 – Manual layout in a container
Once set, these sizes and positions will not change unless we add more code to modify their positions.
Important note
Note that there is no resized event published, so if you want to automatically adjust when the container is resized, you should consider building a custom layout, described under Providing a custom layout later in this chapter.
Using a layout manager
In essence, a layout manager is the same as the manual move and resize code we just saw, with the difference that it operates on a list of CanvasObject items (those that are the children of Container). A layout manager has two responsibilities:
- To control the size and position of each element
- To determine the minimum size that the container should accept
When a Container item is resized, the layout that it is using will be asked to reposition all the child components. A layout algorithm may choose to scale elements according to the new size or to reposition the elements. Alternatively, it may decide to flow elements or adapt the layout according to whether the available space is taller or wider. In this way, setting a layout on a container can provide a responsive user interface based on screen size or even device orientation.
When we lay out interface components, it is common to wish to separate elements by inserting some clear space. This is called padding and in Fyne, you can find the standard padding size using the theme.Padding()function. You can find more about the theme package in Chapter 5, Widget Library and Themes. The standard layouts listed in the next section all include the standard padding between elements. Note that typically, a container layout will not use padding on the outside edge as that will be provided by the parent container, or the window canvas for top-level containers.
Containers using a layout can be created using the container.New function:
container.New(layout, items)
When using a container with a layout, it is not usually required to call Resize as we did before because it will be initially sized to at least the minimum size.
Hidden objects
One additional consideration when selecting a layout, or writing layout code yourself, is that objects may not always be visible. A CanvasObject item may be hidden for two reasons:
- A developer called Hide() on that object.
- It is inside a Container item that has similarly had Hide() invoked.
Typically, a layout algorithm will skip hidden elements when calculating the minimum size or laying out elements. Each of the standard layouts we will see next will skip hidden elements rather than leaving empty space where those items would otherwise have appeared.
We have seen how layouts work in arranging the components of an application. To make building complex user interfaces as simple as possible, there are standard layouts available that cover most common user interface arrangements.
Standard layouts
As there are many standard layout algorithms, the Fyne toolkit includes a collection of standard implementations in the layout package. By importing this package, you can apply these layouts to any Container in your application:
import "fyne.io/fyne/v2/layout"
Each of the layouts is examined in detail in this section. Although a container can only have a single layout, there is no limit to the number of containers you can have nested inside each other, and so we look at combining different layouts at the end of this section.
MaxLayout
MaxLayout (or maximum layout) is the simplest of all the built-in layout algorithms. Its purpose is to ensure that all child elements of a container take up the full space of that container:

Figure 4.2 – MaxLayout in a container
This is most commonly used to align one element over another, such as a text item over a background color rectangle. When using this layout, it is important to list the container elements in the correct order; each will be drawn over the other, and so the last item in the list will be drawn on top:
myContainer := container.New(layout.NewMaxLayout(), …)
CenterLayout
CenterLayout can be helpful when an item of a specified minimum size should be centered within the available space, both horizontally and vertically:

Figure 4.3 – CenterLayout adding space around items
As with MaxLayout, each element within the container will be drawn on top of the previous one, but the size will be set as the minimum for each of the elements instead of filling the available space:
myContainer := container.New(layout.NewCenterLayout(), …)
PaddedLayout
PaddedLayout helps when you wish to inset content by the theme-defined padding value. The content element will be centered in the container by the standard padding on all sides, as shown in the following figure:

Figure 4.4 – PaddedLayout adding a small space around items
As with MaxLayout, each element within the container will be drawn on top of the previous one, all with the same size, but in this case slightly smaller than the container:
myContainer := container.New(layout.NewPaddedLayout(), …)
BoxLayout
The box layout has two varieties, HBoxLayout (horizontal—for arranging items in a row) and VBoxLayout (vertical—for arranging items in a list). Each of the box layouts follows a similar algorithm: it creates a linear flow of elements where they are packed (horizontally or vertically) while maintaining a consistent height or width.
Items listed in a horizontal box will have the width set to each item's minimum, but will share the same height, which is the maximum of all the elements' minimum height:

Figure 4.5 – HBoxLayout aligning three elements in a row
Items in a vertical box all have the same width (the largest of all the minimum widths), while shrinking to each element's minimum height:

Figure 4.6 – VBoxLayout stacking elements in a column
This approach allows items of differing sizes to appear uniform without wasting any space in the container. The syntax for each of these is as follows:
myContainer := container.New(layout.NewHBoxLayout(), …)
myContainer := container.New(layout.NewVBoxLayout(), …)
FormLayout
FormLayout is used by the form widget, but it can be useful on its own when you wish to label items in a container. There should be an even number of elements added; the first of each pair will be on the left, being as narrow as the component allows. The remaining horizontal space will be taken up by the second of each pair:

Figure 4.7 – FormLayout pairing items for labeling
Here's an example of using FormLayout (assuming an even number of parameters to be added):
myContainer := container.New(layout.NewFormLayout(), …)
GridLayout
The basic GridLayout is designed to divide a container into as many equal spaces as the number of child elements in the container.
For a container with two columns and three child items, a second row will be created but not completely filled:

Figure 4.8 – Three elements in a two-column GridLayout
When creating a grid layout, the developer will specify the number of columns or rows to use, and the items will be arranged accordingly. At the end of each row or column, the layout will wrap and create a new one. The number of rows (or columns) will depend upon the number of elements. For example, let's take the following illustration:
myContainer := container.New(layout.NewGridLayoutWithColumns(2), …)
myContainer := container.New(layout.NewGridLayoutWithRows(2), …)
The grid layout has an additional mode that can help to adapt to different output devices. It is common on mobile devices to show items in a single column when held in portrait or a single row in landscape orientation. To enable this, use NewAdaptiveGridLayout; the parameter to this constructor represents the number of rows you wish to have in vertical arrangement or columns when horizontal. This layout will rearrange its Container when a mobile device is rotated, as seen here:
myContainer := container.New(layout.NewAdaptiveGridLayout(3), …)
GridWrapLayout
Another variant of using a grid is when you would like elements to automatically flow to new rows as a container is resized (for example, a file manager or list of image thumbnails). For this scenario, Fyne provides a grid wrap layout. In a wrapped grid in which every child element will be resized to the specified size, they will then be arranged in a row until the next item does not fit, at which point a new row will be created for further elements.
For example, here is a grid wrap container that is wider than three items of the specified size:

Figure 4.9 – Fixed elements in GridWrapLayout
GridWrapLayout and MinSize
It is important to note that this layout, unlike all the others, will not check each item's MinSize. The developer should thus be careful to ensure that it is large enough, or that elements included will truncate their elements (such as text) to avoid overflow.
Here is an example using a grid wrap layout:
myContainer := container.New(layout.NewGridWrapLayout(fyne. NewSize(120, 120), …)
BorderLayout
The most commonly used layout in arranging an application is probably BorderLayout. This layout algorithm will arrange specified elements at the top, bottom, left, and right edges of a container. The top and bottom items will be resized to their minimum height but stretched horizontally, and items on the left and right will be squashed to their minimum width and expanded vertically. Any elements in the container that are not specified as belonging to one of the edges will be sized to fill the available space inside the borders. This is commonly used to position toolbars at the top, footers at the bottom, and file lists on the left. Any edges you wish to leave blank should have nil instead:

Figure 4.10 – BorderLayout with top and left areas set
BorderLayout parameters
Note that for BorderLayout, some elements must be specified twice—the layout parameters specify where an element should be positioned, but the list of items to the container control what will be visible. If you find an item not appearing, be sure that it is specified in both places.
The following code shows how to set up a border container with header at the top and files positioned to the left of content:
myContainer := container.New(layout.NewBorderLayout(header, nil, files, nil), header, files, content)
Combining layouts
To build more complicated application structures, it will be necessary to use multiple layouts within your user interface. As each container has a single layout, we achieve this by nesting different containers. This can be done as many times as required. For example, take a look at the following figure:

Figure 4.11 – Multiple containers with different layouts
For the previous illustration, we have used a container with VBoxLayout for the left panel, HBoxLayout for the top, and GridWrapLayout for the central container, all inside BorderLayout, as follows:
top := container.New(layout.NewHBoxLayout(), ...)
left := container.New(layout.NewVBoxLayout(), ...)
content := container.New(layout.NewGridWrapLayout(fyne. NewSize(40, 40)), ...)
combined := container.New(layout.NewBorderLayout(top, nil, left, nil), top, left, content)
Using the container package
All of the preceding examples use a built-in Layout type to configure the contents of fyne.Container. To help manage more complex layout configurations (we will see more in Chapter 5, Widget Library and Themes), there are many helpful constructor functions in the container package. For example, instead of container.New(layout.NewBorderLayout(…)…) we could use container.NewBorder(...), which can lead to clearer code.
Providing a custom layout
If the standard layouts, or a combination of them, do not accommodate the needs of your user interface, it is possible to build a custom layout and pass that into a container instead.
Any type that implements the fyne.Layout interface can be used as a Container layout. This interface has just two methods that need to be implemented, as shown here:
// Layout defines how CanvasObjects may be laid out in a // specified Size.
type Layout interface {
// Layout will manipulate the listed CanvasObjects Size // and Position to fit within the specified size.
Layout([]CanvasObject, Size)
// MinSize calculates the smallest size that will fit the // listed
// CanvasObjects using this Layout algorithm.
MinSize(objects []CanvasObject) Size
}
As you can see, this interface codifies the earlier description that a layout manager will need to determine the minimum size of a container as well as handling the positioning of each element in a container. As the contents of a container can change from time to time, it is possible that the slice of CanvasObject elements passed to Layout or MinSize may change. Hence, a custom layout should avoid caching references to individual elements. In certain situations (such as BorderLayout, which we saw earlier), the layout may explicitly hold an object reference. If your layout works in this way, it is important to remember that the item may not exist within the slice of objects to lay out.
Most layouts should also skip hidden elements when calculating the minimum size or layout. There are some exceptions, however, particularly if elements are likely to be shown and hidden regularly. For example, a tab-based layout that shows only one content element at a time could cause windows to expand if hidden elements are larger than the ones that are currently visible. In this situation, it will be good for the user if layouts consider hidden elements in the MinSize code, even if they are not positioned in Layout.
We shall create a short example of writing a custom layout:
- This type, named diagonal, will position items of a container in a diagonal line from the top left down to the bottom right. We first implement MinSize() to return the sum of all visible objects (so that there is space to display them all in a diagonal line):
type diagonal struct{}
func (d *diagonal) MinSize(items []fyne.CanvasObject) fyne.Size {
total := fyne.NewSize(0, 0)
for _, obj := range items {
if !obj.Visible() {
continue
}
total = total.Add(obj.MinSize())
}
return total
}
- We then add the Layout() method, which is responsible for actually positioning each object. In this version, we simply declare a topLeft variable and position each visible object, adding to the value each time we have positioned and sized an element:
func (d *diagonal) Layout(items []fyne.CanvasObject, size fyne.Size) {
topLeft := fyne.NewPos(0, 0)
for _, obj := range items {
if !obj.Visible() {
continue
}
size := obj.MinSize()
obj.Move(topLeft)
obj.Resize(size)
topLeft = topLeft.Add(fyne.NewPos(size.Width,
size.Height))
}
}
- To apply this layout to a container, you would simply use the following:
item1 := canvas.NewRectangle(color.Black)
item1.SetMinSize(fyne.NewSize(35, 35))
item2 := canvas.NewRectangle(&color.Gray{128})
item2.SetMinSize(fyne.NewSize(35, 35))
item3 := canvas.NewRectangle(color.Black)
item3.SetMinSize(fyne.NewSize(35, 35))
myContainer := container.New(&diagonal{}, item1, item2, item3)
Here's what we get:

Figure 4.12 – Simple diagonal layout
The example we saw sets up a static layout. The minimum size set for each item sets up the minimum size for Container, which no longer expands. An improved version of this layout would calculate the amount of extra space (the difference between the container's MinSize() and the size argument passed into the Layout() function). An updated version of the Layout() function looks like this:
func (d *diagonal) Layout(items []fyne.CanvasObject, size fyne.Size) {
topLeft := fyne.NewPos(0, 0)
visibleCount := 0
for _, obj := range items {
if !obj.Visible() {
continue
}
visibleCount++
}
min := d.MinSize(items)
extraX := (size.Width - min.Width)/visibleCount
extraY := (size.Height - min.Height)/visibleCount
for _, obj := range items {
if !obj.Visible() {
continue
}
size := obj.MinSize()
size = size.Add(fyne.NewSize(extraX, extraY))
obj.Move(topLeft)
obj.Resize(size)
topLeft = topLeft.Add(fyne.NewPos(size.Width,
size.Height))
}
}
Here's what we get after running the code:

Figure 4.13 – Diagonal layout expanding to fill space
With this more advanced code, we no longer need to control the container with a minimum size for all items (though items would normally have a minimum size). In fact, we could just resize the container (or the app window) instead, as follows:
item1 := canvas.NewRectangle(color.Black)
item2 := canvas.NewRectangle(&color.Gray{128})
item3 := canvas.NewRectangle(color.Black)
myContainer := canvas.New(&diagonal{}, item1, item2, item3)
myContainer.Resize(fyne.NewSize(120, 120))
Now that we have explored the basics of how to lay out an application, we can start to look at bringing this together in a real application. The example that we will explore is an image browsing app that will lay out images and their metadata. However, before we can do this, we need to learn about file handling in a cross-platform context. If app developers assume users will have a filesystem or structure that matches their development system, it may not work on other devices, so understanding how to do this well is essential for ensuring that apps work well across all devices.
Cross-platform file handling
The Go standard library has excellent support for file handling across its supported platforms. The os package allows access to the filesystem (files and directories) and utility packages such as filepath that help to parse and manage locations using the current operating system's semantics. While these operations are likely useful on most devices, they do not extend as well to non-desktop devices where a traditional filesystem is not what the end user is presented with.
Consider mobile devices, for example. Both iOS and Android have a traditional filesystem internally, but the filesystem is not completely available to the device user, nor is it the only source of file data. An application will typically only have access to its own sandbox directory—reading and writing files outside of this space is not permitted—and on iOS, you may even need to request special permissions before accessing it. In addition to that, users now expect to be able to open data from other sources. For example, a file-sharing application such as Dropbox could provide a source of files that a user may wish to pass into your application, but this data is not accessible using standard file handling.
For these reasons, the Fyne toolkit includes a simple storage abstraction that allows your application to handle data from any source, while managing permissions and security considerations for you. This interaction uses the concept of a URI to replace traditional file paths, allowing apps to operate without direct access to files and directories.
URI
At the core of the file handling abstraction is fyne.URI (here URI stands for Uniform Resource Identifier). A URI will be familiar to most computer users as it looks exactly like a web URL, with the small difference that it does not always start with http:// or https://. A URI may represent a filesystem object (where it would start with file://), a data stream from another app (where it may begin content://), or a remote resource (such as sftp:// for a Secure File Transfer Protocol connection).
Like the os.File type, fyne.URI is a reference to a resource, though it does not keep that resource open, so it may be passed around your application without issues. The underlying string representation of this URI can be accessed using the String() method. Use this if you wish to store the URI reference for later use, for example, in a configuration file or database. If you have a URI string representation, the original URI object can be accessed using utilities in the storage package, as follows:
uriString := "file:///home/user/file.txt”
myUri, err := storage.ParseURI(uriString)
Reading and writing
Accessing files when you are not certain where they are stored is a little more complicated than the traditional os.Open(); however, the Fyne storage package provides functionality to handle this. The two main functions for data access are OpenFileFromURI and SaveFileToURI, as shown in this excerpt from the package:
// OpenFileFromURI loads a file read stream from a resource // identifier.
func OpenFileFromURI(uri fyne.URI) (fyne.URIReadCloser, error) {
return fyne.CurrentApp().Driver().FileReaderForURI(uri)
}
// SaveFileToURI loads a file write stream to a resource // identifier.
func SaveFileToURI(uri fyne.URI) (fyne.URIWriteCloser, error) {
return fyne.CurrentApp().Driver().FileWriterForURI(uri)
}
Each of these functions take a URI (as described in the preceding code) for the location and returns URIReadCloser or URIWriteCloser on success and error if the operation failed.
As suggested by their names, these return types implement io.ReadCloser and io.WriteCloser with the addition of a URI() function to query the original resource identifier. You may not recognize these io interfaces, but you will have used them through os.File. This similarity means that you can use URIReadCloser in many places where you would have passed a file for a read operation, or URIWriteCloser if you were writing data.
If you are processing the read or write operations yourself, it is important to remember to call Close() upon completion (as with any io.Closer stream). This is most commonly ensured by calling defer reader.Close() after checking for any error. The following code shows a simple example of reading a file from a URI:
uri := storage.NewFileURI("/home/user/file.txt")
read, err := storage.OpenFileFromURI(uri)
if err != nil {
log.Println("Unable to open file ""+uri. String()+""", err)
return
}
defer read.Close()
data, err := ioutil.ReadAll(read)
if err != nil {
log.Println("Unable to read text", err)
return
}
log.Println("Loaded data:", string(data))
User file selection
The most common way for an application to open a file, at least initially, would be to prompt the user to choose the file they wish to open. The standard file-open dialog is available to provide this feature. An application can call dialog.ShowFileOpen, which will ask the user to select a file (with optional file filters). The chosen file will be returned through a callback function as URIReadCloser, as described earlier. If you wish to store a reference to the chosen file, you can use the URI() method to return the identifier. The following code shows this in action:
dialog.ShowFileOpen(func(reader fyne.URIReadCloser, err error) {
if err != nil { // there was an error - tell user
dialog.ShowError(err, win)
return
}
if reader == nil { // user cancelled
return
}
// we have a URIReadCloser - handle reading the file
// (remember to call Close())
fileOpened(reader)
}, win)
Similarly, there is dialog.ShowFileSave to start a file-write workflow such as the common Save As feature. For more information on the dialog package, see the Dialogs section in Chapter 5, Widget Library and Themes.
ListableURI
In some applications, it may be necessary to open a resource that contains other resources (just like a directory of files). For these situations, there is another type, fyne.ListableURI, which provides a List() method that returns a slice of URI items. This can be used in combination with dialog.ShowDirectoryOpen, which will return the user's selected location as ListableURI.
Let's take a look at an example:
dialog.ShowFolderOpen(func(dir fyne.ListableURI, err error) {
if err != nil { // there was an error - tell user
dialog.ShowError(err, win)
return
}
if dir == nil { // user cancelled
return
}
log.Println("Listing dir", dir.Name())
for _, item := range dir.List() {
log.Println("Item name", item.Name())
}
}, win)
As you can see in this example, once the user has made their selection, ListableURI is passed to our code. We can then iterate through the URI of each item inside the directory or collection using range List(). If you already have the name of a directory, then you can use storage.ListerForURI(storage.NewFileURI(dirPath)).
Let's put layouts and file handling into action. We will now build a simple image browsing application using all that we've seen till now.
Implementing an image browser application
This application will load a directory that contains some images, provide a summary of the content in a status bar at the bottom of the window, and use most of the space to show each image. The images will be loaded as thumbnails (smaller versions of the images) and we will display the image information under each thumbnail.
Creating the layout
To start this example, we will create the layout of the application and the image items that will display in the central grid. Let's understand each of these actions in detail:
- First, we set up the image items. We wish to have the image name underneath the image. While this could be positioned manually, the items will be more responsive to changes in size if we use BorderLayout. We will create a canvas.Text element in the bottom position and use canvas.Rectangle to represent the image that we will load later:
func makeImageItem() fyne.CanvasObject {
label := canvas.NewText("label", color.Gray{128})
label.Alignment = fyne.TextAlignCenter
img := canvas.NewRectangle(color.Black)
return container.NewBorder(nil, label, nil, nil,
img)
}
- For the main application, we need to create the grid to contain image thumbnails as well as the status panel, which will be positioned later on. For the image grid, we will use GridWrapLayout. This version of a grid layout sizes all elements to a specified size and as the available space increases, the number of visible items will also increase. In this case, the user could increase the window size to see more images.
- As we have not yet loaded the directory, we will fake the number of items (hardcoded to three by iterating over {1, 2, 3}). We create a list of items, calling makeImageItem for each one. This list is then passed to NewGridWrap after the size parameter (which is the size used for each item—a behavior specific to the grid wrap layout):
func makeImageGrid() fyne.CanvasObject {
items := []fyne.CanvasObject{}
for range []int{1, 2, 3} {
img := makeImageItem()
items = append(items, img)
}
cellSize := fyne.NewSize(160, 120)
return container.NewGridWrap(cellSize, items...)
}
- To start, we will just create a text placeholder for the status for the purpose of laying out the app:
func makeStatus() fyne.CanvasObject {
return canvas.NewText("status", color.Gray{128})
}
- And finally, we will create a new container once again using BorderLayout to arrange the status bar beneath the rest of the content. By placing the image grid in the central space of BorderLayout, it will fill any available space as desired:
func makeUI() fyne.CanvasObject {
status := makeStatus()
content := makeImageGrid()
return container.NewBorder(nil, status, nil, nil,
content)
}
- To complete the application, we just need a short main() function that loads the Fyne application and creates a window, and we will resize it to larger than the minimum size so that the image grid layout will expand to multiple columns:
func main() {
a := app.New()
w := a.NewWindow("Image Browser")
w.SetContent(makeUI())
w.Resize(fyne.NewSize(480, 360))
w.ShowAndRun()
}
- All we have to do now is run the combined code:
Chapter04/example$ go run main.go
- Running this will show the following window, ready for some real data and images to be loaded:

Figure 4.14 – The basic layout of our photos app
Listing a directory
Before we can load images, we need to establish which directory we are loading when the application starts. Let's take a look at the steps to do just that:
- From the main() function, we will call a new startDirectory (that parses the app flags or falls back to the current working directory) and pass this into the makeUI() function. The directory path is converted to ListableURI by calling ListerForURI and NewFileURI:
func startDirectory() fyne.ListableURI {
flag.Parse()
if len(flag.Args()) < 1 {
cwd, _ := os.Getwd()
list, _ := storage.ListerForURI(
storage.NewFileURI(cwd))
return list
}
dir, err := filepath.Abs(flag.Arg(0))
if errr != nil {
log.Println("Could not find directory", dir
cwd, _ := os.Getwd
list, _ := storage.ListerForURI(
storage.NewFileURI(cwd))
return list
}
list, _ := storage.ListerForURI(storage.NewFileURI(dir))
return list
}
- Once ListableURI is passed into makeUI, we can use this dir.List() and filter it for image files before ranging over the URIs. A new function, filterImages, will take the directory list and return a slice of image URIs. To do this, a small isImage() function will help to filter:
func isImage(file fyne.URI) bool {
ext := strings.ToLower(file.Extension())
return ext == ".png" || ext == ".jpg" ||
ext == ".jpeg" || ext == ".gif"
}
func filterImages(files []fyne.URI) []fyne.URI {
images := []fyne.URI{}
for _, file := range files {
if isImage(file) {
images = append(images, file)
}
}
return images
}
- With a slice of fyne.URI representing the images, we can update the status and image grid creation functions as well as updating the image label to use URI.Name() under each image placeholder:
func makeImageGrid(images []fyne.URI) fyne.CanvasObject {
items := []fyne.CanvasObject{}
for range images {
img := makeImageItem()
items = append(items, img)
}
cellSize := fyne.NewSize(160, 120)
return container.NewGridWrap(cellSize, items...)
}
func makeStatus(dir fyne.ListableURI, images []fyne.URI) fyne.CanvasObject {
status := fmt.Sprintf("Directory %s, %d items",
dir.Name(), len(images))
return canvas.NewText(status, color.Gray{128})
}
func makeUI(dir fyne.ListableURI) fyne.CanvasObject {
list, err := dir.List()
if err != nil {
log.Println("Error listing directory", err)
}
images := filterImages(list)
status := makeStatus(dir, images)
content := makeImageGrid(images)
return container.NewBorder(
(nil, status, nil, nil, content)
}
Loading the images
Let's now look at the steps to load images into our application:
- To start with, we create a simple image load method that accepts a URI and returns *canvas.Image. The new loadImage function will then be used instead of the placeholder rectangle:
func loadImage(u fyne.URI) fyne.CanvasObject {
read, err := storage.OpenFileFromURI(u)
if err != nil {
log.Println("Error opening image", err)
return canvas.NewRectangle(color.Black)
}
res, err :=
storage.LoadResourceFromURI(read.URI())
if err != nil {
log.Println("Error reading image", err)
return canvas.NewRectangle(color.Black)
}
img := canvas.NewImageFromResource(res)
img.FillMode = canvas.ImageFillContain
return img
}
- The makeImage function should be updated to pass the URI item as follows:
func makeImageItem(u fyne.URI) fyne.CanvasObject {
- Then the line that creates the image inside the makeImageItem function as a rectangle can be replaced with the image created:
img := loadImage(u)
- In the loadImage function, before returning canvas.Image, we changed FillMode from the default (canvas.ImageFillStretch) to canvas.ImageFillContain so that the image aspect ratio will be respected and the images will fit within the available space:
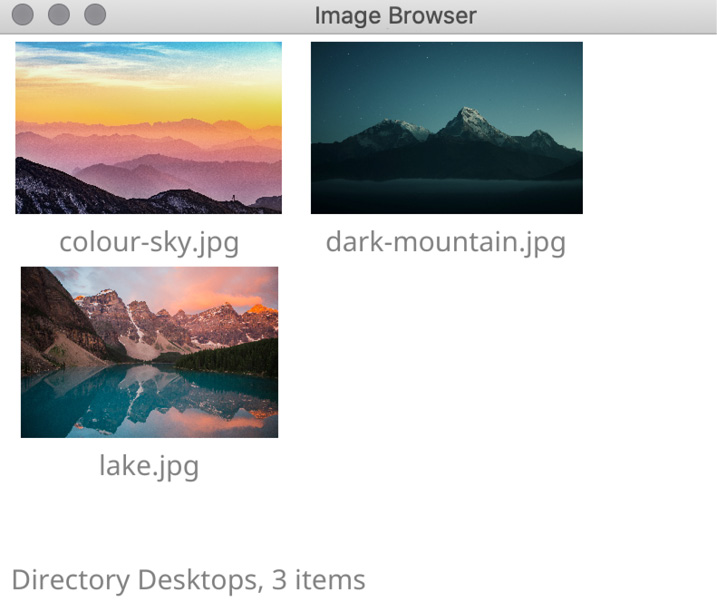
Figure 4.15 – Images and names loaded into the layout
This code works as expected, as we can see in the figure, but it can be slow. We are loading the images before continuing with the user interface load. This does not make for a good user experience, so let's improve this situation by using background image loading.
Loading the app faster
To avoid image sizes slowing down the loading of our user interface, we need to complete the construction of the application UI before the images load. This is called asynchronous (or background) loading and can be powerful if your app needs to use large amounts of resources.
The easiest way to load all the images in the background would be to start many goroutines. But, when displaying a large directory, that could become very slow indeed. Instead, we will use a single image load goroutine that will process one image at a time. (As an exercise, if you are feeling adventurous, you could expand this to process eight or more images at a time.)
Let's now take a look at how to do this:
- To track the image loads, we will create a new type called bgImageLoad that will reference the URI of the image to load and the *canvas.Image item that it should be loaded into. We additionally need to create a channel (we'll name it loads) that will enqueue the items to load. We buffer this at 1024 items, which represents a large directory—an implementation to handle unbounded numbers of files might need us to be a little smarter:
type bgImageLoad struct {
uri fyne.URI
img *canvas.Image
}
var loads = make(chan bgImageLoad, 1024)
- When loading images in this updated version, we will create an empty Fyne *canvas.Image that will later have the image loaded. We then queue the details of this image URI, for loading once the goroutine is able to process it:
func loadImage(u fyne.URI) fyne.CanvasObject {
img := canvas.NewImageFromResource(nil)
img.FillMode = canvas.ImageFillContain
loads <- bgImageLoad{u, img}
return img
}
- We move the image load code to a new doLoadImage function that will run in the background. In this version, we want to do all of the slow parts of image loading; so, we load and decode the image, convert it to a Go in-memory image to display, and leave the user interface much more responsive to updates, resizing, and so on.
The new function, doLoadImages, will range over all the items being added to the channel and call doLoadImage to load them one at a time. The image load code will refresh the image CanvasObject after loading the raw data, so each item appears as it is loaded:
func doLoadImage(u fyne.URI, img *canvas.Image) {
read, err := storage.OpenFileFromURI(u)
if err != nil {
log.Println("Error opening image", err)
return
}
defer read.Close()
raw, _, err := image.Decode(read)
if err != nil {
log.Println("Error decoding image", err)
return
}
img.Image = scaleImage(raw)
img.Refresh()
}
func doLoadImages() {
for load := range loads {
doLoadImage(load.uri, load.img)
}
}
- To make sure that the images are loaded, we launch doLoadImages as a goroutine within the main() function:
func main() {
...
go doLoadImages()
w.ShowAndRun()
}
- Finally, in the preceding code, we referenced scaleImage. This means that each image we display is a smaller version of the full-sized image. This is necessary when the directory we browse contains very large images. The toolkit will attempt to paint very large images quite small, which can be very slow. Instead, we reduce the size of our images to fit inside the space available in each grid cell. We used larger numbers (twice the cell size) so that high-density displays still give a good-looking result.
- The following code snippet makes use of the helpful github.com/nfnt/resize package to scale images. Although the image package in Go is often helpful, it does not contain efficient scaling routines. We use this library and request Lanczos3 interpolation, which provides a balance between speed and quality when downscaling images:
func scaleImage(img image.Image) image.Image {
return resize.Thumbnail(320, 240, img,
resize.Lanczos3)
}
The resize.Thumbnail function creates a smaller image that fits within the stated size, which is ideal for our purpose so we can avoid worrying about aspect ratios and calculations.
Using the updated code will create a quick-to-load and responsive user interface for even large directories containing very large images. There we have it: resizing, which could have been slow when using full-sized images, is now much faster!
Creating a custom layout for the image elements
The space taken up by labels in this example could be a bit wasted, so let's make a custom layout that writes the text over the bottom edge of each image. We will use a semi-transparent background to make the text more readable and a small gradient to blend from the text background to the image.
To build a custom layout, we need to define a type (itemLayout in this case) that implements the MinSize and Layout functions from the fyne.Layout interface. As the background, gradient, and text all have special positions, we will save a reference to these canvas objects so that they can be arranged later:
type itemLayout struct {
bg, text, gradient fyne.CanvasObject
}
func (i *itemLayout) MinSize(_ []fyne.CanvasObject) fyne.Size {
return fyne.NewSize(160, 120)
}
func (i *itemLayout) Layout(objs []fyne.CanvasObject, size fyne.Size) {
textHeight := float32(22)
for _, o := range objs {
if o == i.text {
o.Move(fyne.NewPos(0, size.Height-textHeight))
o.Resize(fyne.NewSize(size.Width, textHeight))
} else if o == i.bg {
o.Move(fyne.NewPos(0, size.Height-textHeight))
o.Resize(fyne.NewSize(size.Width, textHeight))
} else if o == i.gradient {
o.Move(fyne.NewPos(0, size.Height- (textHeight*1.5)))
o.Resize(fyne.NewSize(size.Width, textHeight/2))
} else {
o.Move(fyne.NewPos(0, 0))
o.Resize(size)
}
}
}
This code will ensure that each of the elements of our container is positioned in the correct place. text and bg are bottom aligned with gradient positioned above the text background. Any other element (in this case, our image thumbnail) will be positioned at the fill size that the layout is asked to fill.
To use this layout, we update the makeImageItem function to use &itemLayout as the container layout. Into this constructor, we pass a new canvas.Rectangle and canvas.Gradient to be used for the effect described previously. It is important to pass the image before the text background and pass the text element last to NewContainerWithLayout, as this sets up the order that these elements will be drawn:
func makeImageItem(u fyne.URI) fyne.CanvasObject {
label := canvas.NewText(u.Name(), color.Gray{128})
label.Alignment = fyne.TextAlignCenter
bgColor := &color.NRGBA{R: 255, G: 255, B: 255, A: 224}
bg := canvas.NewRectangle(bgColor)
fade := canvas.NewLinearGradient(color.Transparent, bgColor, 0)
return container.New(
&itemLayout{text: label, bg: bg, gradient: fade},
loadImage(u), bg, fade, label)
}
With these changes, we can run the code once more and see how our new layout makes each image preview larger in the same amount of space, while giving the application a little flair:

Figure 4.16 – Custom layout for images and their labels
Last of all, you may have noticed that directories with many images will force the window to expand, and so you may want to add scrolling to the grid container. To do so, we will use one of the helpers from the container package mentioned earlier, adding container.Scroll around the image grid container. It just requires replacing the content creation line of the makeUI function with this:
content := container.NewScroll(makeImageGrid(images))
Changing a directory
In addition to loading a specified directory, we may wish to allow users to open a different directory once the application is open. To add this functionality, we will use the SetMainMenu function on Window, which sets up a structure to populate a menu bar.
Using the NewMainMenu, NewMenu, and NewMenuItem helper functions in the fyne package, we set up a structure that defines the File | Open Directory… menu and will call chooseDirectory when clicked (we also pass in the current window so we can show a dialog from that function). The following code gets added to the main() function just before Window.ShowAndRun():
w.SetMainMenu(fyne.NewMainMenu(fyne.NewMenu("File",
fyne.NewMenuItem("Open Directory...", func() {
chooseDirectory(w)
}))))
To support this menu operation, we need to create the chooseDirectory function. This will call dialog.ShowDirectoryOpen, which asks the user to select a directory on their computer. This functions much like the ShowFileOpen call we explored before, with the exception that the parameter returned in the callback is ListableURI instead of URIReadCloser. Using this parameter (after checking for any error), we can call makeUI with this new location and update our whole application's user interface:
func chooseDirectory(w fyne.Window) {
dialog.ShowFolderOpen(func(dir fyne.ListableURI, err error) {
if err != nil {
dialog.ShowError(err, w)
return
}
w.SetContent(makeUI(dir)) // this re-loads our // application
}, w)
}
If we were building a more complex application, then simply calling Window.SetContent would not be the most efficient approach. In that situation, we would save a reference to the main fyne.Container and update just the image grid instead of the entire application. However, the final version of our application should look like the following screenshot:

Figure 4.17 – Adding a main menu
Note that when running on macOS, the default behavior is to show menus in the desktop menu bar—this can be overridden using the no_native_menus build tag, as follows:
$ go run -tags no_native_menus main.go Images/Desktop
Summary
This chapter stepped through the details of how layouts work, the details of all the built-in layouts in the toolkit, and when to use them. We also saw how simple it is to combine multiple layouts and created our own custom layout to add a bit of flair to our image browsing application.
We also explored how to adapt file handling code to work across all platforms using the URI and ListableURI types. Using this knowledge, our image browsing application is now compatible with all desktop and mobile platforms. With this knowledge of how to lay out applications and avoid assumptions about a traditional filesystem, you can now ensure that your apps will function correctly on any supported platforms, mobile, desktop, and beyond.
While we have created a complete application using just canvas primitives and layouts, it is possible to build much more complex applications using the widget package, which we will look at in the next chapter.